


Operation Manual
8888

Precautions Usage Precautions/ Safety
Safety Precautions/
Usage Precautions
Safety Precautions
In this manual, symbols are used to highlight warnings and cautions for you to read so that accidents can be prevented. The meanings of these symbols are as follows:
This symbol indicates
Warning explanations about extremely dangerous matters. If users ignore this symbol and handle the device the wrong way, serious injury or death could result.
This symbol indicates
Caution explanations about dangerous matters. If users
ignore this symbol and handle the device the wrong way, bodily injury and damage to the equipment could result.
Please observe the following safety tips and precautions to ensure hazard-free use of the MRT-3.
About power
Warning Since power consumption of this unit is fairly high, we recommend the use of an AC adapter whenever possible. When powering the unit from the batteries, use only an alkaline type.
AC adapter operation
•Be sure to use only an AC adapter which supplies 9 V DC, 300 mA and is equipped with a "center minus" plug (Zoom AD-0006).
The use of an adapter other than the specified type may damage the unit and pose a safety hazard.
•Connect the AC adapter only to an AC outlet that supplies the rated voltage required by the adapter.
•When disconnecting the AC adapter from the AC outlet, always grasp the adapter itself and do not pull at the cable.
•If the unit is not to be used for a long time, disconnect the AC adapter from the outlet.
Battery operation
•Use four IEC R6 (size AA) batteries (alkaline or manganese).
•The MRT-3 cannot be used for recharging.
Pay close attention to the labelling of the battery to make sure you choose the correct type.
•If the MRT-3 is not to be used for an extended period of time, remove the battery from the unit.
•If batteries leakage has occurred, wipe the battery compartment and the battery terminals carefully to remove all remnants of battery fluid.
•While using the unit, the battery compartment cover should be closed.
Environment
Caution Avoid using your MRT-3 in environments where it will be exposed to:
•Extreme temperature
•High humidity or moisture
•Excessive dust or sand
•Excessive vibration or shock
2 ZOOM MRT-3
Handling
Caution • Since the MRT-3 is a precision electronic device, avoid applying excessive force to the controls. Do not operate the keys or controls with your foot.
•Take care that no foreign objects (coins or pins etc.) or liquids can enter the unit.
•Be sure to turn the power to all equipment off before making connections.
•Before moving the unit, turn the power off, and disconnect all cables and the AC adapter.
Alterations
Caution Never open the case of the MRT-3 or attempt to modify the product in any way since this can result in damage to the unit.
Caution In Case of Trouble
If there seems to be a defect or a problem with the unit, immediately disconnect the AC adapter or remove the batteries to shut off the power. Then disconnect any other cables connected to the unit.
Usage Precautions
• Electrical interference
For safety considerations, the MRT-3 has been designed to provide maximum protection against the emission of electromagnetic radiation from inside the device, and protection from external interference. However, equipment that is very susceptible to interference or that emits powerful electromagnetic waves should not be placed near the MRT-3, as the possibility of interference cannot be ruled out entirely.
With any type of digital control device, the MRT-3 included, electromagnetic interference can cause malfunctioning and can corrupt or destroy data. Care should be taken to minimize the risk of damage.
• Cleaning
Use a soft, dry cloth to clean the MRT-3. If necessary, slightly moisten the cloth. Do not use abrasive cleanser, wax, or solvents (such as paint thinner or cleaning alcohol), since these may dull the finish or damage the surface.
Please keep this manual at hand for future reference.
Precautions Usage Precautions/ Safety
ZOOM MRT-3 3

Contents
Contents
Safety Precautions/
Usage Precautions • • • • • • • • • • • • • • • • • • • • • • • • • 2 Introduction • • • • • • • • • • • • • • • • • • • • • • • • • • • • • • • • • • • 5 Names of Parts • • • • • • • • • • • • • • • • • • • • • • • • • • • • • • 6
Top Panel • • • • • • • • • • • • • • • • • • • • • • • • • • • • • • • • • • • • 6 Rear Panel • • • • • • • • • • • • • • • • • • • • • • • • • • • • • • • • • • • 6
Getting Connected • • • • • • • • • • • • • • • • • • • • • • • • • 7
Connection Example 1 |
• • • • • • • • • • • • • • • • • • • • 7 |
Connection Example 2 |
• • • • • • • • • • • • • • • • • • • • 7 |
Preparations • • • • • • • • • • • • • • • • • • • • • • • • • • • • • • • • • • 8
Using Batteries • • • • • • • • • • • • • • • • • • • • • • • • • • • • • • 8
Terms Used in This Manual • • • • • • • • • • • • • 9 Listening to the Demo Song • • • • • • • • • • 11 Playing the Pads (Manual Play) • • • • • • 12
Using Patterns (Pattern Mode) • • • • • • 14
Playing a Pattern • • • • • • • • • • • • • • • • • • • • • • • • • • 14
Changing the Tempo of Pattern
Playback • • • • • • • • • • • • • • • • • • • • • • • • • • • • • • • • • • 15
Real-Time Pattern Recording • • • • • • • • • • • 16 Pattern Step Recording • • • • • • • • • • • • • • • • • • 19 Changing User Pattern Resolution
After Recording • • • • • • • • • • • • • • • • • • • • • • • • • • • 21
Changing the User Pattern
Length • • • • • • • • • • • • • • • • • • • • • • • • • • • • • • • • • • • • • 21
Changing the User Pattern Beat • • • • • • • 22
Copying a Pattern • • • • • • • • • • • • • • • • • • • • • • • • 23
Erasing a Single User Pattern • • • • • • • • • • 24 Deleting All User Patterns • • • • • • • • • • • • • • • 25
Creating Your Own Kit
(Kit Mode) • • • • • • • • • • • • • • • • • • • • • • • • • • • • • • • • • • • 26
Editing a User Kit • • • • • • • • • • • • • • • • • • • • • • • • • 26 Kit Items • • • • • • • • • • • • • • • • • • • • • • • • • • • • • • • • • • • • 28 Copying a Kit • • • • • • • • • • • • • • • • • • • • • • • • • • • • • • 30
Creating Songs (Song Mode) • • • • • • • • • 32
What Is a Song? • • • • • • • • • • • • • • • • • • • • • • • • • • 32
Recording Song Patterns • • • • • • • • • • • • • • • • 33 Changing the Tempo Within a
Song • • • • • • • • • • • • • • • • • • • • • • • • • • • • • • • • • • • • • • • 36
Changing the Song Volume • • • • • • • • • • • • • 37 Selecting a Dedicated Song Kit • • • • • • • • 38 Checking the Amount of Remaining
Memory for Songs • • • • • • • • • • • • • • • • • • • • • • • • • • • 39 Copying a Song • • • • • • • • • • • • • • • • • • • • • • • • • • • 39 Deleting a Song • • • • • • • • • • • • • • • • • • • • • • • • • • • 40 Deleting All Songs • • • • • • • • • • • • • • • • • • • • • • • 41
Other Functions • • • • • • • • • • • • • • • • • • • • • • • • • • • • 42
Controlling the MRT-3 With a Foot
Switch • • • • • • • • • • • • • • • • • • • • • • • • • • • • • • • • • • • • • 42
Synchronizing Playback With an
External Device • • • • • • • • • • • • • • • • • • • • • • • • • • 44
Playing MRT-3 Sounds From an External
MIDI Component • • • • • • • • • • • • • • • • • • • • • • • • 46
Setting the Pattern/Song Playback
Swing • • • • • • • • • • • • • • • • • • • • • • • • • • • • • • • • • • • • • • 47
Setting the Precount for Real-Time
Recording • • • • • • • • • • • • • • • • • • • • • • • • • • • • • • • • • 48
Returning the MRT-3 to the Factory
Default Condition • • • • • • • • • • • • • • • • • • • • • • • • 49
Troubleshooting • • • • • • • • • • • • • • • • • • • • • • • • • • • 50 Specifications • • • • • • • • • • • • • • • • • • • • • • • • • • • • • • 51
Reference • • • • • • • • • • • • • • • • • • • • • • • • • • • • • • • • • • • • 52
Kit List • • • • • • • • • • • • • • • • • • • • • • • • • • • • • • • • • • • • • • 52
MIDI Note Number Chart • • • • • • • • • • • • • • • • 53
Instrument List • • • • • • • • • • • • • • • • • • • • • • • • • • • • 54 Pattern List • • • • • • • • • • • • • • • • • • • • • • • • • • • • • • • • • 56 MIDI Implementation • • • • • • • • • • • • • • • • • • • • • 60
MIDI Implementation Chart • • • • • • • • • • • • • • 61
Index • • • • • • • • • • • • • • • • • • • • • • • • • • • • • • • • • • • • • • • • • • • 62
4 ZOOM MRT-3

Introduction
Thank you for purchasing the ZOOM Micro RhythmTrak MRT-3 (subsequently referred to as "the MRT-3").
The MRT-3 offers the following attractive features.
●Sophisticated rhythm machine incorporates 199 super-realistic drum and percussion sounds in an amazingly compact body. A full 396 preset patterns contain a wide variety of preprogrammed rhythms. 99 additional patterns can be programmed and stored by the user.
●Create a backing sequence (song) with up to 99 patterns. As many as 99 such songs can be stored for immediate use at any time.
●Internally lit pads let you follow the rhythm pattern visually during song playback or when using a pattern.
●Choose up to 14 sounds from the built-in drum and percussion sources, and then adjust level, tuning, and panning individually to create your very own drum kit. This gives you the flexibility to realize your creative vision.
●Perfectly intuitive and simple design lets you master the unit right away, even if you have never used a drum machine before.
●Optional foot switch FS01 allows pattern start/stop control or tempo switching. You can also operate an assigned sound such as bass drum or open/closed hihat.
●MIDI IN connector allows use with an external MIDI sequencer or other device. The Multitrak Recording Studio ZOOM MRS-4 is an ideal match, letting you synchronize the audio tracks from the recorder with the rhythm track from the MRT-3. Playing the sounds of the MRT-3 with an external MIDI component is also possible.
Please take the time to read this manual carefully so as to get the most out of your MRT-3 and to ensure optimum performance and reliability.
Introduction
ZOOM MRT-3 5

Names of Parts
Top Panel
Display |
[VALUE +/-] keys |
[OUTPUT LEVEL] knob |
Parts of Names
8888
[INSERT/COPY] key
[DELETE/ERASE] key
[SONG] key (LED) [PATTERN] key (LED) [KIT] key (LED) [TEMPO] key (LED)
[REC] key (LED) [PLAY] key (LED) [STOP] key (LED)
[PAD BANK] key (LED) |
Pads 1 – 7 (LEDs) |
[FUNCTION] key (LED) |
|
NOTE |
|
|
HINT |
Keys marked (LED) have an integrated LED |
|
Names of top panel controls and rear panel |
|
that causes the key itself to light up. |
|
|
connectors are indicated with angle |
|
|
|
brackets [ ] in this manual. |
Rear Panel |
|
|
|
[POWER] switch |
[FOOT SW] jack |
||
[MIDI IN] connector
[DC IN] connector 
[OUTPUT MONO] jack [OUTPUT STEREO/PHONES] jack
6 ZOOM MRT-3
Getting Connected
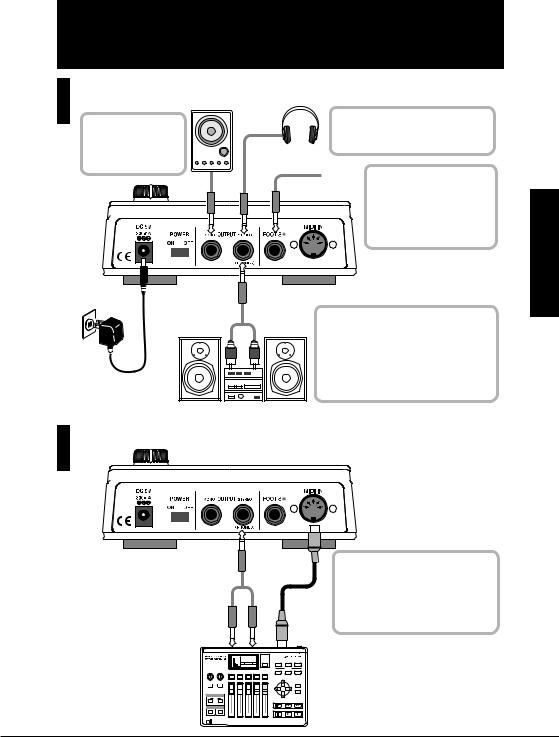
Connection Example 1
For mono playback, connect a mono cable to the [OUTPUT MONO] jack.
AC adapter
To monitor the sound with headphones, plug the phones into the
[OUTPUT STEREO/PHONES] jack.
Headphones
 If you connect the optional FS01 foot switch FS01 to the
[FOOT SW] jack, you can control start/stop and switch
the sound of the MRT-3 with your foot.
For stereo playback, connect a Y cable to the [OUTPUT STEREO/PHONES] jack and plug the other end of the cable into the L/R channel inputs of an audio system or two channels of a mixer assigned to left and right positions.
Monitor system
Connection Example 2
Connected Getting
|
To synchronize the unit with a MIDI |
|
sequencer/recorder that has a MIDI |
|
clock output, connect a MIDI cable |
|
from the MIDI OUT connector of |
|
the device to the [MIDI IN] |
|
connector of the MRT-3. |
AUX IN |
MIDI OUT |
MRS-4 |
ZOOM MRT-3 7
Preparations
Preparations
When connections are complete, set the volume as follows.
1.While the playback system is still turned off and the volume is fully turned down, double-check whether all connections have been made correctly.
If cables are connected or disconnected while power is on, or if power is turned on with the volume turned up, damage to the speakers may occur.
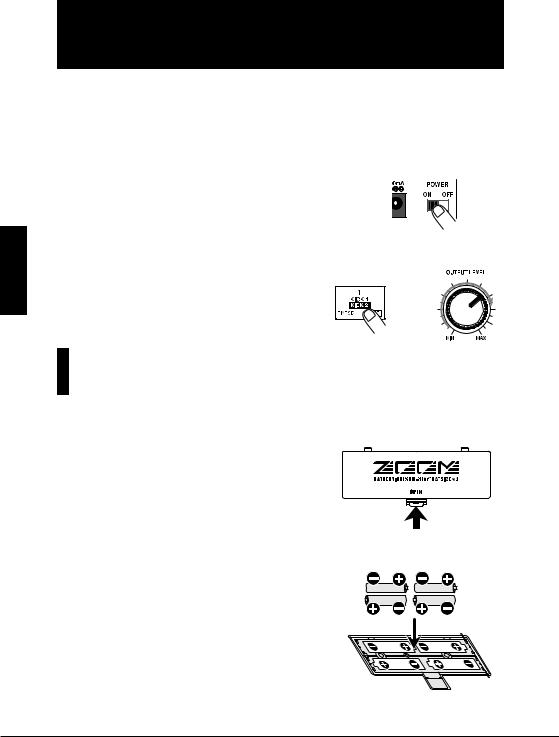
2. Turn power to the MRT-3 on.
Set the [POWER] switch to ON.
3.Turn power to the playback system on and set the volume to about midway.
4.While tapping a pad to produce sound,
adjust the [OUTPUT LEVEL] knob of the MRT-3 to obtain a suitable volume.
Using Batteries
The MRT-3 can be powered from batteries (not supplied). Follow the steps below to insert the batteries.
1. Turn the unit over and open the battery compartment cover.
|
MRT-3 underside |
2. Insert four fresh IEC R6 (size AA) batteries |
Four IEC R6 (size AA) batteries |
into the battery compartment. The use of |
|
alkaline batteries is recommended. |
|
3. Close the battery compartment cover.
 NOTE
NOTE 
When using batteries, a flashing dot at the right side of the display means that the batteries are nearly exhausted. Insert fresh batteries as soon as possible.
8 ZOOM MRT-3
Terms Used in This Manual
This section explains some important concepts of the MRT-3.
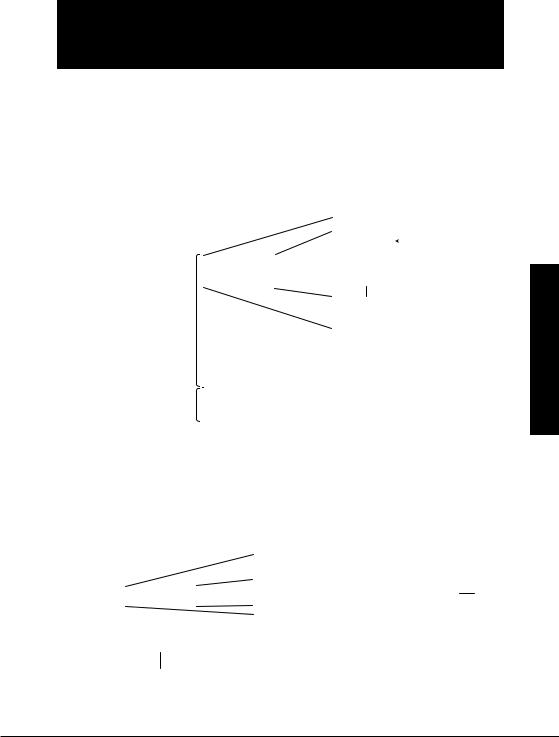
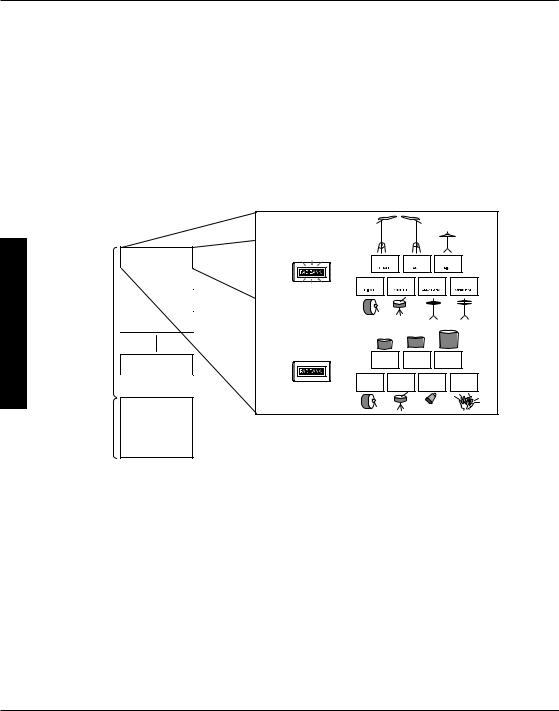
■Pattern
Playing a rhythm using sounds stored in the MRT-3 is called playing a pattern. The information stored in a pattern includes data such as pattern length, beat, and which kit (combination of drum/percussion sounds) is used.
The patterns are organized in banks (A – D, U) and numbers (01 – 99). The MRT-3 has 396 read-only preset patterns (A01 – D99) and 99 read/write user patterns (U01 – U99).
|
|
|
|
|
Bank A |
|
|
|
|
|
|
|
|
|
A01 |
|
|
|
Pattern |
|
|
|
|
|
|
|
|
||
|
|
|
|
|
A02 |
|
|
|
|
|
Bank A |
|
|
|
A03 |
|
|
|
|
|
|
|
A04 |
|
|
|
|
||
|
|
|
|
|
|
|
|
|
|
|
|
|
|
|
|
|
|
|
|
|
Bank B |
|
|
|
|
|
|
|
|
|
A98 |
|
|
|
|
||||
Preset patterns |
|
|
|
|
A99 |
|
|
|
|
Bank C |
|
|
|
|
|
|
|
||
|
|
|
|
|
|
|
|
||
|
|
|
|
|
|
|
|||
|
|
|
|
|
|
|
|
||
|
Bank D |
|
|
|
|
|
|
|
|
User patterns |
|
|
|
|
|
|
|
||
Bank U |
|
|
|
|
|
|
|
|
|
|
|
|
|
|
|
|
|
|
|
■Song
A song is a sequence of patterns played in subsequent steps. The maximum number of steps in a song is 99. Provided that there is free memory, the MRT-3 has the capability to store up to 99 songs.
A song includes data such as pattern number, overall song tempo (master tempo), tempo change information, volume change information, dedicated kit information, etc.
|
|
Master tempo |
|
|
|
||
|
|
Kit number |
|
|
|
|
|
|
|
|
Pattern |
Pattern |
Pattern |
Pattern |
|
Song 01 |
|
|
|
||||
|
|
number |
number |
number |
number |
|
|
Song 02 |
|
|
|
|
|
|
|
|
|
|
|
|
|
||
Song 03 |
|
|
|
|
|
|
|
|
|
|
|
|
|
|
|
|
|
|
|
|
|
|
|
|
|
|
|
|
|
|
|
Song 98 |
|
|
|
|
|
|
|
|
|
|
|
|
|
|
|
Song 99 |
|
|
|
|
|
|
|
|
|
|
|
|
|
|
|
|
|
|
|
|
|
|
|
Manual This in Used Terms
ZOOM MRT-3 9
Manual This in Used Terms
■Kit
The MRT-3 lets you select 14 sounds from the built-in drum and percussion sources to use for playing with the pads. A combination of such sounds, together with pad sensitivity information and level/tuning information for each pad is called a kit. The MRT-3 has a capacity for 70 kits. Kits 01 – 50 are read-only preset kits and kits 51 – 70 are read/write user kits.
■Pad/Pad Bank
Each pad on the MRT-3 can be used to play the currently selected sound, and to record it as a phrase in a pattern.
To be able to play 14 sounds with the 7 pads on the unit, pads are grouped in two banks (A and B) which can be switched with the [PAD BANK] key. When the [PAD BANK] key is out, bank A is selected. When the key is lit, bank B is selected.
Kit 01 |
PAD BANK A |
|
|
|
|
A02 |
A04 |
A06 |
|
Kit 02 |
A01 |
A03 |
A05 |
A07 |
|
Kit03
Preset kits
Kit 04
PAD BANK B
B02 B04 B06
Kit 49
B01 B03 B05 B07
Kit 50
User kits |
Kit 51 – 70 |
|
|
10 ZOOM MRT-3
Listening to the Demo Song
The MRT-3 comes with a demo song already built in. Listen to this song to hear for yourself what the MRT-3 can do.
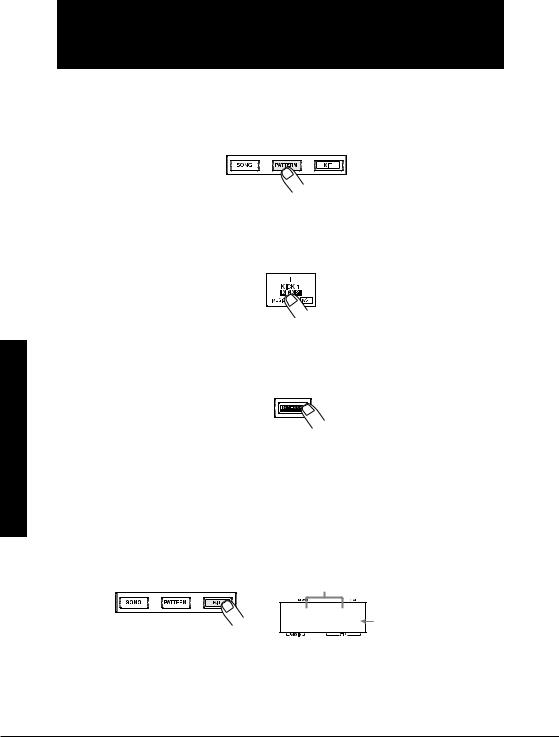
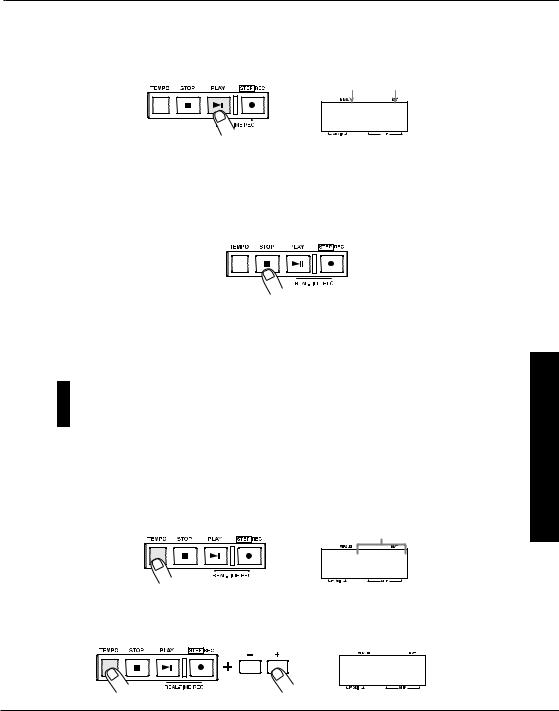
1.Press the [FUNCTION] key.
The [FUNCTION] key flashes.
2.Press the [SONG] key.
The indication "dEMo" appears on the display and the demo song starts. The display indication changes and the pads light up in sync with the song.
DEMO
The demo song is played repeatedly until you stop it.
3.To stop the demo song, press the [PATTERN] key or the [SONG] key.
Song Demo the to Listening
ZOOM MRT-3 11
Play) (Manual Pads the Playing
Playing the Pads
(Manual Play)
The pads on the top panel of the MRT-3 each produce a different sound when hit. The sound depends on the currently selected kit and pad bank. Try hitting the pads to hear the realistic sounds of the MRT-3.
1.Press the [PATTERN] key.
The [PATTERN] key lights up and the MRT-3 goes into pattern mode (in which rhythm pattern playback and recording can be carried out).
2.Hit any pad.
The pad lights up briefly, and the sound assigned to it is played. The volume of the sound depends on the intensity with which the pad is hit.
3.To switch the bank, press the [PAD BANK] key so that the key lights up.
The key lights up, and the sound assigned to pads 1 – 7 changes. To return to the earlier sound, press the [PAD BANK] key once more.
 HINT
HINT 
When the [PAD BANK] key is out, bank A is selected. When the key is lit, bank B is selected.
4.To switch the kit played by the pads, press the [KIT] key.
The [KIT] key lights up, and the MRT-3 goes into kit mode. In this mode, you select the kit for playing the pads and patterns. The display shows the currently selected kit number.
Kit number
01P "P" indicates a preset kit and "U" a user kit.
 NOTE
NOTE 
The kit can only be changed for a user pattern, not for a preset pattern.
12 ZOOM MRT-3
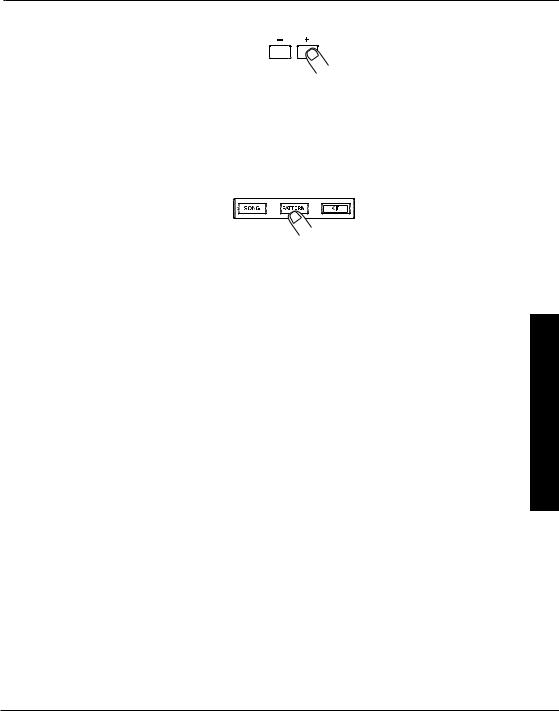
5.Use the [VALUE +/-] keys to select a kit number.
The kit numbers are switched in the order 01P – 50P, 51U – 70U.
Try hitting the pads and switching the pad bank to check out which sounds are available in the newly selected kit.
6.When you have found the desired kit, press the [PATTERN] key to return to the pattern mode.
Play) (Manual Pads the Playing
ZOOM MRT-3 13
Using Patterns
(Pattern Mode)
This section shows how to play and record patterns of the MRT-3 in pattern mode.
Playing a Pattern
The MRT-3 has 396 read-only preset patterns (A01 – D99) and 99 read/write user patterns (U01 – U99). To select and play a pattern, proceed as follows.
 NOTE
NOTE 
In the factory default condition, all user patterns are empty.
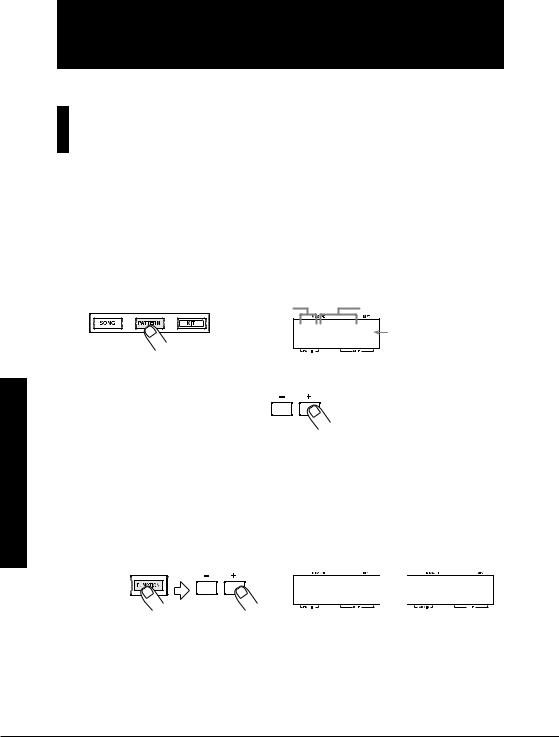
1.Press the [PATTERN] key.
The [PATTERN] key lights up and the MRT-3 goes into pattern mode. The display shows the bank and number of the currently selected pattern.
|
Bank (A - D, U) |
Pattern number |
|
|
A01 |
For an empty user pattern, |
|
|
"E" is shown here. |
||
Using |
2. Use the [VALUE +/-] keys to select the pattern number. |
||
|
|
||
Patterns |
repeatedly press the [VALUE +] key, the patterns are switched in the order U01 ... U99 |
||
(Pattern |
In pattern mode, the [VALUE +/-] keys serve to select the pattern. For example, if you |
||
A01 ... A99 B01 ... B99 C01 ... C99 D01 ... D99 |
U01. |
||
|
|||
|
3. To directly switch the bank, press the [FUNCTION] key and then use the [VALUE |
||
Mode) |
+/-] keys. |
|
|
This switches only the bank and keeps the pattern number. |
|
||
|
|
||
D05 

 @05
@05
 HINT
HINT 
The [FUNCTION] key serves for making various settings of the MRT-3. The actual effect of pressing the key depends on the currently selected mode and on which other keys are used together with it.
14 ZOOM MRT-3
4.Press the [PLAY] key.
The [PLAY] key lights up and the pattern is played repeatedly. During playback, the [TEMPO] key flashes in sync with the tempo. The display shows the current position in the pattern (measure/beat).
Measure Beat
01-3
 HINT
HINT 
•While a pattern is playing, you can also manually play the pads.
•While a pattern is playing, you can also switch to a different bank and pattern number. The new pattern will begin playing as soon as you switch to it.
5.To stop pattern playback, press the [STOP] key.
If you press the [PLAY] key instead of the [STOP] key, the unit goes into pause mode, and the [PLAY] key flashes. If you press the [PLAY] key again in this condition, playback resumes from the same position.
Changing the Tempo of Pattern Playback
In pattern mode, you can adjust the play tempo in the range of 40 – 250 BPM (quarter note beats per minute).
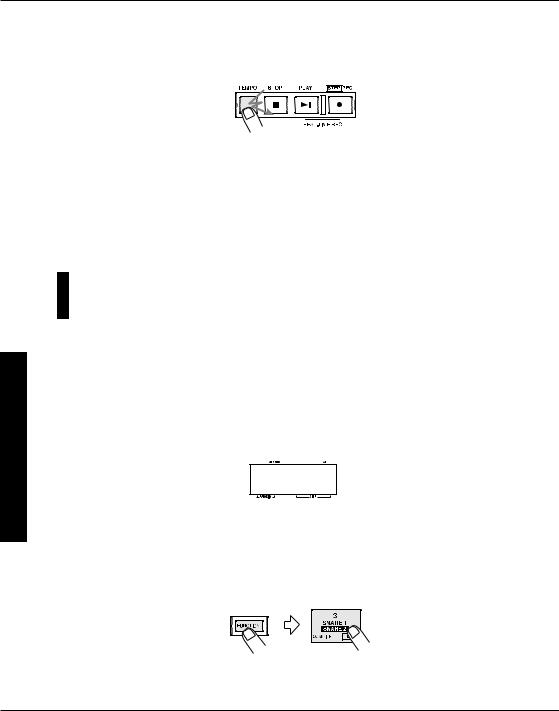
1.Press and hold the [TEMPO] key.
The [TEMPO] key lights up and the current tempo is shown on the display.
Tempo value (BPM)
112
2.While keeping the [TEMPO] key depressed, use the [VALUE +/-] keys to adjust the tempo.
114
Mode) (Pattern Patterns Using
ZOOM MRT-3 15
Mode) (Pattern Patterns Using
3.When the tempo is as desired, release the [TEMPO] key.
4.To specify the tempo manually, tap the [TEMPO] key twice or more in the desired tempo (tap input function).
Tap twice
If you tap the [TEMPO] key twice or more often while a pattern is playing or stopped, the tapping interval of the last two taps is taken as the quarter note tempo. This allows you to simply set the tempo in sync with a song.
 NOTE
NOTE 
The tempo set in pattern mode applies to all patterns. It is not possible to set the tempo for a pattern individually.
Real-Time Pattern Recording
The MRT-3 has 99 user pattern slots which can be filled with your own patterns. Creating and recording a pattern is possible in two ways: by actually playing the pattern on the pads (real-time recording), or by entering each sound individually (step recording).
This section describes the procedure for real-time recording.
1.In pattern mode, select an empty user pattern (U01 – U99). If necessary, select a kit.
When you select an empty user pattern, the indication "E" appears on the right side of the display.
@01E
 HINT
HINT 
•If you change the kit in pattern mode while a user pattern is selected, the last selected kit will be stored for that pattern.
•You can also erase a recorded user pattern to return it to the empty state. See page 24.
2.Press the [FUNCTION] key and then pad 3 (QUANTIZE).
The display shows the current quantize setting. Quantization refers to the degree of detail with which notes are recorded. By setting the quantize value to the shortest note that you
16 ZOOM MRT-3
want to use for the pattern, recording can be carried out while automatically maintaining precise timing.
3.Use the [VALUE +/-] keys to set the quantize value (shortest note to be recorded).
The following settings are available.
|
|
4 |
• • • • • • • • |
Quarter note |
24 • • • • • • • |
Sixteenth triplet note |
|
|
8 |
• • • • • • • • |
Eighth note |
32 • • • • • • • |
Thirty-second note |
|
|
12 • • • • • • • |
Eighth triplet note |
48 • • • • • • • |
Thirty-second triplet note |
|
|
|
16 • • • • • • • |
Sixteenth note |
Hi • • • • • • • |
1 tick (1/96 of quarter note) |
|
|
|
|
|
|
|
|
The selected setting will be used as shortest note for real-time recording.
4.Press the [FUNCTION] key again.
 HINT
HINT 
•The quantize setting applies to all patterns. When recording another pattern with the same resolution, it is not necessary to set the quantize value again.
•By changing the quantize setting after recording is completed, you can add another part with different resolution to the same pattern. For example, after recording bass drum and snare drum using sixteenth notes, you may want to record a hi-hat sequence with thirty-second notes.
•If desired, you can change the resolution of a recorded phrase afterwards. For details, see the section "Changing User Pattern Resolution After Recording".
5.While holding down the [REC] key, press the [PLAY] key.
The [REC] key and [PLAY] key light up. The [TEMPO] key flashes in sync with the tempo, and one measure of precount clicks is heard before recording starts. During recording, metronome clicks are heard, and the display shows the current position in the pattern (measure/beat).
|
Tock tock tock tock |
Clack clack clack clack clack |
Measure |
|
Beat |
|||||||||||||
Metronome |
|
|
|
|
|
|
|
|
|
|
|
|
|
|
|
|
|
|
sound |
|
|
|
|
|
|
|
|
|
|
|
|
01-3 |
|||||
|
|
|
|
|
|
|
|
|
|
|
|
|
|
|||||
|
|
Precount |
Recording start |
|
|
|
|
|||||||||||
|
|
|
|
|
|
|
|
|
||||||||||
|
|
|
|
|
|
|
|
|
|
|
|
|
|
|
|
|
|
|
 HINT
HINT 
•Unless specified otherwise, the beat and duration of an empty pattern where nothing has been recorded are the same as those of the most recently selected recorded pattern. If desired, you can change the beat and number of measures for the pattern ( p. 21 – 22).
•If desired, the duration of the precount can be changed, or it can be turned off ( p. 48).
Mode) (Pattern Patterns Using
ZOOM MRT-3 17
Mode) (Pattern Patterns Using
6.Adjust the tempo if necessary.
The pattern tempo can be changed at any time. For recording a difficult phrase, it might be helpful to temporarily reduce the tempo.
7.Tap the pads in accordance with the metronome sound.
The sound of the respective pad is heard, and it is recorded for the duration set with the quantize value. You can verify the current position in the pattern by checking the display. When the end of the pattern is reached, the recording loops back to the beginning and continues, allowing you to add to the recording as often as desired. (If necessary, use the [PAD BANK] key to change the pad bank.)
8.To temporarily pause pattern recording, press the [REC] key while real-time recording is in progress.
The [REC] key starts to flash. If you hit a pad in this condition, the sound will be heard, but it is not recorded. This is useful to check the phrasing and sound before actually recording. To resume recording, press the [REC] key once more.
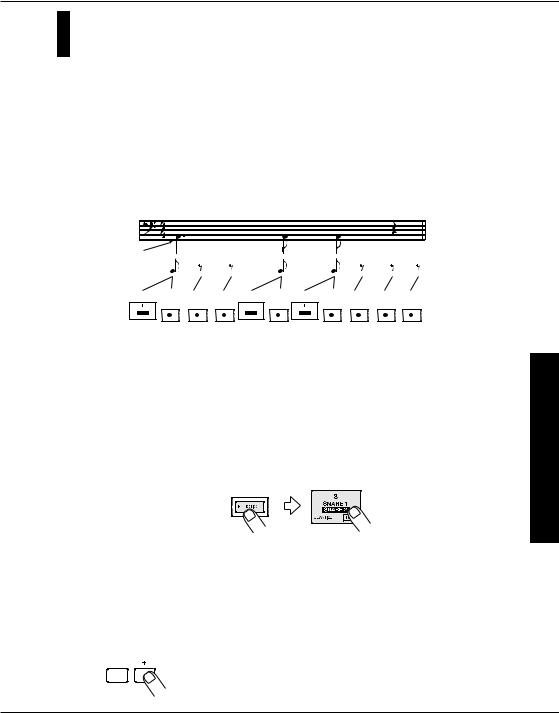
9.To erase the sound from a specific pad, push the pad while holding down the [DELETE/ERASE] key.
While the key is held down, the sound from that pad is erased from the pattern.
Snare drum
Bass drum
Snare drum
Bass drum
10.When recording is completed, press the [STOP] key.
 NOTE
NOTE 
•If a MIDI clock signal is being received, real-time recording is not possible. For details, please refer to page 44.
•When there is not enough remaining free memory in the MRT-3, the indication "FULL" appears on the display, and further recording is not possible. Erase unneeded patterns.
18 ZOOM MRT-3
Pattern Step Recording
This section describes step recording, which allows you to enter and record each sound separately, step by step, while the MRT-3 is in the stop condition. Even without mastering how to play the pads in real time, you can easily create complex drum and bass patterns. And you don't need to stop there, because you can even create patterns that would be impossible to play in real time.
For step recording, you select the shortest note that is to be used as unit, and you create the pattern by pressing a pad (note) or the [REC] key (rest) for each step.
For example, to create the following bass drum pattern with step recording, select an eighth note as smallest unit and make the entry as follows:
Bass drum
[Pad] [REC] [REC] [REC] [Pad] [REC] [Pad] [REC] [REC] [REC] [REC]
When the end of a pattern is reached, it loops automatically back to the beginning, allowing you to add other instrument sounds, to complete the pattern. By hitting two pads at the same time, you can enter two sounds in the same position.
1.In pattern mode, select an empty user pattern.
2.If required, select the kit for recording.
The kit selection procedure is the same as for manual play ( p. 12).
3.Press the [FUNCTION] key and then pad 3 (QUANTIZE).
The current quantize setting appears on the display. The minimum unit (shortest note) for step recording is determined by this setting.
 NOTE
NOTE 
The quantize setting applies to all patterns.
4.Use the [VALUE +/-] keys to set the quantize value (shortest note to be recorded).
The following settings are available.
|
|
4 |
• • • • • • • • |
Quarter note |
24 • • • • • • • |
Sixteenth triplet note |
|
|
8 |
• • • • • • • • |
Eighth note |
32 • • • • • • • |
Thirty-second note |
|
|
|||||
|
|
12 • • • • • • • |
Eighth triplet note |
48 • • • • • • • |
Thirty-second triplet note |
|
|
|
16 • • • • • • • |
Sixteenth note |
Hi • • • • • • • |
1 tick (1/96 of quarter note) |
|
|
|
|
|
|
|
|
Mode) (Pattern Patterns Using
ZOOM MRT-3 19
Mode) (Pattern Patterns Using
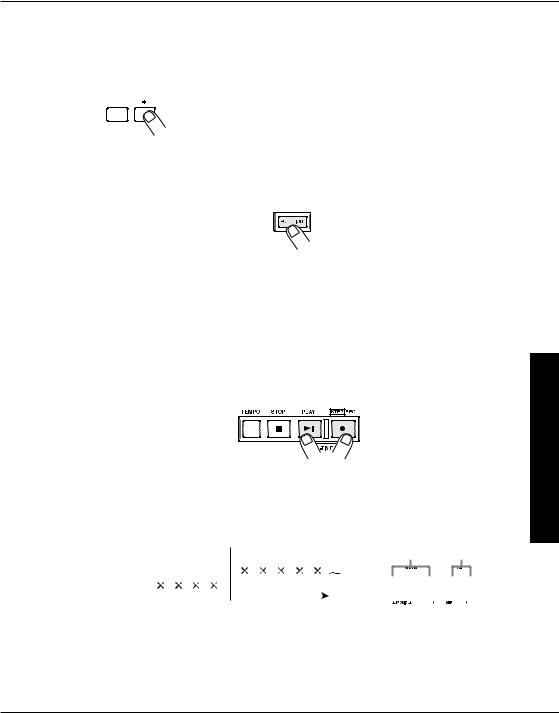
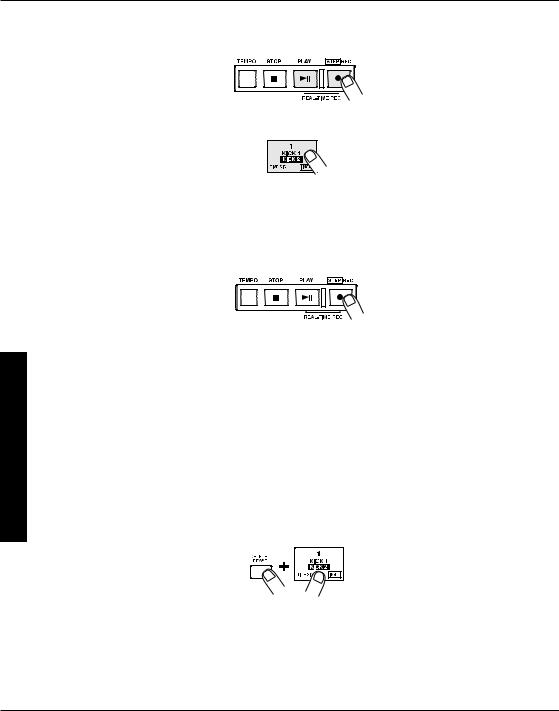
5.Press the [REC] key.
The [REC] key and [START] key light up, indicating that the MRT-3 is ready for recording.
6.To enter a note, hit the pad corresponding to the desired sound.
For example, tapping pad 1 will enter a bass drum note (pad 1 lights up). The tapping intensity will also be recorded. When you press the [REC] key, the current position advances by the minimum unit. You can verify the current position (measure/beat) in the pattern by checking the display.
7.To enter a rest, press the [REC] key.
No sound is recorded, and the position advances by one step. If you press the [REC] key, the current position within the beat is shown as number of ticks.
 NOTE
NOTE 
•If you press the [PLAY] key, the current position within the beat is shown as number of ticks, for as long as the button is held.
•When there is not enough remaining free memory in the MRT-3, the indication "FULL" appears on the display, and further recording is not possible. Erase unneeded patterns.
When the end of the pattern is reached, the recording loops back to the beginning and continues, allowing you to add to the recording as often as desired. (If necessary, use the [PAD BANK] key to change the pad bank.)
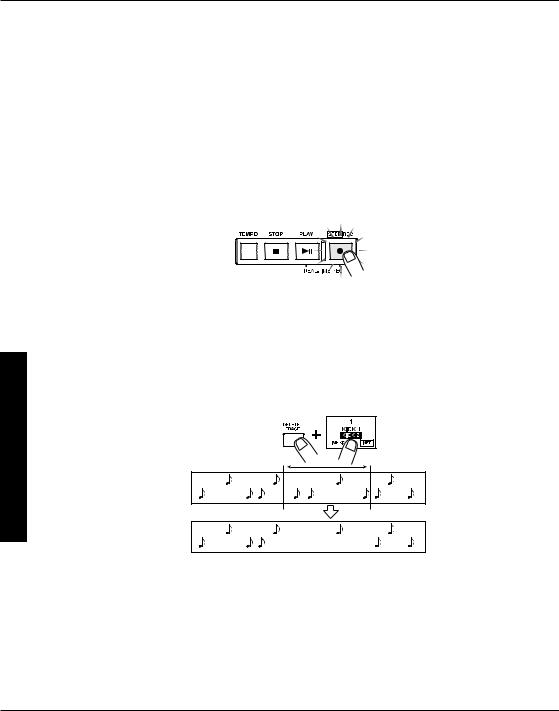
8.To erase a sound, use the [REC] key to move to the desired position. Then press the corresponding pad while holding down the [DELETE/ERASE] key.
As you move the position with the [REC] key, the pad that has been input for the current position lights up. Pressing the pad while holding the [DELETE/ERASE] key down causes the pad to go out and the sound will be erased.
9.When recording is completed, press the [STOP] key.
The [REC] key goes out and step recording terminates.
20 ZOOM MRT-3
 Loading...