


 Loading...
M Series® Service Manual
9650-0450-01 Rev R

The issue date for the M Series Service Manual (REF 9650-0450-01 Rev. R) is March, 2013.
If more than 3 years have elapsed since the issue date, contact ZOLL Medical Corporation to determine if additional product information updates are available.
Copyright © 2013 ZOLL Medical Corporation. All rights reserved. Rectilinear Biphasic, M Series, and ZOLL are trademarks or registered trademarks of ZOLL Medical Corporation in the United States and/or other countries.
Masimo is a trademark or registered trademark of Masimo Corporation in the United States and/or other countries.
ZOLL Medical Corporation
269 Mill Road Chelmsford, MA USA 01824-4105
ZOLL International Holding B.V.
Newtonweg 18
6662 PV ELST
The Netherlands
0123
9650-0450-01 Rev R

M Series Service Manual
T A B L E O F C O N T E N T S
PREFACE ....................................................................................................................................................................................... |
|
V |
Overview .............................................................................................................................................................................................. |
v |
|
Safety Considerations ........................................................................................................................................................................... |
v |
|
Additional Reference Material ........................................................................................................................................................... |
vi |
|
Conventions ....................................................................................................................................................................................... |
vii |
|
Service Policy Warranty .................................................................................................................................................................... |
vii |
|
Technical Service .............................................................................................................................................................................. |
vii |
|
Technical Service for International Customers ................................................................................................................................ |
viii |
|
CHAPTER 1 MAINTENANCE TESTS .............................................................................................................................................. |
1 |
|
Overview .............................................................................................................................................................................................. |
1 |
|
Before You Begin the Maintenance Tests ............................................................................................................................................ |
2 |
|
Equipment that You Need to Perform the M Series Maintenance Tests .............................................................................................. |
3 |
|
Equipment You Need for the M Series Options Maintenance Tests ................................................................................................... |
4 |
|
1.0 |
Physical Inspection of the Unit...................................................................................................................................................... |
5 |
2.0 |
Front Panel Button Test................................................................................................................................................................. |
7 |
3.0 |
3, 5, and 12 Leads Test................................................................................................................................................................ |
10 |
4.0 |
Power Supply Test (Optional) ..................................................................................................................................................... |
11 |
5.0 |
Leakage Current Test................................................................................................................................................................... |
15 |
6.0 |
Paddles Test (If applicable) ......................................................................................................................................................... |
16 |
7.0 |
Heart Rate Display Test............................................................................................................................................................... |
18 |
8.0 |
Calibrating Pulses on Strip Chart Test ........................................................................................................................................ |
19 |
9.0 |
Notch Filter Test.......................................................................................................................................................................... |
20 |
10.0 Heart Rate Alarm Test............................................................................................................................................................... |
21 |
|
11.0 |
Defibrillator Self Test................................................................................................................................................................ |
23 |
12.0 |
Synchronized Cardioversion Test.............................................................................................................................................. |
25 |
13.0 Shock Test ................................................................................................................................................................................. |
26 |
|
14.0 Summary Report Test................................................................................................................................................................ |
29 |
|
15.0 Advisory Message Test ............................................................................................................................................................. |
30 |
|
16.0 |
Pacer Test .................................................................................................................................................................................. |
31 |
i

M Series Service Manual
17.0 |
SpO2 Monitor Test for SpO2 Option ........................................................................................................................................ |
33 |
|
18.0 |
EtCO2 Monitor Test (for EtCO2 Option).................................................................................................................................. |
36 |
|
19.0 |
Temperature Test........................................................................................................................................................................ |
38 |
|
20.0 |
IBP Monitoring Test................................................................................................................................................................. |
39 |
|
21.0 |
NIBP Transducer Calibration Test ............................................................................................................................................. |
44 |
|
22.0 |
NIBP Monitor Test ..................................................................................................................................................................... |
47 |
|
23.0 |
NIBP Volume Leak Test with Fluke Biomedical NIBP Analyzer............................................................................................. |
49 |
|
24.0 |
Bluetooth Test............................................................................................................................................................................ |
51 |
|
CHAPTER 2 TROUBLESHOOTING ................................................................................................................................................ |
53 |
||
Overview ............................................................................................................................................................................................ |
53 |
||
Troubleshooting .................................................................................................................................................................................. |
54 |
||
Zoll M Series Error Messages ............................................................................................................................................................ |
58 |
||
CHAPTER 3 DISASSEMBLY PROCEDURES .................................................................................................................................. |
75 |
||
Overview ............................................................................................................................................................................................ |
75 |
||
Required Equipment ........................................................................................................................................................................... |
76 |
||
Parts That May Need Replacing After Disassembly .......................................................................................................................... |
76 |
||
Safety Precautions .............................................................................................................................................................................. |
77 |
||
Overview of Modules ......................................................................................................................................................................... |
78 |
||
1. |
Removing the ZIF Keeper ............................................................................................................................................ |
81 |
|
2. |
Removing the Front Panel ............................................................................................................................................ |
82 |
|
2A.Removing the Display ................................................................................................................................................. |
83 |
||
2B.Removing the Control Board ...................................................................................................................................... |
84 |
||
3. |
Removing the Upper Housing Assembly ..................................................................................................................... |
86 |
|
4. |
Removing the System Board Assembly ....................................................................................................................... |
87 |
|
5. |
Removing the Battery Interconnect Board Assembly .................................................................................................. |
90 |
|
6. |
Removing the High Voltage/Charger Assembly ......................................................................................................... |
91 |
|
7. |
Removing the High Voltage Module Assembly .......................................................................................................... |
94 |
|
8. |
Removing the High Voltage Capacitor Assembly ....................................................................................................... |
96 |
|
9. |
Removing the System Interconnect Board ................................................................................................................... |
98 |
|
10.Removing the Printer/Recorder Motor ...................................................................................................................... |
100 |
||
11.Removing the Lower Housing Assembly .................................................................................................................. |
102 |
||
12.Removing the Print Head Assembly .......................................................................................................................... |
103 |
||
13.Removing the PCMCIA Card Slot Assembly ........................................................................................................... |
104 |
||
ii

M Series Service Manual |
|
14.Removing the Paddle Release Latch ......................................................................................................................... |
105 |
CHAPTER 4 REPLACEMENT PARTS ......................................................................................................................................... |
107 |
Overview .......................................................................................................................................................................................... |
107 |
Replacement Parts ............................................................................................................................................................................ |
108 |
Field Replacement Parts ................................................................................................................................................................... |
112 |
CHAPTER 5 FUNCTIONAL DESCRIPTION ................................................................................................................................. |
115 |
Overview .......................................................................................................................................................................................... |
115 |
Main System Board .......................................................................................................................................................................... |
116 |
Main System Board Functions ......................................................................................................................................................... |
118 |
Power Supply .................................................................................................................................................................................... |
120 |
ECG Front End ................................................................................................................................................................................. |
121 |
Multifunction Electrode (MFE)/PADS (System Board and High Voltage Module) ....................................................................... |
121 |
CPU and EPU ................................................................................................................................................................................... |
121 |
High Voltage Module ....................................................................................................................................................................... |
122 |
Defibrillator Charging and Discharging ........................................................................................................................................... |
123 |
High Voltage Capacitor Monitor ...................................................................................................................................................... |
124 |
Pacer/Defibrillator Control Signals .................................................................................................................................................. |
125 |
Internal Discharge Resistor Module ................................................................................................................................................. |
127 |
AC/DC Charger Module ................................................................................................................................................................... |
127 |
System Interconnect Module ............................................................................................................................................................ |
127 |
Stripchart Recorder ........................................................................................................................................................................... |
128 |
PCMCIA Slots .................................................................................................................................................................................. |
128 |
Front Panel and Controls PWBA ...................................................................................................................................................... |
128 |
M Series Options .............................................................................................................................................................................. |
128 |
Isolated Power Supply Module ......................................................................................................................................................... |
129 |
12 Lead Option ................................................................................................................................................................................. |
129 |
Pulse Oximetry (SpO2) .................................................................................................................................................................... |
130 |
End Tidal Carbon Dioxide (EtCO2) ................................................................................................................................................. |
130 |
Biphasic Waveform .......................................................................................................................................................................... |
131 |
APPENDIX ................................................................................................................................................................................... |
135 |
Overview .......................................................................................................................................................................................... |
135 |
Interconnect Diagram for the M Series Monophasic Unit ............................................................................................................... |
136 |
Interconnect Diagram for the M Series Biphasic Unit ..................................................................................................................... |
137 |
Interconnect Diagram for the M Series CCT Biphasic Unit ............................................................................................................ |
138 |
iii |
|

M Series Service Manual
INDEX .......................................................................................................................................................................................... |
139 |
iv

M Series Service Manual
Preface
Overview
ZOLL Medical Corporation’s M Series Service Manual is intended for the service technician whose responsibility is to identify malfunctions and/or make repairs at the subassembly level. The Zoll M Series Service Manual has five main sections and one appendix.
Preface—Contains safety warnings and an overview of the manual’s contents. Be sure to review this section thoroughly before attempting to use or service the M Series unit.
Chapter 1—Maintenance Tests explains how to check the defibrillator’s performance using a series of recommended checkout procedures to be conducted every six months.
Chapter 2—Troubleshooting provides a listing of the procedures and error messages to help the service technician detect faults and repair them.
Chapter 3—Disassembly Procedures describes step-by-step procedures for removing subassemblies from the M Series unit.
Chapter 4—Replacement Parts List displays a complete list of ZOLL part numbers for field replaceable parts available for the M Series unit, allowing the service person to identify and order replacement parts from ZOLL.
Chapter 5—Functional Description provides technical descriptions for the M Series major subassembly modules. Appendix A—M Series Operator’s Manual.
Safety Considerations
The following section describes general warnings and safety considerations for operators and patients. Service technicians should review the safety considerations prior to servicing any equipment and read the manual carefully before attempting to disassemble the unit. Only qualified personnel should service the M Series unit.
Federal (U.S.A.) law restricts this unit for use by or on the order of a physician.
Safety and effectiveness data submitted by ZOLL Medical Corporation to the Food and Drug Administration (FDA) under section 510(K) of the Medical Device Act to obtain approval to market is based upon the use of ZOLL accessories such as disposable electrodes, patient cables and batteries. The use of external pacing/defibrillation
v

M Series Service Manual
|
electrodes and adapter units from sources other than ZOLL is not recommended. ZOLL makes no representations or |
|
|
warranties regarding the performance or effectiveness of its products when used in conjunction with pacing/ |
|
|
defibrillation electrodes and adapter units from other sources. If unit failure is attributable to pacing/defibrillation |
|
|
electrodes or adapter units not manufactured by ZOLL, this may void ZOLL's warranty. |
|
|
Only qualified personnel should disassemble the M Series unit. |
|
|
|
|
WARNING! |
This unit can generate up to 4500 volts with sufficient current to cause lethal shocks. |
|
|
All persons near the equipment must be warned to “STAND CLEAR” prior to discharging the defibrillator. |
|
|
Do not discharge the unit’s internal energy more than three times in one minute or damage to the unit may result. |
|
|
Do not discharge a battery pack except in a Base PowerCharger4x4 or compatible ZOLL Battery Charging/Testing unit. |
|
|
Do not use the M Series in the presence of flammable agents (such as gasoline), oxygen-rich atmospheres, or |
|
|
flammable anesthetics. Using the unit near the site of a gasoline spill may cause an explosion. |
|
|
Do not use the unit near or within puddles of water. |
|
NOTE |
The M Series is protected against interference from radio frequency emissions typical of two-way radios and cellular |
|
|
phones (digital and analog) used in emergency service/public safety activities. Users of the M Series should assess the |
|
|
unit’s performance in their typical environment of use for the possibility of radio frequency interference from |
|
|
high-power sources. Radio Frequency Interference (RFI) may be observed as shifts in monitor baseline, trace |
|
|
compression, or transient spikes on the display. |
|
Additional Reference Material
In addition to this guide, there are several other components to the Zoll M Series documentation. They include:
•Operator’s Guide - A comprehensive reference work that describes all the user tasks needed to operate the M Series.
•Configuration Guide - Describes the M Series features and functions whose operation can be customized by authorized users.
vi

M Series Service Manual
|
Conventions |
||
|
|
|
|
WARNING! |
Warning statements describe conditions or actions that can result in personal injury or death. |
|
|
|
|
|
|
CAUTION |
Caution statements describe conditions or actions that can result in damage to the unit. |
|
|
NOTE |
Notes contain additional information on using the defibrillator. |
||
|
Service Policy Warranty |
||
|
In North America: Consult your purchasing agreement for terms and conditions associated with your warranty. Outside |
||
|
of North America, consult ZOLL authorized representative. |
||
|
In order to maintain this warranty, the instructions and procedures contained in this manual must be strictly followed. |
||
|
For additional information, please call the ZOLL Technical Service Department 1-800-348-9011 in North America. |
||
|
Technical Service |
||
|
If the ZOLL M Series unit requires service, contact the ZOLL Technical Service Department: |
||
|
Telephone: 1-978-421-9655; 1-800-348-9011 |
||
|
Fax 1-978-421-0010 |
||
|
Have the following information available for the Technical Service representative: |
||
|
• |
Unit serial number. |
|
|
• |
Description of the problem. |
|
|
• |
Department where equipment is used. |
|
|
• |
Sample chart recorder strips documenting the problem, if applicable. |
|
|
• |
Purchase Order to allow tracking of loan equipment. |
|
|
• |
Purchase Order for a unit with an expired warranty. |
|
vii

M Series Service Manual
If the unit needs to be sent to ZOLL Medical Corporation, obtain a service order request number from the Technical Service representative. Return the unit in its original container to:
ZOLL Medical Corporation 269 Mill Road
Chelmsford, Massachusetts 01824-4105 Attn: Technical Service Department
Telephone: 1-800-348-9011; 1-978-421-9655 FAX: 978-421-0010
Technical Service for International Customers
International customers should return the unit in its original container to the nearest authorized ZOLL Medical Corporation Service Center. To locate an authorized service center, contact the International Sales Department at ZOLL Medical at the above address.
Units are available on loan while your unit is being repaired.
viii
M Series Service Manual
Chapter 1
Maintenance Tests
Overview
The M Series has two checkout procedures: the operator’s shift checklist and the extensive six-month maintenance tests checkout procedures.
Because the M Series units must be maintained ready for immediate use, it is important for users to conduct the Operator’s Shift Checklist procedure at the beginning of every shift. This procedure can be completed in a few minutes and requires no additional test equipment. (See the ZOLL M Series Operator’s Guide for the Operator’s Shift Checklist.)
A qualified biomedical technician must perform a more thorough maintenance test checkout every six months to ensure that the functions of the M Series unit work properly. This chapter describes the step by step procedures for performing the six month maintenance test checkout. Use the checklist at the back of this document (ZOLL M Series Maintenance Tests Checklist) to record your results of the maintenance tests.
This chapter describes the following M Series maintenance tests:
1.Physical Inspection of the Unit
2.Front Panel Button
3.3, 5, and 12 Leads
4.Power Supply
5.Leakage Current
6.Paddles
7.Heart Rate Display
8.Calibrating Pulses on Strip Chart
9.Notch Filter
10.Heart Rate Alarm
1

M Series Service Manual
11.Defibrillator Self Test
12.Synchronized Cardioversion
13.Shock
14.Summary Report
15.Advisory Message
16.Pacer
17.SpO2 Monitor
18.EtCO2 Monitor
19.Temperature Test
20.IBP Monitoring Test
21.NIBP Transducer Calibration Test
22.NIBP Monitor Test
23.NIBP Volume Leak Test with Fluke Biomedical NIBP Analyzer
24.Bluetooth Test
Before You Begin the Maintenance Tests
•Assemble the tools or specialized testing equipment listed in the “Equipment You Need to Perform the Maintenance Tests” section shown below.
•Keep an extra fully charged ZOLL M Series compatible battery available.
•Schedule an hour to conduct the entire maintenance test.
•Photocopy the checklist at the back of this document and use the copy to record your results. As you conduct each step of a procedure, mark the
Pass/Fail/NA check boxes on your checklist and then save it for your maintenance file.
•Perform the tests in the order presented.
•Perform all the steps of each test procedure.
•Complete all the steps of the procedure before evaluating the test results.
2

M Series Service Manual
Equipment that You Need to Perform the M Series Maintenance Tests
This section lists equipment that we use to perform the maintenance tests that we describe in this chapter. You can substitute an equivalent device for a listed device; however, not all simulators and analyzers will produce the same results. Be sure to follow the manufacturer’s recommendations for conducting the maintenance tests.
We recommend the use of the following equipment when performing M Series Maintenance Tests:
•ZOLL Medical Electrode Adapter from Fluke Biomedical (ZOLL Part Number 3010-0378).
•QED 6 Defibrillator Analyzer
•MFC Test Port Connector, 1004-0053-99
•Fluke Biomedical 601 Pro Series International Safety Analyzer.
•ECG Simulator; 12 Lead Simulator for 12 Lead test (e.g., Symbio CS1201).
•Stop watch.
•Standard series II PC flash memory cards.
•1 red miniature alligator to miniature alligator test lead.
•1 black miniature alligator to miniature alligator test lead.
•DC power supply (15 amp minimum).
•0.1 ohm 1% resistor (1/4 watt or greater).
•1000 ohm 1% resistor (1/4 watt or greater).
•Fluke 75 Multimeter or equivalent.
•Printer Paper.
•Battery.
•AC line cord.
•3 lead, 5 lead and 12 lead ECG cables. (12 lead cable needed if 12 lead option is installed.
3

M Series Service Manual
Equipment You Need for the M Series Options Maintenance Tests
•Fluke Biomedical Index 2 SpO2 Simulator or equivalent. (For SpO2 units only.)
•SpO2 cable and sensor (if option is installed).
•EtCO2 cable, and CAPNOSTAT 3 Mainstream cable with airway adapter, or CAPNOSTAT 3 Sidestream cable with cannula (if option is installed).
•Novametrix Capnostat Simulator Yb 1265/7100
•Paddles (if used).
•)
•Fluke Biomedical BP Pump 2 NIBP Monitor Analyzer (For NIBP units only) with NIBP cable and cuff (if NIBP option is installed), or
•Fluke Biomedical Cufflink Analyzer (if NIBP option is installed)
•IBP Temperature Simulator 9100-0402-TF
•DNI Nevada 214B Patient SImulator, with M Series interface cable
NOTE The Fluke Biomedical BP Pump NIBP Monitor Analyzer and the Fluke Biomedical BP Pump NIBP Analyzer use different technologies for testing NIBP monitors and therefore, the manual provides two different procedures for performing the NIBP Volume Leak test with each of these types of test equipment.
4

M Series Service Manual
1.0 Physical Inspection of the Unit
Tools Needed |
Battery. |
|
|
|
|
|
Test Setup |
None. |
|
|
|
|
|
|
|
|
|
|
||
|
|
Observe this... |
Pass/Fail/NA |
|||
|
|
|
|
|
|
|
|
|
1.1 |
Housing |
o |
o |
|
|
|
|
Is the unit clean and undamaged? |
|
|
|
|
|
|
|
|
|
|
|
|
1.2 |
Does the unit show signs of excessive wear? |
o |
o |
|
|
|
|
|
|
|
|
|
|
1.3 |
Does the handle work properly? |
o |
o |
|
|
|
|
|
|
|
|
|
|
1.4 |
Does the recorder door open and close properly? |
o |
o |
|
|
|
|
|
|
|
|
|
|
1.5 |
Are input connectors clean and undamaged? |
o |
o |
|
|
|
|
|
|
|
|
|
|
1.6 |
Are there any cracks in the housing? |
o |
o |
|
|
|
|
|
|
|
|
|
|
1.7 |
Do the front panel or selector switches have any damage or cracks? |
o |
o |
|
|
|
|
|
|
|
|
|
|
1.8 |
Are there any loose housing parts? |
o |
o |
|
|
|
|
|
|
|
|
|
|
1.9 |
Cables |
o |
o |
|
|
|
|
Are all cables free of cracks, cuts, exposed or broken wires? |
|
|
|
|
|
|
|
|
|
|
|
|
1.10 |
Are all cable bend/strain reliefs undamaged and free of excessive cable |
o |
o |
|
|
|
|
wear? |
|
|
|
|
|
|
|
|
|
|
|
|
1.11 |
Paddles |
o |
o |
o |
|
|
|
Do the adult and pedi plates have major scratches or show signs of damage? |
|
|
|
|
|
|
|
|
|
|
|
|
1.12 |
Do the adult shoes slide on and off easily to expose the covered pedi plates? |
o |
o |
o |
|
|
|
|
|
|
|
|
|
1.13 |
Are the paddles clean (e.g., free of gel) and undamaged? (if applicable) |
o |
o |
o |
|
|
|
|
|
|
|
5

M Series Service Manual
Observe this... |
Pass/Fail/NA |
||
|
|
|
|
1.14 |
Battery |
o |
o |
|
Place battery in battery well. |
|
|
|
|
|
|
1.15 |
Is the battery seated in the battery well correctly? |
o |
o |
|
|
|
|
Record your results on the Maintenance Test Checklist.
6

M Series Service Manual
|
2.0 Front Panel Button Test |
Tools Needed |
QED 6 Defibrillator Analyzer |
Test Setup |
• Install strip chart paper into the recorder tray. |
•Install the battery in the unit or connect the A/C power cord to the unit and then plug the cord into an electrical outlet.
•Connect the universal cable and ECG cable (3 lead, 5 lead, or 12 lead) to the QED 6 Analyzer (or equivalent).
|
|
Do this... |
Verify that... |
Pass/Fail/ |
|
||
|
|
|
|
NA |
|
|
|
|
|
|
|
|
|
|
|
|
2.1 |
Turn the selector switch to |
The unit sounds 4 beep tones. PADS and MONITOR |
o |
o |
|
|
|
|
MONITOR. |
display on the monitor. |
|
|
|
|
|
|
(For AED units, turn the selector |
Note: PADS is a factory default setting. |
|
|
|
|
|
|
switch to ON and select Manual |
|
|
|
|
|
|
|
mode.) |
|
|
|
|
|
|
|
|
|
|
|
|
|
|
2.2 |
Set the QED 6 analyzer to NSR |
As you press the SIZE button five times (0.5, 1.0, 1.5, |
o |
o |
|
|
|
|
of 120 BPM. To check the size of |
2.0, 3.0), the size of the ECG waveform appropriately |
|
|
|
|
|
|
the ECG waveform, press the |
changes on the display. |
|
|
|
|
|
|
SIZE button. |
|
|
|
|
|
|
|
|
|
|
|
|
|
|
2.3 |
Press the ALARM SUSPEND |
Alarm symbol changes from disabled to enabled. If the |
o |
o |
o |
|
|
|
button. |
alarm sounds, press the ALARM SUSPEND button to |
|
|
|
|
|
|
|
turn it off. The alarm will only be suspended for 90 |
|
|
|
|
|
|
|
seconds at this point. Press and hold the ALARM |
|
|
|
|
|
|
|
SUSPEND button for 3 seconds to disable alarms. |
|
|
|
|
|
|
|
|
|
|
|
|
|
2.4 |
Press the RECORDER button. |
The strip chart paper moves out of the unit from the |
o |
o |
o |
|
|
|
|
paper tray. Check that the correct time, date, ECG |
|
|
|
|
|
|
|
lead annotation and waveform are recorded on the |
|
|
|
|
|
|
|
paper. (Set Time and Date, if necessary.) |
|
|
|
|
|
|
|
|
|
|
|
|
|
2.5 |
Open the paper compartment |
The CHECK RECORDER message appears on the |
o |
o |
o |
|
|
|
door, then press the |
monitor. |
|
|
|
|
|
|
RECORDER button. |
|
|
|
|
|
|
|
|
|
|
|
|
|
|
2.6 |
Close the paper compartment |
The strip chart paper flows out of paper tray and the |
o |
o |
o |
|
|
|
door, then press the |
monitor no longer displays the CHECK RECORDER |
|
|
|
|
|
|
RECORDER button. |
message. |
|
|
|
|
|
|
|
|
|
|
|
|
|
|
|
|
|
|
|
|
|
|
|
7 |
|
|
|
|

M Series Service Manual
|
Do this... |
Verify that... |
Pass/Fail/ |
||
|
|
|
NA |
|
|
|
|
|
|
|
|
2.7 |
Press the RECORDER button. |
The strip chart paper stops flowing out of the paper |
o |
o |
o |
|
|
tray. |
|
|
|
|
|
|
|
|
|
2.8 |
Press the VOLUME softkey. |
The volume bar graph displays. |
o |
o |
|
|
|
Note: The QRS tone is on or off. There is no gradual |
|
|
|
|
|
change in volume. If equipped, voice prompts |
|
|
|
|
|
are gradual. Note: The voice volume has 5 |
|
|
|
|
|
settings. Setting 3 is in the mid-range. |
|
|
|
|
|
|
|
|
|
2.9 |
Press the INC softkey. |
The bar graph appears on the display, indicating an |
o |
o |
|
|
|
increase in volume. |
|
|
|
|
|
Note: This action does not increase the volume of the |
|
|
|
|
|
unit’s audio prompts. |
|
|
|
|
|
|
|
|
|
2.10 |
Press the DEC softkey. |
The bar graph appears on the display, indicating a |
o |
o |
|
|
|
decrease in volume. |
|
|
|
|
|
Verify that pressing the DEC softkey until only the last |
|
|
|
|
|
bar appears silences the unit’s audio prompts, |
|
|
|
|
|
otherwise the volume of the audio prompts does not |
|
|
|
|
|
decrease. |
|
|
|
|
|
|
|
|
|
2.11 |
Press the CONTRAST button. |
The monitor screen displays the Contrast Menu. |
o |
o |
|
|
|
|
|
|
|
2.12 |
Press the INC softkey. |
The screen contrast and bar graph increases on the |
o |
o |
o |
|
|
display. |
|
|
|
|
|
|
|
|
|
2.13 |
Press the DEC softkey. |
The screen contrast and bar graph decreases on the |
o |
o |
|
|
|
display. |
|
|
|
|
|
|
|
|
|
2.14 |
Press the SUMMARY button. |
The monitor screen displays the Summary menu, |
o |
o |
o |
|
|
showing the summary report options. |
|
|
|
|
|
|
|
|
|
2.15 |
Press the CODEMARKER |
The monitor screen displays the Code marker menu. |
o |
o |
o |
|
button. |
|
|
|
|
|
|
|
|
|
|
2.16 |
Connect to AC or DC current |
The CHARGER ON indicator lights (either the Green |
o |
o |
o |
|
and install the battery. Turn the |
or Amber indicator lights). |
|
|
|
|
unit off. |
|
|
|
|
|
|
|
|
|
|
8

M Series Service Manual
|
Do this... |
Verify that... |
Pass/Fail/ |
||
|
|
|
NA |
|
|
|
|
|
|
|
|
2.17 |
Remove the battery. |
The charger light alternately flashes green and amber. |
o |
o |
|
|
|
|
|
|
|
2.18 |
Replace the battery and the turn |
The amber charger light illuminates. |
o |
o |
|
|
unit on. |
|
|
|
|
|
|
|
|
|
|
2.19 |
Press the ANALYZE button. |
The SELECT DEFIB MODE message appears on the |
o |
o |
o |
|
|
monitor (for manual devices). |
|
|
|
|
|
|
|
|
|
2.20 |
Connect the universal cable to |
The display shows that the unit is charging. The |
o |
o |
o |
|
the QED 6. Move the selector |
SHOCK button lights when the unit is charged, and |
|
|
|
|
switch to DEFIB. Select 2J. |
the Ready tone for DEFIB sounds. |
|
|
|
|
Press the CHARGE button. |
|
|
|
|
|
|
|
|
|
|
2.21 |
Press and hold the ENERGY |
The unit discharges internally and selected energy |
o |
o |
o |
|
SELECT down arrow. |
decrements to 1J. |
|
|
|
|
|
|
|
|
|
2.22 |
Press and release the ENERGY |
The following selections appear: Verify the following |
o |
o |
o |
|
SELECT up arrow 19 times. |
energy amounts display incrementally: |
|
|
|
|
|
Biphasic:2-10, 15, 20,30, 50, 75, 100,120, 150, 200J |
|
|
|
|
|
Monophasic(DSW): 2-10, 15,20,30,50,75, 100, 150, |
|
|
|
|
|
200, 300, 360J |
|
|
|
|
|
|
|
|
|
2.23 |
Press the CHARGE button. |
The display shows the unit charged up to 200J (360J |
o |
o |
o |
|
|
monophasic) and the SHOCK button lights. |
|
|
|
|
|
|
|
|
|
2.24 |
Press the SHOCK button. |
The unit discharges and the SHOCK button is no |
o |
o |
o |
|
|
longer illuminated. |
|
|
|
|
|
A 15 second strip chart automatically prints, displaying |
|
|
|
|
|
the number of joules delivered (if equipped with |
|
|
|
|
|
recorder and configured to print event). |
|
|
|
|
|
|
|
|
|
Record your results on the Maintenance Test Checklist.
9

M Series Service Manual
3.0 3, 5, and 12 Leads Test
Tools Needed: |
3 lead, 5 lead, and 12 lead cables. Test each cable separately. QED 6 Defibrillator Analyzer. |
|
|
||||
Test Setup: |
The M |
Series unit must be configured to display ECG LEAD OFF message. |
|
|
|
||
|
Connect the lead wires appropriate to each test to the QED 6 Defibrillator Analyzer. |
|
|
|
|||
|
|
|
|
|
|
||
|
|
|
Do this... |
Observe this... |
Pass/Fail/ |
||
|
|
|
|
|
NA |
|
|
|
|
3.1 |
Turn the selector switch to |
The monitor displays the NO ECG LEADS OFF |
o |
o |
o |
|
|
|
MONITOR. Select leads. |
message. |
|
|
|
|
|
|
|
|
|
|
|
|
|
3.2 |
Disconnect one lead from the |
The monitor displays the ECG LEAD OFF message |
o |
o |
o |
|
|
|
simulator. |
within 3 seconds (if configured). |
|
|
|
|
|
|
|
|
|
|
|
|
|
3.3 |
Reconnect the lead. Repeat |
The ECG LEAD OFF message appears when the |
o |
o |
o |
|
|
|
step 3.2 with the remaining |
lead is disconnected and clears the lead is |
|
|
|
|
|
|
leads. |
reconnected. |
|
|
|
|
|
|
|
|
|
|
|
|
|
3.4 |
Repeat 3.2 and 3.3 for 5 lead |
Note: If heart rate alarm sounds, press and hold the |
o |
o |
o |
|
|
|
and 12 lead cables. |
ALARM SUSPEND button for 4 seconds to |
|
|
|
|
|
|
|
disable the alarms. |
|
|
|
|
|
|
|
Note: When testing the 12 lead cable, the ECG |
|
|
|
|
|
|
|
LEAD OFF message displays when you pull |
|
|
|
|
|
|
|
off a limb lead. When you pull off a V lead, the |
|
|
|
|
|
|
|
ECG VX LEAD OFF message displays, where |
|
|
|
|
|
|
|
“X” is the number between 1 and 6. |
|
|
|
|
|
|
|
|
|
|
|
Record your results on the Maintenance Tests Checklist.
10
M Series Service Manual
4.0 Power Supply Test (Optional)
Tools Needed: |
• |
1 red miniature alligator to miniature alligator test lead. |
|
|
• |
1 black miniature alligator to miniature alligator test lead. |
|
|
• DC power supply (15 Amp minimum). |
||
|
• |
0.1 ohm resistor (¼W or greater). |
|
|
• |
1000 ohm 1% resistor (¼W or greater). |
|
|
• |
Fluke 75 multimeter or equivalent. |
|
Test Setup: |
Make sure the unit and power supply are turned off. |
||
|
Connect one end of the black lead to the “-” terminal in the battery well. |
||
|
Connect the other end of the black lead to the “-” terminal of the power supply. |
||
|
Connect the red lead to “+” terminal socket of the battery well. Use the middle pin with the plastic guard around it. |
||
|
Connect the other end of the red lead to the “+” terminal of the power supply. |
||
|
Set the power supply voltage to 7V. |
||
|
|
|
|
CAUTION |
Be sure to connect the power supply properly to the M Series battery well terminals or damage to the unit may result. Do NOT raise |
||
|
the power supply voltage above 12V. |
|
|
11

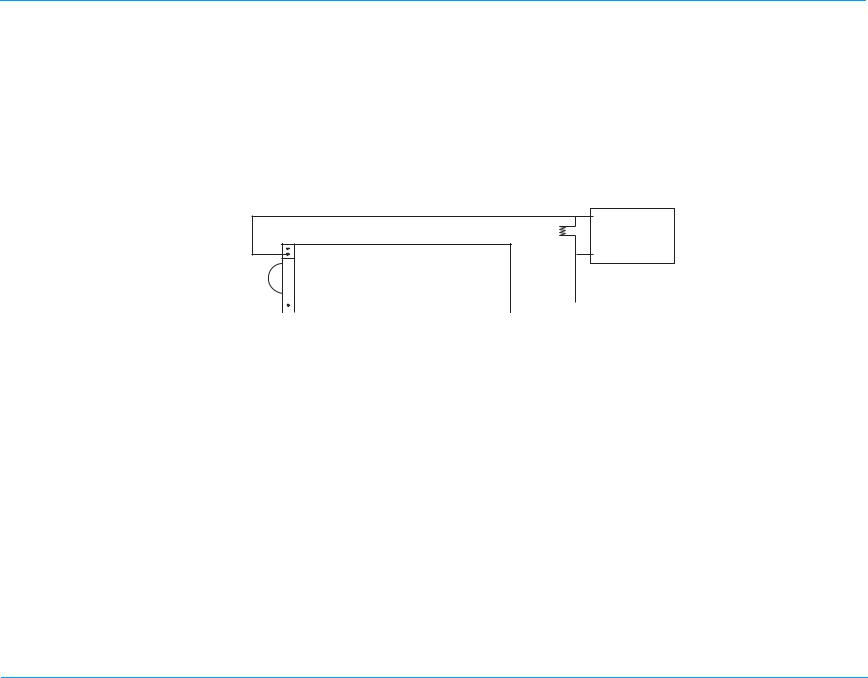
M Series Service Manual
Red
|
|
|
|
|
|
|
|
|
|
|
|
|
|
|
|
|
|
|
Battery Well |
|
|
15 Amp |
|
|
|
||
|
|
|
|
|
|
|
|
|
|||||
|
|
|
|
|
|
|
|
|
|
|
|||
|
|
|
|
|
|
? |
Supply |
|
|
|
|||
|
|
|
|
|
? |
|
|
|
|
|
|||
|
|
|
|
|
|
|
|
|
|
|
|
|
|
|
|
|
|
|
|
|
|
|
|
|
|
|
|
|
|
Black |
|
|
|
|
|
|
|
|
|||
|
|
|
|
|
|
|
|
|
|
|
|
|
|
|
|
|
|
|
|
|
|
|
|
|
|
|
|
|
Do this... |
Verify that... |
|
|
Pass/ |
||||||||
|
|
|
|
|
|
|
|
|
|
|
|
Fall |
|
4.1 |
Turn the selector switch to |
The unit does not turn on. |
|
|
o |
o |
|||||||
|
MONITOR. |
|
|
|
|
|
|
|
|
||||
|
(For AED units, turn the selector |
|
|
|
|
|
|
|
|
||||
|
switch to ON and select Manual |
|
|
|
|
|
|
|
|
||||
|
mode.) |
|
|
|
|
|
|
|
|
||||
|
|
|
|
|
|
|
|
|
|
|
|
|
|
4.2 |
Turn the selector switch to the |
|
|
|
|
|
|
|
|
||||
|
OFF position. |
|
|
|
|
|
|
|
|
||||
|
|
|
|
|
|
|
|
|
|
|
|
|
|
4.3 |
Adjust the power supply voltage to |
The unit turns on. |
|
|
o |
o |
|||||||
|
10.3V and turn the selector switch |
|
|
|
|
|
|
|
|
||||
|
to MONITOR (for AED units, turn |
|
|
|
|
|
|
|
|
||||
|
the selector switch to the ON |
|
|
|
|
|
|
|
|
||||
|
position). |
|
|
|
|
|
|
|
|
||||
|
|
|
|
|
|
|
|
|
|
|
|
|
|
4.4 |
Low Battery Test |
The unit does not display the LOW BATTERY message. |
o |
o |
|||||||||
|
Set voltage to 9.8V. |
|
|
|
|
|
|
|
|
||||
|
|
|
|
|
|
|
|
|
|
|
|
|
|
4.5 |
Set voltage to 9.4V. |
The unit displays the LOW BATTERY message within 30 |
o |
o |
|||||||||
|
|
|
|
|
|
seconds. |
|
|
|
|
|||
|
|
|
|
|
|
|
|
|
|
|
|
|
|
4.6 |
Shut Down Voltage Test |
The unit shuts off within 30 seconds. |
|
|
o |
o |
|||||||
|
Set voltage to 8.5V. |
|
|
|
|
|
|
|
|
||||
|
|
|
|
|
|
|
|
|
|
|
|
|
|
Record your results on the Maintenance Tests Checklist. |
|
|
|
|
|||||||||
|
|
|
|
|
|
|
|
|
|
|
|
|
|
12
M Series Service Manual
Test Setup
Remove red lead from power supply and connect to 0.1ohm resistor.
Connect other end of resistor to “+” terminal of power supply using a second red label. Connect multimeter across the resistor.
Set voltage scale (if DVM is not autoranging) to 220mV.
|
_ |
Red |
DMM |
|
|
+ |
+ |
|
|
|
|
Battery Well |
|||||
|
|
|
_ |
|
|
|
|
|
|
|
|
|
|
|
|
|
+ |
||
|
|
|
|
|
|
|
|
|
15 Amp |
Black |
|
|
|
|
|
Supply |
|||
|
|
|
|
|
|
|
_ |
||
|
|
|
|
|
|
|
|
|
|
|
Do this.... |
Observe this... |
Pass/ |
|
|
|
Fail/ |
|
|
|
|
4.7 |
System Current Test |
|
|
|
Set power supply to 10.3V. |
|
|
|
|
|
|
13

M Series Service Manual
|
Do this.... |
Observe this... |
Pass/ |
|
|
|
|
Fail/ |
|
|
|
|
|
|
4.8 |
Turn the selector switch to |
Voltage across resistor should be 80 mV or less (<800 |
o |
o |
|
MONITOR. (For AED units, turn |
mA of ON current). Note: Without optional parameters. |
|
|
|
the selector switch to ON and |
a) With green screen or LCD and no options <80mV. |
|
|
|
select Manual mode. |
|
|
|
|
b) With yellow screen and no options <81mV. |
|
|
|
|
|
|
|
|
|
|
c) With yellow screen and SpO2 <104mV. |
|
|
|
|
d) With yellow screen and voice recording <91mV. |
|
|
|
|
e) With yellow screen, voice recording, and SpO2 |
|
|
|
|
<114mV. |
|
|
|
|
f) All devices with EtCO2 <121mV. |
|
|
|
|
|
|
|
4.9 |
Turn unit off. |
|
o |
o |
|
|
|
|
|
Record your results on the Maintenance Test Checklist |
|
|
||
|
|
|
|
|
|
Off Current Test |
Test Setup |
Remove 0.1 ohm resistor and replace with 1K |
|
Connect DMM across resistor. |
|
Set voltage scale to DCV. |
|
Measure voltage across resistor. |
4.10 |
Measure across resistor with unit |
Voltage should be less than 450mV (<450uA of current). |
o o |
|
turned off. |
|
|
|
|
|
|
Record your results on the Maintenance Test Checklist |
|
||
|
|
|
|
14

M Series Service Manual
|
|
5.0 Leakage Current Test |
|
|
||
Tools Needed: |
See the manufacturer’s instructions or supplied specifications for the leakage tester you use. |
|||||
Test Setup: |
See the manufacturer’s instructions or supplied specifications for the leakage tester you use. Repeat leakage test with |
|||||
|
accessories: MFC, external paddles, and anterior/posterior paddles. |
|||||
|
|
|
|
Table 1: |
|
|
|
|
|
|
|
|
|
|
|
|
Maximum Leakage Acceptance Limits |
|
||
|
|
|
|
|
|
|
|
|
|
|
Normal Condition |
Single Fault Condition* |
|
|
|
|
|
|
|
|
|
|
ECG |
|
10 |
50 |
|
|
|
|
|
|
|
|
|
|
Universal |
|
100 |
100 |
|
|
|
|
|
|
|
|
|
|
Earth |
|
500 |
1000 |
|
|
|
|
|
|
|
|
|
|
*Single fault considered AC mains on applied part. |
|
|
||
|
|
|
|
|
|
|
15

M Series Service Manual
6.0 Paddles Test (If applicable)
Tools Needed: |
QED 6 Defibrillator Analyzer. |
|
|
|
||
Test Setup: |
If applicable, connect the universal cable to the paddles and place the paddles in paddle wells. |
|
|
|||
|
|
|
|
|
|
|
|
|
|
Do this... |
Verify that... |
Pass/Fail/ |
|
|
|
|
|
|
NA |
|
|
|
6.1 |
Turn the selector switch to |
The energy selection decreases to 1J. |
o |
o |
|
|
|
DEFIB (For AED units,turn the |
|
|
|
|
|
|
selector switch to ON and |
|
|
|
|
|
|
select Manual mode.) Press |
|
|
|
|
|
|
and hold the ENERGY DOWN |
|
|
|
|
|
|
button on the sternum paddle. |
|
|
|
|
|
|
|
|
|
|
|
|
6.2 |
Press and release the ENERGY |
The joules selection increases as follows: Biphasic 1- |
o |
o |
|
|
|
UP button on the sternum paddle |
10, 15, 20, 30, 50, 75, 100, 120, 150, 200J. |
|
|
|
|
|
for each setting. |
Monophasic (DSW): 1-10,15, 20, 30, 50, 75, 100, 150, |
|
|
|
|
|
|
200, 300, 360. |
|
|
|
|
|
|
|
|
|
|
|
6.3 |
Press and release the |
The recorder starts printing. |
o |
o o |
|
|
|
RECORDER button on the |
|
|
|
|
|
|
sternum paddle. |
|
|
|
|
|
|
|
|
|
|
|
|
6.4 |
Press and release the |
The recorder stops printing. |
o |
o |
|
|
|
RECORDER button again. |
|
|
|
|
|
|
|
|
|
|
|
|
6.5 |
Select 30J using the paddle |
The unit charges to 30J, then the red LED charge |
o |
o |
|
|
|
ENERGY button. Press the |
indicator illuminates and the charge tone sounds. |
|
|
|
|
|
CHARGE button on the Apex |
Note: The front panel shock button does not |
|
|
|
|
|
paddle. |
illuminate. |
|
|
|
|
|
|
|
|
|
|
|
|
|
|
|
|
|
|
6.6 |
Press and release the APEX |
The unit does not discharge. |
o |
o |
|
|
|
SHOCK button. |
|
|
|
|
|
|
|
|
|
|
|
|
6.7 |
Press and release the |
The unit does not discharge. |
o |
o |
|
|
|
STERNUM SHOCK button. |
|
|
|
|
|
|
|
|
|
|
|
|
6.8 |
Press and hold both paddles |
The unit discharges. The TEST OK message displays |
o |
o |
|
|
|
SHOCK buttons. |
and the red LED turns off. If configured, the recorder |
|
|
|
|
|
|
prints a strip chart. |
|
|
|
|
|
|
|
|
|
16

M Series Service Manual
|
...Do this |
...Verify that |
Pass/Fail/ |
|
|
|
NA |
Record your results on the Maintenance Tests Checklist.
17

M Series Service Manual
7.0 Heart Rate Display Test
Tools Needed: |
|
• |
ECG Cable (3, 5 or 12 leads). |
|
|
|
|
|
|
• |
QED 6 Defibrillator Analyzer. |
|
|
|
|
Test Setup: |
Turn the selector switch to MONITOR (For AED units, turn the selector switch to ON and select Manual override.) |
||||||
|
Press LEAD button until “I” displays. |
|
|
|
|||
|
Connect the ECG leads to the QED 6 Defibrillator Analyzer. |
|
|
||||
|
Connect the ECG cable to the unit. |
|
|
|
|||
|
|
|
|
|
|
|
|
|
|
|
|
Do this... |
Verify that... |
Pass/Fail/ |
|
|
|
|
|
|
|
NA |
|
|
|
|
7.1 |
Set the QED 6 Defibrillator |
The Heart Rate displays as 120 +/- 2 bpm. |
o o o |
|
|
|
|
|
Analyzer to 120BPM. |
|
|
|
|
|
|
|
|
|
|
|
|
|
|
Record your results on the Maintenance Tests Checklist. |
|
|
||
|
|
|
|
|
|
|
|
18

M Series Service Manual
8.0 Calibrating Pulses on Strip Chart Test
Tools Needed: |
None |
|
|
|
|
Test Setup: |
None. |
|
|
|
|
|
|
|
|
|
|
|
|
|
Do this... |
Verify that... |
Pass/Fail/ |
|
|
|
|
|
NA |
|
|
8.1 |
Press the RECORDER button. |
|
|
|
|
|
|
|
|
|
8.2 |
Press and hold SIZE button to |
The strip chart displays a signal of 300 ppm with an |
o o o |
|
|
|
|
activate the calibration signal. |
amplitude of 10 mm +/- 1 mm. The signal also appears |
|
|
|
|
|
on the video display. |
|
|
|
|
|
|
|
Record your results on the Maintenance Tests Checklist.
19

M Series Service Manual
9.0 Notch Filter Test
Tools Needed: |
QED 6 Defibrillator Analyzer. |
|
|
||
Test Setup: |
Connect the ECG cable to the QED 6 Defibrillator Analyzer. |
|
|||
|
Connect the ECG cable to the unit. |
|
|
||
|
|
|
|
|
|
|
|
|
Do this... |
Verify that... |
Pass/Fail/ |
|
|
|
|
|
NA |
|
|
9.1 |
Turn the selector switch to |
|
|
|
|
|
MONITOR mode. |
|
|
|
|
|
(For AED units, turn the selector |
|
|
|
|
|
switch to ON and select Manual |
|
|
|
|
|
mode.) |
|
|
|
|
|
|
|
|
|
9.2 |
Select lead I, size 3x. |
|
|
|
|
|
|
Select 60Hz (or 50 Hz for a 50Hz |
|
|
|
|
|
unit) on |
|
|
|
|
|
the QED 6 Defibrillator Analyzer. |
|
|
|
|
|
|
|
|
|
9.3 |
Press RECORDER button. |
Verify that the waveform amplitude on the strip chart is |
o o o |
|
|
|
|
|
less than 1.5 mm. |
|
|
|
|
|
|
|
|
9.4 |
Press RECORDER button to |
|
|
|
|
|
|
stop printing. |
|
|
|
|
|
|
|
|
Record your results on the Maintenance Tests Checklist.
20
Loading...