


L20
EN
StudSensor
™
L20
Stud Finder
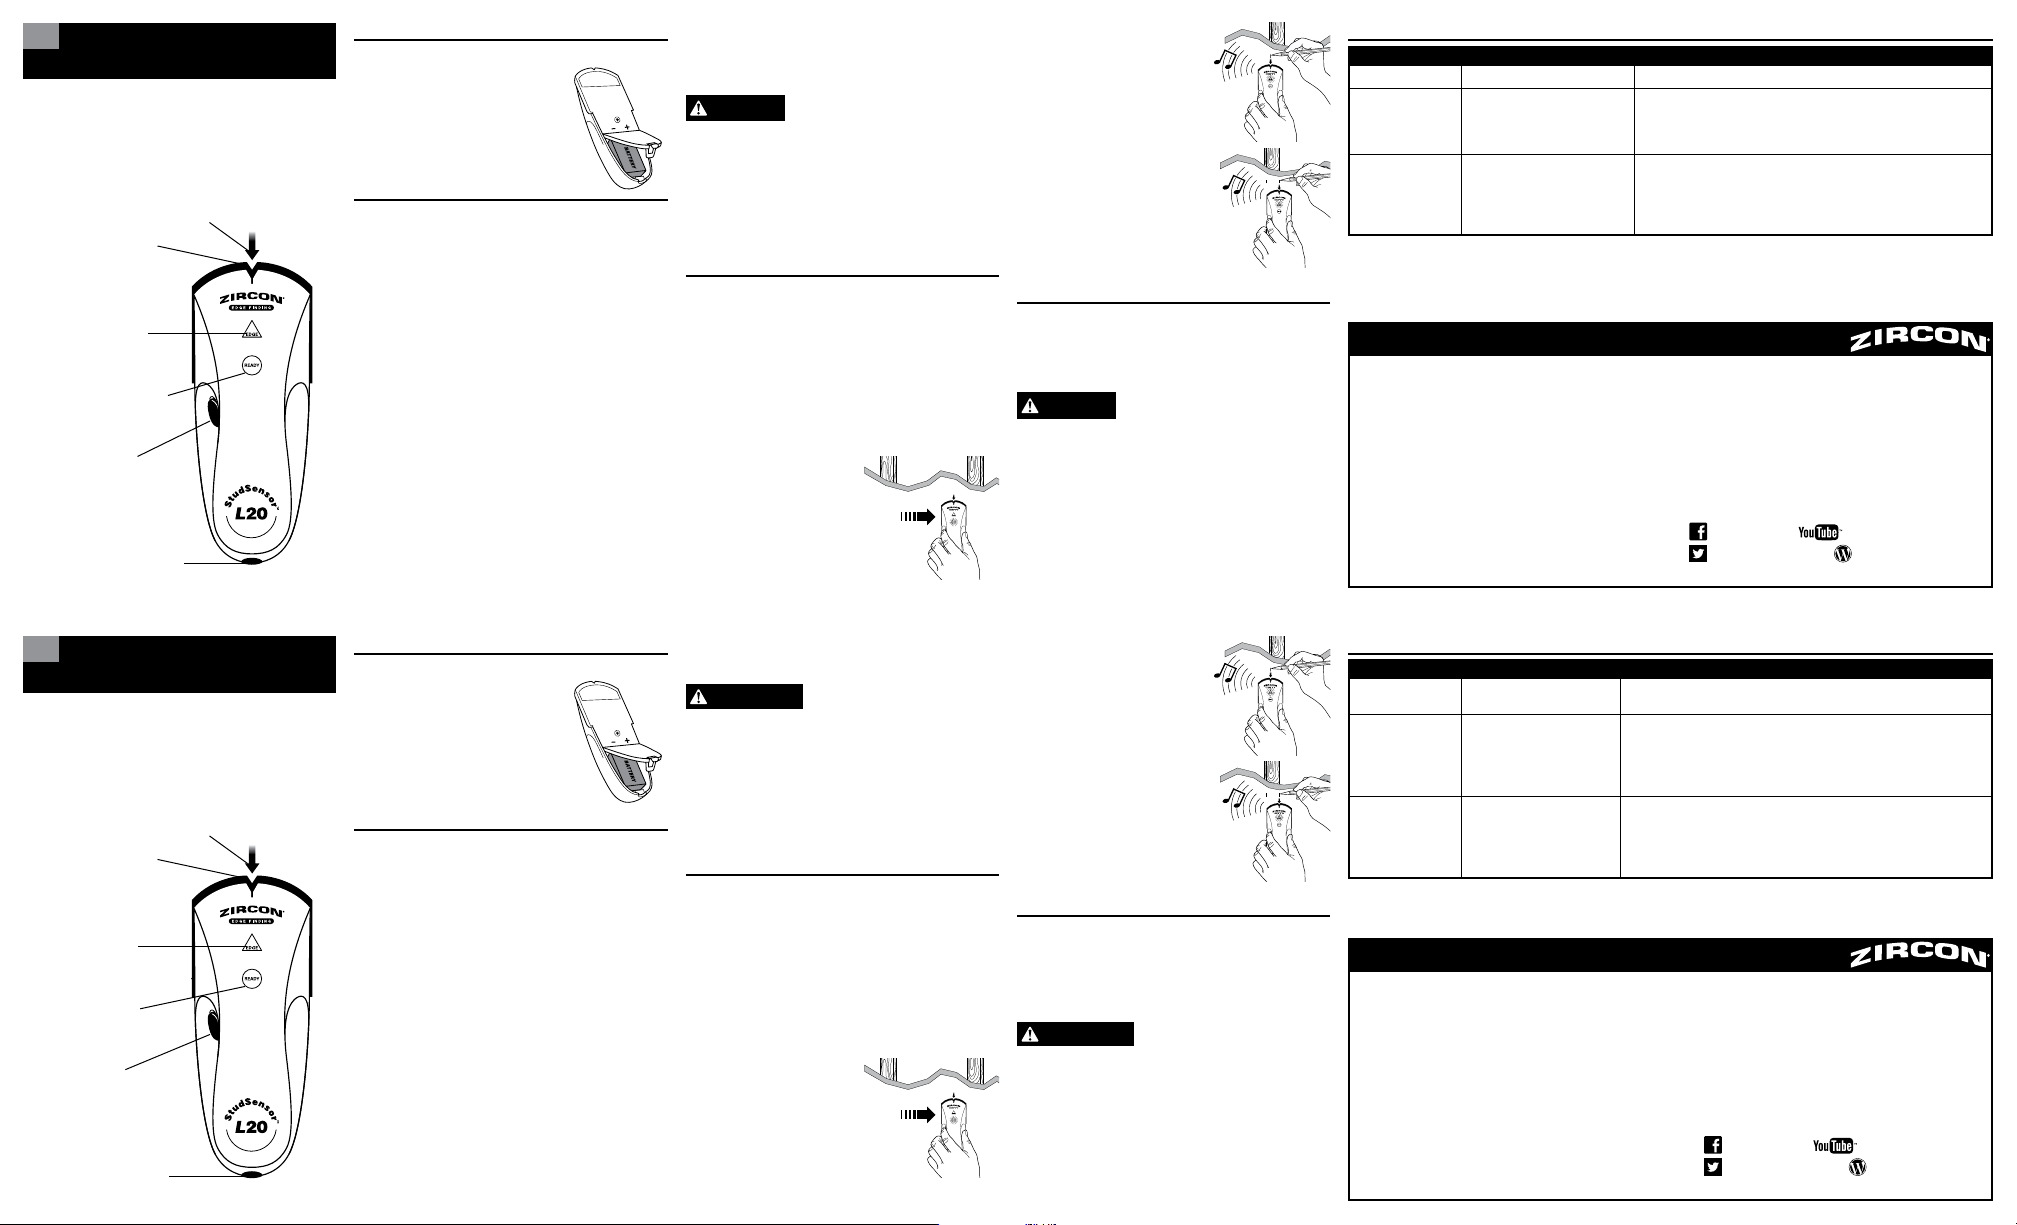
The Zircon StudSensor™ L20 stud finder finds
the edges of wood and metal studs up to ¾ in.
(19 mm) deep in walls. It features a sleek,
high-impact case, with a patented pinch grip
design, and a SpotLite® Pointer.
SpotLite® Pointer
Stud Edge Groove
Red EDGE Light
Green READY Light
Power Button
Battery Door Tab
1. INSTALLING THE BATTERY
Do not attempt to unscrew the back of the tool.
Push in the battery door tab at the
bottom of the tool and open the door.
Insert a new 9-volt battery, matching the
positive (+) and negative (-) terminals to
the icons printed on the back. Snap the
battery into place and replace the door.
2. OPERATING TIPS
• Tool Position: For proper use, always place scanner
flat against the surface before turning on power.
• Power: Press and hold in the Power button
continuously while in use.
• Operation: Move the unit slowly, while keeping it flat
against the wall. Do not rock, tilt, or lift it.
If you’re receiving erratic scanning results, it may be a
result of humidity, moisture within the wall cavity or
drywall, or recently applied paint or wallpaper that hasn’t
fully dried. While the moisture may not always be visible,
it will interfere with tool’s sensors. Please allow a few days
for the wall to dry out.
WORKING WITH DIFFERENT MATERIALS
Freshly painted walls: May take one week or longer to
dry after application.
Wallpaper: The StudSensor
on walls covered with wallpaper or fabric, unless the
materials are metallic foil, contain metallic fibers, or are
still wet after application.
Lath & plaster: Due to irregularities in plaster thickness,
this tool is not recommended for use on lath & plaster.
™
L20 functions normally
The StudSensor™ L20 cannot scan for wood studs and
joists through ceramic tile or carpeting and pad.
Note: Sensing depth and accuracy can vary due to
moisture, content of materials, wall texture, and paint.
WARNING
Do not rely exclusively on the
detector to locate items behind
• When the top red EDGE light
is lit, the beep sounds, and the
SpotLite
you have located the edge of the
stud. Mark this spot.
the scanned surface. Use other information sources
to help locate items before penetrating the surface.
Such additional sources include construction plans,
visible points of entry of pipes and wiring into walls,
such as in a basement, and in standard 16 and 24 in.
(41 and 61 cm) stud spacing practices.
3. TURNING ON/CALIBRATING THE
• Continue scanning beyond
the marked spot until the red
EDGE light turns off. Slide unit in
reverse direction to locate other
edge of stud. Mark this second
spot. The middle of the stud is
centered between the two marks.
TOOL AND FINDING A STUD
• Place unit flat on wall. Press and hold the Power button.
During calibration, SpotLite
®
arrow and red EDGE light
will flash, unit will beep, and green READY light will
stay illuminated. Do not move the unit until calibration
is complete.
• If you calibrate over a stud, the unit will beep repeatedly.
Move the unit a few inches (5–8 cm) right or left,
release the Power button, and start over.
• After calibration is complete,
continue to hold the Power
button and slowly slide the
unit across the surface.
4. OPERATING CAUTIONS
Depending on the proximity of electrical wiring or pipes
to the wall surface, the StudSensor
in the same manner as studs. Caution should always be
used when nailing, sawing, or drilling into walls, floors,
and ceilings that may contain these items.
THE WALL. DO NOT TAKE ACTIONS THAT COULD
BE DANGEROUS IF THE WALL CONTAINS A LIVE
ELECTRICAL WIRE. ALWAYS TURN OFF THE
ELECTRICAL POWER, GAS, AND WATER SUPPLIES
BEFORE PENETRATING A SURFACE. FAILURE TO
FOLLOW THESE INSTRUCTIONS MAY RESULT IN
ELECTRIC SHOCK, FIRE, AND/OR SERIOUS INJURY
OR PROPERTY DAMAGE.
Always turn off the power when working near
electrical wires.
®
Pointer arrow shines,
WARNING
™
L20 may detect them
DO NOT ASSUME THERE ARE
NO LIVE ELECTRICAL WIRES IN
5. HELPFUL HINTS (See also number 2, OPERATING TIPS)
Situation
No indications.
Unit beeps repeatedly.
Detects other objects
besides studs.
Finds more targets
than there should be.
FCC Part 15 Class B Registration Warning
This device complies with Part 15 of FCC Rules. Operations subject to the following two conditions: (1) this device may not cause harmful
interference, and (2) this device must accept any interference received, including interference that may cause undesired operation.
SpotLite, StudSensor, and Zircon are trademarks or registered trademarks of Zircon Corporation.
Visit www.zircon.com/support for the most current instructions.
LIMITED 1 YEAR WARRANTY
Zircon Corporation, (“Zircon”) warrants this product to be free from defects in
materials and workmanship for one year from the date of purchase. Any in-warranty
defective product returned to Zircon*, freight prepaid with proof of purchase date
and $5.00 to cover postage and handling, will be repaired or replaced at Zircon’s
option. This warranty is limited to the electronic circuitry and original case of
the product and specifically excludes damage caused by abuse, unreasonable use
or neglect. This warranty is in lieu of all other warranties, express or implied,
and no other representations or claims of any nature shall bind or obligate Zircon.
Any implied warranties applicable to this product are limited to the one year period
following its purchase. IN NO EVENT WILL ZIRCON BE LIABLE FOR ANY SPECIAL,
INCIDENTAL OR CONSEQUENTIAL DAMAGES RESULTING FROM POSSESSION,
USE OR MALFUNCTION OF THIS PRODUCT.
In accordance with government regulations, you are advised that: (i) some states
do not allow limitations on how long an implied warranty lasts and/or the exclusion
or limitation of incidental or consequential damages, so the above limitations and/
or exclusions may not apply to you, and further. (ii) this warranty gives you specific
legal rights and you may also have other rights which vary from state to state.
Probable Causes Solutions
• No studs in that area.
• Tool was calibrated over a stud
or on dense part of wall.
• Tool tilted or lifted during scan.
• Electrical wiring and metal/plastic
pipes may be near or touching
back surface of wall.
• Move several inches (13–15 cm) to the left or right and start again.
• Turn scanner off, move over a few inches (5–8 cm), press Power button, and
start again.
• On rough surfaces, place thin cardboard on wall, scanning through it to
help slide scanner more smoothly.
• Check for other studs equally spaced to either side (12, 16, or 24 in.
[305, 406, or 610 mm] apart) or the same stud at several places directly
above and below the first scan area.
• Use CAUTION when nailing, sawing, or drilling into walls, floors, and
ceilings where these items may exist.
Return product freight prepaid with proof of purchase date (dated sales
receipt) and $5.00 to cover postage and handling, to:
Zircon Corporation
*Attn: Returns Department
1580 Dell Avenue
Campbell, CA 95008-6992 USA
Be sure to include your name and return address. Out of warranty
service and repair, where proof of purchase is not provided, shall be returned
with repairs charged C.O.D. Allow 4 to 6 weeks for delivery.
Customer Service: 1-800-245-9265 or 1-408-963-4550
Monday–Friday, 8:00 a.m. to 5:00 p.m. PST
E-mail: info@zircon.com
ZirconCorporation ZirconTV
|
ZirconTools
©2014 Zircon Corporation • P/N 66357 Rev A 05/14
ZirconToolPro
ZirconTools
ES
StudSensor
™
L20
Detector de vigas
El localizador de vigas StudSensor™ L20 de Zircon
encuentra los bordes de vigas de madera y metal hasta
¾ pulg. (19 mm) de profundidad en las paredes. Una de
sus caracteristica es que está compuesto de un material liso
de alto impacto con un nuevo diseño patentado de asidero
tipo “pellizco”, y indicador de SpotLite
Indicador de SpotLite
®
.
®
Punto de Referencia
Luz roja BORDE
Luz verde LISTO
Botón Power
(Encendido)
Lengüeta de
Tapa de Batería
1. INSTALAR LA BATERÍA
No intente desatornillar la tapa trasera de la unidad.
Presione la lengüeta de la tapa de
la batería en la parte trasera de la
unidad y ábrala. Inserte una batería
nueva de 9 voltios asegurándose de que
la polaridad de las terminales coincida con
los iconos impresos.
2. CONSEJOS DE FUNCIONAMIENTO
• Posición de la Herramienta: Para el uso adecuado, siempre
coloque el escáner en forma plana contra la superficie antes
de encenderlo.
• Encendido: Oprima y sostenga el botón power (encendido)
continuamente mientras lo está usando.
• Operación: Mover la unidad lentamente, mientras la
mantiene plana contra la pared. No sacudirla, inclinarla, ni
levantarla.
ESCANEO EN DIFERENTES SUPERFICIES
Paredes recien pintadas: Puede tomar una semana o más
para secar después de la aplicación.
Papel de empapelar: El StudSensor
normalmente sobre las paredes cubiertas con papel de
empapelar o tela, a menos que los materiales sean lámina
metálica, contengan fibras metálicas, o aún estén húmedos
después de aplicarlos.
Mallas de yeso y enjarrado: Debido a las irregularidades en
el espesor del enjarrado, esta herramienta no es recomendada
para usarse en mallas de yeso y enjarres.
El StudSensor
madera a través de baldosa de cerámica o alfombra y relleno.
™
L20 no puede escanear los postes y las vigas de
™
L20 funciona
Nota: La detección de la profundidad y la precisión pueden
variar debido a las humedad, el contenido, de los materiales,
la textura de la pared, y la pintura.
ADVERTENCIA
detrás de la superficie escaneada. Utilice otras fuentes
de información para ayudarse a localizar los artículos
antes de atravesar la superficie. Estas fuentes adicionales
incluyen los planes de construcción, los puntos visibles
de entrada de los tubos y cables en las paredes, como en
un sótano, y en separaciones estándar entre las vigas de
16 y 24 pulg. (41 y 61 cm).
No se confíe exclusivamente en el
detector para localizar elementos
3. ENCENDER/CALIBRAR LA UNIDAD
• Cuando se encienda la luz roja
superior que indica el borde
“EDGE”, suena la alarma, y la flecha
del indicador SpotLite
usted habrá encontrado el borde de
la viga. Marque la posición.
• Continúe explorando más allá del
punto marcado hasta que se apague
la luz roja que indica el borde
“EDGE”. Marque este segundo punto.
El centro de la viga es el punto en
medio de los dos.
Y LOCALICE UNA VIGA
• Coloque la unidad en forma plana sobre la pared. Oprima y
sostenga el botón de encendido. Durante la calibración, el
®
en forma de flecha y la luz roja del EDGE deberán
SpotLite
parpadear, la unidad emitirá un sonido y la luz verde READY
permanecerá encendida. No mueva la unidad hasta que no
se complete la calibración.
• Si calibra sobre una viga, la unidad sonorá varias veces.
Mueva la unidad algunas pulgadas (5–8 cm) hacia la derecha
o la izquierda, deje de oprimir el botón de encendido y
comience nuevamente.
• Después de calibrar, continúe
oprimiendo el botón de
encendido y deslice lentamente
la unidad por la superficie.
4. PRECAUCIONES DE
FUNCIONAMIENTO
Dependiendo de la proximidad de los cables eléctricos o
de las tuberías a la superficie de la pared, el StudSensor
L
20 puede detectarlos de la misma manera que vigas.
Siempre se debe tener precaución cuando esté clavando,
serruchando o taladrando en las paredes, pisos, techos
que puedan contenerlos.
ADVERTENCIA
CORRIENTE EN LA PARED. NO TOME MEDIDAS QUE
PUEDAN SER PELIGROSAS SI LA PARED CONTIENE UN
CABLE ELÉCTRICO CON CORRIENTE. SIEMPRE APAGUE
LA ELECTRICIDAD Y DESCONECTE GAS Y FUENTES DE
AGUA ANTES DE ATRAVESAR UNA SUPERFICIE.
EL INCUMPLIMIENTO DE ESTAS INSTRUCCIONES PODRÍA
PROVOCAR UNA DESCARGA ELÉCTRICA, FUEGO, Y/O
LESIONES GRAVES O DAÑOS A LA PROPRIEDAD.
Siempre apague la unidad cuando esté trabajando cerca
de cables eléctricos.
®
se encienda,
NO ASUMA QUE NO HAYA
CABLES ELÉCTRICOS CON
5. CONSEJOS UTILES (Vea también número 2, CONSEJOS DE FUNCIONAMIENTO)
Situación
No indica.
Suena repetidamente
la alarma de la
unidad.
Detecta otros objetos
además de los postes.
Encuentra más
objetos de los que
debería existir.
Advertencia de Registro de la Parte 15 del FCC Clase B
Este aparato cumple con las reglas Parte 15 de la FCC. Su operación esta sujeta a las siguientes dos condiciones: (1) este aparato no puede causar interferencia dañina,
y (2) este aparato debe aceptar cualquier interferencia recibida, incluyendo la interferencia que pueda causar la operación no deseada.
SpotLite, StudSensor, y Zircon son marcas de fábrica registradas o marcas registradas de Zircon Corporation.
™
Visite www.zircon.com/support las instrucciones más actualizadas.
GARANTÍA LIMITADA DE 1 AÑO
Zircon Corporation (“Zircon”) garantiza este producto como libre de defectos en
materiales y mano de obra por un año a partir de la fecha de compra. Cualquier
producto defectuoso dentro de la garantía enviado a Zircon* con el envio pagado,
comprobante de fecha de compra y $5,00 para cubrir porte y manejo, se reparará o
reemplazará a opción de Zircon. Esta garantía se limita a los circuitos electrónicos y
a la caja original del producto y excluye específicamente los daños provocados por
uso indebido, uso no razonable o descuido. Esta garantía está en lugar de todas las
demás garantías, expresas o implícitas, y ninguna otra declaración o reclamación de
cualquier naturaleza será obligatoria para Zircon. Cualquier garantía implícita aplicable
para este producto se limita al periodo de un año inmediato a su compra. EN NINGÚN
CASO, ZIRCON SERÁ RESPONSABLE DE NINGÚN DAÑO ESPECIAL, INCIDENTAL
O RESULTANTE DE LA POSESIÓN, USO O MAL FUNCIONAMIENTO DE ESTE PRODUCTO.
De conformidad con las reglamentaciones gubernamentales, se le notifica que: (i) en
algunos estados no se permiten limitaciones del tiempo de vigencia de una garantía
implícita y/o de la exclusión o limitación de daños incidentales o consecutivos; así que
las limitaciones y/o exclusiones anteriores tal vez no se apliquen para usted, y además,
(ii) esta garantía le otorga derechos legales específicos y usted tal vez tenga otros
Causas Probables Soluciones
• No hay postes en esa zona.
• La unidad está calibrada sobre
un poste o en la parte densa
de la pared.
• La herramienta se inclinó o se
levantó durante el escaneo.
• Cables electricos y las tuberías
de metal o de plástico pueden
estar cerca o tocando la
superficie de la pared.
• Muevas la unidad varias pulgadas (13–15 cm) a la derecha o izquierda,
empiece de nuevo.
• Apague el escáner, muévalo unas cuantas pulgadas (5–8 cm), presione el
botón de encendido y comience nuevamente.
• En superficies rugosas, coloque un cartón delgado sobre la pared, escanee
a través de él para que el escaner se deslice más suavemente.
• Verifique si hay otras espaciadas de manera uniforme a cada lado
(12, 16 ó 24 pulg. [305, 406 ó 610 mm] de distancia) y la misma viga en
diferentes lugares directamente encima o por debajo del primero.
• Tome PRECAUCIONES al clavar, serruchar o taladrar en las paredes, pisos y
techos cuando existan estos artículos.
derechos que varían de estado en estado.
Devuelva el producto con envio pagado y comprobante de la fecha
de compra (recibo de venta fechado) y $5,00 para cubrir el porte y el
manejo, a:
Zircon Corporation
*Attn: Returns Department
1580 Dell Avenue
Campbell, CA 95008-6992 USA
Asegúrese de incluir su nombre y dirección. El servicio y reparación
fuera de garantía donde no se incluya el comprobante de compra se
regresará con cargos de reparación C.O.D. Permita de 4 a 6 semanas
para la entrega.
A la dirección de correo electrónico: info@zircon.com
ZirconCorporation ZirconTV
|
ZirconTools
ZirconToolPro
©2014 Zircon Corporation • P/N 66357 Rev A 05/14
ZirconTools
 Loading...