


Zigmund & Shtain K 006.51 S, K 006.51 W, K 006.71 W, K 007.61 B, K 007.61 W User Manual
...
ANKASTRE ÜRÜNLER BUILT-IN АPPLIANCES INTÉGRÉ DANS DES APPAREILS EINBAUGERÄTE
K 007.61 B K 007.61 S K 007.61 W K 007.61 X K 007.91 B K 007.91 S K 007.91 W K 008.61 B K 008.61 W K 006.51 B K 006.51 S K 006.51 W K 006.71 B K 006.71 S K 006.71 W
K 130.61 A K 130.61 X K 216.61 B K 216.61 W K 216.61 X K 216.91 B K 216.91 W K 216.91 X K 247.61 B K 247.61 W K 247.91 B K 247.91 W K 128.61 W K 128.61 B K 128.61 S
TR
EN
RU
FR
DE
DAVLUMBAZ |
COOKER HOOD |
Вытяжка |
COOKER HOOD |
KULLANMA KLAVUZU |
INSTRUCTION MANUAL |
Руководство по эксплуатации |
INSTRUCTION MANUAL |
DUNSTABZUGSHAUBE
GEBRAUCHSANWEISUNG
DEĞERLİ MÜŞTERİLERİMİZ,
Çevreye duyar lı ve mo dern tesislerde üretilen ve sıkı kali te kontrolden geçirilmiş ürününüzün size en iyi verimi sunmasını arzu ediyoruz. Klavuzun tüm bölümlerini, ürünüzü kullanmadan önce dikkatle okumanızı ve bir başvuru kaynağı olarak saklamanızı önemle rica ederiz.
DEAR OUR CUSTOMER,
We hope that this product, which was manufactured in environment-friendly and modern facilities and released after strict quality control, offers you the highest level
ДОРОГИЕ НАШИ ПОКУПАТЕЛИ,
Мы хотим предложить вам нашу продукцию, выпущенную на современном и экологически безопасном предприятии, прошедшую очень тщательный контроль качества, обладающую лучшей производительностью. Прежде чем приступить к пользованию этим изделием, просим вас внимательно прочесть все разделы руководства пользователя и сохранить эту брошюру в качестве источника информации для дальнейшего обращения.
CHERS CLIENTS,
Vous souhaitez que votre produit soit respectueux de la l’environnement, produit dans des usines modernes et passé par un contrôle qualité rigoureux vous donne la meilleur performance. Nous vous prions de lire toutes les parties de la notice avec attention avant d’utiliser votre produit et de la conserver comme une référence encas de besoin.
LIEBE KUNDEN,
Wir hoffen, dass diese Produkte, welche umweltfreundlich und in modernen Anlagen hergestellt werden und unter strikten Qualitätskontrollen unterzogen werden, Ihnen die höchste Leistung bieten werden. Wir bitten Sie, alle Abschnitte dieser Gebrauchsanweisung vollständig undvorsichtig zu lesen und sie als eine Referenzquelle zu betrachten.
AR
PE

Kullanma Klavuzu |
TÜRKÇE |
|
|
İÇİNDEKİLER
A - GENEL BİLGİLER .............................................. |
Sayfa 1 |
B - GÜVENLİK TALİMATLARI................................... |
Sayfa 1 |
C - MONTAJ TALİMATLARI...................................... |
Sayfa 1 |
D - KULLANIM VE BAKIM......................................... |
Sayfa 2 |
E - FİLTRELER........................................................... |
Sayfa 2 |
F - KUMANDA TİPLERİ ve KULLANIMLARI............ |
Sayfa 2 |
G-SORUNGİDERME................................................ |
Sayfa4 |
H-TEKNİKBÖLÜM................................................... |
Sayfa29 |
A-GENEL BİLGİLER
Değerli Müşterilerimiz
Güvenli montaj ve bakım için kullanma klavuzunuzu dikkatli bir şekilde okunuyunuz, gereken durumlarda kolay ulaşılabilen bir yerde saklayınız.Bu el kitabı birden fazla cihaz için kullanılmaktadır. H-Kodlama Bölümü ile cihazınıza ait modeli tanımlayın. Cihazınızla birlikte her ürün için farklı adet ve ölçülerdeki klapeli baca, baca destek sacı, dübel ve vida tipleri ürün kutusu içinde bulunur. Lütfen kontrol ediniz.
*Ürünümüz sanayi tipi değil ev tipidir.
*Ürünlerimizin montajı yetkili servislerimiz tarafından kontrollü ve gözetimli olarak yapılacaktır.
*Ürünün istemimiz dışında yanlış kurulumundan doğabilecek olan hasarlarla ilgili olarak tarafımızca sorumluluk kabul edilmeyecektir.
*Ürün kutu ve ambalajını garanti kapsamı sürecinde mutlaka koruyunuz ve saklayınız.
*Sürekli gelişme politikamız gereği, ürünlerimiz üzerinde,önceden herhangi bir açıklama yapma gereği olmadan,değişim ve düzeltme hakkımız saklıdır. Revize edilmiş tüm ürünlerimiz sorumluluğumuz altındadır.
* Ürünlerimizin kullanım ömrü 10 yıldır. Bu sürenin kullanıcının ürün kullanma klavuzundaki talimatları eksiksiz uygulamasıyla gerçekleşeceğini unutmayınız.
B-GÜVENLİK TALİMATLARI
*Cihazınızı çalıştırmadan önce voltaj ve elektrik gücünün şebekeye uygunluğunu ürün içindeki elektrik şemasına bakarak kontrol ediniz. Herhangi bir sorunla karşılaştığınızda uzman bir elektrikçiye başvurunuz. Uygunsuz durumlarda cihazı monte ettirmeyiniz.
*Cihazınız için topraklı pirize ihtiyaç vardır. Mutlaka doğruluğunu onaylatınız.
*Davlumbazınız çalışır vaziyette yada fişe takılı iken bakım yapmayınız.
*Aydınlatma açık iken yada uzun süreli kullanımın ardından ampullere yada yakınına dokunmayınız.
*Davlumbazınız çalışırken yüksek harlı ateş ile yemek pişirmeyiniz.
*Kızartma yaparken yüksek sıcaklıktaki yağın neden olabileceği yangın tehlikesini göz önüne alarak yemeğinizi devamlı olarak kontrol ediniz.
*Cihaz çocukların veya gözetim gerektiren yetişkinlerin kullanımı için uygun değildir.
*Cihazınıza talimatlara uygun bir temizleme işlemi yapılmadığı taktirde yangın tehlikesi arz edebilir. Temizliklerini aksatmayınız.
*Davlumbazın hava emiş orta mesafesi ile pişiricinin en üst noktası arasındaki minimum dik mesafe 65 cm olmasına mutlaka uyunuz.
*Ortamdaki sıcak havayı ya da dumanı dışarı atan cihazlar ile davlumbaz hava çıkışını aynı yere bağlamayınız.
*Bacalı bağlantı yapılacaksa bacamızın açık, temiz, geri tepmesiz ve sorunsuz olduğunu tespit ettiriniz.
*Ürünü karbon filtreli kullanıyorsanız kullanım sıklığınıza göre 3-6 ayda bir karbon filtreyi değiştiriniz.
*Dışarıya hava tahliyesi konusunda yerel kanunları göz önünde bulundurunuz.
*Cihazların güvenliğinden sorumlu bir kişi tarafından cihazın kullanımı ile ilgili gözetim ve yönetim sağlanmadıkça bu cihazın fiziksel duyu ve zihinsel yetenekleri özürlü olan ( çocuklar dahil) veya deneyim ve bilgi eksikliği olan kişiler tarafından kullanılması amaçlanmamıştır. Cihazla oynamamalarını güvenceye almak için çocuklar gözetim altında bulundurmalıdır.
*Cihaz, 8 yaş ve üzeri çocuklar ve fiziksel, algısal ve zihinsel yetenekleri azalmış veya tecrübe ve bilgi eksikliği olan kişiler tarafından gözetim veya cihazın güvenli bir şekilde kullanımına ve karşılaşılan ilgili tehlikelerin anlaşılmasına dair talimat verilirse kullanılabilir. Çocuklar cihazla oynamamalıdır.
*Temizleme ve kullanıcı bakımı 8 yaşından büyük ve gözetim altında olmadıkça çocuklar tarafından yapılmamalıdır.
*Elektrikli ocak üstü davlumbaz, gaz ve diğer yakıtları kullanan cihazlarla aynı anda kullanıldığında, odanın havalandırması yeterli olmalıdır.
*Gaz veya diğer yakıtları kullanan cihazlardan çıkan dumanların dışarı atılması için kullanılan baca içine hava kesinlikle boşaltılmamalıdır.
C- MONTAJ TALİMATLARI
Montaj işlemlerini gerçekleştirirken,“madde A ve B ‘deki ”deki güvenlik tedbirlerinin alındığından emin olunuz.
Montaj işlemlerini mutlaka yetkili servislere yaptırtınız. Montaj işlemlerinde sayfa 28’de yer alan Teknik Bölümdeki model seri montaj resimlerine ve aşağıdaki açıklamalara dikkat ediniz.
Davlumbaz İçin;
*Cihaz üzerinden alınacak işaretlemelerle delikler delinip, verilen dübel ve vidalarla ürün gövdesi emniyetli ve doğru şekilde duvara sabitlenir.
*Verilen baca destek sacları, dübel ve vidalarla uygun şekilde duvara sabitlenir. Baca ve gövdeyle bağlantısı yapılır.
*Kullanıcı tarafından temin edilecek uygun çap (tercih çap 150mm) ve boydaki esnek boruyu ürünle verilen redüksüyonlu klapeli (çap 120150mm) ile irtibatlandırılarak diğer ucunun dışarıya /bacaya bağlantısı sağlanır.
*Hava ve titreşim seslerinin olmaması için borunun tam, sızdırmaz ve hareketsiz sabit bağlantılı hale getirilmesini sağlayınız.
1
TÜRKÇE Kullanma Klavuzu
*Elektrik bağlantısı yapılıp çalışma testinden sonra bacalar vidalanarak sabitlenir.
Aspiratör İçin;
*Figur G1 ve G2’daki gibi dolabın içine cihazınızın montaj deliklerini ürünle verilen şablona göre delin.
*Cihazınızı dolap içine yerleştirin ve cihazla beraber gelen m4x40 vidalarla sabitleyin.
*Kullanıcı tarafından temin edilen 100 mm’lik esnek boruyu baca klapesine takın ve hava çıkışını sağlayın.
D-KULLANIM VE BAKIM
*Cihazınızı, pişirme işlemine başlamadan önce çalıştırmanız tavsiye edilir. Ortamdaki yemek kokusunu uzaklaştırmak için cihazınızı yemek pişirme işlemi bittikten sonra 15 dakika daha çalıştırınız.
*Yağ filtresi havadaki yağ zerreciklerini yakalar, cihazınızı kullanım sıklığınıza bağlı olarak filtreniz tıkanabilir. Yangın tehlikesine karşı aşağıdaki talimatlara uygun olarak en fazla 2 ayda bir filtrenizi temizleyiniz.
*Filtreyi cihazınızdan çıkarınız ve su içerisine herhangi bir doğal deterjan ilave ederek yıkayıp, sabundan arındırmaya özen gösteriniz.
*Ilık su ile durulayıp kuruması için bırakınız.
*Filtrenizi dilerseniz bulaşık makinesinde yıkayabilirsiniz (max 40 C).
*Alüminyum panel birkaç yıkamadan sonra renk değiştirecektir. Bu, gayet normal bir durumdur fonksiyonel olarak problem teşkil etmez.
*Karbon filtrenin görevi ortamdaki havayı temizlemektir. Karbon filtreler yıkanmamalı, kullanma sıklığınıza göre en fazla 3-6 ayda bir yenisi ile değiştirilmelidir.
*Cihazınızın yüzeylerini nemli bir bez veya aşındırmayan bir deterjan yardımıyla temizleyiniz. Çamaşır suyu, kezzap gibi aşındırıcılarla ve sert süngerlerle kesinlikle temizlemeyiniz.
*Aydınlatma sistemi yemek pişirirken kullanılmak üzere dizayn edilmiştir. Ortamı aydınlatmak maksadıyla uzun süre kullanılmamalıdır. Bu
aydınlatma ekipmanlarına zarar verebilir.
E-FİLTRELER
Tüm ürünlerimizde yemek buharlarıyla emilen yağ zerreciklerini cihaza girişte yakalamak üzere çok katlı alüminyum kaset filtreler kullanılır. filtreler ürün seri ve tiplerine bağlı olarak farklı boylarda ve çeşitlidirler. Yerine takılıp çıkarılması kolaydır. Doğal deterjanla darbesiz ve baskısız elle yıkanabileceği gibi, bulaşık makinasında da yıkanabilir. Kullanıma bağlı olarak 2-3 ayda bir temizlenmesi hem yangın emniyeti hemde cihaz verimliliği için gereklidir.
İç havanın dışarıya atılamadığı özel durumlarda kullanılmak üzere daha hassas, yağ ve kokuyu alan ve opsiyonel olan YKFA,AC, B, C, E, F ve YKAF-Atipi karbon filtreler ürün seri ve tiplerine bağlı olarak tüm cihazlarımızda kullanılabilir. Karbon filtreler ocak ve yemek yapma sistemine bağlı olarak 3-6 aylık dönemlerle yerine yenisi takılarak değiştirilmesi gerekir. Tip YKFA, C,AC, E : Karbon filtre plastik motor gövdesinin her iki yanındaki tırnaklara oturtulduktan sonra 90° (çeyrek tur) döndürülüp ‘klik’ sesi duyulduğunda montajı tamamlanmış olur. Geri sökmek için bu işlemlerin tersi yapılmalıdır.(Figür E, H). Tip YKF-B, F: Motor kitinin içerisinde bulunduğu metal kutunun önüne takılmaktadır. Filtrenin altındaki tırnaklar kutunun duvara gelen yüzeyindeki deliklere oturtulur daha sonra filtrenin üst kısmındaki klipsler kutunun içerisine doğru itilerek kilitleme yapılır ve montajı tamamlanır. (Figür F). Ürününüzde motor metal bir kutunun içinde ise B tipi, Metal kutu içinde değil iseA,AC, C, E tipi karbon filtre ürününüze uygundur.Ankastre aspiratörlerdeAtipi karbon filtre kullanılır.
İhtiyaç halinde YALF ve YKF filtreleri sayfa 25 Teknik Bölüm 3’deki resimler doğrultusunda, ürünün kodu belirtilerek yetkili satıcı, servis ve tarafımızdan temin edilebilir.
F- KUMANDATİPLERİ VE KULLANIMLARI
Ürününüzde modeline göre değişken olan kumanda tipleri aşağıda açıklanmıştır. Ürününüzün kumanda tipini Madde H’daki ürün kod sisteminden tespit edebilirsiniz.
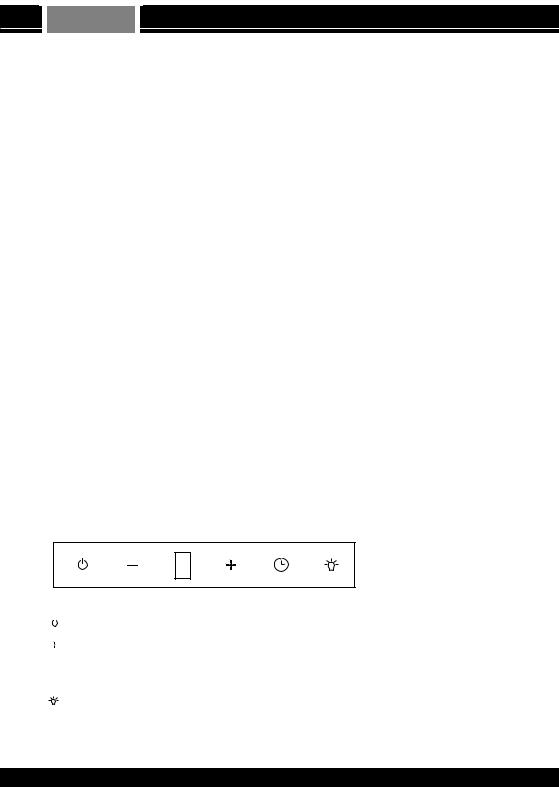
1- TIP TC - DOKUNMATIK KUMANDA TİPİ
5 devirli olarak programlanmıştır. T2004-1 ve T2004 motorlarda kullanılmaktadır.
|
|
M.On/Off Butonu |
:Motoru açıp-kapamaya yarar. Motor başlangıçta 3.devirden başlar. |
|
|||
|
|||
|
|
(eksi) Butonu |
:Devir eksiltme tuşudur. Butona basılı tutularak devirler ardı ardına azaltılabilir. Min 1. devir |
|
|
||
|
|
(artı) Butonu |
:Devir arttırma tuşudur. Butona basılı tutularak devirler ardı ardına arttırılabilir. Max 5. devir |
 Turbo Timer Butonu Turbo: Timer tuşuna basıldığında motor en yüksek devirde çalışmaya başlar ve 5 dakika sonra kapanmaya programlanmış olur. Turbo timer devrede iken DEVİR– veya DEVİR+ butonuna basıldığında motor turbodan önceki devrine geri döner ama timer devam eder. Timer devrede iken turbo timer led’i yanar. 5 dakika dolduğunda motor kapanır. Lambanın durumunda bir değişiklik olmaz. Timer devrede iken timer tuşuna basılırsa motor kapatılır.
Lamba Butonu |
:Lamba/Led açıp-kapamaya yarar. Kısa basılırsa lamba, 3 saniye basılı tutulursa led kumanda edilir. Led ve |
aydınlatma beraber çalışabildiği gibi birbirinden bağımsızda çalışabilir. |
|
Filtre Uyarısı |
:Motor 60 saatlik çalışma süresine ulaştıktan sonra filtreyi temizleyin veya değiştirin (filtre tipine göre) anlamında 5 |
saniye boyunca ekrana ‘ C ‘ (Clean or Change) yazılacaktır. Motor her açıldığında ‘ C ’ uyarısı yeniden verilerek kullanıcıya hatırlatılır. Filtre süresini sıfırlamak için (-) tuşuna ekranda ‘ E ‘ (Erased) yazana kadar (yaklaşık 5s.) basılır ve 60 saatlik süreç yeniden başlatılmış olur.
2
Kullanma Klavuzu |
TÜRKÇE |
|
|
|
|
|
|
|
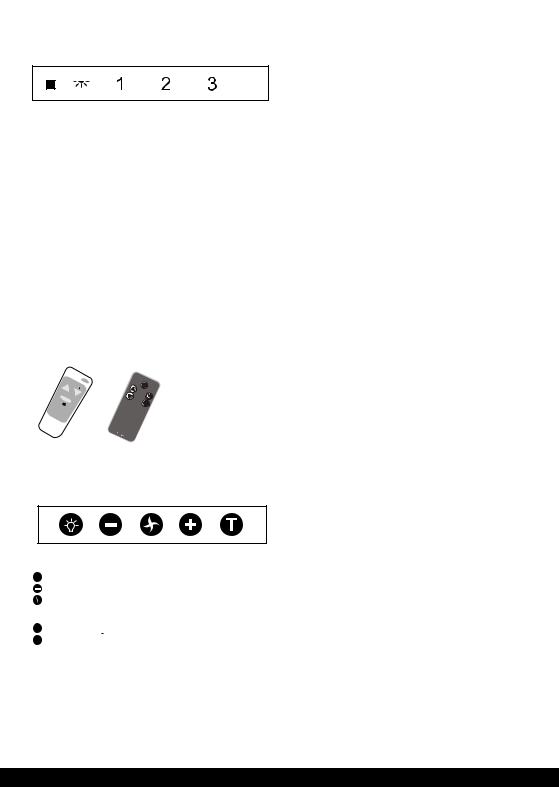
2 - TİP TC - SIRALI DOKUNMATIK KUMANDA TİPİ
3 devirli olarak programlanmıştır. T2004-1 ve T2004 motorlarda kullanılmaktadır.
1-2-3:Motoru açıp-kapamaya yarar. Motor başlangıçta 2.devirden başlar. Hangi devirde çalıştırlmak isteniyorsa o devir butonuna basılır.
Motor Butonu:
1-On/Off ile motor çalıştırldıktan sonra motoru 1. devirde çalıştırır. 2-On/Off ile motor çalıştırldıktan sonra motoru 2. devirde çalıştırır. 3-On/Off ile motor çalıştırldıktan sonra motoru 3. devirde çalıştırır.
Timer: Motor hangi devirde çalışıyorsa o devir butonuna yaklaşık 2 saniye basıldığında, 5 dakikalık kapanma timer’ı başlar. Timer kurulu iken hangi devirde timer aktif edildi ise o devrin LED’i flaşlar. 5 dakika dolduğunda motor ve açıksa lamba kapanacaktır.
Motor kapatıldığında veya devir değiştirildiğinde timer iptal edilmiş olur.
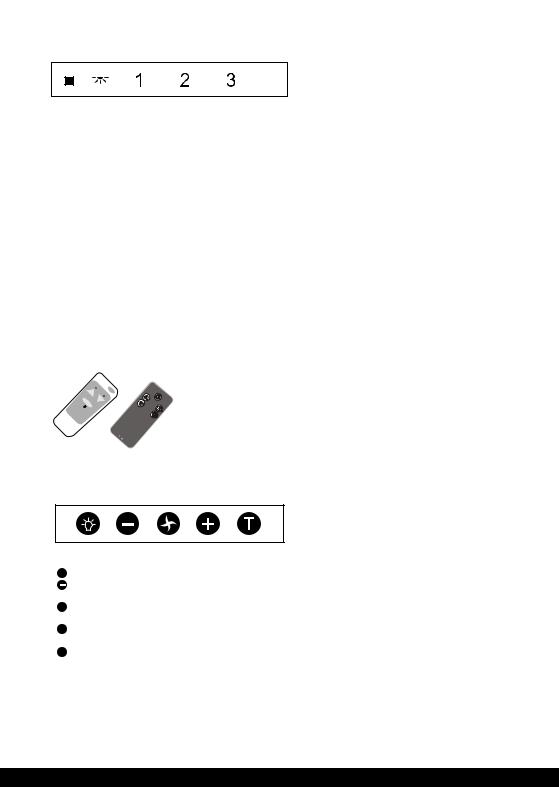
Bu kumandaya sahip ürünü uzaktan kumandası ile (Şekil 4) kontrol edebilirsiniz.
(Şekil 4)
Uzaktan Kumanda El aleti
3- TİP HM - MULTICOLOR KUMANDA TİPİ
9 devir olarak programlanmıştır. T2004-1 ve T2004 motorlarda kullanılmaktadır.
 Lamba Butonu: Lamba tuşu aspiratörün aydınlatmasını devreye alıp çıkartır. Lamba yanarken lamba led’i yanar.
Devir – Butonu: Motor çalışıyorken çalıştığı deviri azaltmayı sağlar. – butonu ile en düşük devire gelindiğinde – led’i flaşlar.
 On / Off Butonu: Motor duruyorken motoru çalıştırmayı, çalışıyorken durdurmayı sağlar. Motor çalışmaya en son kapatıldığı devirden başlar.
 Devir + Butonu: Motor çalışıyorken çalıştığı deviri artırmayı sağlar. + butonu ile en yüksek devire gelindiğinde + led’i flaşlar.
 Turbo Timer Butonu: Turbo Timer tuşuna basıldığında motor en yüksek devirde çalışmaya başlar ve 5 dakika sonra kapanmaya programlanmış olur. Timer devrede iken DEVİR– veya DEVİR+ butonuna basıldığında motor turbodan önceki devrine geri döner ama timer devam eder. Timer devrede iken turbo timer led’i yanar. 5 dakika dolduğunda motor kapanır. Lambanın durumunda bir değişiklik olmaz. Timer devrede iken timer tuşuna basılırsa motor kapatılır.
Filtre Uyarısı:
Motor 60 saatlik çalışma süresine ulaştıktan sonra:
Filtre için uyarı süresi dolu iken M.on/off veya turbo timer tuşu ile motor açıldığında M.on/off led’i yaklaşık 5 saniye flaşlar.
Filtre temizlendikten sonra, M.on/off tuşuna uzun basarak (yaklaşık 3 saniye) filtre süresini sıfırlayabilirsiniz. Filtre süresi sıfırlandığında M.on/off led’i bir kez yanıp söner.
3
TÜRKÇE Kullanma Klavuzu
4- TİP PB - PUSH BUTTON KUMANDALI TİP
5- TİP SA - SLIDER KUMANDALI TİP
AHŞAP KUŞAK
Rustik serisi davlumbazların alt kısmında yer alan, kolay şekillenen, nem ve ısıdan
etkilenmeyen, 1. sınıf fırınlanmış malzemeden yapılmış ahşap kuşaktır. Ürününüzü satın aldığınızda, kuşağı boyasız ve hamdır. Mutfağınızla ile uyumlu olması için tarafınızdan belirlenen renk ile boyatabilirsiniz. Boyanmış kuşak ürünün alt kenarında bulunan kuşak yuvasına yerleştirilip, geriye itilir ve vidalanarak ürün üzerine montajı
yapılır.
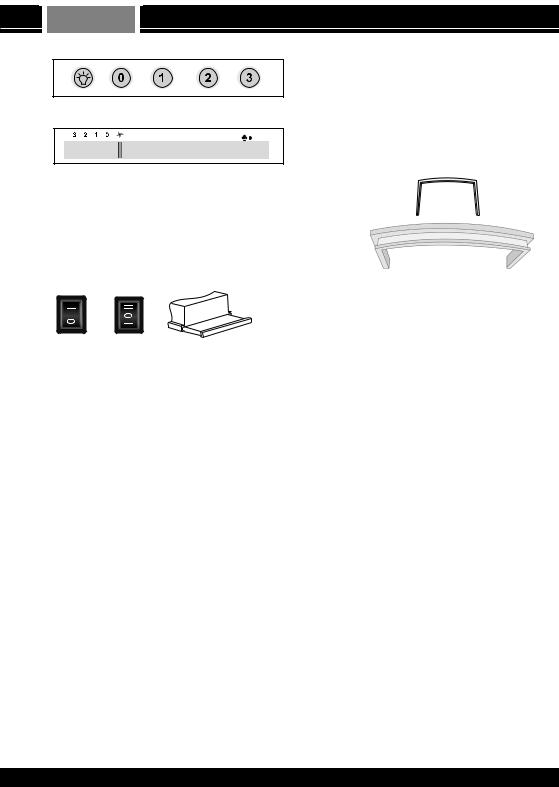
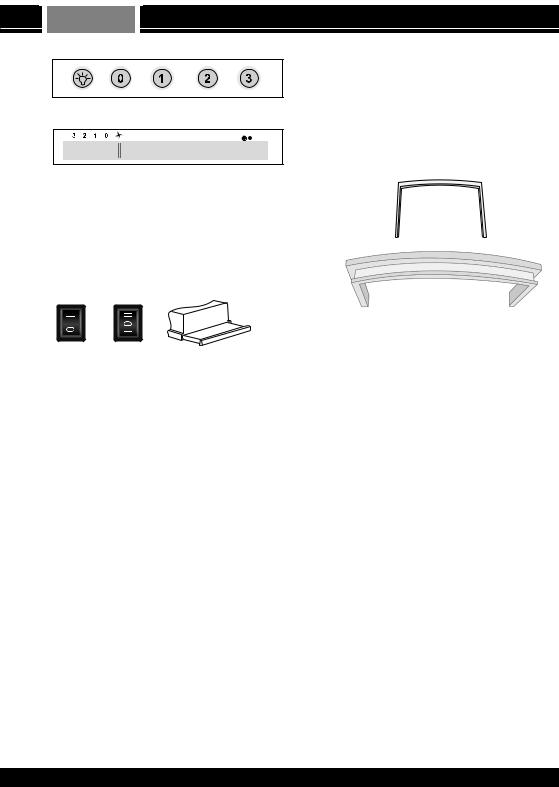
6- TİP LR - ANKASTREASPİRATÖR KUMANDA TAKIMI
2 devirli olarak GR114 motorlarda mekanik olarak kullanılır.
0 - 1 : Aydınlatma butonu ( 0 konumunda kapalı, I konumdada açık)
0 - I - II : Devir butonu (0 konumunda kapalı, I konumunda minumum devir, II konumunda maximum devirde) Sürgü sacı çekili değil ise motor ve aydınlatma çalışmayacaktır.
G-SORUN GİDERME
*Cihaz çalışmıyor : Öncelikle güç kaynağına bağlı olup olmadığını kontrol ediniz. Sürgülü aspiratörde sürgü sacının çekili olup olmadığını kontrol ediniz.
Cihaza güç geldiği halde çalışmıyorsa sadece uzman servis personeli sizlere yardımcı olabilir.
Servisi arayın,servis dışında tamir ettirmeye çalışmayın aksi durumda cihazınız garanti kapsamı dışında kalacaktır.
*Cihaz yeteri kadar çekmiyor : Karbon filtre ile kullanıyorsanız değişim zamanı gelmiş olabilir yenisi ile değiştirin. Karbon filtreli değil ise Alüminyum filtreler temizlenmesi gerekebilir. Bacanın tıkalı olup olmadığını kontrol ediniz.
*Işık yanmıyor : Ürünün aydınlatma ampulleri gevşemiştir. Gevşek ise sıkın. Yanmış ise yenisi ile değiştirin. Maksimum ampul gücü ürün içerisinde belirtilmiştir.
4

Instruction Manual |
ENGLISH |
|
|
CONTENTS
A- GENERAL INFORMATION.................................... |
Page 5 |
B-SECURITYINSTRUCTIONS.................................. |
Page5 |
C- INSTALLATION INSTRUCTIONS ......................... |
Page 5 |
D-USEANDMAINTENANCE..................................... |
Page6 |
E - FILTERS................................................................. |
Page 6 |
F- CONTROLLER TYPES AND USE........................ |
Page 6 |
G - TROUBLESHOOTING. ....................................... |
Page 8 |
H - TECHNICALSECTION......................................... |
Page29 |
A-GENERAL INFORMATION
Dear Customers,
Please read the user’s manual for safe mounting and maintenance and keep it in an accessible location for easy urgent acces. This manual was prepared for more than one device. Refer to Seciton H - Coding for your device’s model.
Flap flues, flue supporting plate, fixing plugs and screws are provided inside the product package in different sizes and dimensions for each product. Please check the package for them.
*This product is not for industrial use; it is for domestic use.
*Installation of our products will be carried out by our authorized service providers in a controlled and supervised manner.
*We cannot be held responsible for damages arising from inappropriate installation of the product by incompetent persons who are not part of our authorized service.
*Keep and maintain the product package throughout the product’s warranty period.
*As required for our constant development policy; we reserve the right to carry out modifications and corrections on our products without prior notice. We hold the sole responsibility for all of our revised products.
*The life of service for our products is 10 years. Note that this life of service is valid only if the user fully complies with the instructions provided in the user’s manual.
B-SECURITY INSTRUCTIONS
*Check the product’s power diagram to make sure that the device’^s power and current requirements are appropriate for your power circuit. In case you experience a problem, consult an competent electrician. Do not install the device in case of inappropriate circumstances.
*You need a earthed plug for your device. Ensure that your plug is earthed.
*Do not carry out maintenance operations while your fume hood is on.
*Do not touch the light bulbs or their surrounding area when the lighting is on or has been used for a long time.
*Do not cook on high temperatures while your fume hood is operating.
*Check your food regularly in case a fire might break out due to hot oil when frying food.
*This device is not appropriate for use by children or adults who require supervision.
*In case the device is not cleaned in accordance with cleaning instructions, risk of fire will be present. Do not neglect cleaning the device.
*Ensure, at al times, that there is a vertical distance of 65 cm between the middle suction area of the fume hood and the top point of the cooker.
*Do not connect ventilation devices evacuating warm air or smoke and the air evacuation output of the fume hood in the same area.
*If a flue connection is to be established; have your flue checked to ensure that it is clean, unobstructed, recoilles and problem-free.
*If you are using carbon filters on your product, replace the carbon filter in every 3 to 6 months in accordance with your frequency of use.
*Comply with local regulations for evacuation of air.
*This appliance is not manufactured for use by people who have disability about physical, sense and mental ability (including children) or people who lack experience and knowledge without supervision or management of the person who responsible about safety of this appliance.
*Keep children under supervision to ensure, they do not play with the appliance.
*Appliance can use by 8 years old and older children and people with reduced physical,sense and mental ability or people who lack experience and knowledge with under supervision or use the appliance safely and introduction is given for understanding of the dangerous. Children do not play with appliance.
*Cleaning or user maintenance can not be done by children are older then 8 years old and without supervising. *If you will use cooker hood with appliences that are used with gas or other fuels, ventilation should be enough. *Do not blow air in to the appliance that are used with gas or other fuels in order to expel smoke.
C- INSTALLATION INSTRUCTIONS
Prior to carrying out maintenance operations, ensure that the safety precautions specified inArticleAand B have been taken.
Ensure that istallation is carried out by the authorized service provider. Take into consideration the model verions, series and installation figures given in page 29 as well as the following instructions for the installation process.
For the fume hood;
*Drill holes on the points marked on the device and safely fix the device body on the wall using the fixing pulgs and screws that come in the product package.
*Fix the provided flue support plates to the wall using the fixing plugs and screws. Connect the flue to the device body.
*Connect a flexible pipe of appropriate diameter (150 mm preferred) and length to be provided by the user to the reducing flap flue (120 to 150 mm of diameter) and ensure that the other end goes outside.
*To avoid vibration and suction noise, ensure that the pipe is leakage-free, its connection is appropriate and it does not move.
*Fix the flues using screws after carrying out the power connection and the operation test.
5
ENGLISH Instruction Manual
For the ventilation hood;
*Drill the holes as shown in Figure G1 and G2 inside your closet according to the template provided with the product.
*Place the device inside the closet and fix it using the m4x40 screws that come with the device.
*Connect the 100 mm flexible pipe provided by the user to the the flue flap and ensure air discharge.
D-USEAND MAINTENANCE
*You are advised to start your device before starting cooking. Keep your device operating for 15 minutes after finishing cooking in order to eliminate the food smell in the room.
*The oil filter will capture oil particles in the room and this filter might get clogged in accordance with your frequency of use. Comply with the following instructions and clean your filter at least once in every 2 months in case of risk of fire.
*Remove the filter from your device. Wash it using any type of natural detergent in water and rinse it thoroughly without leaving detergent residues on it.
*Rinse with warm water and leave it to dry.
*You can wash your filter in your dish washer (max 40 C).
*The aluminum panel will change color after being washed a couple of times. This is totally normal and it will not cause any functional problem.
*The function of the carbon filter is to clean the air in the room. Carbon filters should be cleaned regularly and replaced within every 3 to 6 months in accordance with your frequency of use.
*Clean the surface of your device using a damp piece of cloth and a non-abrasive detergent. Do not, under any circumstances, clean it using abrasive substances like vitriol or bleachers or rough pieces of sponge.
*The lighting system is designed to be used while cooking. It should not be used to illuminate the room for prolonged periods. This might damage
the lighting equipment.
E-FILTERS
Aluminum cartridge filters are used in all of our products in order to capture oil particles sucked along with food vapor before they enter the device. These filters vary in size and type in accordacne with the product series and types. They are easy to remove and reassenble. They can washed in hand without applyinh pressure or impacts using natural detergents and they can be washed in dish washers as well. Cleaning filters once in every 2 to 3 months in accordance with frequency of use is crtitical for both fire safety and device efficiency.
More sensitive optional YKFA,AC, B, C, E, F and YKAF-Atype carbon filters can also be used in all of our products in accordance with product series and types in order to evacuate oil particles in the air and odour in special cases where the indoor air cannot be evacuated. Carbon filters should be replaced in every 3 to 6 months in accordance with stove and cooking systems. Type YKFA,AC,C, E :After locating the carbon filter on the lugs at both sides of the plastic engine body, turn it 90° (a quarter turn) and the assembly will be completed when you hear the ‘click’ sound. Retrace these steps to disassemble it (Figure E, H). Type YKF-B, F: This should be located in front of the metal box in which the engine kit is located. Locate the lugs under the filter on the holes on the surface of the box which faces the wall and finish the assembly by pushing the clips on the upper section of the filter towards the inside of the box (Figure F). If the engine is located inside a metal box in your product, then typeA, AC, C, E carbon filters are convenient for your product. TypeAcarbon filters are used for flush ventilation hoods. In case you need YALF and YKF filters, they can be purchased from the authorized service provider or our company after selecting your filter from the figures in subsection 3 of the Technical Section.
F- CONTROLLER TYPESAND USE
Controller types which vary depending on your product model are described below. You can determine the controller type for your product by checking the product code section ofArticle H.
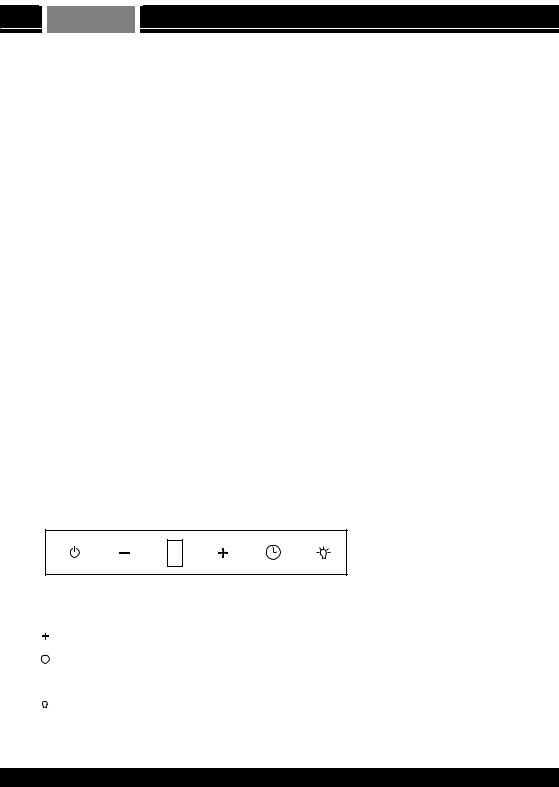
1- TYPE TC -
It was designed with 5 rotation speeds. It is used for T2004-1 and T2004 engines.
 M.On/Off Button: It turns the engine on and off. The engine will start at the 3nd cycle at startup.
(minus) Button: This is the rotation speed reduction button. You reduce rotation speed by keeping this button pressed. The minimum rotation speed is 1.


 (plus) Button: This is the button for increasing rotation speed. You can incerase rotation speed by keeping this button pressed. The maximum rotation speed is 5.
 Turbo Timer Button: When you press the Turbo Timer button, the engine will operate at the highest rotation speed and it will be programmed for automatic shutdown after 5 minutes. The motor operation will revert to normal if you press ROTATIONor ROTATION+ when the turbo timer is on but the timer will continue. When the times is on, the timer led will be on and automatic shutdown will initiate after 5 minutes. The state of the led light will not change though. The engine will shut down if the timer button is pressed when the timer is on.
 The Light Button: This button is for turning the Light/Led on and off. If you briefly press it, the light will be turned on and if you keep it pressed for 3 seconds, the led light will be turned on. The led light and lighting system can be turned on at the same time and they can also operate separately.
Filter Warning: ‘C’ (Clean or Change) warning will be displayed on the indicator after the engine reaches 60 hours of operation. This requires the user to clean or replace the filter (in accordance with your filter type). Keep the (-) button pressed until ‘E’ (Erased) is displayed on the indicator (for about 5 seconds) in order to reset the filter time.
6
Instruction Manual |
ENGLISH |
|
|
|
|
2 - TYPE - SEQUENTIAL TOUCH SCREEN REMOTE CONTROL
Programmed in 3 cycles - Used for T2004-1 and T2004 engines
1-2-3:Turns on and off the engine. The engine initially starts from the 2nd cycle. Push the button of the cycle that you want to operate.
Engine Button:
1-After the engine is started with On/Off, it operates the engine in the 1st cycle. 2-After the engine is started with On/Off, it operates the engine in the 2nd cycle. 3-After the engine is started with On/Off, it operates the engine in the 3rd cycle.
Timer: When the button of the cycle in operation is pushed for approximately 2 seconds, 5-minute countdown timer starts. When the timer is set, the LED of the cycle in which the timer was activated flashes.After 5 minutes expire, the engine and the lamp, if on, will switch off. Timer is cancelled when the engine is switched off or the cycle is changed.
You can control devices with this controller by using the its remote controller (Figure 4)
(Figure 4) Remote
Controller
3- TYPE HM - MULTICOLOR CONTROLLER
It is programmed with 9 rotation speeds. It is used for T2004-1 and T2004 engines.
 Lamp Button: The lamp button controls the ventilation hood’s lighting. The led will be on when the lighting is on.
Rotation Speed Button: It reduces rotation speed while the engine is operating. When the lowest value is reached by pressing the -- button, the -- led will flash.
 On / Off Button: It stops the engine while it is operating and starts it when it is off. The engine will start its operation at the last rotation speed set prior to shutdown.
 Rotation + Button: It increases rotation speed while the engine is operating. When the lowest value is reached by pressing the + button, the + led will flash.
 Turbo Timer Button: When you press the Turbo Timer button, the engine will operate at the highest rotation speed and it will be programmed for automatic shutdown after 5 minutes. The motor operation will revert to normal if you press ROTATIONor ROTATION+ when the timer is on but the timer will continue. When the times is on, the timer led will be on and automatic shutdown will initiate after 5 minutes. The state of the led light will not change though.
If you press the timer button when the timer is on, the engine will shut down.
Filter Warning:
After the engine reaches 60 hours of operation period: The M.on/off led light will flash for 5 seconds when the warning period is expired after starting the engine by pressing either the M.on/off or the turbo timer button.
After cleaning the filter, you can reset the filter time by keeping the M.on/off button pressed (for about 5 seconds). When the filter time is reset, the M.on/off led light will flash once.
7
ENGLISH Instruction Manual
4- TYPE PB - PUSH BUTTON REMOTE CONTROLLED TYPE
5- TYPE SA - SLIDER REMOTE CONTROLLED TYPE
WOODEN BELT
It can be used in all types of engines with 3 rotation speeds. Lamp Button: It turns the lamp on and off.
Rotation Speed Buttons: You can adjust engine rotation speed by pressing the 1, 2 and 3 buttons.
Engine Shutdown: The engine can be shut down by pressing the 0 button.
It can be used for T2004 engines with 3 rotation speeds.
Rotation Slider : You can select 1, 2 or 3 with the slider to set rotation speed.
Lamp Slider : It turns the lamp on and off.
Wooden belts are located on the lower section of Rustik series fume hoods. They are heat and humidity resistant, easy to shape amd manufactured from 1st class materials. The belt will be unpainted. You can paint it with the color of your choice in order to ensure that it fits your kitchen decoration. Locate the painted belt in the belt housing on the lower corner of the device, push it backwards and assemble by
screwing it on the product.
6- TYPE LR - BUILT-IN VENTILATION HOOD REMOTE CONTROLLER SET
It can be used as a 2-rotation speed mechanical controller for GR114 engines. 0 - 1 : Lighting button ( 0 off, I on)
0 - I - II : Rotation speed button (0 off, I minimum rotation speed, II maximum rotation speed) If the slider plate is not pulled, engine and lighting will not function.
G-TROUBLESHOOTING
*The device will not start: First, check power connection. If you have a slider ventilation hood, check whether the slider plate is pulled. If the device will not start although there are no power connection problems, expert service personnel will help you.
Call the service and do not try to manually repair it by yourself. Otherwie, your device’s warranty will become void.
*Device suction is insufficient: If you are using a carbon filter, its life of service might have expired. Replace it. If you do not use a carbon filter, your aluminum filter might need cleaning. Check that the chimney is blocked.
*The light will not be lit: The lighting bulbs might have gotten losse. If so, retighten them. If they are out of order, replace them. Maximum light bulb power is specified on the device.
8

|
|
Руководство по эксплуатации |
Русский |
|
|
|
|
|
|
Содержание |
|
|
|
|
...........................................A-ОБЩИЕ СВЕДЕНИЯ |
9 |
|
|
|
B-ИНСТРУКЦИИ ПО ТЕХНИКЕ БЕЗОПАСНОСТИ 9 |
|
|
||
C- ИНСТРУКЦИИ ПО МОНТАЖУ ......................... |
9 |
|
|
|
D-ПРИМЕНЕНИЕ И ОБСЛУЖИВАНИЕ .................... |
10 |
|
|
|
E-ФИЛЬТРЫ ............................................................. |
10 |
|
|
|
F-ВИДЫПАНЕЛИУПРАВЛЕНИЯИ ПРИМЕНЕНИЕ 10 |
|
|
||
G-УСТРАНЕНИЕНЕИСПРАВНОСТЕЙ .................... |
12 |
|
|
|
H - ТЕХНИЧЕСКИЕ ХАРАКТЕРИСТИКИ.............. |
29 |
|
|
|
A-ОБЩИЕ СВЕДЕНИЯ
Уважаемые клиенты!
С целью выполнения надежного монтажа и обслуживания, внимательно прочтите это руководство и сохраните в доступном месте для получения необходимой информации в дальнейшем.Эта брошюра была подготовлена для нескольких моделей изделий. Описание модели прибора приобретенного вами дается в разделе под кодом “H”.
В комплекте с изделием в коробке поставляются в разном количестве и разном диаметре: дымовыводящая труба с заслонкой, опорный лист трубы, винтовые крепежные элементы (опорные штифты, шурупы). Пожалуйста, проверьте.
* Данное изделие должно использоваться в домашних условиях в соответствии с данной инструкцией.
*Монтаж данного изделия должен производиться только квалифицированным персоналом, в соответствии с рекомендациями производителя. *Производитель не несет ответственности за ущерб, причиненный в следствие неправильной установки устройства.
*Обязательно сохраните целостность упаковки изделия в течение всего гарантийного срока.
* В рамках нашей политики непрерывного развития, фирма сохраняет за собой право на внесение любых изменений и исправлений в продукцию, без необходимости в предварительном уведомлении. Вся пересмотренная продукция находится под нашей ответственностью. * Срок службы изделия 10 лет. Строго соблюдайте все инструкции, изложенные в данном руководстве.
B- Инструкция по технике безопасности
* До начала экплуатации устройствавнимательно проверьте напряжение и иные электрические параметры, указанные в электросхеме тому
напряжениюипараметрам,которыеимеютсяввашейэлектросети.Вслучаевозникновениялюбогосомнения,обрати тесь к квалифицированному специалисту. Не следует начинать монтаж устройства в случае каких-либо несоответствий.
*Для подключения этого устройства необходимо наличиерозетки с заземлением.Электрическая безопасность гарантирована только при наличии
эффективного заземления, Если возникли сомнения, свяжитесь со специалистом, который проверит Вашу систему заземления. |
|
* |
Перед выполнением любой операции по обслуживанию или чистке, отсоедините вытяжку от электрической сети, вынув вилку из розетки. |
* |
Не прикасайтесь к лампочкам или прилегающим к ним зонам в процессе работы системы освещения или сразу же после её выключения. |
* |
Избегайте открытого пламени, так как оно повреждает фильтры и может привести к возгаранию. Запрещается готовить блюда на открытом |
пламени под кухонной вытяжкой. |
|
* |
В процессе жарки продуктов во фритюренепрерывно следите за процессом во избежание возгорание кипящего масла. |
*Устройство не рассчитано на эксплуатацию детьми или недееспособными лицами без контроля. Не разрешайте детям играть с изделием. |
|
* |
В случае выполнения операций по чистке без соблюдения инструкций существует опасность возгорания. Не нарушайте инструкцию по чистке устройства. |
* |
Обязательно соблюдайте расстояние между нижней частью кухоннойвытяжки ирабочей поверхностью кухонной плиты, минимальная дистанция |
должна составлять не менее 65 см. |
|
* |
Никогда не используйте выходное отверстие вытяжки для подключения другого оборудования по отводугорячего воздуха идыма из |
помещения. |
|
* Выполняя крепление трубы дымохода, необходимо обязательно обеспечить свободный, чистый и безоткатный (препятствующий обратному ходу) проход, и убедиться в том, что выбранная позиция обеспечит безупречную работу вытяжки.
*Если в устройстве используется угольный фильтр, то этот фильтр необходимо производить смену фильтра 1 раз в течение 3-6 месяцев. *Утилизируйте продукты сгорания с соблюдением правил охраны окружающей среды.
C- ИНСТРУКЦИИ ПО МОНТАЖУ
Прежде чем перейти к монтажу устройства, необходимо убедиться в том, что все меры по технике безопасности, приведенные в разделах "A и B", выполнены.
Для выполнения монтажа обязательно пригласите представителя авторизованного сервиса. Следите за тем, чтобы последовательность монтажных операций соответствовала рекомендациям (см. 29-ю страницу технического раздела).
Для корпуса вытяжки:
*Обозначьте положение винтов и контур области установки, просверлите отверстия для крепления устройства.
*Для безопасного крепления вытяжки используются опорный лист, опорные штифты и шурупы. Выполните соединение корпуса вытяжки с дымовыводящей трубой.
*С помощью гибкой трубы соответствующего диаметра (предпочтительно 120-150 мм), соедините трубу, которая идет в комплекте с устройством, с редукторным переходником и заслонкой (диаметром 120-150 мм), другой конец выведите наружу и присоедините к центральной дымовыводящей трубе, если такая имеется.
* Чтобы не допустить появления звуков от потока воздуха и вибрации, место соединения должно выполняться полностью герметичным, а вся конструкция должна быть неподвижной.
* Труба фиксируется после подключения к электросети и рабочего испытания.
Для корпуса вытяжки:
*В соответствии с прилагаемым к устройству шаблоном, просверлите внутри шкафа монтажные отверстия, как показано на рис. “G1” и “G2”. *Поместите устройство внутри шкафа и прикрепите с помощью винтов М4x40.
*С помощью гибкой трубы диаметром 100 мм, наличие которой должно быть у пользователя, соедините устройство с дымовыводящей трубой с заслонкой и выведите конец трубы наружу.
9
 Loading...