


0Š/kŠkÅ 3Åk¿ÅÌ ×Šbk
žÂÌ·kÌ>kNÂ@Ì¥æz0lÔ @šbÌ¥Êæ0ÔÌ,ŠšÎkÂÅ
Customer Order # 11991L
Manufacturer Part # 11991LB Rev. 2
3URSULHWDU\ 6WDWHPHQW
This manual contains proprietary information of Zebra Technologies Corporation. It is intended solely for the information and use of parties operating and maintaining the equipment described herein. Such proprietary information may not be used, reproduced, or disclosed to any other parties for any other purpose without the expressed written permission of Zebra Technologies Corporation.
3URGXFW ,PSURYHPHQWV
Continuous improvement of products is a policy of Zebra Technologies Corporation. All specifications and signs are subject to change without notice.
)&& &RPSOLDQFH 6WDWHPHQW
Note: This equipment has been tested and found to comply with the limits for a Class A digital device, pursuant to Part 15 of the FCC Rules. These limits are designed to provide reasonable protection against harmful interference when the equipment is operated in a commercial environment. This equipment generates, uses, and can radiate radio frequency energy and, if not installed and used in accordance with the instructions manual, may cause harmful interference to radio communications. Operation of this equipment in a residential area is likely to cause harmful interference in which case the user will be required to correct the interference at his own expense.
In order to ensure compliance, this printer must be used with a Shielded Power Cord and Shielded Communication Cables.
“The user is cautioned that any changes or modifications not expressly approved by Zebra Technologies Corporation could void the user’s authority to operate the equipment.”
&DQDGLDQ '2& &RPSOLDQFH 6WDWHPHQW
This digital apparatus does not exceed the Class A limits for radio noise emissions from digital apparatus as set out in the radio interference regulations of the Canadian Department of Communications.
/LDELOLW\ 'LVFODLPHU
Zebra Technologies Corporation takes steps to assure that its published Engineering Specifications and Manuals are correct; however, errors do occur. Zebra Technologies Corporation reserves the right to correct any such errors and disclaims liability resulting therefrom.
1R /LDELOLW\ IRU &RQVHTXHQWLDO 'DPDJH
In no event shall Zebra Technologies Corporation or anyone else involved in the creation, production, or delivery of the accompanying product (including hardware and software) be liable for any damages whatsoever (including, without limitation, damages for loss of business profits, business interruption, loss of business information, or other pecuniary loss) arising out of the use of or the results of use or inability to use such product, even if Zebra Technologies Corporation has been advised of the possibility of such damages. Because some states so not allow the exclusion or limitation of liability for consequential or incidental damages, the above limitation may not apply to you.
&RS\ULJKWV
This copyrighted manual and the label printer described herein are owned by Zebra Technologies Corporation. All rights are reserved. Unauthorized reproduction of this manual or the software in the label printer may result in imprisonment of up to one year and fines of up to $10,000 (17 U.S.C.506). Copyright violators may be subject to civil liability.
© 2001 Zebra Technologies Corporation. All rights reserved.
All products and brand names are trademarks of their respective companies. All rights reserved.
Zebra S-Series User’s Guide |
ii |
2AO’lÍŸyÍ Ÿ›Ïl›ÏÆ
›ÏßcØYÏ‹Ÿ› ³³³³³³³³³³³³³³³³³³³³³³³³³³³³³³³³³³³³³³³³³³³³³³³³³³³³³³³³³³³³³¦
Scope........................................................................................................................ |
1 |
Model Designation................................................................................................... |
1 |
System Overview ..................................................................................................... |
2 |
Communication Capabilities .............................................................................. |
2 |
Thermal Transfer Printer Internal Functions ...................................................... |
2 |
Print Mechanism Capabilities............................................................................. |
2 |
Media Transport Mechanism Capabilities.......................................................... |
3 |
Additional System Requirements ............................................................................ |
3 |
Media and Ribbon Requirements............................................................................. |
4 |
Warnings and Precautions........................................................................................ |
4 |
Installation .......................................................................................................... |
4 |
230 VAC Operation............................................................................................ |
4 |
Use of Shielded Cable ........................................................................................ |
5 |
Ribbons and Printhead Wear .............................................................................. |
5 |
Repacking ........................................................................................................... |
5 |
›ÆÏA’’AÏ‹Ÿ›³³³³³³³³³³³³³³³³³³³³³³³³³³³³³³³³³³³³³³³³³³³³³³³³³³³³³³³³³³³³³³³Ê
Unpacking ................................................................................................................ |
7 |
Inspection ................................................................................................................. |
7 |
Reporting Damage ................................................................................................... |
7 |
Storage and Reshipping ........................................................................................... |
8 |
Power Connection .................................................................................................... |
8 |
AC Voltage Selection Procedure ........................................................................ |
8 |
AC Power Fuse Replacement ............................................................................. |
9 |
115 VAC Operation.......................................................................................... |
10 |
230 VAC Operation.......................................................................................... |
10 |
Site Requirements .................................................................................................. |
10 |
Ribbon Loading (105Se)........................................................................................ |
11 |
Ribbon Loading (160S).......................................................................................... |
14 |
Zebra S-Series User’s Guide |
iii |
Media Loading....................................................................................................... |
15 |
Roll Media........................................................................................................ |
15 |
Tear-Off Mode ................................................................................................. |
17 |
Rewind Mode ................................................................................................... |
17 |
Peel-Off Mode.................................................................................................. |
17 |
Cutter Mode...................................................................................................... |
18 |
Fanfold Media .................................................................................................. |
18 |
Removing Used Ribbon (105Se)........................................................................... |
19 |
Removing Used Ribbon (160S)............................................................................. |
20 |
Initial Printer Power Up......................................................................................... |
21 |
%®lÃAÏ‹Ÿ› ³³³³³³³³³³³³³³³³³³³³³³³³³³³³³³³³³³³³³³³³³³³³³³³³³³³³³³³³³³³³³³³ÖÑ
Operating Your Zebra S-Series Printer ................................................................. |
23 |
Printer Operating Modes ....................................................................................... |
23 |
Media Sensing Modes ...................................................................................... |
23 |
Media Transport Modes ................................................................................... |
24 |
Front Panel Keys ................................................................................................... |
26 |
PAUSE Key...................................................................................................... |
26 |
FEED Key ........................................................................................................ |
26 |
CANCEL Key .................................................................................................. |
26 |
MODE Key ...................................................................................................... |
27 |
Front Panel Lights ................................................................................................. |
27 |
Power-On Self Test ............................................................................................... |
28 |
Printer Self Tests ................................................................................................... |
28 |
Introduction ...................................................................................................... |
28 |
CANCEL Key Self Test................................................................................... |
30 |
PAUSE Key Self Test ...................................................................................... |
31 |
FEED Key Self Test......................................................................................... |
32 |
FEED Key and PAUSE Key Self Test............................................................. |
33 |
MODE Key Self Test ....................................................................................... |
33 |
PAUSE Key and CANCEL Key Self Test....................................................... |
33 |
FEED Key and CANCEL Key Self Test ......................................................... |
34 |
Extended Printer Diagnostics ................................................................................ |
34 |
Sample ZPL II® Label Formats ............................................................................ |
35 |
Format 1: Simple Text and a Barcode............................................................. |
36 |
Format 2: Saving a Label Format as a Graphic Image.................................... |
36 |
Format 3: Using a Serialized Data Field ......................................................... |
37 |
Zebra S-Series User’s Guide |
iv |
Ÿ›y‹€ØÃAÏ‹Ÿ›ÍA›cÍ A’‹OÃAÏ‹Ÿ› ³³³³³³³³³³³³³³³³³³³³³³³³³³³³Ñœ
Option Switches ..................................................................................................... |
39 |
Bank 1............................................................................................................... |
40 |
Bank 2............................................................................................................... |
41 |
Configuration Mode............................................................................................... |
42 |
Calibration ........................................................................................................ |
43 |
Adjusting the Print Darkness ............................................................................ |
44 |
Adjusting the Media Rest Position ................................................................... |
44 |
Adjusting the Position of the Top of the Label................................................. |
44 |
›ÏlÃYŸ››lYÏ‹Ÿ›Æ³³³³³³³³³³³³³³³³³³³³³³³³³³³³³³³³³³³³³³³³³³³³³³³³³³³³³~{
System Components............................................................................................... |
45 |
System Considerations........................................................................................... |
45 |
Communications Code...................................................................................... |
45 |
Interfaces........................................................................................................... |
46 |
Data Specifications ........................................................................................... |
46 |
RS-232 Serial Data Port......................................................................................... |
46 |
RS-232 Pinouts ................................................................................................. |
46 |
Hardware Control Signal Descriptions ............................................................. |
47 |
RS-232 Cabling Requirements ......................................................................... |
47 |
Interconnect to DTE Devices............................................................................ |
48 |
Interconnect to DCE Devices ........................................................................... |
48 |
Parallel Cabling Requirements ......................................................................... |
49 |
Parallel Interface............................................................................................... |
49 |
Signal Descriptions........................................................................................... |
50 |
-ÃlÞl›Ï‹ÞlÍ"A‹›Ïl›A›Yl ³³³³³³³³³³³³³³³³³³³³³³³³³³³³³³³³³³³³³³³³{¦
Overview................................................................................................................ |
51 |
Cleaning ................................................................................................................. |
51 |
Exterior Surfaces .............................................................................................. |
51 |
Interior .............................................................................................................. |
51 |
Printhead and Platen Roller .............................................................................. |
52 |
Media, Ribbon, and Label Available Sensors .................................................. |
57 |
Cutter Module................................................................................................... |
57 |
Lubrication ............................................................................................................. |
58 |
Zebra S-Series User’s Guide |
v |
c•ØÆÏ–l›ÏÆ ³³³³³³³³³³³³³³³³³³³³³³³³³³³³³³³³³³³³³³³³³³³³³³³³³³³³³³³³³³³³{œ
Toggle Positioning................................................................................................. |
59 |
Printhead Pressure Adjustment.............................................................................. |
59 |
Black Mark Media Sensor Position Adjustment ................................................... |
60 |
Transmissive Media Sensor Position Adjustment................................................. |
60 |
Upper Transmissive Media Sensor Position Adjustment................................. |
61 |
Lower Transmissive Media Sensor Position Adjustment ................................ |
62 |
Media and Ribbon Sensor Sensitivity Adjustment................................................ |
63 |
2ßØO’lƈŸŸÏ‹›€³³³³³³³³³³³³³³³³³³³³³³³³³³³³³³³³³³³³³³³³³³³³³³³³³³³³³Ë{
0®lY‹y‹YAÏ‹Ÿ›Æ ³³³³³³³³³³³³³³³³³³³³³³³³³³³³³³³³³³³³³³³³³³³³³³³³³³³³³³³³³Ê¦
Printer Specifications............................................................................................. |
71 |
Printing Considerations .................................................................................... |
71 |
Print Speeds...................................................................................................... |
71 |
Media Handling................................................................................................ |
72 |
Media................................................................................................................ |
72 |
Ribbon .............................................................................................................. |
73 |
Zebra Programming Language II (ZPL II®).................................................... |
73 |
Bar Codes ......................................................................................................... |
73 |
Standard Fonts.................................................................................................. |
74 |
Physical ............................................................................................................ |
76 |
Electrical........................................................................................................... |
76 |
Communications Interface ............................................................................... |
77 |
Environmental Ranges ..................................................................................... |
77 |
Options and Accessories .................................................................................. |
77 |
%®Ï‹Ÿ›Æ ³³³³³³³³³³³³³³³³³³³³³³³³³³³³³³³³³³³³³³³³³³³³³³³³³³³³³³³³³³³³³³³³³³³Êœ
Peel-Off ................................................................................................................. |
79 |
Cutter Module........................................................................................................ |
79 |
Media Rewind ....................................................................................................... |
79 |
Fanfold Supply Bin................................................................................................ |
80 |
External ZebraNet™ (Ethernet) Interface ............................................................. |
80 |
Black Mark (Reflective) Sensor ............................................................................ |
80 |
Optional Printer Fonts ........................................................................................... |
81 |
230 VAC Factory Setup ........................................................................................ |
82 |
512 KB DRAM Memory Expansion..................................................................... |
82 |
12-Dot/mm and 6-dot/mm Printhead..................................................................... |
82 |
Zebra S-Series User’s Guide |
vi |
®®l›c‹à ³³³³³³³³³³³³³³³³³³³³³³³³³³³³³³³³³³³³³³³³³³³³³³³³³³³³³³³³³³³³³³³³qÑ
230 VAC Power Cord ............................................................................................ |
83 |
ASCII Code Chart.................................................................................................. |
84 |
Adjusting Darkness for “In-Spec” Bar Codes........................................................ |
85 |
Label Darkness Levels...................................................................................... |
86 |
Optional Printer Fonts............................................................................................ |
88 |
’ŸÆÆAÃá ³³³³³³³³³³³³³³³³³³³³³³³³³³³³³³³³³³³³³³³³³³³³³³³³³³³³³³³³³³³³³³³³³œ¦
›clà³³³³³³³³³³³³³³³³³³³³³³³³³³³³³³³³³³³³³³³³³³³³³³³³³³³³³³³³³³³³³³³³³³³³³³³œ{
Zebra S-Series User’s Guide |
vii |

Zebra S-Series User’s Guide |
viii |
›ÏßcØYÏ‹Ÿ›
6FRSH
This user’s guide contains descriptive information and operational instructions for the Zebra 105Se and the 160S thermal transfer demand printers. It contains information on how to set up and operate the printer as well as adjustment and maintenance procedures that can be performed by the operator. Information covering the use and operation of Zebra S-Series Printer options is also included.
Additional documentation for the Zebra S-Series Printer is available:
•The ZPL II® Programming Guide (part # 46469L).
•The two-volume Maintenance Manual: Volume 1: General Maintenance (part # 38452L) contains the information you need to maintain your printer. Volume 2: Circuit Descriptions and Electrical Schematics (part # 38453L) contains the information you need to repair the circuit boards at the component level. You may order both volumes as a set (part # 31452L).
0RGHO 'HVLJQDWLRQ
Labels located inside the media compartment above the frame support at the rear of the S-Series Printer include both the serial number and model designation. If you need to contact our technical support staff for assistance, please have both the model designation and serial number available so that we may help you more efficiently.
Zebra S-Series User’s Guide |
1 |
6\VWHP 2YHUYLHZ
The S-Series Printer, when connected to an appropriate ASCII data source, functions as a complete label, ticket, and tag printing system. Customersupplied asynchronous modems may be used to connect remote hosts to the S-Series Printer.
Connection of the S-Series Printer to data sources using data codes other than ASCII requires the use of an appropriate protocol converter.
Connection to data sources using interfaces other than the type installed in the printer requires the use of an appropriate interface converter.
&RPPXQLFDWLRQ &DSDELOLWLHV
The S-Series Printer comes with either an Electronics Industries Association (EIA) RS-232 serial data interface or a factory-installed parallel interface. In both cases, the required interface cable is not supplied with the printer.
7KHUPDO 7UDQVIHU 3ULQWHU ,QWHUQDO )XQFWLRQV
Command/control data signals are received via the RS-232 port, parallel port, or DIP switches and are sent to the main logic board. The microprocessor continuously monitors these signals along with the inputs received from the control panel and various sensors. The microprocessor interprets this information and controls the S-Series Printer’s mechanics, printhead, communications, command interpretation, label formatting, media control, and mechanical drive.
3ULQW 0HFKDQLVP &DSDELOLWLHV
The print mechanism has been designed to print random information labels, tickets, and tags. It uses a thermal printhead that heats a ribbon as it passes beneath the print elements, melting its ink onto the media (direct thermal uses heat-sensitive media instead of an inked ribbon). Constant print speeds may be selected via software control.
2 |
Zebra S-Series User’s Guide |
The standard printhead for the S-Series Printer has a print resolution of 8 dots/mm (203.2 dots/inch). Optional printheads are available for the
105Se for either 6 dots/mm (152 dots/inch) or 12 dots/mm (300 dots/inch) resolution.
0HGLD 7UDQVSRUW 0HFKDQLVP &DSDELOLWLHV
The media transport mechanism of the S-Series Printer has been designed to accommodate various types of media, including die-cut labels, ticket and tag stock, continuous roll, and fanfold media.
Media may be rewound internally onto standard 3" cores if the rewind spindle option is installed. With the peel-off option, backing material may be rewound internally.
Ribbons for the S-Series Printer are supplied on 1" cores in standard widths and lengths.
$GGLWLRQDO 6\VWHP 5HTXLUHPHQWV
In addition to the Zebra S-Series Printer, you need the following items to form a complete label preparation system:
•Label, ticket, or tag stock.
•An intelligent device, such as a computer, for data entry or entry of ZPL II formats.
•A data communication cable to connect the controlling device to the printer (remote installations may require additional cables and communication devices, such as modems and/or protocol converters).
•Thermal transfer ribbon (if using thermal transfer mode).
Zebra S-Series User’s Guide |
3 |
0HGLD DQG 5LEERQ 5HTXLUHPHQWV
Print quality not only depends on the Zebra S-Series Printer, but also on the print media. Factors such as reflectivity and contrast are important for bar code scanning applications. Factors such as paper abrasion and temperature requirements are important in maintaining the life of the printhead.
We STRONGLY RECOMMEND the use of Zebra-brand media for continuous high quality printing. A wide range of paper, polypropylene, polyester, and vinyl stock has been specifically engineered to enhance the printing capabilities of the printer and to ensure against premature printhead wear.
Continuous roll form paper, fanfold media, or cardstock with optional perforations and registration holes may be used. The standard 160S Printer and 105Se Printer with an optional reflective sensor can use “black-mark media” (media having a black mark printed on the liner side for use in positioning the labels).
Since print quality is affected by media and ribbon, printing speeds, and printer operating modes, it is very important to run tests for your applications. This is especially true if you’re operating in peel-off mode, where these variables combine with label size, backing content, diecut depth, and even humidity to affect printer operation.
:DUQLQJV DQG 3UHFDXWLRQV
,QVWDOODWLRQ
&$87,21 7R HQVXUH WKDW WKH =HEUD 6 6HULHV 3ULQWHU KDV SURSHU FRROLQJ GR QRW SODFH DQ\ SDGGLQJ RU FXVKLRQLQJ PDWHULDO RQ WKH EDFN RI RU XQGHUQHDWK WKH XQLW
9$& 2SHUDWLRQ
&$87,21 5HIHU WR SDJH IRU LQVWUXFWLRQV RQ FRQILJXULQJ \RXU SULQWHU IRU 9$& RSHUDWLRQ EHIRUH FRQQHFWLQJ WR D 9$& SRZHU VRXUFH
4 |
Zebra S-Series User’s Guide |
8VH RI 6KLHOGHG &DEOH
&$87,21 5HIHU WR ´,QWHUFRQQHFWLRQVµ RQ SDJH
=HEUD SULQWHUV FRPSO\ ZLWK )&& ´5XOHV DQG 5HJXODWLRQVµ 3DUW
6XESDUW - IRU &ODVV $ (TXLSPHQW XVLQJ IXOO\ VKLHOGHG GDWD FDEOHV 8VH RI XQVKLHOGHG FDEOHV PD\ LQFUHDVH UDGLDWHG HPLVVLRQV DERYH WKH &ODVV $ OLPLWV DQG LV QRW UHFRPPHQGHG
=HEUD SULQWHUV FRPSO\ ZLWK LQWHUQDWLRQDO UHJXODWLRQV JRYHUQLQJ UDGLDWHG HPLVVLRQV ZKHQ XVLQJ IXOO\ VKLHOGHG GDWD FDEOHV 8VH RI XQVKLHOGHG FDEOHV PD\ LQFUHDVH UDGLDWHG HPLVVLRQV DERYH WKH UHJXODWHG OLPLWV
5LEERQV DQG 3ULQWKHDG :HDU
&$87,21 5LEERQV XVHG LQ WKH =HEUD 7HFKQRORJLHV &RUSRUDWLRQ 3ULQWHU 0867 EH DV ZLGH DV RU ZLGHU WKDQ WKH PHGLD
=HEUD EUDQG ULEERQV SURYLGH DQ H[WUHPHO\ VPRRWK EDFNLQJ VXUIDFH WKDW SURWHFWV WKH SULQWKHDG IURP DEUDVLRQ E\ WKH PHGLD
,I WKH ULEERQ LV QDUURZHU WKDQ WKH PHGLD DUHDV RI WKH SULQWKHDG DUH XQSURWHFWHG DQG VXEMHFW WR SUHPDWXUH ZHDU
5HSDFNLQJ
&$87,21 ,I VKLSPHQW RI \RXU SULQWHU LV QHFHVVDU\ FDUHIXOO\ SDFN WKH SULQWHU LQ D VXLWDEOH FRQWDLQHU WR DYRLG GDPDJH GXULQJ WUDQVLW :KHQHYHU SRVVLEOH XVH WKH RULJLQDO FRQWDLQHU IURP WKH IDFWRU\ ,I WKH RULJLQDO FRQWDLQHU LV QRW DYDLODEOH DQ RSWLRQDO SDFNLQJ NLW FDQ EH SXUFKDVHG IURP =HEUD :KHQ XVLQJ D GLIIHUHQW FRQWDLQHU D SURFHGXUH VLPLODU WR WKH RULJLQDO IDFWRU\ SDFNDJLQJ VKRXOG EH IROORZHG
5HIHU WR ´6WRUDJH DQG 5HVKLSSLQJµ RQ SDJH IRU IXUWKHU UHSDFNLQJ LQVWUXFWLRQV
Zebra S-Series User’s Guide |
5 |

6 |
Zebra S-Series User’s Guide |
›ÆÏA’’AÏ‹Ÿ›
8QSDFNLQJ
When unpacking the Zebra S-Series Printer, make sure you save all packing materials. Once the printer is out of the box, raise the printer’s media access door and remove the power cord.
,QVSHFWLRQ
Inspect the printer for possible damage incurred during shipment.
•Check all exterior surfaces for damage.
•Raise the media access door and inspect compartment for damage to components.
5HSRUWLQJ 'DPDJH
If you discover shipping damage upon inspection:
•Immediately notify the shipping company of the damage.
•Retain all packaging material for shipping company inspection.
•File a damage report with the shipping company and notify your local distributor and Zebra Technologies Corporation of the damage. Zebra Technologies Corporation is not responsible for any damage incurred during shipment of the equipment and will not repair this damage under warranty. Immediate notification of damage to the shipping company or its insuring agency generally results in ensuring any damage claim validity and ultimate monetary compensation.
Zebra S-Series User’s Guide |
7 |
6WRUDJH DQG 5HVKLSSLQJ
If you are not placing the printer into operation immediately, repackage it using the original packing materials. The S-Series Printer may be stored under the following conditions:
•Temperature: –40° to +158° F (–40° to +70° C)
•Relative humidity: 20% to 85% non-condensing
Should it become necessary to ship your printer, remove any ribbon and paper roll from the supply spools, otherwise damage to the printer could result. Carefully pack the printer in a suitable container to avoid damage during transit. Whenever possible, use the original container and packaging material from the factory. If you use a different container, a procedure similar to the original factory packaging should be followed.
&$87,21 'R QRW SDFNDJH WKH SULQWHU LQ D ULJLG FRQWDLQHU ZLWKRXW XWLOL]LQJ VKRFN PRXQWV RU VKRFN DEVRUELQJ SDFNLQJ PDWHULDO $ ULJLG FRQWDLQHU DOORZV VKRFN RQ WKH RXWVLGH WR EH WUDQVPLWWHG XQGDPSHG WR WKH XQLW ZKLFK PD\ FDXVH GDPDJH
3RZHU &RQQHFWLRQ
$& 9ROWDJH 6HOHFWLRQ 3URFHGXUH
The S-Series Printer’s AC voltage may be set for either 115 VAC or 230 VAC operation. To match the printer’s power entry selection to the available power source, refer to Figure 1 and follow the procedure outlined below:
1.Locate the AC power area at the rear of the printer.
2.Using a small flatblade screwdriver or similar tool, move the voltage selection switch to the 115 V or 230 V position as required. (The initial position of the switch depends on how the printer was ordered.) Make sure that the appropriate fuse is in place.
8 |
Zebra S-Series User’s Guide |
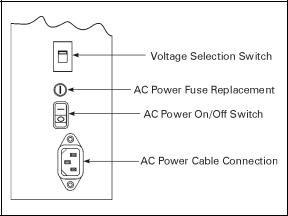
Figure 1
$& 3RZHU )XVH 5HSODFHPHQW
A user-replaceable AC power fuse is located just above the power ON/OFF switch (see Figure 1). For a 115 VAC installation, the replacement fuse is a 3AG Fast Blow style rated at 5 Amp/250VAC. For a 230 VAC installation, the fuse is the same style but rated at 3 Amp/250 VAC. Make sure the fuse you use is correct for the voltage source.
Note: Before replacing the fuse, turn the AC power switch OFF and unplug the AC power cable.
1.To replace the fuse, insert the tip of a flatblade screwdriver into the slot in the end of the fuse holder end cap.
2.Press in slightly on the end cap and turn the screwdriver slightly counterclockwise. This disengages the end cap from the fuse holder and allows you to remove the fuse.
3.To install a new fuse, remove the old fuse and insert the new fuse into the fuse holder.
4.Push the end cap in slightly, then insert the tip of a flatblade screwdriver into the slot in the end cap and turn clockwise to engage it.
Zebra S-Series User’s Guide |
9 |
9$& 2SHUDWLRQ
1.Confirm that the voltage selector switch is set to 115 V.
2.Attach the supplied power cord to the AC power receptacle located on the rear of the printer.
3.Connect the opposite end of the power cord to a properly grounded source of 115 VAC (50 or 60 Hz) power rated for at least 5 Amps.
9$& 2SHUDWLRQ
1.Confirm that the voltage selector switch is set to 230 V.
2.Depending on how the printer was ordered, a power cord may or may not be provided for 230 VAC operation. If not provided, obtain a cord set with the proper AC power plug. The cord may then be connected to the standard (international) IEC-type 3-prong AC connector provided on the S-Series Printer. Refer to “230 VAC Power Cord” on page 83 for more information.
6LWH 5HTXLUHPHQWV
&$87,21 7R HQVXUH WKDW WKH 6 6HULHV 3ULQWHU KDV SURSHU YHQWLODWLRQ DQG FRROLQJ GR QRW SODFH DQ\ SDGGLQJ RU FXVKLRQLQJ PDWHULDO RQ WKH EDFN RI RU XQGHUQHDWK WKH XQLW DV WKLV UHVWULFWV WKH DLU IORZ
The S-Series Printer may be installed on any solid, level surface of sufficient size and strength to accommodate the unit. The area in which the printer operates must meet the environmental conditions specified (see page 77).
Since the Zebra S-Series Printer was designed and is fabricated as an industrial-type unit, it functions satisfactorily in areas such as a warehouse or factory floor that conform to the specified environmental and electrical conditions (see page 76).
10 |
Zebra S-Series User’s Guide |
5LEERQ /RDGLQJ 6H
Refer to Figure 4 throughout this procedure.
Note: When placing the ribbon roll on the ribbon supply spindle, make sure that the core is pushed up against the stop on the ribbon supply spindle and that the ribbon is aligned squarely with its core. If this is not done, the ribbon may not cover the inside edge of the printhead, exposing print elements to potentially damaging contact with the media.
Do not load ribbon if the printer is to be used in the direct thermal mode.
&$87,21 'R QRW XVH ULEERQ WKDW LV QDUURZHU WKDQ WKH PHGLD ,I WKH SULQWKHDG LV QRW SURWHFWHG E\ WKH VPRRWK EDFNLQJ RI WKH ULEERQ H[FHVVLYH DEUDVLRQ PD\ FDXVH SUHPDWXUH SULQWKHDG IDLOXUH
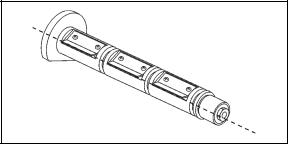
1. Align the segments of the ribbon supply spindle. See Figure 2.
Figure 2
2.Place the ribbon roll on the ribbon supply spindle.
3.Open the printhead by moving the handle to the OPEN position.
Zebra S-Series User’s Guide |
11 |
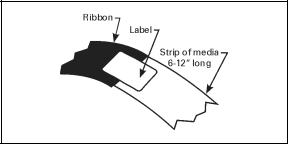
4.Important...To make ribbon loading and unloading easier, make a leader for your ribbon roll if it doesn’t already have one (refer to Figure 3). Tear off a strip of media (labels and backing) about 6" - 12" long from the roll. Peel off a label from this strip and remove the remaining labels. Apply half of this label to the end of the strip and the other half to the end of the ribbon. This acts as a ribbon leader.
Figure 3
5.Thread the leader and attached ribbon as shown in Figure 4. Be careful not to crease or wrinkle the ribbon.
6.Remove the hook from the ribbon take-up spindle.
7.Place the leader under the long leg of the hook and wind for several turns.
8.Close the printhead by moving the lever to the CLOSED position.
12 |
Zebra S-Series User’s Guide |
Figure 4
Zebra S-Series User’s Guide |
13 |
5LEERQ /RDGLQJ 6
Refer to Figure 4 throughout this procedure.
Note: When placing the ribbon roll on the ribbon supply spindle, make sure that the core is pushed up against the stop on the ribbon supply spindle and that the ribbon is aligned squarely with its core. If this is not done, the ribbon may not cover the inside edge of the printhead, exposing print elements to potentially damaging contact with the media.
Do not load ribbon if the printer is to be used in the direct thermal mode.
&$87,21 'R QRW XVH ULEERQ WKDW LV QDUURZHU WKDQ WKH PHGLD
,I WKH SULQWKHDG LV QRW SURWHFWHG E\ WKH VPRRWK EDFNLQJ RI WKH ULEERQ H[FHVVLYH DEUDVLRQ PD\ FDXVH SUHPDWXUH SULQWKHDG IDLOXUH
1.Align the segments of the ribbon supply spindle. See Figure 2.
2.Place the ribbon roll on the ribbon supply spindle.
3.Open the printhead by moving the handle to the OPEN position.
4.Important...To make ribbon loading and unloading easier, make a leader for your ribbon roll if it doesn’t already have one (refer to Figure 3). Tear off a strip of media (labels and backing) about 6" - 12" long from the roll. Peel off a label from this strip and remove the remaining labels. Apply half of this label to the end of the strip and the other half to the end of the ribbon. This acts as a ribbon leader.
5.Thread the leader and attached ribbon as shown in Figure 4. Be careful not to crease or wrinkle the ribbon.
6.Place the leader around the ribbon take-up spindle and wind counterclockwise for several turns.
7.Close the printhead by moving the lever to the CLOSED position.
14 |
Zebra S-Series User’s Guide |
0HGLD /RDGLQJ
To load media, move the printhead locking lever to the OPEN position. Refer to Figures 5, 6, 7, and 8. When the media is loaded, close the printhead by moving the lever on the upper printhead mechanism to the CLOSED position.
Note: The first time you load media and whenever you subsequently change the media type, you must re-calibrate the printer. See “Calibration” on page 43 for details.
5ROO 0HGLD
Roll media may contain labels of a fixed length with gaps in between or it may be formed as one continuous length with no gaps (see “Continuous Media” on page 91 for a complete definition). Both types of roll media mount inside the printer in the same manner. To load roll media, refer to Figures 5 and/or 6 and do the following:
1.Move the media guide and media supply guide as far away from the printer frame as possible.
2.Place the media roll on the media supply hanger.
3.Push the media supply guide inward until it is just touching the outer side of the media supply roll. (The guide must not cause pressure or excessive drag on the media supply roll.)
4.Thread the media through the printhead as shown in the illustrations.
5.Adjust the media guide until it just touches the outer edge of the media without causing it to buckle.
6.Close the printhead by moving the lever located on the upper printhead assembly to the CLOSED position.
Zebra S-Series User’s Guide |
15 |

Figure 5
Figure 6
16 |
Zebra S-Series User’s Guide |
7HDU 2II 0RGH
Follow the instructions described in “Roll Media” on page 15.
5HZLQG 0RGH
Note: Rewind option required.
To initially configure the printer for this mode, follow these steps:
1.Remove the media rewind plate from its storage location in front of the printhead inside the media compartment.
2.Invert the rewind plate so that the lip on the attached hook plate points down.
3.Insert the hook plate lip a short distance (1/2") into the lower opening in the side plate.
4.Align the upper end of the rewind plate with the corresponding opening in the side plate and slide the rewind plate in so that it stops against the main frame.
5.Remove the hook from the take-up spindle shaft.
6.Route the media as shown in Figures 5 and 6 and wind it 1-2 times around a 3" core.
3HHO 2II 0RGH
1.Remove the rewind plate if one is present and store it on the two mounting screws on the inside of the front panel. Align the notch or web in the media so that the take label sensor can sense a peeled label.
2.Load media as shown in Figures 5 and 6.
3.Remove the hook from the take-up spindle shaft.
4.Remove several labels from the media backing and then wind the backing 1-2 times around the media take-up spindle and reinstall the hook.
Zebra S-Series User’s Guide |
17 |
&XWWHU 0RGH
Follow the instructions described in “Roll Media” on page 15 with the exception of step 6: first route the media through the cutter module (see Figures 5 and 6) and then close the printhead assembly by moving the lever located on the upper printhead assembly to the CLOSED position.
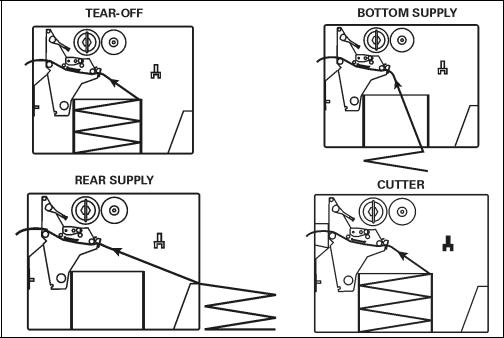
)DQIROG 0HGLD
To load fanfold media, place the fanfold media in the bottom or to the rear of the media compartment or fanfold supply bin (105Se only) and thread it through the printhead as shown in Figures 7 and 8. Adjust the media guide using the thumb screw to keep the media from drifting left or right.
Fanfold media from outside the printer feeds through one of the two access slots: one at the bottom of the printer, and one at the rear.
Figure 7
18 |
Zebra S-Series User’s Guide |
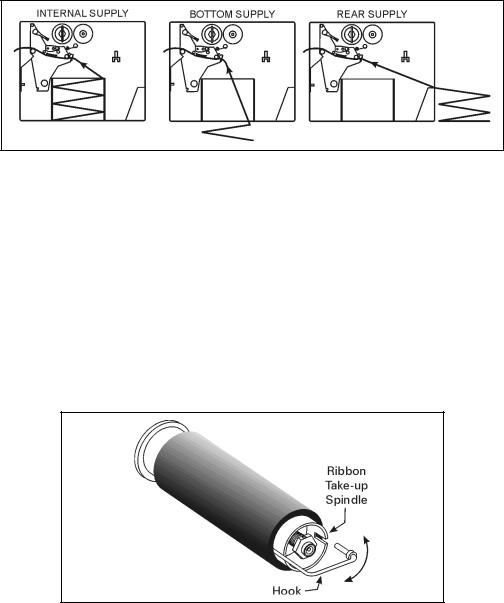
Figure 8
5HPRYLQJ 8VHG 5LEERQ 6H
To remove used ribbon, refer to Figure 9 and follow the steps below.
1.Pull the hook out slightly, then rotate the hook back-and-forth several times as shown and remove it from the spindle.
2.Grasp the used ribbon and remove it from the ribbon take-up spindle.
3.Remove the empty core from the ribbon supply spindle.
4.Follow the ribbon loading procedure on page 11 to load the new ribbon.
Figure 9
Zebra S-Series User’s Guide |
19 |

5HPRYLQJ 8VHG 5LEERQ 6
Refer to Figure 10.
1.Turn the knob at the end of the ribbon take-up spindle (1) clockwise until it stops. This causes the ribbon release bars to pivot down (2), easing the spindle’s “grip” on the wound ribbon.
2.Slide the ribbon off of the ribbon take-up spindle. Once the used ribbon has been removed, ensure that the arrow on the knob aligns with the indented notch in the ribbon take-up spindle (see inset).
3.Remove the empty core from the ribbon supply spindle.
4.Follow the ribbon loading procedure on page 14 to load the new ribbon.
Figure 10
20 |
Zebra S-Series User’s Guide |
,QLWLDO 3ULQWHU 3RZHU 8S
After you finish loading the ribbon and media, continue reading through “Operation” beginning on page 23 and “Configuration and Calibration” beginning on page 39. Perform the following initial printer power-up steps as you come to them:
1.Power-On Self Test (POST)
2.Calibration
Note: Subsequent power-ups do not necessarily require step 2 to be performed.
Zebra S-Series User’s Guide |
21 |

22 |
Zebra S-Series User’s Guide |
 Loading...