


 Loading...
User Manual - English
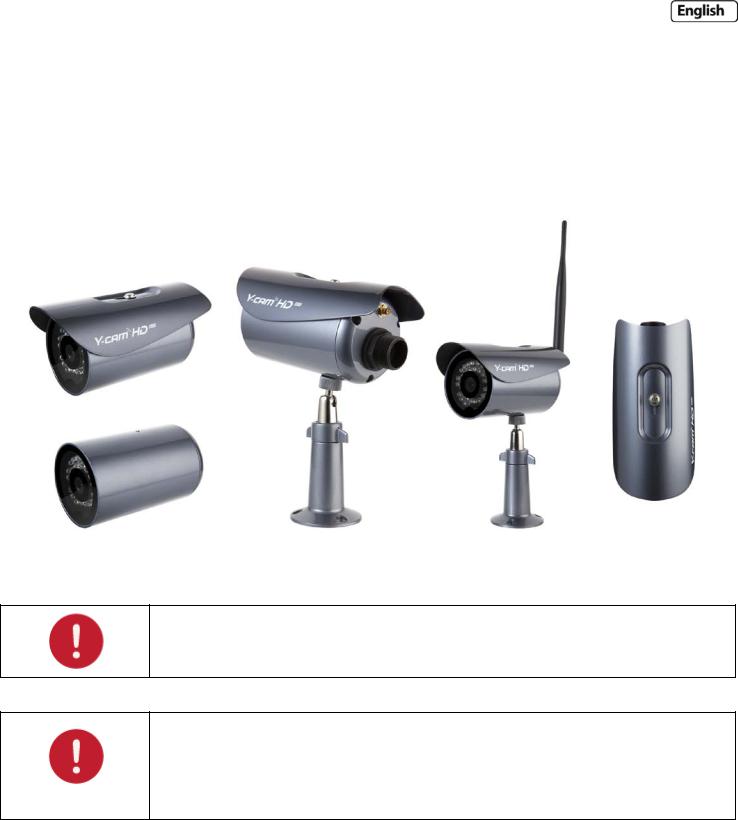
This manual applies to the following Y-cam products:
Y-cam Bullet HD 1080
Please read this manual carefully before attempting to install or operate this product.
Please retain this manual for your future reference. This User Manual is a work-in-progress and is constantly being updated. You are invited to check the website regularly for updated versions.
v1.0

Table of Contents
1.0 |
INTRODUCTION........................................................................................................................................... |
4 |
|
1.1 |
|
APPROVAL INFORMATION ......................................................................................................................................... |
4 |
1.2 |
|
RESTRICTIONS ......................................................................................................................................................... |
5 |
1.3 |
|
POWER SUPPLY ....................................................................................................................................................... |
5 |
1.4 |
|
MAINTENANCE........................................................................................................................................................ |
6 |
1.5 |
|
RECOMMENDATIONS................................................................................................................................................ |
6 |
1.6 |
|
MINIMUM SYSTEM REQUIREMENTS............................................................................................................................ |
7 |
1.7 |
|
EU ENVIRONMENTAL PROTECTION ............................................................................................................................. |
7 |
2.0 |
EXPLORING YOUR Y-CAM ............................................................................................................................ |
8 |
|
2.1 |
|
Y-CAM BULLET HD 1080 AT A GLANCE ....................................................................................................................... |
8 |
2.2 |
|
MICROSD CARD INFORMATION AND INSTALLATION........................................................................................................ |
9 |
2.21 |
|
MICROSD CARD INSTALLATION FOR Y-CAM BULLET HD 1080.......................................................................................................... |
10 |
3.0 |
INSTALLATION........................................................................................................................................... |
11 |
|
3.1 |
|
HARDWARE INSTALLATION ...................................................................................................................................... |
12 |
3.11 |
|
USING STANDARD SUPPLIED CABLE.............................................................................................................................................. |
12 |
3.12 |
|
USING CABLE CONNECT ............................................................................................................................................................ |
12 |
4.0 |
Y-CAM SOFTWARE INSTALLATION ............................................................................................................. |
14 |
|
4.1 |
|
Y-CAM SOFTWARE INSTALLATION FOR WINDOWS ....................................................................................................... |
14 |
4.2 |
|
Y-CAM SOFTWARE INSTALLATION FOR MAC ............................................................................................................... |
16 |
4.3 |
|
FINDING YOUR CAMERA WITH Y-CAM SETUP .............................................................................................................. |
17 |
5.0 |
WELCOME TO YOUR Y-CAM!...................................................................................................................... |
18 |
|
5.1 |
|
LIVE VIEW ON BULLET HD 1080 (USING INTERNET EXPLORER) ..................................................................................... |
20 |
5.2 |
|
LIVE VIEW ON BULLET HD 1080 (USING FIREFOX, SAFARI AND OTHER BROWSERS) .......................................................... |
22 |
6.0 |
Y-CAM SETTINGS ....................................................................................................................................... |
23 |
|
6.1 |
|
QUICK SETUP WITH SMART SETUP......................................................................................................................... |
23 |
6.2 |
|
CONNECTION MENU ......................................................................................................................................... |
25 |
6.2.1 |
|
WIRELESS SETUP..................................................................................................................................................................... |
26 |
6.2.1.1 |
INFRASTRUCTURE WIRELESS SETUP OPTIONS ....................................................................................................................... |
27 |
|
6.2.1.2 |
AD-HOC WIRELESS SETUP OPTIONS................................................................................................................................... |
28 |
|
6.2.2 |
|
TCP/IP SETUP ....................................................................................................................................................................... |
29 |
6.2.3 |
|
DDNS SETUP......................................................................................................................................................................... |
30 |
6.2.4 |
|
UPNP SETUP ......................................................................................................................................................................... |
31 |
6.2.5 |
|
NETWORK PORT ..................................................................................................................................................................... |
31 |
6.2.6 |
|
RTSP AUTHENTICATION........................................................................................................................................................... |
31 |
6.2.7 |
|
VIEWING YOUR CAMERA EXTERNALLY USING DDNS ....................................................................................................................... |
32 |
6.2.8 |
|
VIEWING YOUR CAMERA EXTERNALLY USING A STATIC IP ................................................................................................................. |
32 |
6.2.9 |
|
PORT FORWARDING IF UPNP IS NOT AVAILABLE............................................................................................................................ |
33 |
6.3 |
|
CAMERA MENU ................................................................................................................................................. |
33 |
6.3.1 |
|
IMAGE .................................................................................................................................................................................. |
34 |
6.3.2 |
|
AUDIO .................................................................................................................................................................................. |
36 |
Page 2

|
6.3.3 |
STREAM SETUP ....................................................................................................................................................................... |
36 |
|
6.3.4 |
HARDWARE............................................................................................................................................................................ |
37 |
|
6.3.4.1 |
GPIO .......................................................................................................................................................................... |
37 |
|
6.3.4.2 |
SYSTEM IDENTITY ........................................................................................................................................................... |
38 |
|
6.3.4.3 |
SYSTEM TIME SETTING ..................................................................................................................................................... |
38 |
|
6.3.4.4 |
USER MANAGEMENT ...................................................................................................................................................... |
40 |
|
6.3.4.5 |
FIRMWARE UPGRADE...................................................................................................................................................... |
41 |
|
6.3.4.6 |
BACKUP, RESTORE, RESET AND REBOOT............................................................................................................................... |
42 |
|
6.4 |
STORAGE MENU ................................................................................................................................................ |
43 |
|
6.4.1 |
STORAGE SETUP .................................................................................................................................................... |
43 |
|
6.4.1.1 |
SD DISK ....................................................................................................................................................................... |
43 |
|
6.4.1.1 |
NAS SERVER SETUP......................................................................................................................................................... |
43 |
|
6.4.2 |
FILE LIST ................................................................................................................................................................................ |
44 |
|
6.4.3 |
E-MAIL SERVER SETUP ............................................................................................................................................................. |
45 |
|
6.4.3.1 |
Y-CAM & COMMON EMAIL SERVER SETTINGS...................................................................................................................... |
46 |
|
6.4.4 |
FTP SERVER........................................................................................................................................................................... |
47 |
|
6.5 |
TIMED RECORDING MENU ................................................................................................................................ |
48 |
|
6.5.1 |
SCHEDULE.............................................................................................................................................................................. |
48 |
|
6.5.1 |
CONTINUOUS RECORD.............................................................................................................................................................. |
48 |
|
6.5.2 |
SNAPSHOT AT INTERVAL ........................................................................................................................................................... |
49 |
|
6.5.3 |
E-MAIL PERIODIC SENDING ....................................................................................................................................................... |
50 |
|
6.5.4 |
PERIODIC SENDING - FTP ......................................................................................................................................................... |
51 |
|
6.6 |
MOTION RECORDING MENU............................................................................................................................. |
52 |
|
6.6.1 |
SCHEDULE.............................................................................................................................................................................. |
52 |
|
6.6.2 |
MOTION DETECTION ............................................................................................................................................................... |
53 |
|
6.6.2.1 |
MOTION DETECTION WINDOW......................................................................................................................................... |
53 |
|
6.6.2.2 |
PRIVACY MASK WINDOW ................................................................................................................................................ |
54 |
|
6.6.3 |
RECORD ON ALARM ................................................................................................................................................................. |
55 |
|
6.6.4 |
SNAPSHOT ON ALARM .............................................................................................................................................................. |
56 |
|
6.6.5 |
E-MAIL ALARM MANAGEMENT .................................................................................................................................................. |
57 |
|
6.6.6 |
PERIODIC SENDING - FTP ......................................................................................................................................................... |
58 |
|
6.6.7 |
GPOUT................................................................................................................................................................................ |
59 |
|
6.7 |
SYSTEM INFO MENU.......................................................................................................................................... |
60 |
7.0 |
ADVANCED SETTINGS ................................................................................................................................ |
61 |
|
|
7.1 |
MANUALLY ENTERING TCP/IP SETTINGS FOR A CAMERA.............................................................................................. |
61 |
|
7.2 |
PROXY SERVER SETTING.......................................................................................................................................... |
63 |
|
7.3 |
ENABLING ACTIVE X IN INTERNET EXPLORER............................................................................................................... |
64 |
|
7.4 |
CONNECTING YOUR Y-CAM DIRECTLY TO A COMPUTER................................................................................................. |
65 |
8.0 |
TROUBLESHOOTING .................................................................................................................................. |
66 |
|
9.0 |
GLOSSARY OF TERMS ................................................................................................................................ |
68 |
|
Page 3

1.0 INTRODUCTION
Thank you for purchasing a Y-cam internet video camera.
Please read the following instructions carefully before attempting to install or use the camera.
The Y-cam can be accessed remotely, and controlled from any PC/laptop over an Intranet or the Internet via a web browser. The user friendly installation procedure and intuitive web-based interface allows easy integration with your home or business network or Wi-Fi. The Y-cam also comes with motion detection software that can generate alarm triggers via e-mail and by uploading images straight to a website.
Notice
This product may cause interference with other wireless equipment that operate at 2.4GHz ISM band. In the event of interference please turn off one of the devices or move it to a safe distance.
Product Assurance
This 2.4GHz wireless camera meets wireless frequency security standards and recommended indexes during operation. These standards and indexes are certificated by the academic organization as illustrated in the following paragraphs.
1.1 Approval Information
All our products meet the requirements for approval by FCC and CE, and are authorized to bear the FCC and CE mark.
FCC : This equipment has been tested and found to comply with the limits for a Class A digital device, pursuant to Part 15 of the FCC rules. These limits are designed to provide reasonable protection against harmful interference in a residential installation this equipment generates, uses and can radiate radio frequency energy and, if not installed and used in accordance with the instructions, may cause harmful interference to radio communications. However, there is no guarantee that interference will not occur in a particular installation. If this equipment does cause harmful interference to radio or television reception, which can be determined by turning the equipment off and on, the user is encouraged to try to correct the interference by one or more of the following measures:
-Reorient or relocate the receiving antenna.
-Increase the separation between the equipment and the receiver.
-Connect the equipment into an outlet on a circuit different from that to which the receiver is connected. -Consult the dealer or an experienced radio/TV technician for help.
This device complies with Part 15 of the FCC Rules. Operation is subject to the following two conditions:
(1)This device may not cause harmful interference
(2)This device must accept any interference received, including interference that may cause undesired operation Changes and modification not expressly approved by the manufacturer or registrant of this equipment can void your authority to operate this equipment under Federal Communications Commission rules.
Page 4
CE : This product complies with standards including Low Voltage Device Directive 73/23/EEC; EMC Directive 89/336/EEC and R&TTE Directive 1999/5/EC. It passed the subject tests by the authority concerned and is authorized to bear CE mark.
1.2 Restrictions
1.DO NOT use this product to violate one's privacy. Monitoring one's activities without consent is illegal and this product is not designed and manufactured for such purpose.
2.DO NOT put this product near any medical equipment. Radio waves might potentially cause breakdown of electrical medical equipment.
3.This product should be placed at least one foot away from any heart pacemaker. Radio waves might potentially influence a heart pacemaker.
4.DO NOT use this product for any illegal activities. It is the user’s responsibility to ensure that the usage of this camera is of a legal nature.
1.3 Power Supply
This product conforms to the following approvals:
When using the power adapter, make sure your power rating is compatible with that of the device to avoid potential damage.
Please note: Y-cam Power Supplies are not interchangeable. The Power Adaptor supplied with your Y-cam should not be used with other models of Y-cam, and may cause product failure for other products. Always check the voltage of the Power Supply you are using with the corresponding model.
Page 5

1.4 Maintenance
1.Ensure that the Y-cam and its power source have sufficient ventilation;
2.Do not shake, strike or drop the product;
3.Keep the camera dry and dustless, and avoid exposing it to direct sunlight;
4.Do not place the product near any magnetic objects;
5.Avoid putting the product in places where there is constant change in temperature and humidity;
6.Keep the product away from heat sources;
7.Do not use the camera near aggressive chemicals;
8.Do not use this camera near water (unless the camera is specified as waterproof);
9.Do not use the camera in the places which are enclosed by metal. The surrounding metal may shield the electromagnetic waves, and result in failure of signal reception;
10.Please follow your local government environment protection policies;
11.Please turn off the power when left unused;
12.Do not disassemble or attempt to repair the camera; doing so might cause damage to the product and will invalidate warranty.
Applies to products: YCBLHD6
Please note: Infrared LEDs produce heat. Do not place any objects within 10cm of the LEDs or allow any object to come in contact with the dome covering the LEDs.
1.5 Recommendations
1.New firmware versions are released periodically and they provide new features, improvement to existing features, fixes to known issues or bugs etc. It is strongly recommended that you upgrade to the latest firmware version available for your Y-cam product before set-up begins (as settings may be lost). To ensure that you have the most recent firmware, please visit http://www.y-cam.com
2.New versions of the software available on the Setup CD may also be available, to ensure that you have the most recent versions, please visit http://www.y-cam.com
3.It is recommended that Y-cam products are not installed near microwave ovens or DECT phones (cordless phones) as these devices tend to interfere with the Wi-Fi signal.
Page 6

1.6 Minimum System Requirements
A PC or Mac is required for the initial setup of a Y-cam only and once the camera is configured, a Y-cam can be used independently without being connected to a computer.
Network requirements:
•Network Connection: 10/100 Mbps Ethernet
•Wireless router (if wireless connectivity required)
•Broadband Connection: Minimum 256kb/s upload speed (if internet access to your Y-cam is required)
PC Requirements:
•Processor: Intel Pentium IV, 2.6GHz or higher recommended
•Memory (RAM): 512Mb or higher recommended
•Operating System: Windows XP, Vista, Windows 7
•Web Browser: Internet Explorer Version 9 or above, Mozilla Firefox, Google Chrome, Safari and most other browsers
•Plug-ins: Quicktime (for non-IE browsers)
Mac Requirements:
•Processor: 2000MHz - PowerPC G4 or Intel.
•Memory (RAM): 512Mb or higher recommended
•Operating System: Mac OSX 10.4 Tiger
•Web Browser: Safari, Mozilla Firefox, Google Chrome and most other browsers
•Plug-ins: Quicktime
1.7EU Environmental Protection
Waste electrical products should not be disposed of with household waste. Please recycle where facilities exist. Check with your Local Authority or retailer for recycling advice.
Page 7
2.0EXPLORING YOUR Y-CAM
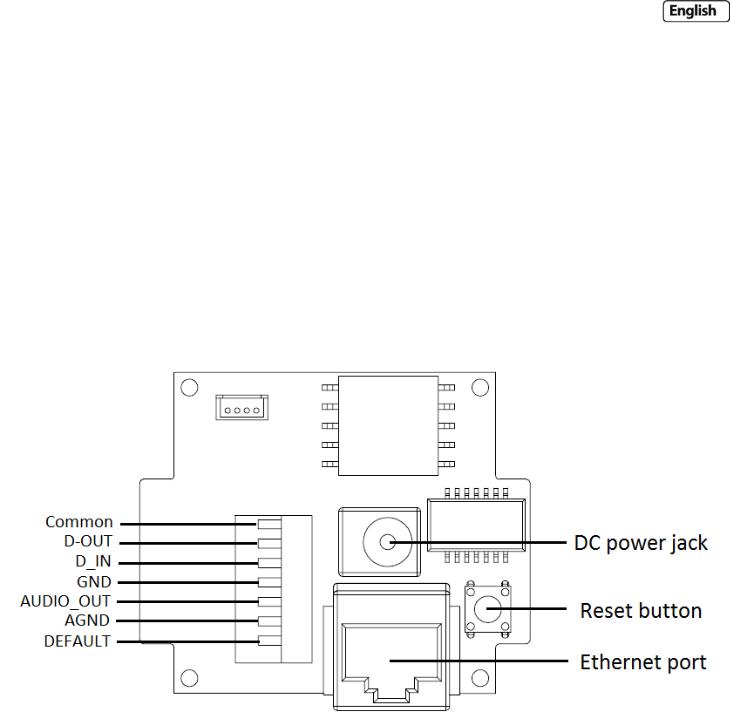
2.1Y-cam Bullet HD 1080 at a glance
Applies to products: YCBLHD6
Please note: The status LED on the Bullet HD 1080 is on the Ethernet connector on the cable.
Please note: To reset your Y-cam Bullet HD 1080 back to factory default settings, you will need to press the reset button. This is located inside the Y-cam Bullet HD 1080 and you will need to remove the back part of the camera. The reset button is located next to the internal Ethernet connector.
Page 8

2.2 microSD card information and installation
Adding a microSD to your Y-cam will allow you to record footage and motion alerts direct to memory card for future review.
Please note: It is advised to insert the microSD card before any other setup begins as the card will not be recognized if inserted once the Y-cam is turned on. Every time the card is reinserted, you will need to turn the power off and then on again for the card to be recognized.
If you do not have a microSD card, but plan to add one later, this is fine. When inserting the card, remember to turn the power off from the camera, insert the card, and then power it back on.
The Y-cam Bullet HD 1080 officially supports microSD memory cards with capacities ranging from 4GB to 32GB (class 6 or higher), including those labelled “SDHC”.
You are advised to format the microSD card through your computer (with FAT32 file system) before installation.
microSD Important Notes and Information
1)There is a limit to the number of rewrites possible on any microSD memory card. If you notice the card becoming slow or sluggish after reasonable usage, you will probably need to replace the microSD memory card. You should try to avoid purchasing second-hand memory cards.
2)If the card is not recognized by the Y-cam, try formatting the microSD card via your computer and then trying it again in the camera.
3)Images may not be recorded or read correctly if an unsupported microSD memory card is used with the Y-cam.
4)Carefully read the User guide, precautions on use, and any other information that was supplied with the memory card when purchased.
5)Do not use a memory card containing data recorded by another device as this may result in the Y-cam not functioning correctly.
6)Do not modify, overwrite the data, or change the folder names of the microSD memory card. It may result in the Y-cam not functioning correctly.
7)Always turn the power off to your camera before removing the microSD memory card.
8)Y-cam Solutions Ltd cannot be held liable for any loss of data or product misuse.
Page 9
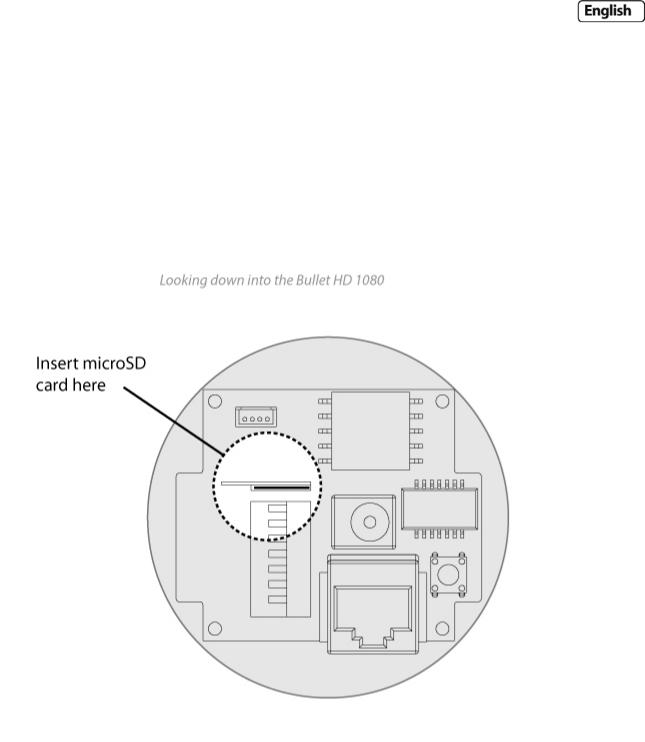
2.21 microSD card installation for Y-cam Bullet HD 1080
Inserting a microSD card into the Y-cam Bullet HD 1080 requires you to remove the back section of the camera. For this reason, it is advised not to do this once the camera has been mounted in a wall or in a non-easily accessible place.
Unscrew the front part of the camera and lift this carefully from the lens array. Be careful not to break the lens or infrared LEDs.
The microSD card slot is situated behind the back section.
The card can only be inserted into the camera with the golden pins of the microSD card facing towards the metal bracket. The SD card should not be forced into the SD card slot as this may damage the Y-cam.
Page 10
3.0 INSTALLATION
Please note: If you are planning to connect wirelessly, for initial setup, you need to connect the Y-cam directly to your router or switch with a network cable. You cannot connect wirelessly to the camera without first setting it up via a network cable.
You should connect the Y-cam directly in to your internet router (normally supplied by your broadband provider) or a network switch or hub (that is connected to your computers network).
Using the standard Ethernet network cable, plug this in to the network connection socket on the Y-cam at one end, and plug the other end in to a spare port on your router/switch.
Using the Power Adaptor (supplied), plug one end in to the Power Connection socket on the Y-cam. Plug the other end in to an electrical socket and turn the power on.
The Connectivity Status LEDs will light up. Your router/switch will then begin to communicate with the camera.
Page 11
3.1 Hardware installation
3.11 Using standard supplied cable
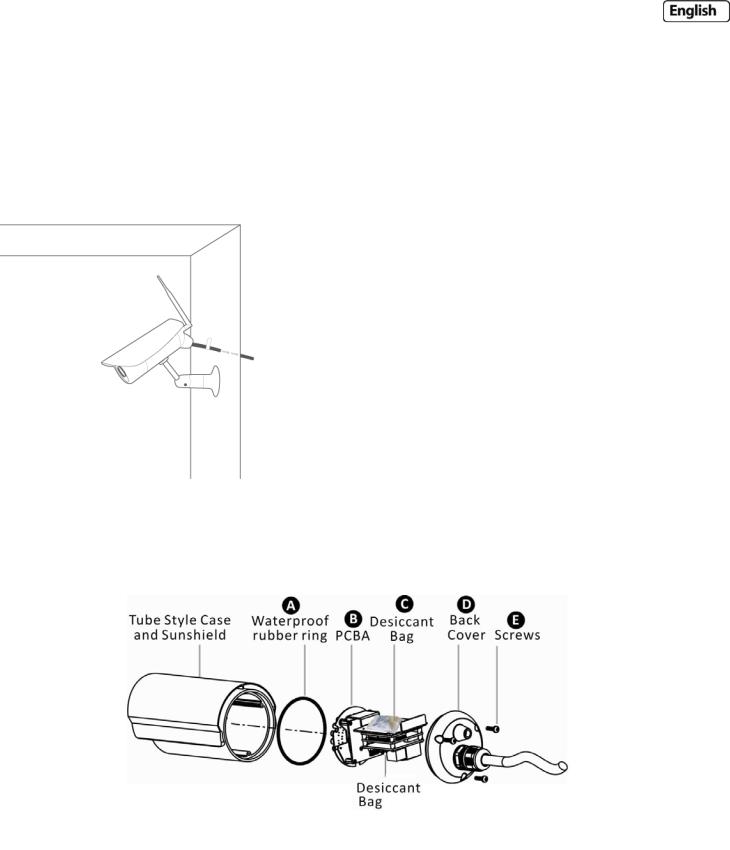
Secure the Network Camera to the wall/ceiling by the supplied camera stand.
If the housing was opened for microSD card installation or factory default, please re-install the parts in the following order (A to E) and make sure you tightly fasten the screws
Please Note: To ensure water-proof function, put the waterproof rubber in place (see the figure), before installing the back cover. There is one additional unopened desiccant (silica gel) inside the housing. To prevent condensation on the lens, please replace the desiccant bag with a new one, when re-assembling the camera. An unopened bag can last 3 months but the durability might be shortened under severe environments.
Page 12
3.12Using Cable connect
1)Loose the back cover by removing the 3 screws on the back cover
2)Disconnect the Ethernet, power and terminal block wires on the supplied cable from the main board
3)Remove the supplied cable from the back cover by loosening the plastic connector at the back.
4)Disassemble the supplied ½” conduit gland included
5)Pull the network and power cable through the flex conduit (not included)
6)Thread through the outside part of the conduit gland with the flex conduit
7)Attach the inner part of the conduit gland to the back cover
8)Pull the network and power cable through the back cover of the camera
9)Connect the flex conduit to the back cover and tighten the conduit gland
10)Plug the network and power cable into the camera’s internal Ethernet and power connector
11)Replace the desiccant with new one supplied.
12)Re-attach back cover
13)Secure the Network Camera to the wall/ceiling by the supplied camera stand
1
2
Page 13

4.0 Y-CAM SOFTWARE INSTALLATION
We are now going to run the Setup CD provided in the Y-cam box. This will install an utility called Y-cam Setup software on your computer. This is for PC and Mac. Y-cam Setup software searches your local network and displays any cameras it finds. It is very useful if you ever forget the address of you camera or in this case, when you first install it.
4.1Y-cam software installation for Windows
1.Insert the Y-cam Setup CD into your CD drive.
2.Browse to the disk and open the “Microsoft Windows” directory. Inside is the Y-cam Setup
3.Double click on the “Y-cam Setup for Windows” installation program and the following screen will be displayed. Click “Next”.
Page 14
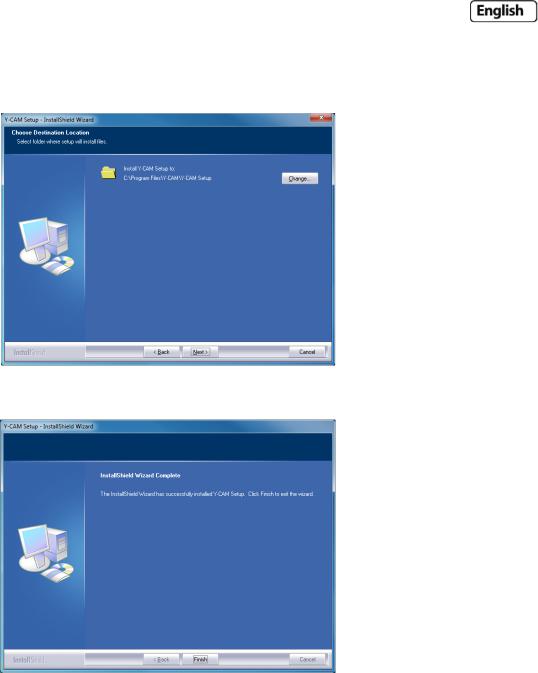
4.If you want to change the default folder click “Change” to replace otherwise click “Next”
5.Click “Install” to install the Y-cam Setup utility.
6.Click Finish to end the installation. You should now find a Y-cam icon on your Desktop.
Page 15

4.2Y-cam software installation for Mac
1.Insert the Y-cam Setup CD into your CD drive.
2.Browse to the disk and open the “Apple Mac OS” directory. Inside is the Y-cam Setup .
3.Move this file to your Desktop (or place of choosing) and double-click on Y-cam.app to run the program. Note: If you get a warning saying “Do you want the application ‘Y-CAM.app’ to accept incoming network connections?” Click “Allow”
Below are OS specific procedures to allow the Y-cam Setup software to search for cameras on the network.
Please Note: Leaving ports open can expose you to malicious attacks from the internet or other computers around you. Please make sure you revert the settings back to their current state after following any of the below procedures and setting up your cameras.
OSX 10.4 (Tiger)
1.Click on “System Preferences”
2.Click on “Sharing” in the Internet and Network section.
3.Select “Firewall” tab then click “Advanced”
4.Make sure the check box next to “Block UDP Traffic” is un-ticked then click “Ok”
5.Quit System Preferences and test the Y-cam Setup software again.
OSX 10.5 (Leopard)
1.Click on “System Preferences”
2.Click on “Security” in the “Personal” section
3.Select the “Firewall” tab
4.Select “Allow all incoming connections”
5.Close the window and wait for a few seconds (around 30 seconds) for the system to update the adapter settings then run Y-cam setup.
OSX 10.6 (Snow Leopard)
1.Click on “System Preferences”
2.Click on “Security” in the “Personal” section
3.Select the “Firewall” tab then click on “Advanced”
4.Select “Automatically allow signed software to receive incoming connections”
5.Click on the “+” button and locate and select the Y-cam Setup program then click “Add”. You should now “Y-cam
– Allow incoming connections” in the table.
6.Close the window and wait for a few seconds (around 30 seconds) for the system to update the adapter settings.
7.Close any versions of the Y-cam Setup that are running and then run the program again.
Page 16
4.3 Finding your camera with Y-cam setup
Now you have your camera attached and the software ready, you are ready to find your camera on your network. Double-click the Y-cam icon on your Desktop to launch the Y-cam Setup program.
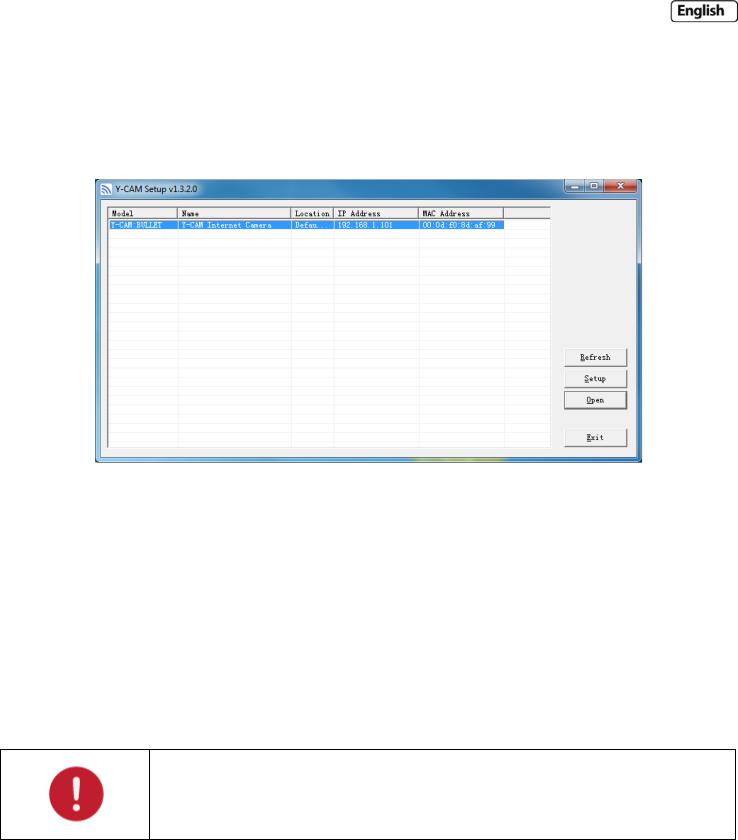
The Y-cam Setup utility should automatically find your camera if it is correctly connected (See image below).
Sometimes the program may take a few minutes to find your camera, so if your camera isn’t displayed within a few moments then click “Refresh” to search for cameras again.
[Refresh] – Searches your local network for cameras
[Setup] - Select the required camera and click Setup to configure the network settings for the camera [Open] - Select the required camera and click Open to access the camera via a web browser
[Exit] - Click Exit to close the Y-cam Setup window.
Anytime you lose the IP address of your Y-cam camera, you can run the Setup software to easily find it again. Once your camera is displayed, either chose “Open” to open the camera.
Please note: Y-cam Setup will only detect cameras that are on the same network as your computer. Ensure the camera is plugged in to the same router/network switch that your computer is connected to.
Page 17
5.0 WELCOME TO YOUR Y-CAM!
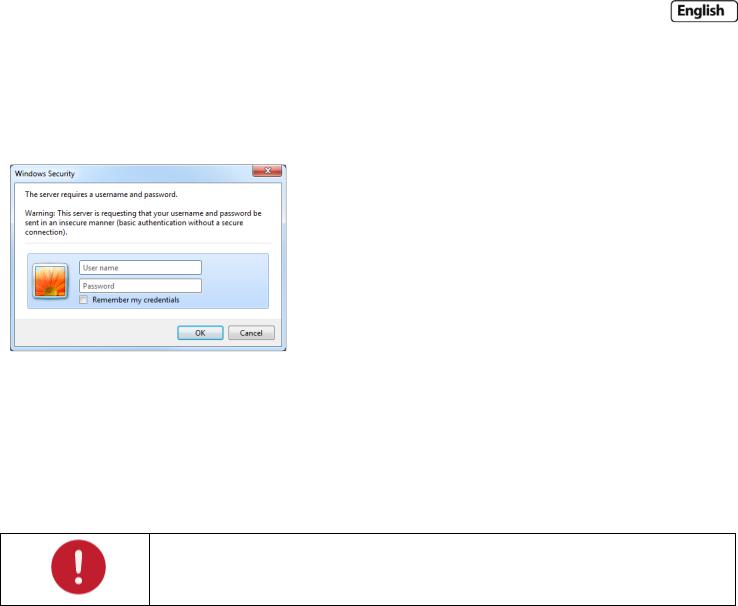
Once you have used the Y-cam Setup Software to find your camera and opened your selected camera, it will bring up a Login panel, similar to the below screenshot. You will need to enter the username and password to access the camera.
The default username and password for a Y-cam is:
Username: admin
Password: 1234
This is login is case sensitive, so should be entered exactly as they are above. It is recommended you change your password as soon as you are logged in - to avoid unauthorised access to the camera. Make a note of the password somewhere safe, as the only way to reset the password is to reset the cameras, so all settings will be lost.
Please note: The password can be any mixture of lower and uppercase alpha-numeric characters. Extended characters are not permitted.
You will then be greeted with the LIVE VIEW page.
Page 18

The address in the web browsers address bar should look something like http://192.168.1.50 – this is your cameras internal IP address.
Accessing this homepage is a common way to access the camera when you are using it on your local network, so it may be worth writing down the address that is displayed in your web browsers address bar or bookmarking it (Ctrl+D) so you can come back later. Of course, you can run Y-cam Setup at any time to find it again, but this option may save you time.
Page 19
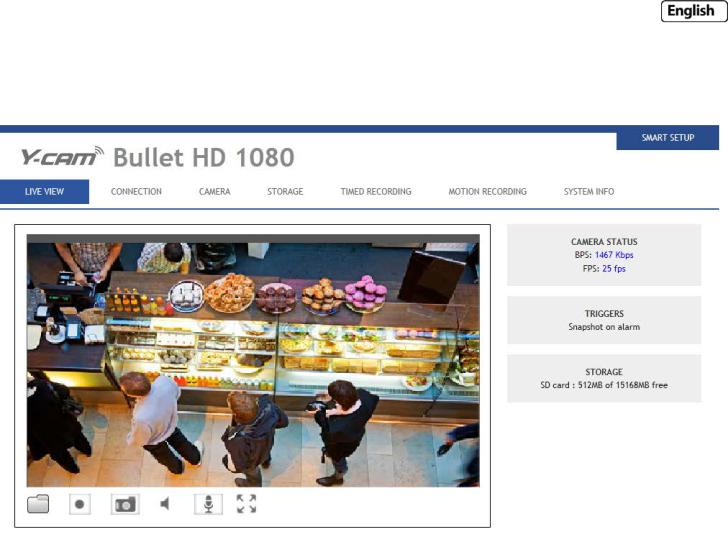
5.1 Live View on Bullet HD 1080 (using Internet Explorer)
Please note that when using the camera for the first time, you will be prompted to install an ActiveX Control. Please follow the on-screen instructions to download and install this control. You will then view the following screen:
Please view the next page for an explanation of the Operating Bar settings.
Page 20
Explanation of Operating Bar
1)Folder. Press this button to change the default snapshot and record path.
2)Recording. Press the Record button to record from the Live View to your local hard disk.
3)Snapshot. Press the Snapshot button to capture a still image of the camera view.
4)Listen. Mute. Click to listen and mute the audio.
5)Audio Upload: Press and release to start sending audio from your computer’s microphone to the camera speakers. Press and release to stop sending audio
6)Full screen mode. Click this button to view the camera stream full screen. Press Escape key to exit.
Page 21
Loading...