


Owner's Manual

SPECIAL MESSAGE SECTION
This product utilizes batteries or an external power supply (adapter). DO NOT connect this product to any power supply or adapter other than one described in the manual, on the name plate, or specifically recommended by Yamaha.
This product should be used only with the components supplied or; a cart, rack, or stand that is recommended by Yamaha. If a cart, etc., is used, please observe all safety markings and instructions that accompany the accessory product.
SPECIFICATIONS SUBJECT TO CHANGE:
The information contained in this manual is believed to be correct at the time of printing. However, Yamaha reserves the right to change or modify any of the specifications without notice or obligation to update existing units.
This product, either alone or in combination with an amplifier and headphones or speaker/s, may be capable of producing sound levels that could cause permanent hearing loss. DO NOT operate for long periods of time at a high volume level or at a level that is uncomfortable. If you experience any hearing loss or ringing in the ears, you should consult an audiologist.
IMPORTANT: The louder the sound, the shorter the time period before damage occurs.
NOTICE:
Service charges incurred due to a lack of knowledge relating to how a function or effect works (when the unit is operating as designed) are not covered by the manufacturer’s warranty, and are therefore the owners responsibility. Please study this manual carefully and consult your dealer before requesting service.
ENVIRONMENTAL ISSUES:
Yamaha strives to produce products that are both user safe and environmentally friendly. We sincerely believe that our products and the production methods used to produce them, meet these goals. In keeping with both the letter and the spirit of the law, we want you to be aware of the following:
Battery Notice:
This product MAY contain a small non-rechargeable battery which (if applicable) is soldered in place. The average life span of this type of battery is approximately five years. When replacement becomes
necessary, contact a qualified service representative to perform the replacement.
This product may also use “household” type batteries. Some of these may be rechargeable. Make sure that the battery being charged is a rechargeable type and that the charger is intended for the battery being charged.
When installing batteries, do not mix batteries with new, or with batteries of a different type. Batteries MUST be installed correctly. Mismatches or incorrect installation may result in overheating and battery case rupture.
Warning:
Do not attempt to disassemble, or incinerate any battery. Keep all batteries away from children. Dispose of used batteries promptly and as regulated by the laws in your area. Note: Check with any retailer of household type batteries in your area for battery disposal information.
Disposal Notice:
Should this product become damaged beyond repair, or for some reason its useful life is considered to be at an end, please observe all local, state, and federal regulations that relate to the disposal of products that contain lead, batteries, plastics, etc. If your dealer is unable to assist you, please contact Yamaha directly.
NAME PLATE LOCATION:
The name plate is located on the bottom of the product. The model number, serial number, power requirements, etc., are located on this plate. You should record the model number, serial number, and the date of purchase in the spaces provided below and retain this manual as a permanent record of your purchase.
Model
Serial No.
Purchase Date
92-BP (bottom)
PLEASE KEEP THIS MANUAL
FCC INFORMATION (U.S.A.)
1. IMPORTANT NOTICE: DO NOT MODIFY THIS UNIT! |
guarantee that interference will not occur in all installations. If this |
||
This product, when installed as indicated in the instructions contained |
product is found to be the source of interference, which can be |
|
|
in this manual, meets FCC requirements. Modifications not expressly |
determined by turning the unit “OFF” and “ON”, please try to eliminate |
||
approved by Yamaha may void your authority, granted by the FCC, to |
the problem by using one of the following measures: |
|
|
use the product. |
Relocate either this product or the device that is being affected by the |
||
2. IMPORTANT: When connecting this product to accessories and/or |
interference. |
|
|
another product use only high quality shielded cables. Cable/s |
Utilize power outlets that are on different branch (circuit breaker or |
||
supplied with this product MUST be used. Follow all installation |
fuse) circuits or install AC line filter/s. |
|
|
instructions. Failure to follow instructions could void your FCC |
In the case of radio or TV interference, relocate/reorient the antenna. If |
||
authorization to use this product in the USA. |
the antenna lead-in is 300 ohm ribbon lead, change the lead-in to co- |
||
3. NOTE: This product has been tested and found to comply with the |
axial type cable. |
|
|
requirements listed in FCC Regulations, Part 15 for Class “B” digital |
If these corrective measures do not produce satisfactory results, |
|
|
devices. Compliance with these requirements provides a reasonable |
please contact the local retailer authorized to distribute this type of |
||
level of assurance that your use of this product in a residential |
product. If you can not locate the appropriate retailer, please contact |
||
environment will not result in harmful interference with other electronic |
Yamaha Corporation of America, Electronic Service Division, 6600 |
||
devices. This equipment generates/uses radio frequencies and, if not |
Orangethorpe Ave, Buena Park, CA90620 |
|
|
installed and used according to the instructions found in the users |
The above statements apply ONLY to those products distributed by |
||
manual, may cause interference harmful to the operation of other |
|||
Yamaha Corporation of America or its subsidiaries. |
|
||
electronic devices. Compliance with FCC regulations does not |
|
||
|
|
||
|
|
||
* This applies only to products distributed by YAMAHA CORPORATION OF AMERICA. |
(class B) |
||
OBSERVERA!
Apparaten kopplas inte ur växelströmskällan (nätet) sá länge som den ar ansluten till vägguttaget, även om själva apparaten har stängts av.
ADVARSEL: Netspæendingen til dette apparat er IKKE afbrudt, sálæenge netledningen siddr i en stikkontakt, som er t endt — ogsá selvom der or slukket pá apparatets afbryder.
VAROITUS: Laitteen toisiopiiriin kytketty käyttökytkin ei irroita koko laitetta verkosta.
(standby)
2

PRECAUTIONS
PLEASE READ CAREFULLY BEFORE PROCEEDING
* Please keep this manual in a safe place for future reference.
 WARNING
Always follow the basic precautions listed below to avoid the possibility of serious injury or even death from electrical shock, shortcircuiting, damages, fire or other hazards. These precautions include, but are not limited to, the following:
•Do not open the instrument or attempt to disassemble the internal parts or modify them in any way. The instrument contains no user-serviceable parts. If it should appear to be malfunctioning, discontinue use immediately and have it inspected by qualified Yamaha service personnel.
•Do not expose the instrument to rain, use it near water or in damp or wet conditions, or place containers on it containing liquids which might spill into any openings.
•If the AC adaptor cord or plug becomes frayed or damaged, or if there is a sudden loss of sound during use of the instrument, or if any unusual smells or smoke should appear to be caused by it, immediately turn off the power switch, disconnect the adaptor
plug from the outlet, and have the instrument inspected by qualified Yamaha service personnel.
•Use the specified adaptor (PA-5C or an equivalent recommended by Yamaha) only. Using the wrong adaptor can result in damage to the instrument or overheating.
•Before cleaning the instrument, always remove the electric plug from the outlet. Never insert or remove an electric plug with wet hands.
•Check the electric plug periodically and remove any dirt or dust which may have accumulated on it.
 CAUTION
Always follow the basic precautions listed below to avoid the possibility of physical injury to you or others, or damage to the instrument or other property. These precautions include, but are not limited to, the following:
•Do not place the AC adaptor cord near heat sources such as heaters or radiators, and do not excessively bend or otherwise damage the cord, place heavy objects on it, or place it in a position where anyone could walk on, trip over, or roll anything over it.
•When removing the electric plug from the instrument or an outlet, always hold the plug itself and not the cord.
•Do not connect the instrument to an electrical outlet using a mul- tiple-connector. Doing so can result in lower sound quality, or possibly cause overheating in the outlet.
•Unplug the AC power adaptor when not using the instrument, or during electrical storms.
•Always make sure all batteries are inserted in conformity with the +/- polarity markings. Failure to do so might result in overheating, fire, or battery fluid leakage.
•Always replace all batteries at the same time. Do not use new batteries together with old ones. Also, do not mix battery types, such as alkaline batteries with manganese batteries, or batteries from different makers, or different types of batteries from the same maker, since this can cause overheating, fire, or battery fluid leakage.
•Do not dispose of batteries in fire.
•Do not attempt to recharge batteries that are not intended to be charged.
•When the batteries run out, or if the instrument is not to be used for a long time, remove the batteries from the instrument to prevent possible leakage of the battery fluid.
•Keep batteries away from children.
•If the batteries do leak, avoid contact with the leaked fluid. If the battery fluid should come in contact with your eyes, mouth, or skin, wash immediately with water and consult a doctor. Battery fluid is corrosive and may possibly cause loss of sight or chemical burns.
•Before connecting the instrument to other electronic components, turn off the power for all components. Before turning the power on or off for all components, set all volume levels to minimum. Also, be sure to set the volumes of all components at their minimum levels and gradually raise the volume controls while playing the instrument to set the desired listening level.
•Do not expose the instrument to excessive dust or vibrations, or extreme cold or heat (such as in direct sunlight, near a heater, or in a car during the day) to prevent the possibility of panel disfiguration or damage to the internal components.
•Do not place the instrument in an unstable position where it might accidentally fall over.
•Before moving the instrument, remove all connected adaptor and other cables.
•When cleaning the instrument, use a soft, dry cloth. Do not use paint thinners, solvents, cleaning fluids, or chemical-impreg- nated wiping cloths. Also, do not place vinyl, plastic or rubber objects on the instrument, since this might discolor the panel or keyboard.
•Do not rest your weight on, or place heavy objects on the instrument, and do not use excessive force on the buttons, switches or connectors.
•Use only the stand specified for the instrument. When attaching the stand, use the provided screws only. Failure to do so could cause damage to the internal components or result in the instrument falling over.
•Do not operate the instrument for a long period of time at a high or uncomfortable volume level, since this can cause permanent hearing loss. If you experience any hearing loss or ringing in the ears, consult a physician.
•Playing while looking at the lights for a long period of time may cause eye strain and stiff neck/shoulders. For your health and comfort, we recommend that you take a ten-minute break for every hour.
■DATA BACK-UP AND STORAGE
•Yamaha recommends that you regularly save data using an external device such as the floppy disk-based Yamaha MIDI data filer MDF3, and storing the floppy disks in a safe, cool, dry place. YAMAHA CANNOT BE HELD RESPONSIBLE FOR THE ACCIDENTAL LOSS OF IMPORTANT MUSIC DATA! Regarding the data you have created, as long as fresh batteries are inserted in (or an AC power adaptor is connected to) the instrument, the data will be retained, even when the power is turned off. It will also be retained long enough to exchange an old set of batteries for a new set. If you have important data in the instrument which you don’t want to lose, please take care to keep fresh batteries inserted in (or keep an AC power adaptor connected to) the instrument, and to regularly save data.
Yamaha cannot be held responsible for damage caused by improper use or modifications to the instrument, or data that is lost or destroyed.
•Do not use the instrument near other electrical products such as televisions, radios, or speakers, since this might cause interference which can affect proper operation of the other products.
(4)-7
Always turn the power off when the instrument is not in use. Make sure to discard used batteries according to local regulations.
3

Congratulations on your purchase of the Yamaha EZ-30 PortaTone!
You now own a portable keyboard that combines advanced functions, great sound and exceptional ease-of-use in a highly compact package. Its outstanding features also make it a remarkably expressive and versatile instrument.
Read this Owner’s Manual carefully while playing your new EZ-30 in order to take full advantage of its various features.
Main Features
The EZ-30 is a sophisticated yet easy-to-use keyboard with the following features and functions:
 Yamaha Education Suite
The EZ-30 features the new Yamaha Education Suite - a set of learning tools that utilize the latest technology to make studying and practicing music more fun and fulfilling than ever before!
The Yamaha Education Suite includes: |
|
● Lesson ................................................................ |
page 34 |
The convenient and easy-to-use Lesson feature guides you through the parts of a song - just like a patient teacher! Select from any one of 100 songs on the EZ-30, and learn the leftand right-hand parts independently at first, then together. Lesson features three easy steps that help you master each song: Timing, Waiting and Minus One.
● Grade & Talking ................................................ |
pages 37 and 38 |
The EZ-30 also has the Grade and Talking features. Grade is a virtual “teacher,” evaluating your practice sessions and rating your performance. The convenient Talking function “announces” each Lesson step and your “grades,” among other things.
● Dictionary .......................................................... |
page 58 |
Dictionary is a built-in “chord encyclopedia” that teaches you how to play specific chords by showing you the appropriate notes in the display - perfect for when you know the name of a chord and want to quickly learn how to play it!
● Lighting ............................................................. |
page 32 |
When you are using the Lesson feature or Dictionary, the key indicators tell you which keys to play. Also, during song playback, they show the keys that are playing.
● ABC/DoReMi...................................................... |
page 43 |
The EZ-30 sings the melody using “A, B, C...” or “DoReMi.” Also, while you are using the Lesson function, the EZ-30 guides you by singing a note ahead using “A, B, C” or “DoReMi.”
4

Portable Grand ................................. |
page 39 |
The EZ-30 also has a Portable Grand function for realistic piano performance. Pressing the [PORTABLE GRAND] button instantly calls up the stunningly authentic “Stereo Sampled Piano” voice and configures the entire EZ-30 for optimum piano play. Special Pianist styles and songs - with piano-only accompaniment - are also provided.
Flash Memory ............................................ |
page 71 |
The EZ-30, when connected to a personal computer, can load song data (purchased via internet) into the internal flash memory. You can use this song data along with the Lesson function. Also, the song data will be retained, even when the AC power adaptor and batteries are removed from the EZ-30.
Other powerful features include:
61 keys with a Touch Response mechanism that enables you to express subtle nuances through various playing techniques.
A total of 610 various high-quality voices (including 480 Expanded voices), with a maximum polyphony of 32 voices.
High-quality Reverb, DSP, and Harmony effects for enhancing the sound of the voices - and your performance.
106 auto accompaniment styles, each with Intro, Main A and B, and Ending sections. An Auto Fill function adds dynamic fills when switching sections.
Powerful, easy-to-use song recording operations, for recording and playing back up to five of your original songs.
Registration Memory presets for storing all of the EZ-30’s panel settings to a single button for instant and automatic recall.
One Touch Setting function for automatically calling up an appropriate voice to match the style or song you select.
Full MIDI and General MIDI (GM) compatibility, letting you easily integrate the EZ30 into a MIDI music system, and use the built-in Expanded voices with all GM software.
*The illustrations and LCD screens as shown in this owner’s manual are for instructional purposes only, and may be different from the ones on your instrument.
5

Contents |
|
Setting Up ................................. |
8 |
Power Requirements ................... |
8 |
Using Headphones...................... |
9 |
Connecting a Keyboard Amplifi- |
|
er or Stereo System...................... |
9 |
Using a Footswitch...................... |
9 |
Using the MIDI Terminals ........... |
9 |
Panel Controls and Terminals.10 |
|
Quick Guide ........................ |
12 |
Songs ........................................ |
12 |
Playing the Demo Songs............. |
12 |
Playing a Single Song ................. |
13 |
Lesson ....................................... |
14 |
Using the Lesson Feature............ |
14 |
Voices ....................................... |
16 |
Playing the Piano ........................ |
16 |
Playing along with the Metro- |
|
nome ........................................... |
16 |
Playing the ABC/DoReMi voices.17 |
|
Selecting and Playing Other |
|
Voices .......................................... |
17 |
Auto Accompaniment .............. |
18 |
Using the Auto Accompaniment 18 |
|
Looking up Chords in the Dic- |
|
tionary ......................................... |
20 |
Panel Display Indications........ |
22 |
Selecting and Playing Songs ... |
28 |
Listening To a Demo Song ......... |
28 |
Selecting and Playing a Song ..... |
28 |
Listening to a Flash Song............ |
29 |
Switching the Tracks On and |
|
Off ............................................... |
29 |
Melody Voice Change............... |
30 |
Adjusting the Tempo .................. |
31 |
Tap Function ............................. |
31 |
Song Volume Level ..................... |
32 |
Switching the Light Guide On |
|
and Off ........................................ |
32 |
Song Lesson............................. |
34 |
Using the Lesson Feature ........... |
34 |
ABC/DoReMi Guide.................... |
36 |
Grade .......................................... |
37 |
Talking ........................................ |
38 |
Portable Grand........................ |
39 |
Using the Metronome................ |
39 |
Setting a Tempo......................... |
39 |
Setting the Time Signature of |
|
the Metronome.......................... |
40 |
Adjusting the Metronome Vol- |
|
ume........................................... |
40 |
Playing Voices ......................... |
42 |
Selecting a Voice ........................ |
42 |
Playing a Voice ........................... |
42 |
One Touch Setting ..................... |
43 |
Changing the Split Point............ |
44 |
Transpose ................................... |
45 |
Tuning ........................................ |
46 |
Touch .......................................... |
47 |
Touch Sensitivity ........................ |
47 |
Effects...................................... |
48 |
Reverb......................................... |
48 |
DSP ............................................. |
49 |
Harmony ..................................... |
50 |
Auto Accompaniment ............. |
51 |
Selecting a Style ......................... |
51 |
Starting Accompaniment ........... |
52 |
Sync start................................... |
52 |
Start........................................... |
53 |
Tap start .................................... |
53 |
Stopping the Accompaniment ... |
54 |
Changing the Tempo ................. |
54 |
Using Auto Accompaniment— |
|
Multi Fingering........................... |
55 |
Single Finger Chords.................. |
55 |
Fingered Chords ........................ |
56 |
6

Looking up Chords in the dictio- |
|
nary............................................. |
58 |
Playing a Melody along with |
|
the Accompaniment ................... |
61 |
Adjusting the Accompaniment |
|
Volume...................................... |
61 |
Changing the Accompaniment |
|
Section ........................................ |
62 |
Intro........................................... |
62 |
Main.......................................... |
62 |
Ending ....................................... |
63 |
Registration Memory ............. |
64 |
Recording a Registration Memo- |
|
ry Preset...................................... |
64 |
Recalling a Registration Memo- |
|
ry Preset...................................... |
65 |
Song Recording ...................... |
66 |
Recording a User Song............... |
66 |
Erasing a Song ............................ |
69 |
Song Clear ................................. |
69 |
Track Clear ................................ |
70 |
Loading a Song into Flash |
|
Memory .................................. |
71 |
Installing Song Filer.................... |
71 |
Song Filer’s Functions................. |
72 |
Octave......................................... |
73 |
Available Flash Memory Amount 74 |
|
Flash Clear .................................. |
74 |
MIDI Functions........................ |
75 |
What is MIDI? ............................. |
75 |
Available MIDI Funcitons............ |
77 |
Connecting to a Personal Com- |
|
puter ........................................... |
78 |
Local Control .............................. |
79 |
Using Bulk Dump Send to Save |
|
Data ............................................ |
80 |
Transmitting the EZ-30 Panel |
|
Settings (Initial Send) ................ |
81 |
Transmitting SMF Format Data.. 82
Troubleshooting..................... |
83 |
Data Backup & Initialization.. 84
Data Backup ................................ |
84 |
Data Initialization ....................... |
84 |
Voice List ................................ |
85 |
Style List ................................. |
90 |
Drum Kit List .......................... |
91 |
Effect Type List....................... |
96 |
MIDI Implementation Chart... |
98 |
Specifications ....................... |
102 |
Index..................................... |
103 |
7
Setting Up
Power Requirements
Although the EZ-30 will run either from an optional AC adaptor or batteries, Yamaha recommends use of an AC adaptor whenever possible. An AC adaptor is more environmentally friendly than batteries and does not deplete resources.
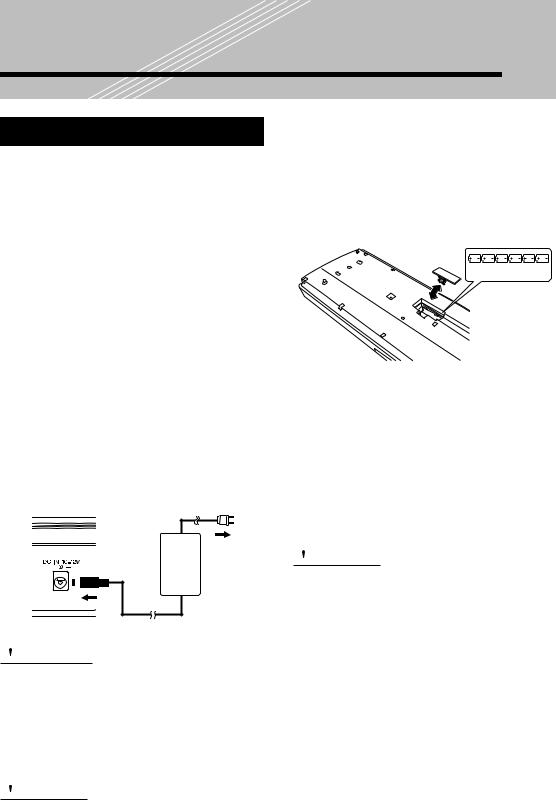
■ Using an AC Power Adaptor
Use of an AC power adaptor is recommended, especially when you use the EZ-30 for a long period of time.
1Make sure that the [STANDBY/ON] switch of the EZ-30 is set to STANDBY.
2Connect one end of the adaptor to the DC IN 10-12V jack on the rear panel of your EZ-30.
3Connect the other end to a suitable electrical outlet.
3outlet
2 |
PA-5C |
 WARNING
Use ONLY a Yamaha PA-5C AC Power Adaptor (or other adaptor specifically recommended by Yamaha) to power your instrument from the AC mains.
The use of other adaptors may result in irreparable damage to both the adaptor and the EZ30.
 CAUTION
Unplug the AC Power Adaptor when not using the EZ-30, or during electrical storms.
■ Using Batteries
1Turn the instrument upside-down and remove the battery compartment lid.
2Insert six 1.5-volt “D” size, R20P (LR20) or equivalent batteries as shown in the illustration, making sure that the positive and negative terminals are properly aligned.
3 Replace the lid.
BATTERIES 1.5 V x 6
Replace the batteries before they completely discharge. If the battery voltage gets low, the volume level may be reduced, sound integrity may deteriorate, the display indicators may disappear, or the stored data may be deleted. If any of these events occur, replace the battery, heeding the cautions described below.
 CAUTION
•Insert the batteries in the correct direction, making sure that the positive and negative terminals of the batteries match the label. If the orientation does not match the label, the batteries may generate heat, cause a fire, or leak.
•Never mix old and new batteries or different types of batteries (e.g., alkaline and manganese).
•To prevent possible damage from battery leakage, remove the batteries from the instrument if it is not to be used for a long time.
•Even when the switch is in the “STANDBY” position, electricity is still flowing to the instrument at the minimum level.
When you plan not to use the EZ-30 for a long period of time, make sure you unplug the AC power adaptor from the wall AC outlet, and/or remove the batteries from the instrument.
8
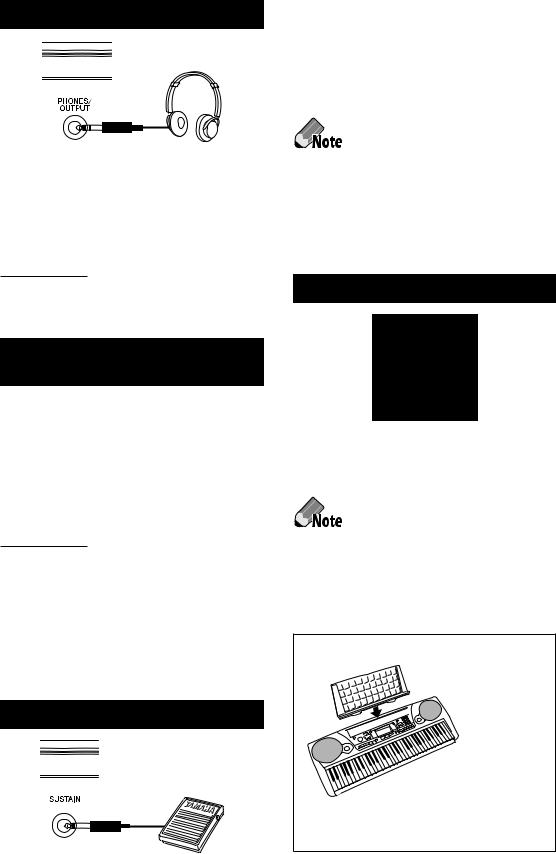
Using Headphones
For private practicing and playing without disturbing others, connect a set of stereo headphones to the rear panel PHONES/OUTPUT jack. Sound from the built-in speaker system is automatically cut off when you insert a headphone plug into this jack.
 CAUTION
Do not use headphones for a long time at high volume levels. Otherwise, you may damage your hearing.
Connecting a Keyboard Ampli-
fier or Stereo System
Though the EZ-30 is equipped with a built-in speaker system, you can also play it through an external amplifier/speaker system. First, make sure the EZ-30 and any external devices are turned off, then connect one end of a stereo audio cable to the LINE IN or AUX IN jack(s) of the other device and the other end to the rear panel PHONES/OUTPUT jack on the EZ-30.
 CAUTION
To prevent damage to the speakers, set the volume of the external devices at the minimum setting before connecting them. Failure to observe these cautions may result in electric shock or equipment damage. Also, be sure to set the volumes of all devices at their minimum levels and gradually raise the volume controls while playing the instrument to set the desired listening level.
Using a Footswitch
This feature lets you use an optional footswitch (Yamaha FC4 or FC5) to sustain the sound of the voices. The footswitch functions the same way as a damper pedal on an acoustic piano - press and hold down the footswitch as you play the keyboard to sustain the sound.
• Make sure that the footswitch plug is properly connected to the SUSTAIN jack before you turn on the power.
•Do not press the footswitch while turning the power on. Doing this changes the recognized polarity of the footswitch, resulting in reversed footswitch operation.
Using the MIDI Terminals
The EZ-30 also features MIDI terminals, allowing you to interface the EZ-30 with other MIDI instruments and devices. (For more information, see page 78.)
• Special MIDI cables (sold separately) must be used for connecting to MIDI devices. They can be bought at music stores, etc.
•Never use MIDI cables longer than about 15 meters. Cables longer than this can pick up noise which can cause data errors.
Music Stand
Insert the bottom edge of the included music stand into the slot located at the top rear of the EZ-30 control panel.
9
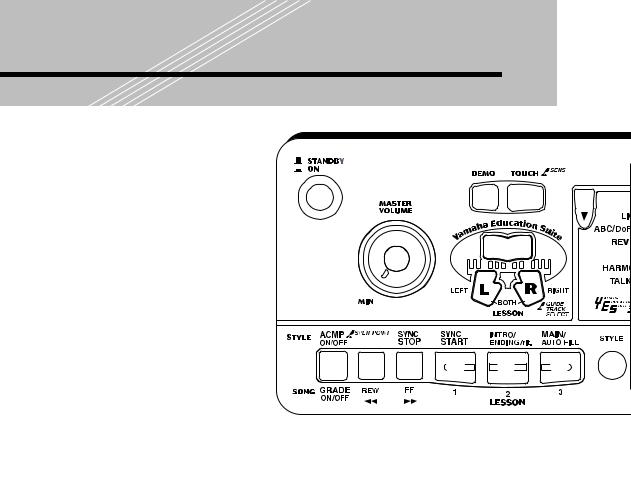
Panel Controls and Terminals
Front Panel |
|
|
1 Power switch ([STANDBY/ON])........... |
22 |
|
2 |
[MASTER VOLUME] dial...................... |
22 |
3 |
[DEMO] button .................................... |
28 |
4 |
[TOUCH] button.................................. |
47 |
5 |
[Dict.] (DICTIONARY) button .............. |
58 |
6 LESSON [L] (Left) and [R] (Right) buttons34 |
||
7 Overall (left, right) buttons ................... |
23 |
|
8 |
[TEMPO/TAP] button ........................... |
31 |
9 |
[PORTABLE GRAND] button ............... |
39 |
0 |
[METRONOME] button........................ |
39 |
A [ABC/DoReMi] button ......................... |
43 |
|
B Numeric keypad, [+/YES] and [–/NO] |
||
|
buttons................................................. |
25 |
C [ACMP ON/OFF] / [GRADE ON/OFF] |
||
|
button ............................................ |
52, 37 |
D [REW] button ....................................... |
29 |
|
E [SYNC STOP] / [FF] button............. |
52, 29 |
|
F [SYNC START] / [LESSON 1] button52, 35 |
||
G [INTRO/ENDING] / [LESSON 2] |
|
|
|
button ............................................ |
62, 35 |
H [MAIN/AUTO FILL] / [LESSON 3] |
|
|
|
button............................................... |
62, 35 |
I [STYLE] button ..................................... |
51 |
|
J [SONG] button .................................... |
28 |
|
K [START/STOP] button .......................... |
29 |
|
L [VOICE] button .................................... |
42 |
|
M [RECORD] button ................................ |
67 |
|
N SONG MEMORY buttons..................... |
67 |
|
O REGISTRATION MEMORY buttons ...... |
64 |
|
Rear Panel |
|
|
P MIDI IN,OUT terminals ......................... |
9 |
|
Q SUSTAIN jack ........................................ |
9 |
|
R PHONES/OUTPUT jack ......................... |
9 |
|
S DC IN 10-12V jack ............................... |
8 |
|


 7
7
34
1
5 

2

 6
6
C D E F G H
I
10

B 7 8


 0
0
9 A
J K L
M 


 O
O
N
 P
P Q R S
Q R S
11
 Quick
Quick


 Guide
Guide

STEP

 1
1


 Songs
Songs


12
212
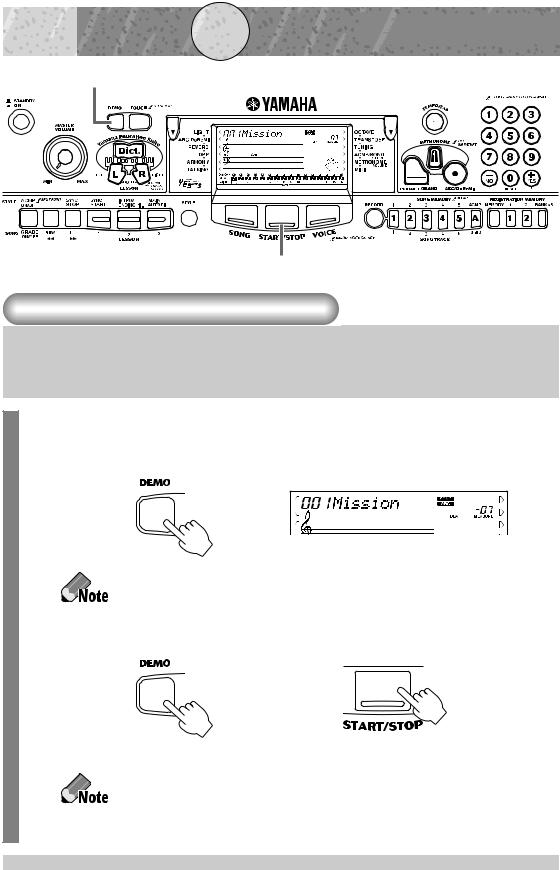
Playing the Demo Songs
Demo songs (001–100) showcase the sophisticated features and stunning sound of the EZ-30. Let’s play the Demo songs now, starting with 001...
1 Press the [DEMO] button.
Demo song 001 starts playing. When the song is complete, the subsequent songs (002, 003...) start playing sequentially.
If you have loaded songs into flash memory, they are the first to play.
2 Stop the Demo song.
or
Want to find out more? See page 28.
If you do not wish to play the Demo songs when you press the [DEMO] button, turn on the power to the EZ-30 while pressing and holding down the [DEMO] button. To activate the Demo playback function, turn on the power to the EZ-30 in the normal manner.
12
Playing a Single Song
Naturally, you can also individually select and play back any of the EZ30’s songs (Songs 001–100 and songs in flash memory). Also, simply by pressing the [START/STOP] button, you can start playback.
1 Start the song.
When the power of the EZ-30 is turned on, the song of “003: Linus And Lucy” is selected. For instructions on selecting songs, See page 28.
2 Stop the song.
Want to find out more? See page 28.
[Song List]
No. |
Song Name |
|
No. |
Song Name |
|
No. |
Song Name |
|
|
|
|
|
|
|
|
|
|
|
Favorite |
|
25 |
Aura Lee |
|
52 |
O Christmas Tree (DUET) |
|
|
|
|
|
|
|
|
|
|
1 |
Mission:Impossible |
|
26 |
Londonderry Air |
|
53 |
Mary Had A Little Lamb |
|
|
|
|
|
|
|
(DUET) |
||
2 |
Beauty And The Beast |
|
27 |
Ring De Banjo |
||||
|
|
|
|
|
|
54 |
Ten Little Indians (DUET) |
|
3 |
Linus And Lucy |
|
28 |
Wenn Ich Ein Vöglein Wär ? |
||||
|
|
|
|
|
|
55 |
Pop Goes The Weasel (DUET) |
|
4 |
Can You Feel The Love Tonight |
|
29 |
Die Lorelei |
||||
|
|
|
|
|
|
56 |
Twinkle Twinkle Little Star |
|
5 |
Celebration |
|
30 |
Funiculi-Funicula |
||||
|
|
|
|
|
|
|
Twinkle Twinkle Little Star |
|
6 |
Unchained Melody |
|
31 |
Turkey In The Straw |
|
57 |
||
|
|
|
|
|
|
|
(DUET) |
|
7 |
A Whole New World |
|
32 |
Old Folks At Home |
|
|
||
|
|
58 |
Close Your Hands, Open Your |
|||||
8 |
Chopsticks |
|
33 |
Silent Night |
|
|||
|
|
Hands |
||||||
9 |
Georgia On My Mind |
|
34 |
Jingle Bells |
|
|
|
|
|
|
59 |
Close Your Hands, Open Your |
|||||
10 |
Don't Let The Sun Go Down |
|
35 |
Muss I Denn |
|
Hands (DUET) |
||
On Me |
|
36 |
Liebesträume Nr.3 |
|
60 |
The Cuckoo |
||
11 |
Rhapsody In Blue |
|
|
|
|
|
|
|
|
37 |
Jesu, Joy Of Man's Desiring |
|
61 |
The Cuckoo (DUET) |
|||
|
Bill Bailey (Won't You Please |
|
|
|
|
|
|
|
12 |
|
38 |
Symphonie Nr.9 |
|
62 |
O Du Lieber Augustin |
||
Come Home) |
|
|
|
|
||||
|
|
39 |
Song Of The Pearl Fisher |
|
63 |
O Du Lieber Augustin (DUET) |
||
13 |
When Irish Eyes Are Smiling |
|
|
|||||
|
40 |
Gavotte |
|
64 |
London Bridge |
|||
|
|
|
|
|||||
14 |
Down By The Riverside |
|||||||
|
41 |
String Quartet No.17 2nd Mov. |
|
65 |
London Bridge (DUET) |
|||
15 |
Fascination |
|
|
|||||
|
"Serenade" |
|
66 |
American Patrol |
||||
16 |
America The Beautiful |
|
|
|||||
|
42 |
Menuett |
|
|
|
|||
|
|
67 |
Beautiful Dreamer |
|||||
17 |
Take Me Out To The Ball Game |
|
|
|||||
|
43 |
Canon |
|
|
|
|||
|
|
68 |
Battle Hymn Of The Republic |
|||||
|
When The Saints Go Marchin' |
|
|
|||||
18 |
|
44 |
The Danube Waves |
|
|
|
||
|
|
69 |
Home Sweet Home |
|||||
In |
|
|
||||||
|
|
45 |
From "The Magic Flute" |
|
||||
|
|
|
|
|
Valse Des Fleurs (From"The |
|||
19 |
Tain't Nobody's Business If I |
|
70 |
|||||
|
|
|
|
|||||
Do |
|
46 |
Piano Sonate Op.27-2 |
|
|
Nutcracker") |
||
|
|
|
"Mondschein" |
|
71 |
Aloha Oe |
||
20 |
Happy Birthday To You |
|
|
|||||
|
47 |
"The Surprise"Symphony |
|
|
|
|||
|
|
|
|
72 |
I've Been Working On The |
|||
|
World/Classic |
|
||||||
|
|
48 |
To A Wild Rose |
|
Railroad |
|||
21 |
Little Brown Jug |
|
49 |
Air de Toréador"Carmen" |
|
73 |
My Darling Clementine |
|
22 |
Loch Lomond |
|
|
|||||
|
50 |
O Mio Babbino Caro (From |
|
74 |
Auld Lang Syne |
|||
|
|
|
|
|||||
23 |
Oh! Susanna |
|
||||||
|
"Gianni Schicchi") |
|
75 |
Grandfather's Clock |
||||
24 |
Greensleeves |
|
|
|
|
|
|
|
|
51 |
Im Mai (DUET) |
|
|
|
|||
|
|
76 |
Amazing Grace |
|||||
|
|
|
|
|
|
|
|
|
|
|
|
|
|
|
|
|
No. |
Song Name |
77My Bonnie
78Yankee Doodle
79Joy To The World
80Ave Maria
Pianist
81Dolly's Dreaming And Awakening
82La Candeur
83Arabesque
84Pastorale
85Petite Réunion
86Innocence
87Progrès
88Tarentelle
89La Chevaleresque
90Etude Op.10-3 "Chanson De L'adieu"
91Marcia Alla Turca
92Turkish March
93Valse Op.64-1 "Peiti Chien"
94Menuett
95Nocturne Op.9-2
96Moments Musicaux Op.94-3
97The Entertainer
98Prelude (Wohltemperierte Klavier 1-1)
99La Viollette
100 Für Elise
13
 Quick
Quick


 Guide
Guide

STEP

 2
2


 Lesson


12
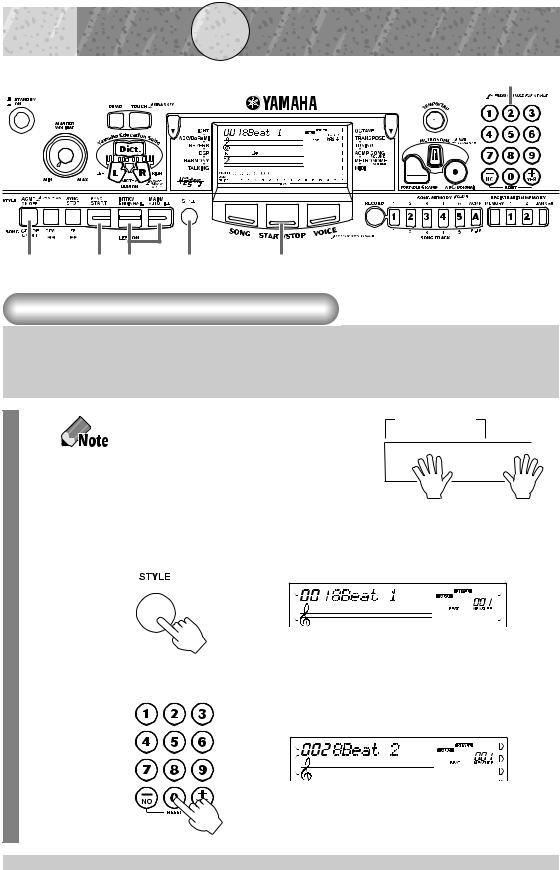
Using the Lesson Feature
Songs 001 to 100 are specially designed for use with the educational Lesson feature. Let’s start the practice, following the light.
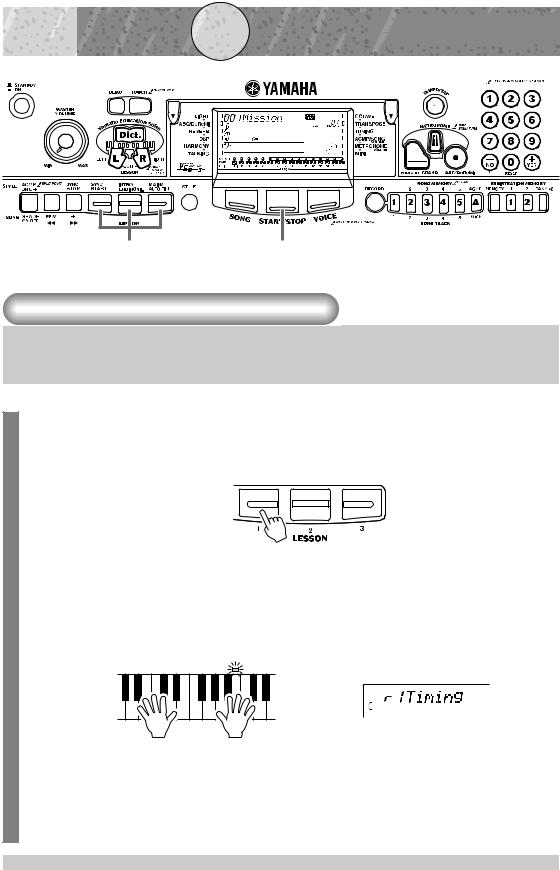
1 Select Timing, Waiting, or Minus One, and start the lesson.
When the power of the EZ-30 is turned on, the song of ”003: Linus And Lucy” and the right-hand part are selected.
Lesson 1: Timing
This step lets you work on the timing of the notes. In Lesson 1, the particular note you play on the keyboard is unimportant. The EZ-30 checks your timing and how rhythmically “tight” your playing is.
14
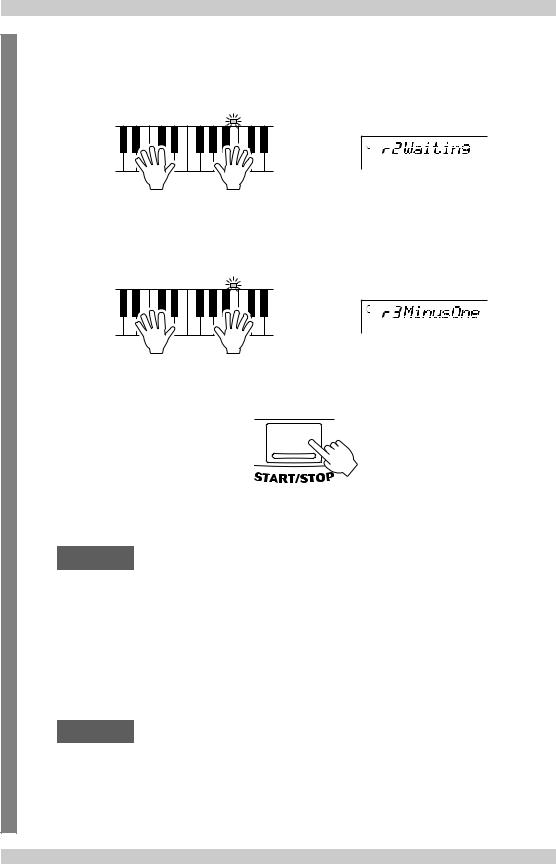
Lesson 2: Waiting
In Lesson 2, you practice playing the notes correctly as they appear in the display notation. The accompaniment pauses and waits for you to play the notes correctly before it continues.
Lesson 3: Minus One
In Lesson 3, you practice playing correct notes, along with the accompaniment. The accompaniment continues playing in tempo.
2When you’re finished, stop the Lesson.
Want to find out more? See page 34.
Grade
The EZ-30 has a built-in evaluation function that monitors your practicing and - like a real teacher - tells you how well you did each practice. Four grades are assigned, depending on your performance: “Try Again,” “Good,” “Very Good,” and “Excellent.”
Want to find out more? See page 37.
Talking
This feature “talks” to you through the speakers, “announcing” the Grade comments as well as the titles of the Lesson steps.
Want to find out more? See page 38.
15
 Quick
Quick


 Guide
Guide

STEP

 3
3


 Voices


1 1 2
1 1
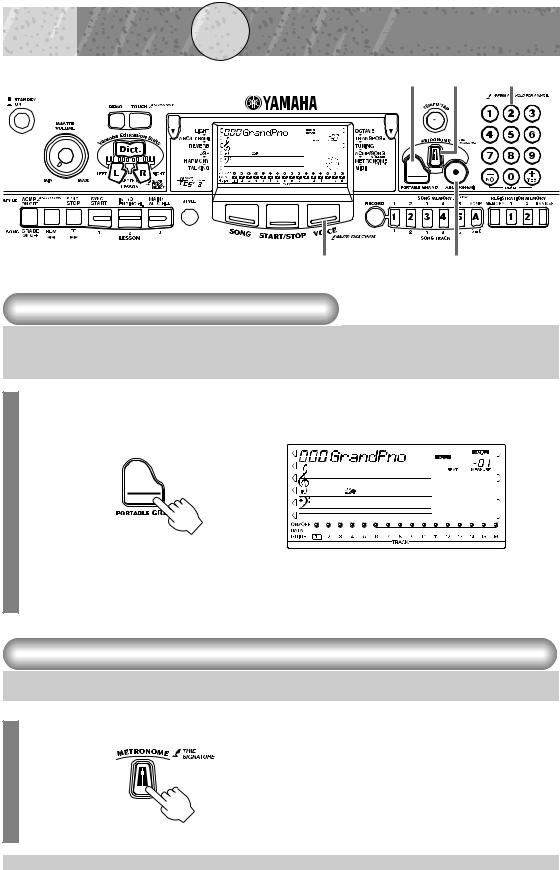
Playing the Piano
Simply by pressing the [PORTABLE GRAND] button, you can automatically reset the entire EZ-30 for piano play.
1 Press the [PORTABLE GRAND] button.
The song and style are also set for piano performance.
2Play the keyboard.
Want to find out more? See page 39.
Playing along with the Metronome
1Press the [METRONOME] button.
Want to find out more? See page 39.
16
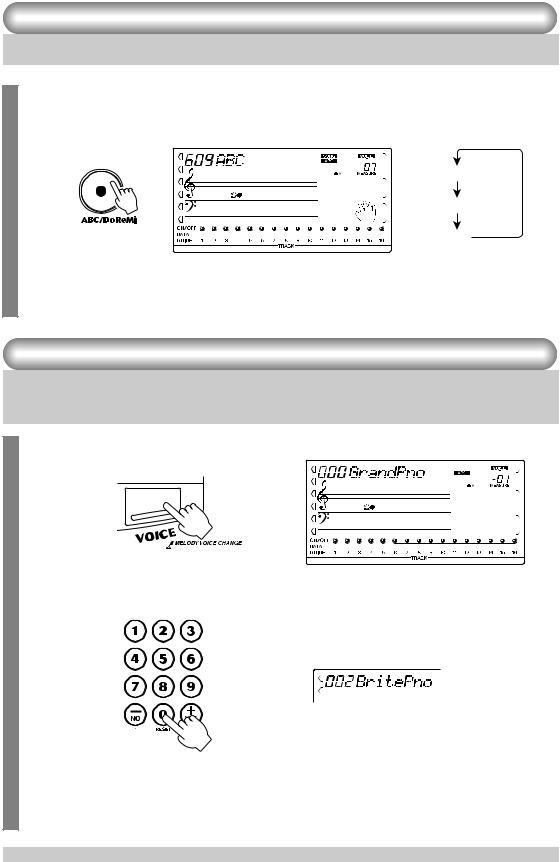
Playing the ABC/DoReMi voices
1 Press the [ABC/DoReMi] button.
The ABC voice is selected. To select the DoReMi voice, press the [ABC/ DoReMi] again.
ABC
DoReMi
Off
2Play the keyboard.
Want to find out more? See page 43.
Selecting and Playing Other Voices
The EZ-30 has a huge total of 610 dynamic and realistic instrument
voices. Let’s try a few of them out now...
1 Press the [VOICE] button.
2 Select a voice.
3Play the keyboard.
Want to find out more? See page 42.
17
 Quick
Quick


 Guide
Guide

STEP

 4
4


 Auto
Auto
 Accompaniment
2
3 |
4 6 |
1 |
7 |
Using the Auto Accompaniment
Simply play chords with your left hand - and the EZ-30 automatically produces appropriate bass, chord and rhythm backing. Use your right hand to play melodies, and you’ll sound like an entire band!
For more information on playing proper chords for the auto accompaniment, see “Using Auto Accompaniment - Multi Fingering” on page 55 and “Looking up Chords in the dictionary” on page 58.
1 Press the [STYLE] button.
Accompaniment key range
|
|
|
|
|
|
|
|
|
|
|
|
|
|
|
|
|
|
|
|
|
|
|
|
|
|
|
|
|
|
|
|
|
|
|
|
|
Left hand |
+ |
|
Right hand |
||||||||||
Auto accompaniment |
|
|
|
Melody |
||||||||||||
(for example, bass + guitar + drums)
2 Select a style. Refer to the Style List on page 90.
18
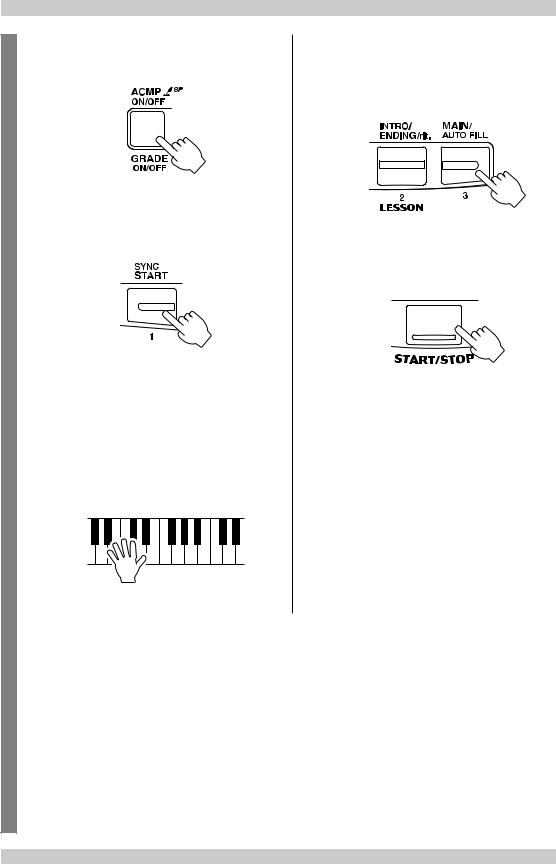
3Turn the auto accompaniment on.
4Turn the Sync Start function on.
5Play a chord with your left hand.
The auto accompaniment starts as soon as you play the keyboard.
Want to find out more? See page 55.
6 Select a section.
The auto accompaniment has four sections: Intro, Main A/B, and Ending.
7Stop the auto accompaniment.
Want to find out more? See page 51.
19
Continuation
Quick
Guide
 STEP 4
 Auto Accompaniment
15
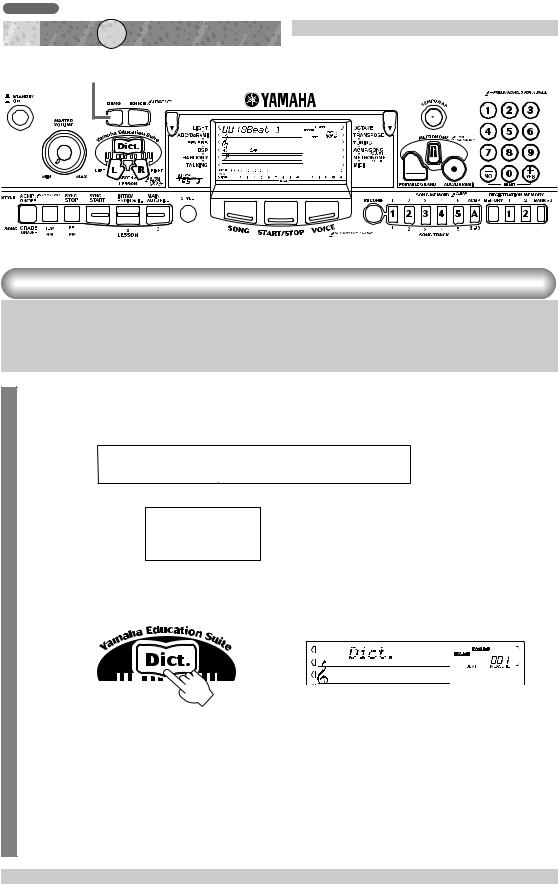
Looking up Chords in the Dictionary
The convenient Dictionary function teaches you how to play chords by showing you the individual notes. In the example below, we’ll learn how to play a GM7 chord...
|
|
|
Chord detection |
Keys for entering |
|
|
Keys for entering |
||||||||||||||||||||||||||||
|
|
|
|
|
key range |
|
the chord type |
|
|
the chord root |
|||||||||||||||||||||||||
|
|
|
|
|
(C1–B2) |
|
|
(C3–B4) |
|
|
|
|
(C5–B5) |
||||||||||||||||||||||
|
|
|
|
|
|
|
|
|
|
|
|
|
|
|
|
|
|
|
|
|
|
|
|
|
|
|
|
|
|
|
|
|
|
|
|
|
|
|
|
|
|
|
|
|
|
|
|
|
|
|
|
|
|
|
|
|
|
|
|
|
|
|
|
|
|
|
|
|
|
|
|
|
|
|
|
|
|
|
|
|
|
|
|
|
|
|
|
|
|
|
|
|
|
|
|
|
|
|
|
|
|
|
|
|
|
|
|
|
|
|
|
|
|
|
|
|
|
|
|
|
|
|
|
|
|
|
|
|
|
|
|
|
|
|
|
|
|
|
|
|
|
|
|
|
|
|
|
|
|
|
|
|
|
|
|
|
|
|
|
|
|
|
|
|
|
|
|
|
|
|
|
|
|
|
|
|
|
|
|
Example: G M7
Root note Chord type
1 Press the [Dict.] button.
20
2 Specify the root note of the chord (in this case, G).
3 Specify the chord type of the chord (in this case, M7).
4 Play the chord by pressing the keys lighted up.
The chord name flashes and a ”congratulations” melody is played, when the chord is played properly.
5To leave the Dictionary function, press the [Dict.] button again.
Want to find out more? See page 58.
21
Panel Display Indications
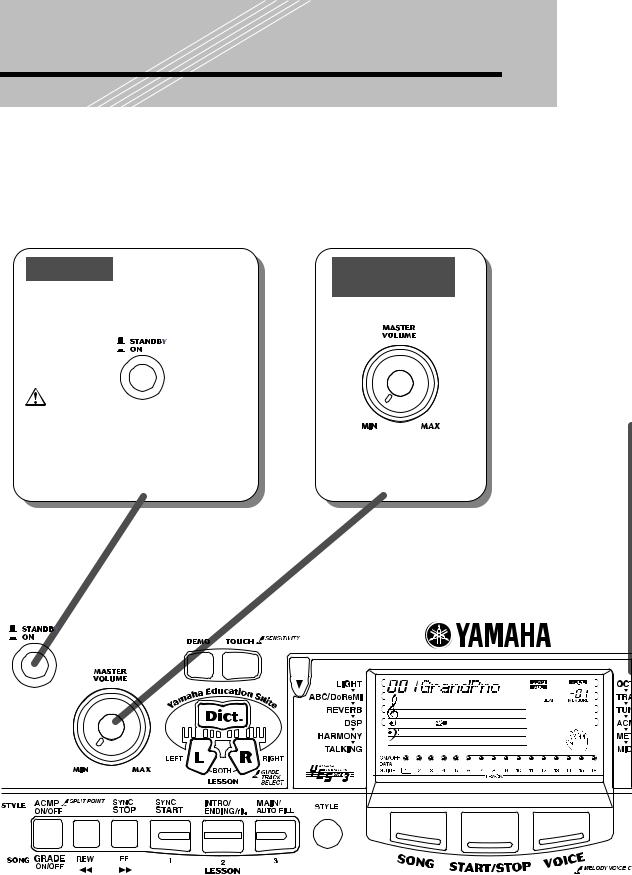
Power on
Press the [STANDBY/ON] switch to turn on the power to the EZ-30. Press the [STANDBY/ON] switch again to turn off the power.
Even when the [STANDBY/ON] switch is in the “STANDBY” position, electricity still flows through the instrument at the minimum level. When you plan not to use the EZ-30 for a long period of time, make sure you unplug the AC power adaptor from the wall AC outlet, and/or remove the batteries from the instrument.
Adjusting the volume level
Rotate the [MASTER VOLUME] dial.
Rotating the dial |
Rotating the |
counter-clock- |
dial clockwise |
wise lowers the |
raises the |
volume level. |
volume level. |
22
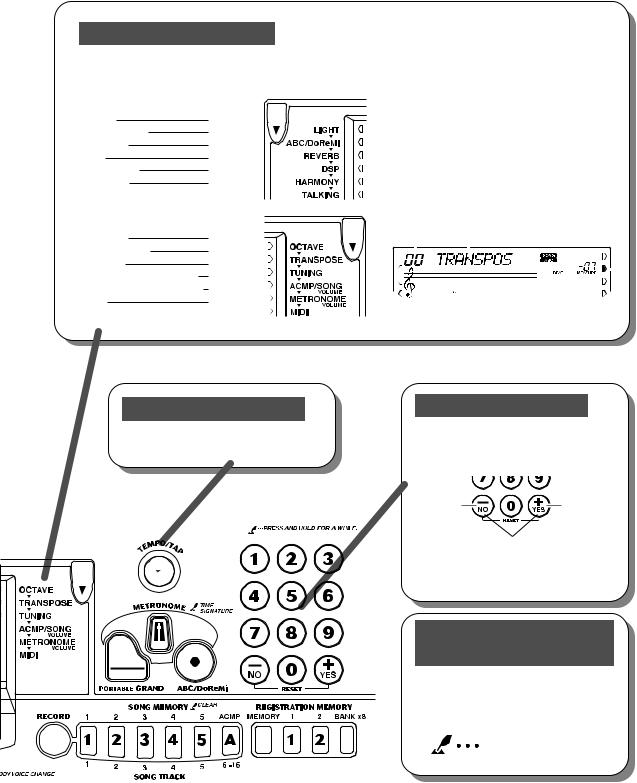
Overall (L, R) indicator
The left and right Overall buttons enable you to make EZ-30’s global settings.
Overall (left) |
|
LIGHT |
32 |
ABC/DoReMi |
36 |
REVERB |
48 |
DSP |
49 |
HARMONY |
50 |
TALKING |
38 |
Overall (right) |
|
OCTAVE |
73 |
TRANSPOSE |
45 |
TUNING |
46 |
ACMP/SONG VOLUME |
61, 32 |
METRONOME VOLUME |
40 |
MIDI |
74, 79 |
If you press the left or right Overall button located in the upper-left and upper-right of the display, a menu icon advances and the top row in the display indicates the current- ly-selected “setting item” and “value.” When you press the left or right Overall button again, the menu icon advances to the next setting item.
E.g., Transpose setting
Value Setting item |
Menu icon |
|||||
|
|
|
|
|
|
|
|
|
|
|
|
|
|
|
|
|
|
|
|
|
|
|
|
|
|
|
|
Adjusting the tempo
Song and accompaniment tempo can be adjusted (page 31).
Changing the value
Use the numeric keypad [0]–[9], [+], or [–] buttons to change the value.
Pressing |
Pressing |
the button |
the button |
once decre- |
once incre- |
ments the |
ments the |
value by |
value by |
one. |
one. |
Pressing and holding down the button increments/decrements the value continuously. For some functions, pressing these buttons simultaneously restores the default setting.
Symbol for pressing and holding down the button
If you press and hold down a button with this symbol for more than one second, a different function will be activated.
Pressing and holding down
23
Panel Display Indications
Selecting a function
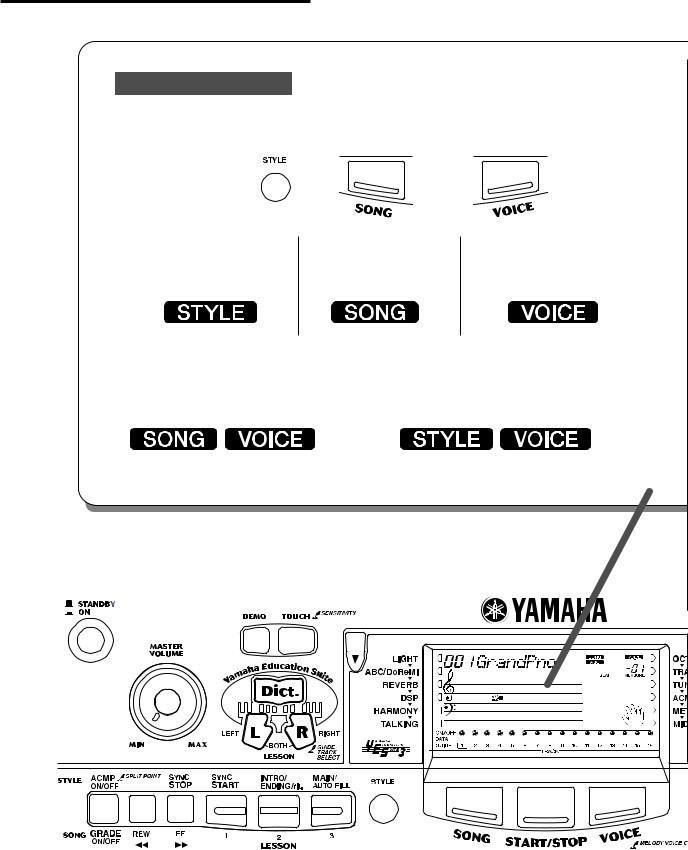
•Pressing the [STYLE], [VOICE], or [SONG] button enables you to select one of EZ-30’s basic functions. (The icon of the selected function appears.)
Style |
|
Song |
|
Voice |
|
Select a style for |
Selects a song for |
Selects a voice to play |
|||
accompaniment. |
playback or practice. |
on the keyboard. |
|||
• If you select a song or accompaniment, then select a voice, the EZ-30 indicates the following:
[Song→ Voice]
Select a voice using the numeric keypad.
[Style→ Voice]
Select a voice using the numeric keypad.
Press the [START/STOP] button to start the song.
Press the [START/STOP] button to start the accompaniment.
24
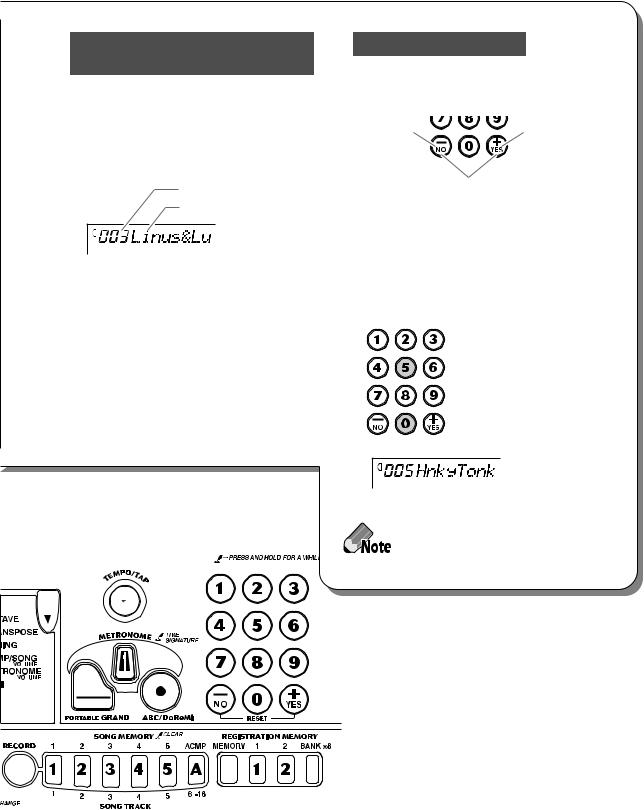
Name & number indication (Song/Style/Voice)
The top row of the display indicates the name and number of the currently-selected function.
E.g., Selecting a song
Song number
Song name
Selecting a number
•To increment or decrement the number, use the numeric keypad or [+]/[–] button.
Pressing the |
Pressing the |
button once |
button once |
decrements the |
increments the |
number by one. |
number by one. |
Pressing and holding down the button increments/decrements the number continuously. Pressing both buttons simultaneously resets the number.
•To select the number directly, use the numeric keypad [0]–[9].
For example, to select Voice #005: HnkyTonk, press [0], [0], then [5] on the numeric keypad.
If the first digit is “0,” you can skip pressing [0]. If the first and second digits are both “0,” you can also skip pressing [0] twice.
25
Panel Display Indications
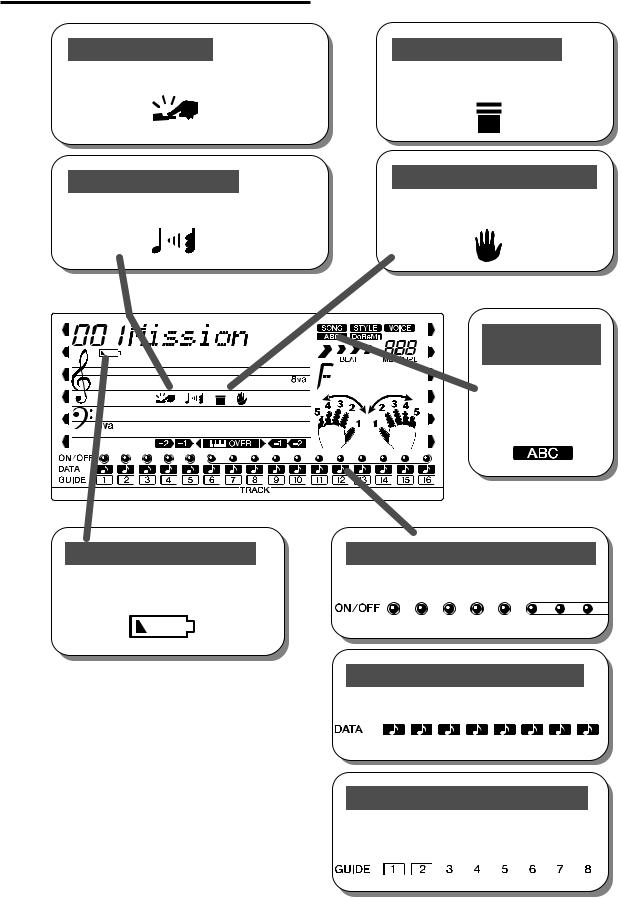
Touch indicator
This appears when the Touch function is turned on.
Harmony indicator
This appears when the Harmony effect is turned on.
Low battery indicator
This appears when the battery voltage is getting low.
Sync Stop indicator
This appears when the Sync Stop function is turned on.
Accompaniment On indicator
This appears when the auto accompaniment has been turned on.
ABC/DoReMi indicators
These show the guide voice setting(“ABC” or “DoReMi”) for the Lesson function.
Song track ON/OFF indicators
They light up when the corresponding tracks are turned on.
Song track DATA indicators
They indicates the current playback tracks.
Song track GUIDE indicators
A frame appears around the number of a track that uses the right-hand/left-hand guide function.
26
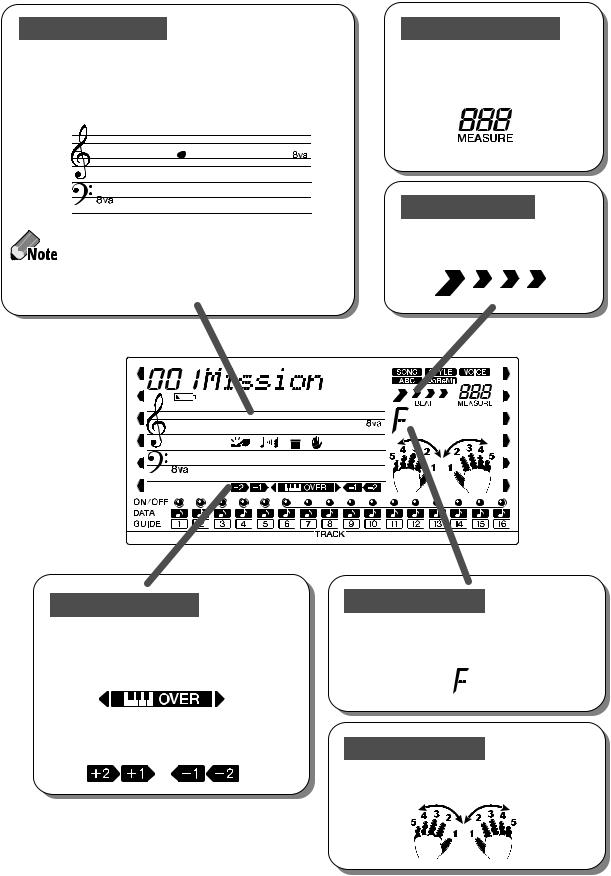
Notation display
When you are using the Lesson function, the notation display indicates the song melody or chord notation. When you are using the Dictionary function, it indicates the notes that make up the chord. Other than that, it usually indicates the notes you played.
• If a note is too high or too low to be notated within the score, a note that is one octave lower or higher will be indicated on the score, along with “8va” at the top or bottom of the score.
•Due to the limitation of the screen, some notes in a chord may not be displayed.
Measure indicator
The measure numbers of a song or accompaniment are displayed. If you select a free-tempo song, “F t” appears.
Beat indicators
Four arrows flash to indicate the beat of a song or accompaniment.
Octave indicator
While a Flash song is being played, this indicator appears if the key range of the notes being played is higher (or lower) than the EZ30’s keyboard range.
These indicators are displayed when the playback pitch is raised (or lowered) by an octave or two (page 73).
Beat
Chord indicator
This indicator indicates the name of the currently-played chord or a chord you play on the keyboard.
Fingering guide
During the Lesson, this guide suggests a fingering for playing the song.
27
Selecting and Playing Songs
The EZ-30 has 100 preset songs. Try playing these songs or songs loaded into flash memory.
Use the Song Memory function to record your own performance. (See page 66.)
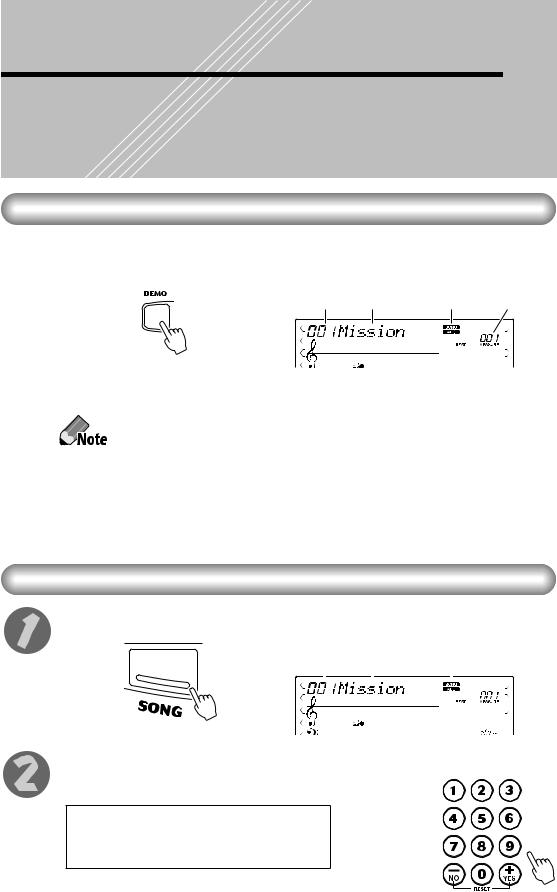
Listening To a Demo Song
Press the [DEMO] button.
Songs from #1 to #100 will be played sequentially.
Song |
Song |
Indicates Song |
Measure |
|
number |
name |
mode is selected |
number |
|
|
|
|
|
|
|
|
|
|
|
If you select a song after another song has started playing, the EZ-30 will sequentially play songs in the category (e.g., Pianist etc. See page 13.) that contains the selected song.
• Turning the power on while pressing and holding down the [DEMO] button will disable the Demo song playback function. To enable the Demo song playback, turn the power on in the normal manner.
•If a song (or songs) has been loaded into flash memory, the Flash song(s) starts playing first.
Press the [START/STOP] button or the [DEMO] button to stop Demo playback.
Selecting and Playing a Song
Press the [SONG] button.
Song |
Song |
Indicates Song |
|||
number |
name |
mode is selected |
|||
|
|
|
|
|
|
|
|
|
|
|
|
|
|
|
|
|
|
Select the desired song number.
Use the numeric keypad or the [+]/[–] buttons (page 25).
001–100 ...................... |
Preset Songs |
101–(199)* .................. |
Flash Songs |
201–205 ...................... |
User Songs |
* The maximum song number differs depending on the amount of available flash memory.
28
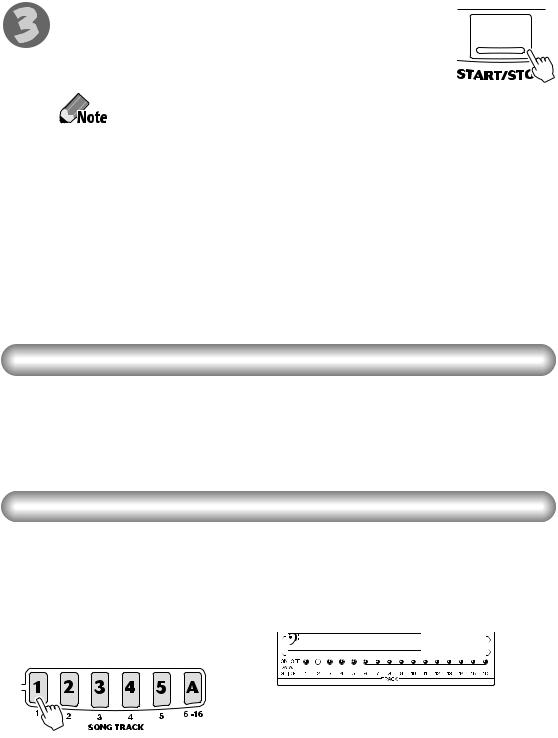
Start and stop the song playback.
Press the [START/STOP] button to start song playback.
You can play the keyboard along with the playback.
Press the [START/STOP] button to stop song playback.
The playback will repeat until you press the [START/STOP] button.
Other controls |
|
[FF] button .................. |
Pressing this button during playback will fast |
|
forward the song. |
|
Pressing this button while playback is stopped |
|
will increment the measure number. |
[REW] button .............. |
Press this button during playback will rewind |
|
the song. (No sound will be heard at this time.) |
|
Pressing this button while playback is stopped |
|
will decrement the measure number. |
|
|
Listening to a Flash Song
The EZ-30 can play a song loaded into its internal flash memory. To do this, you need to connect the EZ-30 to a personal computer, and use “Song Filer” application program on the computer to transmit a song.
For more information on Flash songs and Song Filer, refer to page 71.
Switching the Tracks On and Off
Each song contains 16 tracks (1–16).
You can switch tracks 1–5 on and off using the SONG MEMORY [1]–[5] buttons respectively, and switch tracks 6–16 on and off altogether using the [A] button.
This is useful when you practice playing a certain track by switching that track off (the track sound will be muted).
ON/OFF indicator is lit. The corresponding track is played. (The track contains data.)
ON/OFF indicator is off. The corresponding track is muted (no sound will be heard), or the track contains no data.
A song contains the following tracks:
•Tracks [1]–[5] ...........Each track can be switched on and off individually.
•Tracks [6]–[16] .........Tracks 6–16 can be switched on and off altogether.
29
Selecting and Playing Songs
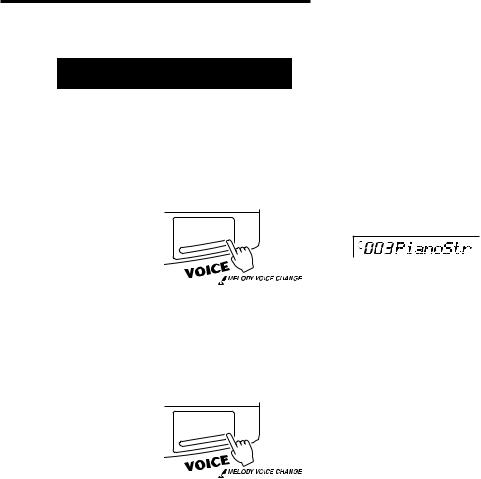
Melody Voice Change
You can change the voice of a song melody to the desired one during song playback.
1 Select the desired voice.
Press the [VOICE] button, then use the numeric keypad or [+]/[–] buttons to select the desired voice.
2 Press and hold down the [VOICE] button for at least one second.
“MELODY VOICE CHANGE” appears in the display, indicating that the selected voice has replaced the song’s original melody voice.
30
 Loading...