


2 Din Car RDS/FM/AM Radio, MP3 Player with USB Inputs
Model No.:XM-2R421
USER’S MANUAL

CONTENTS
Precautions.................................................................................................................. |
|
|
1 |
Precautions & Warnings.............................................................................................. |
1 |
||
Lithium Battery Cell Warnings..................................................................................... |
1 |
||
Drivers and Connections............................................................................................. |
1 |
||
Other Warnings.......................................................................................................... |
|
|
1 |
Installation.................................................................................................................... |
|
|
2 |
Installation Procedures.......................................... |
..................................................... |
2 |
|
Important................................................................................................................... |
|
|
2 |
To Install the Car Radio............................................................................................ |
|
2-3 |
|
Wiring Connections................................................................................. |
................... |
3 |
|
Removal of the Main Unit ............................................................................................ |
3 |
||
Control Panel Button Locations....................................................................................... |
4 |
||
General Operation......................................................................................................... |
|
|
5 |
Turn Unit On/Off......... |
................................................................................................ |
|
5 |
Adjust Volume (VOL).................................................................................................. |
|
5 |
|
Adjust Menu Options (SEL)...................................................................................... |
5-6 |
||
Set the Clock (CLOCK)..................................................... |
.......................................... |
6 |
|
Change the Source (SRC)........................................................................................... |
6 |
||
Mute on/off................................................................................................................ |
|
|
6 |
Preset EQ(Equalizer)........................................................................................... |
...... |
6 |
|
USB Port................................................................................................................... |
|
|
6 |
Hands-free Microphone.............................................................................................. |
6 |
||
AUX input Connector.................................................................................................. |
|
6 |
|
Reset System(Reset)....... |
.......................................................................................... |
6 |
|
Radio Operation............................................................................................................ |
|
|
7 |
Change Bands (BAND)................................................................................................ |
|
7 |
|
Manual Tuning ( |
/ |
)......................................... .................................................... |
7 |
Auto Seek Tuning ( |
/ |
)........................................................................................ |
7 |
To Store/Recall Preset Stations (1 - 6)........................................................................... |
7 |
||
Automatic Store Station / Preset Station Scan (AMS)..................................................... |
7 |
||
Stereo/Mono............................................................................................................... |
|
|
7 |
Local/DX.................................................................................................................... |
|
|
7 |
Using the PTY search function................................................................................... |
7-8 |
||
AF ON/OFF............................................... |
|
.................................................................. |
8 |
TA ON/OFF................................................................................................................. |
|
|
8 |
USB Operation ...................... |
|
........................................................................................ |
9 |
To Insert USB ...................... |
|
........................................................................................ |
9 |
Ej ect USB...................... |
|
............................................................................................. |
9 |
Play/Pause................................................................................................................. |
|
|
9 |
Next/Previous Track....................................................................................... |
............. |
9 |
|
Fast Forward/Backward............................................................................................... |
|
9 |
|
Introduction Scan........................................................................................................ |
|
|
9 |
Repeating the same track........................................................................................... |
9 |
||
Playing All Tracks in Random. ...................................................................................... |
9 |
||
Track/Folder Navigation.............................................................................................. |
9 |
||
Select the track or file for playback in MP3 format........................................................... |
9 |
||
Auxiliary Input operation............................................................................................... |
|
10 |
|
Bluetooth Operation...... |
............................................................................................... |
|
11 |
Pair and Connect....................................................................................................... |
|
|
11 |
Make a Call............................................................ |
|
................................................... |
11 |
Redial Last Dialed Number......................................................................................... |
11 |
||
Answer a Call / Reject a Call / End a Call..................................................................... |
11 |
||
Switch Audio Between Car audio and Moble Phone....................................................... |
11 |
||
Adjust Talk Volume........ |
|
............................................................................................ |
11 |
Audio Streaming (A2DP)............................................................................................ |
11 |
||
Remote Control........................................................................................................... |
|
|
12 |
Specifications...................................................... |
|
....................................................... |
13 |
Troubleshooting........................................................................................... |
|
|
14 |

PRECAUTIONS
Precautions & Warnings
TR UeducH WhH Uisk oI IiUe HlecWUiF Vhock DnG LnWeUfeU-ence Go noW DWWempW WR UepDiU WhiV
XniW \ouUself 5efeU DlO VeUvicH WR D quDlifieG WechniciDn.6omH 0P3/W0A fileV PD\ QoW EH SlD\DEle.
.eeS WhH YolumH DW D UeDsonDElH OeveO WR DvoiG GisWUDcWeG GUiving +igK YolumH OevelV
PD\ PDkH LW GifficulW WR FoncenWUDWH RQ WUDffiF DnG UoDG FondiWionV ZhilH GUiving.,I WhH FDU KDV EeeQ LQ GiUecW VunlighW IoU DQ HxWendeG SeUiod \oX PD\ QeeG WR UeducH Whe
WempeUDWuUH LnsidH WhH FDU EefoUH WuUninJ RQ DnG XsinJ WhH XniW
,f WhH EDWWeU\ LV GisconnecWed GischDUged RU FhDnged WhH SUeseW PemoU\ RI WhH XniW Zill
EH OosW DnG UequiUe UepUogUDmming.ThH XniW LV GesigneG WR EH LnsWDlled iQ D Oevel,hoUizonWDO SosiWion
)oU RpWimDO SeUfoUmDnce DvoiG LnsWDllinJ WhH XniW DW DQ Dngle.1eveU XsH HxcessivH IoUcH ZheQ UemovinJ RU DWWDchinJ WhH IDceplDWe
'R QoW WighWl\ JUiS WhH GisplD\ DnG EuWWonV WR DvoiG GDmDge.
Lithium Battery Cell Warnings
&elO OeDkDgH PD\ FDusH GDmDgH WR WhH UemoWH FonWUol'R QoW WhUoZ FellV LnWR DV WhiV PD\ FDusH DQ Hxplosion..eeS EDWWeU\ FellV RuW RI UeDcK RI FhildUen.
Drives and connections
1eveU SlDcH Dn\ IoUeigQ REjecWV LnWR WhH RpeningV RI WhH FDU UDdiR disF FompDUWmenW 86% jDck A8; ,1 FonnecWion) 2WheUZisH \oX PighW GDmDgH WhH VloWV DnG FonnecWions.
Others Warnings
'R QoW VZiWcK RQ WhH FDU UDdiR IoU OonJ SeUiodV RI WimH ZheQ WhH PoWoU LV VZiWcheG Rff ThiV FoulG FDusH WhH FDU EDWWeU\ WR GischDUgH DnG WhH YehiclH FDQ QR OongeU EH VWDUWed.
1
INSTALLATION
Installation Procedures
First complete the electrical connections and then check for correctness.
Installation Opening
This unit can be installed in any dashboard Having an opening as shown the right figure.
103 mm
 182 mm

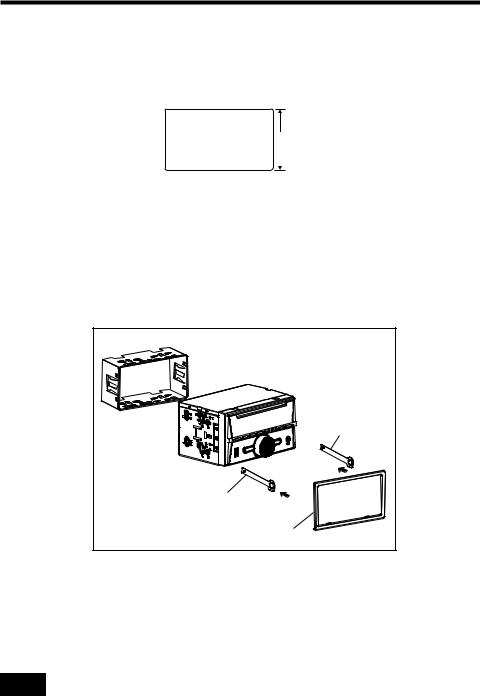
To Install the Car Radio
Be sure you test all connections first, and then follow these steps to install this unit.
1.Make sure the ignition is turned off, and then disconnect the cable from the vehicle battery’s negative (-) terminal.
2.Disconnect the wire harness and the antenna.
3.Lift the left or right top corner of the plastic outer trim ring then pull it out to remove it.
4.Insert the two bracket keys into the left and right side of the chassis, as shown the below figure to separate the chassis from the housing.
Bracket key |
Bracket key |
Plastic outer trim ring |
5.Insert mounting sleeve into the dashboard and bend the mounting tabs out with a screwdriver. Make sure that the lock lever is flush with the mounting sleeve and is not projecting beyond.
6.Insert car radio into the mounting sleeve.
7.Use a metal strap to secure the rear part of the chassis using the hardware indicated.
8.Make wiring connections, as illustrated in the “Wiring Diagram.”
9.Install the plastic outer trim ring.
2

INSTALLATION(CONT.) |
INSTALLATION |
DIAGRAM |
-Only use speakers with 4 ohms impedance.
-The maximum current of the auto antenna is 200mA.
Wiring Connections
WIRING DIAGRAM |
CAUTION |
+12V DC |
NEGATIVE |
GROUND |
Removal of the Main Unit
1.Remove the metal strap from the main unit.
2.Remove the plastic trim out from the main unit.
3.Insert a bracket key into the left and right side of the main unit and draw the unit out of the mounting sleeve.
3
 Loading...