


Xomax XM-VA903, XM-VA902, XM-39BA, XM-46BA, XM-2DA703-A6 User Manual
...XOMAX
User manual
With ANDROID 6.0.1
Navigation & Multimedia
car radio
XM-39BA
XM-46BA
XM-04ZA
XM-05ZA
XM-06ZA
XM-VA902
XM-VA903
XM-2DA703-A6
ENGLISH

XOMAX
Thank you for purchasing one of our XOMAX products! We appreciate your confidence.
Enjoy your brand new multimedia unit!
i
Please read the following manual carefully before you install and use the unit.
Please save this manual in case you will need to clarify further possible questions regarding installation and usage of our product.
We are constantly trying to keep our online-library of user's manuals for our products up-to-date. In case you miss some information or if something should be unclear, please visit our homepage www.xomax.de/download for a current version of user's manual or contact our customer service.
Please note: Any alternations and changes of technical data or/and design due to technical update of some models need no advertisement.
We appreciate our environment, so to keep it safe and clean, we do not print our manuals on paper but provide our products with manuals in digital version created in *.pdf format.
You can find and download them anytime on our homepage www.xomax.de, view them on your mobile devices and print them for yourself if needed.

Safety instructions and precautions
! Handling by stop only
To avoid any accidents please don‘t handle the unit while you driving. Please stop and park the vehicle at safety place and handle the unit casually.
! Installation
Please read the following manual carefully before you install the unit. We recommend you to let the technician install the unit in your vehicle.
! Regular loudness
Please set the loudness of the unit to the appropriate level so you were still able to hear exterior noises especially traffic warning signals. Furthermore the higher loudness level can damage your hearing organs.
! Repair of the unit
Do not open the unit. Do not try to repair the unit by yourself due to any emerging technical problems. While opening the unit by yourself exists the danger to be electrocuted.
Do not use the unit any further since you detect any kind of technical problems. Leave all the repair operations to professional technicians.
Due to flawed warranty seal the warranty becomes invalid.
! Power supply
Use the unit connected only to 12 Volt on-board power supply. The minus (-) should be connected with the ground (GND) (negative).
Due to the wrong configuration exists the danger of fire. In case of doubt please consult with professional technicians.
! Replacement of fuses
While replacing the fuse please make sure that the new fuse has the same properties as the old one, especially the amperage.
! Overheating
Do not occlude the vent holes to avoid the heat generation and accumulation in the unit. Otherwise exists the danger of fire.
! Regular temperature
Please make sure that the temperature inside the vehicle amounts to not lower -10°C or more than +40°C.
If it‘s too cold or hot inside the vehicle, do not turn the unit on until the inside temperature of the cabin increases or descends.
! Cleaning of the unit
Please keep the unit clean and remove the dust from it regularly. Please use for that a soft and dry cleaning rag.
Major soilings can be removed carefully with the wet cleaning rag. Do not use any chemical or alcohol-containing detergents to avoid the damage of the unit‘s varnish.
! Usage of the touchscreen
Do not press the touchscreen too hard – it may lead to image distortions, unit malfunctions and touchscreen damages.
Do not use any sharp articles to use the touchscreen. Please handle the touchscreen with your finger or with the appropriate stylus.
! Moisture
To avoid the danger of fire or the electric shock do not put the unit in to the moist environment (e.g. adverse weather conditions, inappropriate wet cleaning etc.)
! The risk of injuries
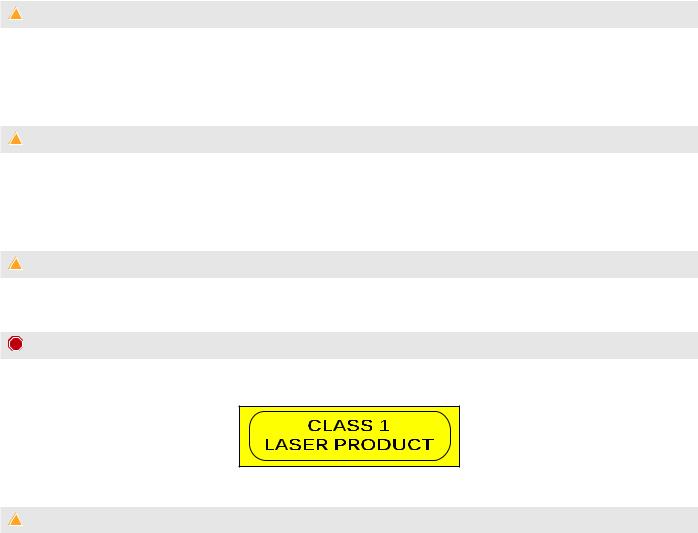
Only for DVD models: Do not open the cabinet or modify the unit. The active laser components used with this product comply with the provisions of Laser Class 1.
!Handling the CDs and DVDs
»Soilings, scratches, dust can impair the playback and damage optical lenses.
»Do not label CDs/DVDs with an inappropriate stickers and markers.
»Do not ever bend the disc.
»Store the discs in an appropriate sleeves to avoid damages of the media.
»Do not expose discs to direct sunlight.
»Do not touch the mirror surface of the disc to avoid the soilings such as fingerprints.

Installation
Installation notes
Here you can find relevant installation notes and common information.
i The detailed installation manual you can find on our homepage www.xomax.de. The printed version of a common installation manual you can find in the package.
Before the installation
! WARNING!
Please read the following manual carefully before you install the unit.
Damages caused due to an inappropriate installation will not be covered by warranty.
If you do not want to risk your warranty entitlement, please let the technician install the unit in your vehicle.
»To avoid a short circuit please disconnect the vehicle battery before the installation. To do it properly please read the manual of your vehicle.
»Make sure that your vehicle is equipped with a car radio slot of required size (1DIN or 2DIN)
»As may be the case you will need a suitable faceplate, adapter or other accessories. These could be provided from your local specialist supplier.
»The connection cables may not be cutted or short-circuited. Otherwise the warranty becomes invalid.
»Before the installation please make sure that your vehicle has the 12 Volt on-board power supply.
»The minus (-) should be connected with the ground (GND) (negative).
»Please tag the polarity of the available speakers before you disconnect the vehicle battery.
»A proper grounding of the unit‘s housing requires a clean ground connection. Thus the grounding area should be rust-, stainand dust-free.
»Please ground the cable separately from other heavy current devices such as an amplifier etc.
»Please ensure that the colored cables are connected according to the wiring diagram. The wrong wiring may lead to malfunctions or even damages of the electric elements of the vehicle.
»Please note that the connection cables of this unit and of the other devices may have the same purpose but the different color. For this reason while connecting this unit with the other devices please ensure that both of the cables in each case have the same purpose. To connect everything correctly please refer to the manuals of the both devices.
»Please ensure that the negative speaker cable is in each case connected with the negative speaker terminal of the ISO port. Do not ever connect the negative speaker cables with the vehicle body.
»This unit is designed and construed for connection with 4 speakers. Do not combine this unit with devices that are designed and construed for connection with 2 speakers.
»The speakers should feature the impedance of 4-8 Ohm and a sufficient wattage.
»Please ensure that the speakers you are connecting with the unit are intact. Damaged speakers can impair the unit.
»To avoid a short circuit please isolate all cable junctions and endings of the unused cables with the electrical tape.
»All the cables should be layed and fixated tidy and properly. The cables should not contact any movable or hot objects.
»If your vehicle doesn‘t have an „ACC“ ignition position, please connect the red cable with the ignition switch. Otherwise the unit will not turn off automatically, causing the discharging of the vehicle battery.
»To avoid a rogue and hazardous short circuit do not lay the yellow cable through the engine bay in order to connect it with the vehicle battery.
»Do not ever connect speaker cables among one another. In case you do not want to connect all the 4 speakers with the unit please isolate the endings of unused cables with the electrical tape to prevent a short circuit.
»Do not ever connect the negative speaker cables with the vehicle body.
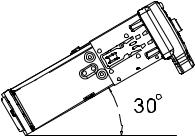
»To ensure a flawless performance of the unit the intergration angle should amount to +/- 30.

Basic operations
Functions of the buttons on the front panel

7LSV IRU 8VLQJ 7RXFK 6FUHHQ
:KHQ XVLQJ WKH WRXFK VFUHHQ \RX FDQ XVH VHYHUDO ZD\V WR SHUIRUP FRUUHVSRQGLQJ RSHUDWLRQV
RQ WKH GHYLFH
&OLFNLQJ )XQFWLRQ
<RX FRXOG VHOHFW DQ DSSOLFDWLRQ LFRQ RU RSWLRQ RQ WKH VFUHHQ WR UHDOL]H FOLFNLQJ IXQFWLRQ
)RU H[DPSOH FOLFN %OXHWRRWK WR HQWHU LQWR EOXHWRRWK DSSOLFDWLRQ
3UHVVLQJ )XQFWLRQ
<RX FRXOG SUHVV WKH FXUUHQW XVHU LQWHUIDFH LFRQ LQSXWWLQJ FROXPQ E\ SUHVVLQJ IXQFWLRQ
)RU H[DPSOH SUHVV RQ WKH EODQN DUHD RI WKH PDLQ LQWHUIDFH WKHQ FRPHV D SRS XS PHQX
\RX FRXOG SHUIRUP VRPH IXQFWLRQ RQ WKH PHQX
'UDJJLQJ )XQFWLRQ
'UDJ WKH WRXFK VFUHHQ RU SUHVV WKH VFUROO EDU IRU XS DQG GRZQ RSHUDWLRQ )RU H[DPSOH EURZVH WKH FRQWDFW OLVW RI WKH EOXHWRRWK SKRQHV E\ GUDJJLQJ IXQFWLRQ
=RRPLQJ )XQFWLRQ
:KHQ EURZVLQJ WKH ZHE FOLFN WKH VFUHHQ WZLFH WKHQ \RX FRXOG ]RRP LQ RU RXW WKH SDJH FRQWHQW
2U \RX FRXOG SUHVV WKH VFUHHQ ZLWK WZR ILQJHUV E\ FRQWURO WKH VOLGLQJ GLVWDQFH EHWZHHQ WKH ILQJHUV WR ]RRP LQ RU RXW WKH SDJH FRQWHQW
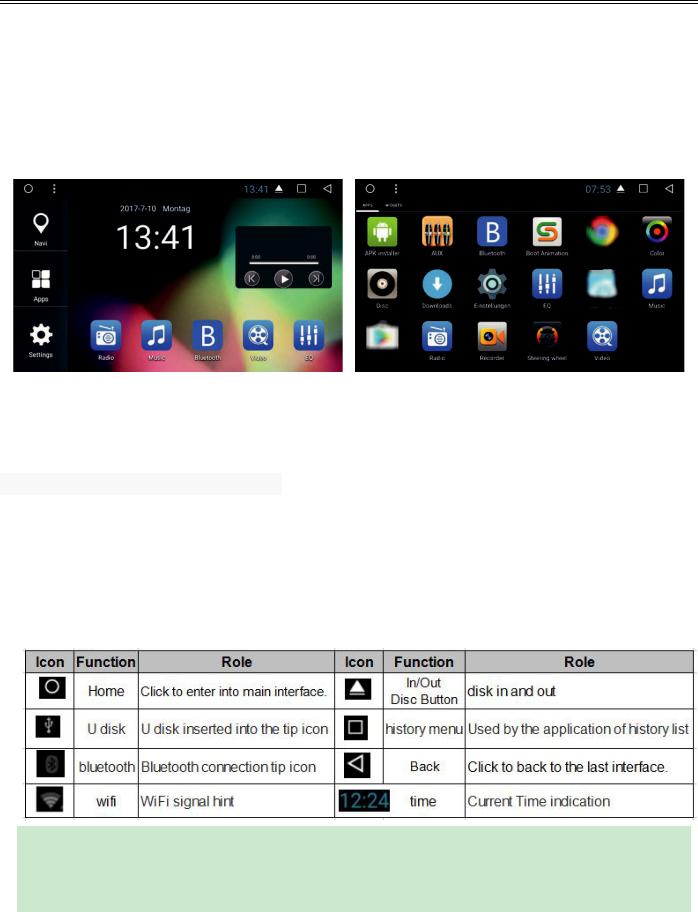
2 0DLQ 6FUHHQ
<RX FDQ XVH WKH WRXFK VFUHHQ RSHUDWLRQ WR XVH WKH YDULRXV IXQFWLRQV RI WKH GHYLFH 7KLV HTXLSPHQW KDV D WRWDO RI ILYH PDLQ VFUHHQ OHIW RU ULJKW VOLGLQJ FDQ EH VZLWFKHG ZLWK HDFK RWKHU $Q\ LQWHUIDFH SUHVV WKH +20( SK\VLFDO EXWWRQV RQ WKH SDQHO WR UHWXUQ WR WKH PDLQ VFUHHQ
LQWHUIDFH DQG GLVSOD\ WKH DSSOLFDWLRQ LFRQ LQ WKH PDLQ VFUHHQ LQWHUIDFH FOLFN DQ\ DSSOLFDWLRQ LFRQ WR
RSHQ WKH SURJUDP
1RWH <RX FDQ DGG WKH IUHHGRP RI WKH VSDFH RI WKH PDLQ VFUHHQ RU 5HPRYH 3URJUDPV LFRQ WR VHH HTXLSPHQW %DVLF 6HWWLQJV VHFWLRQ
&OLFN WKH DSSOLFDWLRQ LFRQ \RX FDQ YLHZ DOO RI WKH SURJUDPV RI WKH HTXLSPHQW
3 7KH VWDWXV EDU DQG LQGLFDWRU
,FRQV RQ WKH OHIW WRS RI WKH VFUHHQ DUH QRWLILFDWLRQV IRU PHVVDJHV DQG HYHQWV ,FRQV RQ WKH ULJKW WRS RI WKH VFUHHQ DUH GHYLFH VWDWXV LQGLFDWRU
,I WKHUH LV QHZ PHVVDJH LW ZLOO EH GLVSOD\HG RQ WKH VWDWXV EDU VOLGH \RXU ILQJHU JHQWO\ IURP WKH VWDWXV EDU DOO SURPSWV ZRXOG EH GLVSOD\HG 7KHQ \RX FRXOG FOLFN WKH PHVVDJH DQG YLHZ WKH FRQWHQW
1RWH 7KH GHYLFH VRIWZDUH LV XQGHU XSJUDGLQJ WKH VWDWXV LQGLFDWRU PD\ EH GLIIHUHQW ZLWK \RXU GHYLFH SOHDVH UHIHU WR WKH DFWXDO GHYLFH VRIWZDUH
 Loading...