


 Loading...
XC353/355/356

Table of Contents |
|
Safety Notes ........................................................................................... |
1 |
Unpacking............................................................................................... |
4 |
Getting to Know Your Copier ................................................................ |
5 |
Rear View ............................................................................................. |
6 |
Underside View..................................................................................... |
6 |
Installation.............................................................................................. |
7 |
XC351................................................................................................... |
7 |
XC353/ XC355/ XC356.......................................................................... |
7 |
Control Panel........................................................................................ |
10 |
XC351................................................................................................. |
10 |
XC353/ XC355/ XC356........................................................................ |
10 |
Paper Specifications ............................................................................ |
11 |
Paper Storage..................................................................................... |
11 |
Specification Chart.............................................................................. |
11 |
Making Copies on the XC351............................................................... |
12 |
Making Copies on the XC353, XC355 and XC356 ............................... |
13 |
Copy Quality......................................................................................... |
15 |
Two-Sided Copying.............................................................................. |
16 |
Setting Copy Exposure Range ............................................................ |
17 |
Paper Supply Indicator (XC353, XC355 and XC356) ...................... |
18 |
Misfeed Removal ........................................................................... |
19 |
Paper Feed Slot.................................................................................. |
19 |
Exit Area............................................................................................. |
19 |
Internal Area ....................................................................................... |
20 |
Toner Cartridge ............................................................................... |
22 |
Toner Cartridge Replacement.............................................................. |
22 |
Toner Cartridge Yield........................................................................... |
24 |
Drum Cartridge Replacement .............................................................. |
25 |
|
i |

Problem Solving................................................................................... |
28 |
Problem Solving Chart........................................................................ |
28 |
Status Code Chart .............................................................................. |
30 |
Copier Maintenance ............................................................................. |
31 |
Document Glass and Cover ................................................................ |
31 |
Lens.................................................................................................... |
31 |
Packing the Copier............................................................................... |
32 |
Technical Data...................................................................................... |
34 |
ii

Safety Notes
Your copier and supplies have been designed and tested to meet strict safety requirements. These include safety agency examination and approval, and compliance to established environmental standards. Please read the following instructions carefully before operating the copier and refer to them as needed to ensure the continued safe operation of your copier.
Follow all warnings and instructions marked on or supplied with the product.
Symbology:  = High Voltage,
  = Heated Surface.
Unplug this copier from the wall outlet before cleaning. Always use materials specifically designated for this copier. Use of other materials may result in poor performance and could create a hazardous situation.
Do not use aerosol cleaners. Follow the instructions in this User Guide for proper cleaning methods.
Never use supplies or cleaning materials for purposes other than what they were intended. Keep all supplies and materials out of reach of children.
Do not use this copier near water, wet locations, or outdoors.
Do not place this copier on an unstable cart, stand, or table. The copier may fall, causing personal injury or serious damage to the copier.
This product is equipped with a 3-wire grounding type plug (e.g., a plug having a third grounding pin). This plug will fit only into a grounding-type power outlet. This is a safety feature. To avoid risk of electric shock, contact your electrician to replace the receptacle if you are unable to insert the plug into the outlet. Never use a grounding adapter plug to connect the copier to a power source receptacle that lacks a ground connection terminal.
This copier should be operated from the type of power source indicated on the marking label. If you are not sure of the type of power available, consult your local power company.
1

Safety Notes
Do not allow anything to rest on the power cord. Do not locate the copier where persons will step on the cord.
The power supply cord is the disconnect device for this equipment. Insure that installation is near the outlet and is easily accessible.
Your machine is equipped with an energy saving device to conserve power when the machine is not in use. The machine may be left on continuously.
Slots and Openings in the cabinet and in the back and sides of the copier are provided for ventilation. To ensure reliable operation of the copier and to protect it from overheating, these openings must not be blocked or covered. The copier should never be located near or over a radiator or heat register. This copier should not be placed in a built-in installation unless proper ventilation is provided.
Never push objects of any kind into the slots of the copier as they may touch dangerous voltage points or short out parts which could result in a fire or electric shock.
Never spill liquid of any kind on the copier.
Never remove covers or guards that require a tool for removal. There are no casual operator serviceable areas within these covers.
Never defeat interlock switches. Machines are designed to restrict operator access to unsafe areas. Covers, guards, and interlock switches are provided to ensure that the machine will not operate with covers opened.
Use of an extension cord with this copier is not recommended or authorized. Users should check building codes and insurance requirements if an extension cord is to be used. Ensure that the total ampere ratings of the products plugged into the extension cord do not exceed the extension cord ampere rating. Also, make sure that the total amperage of all products plugged into the wall outlet does not exceed the outlet rating.
2

Safety Notes
Avoid direct viewing of the document lights. The lamps are bright and, while not harmful, they may cause an annoying afterimage. Always keep the document cover closed during operation and storage.
Avoid exposing the drum cartridge to light for extended periods of time.
Do not touch the red photoreceptor. Scratches or smudges that appear on the photoreceptor will result in poor copy quality and may shorten the service life.
Do not put your hands into the fuser area, located just inside the exit tray area, as you may be burned.
Ozone: This product produces ozone during normal operation. The ozone produced is dependent on copy volume and is heavier than air. Providing the correct environmental parameters, as specified in the Xerox installation procedures, will ensure that concentration levels meet safe limits.
This equipment complies with Council Directive 89/336/EEC, approximation of the laws of the Member States related to electromagnetic compatibility and Council DIrective 73/23/EEC ammended by Council Directive 93/68/EEC, approximation of the laws of the Member States related to low voltage equipment.
3
Unpacking
IMPORTANT: Save the carton and packing materials for future use.
Power
Cord Packing
material
User Guide
Packing material
Copier
Starter Toner
Cartridge
Carton
4
Getting to Know Your Copier
XC351
4B
4A
Document Cover
Document Glass
Front Cover Open Button
4A Paper Tray (XC353/ XC355/ XC356)
4B Paper Feed Slot (XC351)
Paper Guide
Front Cover
Starter Toner Cartridge
Control Panel
Exit Tray (XC353/ XC355/ XC356)
5

Getting to Know Your Copier
Rear View
Serial Number
Power Cord Socket
On/Off Switch
Document Glass Release Button
Underside View
Handle
Drum Cartridge
Bottom Cover Release Lever
Bottom Cover
Drum Cartridge Release Lever
|
|
Fusing Area |
||
|
|
|
|
|
|
|
|
|
|
|
|
|
|
|
|
|
|
|
|
6

Installation
For reliable copier operation and copy quality, Xerox recommends:
•Place your copier in a well-ventilated room.
•Recommended environment:
–Temperature: 50° to 90°F / 10° to 32°C.
–Humidity: 20% to 85%.
•Place the copier on a flat, level surface.
•Avoid locations that subject the copier to:
–Direct sunlight.
–Extreme changes in temperature or humidity.
After selecting a location that meets the conditions, ensure that there is sufficient space around the copier.
XC351
353 mm
725 mm
XC353/ XC355/ XC356
353 mm
XC355 – 725 mm, XC356 – 803 mm
7
Installation
1. Remove the copier from the bag.
2.Remove the thumbscrews, tape and the label from the bottom of the copier.
Note: Failure to remove the thumbscrew will cause a paper jam when operating the copier.
3. Remove all the pieces of tape from the copier and then place the copier on a level surface.
XC351 skip to step 5
4.Remove the paper tray from the top of the copier.
5. Press the button to open the front cover.
6. Vigorously shake the toner cartridge horizontally several times.
7. Remove the toner cartridge cover.
8

Installation
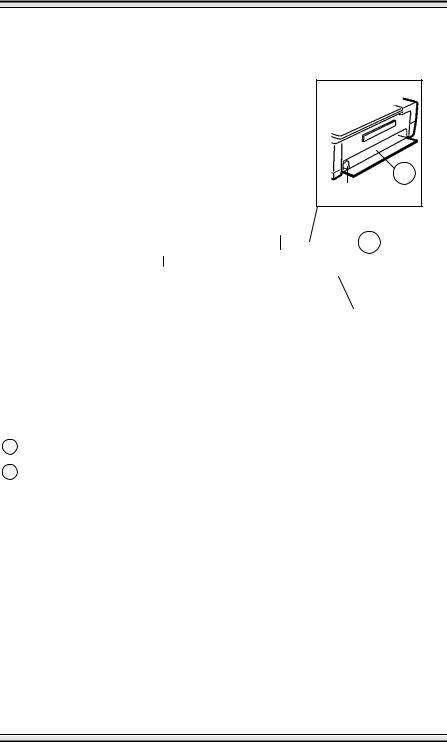
8. Slide the toner cartridge in until it locks in place.
9. Close the front cover.
XC351 skip to step 12
10.Install the paper tray by inserting it at an upward angle into the grooves on the side of the paper feed slot.
11.Open and unfold the exit tray.
12.Plug the power cord into the copier and then into an earthed outlet.
Note: Ensure that the power cord is inserted firmly.
13.Turn the power on.
Note: Wait approximately 1 minute for the
Ready indicator to light.
CAUTION: Ensure that the areas to the right and left sides of the copier are free of obstructions which may prevent movement of the document glass.
9
Loading...