


 Loading...
Phaser® 8510/8560MFP
multifunction product
User Guide
Guide d’utilisation Guida dell'utente
Benutzerhandbuch Guía del usuario
Guia do Usuário Gebruikershandleiding
Användarhandbok Betjeningsvejledning
Εγχειρίδιο χρήστη
www.xerox.com/support
Copyright © 2006 Xerox Corporation. All Rights Reserved. Unpublished rights reserved under the copyright laws of the United States. Contents of this publication may not be reproduced in any form without permission of Xerox Corporation.
Copyright protection claimed includes all forms of matters of copyrightable materials and information now allowed by statutory or judicial law or hereinafter granted, including without limitation, material generated from the software programs which are displayed on the screen such as styles, templates, icons, screen displays, looks, etc.
XEROX®, CentreWare®, FinePoint™, Made For Each Other®, Phaser®, PhaserSMART®, PrintingScout™, TekColor™, and Walk-Up® are trademarks of Xerox Corporation in the United States and/or other countries.
Acrobat®, Adobe® Reader®, Adobe Type Manager®, ATM™, Illustrator®, PageMaker®, Photoshop®, PostScript®, Adobe Brilliant® Screens, Adobe Garamond®, Adobe Jenson™, Birch®, Carta®, IntelliSelect®, Mythos®, Quake®, and Tekton® are trademarks of Adobe Systems Incorporated in the United States and/or other countries.
Apple®, AppleTalk®, Bonjour™, EtherTalk®, LaserWriter®, LocalTalk®, Macintosh®, Mac OS®, TrueType®, Apple Chancery®, Chicago®, Geneva®, Monaco®, New York®, and QuickDraw® are trademarks of Apple Computer, Inc. in the United States and/or other countries.
Marigold™ and Oxford™ are trademarks of Alpha Omega Typography.
Avery™ is a trademark of Avery Dennison Corporation.
HP-GL®, HP-UX®, and PCL®are trademarks of Hewlett-Packard Corporation in the United States and/or other countries.
Hoefler Text was designed by the Hoefler Type Foundry.
IBM® and AIX® are trademarks of International Business Machines Corporation in the United States and/or other countries.
ITC Avant Guard Gothic®, ITC Bookman®, ITC Lubalin Graph®, ITC Mona Lisa®, ITC Symbol®, ITC Zapf Chancery®, and ITC Zapf Dingbats® are trademarks of International Typeface Corporation.
Bernhard Modern™, Clarendon™, Coronet™, Helvetica™, New Century Schoolbook™, Optima™, Palatino™, Stempel Garamond™, Times™, and Univers™ are trademarks of Linotype-Hell AG and/or its subsidiaries.
Macromedia® and Flash® are trademarks of Macromedia, Inc.
Windows®, Windows NT®, Windows Server™, and Wingdings® are trademarks of Microsoft Corporation in the United States and/or other countries.
Albertus™, Arial™, Gill Sans™, Joanna™, and Times New Roman™ are trademarks of Monotype Imaging Inc.
Antique Olive® is a trademark of M. Olive.
Eurostile™ is a trademark of Nebiolo.
Novell®, NetWare®, NDPS®, NDS®, Novell Directory Services®, IPX™, and Novell Distributed Print Services™are trademarks of Novell, Incorporated in the United States and/or other countries.
SunSM, Sun Microsystems™, and Solaris® are trademarks of Sun Microsystems, Incorporated in the United States and/or other countries.
SWOP® is a trademark of SWOP, Inc.
UNIX® is a trademark in the United States and other countries, licensed exclusively through X/Open Company Limited.
PANTONE® Colors generated may not match PANTONE-identified standards. Consult current PANTONE Publications for accurate color. PANTONE® and other Pantone, Inc. trademarks are the property of Pantone, Inc. © Pantone, Inc., 2000.
Contents
1 System Features
Parts of the System . . . . . . . . . . . . . . . . . . . . . . . . . . . . . . . . . . . . . . . . . . . . . . . . . . . . . . . . 1-2
Front View . . . . . . . . . . . . . . . . . . . . . . . . . . . . . . . . . . . . . . . . . . . . . . . . . . . . . . . . . 1-2
Side View . . . . . . . . . . . . . . . . . . . . . . . . . . . . . . . . . . . . . . . . . . . . . . . . . . . . . . . . . . 1-3
Back View. . . . . . . . . . . . . . . . . . . . . . . . . . . . . . . . . . . . . . . . . . . . . . . . . . . . . . . . . . 1-3
Open View . . . . . . . . . . . . . . . . . . . . . . . . . . . . . . . . . . . . . . . . . . . . . . . . . . . . . . . . . 1-4
System Configurations . . . . . . . . . . . . . . . . . . . . . . . . . . . . . . . . . . . . . . . . . . . . . . . . . . . . . 1-5
Standard Features . . . . . . . . . . . . . . . . . . . . . . . . . . . . . . . . . . . . . . . . . . . . . . . . . . . . 1-5
Available Configurations . . . . . . . . . . . . . . . . . . . . . . . . . . . . . . . . . . . . . . . . . . . . . . 1-6
Options . . . . . . . . . . . . . . . . . . . . . . . . . . . . . . . . . . . . . . . . . . . . . . . . . . . . . . . . . . . . 1-7
Upgrade. . . . . . . . . . . . . . . . . . . . . . . . . . . . . . . . . . . . . . . . . . . . . . . . . . . . . . . . . . . . 1-7
Accessory . . . . . . . . . . . . . . . . . . . . . . . . . . . . . . . . . . . . . . . . . . . . . . . . . . . . . . . . . . 1-7
Printer and Scan Drivers . . . . . . . . . . . . . . . . . . . . . . . . . . . . . . . . . . . . . . . . . . . . . . . 1-7
Control Panel . . . . . . . . . . . . . . . . . . . . . . . . . . . . . . . . . . . . . . . . . . . . . . . . . . . . . . . . . . . . . 1-8
Control Panel Features . . . . . . . . . . . . . . . . . . . . . . . . . . . . . . . . . . . . . . . . . . . . . . . . 1-8
Control Panel Layout . . . . . . . . . . . . . . . . . . . . . . . . . . . . . . . . . . . . . . . . . . . . . . . . . 1-8
Information Pages . . . . . . . . . . . . . . . . . . . . . . . . . . . . . . . . . . . . . . . . . . . . . . . . . . . 1-12
Menu Map . . . . . . . . . . . . . . . . . . . . . . . . . . . . . . . . . . . . . . . . . . . . . . . . . . . . . . . . . 1-12
Sample Pages . . . . . . . . . . . . . . . . . . . . . . . . . . . . . . . . . . . . . . . . . . . . . . . . . . . . . . 1-12
More Information . . . . . . . . . . . . . . . . . . . . . . . . . . . . . . . . . . . . . . . . . . . . . . . . . . . . . . . . 1-14
Resources . . . . . . . . . . . . . . . . . . . . . . . . . . . . . . . . . . . . . . . . . . . . . . . . . . . . . . . . . 1-14
Xerox Support Centre . . . . . . . . . . . . . . . . . . . . . . . . . . . . . . . . . . . . . . . . . . . . . . . . 1-15
2 Network Basics
Overview of Network Setup and Configuration . . . . . . . . . . . . . . . . . . . . . . . . . . . . . . . . . . 2-2
Setting Up the Network . . . . . . . . . . . . . . . . . . . . . . . . . . . . . . . . . . . . . . . . . . . . . . . . . . . . . 2-3 Choosing a Connection Method . . . . . . . . . . . . . . . . . . . . . . . . . . . . . . . . . . . . . . . . . 2-3 Connecting via USB . . . . . . . . . . . . . . . . . . . . . . . . . . . . . . . . . . . . . . . . . . . . . . . . . . 2-3 Connecting via Ethernet (Recommended) . . . . . . . . . . . . . . . . . . . . . . . . . . . . . . . . . 2-3
Configuring the Network Address. . . . . . . . . . . . . . . . . . . . . . . . . . . . . . . . . . . . . . . . . . . . . 2-5 TCP/IP and IP Addresses . . . . . . . . . . . . . . . . . . . . . . . . . . . . . . . . . . . . . . . . . . . . . . 2-5 Automatically Setting the System’s IP Address . . . . . . . . . . . . . . . . . . . . . . . . . . . . . 2-5 Dynamic Methods of Setting the System’s IP Address . . . . . . . . . . . . . . . . . . . . . . . 2-6 Manually Setting the System’s IP Address. . . . . . . . . . . . . . . . . . . . . . . . . . . . . . . . . 2-9
Phaser® 8510/8560MFP Multifunction Product i
Contents
Installing the System Drivers . . . . . . . . . . . . . . . . . . . . . . . . . . . . . . . . . . . . . . . . . . . . . . . 2-10 Available Drivers . . . . . . . . . . . . . . . . . . . . . . . . . . . . . . . . . . . . . . . . . . . . . . . . . . . 2-10 Windows 98 SE or Later and Windows 2000 or Later . . . . . . . . . . . . . . . . . . . . . . . 2-11 Macintosh OS 9.x . . . . . . . . . . . . . . . . . . . . . . . . . . . . . . . . . . . . . . . . . . . . . . . . . . . 2-11 Macintosh OS X, Version 10.2 and Higher . . . . . . . . . . . . . . . . . . . . . . . . . . . . . . . 2-12
3 Printing Basics
Overview of Basic Steps . . . . . . . . . . . . . . . . . . . . . . . . . . . . . . . . . . . . . . . . . . . . . . . . . . . . 3-2
Supported Paper and Media. . . . . . . . . . . . . . . . . . . . . . . . . . . . . . . . . . . . . . . . . . . . . . . . . . 3-3
Paper Usage Guidelines . . . . . . . . . . . . . . . . . . . . . . . . . . . . . . . . . . . . . . . . . . . . . . . 3-4
Duplex Automatic Document Feeder Guidelines . . . . . . . . . . . . . . . . . . . . . . . . . . . . 3-4
Paper That Can Damage Your System . . . . . . . . . . . . . . . . . . . . . . . . . . . . . . . . . . . . 3-5
Paper Storage Guidelines . . . . . . . . . . . . . . . . . . . . . . . . . . . . . . . . . . . . . . . . . . . . . . 3-5
Supported Paper Sizes and Weights . . . . . . . . . . . . . . . . . . . . . . . . . . . . . . . . . . . . . . 3-6
Loading Paper . . . . . . . . . . . . . . . . . . . . . . . . . . . . . . . . . . . . . . . . . . . . . . . . . . . . . . . . . . . . 3-9 Loading Paper in Tray 1 . . . . . . . . . . . . . . . . . . . . . . . . . . . . . . . . . . . . . . . . . . . . . . . 3-9 Using Manual Feed . . . . . . . . . . . . . . . . . . . . . . . . . . . . . . . . . . . . . . . . . . . . . . . . . 3-13 Loading Paper in Tray 2, 3, or 4 . . . . . . . . . . . . . . . . . . . . . . . . . . . . . . . . . . . . . . . . 3-14
Selecting Printing Options. . . . . . . . . . . . . . . . . . . . . . . . . . . . . . . . . . . . . . . . . . . . . . . . . . 3-20 Selecting Printing Preferences (Windows) . . . . . . . . . . . . . . . . . . . . . . . . . . . . . . . . 3-20 Selecting Options for an Individual Job (Windows). . . . . . . . . . . . . . . . . . . . . . . . . 3-21 Selecting Options for an Individual Job (Macintosh) . . . . . . . . . . . . . . . . . . . . . . . . 3-23
Printing on Both Sides of the Paper. . . . . . . . . . . . . . . . . . . . . . . . . . . . . . . . . . . . . . . . . . . 3-25 Automatic 2-Sided Printing Guidelines . . . . . . . . . . . . . . . . . . . . . . . . . . . . . . . . . . 3-25 Manual 2-Sided Printing . . . . . . . . . . . . . . . . . . . . . . . . . . . . . . . . . . . . . . . . . . . . . . 3-27
Printing on Specialty Media . . . . . . . . . . . . . . . . . . . . . . . . . . . . . . . . . . . . . . . . . . . . . . . . 3-29 Printing Transparencies. . . . . . . . . . . . . . . . . . . . . . . . . . . . . . . . . . . . . . . . . . . . . . . 3-29 Printing Envelopes . . . . . . . . . . . . . . . . . . . . . . . . . . . . . . . . . . . . . . . . . . . . . . . . . . 3-35 Printing Labels . . . . . . . . . . . . . . . . . . . . . . . . . . . . . . . . . . . . . . . . . . . . . . . . . . . . . 3-41 Printing Glossy Paper . . . . . . . . . . . . . . . . . . . . . . . . . . . . . . . . . . . . . . . . . . . . . . . . 3-47 Printing Custom Size Paper . . . . . . . . . . . . . . . . . . . . . . . . . . . . . . . . . . . . . . . . . . . 3-52
4 Copying
Basic Copying . . . . . . . . . . . . . . . . . . . . . . . . . . . . . . . . . . . . . . . . . . . . . . . . . . . . . . . . . . . . 4-2
Adjusting Copying Options. . . . . . . . . . . . . . . . . . . . . . . . . . . . . . . . . . . . . . . . . . . . . . . . . . 4-3
Basic Settings . . . . . . . . . . . . . . . . . . . . . . . . . . . . . . . . . . . . . . . . . . . . . . . . . . . . . . . 4-3
Image Adjustments . . . . . . . . . . . . . . . . . . . . . . . . . . . . . . . . . . . . . . . . . . . . . . . . . . . 4-8
Image Placement Adjustments . . . . . . . . . . . . . . . . . . . . . . . . . . . . . . . . . . . . . . . . . 4-13
Output Adjustments . . . . . . . . . . . . . . . . . . . . . . . . . . . . . . . . . . . . . . . . . . . . . . . . . 4-16
Advanced Copying . . . . . . . . . . . . . . . . . . . . . . . . . . . . . . . . . . . . . . . . . . . . . . . . . . 4-18
Phaser® 8510/8560MFP Multifunction Product ii
Contents
Managing Copy Functions. . . . . . . . . . . . . . . . . . . . . . . . . . . . . . . . . . . . . . . . . . . . . . . . . . 4-20
Setting the Print Job Interrupt Option . . . . . . . . . . . . . . . . . . . . . . . . . . . . . . . . . . . . 4-20
Using a Color Copy Password . . . . . . . . . . . . . . . . . . . . . . . . . . . . . . . . . . . . . . . . . 4-20
5 Scanning
Overview . . . . . . . . . . . . . . . . . . . . . . . . . . . . . . . . . . . . . . . . . . . . . . . . . . . . . . . . . . . . . . . . 5-2
Installing the Scan Driver . . . . . . . . . . . . . . . . . . . . . . . . . . . . . . . . . . . . . . . . . . . . . . 5-2
Basic Scanning . . . . . . . . . . . . . . . . . . . . . . . . . . . . . . . . . . . . . . . . . . . . . . . . . . . . . . . . . . . 5-3
Scanning Originals at the Phaser 8510MFP Product . . . . . . . . . . . . . . . . . . . . . . . . . 5-4
Scanning Originals at the Phaser 8560MFP Product . . . . . . . . . . . . . . . . . . . . . . . . . 5-5
Using Walk-Up Scanning . . . . . . . . . . . . . . . . . . . . . . . . . . . . . . . . . . . . . . . . . . . . . . 5-7
Retrieving Scanned Images . . . . . . . . . . . . . . . . . . . . . . . . . . . . . . . . . . . . . . . . . . . . . . . . . . 5-8 Using CentreWare IS to Retrieve Images . . . . . . . . . . . . . . . . . . . . . . . . . . . . . . . . . . 5-9 Using the Xerox Scan Utility to Retrieve Images. . . . . . . . . . . . . . . . . . . . . . . . . . . 5-10 Importing Images into an Application . . . . . . . . . . . . . . . . . . . . . . . . . . . . . . . . . . . 5-14
Scanning Options. . . . . . . . . . . . . . . . . . . . . . . . . . . . . . . . . . . . . . . . . . . . . . . . . . . . . . . . . 5-17 Setting the Scan Resolution . . . . . . . . . . . . . . . . . . . . . . . . . . . . . . . . . . . . . . . . . . . 5-17 Automatically Suppressing Background Variations . . . . . . . . . . . . . . . . . . . . . . . . . 5-18 Setting the Color Mode . . . . . . . . . . . . . . . . . . . . . . . . . . . . . . . . . . . . . . . . . . . . . . . 5-18 Setting 1-Sided or 2-Sided Originals . . . . . . . . . . . . . . . . . . . . . . . . . . . . . . . . . . . . 5-19 Setting the Document Type . . . . . . . . . . . . . . . . . . . . . . . . . . . . . . . . . . . . . . . . . . . 5-20 Setting the Original Size . . . . . . . . . . . . . . . . . . . . . . . . . . . . . . . . . . . . . . . . . . . . . . 5-21
Managing Scan Templates. . . . . . . . . . . . . . . . . . . . . . . . . . . . . . . . . . . . . . . . . . . . . . . . . . 5-22 Creating a Template with an Image View Setting . . . . . . . . . . . . . . . . . . . . . . . . . . 5-23 Creating a Template to Scan Images Directly to a Folder . . . . . . . . . . . . . . . . . . . . 5-24 Deleting Templates . . . . . . . . . . . . . . . . . . . . . . . . . . . . . . . . . . . . . . . . . . . . . . . . . . 5-25
Managing Folder and Email Profiles. . . . . . . . . . . . . . . . . . . . . . . . . . . . . . . . . . . . . . . . . . 5-26 Creating or Editing Email Profiles . . . . . . . . . . . . . . . . . . . . . . . . . . . . . . . . . . . . . . 5-27 Deleting Email Profiles. . . . . . . . . . . . . . . . . . . . . . . . . . . . . . . . . . . . . . . . . . . . . . . 5-28 Creating or Editing Folder Profiles. . . . . . . . . . . . . . . . . . . . . . . . . . . . . . . . . . . . . . 5-29 Deleting Folder Profiles . . . . . . . . . . . . . . . . . . . . . . . . . . . . . . . . . . . . . . . . . . . . . . 5-30
Managing Files and Scanning Policies . . . . . . . . . . . . . . . . . . . . . . . . . . . . . . . . . . . . . . . . 5-31 Deleting Image Files from the System . . . . . . . . . . . . . . . . . . . . . . . . . . . . . . . . . . . 5-31 Deleting Image Files from the Xerox Scan Utility . . . . . . . . . . . . . . . . . . . . . . . . . . 5-33 Adding a Password for Scanning to Your Computer . . . . . . . . . . . . . . . . . . . . . . . . 5-33 Creating a Private Folder . . . . . . . . . . . . . . . . . . . . . . . . . . . . . . . . . . . . . . . . . . . . . 5-34 Controlling Scanning Policies. . . . . . . . . . . . . . . . . . . . . . . . . . . . . . . . . . . . . . . . . . 5-34
Calibrating the Scanner . . . . . . . . . . . . . . . . . . . . . . . . . . . . . . . . . . . . . . . . . . . . . . . . . . . . 5-35 Starting the Calibration Procedure . . . . . . . . . . . . . . . . . . . . . . . . . . . . . . . . . . . . . . 5-35 Calibrating the Scanner at the Document Glass . . . . . . . . . . . . . . . . . . . . . . . . . . . . 5-36 Calibrating the Scanner at the Document Feeder . . . . . . . . . . . . . . . . . . . . . . . . . . . 5-37
Phaser® 8510/8560MFP Multifunction Product iii
Contents
6 Faxing
Basic Faxing . . . . . . . . . . . . . . . . . . . . . . . . . . . . . . . . . . . . . . . . . . . . . . . . . . . . . . . . . . . . . 6-2 Sending a Fax from the System . . . . . . . . . . . . . . . . . . . . . . . . . . . . . . . . . . . . . . . . . 6-2 Sending a Fax from Your Computer. . . . . . . . . . . . . . . . . . . . . . . . . . . . . . . . . . . . . . 6-3
Adding Individual and Group Speed Dial Entries. . . . . . . . . . . . . . . . . . . . . . . . . . . . . . . . . 6-5 Adding an Individual . . . . . . . . . . . . . . . . . . . . . . . . . . . . . . . . . . . . . . . . . . . . . . . . . 6-6 Adding a Group. . . . . . . . . . . . . . . . . . . . . . . . . . . . . . . . . . . . . . . . . . . . . . . . . . . . . . 6-8 Editing or Deleting an Individual Speed Dial Entry . . . . . . . . . . . . . . . . . . . . . . . . . 6-10 Editing or Deleting a Group Speed Dial Entry . . . . . . . . . . . . . . . . . . . . . . . . . . . . . 6-11
Faxing Multiple Recipients Using Send List . . . . . . . . . . . . . . . . . . . . . . . . . . . . . . . . . . . 6-12 Setting Up a Send List of Fax Recipients . . . . . . . . . . . . . . . . . . . . . . . . . . . . . . . . . 6-12 Viewing or Editing the Send List . . . . . . . . . . . . . . . . . . . . . . . . . . . . . . . . . . . . . . . 6-13
Selecting Fax Options . . . . . . . . . . . . . . . . . . . . . . . . . . . . . . . . . . . . . . . . . . . . . . . . . . . . . 6-14
Setting the Fax Destination . . . . . . . . . . . . . . . . . . . . . . . . . . . . . . . . . . . . . . . . . . . . 6-14
Setting the Fax Resolution . . . . . . . . . . . . . . . . . . . . . . . . . . . . . . . . . . . . . . . . . . . . 6-15
Selecting the Original Size . . . . . . . . . . . . . . . . . . . . . . . . . . . . . . . . . . . . . . . . . . . . 6-15
Selecting Auto Suppression . . . . . . . . . . . . . . . . . . . . . . . . . . . . . . . . . . . . . . . . . . . 6-15
Selecting the Starting Rate . . . . . . . . . . . . . . . . . . . . . . . . . . . . . . . . . . . . . . . . . . . . 6-16
Delay Sending a Fax . . . . . . . . . . . . . . . . . . . . . . . . . . . . . . . . . . . . . . . . . . . . . . . . . 6-16
Managing Fax Functions . . . . . . . . . . . . . . . . . . . . . . . . . . . . . . . . . . . . . . . . . . . . . . . . . . . 6-17 Printing a Transmission Report. . . . . . . . . . . . . . . . . . . . . . . . . . . . . . . . . . . . . . . . . 6-17 Enabling or Disabling Secure Faxes . . . . . . . . . . . . . . . . . . . . . . . . . . . . . . . . . . . . . 6-18 Printing or Clearing Secure Faxes . . . . . . . . . . . . . . . . . . . . . . . . . . . . . . . . . . . . . . 6-19 Clear Pending Faxes . . . . . . . . . . . . . . . . . . . . . . . . . . . . . . . . . . . . . . . . . . . . . . . . . 6-20 Enabling or Disabling Junk Fax Prevention . . . . . . . . . . . . . . . . . . . . . . . . . . . . . . . 6-21 Printing Fax Reports . . . . . . . . . . . . . . . . . . . . . . . . . . . . . . . . . . . . . . . . . . . . . . . . . 6-22 Inserting Pauses in Fax Numbers . . . . . . . . . . . . . . . . . . . . . . . . . . . . . . . . . . . . . . . 6-23 Changing Default Settings . . . . . . . . . . . . . . . . . . . . . . . . . . . . . . . . . . . . . . . . . . . . 6-24
Solving Fax Problems . . . . . . . . . . . . . . . . . . . . . . . . . . . . . . . . . . . . . . . . . . . . . . . . . . . . . 6-25 Configuring the Modem . . . . . . . . . . . . . . . . . . . . . . . . . . . . . . . . . . . . . . . . . . . . . . 6-25 Printing the Protocol Monitoring Report . . . . . . . . . . . . . . . . . . . . . . . . . . . . . . . . . 6-25 Resetting Fax Options to the Factory Default. . . . . . . . . . . . . . . . . . . . . . . . . . . . . . 6-26
Phaser® 8510/8560MFP Multifunction Product iv
Contents
7 Print Quality
Controlling the Quality of Your Prints . . . . . . . . . . . . . . . . . . . . . . . . . . . . . . . . . . . . . . . . . 7-2
Selecting a Print-Quality Mode. . . . . . . . . . . . . . . . . . . . . . . . . . . . . . . . . . . . . . . . . . 7-2
Adjusting Color. . . . . . . . . . . . . . . . . . . . . . . . . . . . . . . . . . . . . . . . . . . . . . . . . . . . . . 7-4
Solving Print-Quality Problems. . . . . . . . . . . . . . . . . . . . . . . . . . . . . . . . . . . . . . . . . . . . . . . 7-6 Smudges or Smears. . . . . . . . . . . . . . . . . . . . . . . . . . . . . . . . . . . . . . . . . . . . . . . . . . . 7-6 Random Light Stripes . . . . . . . . . . . . . . . . . . . . . . . . . . . . . . . . . . . . . . . . . . . . . . . . . 7-8 Predominate Light Stripes. . . . . . . . . . . . . . . . . . . . . . . . . . . . . . . . . . . . . . . . . . . . . 7-10 Transparency Images Are Too Light or Too Dark . . . . . . . . . . . . . . . . . . . . . . . . . . 7-11 Colors Are Wrong. . . . . . . . . . . . . . . . . . . . . . . . . . . . . . . . . . . . . . . . . . . . . . . . . . . 7-12
8 Maintenance
Maintenance and Cleaning . . . . . . . . . . . . . . . . . . . . . . . . . . . . . . . . . . . . . . . . . . . . . . . . . . 8-2
Routine Maintenance . . . . . . . . . . . . . . . . . . . . . . . . . . . . . . . . . . . . . . . . . . . . . . . . . 8-2
Cleaning the Paper Release Blade . . . . . . . . . . . . . . . . . . . . . . . . . . . . . . . . . . . . . . 8-11
Cleaning the Maintenance Kit Wiper Blade . . . . . . . . . . . . . . . . . . . . . . . . . . . . . . . 8-15
Cleaning the Outside of the System . . . . . . . . . . . . . . . . . . . . . . . . . . . . . . . . . . . . . 8-18
Cleaning the Document Glass and Document Feeder . . . . . . . . . . . . . . . . . . . . . . . 8-18
Ordering Supplies . . . . . . . . . . . . . . . . . . . . . . . . . . . . . . . . . . . . . . . . . . . . . . . . . . . . . . . . 8-23 Consumables . . . . . . . . . . . . . . . . . . . . . . . . . . . . . . . . . . . . . . . . . . . . . . . . . . . . . . . 8-23 Routine Maintenance Items . . . . . . . . . . . . . . . . . . . . . . . . . . . . . . . . . . . . . . . . . . . 8-24 When to Order Supplies . . . . . . . . . . . . . . . . . . . . . . . . . . . . . . . . . . . . . . . . . . . . . . 8-24 Recycling Supplies . . . . . . . . . . . . . . . . . . . . . . . . . . . . . . . . . . . . . . . . . . . . . . . . . . 8-24
Moving and Repacking the System . . . . . . . . . . . . . . . . . . . . . . . . . . . . . . . . . . . . . . . . . . . 8-25 Precautions for Moving the System . . . . . . . . . . . . . . . . . . . . . . . . . . . . . . . . . . . . . 8-25 Moving the System Within the Office . . . . . . . . . . . . . . . . . . . . . . . . . . . . . . . . . . . 8-25 Preparing the System for Shipment . . . . . . . . . . . . . . . . . . . . . . . . . . . . . . . . . . . . . 8-27
9 Troubleshooting
Clearing Paper Jams . . . . . . . . . . . . . . . . . . . . . . . . . . . . . . . . . . . . . . . . . . . . . . . . . . . . . . . 9-2 Jam at Exit Cover . . . . . . . . . . . . . . . . . . . . . . . . . . . . . . . . . . . . . . . . . . . . . . . . . . . . 9-2 Jam at Exit Path. . . . . . . . . . . . . . . . . . . . . . . . . . . . . . . . . . . . . . . . . . . . . . . . . . . . . . 9-8 Jam at Front Cover . . . . . . . . . . . . . . . . . . . . . . . . . . . . . . . . . . . . . . . . . . . . . . . . . . 9-11 Jam at Tray 2, 3, or 4 . . . . . . . . . . . . . . . . . . . . . . . . . . . . . . . . . . . . . . . . . . . . . . . . 9-18 Jam at the Document Feeder. . . . . . . . . . . . . . . . . . . . . . . . . . . . . . . . . . . . . . . . . . . 9-23
Getting Help . . . . . . . . . . . . . . . . . . . . . . . . . . . . . . . . . . . . . . . . . . . . . . . . . . . . . . . . . . . . 9-27
Control Panel Messages . . . . . . . . . . . . . . . . . . . . . . . . . . . . . . . . . . . . . . . . . . . . . . 9-27
PrintingScout Alerts . . . . . . . . . . . . . . . . . . . . . . . . . . . . . . . . . . . . . . . . . . . . . . . . . 9-27
Fax and Scan Alerts . . . . . . . . . . . . . . . . . . . . . . . . . . . . . . . . . . . . . . . . . . . . . . . . . 9-28
PhaserSMART Technical Support . . . . . . . . . . . . . . . . . . . . . . . . . . . . . . . . . . . . . . 9-28
Web Links . . . . . . . . . . . . . . . . . . . . . . . . . . . . . . . . . . . . . . . . . . . . . . . . . . . . . . . . . 9-29
Phaser® 8510/8560MFP Multifunction Product v
Contents
AUser Safety
BCopy Regulations
CFax Regulations
Index
Phaser® 8510/8560MFP Multifunction Product vi

System Features
This chapter includes:
■Parts of the System on page 1-2
■System Configurations on page 1-5
■Control Panel on page 1-8
■More Information on page 1-14
Phaser® 8510/8560MFP Multifunction Product 1-1

Parts of the System
Parts of the System
This section includes:
■Front View on page 1-2
■Side View on page 1-3
■Back View on page 1-3
■Open View on page 1-4
Front View
Phaser 8510MFP/D Product and |
|
All Phaser 8560MFP Products |
Phaser 8510MFP/N Product |
9 |
1 |
8 |
|
7 |
|
6 |
|
5 |
|
4 |
10 |
3 |
11 |
|
2
12
1 
8560-134
8560-001
1. Tray 4 (optional) |
1. Document cover |
2.Tray 3 (optional)
3.Tray 2
4.Tray 1
5.Output tray
6.Exit cover
7.Control panel
8.Document feeder
9.Duplex automatic document feeder
10.Interface cover
11.Side door
12.Front cover release
Phaser® 8510/8560MFP Multifunction Product 1-2

|
|
|
|
|
Parts of the System |
|
Side View |
|
|
|
|
|
|
1 |
2 |
3 |
4 |
1. |
Maintenance kit |
|
2. |
Waste tray |
|||||
|
|
|
|
|||
|
|
|
|
3. |
Power cord connection |
|
|
|
|
|
4. |
Power switch |
|
|
|
|
5 |
5. |
Scanner cable connection |
|
|
|
|
6 |
6. |
USB connection |
|
|
|
|
7 |
7. |
RJ-11 fax modem connection |
|
|
|
|
8 |
|||
|
|
|
8. |
Configuration card |
||
|
|
|
9 |
|||
|
|
|
9. |
Ethernet 10/100 Base-Tx connection |
||
|
|
|
|
8560-002
Back View
Phaser 8560MFP Products |
Phaser 8510MFP Products |
2
 1 1
1 1 


 3
3
8560-003
8560-135
1. Hard drive |
1. Flash memory |
2.RAM slots
3.Stabilizer
Phaser® 8510/8560MFP Multifunction Product 1-3

Parts of the System
Open View
|
1. |
Long paper extension |
|
|
2. |
Short paper stop |
|
5 |
3. |
Exit cover |
|
4. |
Ink cover |
||
|
|||
4 |
5. |
Scanhead transportation lock |
3
2
1
8560-004
Phaser® 8510/8560MFP Multifunction Product 1-4

System Configurations
System Configurations
This section includes:
■Standard Features on page 1-5
■Available Configurations on page 1-6
■Options on page 1-7
Standard Features
Your Phaser 8510/8560MFP Multifunction Product offers many standard features to meet your office needs.
■Maximum print speed (pages per minute) based on letter-size plain paper:
Phaser 8510MFP Products |
|
Phaser 8560MFP Products |
|
|
|
PostScript Print-Quality Modes |
PostScript Print-Quality Modes |
|
■ Fast Color: 24 ppm |
■ Fast Color: 30 ppm |
|
■ Enhanced: 12 ppm |
■ |
Standard: 24 ppm |
PCL Print-Quality Modes |
■ |
Enhanced: 16 ppm |
■ 600 x 300 dpi: 13 ppm |
■ |
High-Resolution/Photo: 10 ppm |
■ 600 x 600 dpi: 6 ppm |
PCL Print-Quality Modes |
|
|
■ 600 x 300 dpi: 16 ppm |
|
|
■ 600 x 600 dpi: 8 ppm |
|
|
|
|
■First-page-out speed (pages per minute): 8 seconds for color prints, 15 seconds for color copies
■Copy, print, scan, fax capabilities
■Fonts: PostScript and PCL
■Trays: Tray 1 and Tray 2
■Connection: USB, Ethernet 10/100 Base-Tx
See also:
Copying on page 4-1
Scanning on page 5-1
Faxing on page 6-1
Phaser® 8510/8560MFP Multifunction Product 1-5

System Configurations
Available Configurations
Standard System Configurations
|
8510MFP/N |
8510MFP/D |
8560MFP/D |
8560MFP/T |
8560MFP/X |
|
|
|
|
|
|
Memory |
512 MB |
512 MB |
512 MB |
512 MB |
1 GB |
|
|
|
|
|
(2x512) |
|
|
|
|
|
|
Hard Drive |
No |
No |
Yes |
Yes |
Yes |
|
|
|
|
|
|
Flash Memory |
Yes |
Yes |
No |
No |
No |
|
|
|
|
|
|
Automatic 2-Sided |
No |
Yes |
Yes |
Yes |
Yes |
Printing |
|
|
|
|
|
|
|
|
|
|
|
Duplex Automatic |
No |
Yes |
Yes |
Yes |
Yes |
Document Feeder |
|
|
|
|
|
|
|
|
|
|
|
525-Sheet Feeder |
Optional* |
Optional* |
Optional* |
Yes |
Yes |
(Tray 3) |
|
|
|
|
|
|
|
|
|
|
|
525-Sheet Feeder |
Optional* |
Optional* |
Optional* |
Optional* |
Yes |
(Tray 4) |
|
|
|
|
|
|
|
|
|
|
|
System cart |
Optional* |
Optional* |
Optional* |
Yes |
Yes |
|
|
|
|
|
|
Copy |
Yes |
Yes |
Yes |
Yes |
Yes |
|
|
|
|
|
|
Scan to PC or |
Yes |
Yes |
Yes |
Yes |
Yes |
Macintosh computer |
|
|
|
|
|
|
|
|
|
|
|
Scan to Email |
Yes |
Yes |
Yes |
Yes |
Yes |
|
|
|
|
|
|
Scan to System Hard |
No |
No |
Yes |
Yes |
Yes |
Drive |
|
|
|
|
|
|
|
|
|
|
|
Fax |
Yes |
Yes |
Yes |
Yes |
Yes |
* This option can be purchased separately for this configuration.
Phaser® 8510/8560MFP Multifunction Product 1-6
System Configurations
Options
You can order additional trays, and memory if these items are not standard on your system. Print the Configuration page to see which options are installed on your system. To print the Configuration page, see Information Pages on page 1-12.
Additional Trays
■525-Sheet Feeder (Tray 3)
■525-Sheet Feeder (Tray 4)
Memory
RAM memory cards: 256 MB and 512 MB (up to a total of 1 GB)
Upgrade
The Phaser 8510MFP/N to Phaser 8510MFP/D upgrade kit contains the duplex automatic document feeder and a configuration card. To order the upgrade kit, contact your local reseller or go to www.xerox.com/office/8510_8560supplies.
Accessory
The system cart is the only accessory for the Phaser 8510/8560MFP product. For more information on accessories, go to www.xerox.com/office/8510_8560supplies.
Printer and Scan Drivers
To access all your system’s features, install the printer and scan drivers from the Software and Documentation CD-ROM or the driver website at www.xerox.com/drivers.
■Printer drivers enable your computer and system to communicate and provide access to your system features. Xerox makes printer driver installation easy with its Walk-Up Technology.
■Scan drivers enable you to scan images directly to your personal computer and place scanned images directly into an application.
Phaser® 8510/8560MFP Multifunction Product 1-7
Control Panel
Control Panel
This section includes:
■Control Panel Features on page 1-8
■Control Panel Layout on page 1-8
■Menu Map on page 1-12
■Information Pages on page 1-12
■Sample Pages on page 1-12
Control Panel Features
The control panel:
■Displays the system’s operating status (for example, Printing, Ready to Print), system errors, and warnings.
■Prompts you to load paper, order and replace supplies, and clear jams.
■Enables you to access tools and information pages to help resolve problems.
■Enables you to change system and network settings.
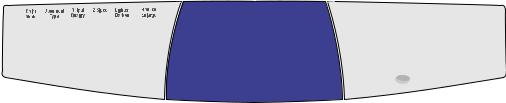
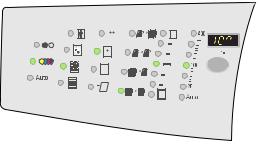
Control Panel Layout
The control panel is divided into three major areas.
|
|
|
|
|
|
|
|
|
|
|
|
|
|
|
|
8560-097 |
|
|
|
|
|
|
|
|
|
|
|
|
|
|
|
|
|
|
|
|
|
|
|
|
|
|
|
|
|
|
|
|
|
|
|
|
|
|
|
|
|
|
|
|
|
|
|
|
|
|
|
|
|
|
|
|
|
|
|
|
|
|
|
|
|
|
|
|
|
|
|
|
|
|
|
|
|
|
|
|
|
|
|
|
|
|
|
|
|
|
|
|
|
|
|
|
|
|
|
|
|
|
|
|
|
|
|
|
|
|
|
|
|
|
|
|
|
|
|
Left side |
Middle |
Right side |
||||||||||||||
Copying, scanning, and faxing |
Function buttons, graphic display |
Fax function buttons, numeric |
||||||||||||||
function buttons and LEDs |
screen, mode buttons, menu |
keypad, Clear All, Stop, and |
||||||||||||||
|
|
|
|
|
|
|
|
|
|
|
|
|
navigation buttons, and status |
Start buttons |
||
|
|
|
|
|
|
|
|
|
|
|
|
|
LED |
|
||
Phaser® 8510/8560MFP Multifunction Product 1-8
Control Panel
Left Side of the Control Panel
Color |
Document |
Output |
2 Sided Lighten |
Reduce |
||||||||
Mode |
Type |
Quality |
|
|
Darken |
Enlarge |
||||||
|
|
|
|
|
|
|
|
|
|
|
|
|
|
|
|
|
|
|
|
|
|
|
|
|
|


 9
9
8
7
1 |
2 |
3 |
4 |
5 |
6 |
8560-007
The left side of the control panel contains the following copy, scan, and fax function buttons and LEDs. A lighted LED indicates the current selection.
1.Color Mode button and LEDs
Press the Color Mode button to select black and white or color for your copy or scan job.
2.Document Type button and LEDs
4.2-Sided button and LEDs
Press the 2-Sided button to select either oneor 2-sided for the original and oneor 2-sided for the output.
5.Lighten/Darken button and LEDs
Press the Lighten/Darken button to select a setting for your copy, scan, or fax job.
6.Reduce/Enlarge button and LEDs
Press the Document Type button to select the type of document for your copy or scan job: photo, graphic, mixed (text and graphics), text only.
3.Output Quality button and LEDs (copy only)
Press the Output Quality button to select the output quality mode for the copy job: fast color, standard, enhanced, and high-resolution/photo.
Press the Reduce/Enlarge button to select reduce/enlarge percentage options for your output: 25, 50, 100, 150, 200, 400.
7.Reduce/Enlarge Down Arrow button
Press the Down Arrow button to reduce the percentage in one percent increments.
8.Reduce/Enlarge Up Arrow button
Press the Up Arrow button to increase the percentage in one percent increments.
9.Reduce/Enlarge Percentage LED
The LED displays the percentage selected.
See also:
Copying on page 4-1 Scanning on page 5-1 Faxing on page 6-1
Phaser® 8510/8560MFP Multifunction Product 1-9

Control Panel
Middle of the Control Panel
1 |
2 |
3 |
4 |
|
|
5 |
Copy |
Scan |
Fax |
System |
6 |
||
|
|
|
|
|
|
|
Ready to Copy |
1 |
|
|
|
|
|
Paper Supply... |
2: Letter 8.5X11 |
|
|
|
|
|
Reduce/Enlarge... |
100% |
|
|
|
|
|
Lighten/Darken... |
0 |
|
|
|
|
|
Original Size... |
Tray/Auto |
|
|
|
|
|
12 |
11 |
10 |
9 |
8 |
|
7 |
|
|
|
|
|
8560-006 |
|
1.Copy button
Press to view the Copy menu on the display screen.
2.Scan button
Press to view the Scan menu on the display screen.
3.Print button
Press to view the Print menu on the display screen.
4.Fax button
Press to view the Fax menu on the display screen.
5.System button
Press to view the System Setup menu on the display screen.
6.Help (?) button
Press to read a help message explaining the menu or message that appears on the display screen.
7.OK ( ) button
Press to accept the setting selected.
8.Down Arrow button
Press to scroll down through menu options.
9.Up Arrow button
Press to scroll up through menu options.
10.Back button
Press to return to the previous menu.
11.Graphic display screen indicates status messages and menus.
12.Status indicator LED:
Green: System is ready to print, copy, scan, or fax.
Yellow: Warning condition, system continues to print, copy, scan or fax.
Red: Startup sequence or error condition exists for the current function.
Blinking: System is busy or warming up.
Phaser® 8510/8560MFP Multifunction Product 1-10

Control Panel
Right Side of the Control Panel
8 |
7 |
6 |
5 |
|
|
|
|
|
, |
Speed |
|
Send |
Delay Pause |
|
Dial |
|
List |
Send |
4 |
|
|
|
|
|
A B C 2 |
|
|
|
3 |
|
|
|
|
2 |
= : ( ) , ! / |
* |
# |
|
|
|
|
|||
|
|
1 |
|
8560-008 |
1.Alphanumeric keys
■Press each alphanumeric key several times to cycle through numbers and letters.
■Press the * and # keys several times to cycle through characters when using speed dial.
The cursor advances after one second.
2.Start button
Press to start a copy, scan, or fax job.
3.Stop button
Press to interrupt print, copy, scan, or fax jobs. To cancel the job, follow the instructions indicated on the graphic display.
4.Clear All button
5.Pause button
Press to enter pauses (represented by commas) in fax numbers.
6.Delayed Send button
Press to select a later time for sending your fax.
7.Send List button
Press to view or add a fax telephone number, an individual, or group speed dial numbers.
8.Speed Dial button
Press to access directories of group or individual fax telephone numbers.
Press once to return to the default main menu. All job settings are reset to default.
Phaser® 8510/8560MFP Multifunction Product 1-11

Control Panel
Information Pages
Your system comes with a set of information pages to help you obtain the best results from your system. Access these pages from the control panel. Print the Menu Map to see where these information pages are located in the control panel menu structure.
Note: This print icon appears before the titles of information pages that can be printed. When the information page is highlighted on the control panel, press the OK button to print that page.
For example, to print the Configuration page, which displays current information about your system, do the following:
1.On the control panel, press the System button.
2.Select Information, and then press the OK button.
3.Select Information Pages, and then press the OK button.
4.Select Configuration Page, and then press the OK button to print.
Note: You can also print the Configuration page from CentreWare IS and from the printer driver.
Menu Map
The Menu Map helps you navigate the control panel menus. To print the Menu Map:
1.On the control panel, press the System button.
2.Select Information, and then press the OK button.
3.Select Menu Map, and then press the OK button to print.
Note: Print the Menu Map to see other information pages available for printing.
Sample Pages
Your system comes with a set of sample pages that demonstrate different printer functions.
To print sample pages:
1.On the control panel, press the System button.
2.Select Information, and then press the OK button.
3.Select Sample Pages, and then press the OK button.
4.Select the desired sample page, and then press the OK button to print.
Phaser® 8510/8560MFP Multifunction Product 1-12
Control Panel
Color Sampler Pages
The color sampler pages are designed to help you select colors to use in your print jobs. Each sampler page lists either the percentages of cyan, magenta, yellow, and black that are used, or the amounts (from 0 to 255) of red, green, and blue that are used.
Note: Before you print the sampler pages, select the appropriate default print-quality mode and color correction for your print job on the control panel.
To print the color sampler pages:
1.On the control panel, press the System button.
2.Select Information, and then press the OK button.
3.Select Sample Pages, and then press the OK button.
4.Select either CMYK Sampler Pages or RGB Sampler Pages, and then press the
OK button to print.
See also:
Advanced Features Guide at www.xerox.com/office/8510_8560support
Phaser® 8510/8560MFP Multifunction Product 1-13

More Information
More Information
This section includes:
■Resources on page 1-14
■Xerox Support Centre on page 1-15
Obtain information regarding your system and its capabilities from the following sources.
Resources
Information |
Source |
|
|
Installation Guide* |
Packaged with system |
Quick Use Guide* |
Packaged with system |
User Guide (PDF)* |
Software and Documentation CD-ROM |
|
|
Advanced Features Guide (PDF) |
www.xerox.com/office/8510_8560support |
Quick Start Tutorials |
www.xerox.com/office/8510_8560support |
Video Tutorials |
www.xerox.com/office/8510_8560support |
Recommended Media List |
Recommended Media List (United States) |
|
Recommended Media List (Europe) |
Printer Management Tools |
www.xerox.com/office/pmtools |
Knowledge Base |
www.xerox.com/office/8510_8560support |
PhaserSMART |
www.phaserSMART.com |
Technical Support |
www.xerox.com/office/8510_8560support |
|
|
Information about menu selection or error |
Control panel Help (?) button |
messages on control panel |
|
Information pages |
Control panel menu |
|
|
* Also available on the Support website. |
|
Phaser® 8510/8560MFP Multifunction Product 1-14

More Information
Xerox Support Centre
The Xerox Support Centre is a utility that is installed during printer driver installation. It is available for systems with Windows 2000 and later or Mac OS X, version 10.2 and higher.
The Xerox Support Centre icon appears on the desktop for Windows systems or is placed in the Mac OS X dock. It provides a central location for accessing the following information:
■User manuals and video tutorials
■Solutions to troubleshooting problems
■Printer and supplies status
■Supplies ordering and recycling
■Answers to frequently asked questions
■Default printer driver settings (Windows only)
To start the Xerox Support Centre utility:
1.Select one of the following options:
■Windows: Double-click the Xerox Support Centre icon on your desktop.
■Macintosh: Click the Xerox Support Centre icon in the dock.
2. Select your printer from the Select Printer drop-down list.
See also:
Using the Xerox Support Centre tutorial at www.xerox.com/office/8510_8560support
Note: If you have a USB connection, some of the status information is not available. You must have an Internet connection to view manuals and videos on the website.
Phaser® 8510/8560MFP Multifunction Product 1-15

Network Basics
This chapter includes:
■Overview of Network Setup and Configuration on page 2-2
■Setting Up the Network on page 2-3
■Configuring the Network Address on page 2-5
■Installing the System Drivers on page 2-10
This chapter provides basic information about setting up and connecting to your system.
See also:
Advanced Features Guide at www.xerox.com/office/8510_8560support
Phaser® 8510/8560MFP Multifunction Product 2-1
Overview of Network Setup and Configuration
Overview of Network Setup and Configuration
To set up and configure the network:
1.Turn on the system and the computer.
2.Connect the system to the network using the recommended hardware and cables.
3.Configure the system’s network address, which is required to identify the system on the network.
■Windows operating systems: Run the Installer on the Software and Documentation CD-ROM to automatically set the system’s IP address if the system is connected to an established TCP/IP network. You can also manually set the printer’s IP address on the control panel. Once the IP address is set, continue the installation procedure to install the driver software.
■Macintosh systems: Manually set the system’s network address (for TCP/IP) on the control panel. Install the driver software on the computer from the Software and Documentation CD-ROM.
Note: For information on driver installation, see the section in this chapter for the specific operating system you are using.
If the Software and Documentation CD-ROM is not available, you can download the latest driver from www.xerox.com/drivers.
See also:
Advanced Features Guide at www.xerox.com/office/8510_8560support
Phaser® 8510/8560MFP Multifunction Product 2-2
Setting Up the Network
Setting Up the Network
This section includes:
■Choosing a Connection Method on page 2-3
■Connecting via USB on page 2-3
■Connecting via Ethernet (Recommended) on page 2-3
Choosing a Connection Method
Connect the system via Ethernet or USB. A USB connection is a direct connection and not used for networking. An Ethernet connection is used for networking. Hardware and cabling requirements vary for the different connection methods. Cabling and hardware are generally not included with your system and must be purchased separately.
Connecting via USB
If you are connecting to one computer, a USB connection offers fast data speeds. However, a USB connection is not as fast as an Ethernet connection. To use USB, PC users must have Microsoft Windows 98 SE, Windows 2000, or Windows XP. Macintosh users must use
Mac OS 9.x and higher.
USB Connection
A USB connection requires a standard A/B USB cable. This cable is not included with your system and must be purchased separately. Verify that you are using the correct USB cable for your connection.
1.Connect one end of the USB cable to the system and turn it on.
2.Connect the other end of the USB cable to the computer.
See also:
Installing the System Drivers on page 2-10
Connecting via Ethernet (Recommended)
Ethernet can be used for one or more computers. It supports many printers and systems on an Ethernet network. An Ethernet connection is recommended because it is faster than a USB connection. It also allows you direct access to CentreWare Internet Services (IS). CentreWare IS provides a simple interface that enables you to manage, configure, and monitor networked printers from your desktop using an embedded web server. For complete information about CentreWare IS, click the Help button in CentreWare IS to go to the
CentreWare IS Online Help.
Phaser® 8510/8560MFP Multifunction Product 2-3
Setting Up the Network
Network Connection
Depending on your particular setup, the following hardware and cabling is required for Ethernet.
■If you are connecting to one computer, an Ethernet RJ-45 crossover cable is required.
■If you are connecting to one or more computers with a hub, an Ethernet hub and two twisted-pair (category 5/RJ-45) cables are required.
■If you are connecting to one or more computers using a cable or DSL router, a cable or DSL router and two or more twisted-pair (category 5/RJ-45) cables are required. (One cable for each device.)
■If you are connecting to one or more computers with a hub, connect the computer to the hub with one cable, and then connect the system to the hub with the second cable. Connect to any port on the hub except the uplink port.
TCP/IP and EtherTalk are the most common protocols used with Ethernet. To print using a TCP/IP protocol, each computer and system requires a unique IP address.
See also:
Configuring the Network Address on page 2-5
Installing the System Drivers on page 2-10
Phaser® 8510/8560MFP Multifunction Product 2-4
Configuring the Network Address
Configuring the Network Address
This section includes:
■TCP/IP and IP Addresses on page 2-5
■Automatically Setting the System’s IP Address on page 2-5
■Dynamic Methods of Setting the System’s IP Address on page 2-6
■Manually Setting the System’s IP Address on page 2-9
TCP/IP and IP Addresses
If your computer is on a large network, contact your network administrator for the appropriate TCP/IP addresses and additional configuration information.
If you are creating your own small Local Area Network or connecting the system directly to your computer using Ethernet, follow the procedure for automatically setting the system’s Internet Protocol (IP) address.
PCs and systems primarily use TCP/IP protocols to communicate over an Ethernet network. With TCP/IP protocols, each system and computer must have a unique IP address. It is important that the addresses are similar, but not the same; only the last digit needs to be different. For example, your system can have the address 192.168.1.2 while your computer has the address 192.168.1.3. Another device can have the address 192.168.1.4.
Generally, Macintosh computers use either TCP/IP or the EtherTalk protocol to talk to a networked printer. For Mac OS X systems, TCP/IP is preferred. Unlike TCP/IP, however, EtherTalk does not require systems or computers to have IP addresses.
Many networks have a Dynamic Host Configuration Protocol (DHCP) server. A DHCP server automatically programs an IP address into every PC and system on the network that is configured to use DHCP. A DHCP server is built into most cable and DSL routers. If you use a cable or DSL router, see your router’s documentation for information on IP addressing.
See also:
Knowledge Base at www.xerox.com/office/8510_8560support
Automatically Setting the System’s IP Address
If the system is connected to a small established TCP/IP network without a DHCP server, use the installer on the Software and Documentation CD-ROM to detect or assign an IP address to your system. For further instructions, insert the Software and Documentation CD-ROM into your system’s CD-ROM drive. After the Installer launches, follow the prompts for installation.
Note: For the automatic Installer to function, the system must be connected to an established TCP/IP network.
Phaser® 8510/8560MFP Multifunction Product 2-5

Configuring the Network Address
Dynamic Methods of Setting the System’s IP Address
Set the system’s IP address using any of the following methods. DHCP is enabled by default on all Phaser printers.
■DHCP
■CentreWare IS
■AutoIP
Information Required for Manual IP Addressing
Information |
Comments |
|
|
Internet Protocol (IP) address of the system |
Format is xxx.xxx.xxx.xxx, where xxx represents |
|
a decimal number from 0–255. |
|
|
Network Mask |
If you are unsure, leave this blank; the system |
|
chooses an appropriate mask. |
|
|
Default Router/Gateway address |
Router address is required to communicate with |
|
the host device from anywhere other than the |
|
local network segment. |
|
|
Enabling DHCP on the System
Verify that the system DHCP protocol is enabled by setting the control panel or by using CentreWare IS. DHCP is enabled by default.
Note: To determine the system’s IP address, select System Identification. On the control panel, press the System button, select Information, press the OK button, select System Identification, and then press the OK button to view the system’s IP address.
See also:
Control Panel Features on page 1-8
Phaser® 8510/8560MFP Multifunction Product 2-6
Configuring the Network Address
Changing or Modifying the IP Address Using CentreWare IS
CentreWare IS provides a simple interface that enables you to manage, configure, and monitor networked systems from your desktop using an embedded web server. For complete information about CentreWare IS, click the Help button in CentreWare IS to go to the
CentreWare IS Online Help.
After setting the system’s IP address, you can modify TCP/IP settings using CentreWare IS.
1.Launch your web browser.
2.Enter the system’s IP address in the browser’s Address field (http://xxx.xxx.xxx.xxx).
3.Click Properties.
4.Select the Protocols folder on the left sidebar.
5.Select TCP/IP.
6.Enter or modify the settings, and then click Save Changes at the bottom of the page.
Using Host Names with the Domain Name Service (DNS)
The system supports DNS through an embedded DNS resolver. The DNS resolver protocol communicates with one or more DNS servers to resolve the IP address for a given host name or the host name for a given IP address.
To use an IP host name for the system, the system administrator must configure one or more DNS servers and a local DNS domain name space database. To set up the printer for DNS, supply a maximum of two DNS name server IP addresses.
Phaser® 8510/8560MFP Multifunction Product 2-7
Loading...