


 Loading...
Xerox ApeosPort-II 6000, ApeosPort-II 7000, DocuCentre-II 6000, DocuCentre-II 7000 Administrator Guide


Microsoft, Windows, Windows NT, and Windows Server, Windows Vista, and Microsoft Network are trademarks or registered trademarks of Microsoft Corporation in the U.S. and other countries.
NetWare is a registered trademark of Novell, Inc. in the United States and other countries.
Adobe, Acrobat, PostScript, and Adobe PostScript 3 are trademarks of Adobe Systems Incorporated.
EtherTalk, Macintosh, and Mac OS are registered trademarks of Apple Computer, Inc.
PCL, HP-GL, and HP-GL/2 are registered trademarks of Hewlett-Packard Corporation.
RSA, BSAFE are either registered trademarks or trademarks of RSA Security Inc. in the United States and/or other countries.
RSA Security Inc. All right reserved.
All product/brand names are trademarks or registered trademarks of the respective holders.
Permission has been obtained from Microsoft Corporation for use of software screen shots.
For information on license, refer to About License.
The data saved in the hard disk of the machine may be lost if there is any problem in the hard disk. Fuji Xerox is not responsible for any direct and indirect damages arising from or caused by such data loss.
Fuji Xerox is not responsible for any breakdown of machines due to infection of computer virus or computer hacking.
Important
1.This manual is copyrighted with all rights reserved. Under the copyright laws, this manual may not be copied or modified in whole or part, without the written consent of the publisher.
2.Parts of this manual are subject to change without prior notice.
3.We welcome any comments on ambiguities, errors, omissions, or missing pages.
4.Never attempt any procedure on the machine that is not specifically described in this manual. Unauthorized operation can cause faults or accidents. Fuji Xerox is not liable for any problems resulting from unauthorized operation of the equipment.
An export of this product is strictly controlled in accordance with Laws concerning Foreign Exchange and Foreign Trade of Japan and/or the export control regulations of the United States.
XEROX, THE DOCUMENT COMPANY, Ethernet, CentreWare, and the stylized X are registered trademarks of Xerox Corporation. DocuWorks is a trademark of Xerox Corporation and Fuji Xerox Co., Ltd. All Xerox and Fuji Xerox product names are either registered trademarks or trademarks of Xerox Corporation and Fuji Xerox Co., Ltd.

|
Table of Contents |
Table of Contents |
|
Table of Contents ........................................................................................................ |
1 |
1 Before Using the Machine ...................................................................................... |
11 |
Preface ...................................................................................................................... |
12 |
Types of Manuals ...................................................................................................... |
13 |
Using This Guide ....................................................................................................... |
14 |
Organization of This Guide ................................................................................... |
14 |
Conventions .......................................................................................................... |
15 |
About License............................................................................................................ |
17 |
RSA BSAFE.......................................................................................................... |
17 |
Heimdal................................................................................................................. |
17 |
LAMA .................................................................................................................... |
17 |
JPEG Code ........................................................................................................... |
18 |
Libcurl ................................................................................................................... |
18 |
FreeBSD ............................................................................................................... |
18 |
OpenLDAP............................................................................................................ |
19 |
DES....................................................................................................................... |
21 |
AES....................................................................................................................... |
21 |
2 Paper and Other Media ........................................................................................... |
23 |
Paper Types .............................................................................................................. |
24 |
Supported Paper Type.......................................................................................... |
24 |
Loading Paper ........................................................................................................... |
26 |
Loading Paper in the Trays 1 to 2......................................................................... |
26 |
Loading Tab Paper in the Trays 1 to 2.................................................................. |
27 |
Loading Paper in the Trays 3 to 4......................................................................... |
28 |
Loading Paper in the Tray 5 (Bypass) .................................................................. |
29 |
Loading Tab Paper in the Tray 5 (Bypass) ........................................................... |
29 |
Loading Paper in the Tray 6 (HCF (A4 1 Tray)).................................................... |
30 |
Loading Paper in the Trays 6 to 7 (HCF (A4 2 Tray)) ........................................... |
31 |
Loading Paper in the Tray 8 (Interposer) .............................................................. |
32 |
Loading Tab Paper in the Tray 8 (Interposer)....................................................... |
32 |
Changing the Paper Size........................................................................................... |
33 |
Changing the Paper Size for the Trays 1 to 2....................................................... |
33 |
Changing the Paper Size for the Tray 6 (HCF (A4 1 Tray)).................................. |
34 |
Changing the Paper Size for the Trays 6 to 7 (HCF (A4 2 Tray)) ......................... |
36 |
Changing the Paper Settings..................................................................................... |
38 |
3 Maintenance............................................................................................................. |
41 |
Replacing Consumables............................................................................................ |
42 |
Replacing the Toner Cartridge.............................................................................. |
43 |
Replacing the Waste Toner Bottle ........................................................................ |
45 |
1

|
Replacing the Staple Cartridge |
|
|
for C-Finisher or C-Finisher with Booklet Maker.......................................... |
47 |
|
Replacing the Booklet Staple Cartridge |
|
|
(C-Finisher with Booklet Maker or Booklet Finisher D2).............................. |
48 |
|
Replacing the Staple Cartridge for Staple Finisher D2 or Booklet Finisher D2 ..... |
49 |
|
Emptying the Punch Scrap Container |
|
|
for C-Finisher or C-Finisher with Booklet Maker.......................................... |
51 |
|
Emptying the Punch Scrap Container |
|
|
for Staple Finisher D2 or Booklet Finisher D2 ............................................. |
52 |
|
Replacing the Staple Scrap Container |
|
|
for Staple Finisher D2 or Booklet Finisher D2 ............................................. |
53 |
|
Cleaning the Machine................................................................................................. |
55 |
|
Cleaning the Exterior ............................................................................................. |
55 |
|
Cleaning the Document Cover and Document Glass ............................................ |
55 |
|
Cleaning the Narrow Glass Strip and Document Presser |
|
|
for ApeosPort Series Models ....................................................................... |
56 |
|
Cleaning the Document Feeder Roller for ApeosPort Series Models.................... |
57 |
|
Cleaning the Narrow Glass Strip and Document Presser |
|
|
for DocuCentre Series Models..................................................................... |
57 |
|
Cleaning the Document Feeder Roller for DocuCentre Series Models ................. |
58 |
|
Printing a Report/List.................................................................................................. |
60 |
4 |
Job Status ................................................................................................................. |
61 |
|
Job Status Overview .................................................................................................. |
62 |
|
Checking Current/Pending Jobs................................................................................. |
63 |
|
Checking Completed Jobs ......................................................................................... |
64 |
|
Printing and Deleting Stored Documents ................................................................... |
65 |
|
Charge Print........................................................................................................... |
65 |
|
Private Charge Print .............................................................................................. |
67 |
|
Secure Print ........................................................................................................... |
69 |
|
Sample Print .......................................................................................................... |
70 |
|
Delayed Print ......................................................................................................... |
72 |
|
Printing Pending Jobs ................................................................................................ |
73 |
|
Handling Error Terminations ...................................................................................... |
74 |
5 |
Machine Status ......................................................................................................... |
75 |
|
Overview of Machine Status....................................................................................... |
76 |
|
Machine Status........................................................................................................... |
77 |
|
Machine Information .............................................................................................. |
77 |
|
Paper Tray ............................................................................................................. |
78 |
|
Overwrite Hard Disk............................................................................................... |
79 |
|
Print Mode ............................................................................................................. |
79 |
|
Billing Meter/Print Report ........................................................................................... |
82 |
|
Billing Meter ........................................................................................................... |
82 |
|
User Account Billing Meter .................................................................................... |
82 |
|
Print Report/List ..................................................................................................... |
83 |
2

Table of Contents |
|
Automatically Printed Reports/Lists ...................................................................... |
89 |
Supplies..................................................................................................................... |
90 |
Faults......................................................................................................................... |
91 |
6 System Settings....................................................................................................... |
93 |
System Settings Procedure ....................................................................................... |
94 |
Step 1 Entering System Administration Mode ...................................................... |
94 |
Step 2 Entering the System Administrator User ID and Passcode ....................... |
94 |
Step 3 Selecting the Operation Mode from the System Administrator Menu........ |
95 |
Step 4 Selecting an Item on the [System Settings] Screen .................................. |
95 |
Step 5 Setting a Feature ....................................................................................... |
96 |
Step 6 Exiting the System Administration Mode ................................................... |
97 |
System Settings Menu List ........................................................................................ |
98 |
Menu List for DocuCentre Series Models ............................................................. |
98 |
Menu List for ApeosPort Series Models.............................................................. |
104 |
Common Settings .................................................................................................... |
114 |
Machine Clock/Timers ........................................................................................ |
114 |
Audio Tones........................................................................................................ |
117 |
Screen/Button Settings ....................................................................................... |
118 |
Paper Tray Settings ............................................................................................ |
119 |
Watermark .......................................................................................................... |
121 |
Secure Watermark .............................................................................................. |
123 |
Image Quality...................................................................................................... |
125 |
Reports ............................................................................................................... |
125 |
Maintenance ....................................................................................................... |
126 |
Image Log Control (ApeosPort series models only) ........................................... |
127 |
Print Universal Unique ID (ApeosPort series models only)................................. |
128 |
Other Settings ..................................................................................................... |
128 |
Copy Mode Settings ................................................................................................ |
136 |
Copy Tab (DocuCentre series models) / |
|
General Settings Tab - Features Allocation (ApeosPort series models)............. |
136 |
Preset Buttons (ApeosPort series models) ......................................................... |
137 |
Copy Defaults ..................................................................................................... |
137 |
Copy Control ....................................................................................................... |
141 |
Original Size Defaults ......................................................................................... |
143 |
Reduce/Enlarge Presets ..................................................................................... |
144 |
Annotation - Create Stamps................................................................................ |
144 |
Network Settings ..................................................................................................... |
145 |
Port Settings ....................................................................................................... |
145 |
Protocol Settings................................................................................................. |
148 |
Machine’s E-mail Address/Host Name ............................................................... |
150 |
Proxy Server Settings (ApeosPort series models).............................................. |
150 |
Outgoing / Incoming E-mail Settings................................................................... |
151 |
Remote Authentication Server/Directory Service |
|
(ApeosPort series models only) ................................................................ |
153 |
3

PKI (Public Key) Settings..................................................................................... |
157 |
Other Settings...................................................................................................... |
158 |
Print Mode Settings .................................................................................................. |
159 |
Allocate Memory .................................................................................................. |
159 |
Delete Form ......................................................................................................... |
161 |
Other Settings...................................................................................................... |
161 |
Scan/Fax Mode Settings .......................................................................................... |
164 |
General Settings Tab........................................................................................... |
164 |
Scan Defaults ...................................................................................................... |
164 |
Scan to PC Defaults ............................................................................................ |
166 |
Original Size Defaults .......................................................................................... |
166 |
Output Size Defaults............................................................................................ |
167 |
Reduce/Enlarge Presets...................................................................................... |
167 |
Other Settings...................................................................................................... |
167 |
E-mail Settings ......................................................................................................... |
169 |
E-mail Control ...................................................................................................... |
169 |
Mailbox/Stored Document Settings (DocuCentre series models) / |
|
Mailbox Settings (ApeosPort series models) and |
|
Stored Document Settings (ApeosPort series models) ............................................ |
172 |
Mailbox Settings .................................................................................................. |
172 |
Stored Document Settings................................................................................... |
172 |
Job Flow Settings for ApeosPort Series Models Only.............................................. |
174 |
Web Applications Settings for ApeosPort Series Models Only ................................ |
175 |
Server Setup........................................................................................................ |
175 |
Configuring/Canceling the Auto Link Server........................................................ |
176 |
Setup Menu .............................................................................................................. |
177 |
Mailbox ................................................................................................................ |
177 |
Job Flow Sheets .................................................................................................. |
179 |
Job Flow Sheet Keywords ................................................................................... |
184 |
Address Book ...................................................................................................... |
184 |
Paper Size/Type .................................................................................................. |
188 |
System Administrator Settings ................................................................................. |
189 |
System Administrator Login ID ............................................................................ |
189 |
System Administrator’s Passcode ....................................................................... |
189 |
Maximum Login Attempts .................................................................................... |
190 |
Login Setup/Auditron Administration ........................................................................ |
191 |
Create/Check User Accounts .............................................................................. |
191 |
Account Details.................................................................................................... |
193 |
Reset User Accounts ........................................................................................... |
193 |
System Administrator's Meter (Copy Jobs).......................................................... |
194 |
User Details Setup............................................................................................... |
194 |
Charge / Private Print Settings ............................................................................ |
195 |
Passcode Entry from Control Panel..................................................................... |
197 |
Login Setup/Auditron Mode ................................................................................. |
197 |
4

|
Table of Contents |
7 Using CentreWare Internet Services ................................................................... |
201 |
Installation of CentreWare Internet Services ........................................................... |
202 |
Preparations........................................................................................................ |
202 |
Configuration on the Machine ............................................................................. |
202 |
Starting CentreWare Internet Services.................................................................... |
204 |
Setting Items Using CentreWare Internet Services ................................................. |
205 |
8 Printer Environment Settings............................................................................... |
209 |
Print Features Overview .......................................................................................... |
210 |
Installation When Using USB Port........................................................................... |
213 |
Preparations........................................................................................................ |
213 |
Installation Overview........................................................................................... |
213 |
Configuration on the Machine ............................................................................. |
213 |
CentreWare Internet Services Setting Items....................................................... |
214 |
Configuration on the Computer........................................................................... |
214 |
Installation When Using TCP/IP (LPD/Port 9100) ................................................... |
215 |
Preparations........................................................................................................ |
215 |
Installation Overview........................................................................................... |
215 |
Configuration on the Machine ............................................................................. |
215 |
CentreWare Internet Services Setting Items....................................................... |
216 |
Configuration on the Computer........................................................................... |
217 |
Installation When Using NetWare............................................................................ |
218 |
Preparations........................................................................................................ |
218 |
Installation Overview........................................................................................... |
218 |
Configuration on the Machine ............................................................................. |
218 |
CentreWare Internet Services Setting Items....................................................... |
220 |
Configuration on the Computer........................................................................... |
220 |
Installation When Using Microsoft Network (SMB).................................................. |
221 |
Preparations........................................................................................................ |
221 |
Installation Overview........................................................................................... |
221 |
Configuration on the Machine ............................................................................. |
221 |
CentreWare Internet Services Setting Items....................................................... |
222 |
Configuration on the Computer........................................................................... |
222 |
Installation When Using Internet Printing Protocol (IPP) ......................................... |
223 |
Preparations........................................................................................................ |
223 |
Installation Overview........................................................................................... |
223 |
Configuration on the Machine ............................................................................. |
223 |
CentreWare Internet Services Setting Items....................................................... |
224 |
Configuration on the Computer........................................................................... |
224 |
Installation When Using EtherTalk .......................................................................... |
225 |
Preparations........................................................................................................ |
225 |
Installation Overview........................................................................................... |
225 |
Configuration on the Machine ............................................................................. |
225 |
CentreWare Internet Services Setting Items....................................................... |
226 |
5

|
Configuration on the Computer............................................................................ |
226 |
9 |
E-mail Environment Settings ................................................................................ |
227 |
|
E-mail Overview ....................................................................................................... |
228 |
|
Preparations ............................................................................................................. |
229 |
|
Installation Procedure............................................................................................... |
231 |
|
Installation Overview............................................................................................ |
231 |
|
Enabling Port and Setting TCP/IP ....................................................................... |
231 |
|
Configuring E-mail Environment .......................................................................... |
232 |
|
CentreWare Internet Services Setting Items ....................................................... |
233 |
10 |
Scanner Environment Settings ............................................................................. |
235 |
|
Scan Service Overview ............................................................................................ |
236 |
|
Configuration of Scan to Mailbox ............................................................................. |
237 |
|
Installation Overview............................................................................................ |
237 |
|
Enabling Port and Setting TCP/IP ....................................................................... |
237 |
|
Configuration of Network Scanning (Job Template Scanning)................................. |
239 |
|
Preparations ........................................................................................................ |
239 |
|
Installation Overview............................................................................................ |
239 |
|
Enabling Port and Setting TCP/IP ....................................................................... |
239 |
|
Configuring the SNMP Port ................................................................................. |
240 |
|
Configuration of Scan to PC..................................................................................... |
241 |
|
Preparations ........................................................................................................ |
241 |
|
Installation Overview............................................................................................ |
241 |
|
Enabling Port and Setting TCP/IP ....................................................................... |
242 |
|
Configuration of the Job Flow................................................................................... |
243 |
|
Installation Overview............................................................................................ |
243 |
|
Enabling Port and Setting TCP/IP ....................................................................... |
243 |
|
Configuring the SNMP Port ................................................................................. |
244 |
11 Using the Server Fax Service................................................................................ |
245 |
|
|
Server Fax Overview................................................................................................ |
246 |
|
Preparations ............................................................................................................. |
247 |
|
System Requirements for the Machine................................................................ |
247 |
|
Installation Procedure............................................................................................... |
248 |
|
Installation Overview............................................................................................ |
248 |
|
Fax Settings......................................................................................................... |
248 |
|
Setting the Server Fax Feature............................................................................ |
249 |
12 |
Security ................................................................................................................... |
251 |
|
Security Service Overview ....................................................................................... |
252 |
|
Communication Security Service......................................................................... |
252 |
|
Scan File Security Services ................................................................................. |
253 |
|
Configuration of HTTP Communication Encryption.................................................. |
254 |
|
Installation Overview............................................................................................ |
254 |
6

Table of Contents |
|
Configuration on the Machine ............................................................................. |
254 |
Configuration of E-mail Encryption/Digital Signature............................................... |
256 |
Installation Overview........................................................................................... |
256 |
Configuration on the Machine ............................................................................. |
256 |
Configuration on a Computer.............................................................................. |
257 |
Configuration of Scan File Signature |
|
(PDF/DocuWorks Signature) for Only ApeosPort Series Models............................ |
259 |
Installation Overview........................................................................................... |
259 |
Configuration on the Machine ............................................................................. |
259 |
13 Authentication and Auditron Administration...................................................... |
261 |
Overview of Authentication...................................................................................... |
262 |
Users Controlled by Authentication..................................................................... |
262 |
Types of Authentication ...................................................................................... |
262 |
Features Controlled by Authentication................................................................ |
263 |
Authentication for Job Flow Sheets and Mailboxes................................................. |
265 |
Job Flow Sheet Types ........................................................................................ |
265 |
Types of Mailboxes ............................................................................................. |
268 |
Linking Job Flow Sheets to Mailboxes................................................................ |
270 |
Overview of Auditron Administration ....................................................................... |
272 |
Authentication and Auditron Administration ........................................................ |
272 |
Manageable Features and Services ................................................................... |
273 |
14 Problem Solving .................................................................................................... |
277 |
Troubleshooting....................................................................................................... |
278 |
Machine Trouble...................................................................................................... |
279 |
Image Quality Trouble ............................................................................................. |
284 |
Trouble during Copying ........................................................................................... |
289 |
Unable to Copy ................................................................................................... |
289 |
The Copy Result is Not What was Expected ...................................................... |
289 |
Trouble during Printing ............................................................................................ |
293 |
Unable to Print .................................................................................................... |
293 |
The Print Result is Not What was Expected ....................................................... |
294 |
Trouble during Scanning ......................................................................................... |
296 |
Unable to Scan with the Machine ....................................................................... |
296 |
Unable to Import Scanned Documents to the Computer .................................... |
296 |
Unable to Send a Scanned Document over the Network (FTP/SMB) ................ |
297 |
Unable to Send E-mail ........................................................................................ |
299 |
The Image is not What was Expected ................................................................ |
299 |
Network-related Problems ....................................................................................... |
302 |
When using SMB ................................................................................................ |
302 |
When using NetWare.......................................................................................... |
303 |
When using TCP/IP ............................................................................................ |
307 |
When using EtherTalk......................................................................................... |
308 |
7

CentreWare Internet Services Problems ............................................................. |
309 |
E-Mail Features Problems ................................................................................... |
310 |
Internet/Intranet Connection Problems ................................................................ |
311 |
Error Code................................................................................................................ |
313 |
Other Errors ......................................................................................................... |
369 |
Paper Jams .............................................................................................................. |
370 |
Paper Jams in the Trays 1 to 2............................................................................ |
371 |
Paper Jams in the Tray 3..................................................................................... |
371 |
Paper Jams in the Tray 4..................................................................................... |
372 |
Paper Jams in the Tray 5 (Bypass) ..................................................................... |
372 |
Paper Jams in the Tray 6 (HCF (A4 1 Tray))....................................................... |
373 |
Paper Jams in the Trays 6 to 7 (HCF (A4 2 Tray)) .............................................. |
375 |
Paper Jams at the HCF (A4 2 Tray) Unit............................................................. |
376 |
Paper Jams in the Transfer Module..................................................................... |
378 |
Paper Jams in the Bottom Left Cover.................................................................. |
382 |
Paper Jams in the Output Tray............................................................................ |
383 |
Paper Jams in the C-Finisher and the C-Finisher with Booklet Maker ................ |
383 |
Paper jams in the Staple Finisher D2 and the Booklet Finisher D2..................... |
391 |
Document Jams for ApeosPort Series Models......................................................... |
402 |
Document Jams for DocuCentre Series Models ...................................................... |
405 |
Stapler Faults ........................................................................................................... |
407 |
Staple Jams in the Staple Cartridge |
|
for C-Finisher or C-Finisher with Booklet Maker........................................ |
408 |
Staple Jams in the Booklet Staple Cartridge |
|
for the C-Finisher with Booklet Maker or Booklet Finisher D2 ................... |
409 |
Staple Jams in the Staple Cartridge |
|
for the Staple Finisher D2 or the Booklet Finisher D2 ............................... |
411 |
Staple Cartridge Taken Off from Unit |
|
for the Staple Finisher D2 or the Booklet Finisher D2 .................................... |
413 |
Solving Curled Output for the Staple Finisher D2 or the Booklet Finisher D2.......... |
415 |
15 Appendix ................................................................................................................. |
417 |
Specifications ........................................................................................................... |
418 |
Printable Area........................................................................................................... |
430 |
Standard Printable Area ...................................................................................... |
430 |
Extended Printable Area...................................................................................... |
430 |
Internal Fonts ........................................................................................................... |
431 |
Optional Components............................................................................................... |
433 |
ESC/P Emulation...................................................................................................... |
435 |
Emulation............................................................................................................. |
435 |
Fonts.................................................................................................................... |
436 |
Output Feature..................................................................................................... |
436 |
ESC/P Emulation Print Features ......................................................................... |
436 |
ESC/P Emulation Settings ................................................................................... |
437 |
Magnification Table.............................................................................................. |
443 |
8
Table of Contents |
|
Paper Size and Number of Printable Characters................................................ |
447 |
PDF Direct Print....................................................................................................... |
449 |
PDF Direct Print Settings .................................................................................... |
449 |
PCL Emulation......................................................................................................... |
451 |
HP-GL2 Emulation................................................................................................... |
454 |
Hard Clip Area .................................................................................................... |
458 |
Printable Area ..................................................................................................... |
459 |
Auto Layout......................................................................................................... |
461 |
Notes and Restrictions ............................................................................................ |
468 |
Notes and Restrictions on the Use of the Machine............................................. |
468 |
Notes and Restrictions in the Interrupt Mode...................................................... |
470 |
Notes and Restrictions when Connecting with Internet Service Provider ........... |
471 |
Notes and Restrictions for Using SMB................................................................ |
472 |
Notes and Restrictions for Using TCP/IP............................................................ |
474 |
Notes and Restrictions for Using EtherTalk ........................................................ |
476 |
Notes and Restrictions for Using Bonjour ........................................................... |
476 |
Notes and Restrictions for Using Scanner Features........................................... |
477 |
Notes and Restrictions when Connecting to Internet or Intranet ........................ |
478 |
Index.............................................................................................................................. |
479 |
9
1 Before Using the Machine
This chapter describes organization of this guide and conventions. |
|
|
z |
Preface ....................................................................................................... |
12 |
z |
Types of Manuals ....................................................................................... |
13 |
z |
Using This Guide ........................................................................................ |
14 |
z |
About License ............................................................................................. |
17 |

Machine the Using Before
1
1 Before Using the Machine
Preface
Thank you for selecting the Fuji Xerox ApeosPort-II 7000/6000, DocuCentre-II 7000/ 6000 (hereafter referred to as “the machine”).
This guide explains how to operate the machine and the precautions that must be followed during operation. To get the most out of the machine and to use it effectively, be sure to read this guide before use.
This guide aimed toward machine administrators, provides maintenance information like how to replace consumables, instructions on configuring your network environment, and troubleshooting procedures.
This guide assumes that an operator has a basic knowledge of the operating environment of the personal computer in use, networking environments, and how to operate a personal computer. For information on the environment of the personal computer in use, basic knowledge of networking environments, and how to operate a personal computer, refer to the manuals provided with the personal computer, operating system, and network system.
After reading this guide, be sure to keep it handy for quick reference. It will be useful in case you forget how to perform operations or if a problem occurs with the machine.
Refer to the User Guide for copy/print/scan operating procedures. For information about optional accessories for the printer functionality, also refer to the guide provided with each optional accessory.
In this manual, safety instructions are preceded by the symbol  .
.
Always read and follow the instructions before performing the required procedures.
The equipment is certified by NEMKO in compliance with [IEC60950-1 (AS/NZS 3260)]. The equipment is manufactured under an ISO 9001 Quality System. The equipment is also certified in compliance with applicable standards by various national bodies.
The equipment was tested and is certified by the New Zealand Ministry of Commerce in conformance with CISPR publ. 22 (AS/NZISS CISPR22:2002) which relates to radio frequency interference regulations, and also complies with the Australian Communication Authority requirements.
NOTE: Machines intended for use in South Korea and Taiwan have been certified separately in compliance with their requirements.
Any unauthorized alteration, which includes the addition of new functions or the connection of external devices, may impact this certification.
Contact your local Xerox representative for a list of approved accessories.
12

Types of Manuals
Types of Manuals
We provide the following guides for optimum usage of the machine.
Included Manuals
Several manuals are included with this product. They are referred to as accompanying manuals.
These accompanying manuals include descriptions on configurations and operation of the product.
The following manuals are included with the machine.
User Guide
Describes all the necessary steps for copy/print/scan.
Administrator Guide (this guide)
Aimed toward machine administrators, as a guide to setting up the network environment and to solving problems that may occur with the machine.
Quick Reference Guide
Introduces the basic operations of the machine, as well as daily management and maintenance.
Manual (HTML)
A guide for installing print drivers, configuring the printer environment, etc. This manual is included in the CD-ROM of the Driver CD Kit.
Guides for Optional Accessories
Optional accessories are also available for the machine. User Guides are provided with the optional accessories exclusively for ApeosPort-II 7000/6000, DocuCentre-II 7000/ 6000. These User Guides are referred to as "guides for optional accessories". Guides for optional accessories are provided in two forms, as printed or as On-line Help.
Guides for optional accessories describe all the necessary steps for operating optional accessories and installing software.
Machine the Using Before
1
13

Machine the Using Before
1
1 Before Using the Machine
Using This Guide
This guide aimed toward machine administrators, provides maintenance information like how to replace consumables, instructions on configuring your network environment, and troubleshooting procedures.
Organization of This Guide
This guide consists of the following chapters.
1 Before Using the Machine
Describes organization of this guide and conventions.
2 Paper and Other Media
Describes the types of paper that can be used on the machine and how to load paper in trays.
3 Maintenance
Describes how to replace consumables and to clean the machine.
4 Job Status
Describes how to check job status and to cancel jobs.
5 Machine Status
Describes how to check the faults that occurred on the machine and to print various reports/lists.
6 System Settings
Describes how to configure the system settings.
7 Using CentreWare Internet Services
Describes how to use CentreWare Internet Services.
8 Printer Environment Settings
Describes how to set up the printer’s operating environment.
9 E-mail Environment Settings
Describes the configuration to use the E-mail features on the machine.
10 Scanner Environment Settings
Describes the configuration to use the scan services on the machine.
11 Using the Server Fax Service
Describes how to use the Server Fax service on this machine.
12 Security
Describes the configuration to utilize the security services on the machine.
14

Using This Guide
13 Authentication and Auditron Administration
Describes the authorization feature for restricting use of the machine, as well as the administration feature for monitoring usage statuses for each feature using the authorization feature.
14 Problem Solving
Describes troubles that may occur with the machine and their solutions.
15 Appendix
Describes the machine specifications, optional accessories, and cautions/restrictions.
Conventions
zThe screen images and illustrations of control panel that are used in this guide are for the DocuCentre series models.
zThe screen images and illustrations that are used in this guide are based on the machine configuration with the various options. Some of the items in the screen images may not be displayed or there may be features that cannot be used depending on the machine configuration.
zIn this document, "Computer" refers to a personal computer or workstation.
zThe following terms are used in this guide.
Important |
Indicates important information that you should read. |
Note |
Indicates additional information on operations or features. |
z The following symbols are used in this guide:
"" : Cross-references in this guide, reference to other guides,
messages displayed on the touch screen, names of CD-ROM, and input strings
[ |
] |
: • The names of screens, tabs, buttons, features, and options |
|
|
displayed on the touch screen |
•The names of menus, windows, dialog boxes, buttons, and other items displayed on computer monitors
<> button : Hardware buttons on the machine’s control panel
< |
> key : |
Keys on computer keyboards |
> |
: |
• Indicates a path to a certain item within a procedure on the |
|
|
control panel. |
|
|
Example: When you see a procedure to "select [System |
|
|
Settings] > [Setup Menu] > [Mailbox]", this means that you |
|
|
need to first select [System Settings], then [Setup Menu], and |
|
|
lastly [Mailbox]. |
|
|
• Indicates a path to a certain item within a procedure on a |
|
|
computer. |
|
|
Example: When you see a procedure "to search for files and |
|
|
folders, select [Start] > [Search] > [For Files or Folders]", this |
|
|
means that you need to click [Start], then select [Search] and |
|
|
[For Files or Folders] in order to search for files and folders. |
|
|
• The reference is indicated in the following manner: |
|
|
"Refer to "6 System Settings" > "Common Settings" > "Audio |
|
|
Tone" in the Administrator Guide." |
|
|
The sentence above means that you need to refer to a section |
Machine the Using Before
1
15

Machine the Using Before
1
1 Before Using the Machine
"Audio Tone", which can be found under "Common Settings" in the chapter 6 System Settings of the Administrator Guide.
z Orientation of documents or paper is described in this guide as follows:
 ,
, ,Long Edge Feed (LEF):Loading with one of the long edges of the document or paper.
 ,
, ,Short Edge Feed (SEF):Loading with one of the short edges of the document or paper.
LEF Orientation |
SEF Orientation |
Paper feed direction |
Paper feed direction |
16

About License
About License
RSA BSAFE
This product includes RSA BSAFE® Cryptographic software from RSA Security Inc.
Heimdal
Copyright (c)2000 Kungliga Tekniska Högskolan (Royal Institute of Technology, Stockholm, Sweden). All rights reserved.
Redistribution and use in source and binary forms, with or without modification, are permitted provided that the following conditions are met:
1.Redistributions of source code must retain the above copyright notice, this list of conditions and the following disclaimer.
2.Redistributions in binary form must reproduce the above copyright notice, this list of conditions and the following disclaimer in the documentation and/or other materials provided with the distribution.
3.Neither the name of the Institute nor the names of its contributors may be used to endorse or promote products derived from this software without specific prior written permission.
THIS SOFTWARE IS PROVIDED BY THE INSTITUTE AND CONTRIBUTORS ''AS IS'' AND ANY EXPRESS OR IMPLIED WARRANTIES, INCLUDING, BUT NOT LIMITED TO, THE IMPLIED WARRANTIES OF MERCHANTABILITY AND FITNESS FOR A PARTICULAR PURPOSE ARE DISCLAIMED. IN NO EVENT SHALL THE INSTITUTE OR CONTRIBUTORS BE LIABLE FOR ANY DIRECT, INDIRECT, INCIDENTAL, SPECIAL, EXEMPLARY, OR CONSEQUENTIAL DAMAGES (INCLUDING, BUT NOT LIMITED TO, PROCUREMENT OF SUBSTITUTE GOODS OR SERVICES; LOSS OF USE, DATA, OR PROFITS; OR BUSINESS INTERRUPTION) HOWEVER CAUSED AND ON ANY THEORY OF LIABILITY, WHETHER IN CONTRACT, STRICT LIABILITY, OR TORT (INCLUDING NEGLIGENCE OR OTHERWISE) ARISING IN ANY WAY OUT OF THE USE OF THIS SOFTWARE, EVEN IF ADVISED OF THE POSSIBILITY OF SUCH DAMAGE.
LAMA
LZMA SDK 4.21 Copyright (c) 1999-2005 Igor Pavlov (2005-06-08)
http://www.7-zip.org/
LZMA SDK 4.22 Copyright (c) 1999-2005 Igor Pavlov (2005-06-10)
http://www.7-zip.org/
Machine the Using Before
1
17

Machine the Using Before
1
1 Before Using the Machine
JPEG Code
Our printer software uses some of the codes defined by the Independent JPEG Group.
Libcurl
COPYRIGHT AND PERMISSION NOTICE
Copyright (c) 1996 - 2006, Daniel Stenberg, <daniel@haxx.se>.
All rights reserved.
Permission to use, copy, modify, and distribute this software for any purpose with or without fee is hereby granted, provided that the above copyright notice and this permission notice appear in all copies.
THE SOFTWARE IS PROVIDED "AS IS", WITHOUT WARRANTY OF ANY KIND, EXPRESS OR IMPLIED, INCLUDING BUT NOT LIMITED TO THE WARRANTIES OF MERCHANTABILITY, FITNESS FOR A PARTICULAR PURPOSE AND NONINFRINGEMENT OF THIRD PARTY RIGHTS. IN NO EVENT SHALL THE AUTHORS OR COPYRIGHT HOLDERS BE LIABLE FOR ANY CLAIM, DAMAGES OR OTHER LIABILITY, WHETHER IN AN ACTION OF CONTRACT, TORT OR OTHERWISE, ARISING FROM, OUT OF OR IN CONNECTION WITH THE SOFTWARE OR THE USE OR OTHER DEALINGS IN THE SOFTWARE.
Except as contained in this notice, the name of a copyright holder shall not be used in advertising or otherwise to promote the sale, use or other dealings in this Software without prior written authorization of the copyright holder.
FreeBSD
This product contains the part of FreeBSD codes.
The FreeBSD Copyright
Copyright 1994-2006 The FreeBSD Project. All rights reserved.
Redistribution and use in source and binary forms, with or without modification, are permitted provided that the following conditions are met:
Redistributions of source code must retain the above copyright notice, this list of conditions and the following disclaimer.
Redistributions in binary form must reproduce the above copyright notice, this list of conditions and the following disclaimer in the documentation and/or other materials provided with the distribution.
18
About License
THIS SOFTWARE IS PROVIDED BY THE FREEBSD PROJECT ''AS IS'' AND ANY EXPRESS OR IMPLIED WARRANTIES, INCLUDING, BUT NOT LIMITED TO, THE IMPLIED WARRANTIES OF MERCHANTABILITY AND FITNESS FOR A PARTICULAR PURPOSE ARE DISCLAIMED. IN NO EVENT SHALL THE FREEBSD PROJECT OR CONTRIBUTORS BE LIABLE FOR ANY DIRECT, INDIRECT, INCIDENTAL, SPECIAL, EXEMPLARY, OR CONSEQUENTIAL DAMAGES (INCLUDING, BUT NOT LIMITED TO, PROCUREMENT OF SUBSTITUTE GOODS OR SERVICES; LOSS OF USE, DATA, OR PROFITS; OR BUSINESS INTERRUPTION) HOWEVER CAUSED AND ON ANY THEORY OF LIABILITY, WHETHER IN CONTRACT, STRICT LIABILITY, OR TORT (INCLUDING NEGLIGENCE OR OTHERWISE) ARISING IN ANY WAY OUT OF THE USE OF THIS SOFTWARE, EVEN IF ADVISED OF THE POSSIBILITY OF SUCH DAMAGE.
The views and conclusions contained in the software and documentation are those of the authors and should not be interpreted as representing official policies, either expressed or implied, of the FreeBSD Project.
OpenLDAP
Copyright 1998-2006 The OpenLDAP Foundation All rights reserved.
Redistribution and use in source and binary forms, with or without modification, are permitted only as authorized by the OpenLDAP Public License.
A copy of this license is available in the file LICENSE in the top-level directory of the distribution or, alternatively, at <http://www.OpenLDAP.org/license.html>.
OpenLDAP is a registered trademark of the OpenLDAP Foundation.
Individual files and/or contributed packages may be copyright by other parties and/or subject to additional restrictions.
This work is derived from the University of Michigan LDAP v3.3 distribution. Information concerning this software is available at <http://www.umich.edu/~dirsvcs/ldap/ldap.html>.
This work also contains materials derived from public sources.
Additional information about OpenLDAP can be obtained at <http://www.openldap.org/>.
---
Portions Copyright 1998-2006 Kurt D. Zeilenga.
Portions Copyright 1998-2006 Net Boolean Incorporated.
Portions Copyright 2001-2006 IBM Corporation.
All rights reserved.
Redistribution and use in source and binary forms, with or without modification, are permitted only as authorized by the OpenLDAP Public License.
---
Machine the Using Before
1
19

Machine the Using Before
1
1 Before Using the Machine
Portions Copyright 1999-2005 Howard Y.H. Chu.
Portions Copyright 1999-2005 Symas Corporation.
Portions Copyright 1998-2003 Hallvard B. Furuseth.
All rights reserved.
Redistribution and use in source and binary forms, with or without modification, are permitted provided that this notice is preserved.
The names of the copyright holders may not be used to endorse or promote products derived from this software without their specific prior written permission. This software is provided ''as is'' without express or implied warranty.
---
Portions Copyright (c) 1992-1996 Regents of the University of Michigan.
All rights reserved.
Redistribution and use in source and binary forms are permitted provided that this notice is preserved and that due credit is given to the University of Michigan at Ann Arbor. The name of the University may not be used to endorse or promote products derived from this software without specific prior written permission. This software is provided ''as is'' without express or implied warranty.
------------------------------------------
The OpenLDAP Public License
Version 2.8, 17 August 2003
Redistribution and use of this software and associated documentation ("Software"), with or without modification, are permitted provided that the following conditions are met:
1.Redistributions in source form must retain copyright statements and notices,
2.Redistributions in binary form must reproduce applicable copyright statements and notices, this list of conditions, and the following disclaimer in the documentation and/or other materials provided with the distribution, and
3.Redistributions must contain a verbatim copy of this document.
The OpenLDAP Foundation may revise this license from time to time.
Each revision is distinguished by a version number. You may use this Software under terms of this license revision or under the terms of any subsequent revision of the license.
THIS SOFTWARE IS PROVIDED BY THE OPENLDAP FOUNDATION AND ITS CONTRIBUTORS ''AS IS'' AND ANY EXPRESSED OR IMPLIED WARRANTIES, INCLUDING, BUT NOT LIMITED TO, THE IMPLIED WARRANTIES OF MERCHANTABILITY AND FITNESS FOR A PARTICULAR PURPOSE ARE DISCLAIMED. IN NO EVENT SHALL THE OPENLDAP FOUNDATION, ITS CONTRIBUTORS, OR THE AUTHOR(S) OR OWNER(S) OF THE SOFTWARE BE LIABLE FOR ANY DIRECT, INDIRECT, INCIDENTAL, SPECIAL, EXEMPLARY, OR CONSEQUENTIAL DAMAGES (INCLUDING, BUT NOT LIMITED TO, PROCUREMENT OF SUBSTITUTE GOODS OR SERVICES; LOSS OF USE, DATA, OR PROFITS; OR BUSINESS INTERRUPTION) HOWEVER CAUSED AND ON ANY THEORY OF LIABILITY,
20

About License
WHETHER IN CONTRACT, STRICT LIABILITY, OR TORT (INCLUDING NEGLIGENCE OR OTHERWISE) ARISING IN ANY WAY OUT OF THE USE OF THIS SOFTWARE, EVEN IF ADVISED OF THE POSSIBILITY OF SUCH DAMAGE.
The names of the authors and copyright holders must not be used in advertising or otherwise to promote the sale, use or other dealing in this Software without specific, written prior permission. Title to copyright in this Software shall at all times remain with copyright holders.
OpenLDAP is a registered trademark of the OpenLDAP Foundation.
Copyright 1999-2003 The OpenLDAP Foundation, Redwood City, California, USA. All Rights Reserved. Permission to copy and distribute verbatim copies of this document is granted.
DES
This product includes software developed by Eric Young(eay@mincom.oz.au)
AES
Copyright (c) 2003. Dr Brian Gladman. Worcester. UK. All rights reserved.
This product uses published AES software provided by Dr Brian Gladman under BSD licensing terms.
Machine the Using Before
1
21
2 Paper and Other Media
This chapter describes the types of paper that can be used on the machine, precautions when handling paper, and how to load paper in trays.
z |
Paper Types ............................................................................................... |
24 |
z |
Loading Paper ............................................................................................ |
26 |
z |
Changing the Paper Size............................................................................ |
33 |
z |
Changing the Paper Settings...................................................................... |
38 |

Media Other and Paper
2
2 Paper and Other Media
Paper Types
This section describes the kinds of paper available for this machine.
Use of inappropriate paper may result in paper jams, cause reduced print quality, malfunctions and other trouble. To make full and effective use of the machine's performance, we recommend using only paper recommended by Fuji Xerox.
If you want to use paper not recommended by Fuji Xerox, contact our Customer Support Center.
 WARNING
Do not use conductive paper such as carbonic paper or coated paper. When paper jam occurs, it may cause short-circuit and eventually a fire accident.
Important • The printed image may fade due to moisture such as water, rain or vapor. For more information, contact our Customer Support Center.
Supported Paper Type
When using commonly used paper (known as printable paper) for copying or printing, make sure that it complies with the following specifications.
Paper tray |
Weight |
Loadable quantity |
|
|
|
|
|
|
Trays 1 to 2 |
52 to 200 g/m2 |
500 sheets |
|
Ream Weight: 45 - 171 kg |
(80 g/m2) |
Tray 3 |
|
1,490 sheets |
|
|
(80 g/m2) |
Tray 4 |
|
1,860 sheets |
|
|
(80 g/m2) |
Tray 5 (bypass) |
52 to 270 g/m2 |
Up to 10mm 100 sheets |
|
Ream Weight: 45 - 232 kg |
(80 g/m2) |
Tray 5 (bypass) |
|
Up to 27mm 250 sheets |
(When HCF (A4 2 Tray) is installed) |
|
(80 g/m2) |
Tray 6 (HCF (A4 1 Tray)) |
52 to 200 g/m2 |
2,000 sheets |
(optional) |
Ream Weight: 45 - 171 kg |
(80 g/m2) |
Trays 6 to 7 (HCF (A4 2 Tray)) |
52 to 200 g/m2 |
2,000 sheets x 2 trays |
(optional) |
Ream Weight: 45 - 171 kg |
(80 g/m2) |
Tray 8 (Interposer) |
60 to 220 g/m2 |
200 sheets |
(optional) |
Ream Weight: 52 - 189 kg |
(80 g/m2) |
24

Paper Types
The following table lists the paper types supported for each paper tray.
Paper Type |
Weight |
Tray 1-2 |
Tray 3-4 |
Tray 5 |
Tray 6-7 |
Tray 8 |
||
(g/m2) |
(Bypass) |
(Interposer) |
||||||
|
|
|
|
|||||
|
|
|
|
|
|
|
|
|
Plain Paper |
|
|
O |
O |
O |
O |
O |
|
|
|
|
|
|
|
|
||
Recycled Paper |
64 - 105 |
O |
O |
O |
O |
O |
||
|
|
|
|
|
|
|
|
|
Plain Paper (Side 2)* |
|
|
O |
O |
O |
O |
O |
|
|
|
|
|
|
|
|
|
|
Transparency |
|
- |
X |
X |
O |
X |
X |
|
|
|
|
|
|
|
|
|
|
Labels |
|
- |
X |
X |
O |
X |
X |
|
|
|
|
|
|
|
|
|
|
Lightweight |
52 |
- 63 |
O |
O |
O |
O |
X |
|
|
|
|
|
|
|
|
|
|
Heavyweight 1 |
106 |
- 200 |
O |
O |
O |
O |
O |
|
|
|
|
|
|
|
|
|
|
Heavyweight 2 |
201 |
- 270 |
X |
X |
O |
X |
X |
|
|
|
|
|
|
|
|
|
|
Tab Stock 1 |
106 |
- 200 |
O |
X |
O |
X |
O |
|
|
|
|
|
|
|
|
|
|
Tab Stock 2 |
201 |
- 270 |
X |
X |
O |
X |
X |
|
|
|
|
|
|
|
|
||
Hole Punched |
64 - 105 |
O |
O |
O |
O |
O |
||
|
|
|
|
|
|
|
|
|
*: Plain Paper (Side 2) means the paper already printed on the one side (i.e., scrap paper).
O: Available
X: Not available
Important • Printing with paper whose type or size differs from the paper specified by the print driver, or printing from a tray not supporting the loaded paper can result in paper jams. To ensure correct printing, select the correct paper size, paper type, and paper tray.
Note |
• Weight means a weight of 1 m2 of a paper sheet. |
|
• Ream weight means weight of 1,000 sheets of paper in duodecimo size (788 x 1,091 mm). |
|
• When copying with a non-standard size paper from the Tray 5 (bypass), you must manually |
|
enter the paper size. If you use non-standard size paper often, you can preset the size on |
|
the machine. Then the preset size appears under [Standard Sizes] in the [Tray 5 (Bypass)] |
|
screen. For more information, refer to "Tray 5 (Bypass) - Paper Size Defaults" (P.121). |
Storing and Handling Paper
Please keep the following points in mind when storing paper
zStore paper inside a cabinet or other dry place. Paper that has absorbed moisture can cause paper jams and image quality defects.
zAfter opening a package of paper, wrap up the remaining paper to store it. It is recommended that you include moisture prevention packets.
zPaper should be stored flat to prevent bends or warping.
Please adhere to the following when setting paper into the tray
zAlign the stack of paper neatly before setting it in the tray.
zDo not use paper that is folded, creased, or heavily warped.
zDo not use waved or curled paper.
zDo not load paper of mixed size together into the tray.
zTransparency paper and label paper can cause paper jams, and multiple sheets can be fed to the printer at once. Be sure to carefully fan these types of paper.
zWhen continuously outputting onto transparencies, transparency sheets may sometimes stick to each other. Remove transparencies from the output tray every 20 or so sheets, and fan them to cool them down.
Media Other and Paper
2
25

Media Other and Paper
2
2 Paper and Other Media
Loading Paper
This section describes how to load paper.
Types of paper loaded in trays
The machine automatically detects the size and orientation of loaded paper in trays. You need to set a paper type, however. Normally, each of the trays is set to plain paper. When loading paper other than plain paper in trays, change the paper type settings. Paper can also be named and set as user-defined paper. Up to five paper types can be set as user-defined paper.
For information on changing the paper type in trays, refer to "Changing the Paper Settings" (P.38).
Automatic Tray Selection
If you set paper source on the [Paper/Output] tab to [Paper Tray] in the PCL print driver's properties screen when making prints, the machine automatically selects the corresponding paper tray according to the size and orientation of the document to print. This is called [Automatic Tray Selection].
When making copies, automatic tray selection is active if [Auto Paper] is selected for [Paper Supply]. If the machine detects two or more corresponding trays in the automatic tray selection, the machine gives higher priority to the tray having the highest [Paper Type Priority] set at [Paper Tray Settings]. During automatic tray selection, trays whose [Paper Type Priority] setting is set to [Auto Paper Off] are not targeted in the automatic tray selection. Also, if the [Paper Type Priority] setting is exactly the same, the tray priority is determined by [Paper Tray Priority].
Note |
• The Tray 5 (bypass) cannot be selected in the automatic tray selection. |
|
• When the machine runs out of paper during copying or printing, select the tray containing the |
|
paper of the same size and orientation that was being used for copying or printing, and |
|
continue copying or printing (Auto Tray Switch feature). During this operation, a tray |
|
containing paper of type whose [Paper Type Priority] setting is set to [Auto Paper Off] cannot |
|
be switched to. |
For information about setting [Paper Type], [Paper Type Priority], [Paper Tray Priority], and setting the paper substitute feature, refer to "Paper Tray Settings" (P.119). The same settings can also be made from CentreWare Internet Services.
Adding paper
When the machine runs out of paper during copying or printing, a message is displayed on the control panel display. Add paper according to the displayed instructions. Copying or Printing is automatically resumed when paper is added.
Note |
• Fan the paper well before loading paper in a tray. It prevents paper from sticking to each |
|
other and reduces paper jams. |
Loading Paper in the Trays 1 to 2
The following describes the procedure for loading paper in the Trays 1 to 2.
When the machine runs out of paper during copying or printing, a message is displayed on the control panel display. Add paper according to the displayed instructions. Copying or printing is automatically resumed when paper is added.
Note |
• Before loading paper in a tray, fan the paper well. It prevents paper from sticking to each |
|
other and reduces paper jams. |
For information on changing the paper size and orientation, refer to "Changing the Paper Size for the Trays 1 to 2" (P.33).
26
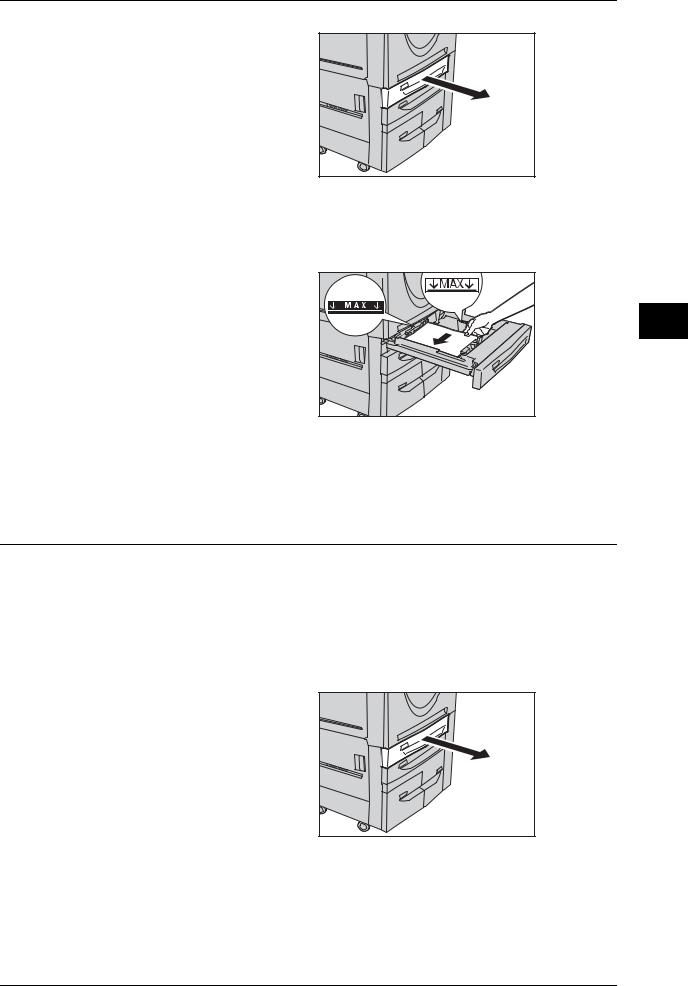
Loading Paper
1Pull out the tray towards you until it stops.
Important • Make sure to pull out the tray slowly. When the tray is being pulled out with force, the tray may possibly hit your knees or other parts of your body causing injuries.
• While the machine processes a job, do not pull the tray out that the job uses.
•Do not add a new stack of paper on top of the remaining paper in the tray, in order to prevent paper jams or any other troubles. First, remove the remaining paper in the tray, then load the new stack of paper.
2 Load and align the edge of the paper against the left edge of the tray with the side to be copied or printed on facing down.
Important • Do not load paper exceeding the maximum fill line. It might cause paper jams or machine malfunctions.
• Do not place any paper or things in the empty space on
the right side of the Tray 1 or 2. It may cause paper jams or machine malfunctions.
3 Push the tray in gently until it comes to a stop.
Loading Tab Paper in the Trays 1 to 2
Following describes the procedure for loading tab paper in the Trays 1 to 2.
Important • Tab paper cannot be loaded on the Trays 3, 4, 6 and 7.
|
• Tab paper can be used only for [Tab Margined Shift], Covers, and Separators. |
Note |
• Before loading paper in a tray, fan the paper well. It prevents paper from sticking to each |
|
other and reduces paper jams. |
For information on changing the paper size and orientation, refer to "Changing the Paper Size for the Trays 1 to 2" (P.33).
1Pull out the tray towards you until it stops.
Important • Make sure to pull out the tray slowly. When the tray is being pulled out with force, the tray may possibly hit your knees or other parts of your body causing injuries.
• While the machine processes a job, do not pull the tray out that the job uses.
•Do not add a new stack of
paper on top of the remaining paper in the tray, in order to prevent paper jams or any other troubles. First, remove the remaining paper in the tray, then load the new stack of paper.
Media Other and Paper
2
27
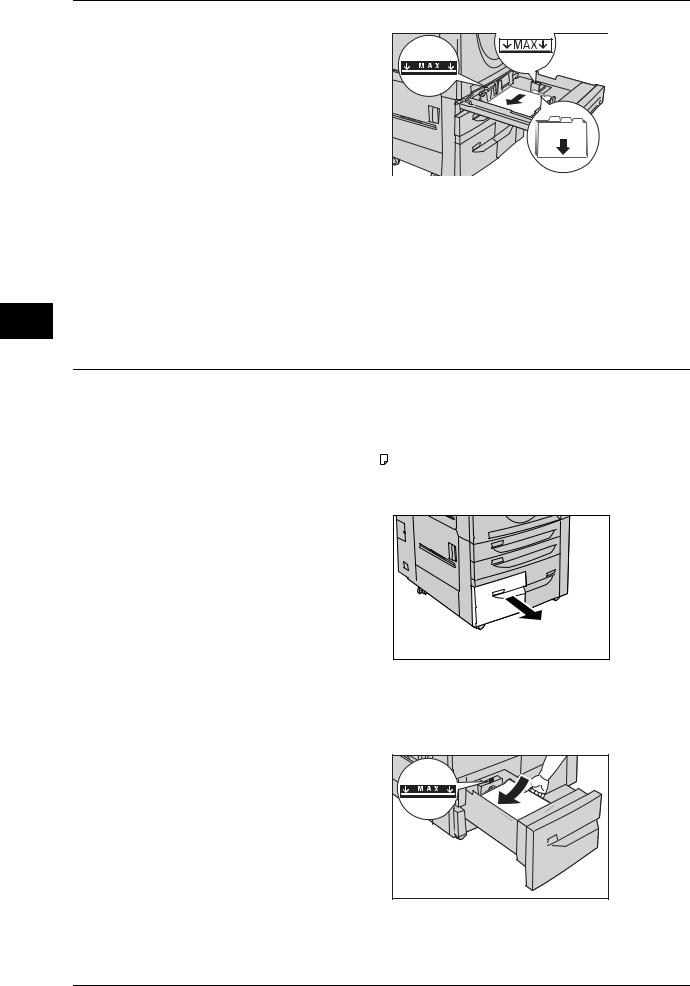
Media Other and Paper
2
2 Paper and Other Media |
|
|
2 Turn tab paper face down with its |
|
|
tabs oriented to the right, and then |
|
|
load it into the tray by aligning its |
|
|
left edge against the left-side of the |
|
|
tray. |
|
|
3 |
2 |
1 |
3 Hold the paper guide by its lever, |
|
|
and then slide the guide to fit snugly |
|
|
against the edge of the paper. |
|
|
Important • Do not load paper exceeding the maximum fill line. It might
cause paper jams or machine malfunctions.
• Fit the hole-punched edge against the left-hand side of the tray.
Note |
• When copying or printing on multiple set of tab stock of a set with which tab positions differ, |
|
load each tab paper with the side to be copied or printed on facing down to set the first paper |
|
coming on top. |
4 Push the tray in gently until it comes to a stop.
Loading Paper in the Trays 3 to 4
Following describes the procedure for loading paper in the Trays 3 to 4.
When the machine runs out of paper during copying or printing, a message is displayed on the control panel display. Add paper according to the displayed instructions. Copying or printing is automatically resumed when paper is added.
Note |
• The trays 3 and 4 accept A4 ( ) paper only. |
•Before loading paper in a tray, fan the paper well. It prevents paper from sticking to each other and reduces paper jams.
1Pull out the tray towards you until it stops.
Important • Make sure to pull out the tray slowly. When the tray is being pulled out with force, the tray may possibly hit your knees or other parts of your body causing injuries.
•While the machine processes a job, do not pull the tray out that the job uses.
•Do not add a new stack of
paper on top of the remaining paper in the tray, in order to prevent paper jams or any other troubles. First, remove the remaining paper in the tray, then load the new stack of paper.
2 Load and align the edge of the paper against the left edge of the tray with the side to be copied or printed on facing down.
Important • Do not load paper exceeding the maximum fill line. It might cause paper jams or machine malfunctions.
3 Push the tray in gently until it comes to a stop.
28
Loading...