


UR24A
8-IN-1
LEARNING
SUPERREMOTE
OWNER’S MANUAL
READ THIS FIRST!
SAFETY CONSIDERATIONS
Remember to exercise good common sense when using your X10 remote’s home automation features - especially when scheduling unattended devices. There can be some unexpected consequences if not used with care. For example, an empty coffee pot can be remotely turned on. If that should happen, your coffee pot could be damaged from overheating. If an electric heater is turned on by remote control while clothing is draped over it, a fire could result. DO NOT USE the system for the control of high power heating appliances such as portable heaters.
Caution: To reduce the risk of electric shock, do not disassemble any part of the Home Automation System. No userserviceable parts are inside. If you spill liquid on a unit, disconnect the unit from the AC outlet to prevent possible fire or shock hazard and consult authorized service personnel.
Powerline operated equipment or accessories connected to any of these units should bear the UL listing or CSA certification mark and should not have been modified in any way that might defeat their safety features.
Warning: To prevent electric shock hazard, do not expose any part of the Home Automation System to rain or moisture.
FCC CAUTION
THIS DEVICE COMPLIES WITH PART 15 OF THE FCC RULES.
OPERATION IS SUBJECT TO THE FOLLOWING TWO CONDITIONS:
(1)THIS DEVICE MAY NOT CAUSE HARMFUL INTERFERENCE, AND
(2)THIS DEVICE MUST ACCEPT ANY INTERFERENCE RECEIVED, INCLUDING INTERFERENCE THAT MAY CAUSE UNDESIRED OPERATION.
This equipment generates and uses radio frequency energy, and if not installed and used properly, that is, in strict accordance with the manufacturers instructions, it may cause interference to radio and television reception. It has been type tested and found to comply with the limits for remote control devices in accordance with the specifications in Sub-Parts B and C of Part 15 of FCC Rules, which are designed to provide reasonable protection against such interference in a residential installation. However, there is no guarantee that interference will not occur in a particular installation. If this equipment does cause interference to radio or television reception, which can be determined by unplugging the equipment, try to correct the interference by one or more of the following measures.
•Reorient the antenna of the radio/TV experiencing the interference.
•Relocate the interface with respect to the radio/TV.
•Move the interface away from the radio/TV.
•Plug the interface into an outlet on a different electrical circuit from the radio/TV
experiencing the interference.
•If necessary, consult your local Dealer for additional suggestions.
NOTE: Modifications to any of the components in this kit will void the user’s authority to operate this equipment.
2 |
3 |

CONTENTS |
|
INTRODUCTION ............................................ |
5 |
GETTING STARTED ......................................... |
6 |
CONTROLLERS AND MODULES .................. |
6 |
HOUSE CODES AND UNIT CODES ............. |
7 |
INSTALLING THE COMPONENTS ............................ |
8 |
TRANSCEIVER MODULE .......................... |
8 |
LAMP MODULE ................................... |
8 |
8-IN-1 SUPERREMOTE .......................... |
9 |
SETTING UP YOUR SUPERREMOTE ...................... |
10 |
BUTTON DESCRIPTIONS ........................ |
10 |
CLEARING THE MEMORY ...................... |
12 |
SETTING UP FOR TV, VCR, |
|
CABLE BOX AND SATELLITE RECEIVER ........ |
14 |
USING AUX TO CONTROL |
|
A SECOND TV, VCR, CABLE BOX OR SATELLITE |
|
RECEIVER ........................................ |
24 |
SEARCHING FOR CODES ...................... |
26 |
IDENTIFYING CODES FOUND USING |
|
THE SEARCH PROCEDURE ...................... |
27 |
SETTING THE SLEEP TIMER ..................... |
28 |
LEARNING ....................................... |
29 |
CONTROLLING X10 MODULES ......................... |
32 |
TO SET THE X10 SLEEP TIMER ............... |
32 |
CHANGING THE X10 HOUSE CODE: ....... |
33 |
CONTROLLING AN |
|
IR MINI CONTROLLER ......................... |
35 |
EXPANDING YOUR SYSTEM ............................. |
36 |
TROUBLESHOOTING ...................................... |
38 |
WARRANTY .............................................. |
39 |
INTRODUCTION
Congratulations on your purchase of the X10 SuperRemote.
Make your lights and appliances go to work for you....
The X10 SuperRemote will control most or all of your video and audio equipment. But what really sets it apart from other remotes is that you can also control almost any light or appliance in your home - even in another room! And it’s easy to install. Within minutes, you can be using your X10 SuperRemote to dim the lights, start brewing a fresh pot of coffee and play your favorite movie!*
Here are just some of the things you can do with your X10 SuperRemote...
•Control your entire audio/video and lighting setup for the ultimate Home Theater experience.
•Turn on lights at night to scare away intruders if you hear a noise.
•Start the coffee from your bedroom when you wake up.
•Turn on your electric blanket before the movie ends, so you it’s nice and warm when you go to bed.
Use this manual to become familiar with your SuperRemote....
This manual will explain how to set up your SuperRemote to use it with your existing Audio/Video equipment.
Next it will show you how you can use it to set up and use an X10 Transceiver Module and Lamp Module (sold separately) to operate electrical devices in your home.
Finally, the manual will show you can expand your system with some of the many additional X10 products you can purchase.
* Requires X10 modules, sold separately.
4 |
5 |
GETTING STARTED
Because we know that you are eager to get started, we’ve kept this introduction as short as possible, but it contains very valuable information, so you should read through it very carefully.
CONTROLLERS AND MODULES
The first thing you need to understand is that there are two different devices you need to control your house;
Controllers and Modules. Any light or appliance that you want to control is plugged into a Module and that Module is then plugged into a standard AC outlet.
Modules receive commands from Controllers. Examples include the Lamp Module (sold separately). The Transceiver Module (also sold separately) is another example (although it also doubles as a controller as described later).
Controllers are plugged into standard wall outlets and send commands to Modules over your existing
electrical wiring in your house without affecting your electricity in any way.
The Transceiver Module works as a controller when it is used with a remote control such
as the 8-in-1 Learning
SuperRemote. When the Transceiver Module receives a command from the remote it sends digital signals over your existing house wiring to a Module which receives the signals and executes the command.
The remote uses radio frequency (RF) signals to send commands to the Transceiver Module. RF signals can go right through walls, so you can use the remote to control lights or appliances from anywhere in your home.
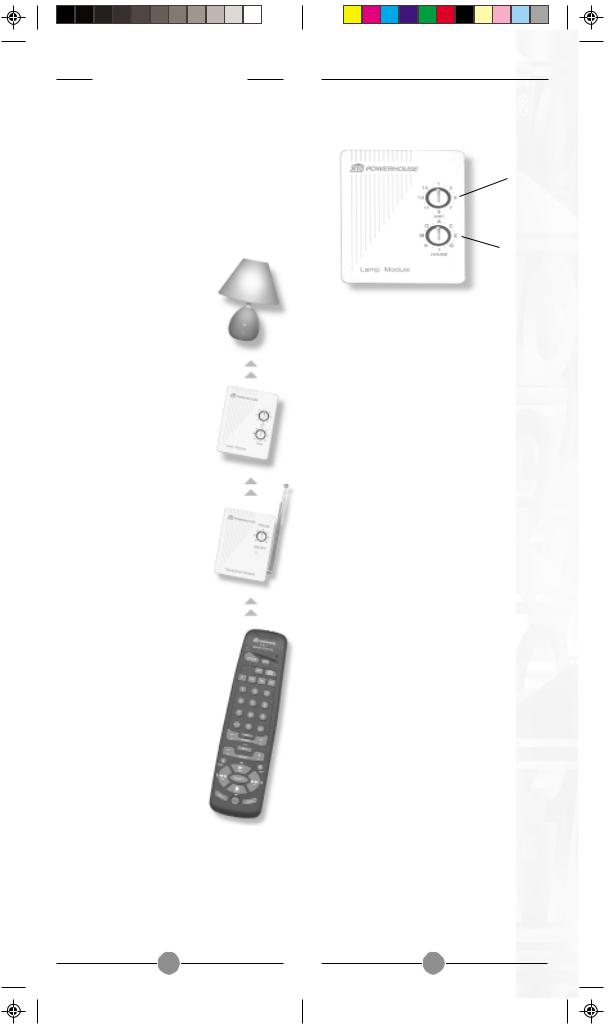
HOUSE CODES AND UNIT CODES
UNIT CODE
DIAL
HOUSE CODE
DIAL
Each Module has a specific address made up of a House Code (red dial on the face of the Module) and a Unit Code (black dial on the face of the Module).
The Controller first sends an address and then a command on the AC power lines. Only the Module with a matching address will execute the command. If more than one Module has the same address, both Modules will execute the command.
Addresses are set on the Module by turning the two dials on the front of the Module to the desired letter and number (using a small screwdriver or a coin). The House Code is selected from the letters A through P, and the Unit Code is selected from the numbers 1 through 16.
6 |
7 |
INSTALLING THE
COMPONENTS
TRANSCEIVER MODULE
The Transceiver Module receives radio frequency (RF) commands from remotes to operate a lamp or appliance plugged into it. The Transceiver Module also passes on commands over your house wiring to control other X10 Modules. Note that unlike the Lamp Module you cannot dim and brighten a lamp connected to the Transceiver Module.
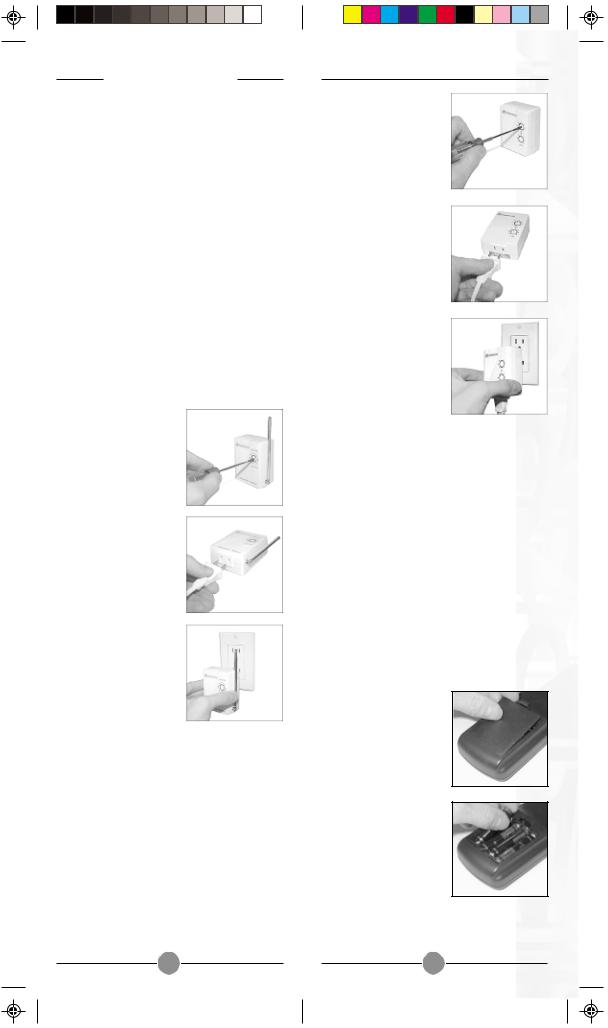
You should locate the Transceiver Module centrally in the home for maximum range when controlled by the X10 Learning SuperRemote.
1.Set the House Code to ‘A’ .
2.Plug a lamp or appliance into the Transceiver Module.
3.Plug the Transceiver Module into a convenient AC outlet. Fully extend the antenna.
LAMP MODULE
The Lamp Module may be used to control any incandescent lamp rated up to 300W. It is not suitable for other types of lamp such as fluorescent or energy saving lamps, or lamps which include a dimmer control.
Caution: Do not connect an appliance such as a coffee pot or heater to the Lamp Module. It may damage the module and the appliance and could cause a fire hazard.
1.Set the House Code to ‘A’ and the Unit Code to ‘2.’
2.Plug a lamp into the Lamp Module.
3.Plug the Lamp Module into a convenient AC outlet.
8-IN-1 LEARNING SUPERREMOTE
The 8-in-1 Learning SuperRemote allows you to control practically everything electrical in your home. It combines IR technology that lets you control all your TV, VCR, Cable and Satellite equipment with X10 RF technology that lets you control lamps and appliances anywhere in your home.
To find out more about configuring the Learning SuperRemote to work with your audio/video equipment, see the section titled “Setting Up your SuperRemote.”
1.Push the tab and lift off the battery cover.
2.Fit four AAA batteries, taking care to match the + and - marks in the battery compartment.
8 |
9 |

SETTING UP
YOUR SUPERREMOTE
BUTTON DESCRIPTIONS
INDICATOR LIGHT
The indicator light flashes when the remote is operating.
POWER
Works in the same way as your original remote.
SET UP
Used for programming the remote.
BACKLIGHT
Lights up the keys for a few seconds when pressed.
LEARN
Lets you learn codes from an existing remote, that might not be in the Learning SuperRemote’s library.
X10
Lets you control X10 Modules to operate lamps and appliances around the home.
TV, VCR, CBL, CD, AUX1, AUX2, SAT
Used to select the device to control. SAT includes DSS receivers.
SHIFT
Lets you learn another function under the same key
0-9
Used as your original remote and to enter device codes.
LAST
Selects the last channel viewed on your TV, VCR, Cable Box or Satellite Receiver.
CHANNEL
Works like your original remote. Also used to turn X10 Modules on and off.
MUTE
Works the same as your original remote.
VOLUME
Works like your original remote. Also used to brighten and dim lamps connected to X10 Modules.
TIMER
Used to set the Sleep Timer to automatically switch off the TV or X10 Modules after a preset time.
L1, L2
Lets you learn additional keys from your original remote.
DISP
Used to access on-screen information or CD programming.
PLAY, REW, FF, STOP
Work the same as on your original VCR remote.
SELECT
Used for menu selections on DSS satellite receivers.
GUIDE
Displays the main menu on DSS satellite receivers.
REC
Record button. Works the same as your original VCR remote. You must press the REC button twice to begin recording.
PAUSE
Works the same as your original VCR remote.
1 0 |
1 1 |

CLEARING THE MEMORY
It is recommended that you clear the memory in the Learning SuperRemote before you start programming it:
1.Press and hold SETUP until the LED indicator lights steadily. Release the SETUP button.
2.Press and release the LEARN key twice.
3.Press and release the SETUP key.
You can also clear the memory for just a particular mode (TV, VCR, etc.).
1.Press and hold SETUP until the LED indicator lights steadily. Release the SETUP button.
2.Press and release the desired mode button (TV, VCR, etc.). The LED blinks once.
3.Press the LEARN key. The LED blinks once.
4.Press SETUP. The LED turns off after a few seconds.
1 2 |
1 3 |
 Loading...