


HSN_DeepFryerManual 6/21/10 10:48 AM Page 1
LIFE IS ABOUT BALANCE AND EATING
I M P O R T A N T N O T I C E
PLEASE DO NOT RETURN TO STORE.
If you have any problems with this unit, contact Consumer Relations for service PHONE: 1-800-275-8273 or visit our website at wphousewares.com
Please read operating instructions before using this product. Please keep original box and packing materials in the event that service is required.
W.P. APPLIANCES, INC. Toll Free (800) 275-8273
Models BDFR0060 Printed in China REV 1.0
U S E & C A R E
Electronic
Deep Fryer
All trademarks, service marks and trade names (collectively the “Marks”) are proprietary to Wolfgang Puck World Wide.

HSN_DeepFryerManual 6/21/10 10:48 AM Page 1
IMPORTANT SAFEGUARDS
When using electrical appliances, basic safety precautions should always be followed, including the following:
1Read all instructions carefully.
2Do not touch hot surfaces. Use handles and knobs.
3To protect against electric shock, do not immerse heater control unit, cord, plug or deep fryer in water or other liquid.
4Close supervision is necessary when any appliance is used by or near children. This appliance is not recommended for use by children.
5Always attach breakaway cord to appliance first, then plug into wall outlet. To disconnect, turn the switch off, then remove plug from wall outlet.
6Unplug from outlet when not in use and before cleaning. Allow to cool before putting on or taking off parts, and before cleaning the appliance.
7Do not operate any appliance with a damaged cord or plug, or after the appliance malfunctions or has been damaged in any manner. Return the appliance to the nearest authorized service center for examination, repair or adjustment.
8The use of accessory attachments not recommended or sold by the manufacturer may cause injury.
9Do not use outdoors.
10Do not let cord hang over edge of table or counter, or touch hot surfaces.
11Do not place on or near a hot gas or electric burner, or in a heated oven.
12Extreme caution must be used when moving Deep Fryer containing hot oil.
13Be sure handles are properly attached to basket and locked in place. See detailed assembly instructions. See instructions regarding handle assembly on page 1 1.
14Do not use this appliance for other than intended use.
15Periodically check for looseness of screws or nuts and retighten them. CAUTION: Over tightening can result in stripping of screws or nuts or cracking of handle or feet.
SAVE THESE INSTRUCTIONS
HOUSEHOLD USE ONLY
POLARIZED PLUG
This appliance has a detachable power-supply cord with polarized plug (one blade is wider than other). As a safety feature, this plug will fit in a polarized outlet only one way. If it still does not fit, contact a qualified electrician. Do not attempt to modify the plug in any way.
A short detachable power-supply cord is provided to reduce the risk resulting from become entangled or tripping over a longer cord.
Do not use an extension cord with this appliance.
An extension cord or longer detachable cord is not recommended for use with deep fryers
1 |
2 |
HSN_DeepFryerManual 6/21/10 10:48 AM Page 3
Wolfgang Puck, owner of the famous Spago restaurants and one of the most influential chef-restauranteurs in America, is credited with reviving California’s rich culinary heritage. His cooking innovations,
a result of blending fresh California ingredients with his classical French techniques, are enjoyed by world leaders, stars and fellow chefs alike. He established other trendsetting restaurants like Postrio, Chinois on Main in Santa Monica, Trattoria del Lupo, Cut, and his latest creation, Jai, an Asian fusion restaurant in San Diego. Home chefs can also share Mr. Puck’s talents through his cookbooks, cutlery, cookware and, of course, through his appliances!
Table of Contents
Important Safeguards |
1 |
About Wolfgang Puck |
3 |
Addtional Safety Precautions |
5 |
Before Your First Use |
7 |
Know Your Deep Fryer |
9 |
Know Your Control Panel |
10 |
Assembling Your Deep Fryer |
1 1 |
Assembling Your Fryer Drain Tap Cap |
12 |
Operating the Control Panel |
|
in Manual Mode |
1 3 |
Operating the Control Panel |
|
in Program Mode |
15 |
Frying Guide |
17 |
Guidelines for Deep Frying |
18 |
Preparing for Frying |
19 |
Care and Cleaning |
20 |
Troubleshooting Guide |
2 1 |
Recipes |
22 |
Limited Warranty |
54 |
3

HSN_DeepFryerManual 6/21/10 10:48 AM Page 5
Additional Safety Precautions
1Do not use the Fryer without oil. The Fryer will be severely damaged if heated dry. Only use liquid oil in your Deep Fryer. Never use solid fat or shortening, as this will cause your Deep Fryer to overheat, or possibly start a fire.
2This Fryer is equipped with a safety reset button in order to prevent operation of the appliance in the event of improper use, or irregular operation. Once your Deep Fryer has completely cooled press the Reset button on the Heater Control Unit. If your Deep Fryer does not operate after using the reset button contact our customer service department for repair.
3Before using your Fryer for the first time wash the Oil Pot, Lid, Oil Pot Filter Screen and Frying Basket in warm soapy water and dry thoroughly. It is important that your Fryer is completely dry prior to use as water will cause the hot oil to spatter. Do not immerse the Control Panel or Power Cord in water. Wipe with damp cloth only.
4Prior to use ensure that your tap is in the closed position (See figure 11 on page 20) and that your Safety Drain Cap is placed securely on the tap. See page 1 1 for installation instructions.
5Do not place oversized foods or utensils not recommended by the manufacturer in the Fryer.
6This product should never be used unsupervised by children or infirmed persons.
7To prevent burns do not touch any metal parts of the Deep Fryer as surfaces are very hot. Always use heat resistant gloves
8DO NOT OPEN THE OIL DRAIN SYSTEM OR REMOVE THE SAFETY DRAIN CAP WHILE THE OIL IS HOT.
9Always disconnect the power cord when not in use or when cleaning your Fryer.
10This Deep Fryer is designed with a Magnetic Release Power Cord that will break away from the Fryer base if the power cord is pulled. This safety feature will prevent the appliance from tipping and the hazardous spillage of hot oil.
a.WARNING: Always attach the cord to the Fryer first, then plug into the proper wall receptacle. Never leave the Magnetic Release Power Cord plugged into the wall without having it plugged into the appliance.
11Do not use an extension cord with this appliance.
12Never leave appliance unattended when it is connected to the power outlet.
5 |
6 |

HSN_DeepFryerManual 6/21/10 10:48 AM Page 7
Before Your First Use
Carefully unpack the Deep Fryer and remove all packaging materials. Remove the Deep Fryer Lid, Oil Pan, Oil Pot Filter Screen, Frying Basket, Control Panel and Housing. Wash all parts except the Control Panel and Power Cord in warm soapy water. Never immerse the Control Panel and Power Cord, simply wipe with a damp cloth. Do not use harsh or abrasive cleansers on any part of the Deep Fryer. Always ensure all components are completely dry prior to first use as water will cause severe spattering of the oil.
Warning: Do not clean the Deep Fryer by heating soapy water in it because there is danger that the water could overflow. Do not immerse the control panel or power cord in water. Reassemble the unit after cleaning.
IMPORTANT NOTICE: Your deep fryer comes equipped with a removable screen located in the Oil Pan at the drain. This will prevent large pieces of food from becoming caught in the drain tap which could cause leaks. Please see the following important safeguards regarding your Drain Tap:
1Prior to adding oil ensure that your Drain Tap Lock is in the closed position and that your Drain Tap Filter is properly seated in the Oil Pan Drain and free of any food debris. Place the Safety Drain Cap on the Tap. See page 12.
2Never heat oil in your Deep Fryer without first ensuring that your Drain Tap is not leaking, and that your Drain Cap is securely in place. See page 1 1 for proper installation.
3Never drain hot oil, or while your Deep Fryer is plugged in. Disconnect the plug from the wall outlet first and allow the oil to completely cool.
4Never attempt to remove the Filter Screen by the Screen itself as this will permanently damage the Screen. Always grasp from the metal tube and pull straight up.
5To clean the Filter Screen hold the Filter by the metal tube and wash in warm soapy water. Flush water through the tube to push food particles out of the screen Never apply pressure to the filter screen itself to avoid damage.
6Should your Screen become damaged, discontinue use and contact our customer service department for replacement.
If you need help with your Wolfgang Puck 4.0 Liter Deep Fryer that is not answered in your instruction manual or if you need assistance with a part replacement, contact Customer Service at 1.800.275.8273 or via our internet site at www.wphousewares.com.
7 |
8 |
HSN_DeepFryerManual 6/21/10 10:48 AM Page 9
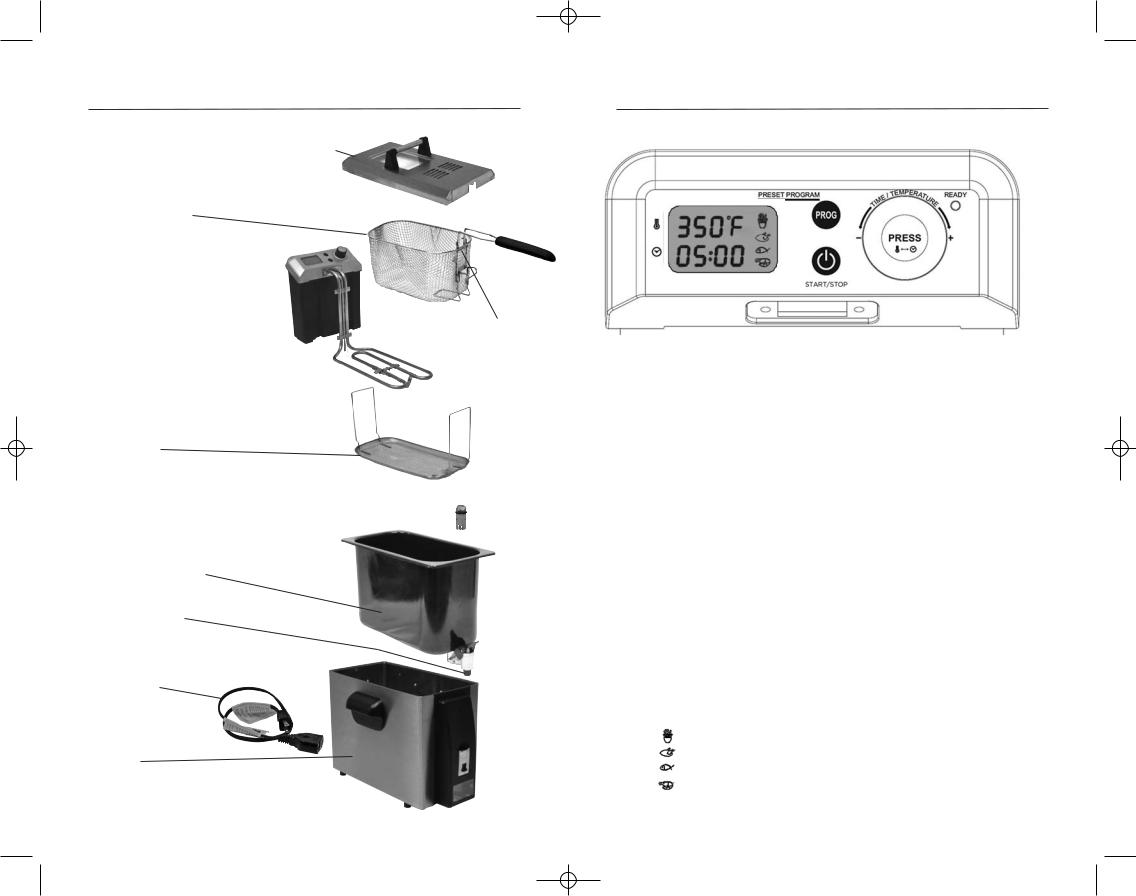
Know Your Deep Fryer
In Order of Assembly
Lid with viewing window and permanent filter
Frying Basket with folding handle
Control Panel 
Heater Control Unit 
Basket clip with MAX food level
Heating Element 
Oil Pot
Filter Screen
Drain Tap Filter 
Oil Pot with Drain Tap
Safety Drain Cap
(Always ensure Drain
Cap is in place when using Fryer.)
Magnetic Release
Power Cord
Housing
Know Your Control Panel
1START/STOP Button
a Used to start preheat function. Also used to start the Timer once the oil has reached the set temperature.
2PROG Button
a Press to change between manual mode or any of the four preprogrammed modes
i |
French Fries |
375°F |
10 Minutes |
ii |
Chicken |
375°F |
15 Minutes |
iii |
Fish |
325°F |
8 MInutes |
iv |
Shrimp |
350°F |
5 Minutes |
3TIME/TEMPERATURE Dial
a Press to toggle between time and temperature settings. You can only make adjustments to time or temperature when the selected setting is blinking. Turn counterclockwise to decrease and clockwise to increase.
4READY Light
a Will illuminate when the oil temperature has reached the set temperature.
5Temperature Display (215°F - 375°F)
a Will display the selected temperature.
6Time Display (0 - 20 minutes)
aWill display the selected time.
7 Program Mode Display.
aWill display the selected program mode.
|
French Fries |
375°F |
10 Minutes |
|
Chicken |
375°F |
15 Minutes |
|
|||
|
Fish |
325°F |
8 MInutes |
|
Shrimp |
350°F |
5 Minutes |
|
|||
|
|
|
|
9 |
10 |
HSN_DeepFryerManual 6/21/10 10:48 AM Page 11
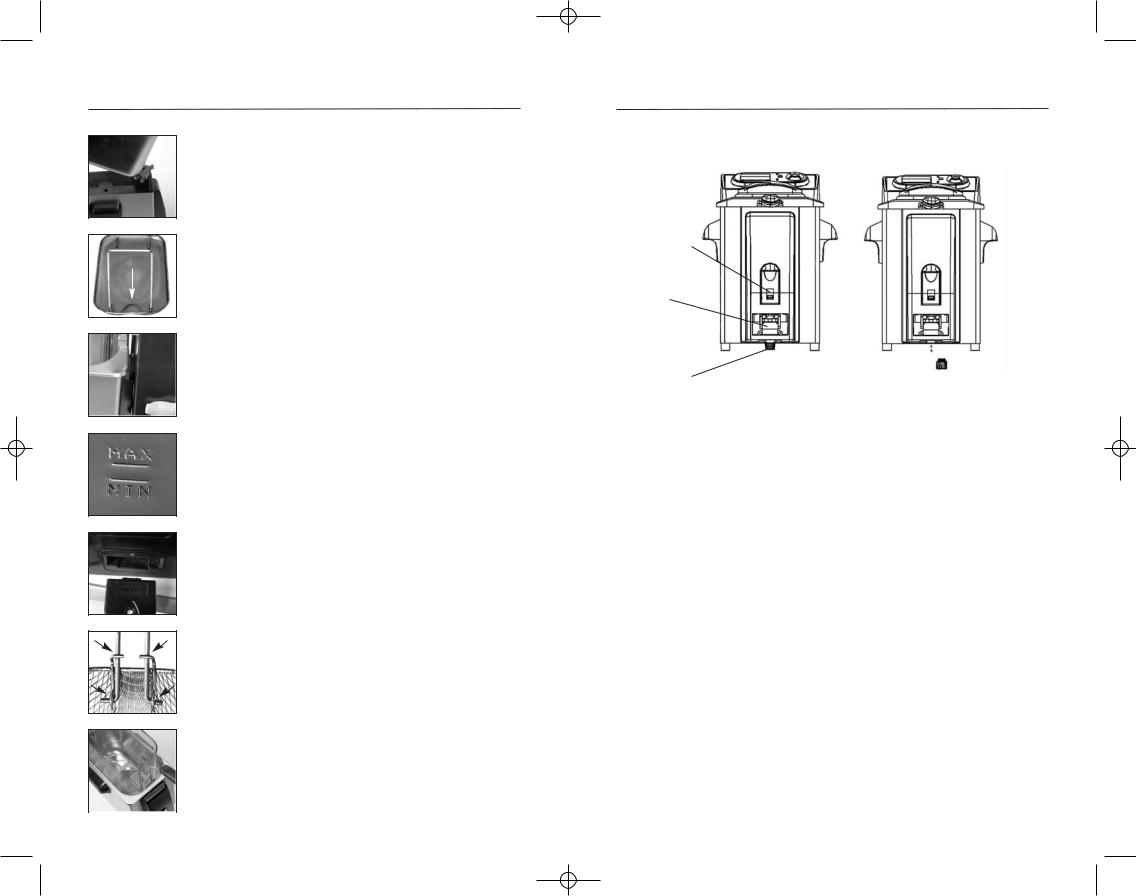
Assembling Your Deep Fryer
figure 1
Front
figure 2
figure 3
figure 4
figure 5
figure 6
Assembling your Deep Fryer for Use
1Place the Deep Fryer housing on a stable, level surface.
2Ensure that all components of your Deep Fryer are completely dry prior to use to avoid risk of injury due to spattering.
3Insert the oil pot into the Deep Fryer housing ensuring that the front of the pot (the front is indicated by the tap) is placed at an angle into the housing. (See figure 1).
4Place the Oil Pot Filter Screen into the Oil Pot. Ensure that the raised end of the filter screen is towards the front of the Fryer Pot. (See figure 2).
5Line up the Heater Control Unit into the grooves on the rear of the Deep Fryer housing. Your Deep Fryer is equipped with a safety microswitch which will not allow the Heater Control Unit to work unless it is properly seated into both grooves in the Housing. (See figure 3).
6Add the appropriate amount of oil to the Oil Pot. Do not fill with oil above the maximum level or below the minimum level marked on the inside of the Deep Fryer pot. (See figure 4).
7Attach the Magnetic Release Power Cord into the receptacle on the Heater Control Unit. Only use the approved receptacle marked MC-316 in your unit. To attach the receptacle ensure that the marking “THIS SIDE IS UP” is facing up in order to line up with the plug receptacle on the
Heater Control Unit. (See Figure 5).
8Unfold the Basket handle and ensure that it is locked into place. The ends of the handle rods must be inserted in the loop of the Basket and placed behind the metal stem in order to lock in place. A serious burn injury can occur if your handle is not properly locked in place.
(See figure 6).
9Place the Basket into the Oil Pot. (See figure 7).
10To drain oil, lift and rest the Frying Basket on the Oil Pot.
Assembling Your Fryer
Drain Tap Cap
Drain tap lock
Drain tap
Drain tap cap
Figure 1 |
Figure 2 |
Your Wolfgang Puck Deep Fryer is equipped with a Safety Drain Cap. Your Drain Tap Cap should always be in place when using your deep fryer or when storing oil in the tank (see figure 1). The following directions outline the use of the Drain Tap.
1Place Drain Tap Cap on Drain Tap by turning counter clockwise until tight. Always ensure that your Drain Tap Lock is closed whenever using your Deep Fryer, or when storing oil in your tank. Never unlock the Drain Tap Lock with the Tap Cap on the Drain Tap.
2To remove Drain Tap Cap first ensure that the Tap Lock is in the closed position. Turn Drain Cap clockwise to remove (see figure 2) and set aside.
3Place container under tap and unlock the Drain Tap Lock to begin draining oil. Never drain hot oil, or while or deep fryer is plugged in.
4Your Drain Tap should be washed in warm soapy water and allowed to dry thoroughly.
figure 7 |
11 |
12 |

HSN_DeepFryerManual 6/21/10 10:48 AM Page 13
Operating the Control Panel
in Manual Mode
1Add the appropriate amount of oil to the oil pot. Do not fill with oil above the maximum level or below the minimum level marked on the inside of the Deep Fryer pot.
2When the unit if first plugged in the blue backlight will illuminate and the temperature and the time will display. The temperature display will blink.
3While the temperature is blinking turn the Adjustment dial to select the desired temperature. Turn clockwise to increase the temperature and turn counter-clockwise to decrease the temperature. You cannot change the temperature unless it is blinking.
4Once you have set the temperature press the Adjustment Dial to change to timer setting. The timer display will blink. Turn the dial to select the desired time. Turn clockwise to increase the time and turn counter-clockwise to decrease the time. You cannot change the time unless it is blinking. If the timer is set 0, the Fryer will stay on and the timer will indicate the elapsed cooking time.
5Once you have made your settings to TIMER and TEMP press START/STOP to begin the preheating cycle. The °F on the Temperature display will blink indicating that the fryer is preheating. Once the oil has reached at least 120°F the temperature will begin to display the actual oil temperature.
6You can adjust the temperature and the timer during the preheating cycle by pressing and turning the Adjustment Dial. Follow step 3 to 5 to adjust the temperature and the time.
7Your oil is ready when the READY light illuminates, 1 beep will sound and the F on the display stops blinking.
8Place your food in the basket ensuring that you do not exceed the MAX line indicated on the basket near the handle.
9To fry without using the optional timer, simply lower the food into the Fryer while the READY light is ON and visually track the cooking process. If the Timer is set 0.00, press the START/STOP button once and lower your food into the Fryer. The Timer Display will indicate the elapsed cooking time and the set temperature. You cannot start the Timer until the oil is preheated. Place the lid on top.
10To stop the frying process, press the START/STOP button. You will hear one beep and the Deep Fryer’s heating element will turn off and display the previously selected temperature which will be blinking. The READY light will turn off indicating that the unit has turned itself off. Unplug the power cord from the wall outlet
Using the Optional Countdown Timer
1To fry with the optional timer, lower the food into the Fryer while the READY light is ON and press START/STOP to start the countdown timer. The timer should be set to at least one minute or more for the countdown timer to function. The timer will not start until the oil is preheated. Place the lid on top. The panel will display the desired temperature and the countdown timer.
2The countdown timer mode features an Auto-Off function, when the countdown time has elapsed the Deep Fryer’s heating element will turn off and display the previously selected temperature blinking. The READY light will turn off indicating that the unit has turned itself off.
3You can adjust the temperature and the timer while your food is cooking by pressing and turning the Adjustment Dial. Press
the dial once to change the temperature setting. The temperature display will blink for 3 seconds. Follow step 3 to 5 to adjust the temperature and the time. If you do not make any adjustments to the Temp or Timer the display will stop blinking and go back to your original settings.
A Note about using the Timer Modes
Countdown Timer: |
Deep Fryer will turn off when set time |
|
has elapsed |
Elapsed Timer |
Deep Fryer will stay on and display |
|
cooking time |
No Timer |
Deep Fryer will display default time of 5 minutes |
13 |
14 |

HSN_DeepFryerManual 6/21/10 10:48 AM Page 15
Operating the Control Panel
in Program Mode
Using the Program Function
1Your Deep Fryer comes equipped with four pre-programmed settings for French Fries, Chicken, Fish & Shrimp. These settings are based upon frying no more than the recommended volume of food, i.e. not to exceed the MAX line on the frying basket.
2Press the PROGRAM button to switch among the manual mode and pre-set functions
3The LCD will display the preset temperature and time according to the chosen program.
4Press START/STOP to start preheating the oil. The °F on the Temperature display will blink indicating the preheating cycle.
5You can adjust the temperature and the timer during the preheating cycle by pressing and turning the Adjustment Dial. Follow step 3 to 5 to adjust the temperature and the time.
6Your oil is ready when the READY light illuminates, 1 beep will sound and the F on the display stops blinking.
7Place your food in the basket ensuring that you do not exceed the MAX line indicated on the basket near the handle.
8To fry without using the optional timer, simply lower the food into the Fryer while the READY light is ON and visually track the cooking process. If the Timer is set 0.00, press the START/STOP button once and lower your food into the Fryer. The Timer Display will indicate the elapsed cooking time and the set temperature. You cannot start the Timer until the oil is preheated. Place the lid on top.
9To stop the frying process, press the START/STOP button. You will hear one beep and the Deep Fryer’s heating element will turn off and display the previously selected temperature which will be blinking. The READY light will turn off indicating that the unit has turned itself off. Unplug the power cord from the wall outlet
Using the Countdown Timer in Program Mode
1Prograqm mode by default used the countdown timer mode.
Lower the food into the Fryer while the READY light is ON and press START/STOP to start the countdown timer. The timer will not start until the oil is preheated. Place the lid on top. The panel will display the desired temperature and the countdown timer.
2The countdown timer mode features an Auto-Off function, when the countdown time has elapsed the Deep Fryer’s heating element will turn off and display the previously selected temperature blinking. The READY light will turn off indicating that the unit has turned itself off.
3You can adjust the temperature and the timer while your food is cooking by pressing and turning the Adjustment Dial. Press the dial once to change the temperature setting. The temperature display will blink for 3 seconds. Follow step 3 to 5 to adjust the temperature and the time. If you do not make any adjustments to the Temp or Timer the display will stop blinking and go back to your original settings.
4Place the basket on the rim of the oil pot, which will allow the excess oil to drain from the food for a minute or two. Do not leave the cooked food in the basket in the draining position for more than five minutes or it may lose its crispness and become soft.
5You can stop the frying process at any time by pressing START/STOP to cancel the program and manually set the Time/Temp as outlined in the Section of Operating the Control Panel in manual mode.
Note: Every time you switch on the Deep Fryer, the Programs will revert back to the default setting.
15 |
16 |
 Loading...