


USE & CARE GUIDE
Outdoor Gas Grills

Contents
Wolf Outdoor Gas Grills . . . . . . . . . . . . . . . . . . . . . . . . 3
Safety Instructions . . . . . . . . . . . . . . . . . . . . . . . . . . . . 4
Outdoor Grill Features . . . . . . . . . . . . . . . . . . . . . . . . . 6
Outdoor Grill Use & Care . . . . . . . . . . . . . . . . . . . . . . . 8
Troubleshooting Guide . . . . . . . . . . . . . . . . . . . . . . . . 18
Wolf Outdoor Grilling Guide . . . . . . . . . . . . . . . . . . . . 19
Service Information . . . . . . . . . . . . . . . . . . . . . . . . . . . 22
Wolf Warranty . . . . . . . . . . . . . . . . . . . . . . . . . . . . . . . 23
Features and specifications are subject to change at any time without notice. Visit our website, subzero-wolf.com.au for the most up-to-date information.
IMPORTANT NOTE: Throughout this guide, dimensions in parentheses are millimeters unless otherwise specified.
Important Note
To ensure the safe and efficient use of Wolf equipment, please take note of the following types of highlighted information throughout this guide:
IMPORTANT NOTE highlights information that is especially important.
CAUTION signals a situation where minor injury or product damage may occur if instructions are not followed.
WARNING states a hazard that may cause serious injury or death if precautions are not followed.
CONTACT
INFORMATION
Sub-Zero Group Australia Pty Ltd
Level 10, 469 La Trobe Street
Melbourne Victoria 3000
Phone 03 9600 2218
subzero-wolf.com.au

Wolf Outdoor Gas Grills |
3 |
|
|
IMPORTANT INSTRUCTIONS
FOR YOUR SAFETY
If you smell gas:
1.Shut off gas to the appliance.
2.Extinguish any open ames.
3.Open lid or remove cover.
4.If odor continues, keep away from the appliance and immediately call your gas supplier orre department.
FOR YOUR SAFETY
1.Do not store or use gasoline or other ammable vapors and liquids in the vicinity of this or any other appliance.
2.An LP cylinder not connected for use shall not be stored in the vicinity of this or any other appliance.
3.Keep any electrical supply cord and the fuel supply hose away from any heated surfaces.
THESE OUTDOOR PRODUCTS ARE FOR OUTDOOR USE ONLY
If stored indoors, detach and leave LP cylinder outdoors.
BEFORE LIGHTING
1.Read instructions before lighting.
2.Open lid or remove cover before lighting.
3.I gnition does not occur in 5 seconds, turn the burner control(s) off, wait 5 minutes, and repeat the lighting procedure.
This appliance shall only be used in an above ground open-air situation with natural ventilation, without stagnant areas, where gas leakage and products of combustion are rapidly dispersed by wind and natural convection.
Any enclosure in which the appliance is used shall comply with one of the following: An enclosure with walls on all sides, but at least one permanent opening at ground level and no overhead cover. Within a partial enclosure that includes an overhead cover and no more than two walls. Within a partial enclosure that includes an overhead cover and more than two walls,the following shall apply—(i) at least 25% of the total wall area is completely open; and (ii) at least 30% of the remaining wall area is open and unrestricted. In the case of balconies, at least 20% of the total of the side, back and front wall areas shall be and remain
open and unrestricted.
Safety Instructions |
4 |
|
|
Thank You
Your purchase of a Wolf outdoor product attests to the importance you place upon the quality and performance of your cooking equipment. We understand this importance and have designed and built your grill with quality materials and workmanship to give you years of dependable service.
We know you are eager to start grilling, but before you do, please take some time to read this use & care guide. Whether you are a beginning cook or an expert chef, it will be to your benefit to familiarize yourself with the safety practices, features, operation and care recommendations of the Wolf outdoor gas grill.
Your Wolf outdoor product is protected by a warranty that is one of the finest in the industry. Take a moment to read the warranty statement at the end of this guide and refer to it should service become necessary.
IMPORTANT NOTE: Wolf outdoor products are manufactured for use with natural gas or LP gas. Check the product rating plate for the type of gas for your specific model. If this appliance does not correspond to your type of gas, contact your authorized Wolf dealer.
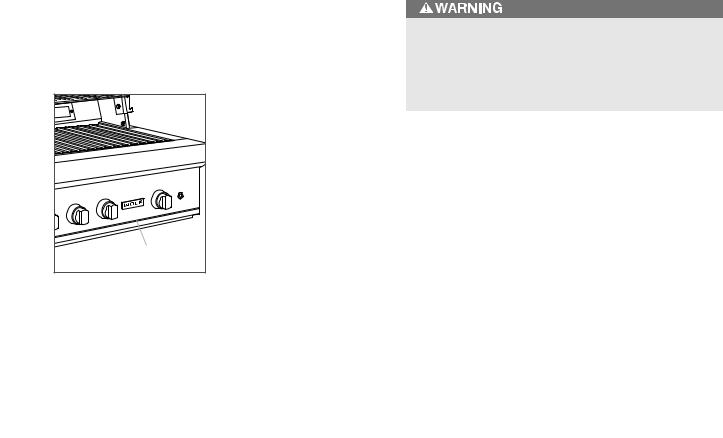
For the outdoor grill, the rating plate is located above the drip tray, behind the logo. The drip tray must be removed to view the rating plate.
Refer to the illustrations below.
RATING PLATE |
IMPORTANT INSTRUCTIONS
•Read this use & care guide carefully before using your outdoor product to reduce the risk of fire, electric shock or injury to persons.
•Installation must be performed by a qualified installer, service agency or the gas supplier.
•Warranty service must be performed by Wolf factory certified service.
•Make sure the outdoor product is properly installed and connected to the gas for which your unit was designed. Do not use charcoal or other material in your outdoor product.
•Make sure the outdoor product is connected to a
properly grounded electrical supply.
•Have the installer show you where the gas shut-off valve is so you can shut off the gas supply in an emergency.
•If the smell of gas is present, gas connections may not be properly sealed or you may have a gas leak. Determining where the gas leak is should be done by Wolf factory certified service or the gas supplier.
Wolf outdoor products are for outdoor use only! Do not operate in enclosed areas. This could result in carbon monoxide buildup which would result in injury or death.
Outdoor grill
Safety Instructions |
5 |
|
|
IMPORTANT INSTRUCTIONS
GENERAL SAFETY REQUIREMENTS
•The installation of this appliance must conform with local codes or, in the absence o ocal codes, either the National Fuel Gas Code, ANZI Z223.1/NFPA 54, or CAN/CGA-B149.1, Natural Gas Installation Code or CAN/CGA-B149.2, Propane Installation Code.
•Minimum clearance of 12" (305) from the back and sides of the grill to adjacent combustible construction must be maintained. This outdoor cooking gas appliance should not be located under overheadunprotected combustible construction.
•The utilization of an external electrical source requires that when installed, this outdoor cooking gas appliance must be electrically grounded in accordance with the local codes or, in the absence o ocal codes, with the National Electrical Code, ANSI/NFPA 70, or the Canadian Electrical Code, CSA C22.1. Keep any electrical supply cord, or the rotisserie motor cord and the fuel supply hose away from any heated surfaces.
•It is critical that the gas burners are properly installed with their ori ces inside the burners air shutters. If not properly installed, gas may leak outside of the burner that could lead to re, potential damage to your grill and bodily injury.
•When choosing an area for the grill, whether a portable or built-in application, consider exposure to wind, proximity to traf c paths and length of the gas supply line.
•LP cylinder must be disconnected when not in use.
•This outdoor cooking gas appliance is not intended to be installed in or on recreational vehicles and/or boats.
•Ensure all transit protection and packaging is removed before operation of this appliance.
•Do not obstruct the ow of combustion and ventilation air to this appliance. Keep the ventilation openings of the cylinder enclosure free and clear from debris.
•Check all gas connections for leaks with soapy water solution and brush. Never use an open ame. Refer to the outdoor gas grill installation guide for the leak testing procedure.
•Check exible hoses for cuts and wear that may affect the safety before each use.
•Never light the outdoor product with cover in place.
•Never use the grill without the drip pan installed and pushed all the way to the back of the grill.
•Never ll an LP cylinder beyond 80% full.
•CALIFORNIA PROPOSITION 65—WARNING: The burning of gas cooking fuel generates some by-products which are on the list of substances
known by the State of California to cause cancer or reproductive harm. California law requires businesses to warn customers of potential exposure to such substances. To minimize exposure to these substances always operate this unit according to the use and care manual, ensuring you provide good ventilation when cooking with gas.
•In Massachusetts: All gas products must be installed using a “Massachusetts” licensed plumber or gas t- ter. A “T” handle type manual gas valve must be installed in the gas supply line to this appliance. This applies to permanently installed natural gas and propane installations. This does not apply to propane portable installations using a 20-lb tank.
Outdoor Grill Features |
6 |
|
|
Outdoor Gas Grill Features
•Natural gas or LP gas outdoor grills in 30" (762), 36" (914), 42" (1067)
•Crafted of heavy-duty stainless steel.
•Each grill burner is individually contained for independent heat control.
•Infrared sear zone—direct heat sears meats to seal in juices.
•Radiant heat from ceramic briquettes mixes with direct heat for more thorough grilling.
•Electric hot surface ignitors operate by pushing in control knobs.
•Double wall hood front for insulation.
•Hood assist system with concealed springs for easy opening and closing.
•Three-position warming rack stowable when not in use.
•30" (762), 36" (914) and 42" (1067) LP gas models include gas regulator and hose.
•Smoker box and basting pan included.
•Two-position rotisserie system with infrared burner.
•Stainless steel burner grates provide more heat contact for even grilling.
•Halogen lights illuminate the grilling surface—LED lit control knobs allow for night grilling.
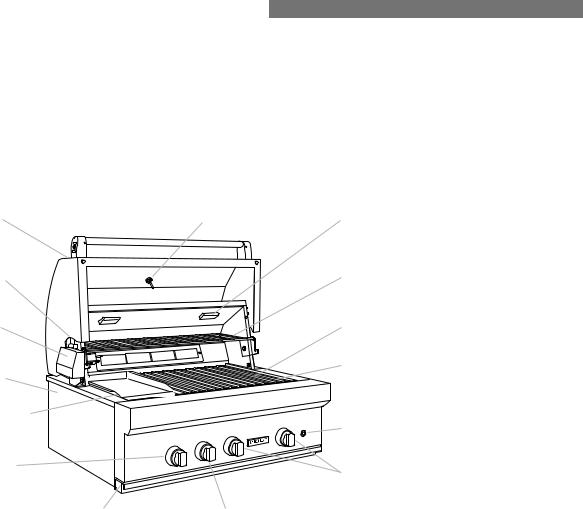
OUTDOOR GRILL
Model OG36 shown
Burner Rating
GRILL BURNERS |
Mj/hr |
|
OG30, OG36 and OG42 |
LPG 28 / NG 29 |
|
SOLID PLATE |
Mj/hr |
|
OG36, OG42 |
LPG 28 / NG 29 |
|
ROTISSERIE BURNER |
Mj/hr |
|
OG36 and OG42 |
LPG/NG 17 |
|
|
|
|
Refer to appliance dateplate for further technical information located under grease tray
Double wall hood |
Thermometer |
Halogen interior |
front |
|
lights |
Hood assist system |
|
Three-position |
concealed springs |
|
warming rack |
Two-position |
|
Stainless steel burner |
rotisserie system |
|
grates |
Heavy-duty stainless |
|
Individually-contained |
steel construction |
|
grill burners |
Radiant heat ceramic |
|
Interior and LED knob |
briquettes |
|
light button |
Infrared sear zone |
|
Hot surface ignition |
control knob |
|
control knobs |
Pull-out drip tray |
Infrared rotisserie |
|
|
control knob |
|
WARNING: SOLID PLATE MUST BE FITTED OVER SEAR BURNER
Outdoor Grill Operation |
8 |
|
|
Outdoor Grills
BURNER LIGHTING
1)Open the grill hood completely. Do not attempt to light the grill with the hood closed.
2)Open the gas supply shut-off valve.
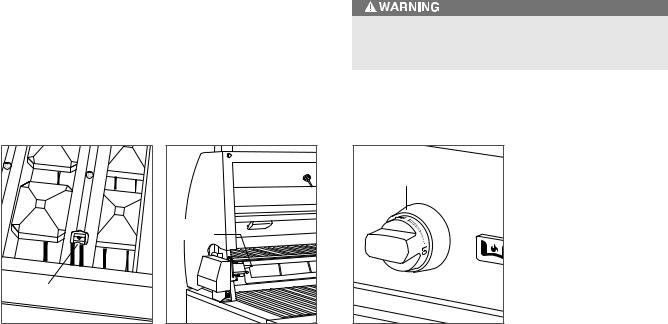
3)Push in the burner control knob and verify that the hot surface igniter glows. The hot surface igniters are located below the burner grates inside the flash tubes. The rotisserie igniter is located on the rear panel next to the rotisserie burner. Refer to the illustrations below.
If the igniter does not glow, verify that the grill is plugged into a approved electrical outlet.
4)Once the glow is verified, push in and turn the knob counterclockwise to the HI position. Hold the knob in for five seconds. Depending on which burner you are attempting to light, a flame will be visible under the briquettes or on the rotisserie or sear burner. Once you see the flame, release the knob. If the burner fails to light within five seconds, turn knob to the OFF position, wait five minutes and repeat the lighting procedure. There may be a popping sound when the burners are first lit, this is normal.
5)Close the hood and allow the grill to preheat until the desired temperature is displayed on the thermometer.
MANUAL LIGHTING
If no electrical supply is available or if the hot surface igniter will not light the grill burners, the burners can be lit manually using a long lit match or BBQ lighter.
1)Open the grill hood completely. Do not attempt to light the grill with the hood closed.
2)Open the gas supply shut-off valve.
3)Push in and turn the burner knob counterclockwise to the HI position. Hold the knob in for five seconds.
4)Insert a lit match held by the lanyard (located in the drip tray) or BBQ lighter through the burner grates and near the top of the flash tube. A flame will be visible under the briquettes. Once you see the flame, release the knob. If the burner fails to light within five seconds, turn knob to the OFF position, wait five minutes and repeat the lighting procedure.
Always keep your face and body as far away as possible when lighting.
FLASH TUBE |
ROTISSERIE |
IGNITER |
CONTROL |
KNOB ON HI |
Location of flash tube. |
Rotisserie igniter. |
Burner control knob. |

Outdoor Grill Operation |
9 |
|
|
Using the Outdoor Grill
IMPORTANT NOTE: Before grilling for the first time, turn the outdoor grill on high for 10 minutes with the hood closed. This will heat the internal components and burn off any residual oil and grease used in the manufacturing process. A small amount of smoke and odor may be noticed during the initial break-in period.
1) Make sure the drip tray is fully inserted into the grill.
2) Light the grill burners following the procedure on the previous page.
3) Turn burner control knobs to HI and allow the grill to preheat for 10 minutes or until the desired temperature is displayed on the thermometer. The hood should be closed during preheating.
4) Place food on the grill and cook to the desired temperature or doneness. Adjust the heat setting if necessary. The burner control knob may be set to any position between HI and LO. Refer to heat settings on page 13.
5) Allow grill to cool and clean the drip tray after each use.
Infrared Sear Burner
Searing steaks and other meats with the infrared sear burner at the beginning of the grilling cycle helps lock in juices and flavor. Sear meats quickly, followed by regular grilling over the grill burners.
Never allow liquids to come in contact with the infrared sear burner. This could cause damage to the ceramic tiles. Do not place briquette trays over the infrared sear burner. This will block the infrared heat and cause damage to the tray.
 Loading...