


Zephyr
Zephyr
English 3
Français 12
Español 21
5.962-179 03/07

1. Starting the unit
English 3

1. Starting the unit
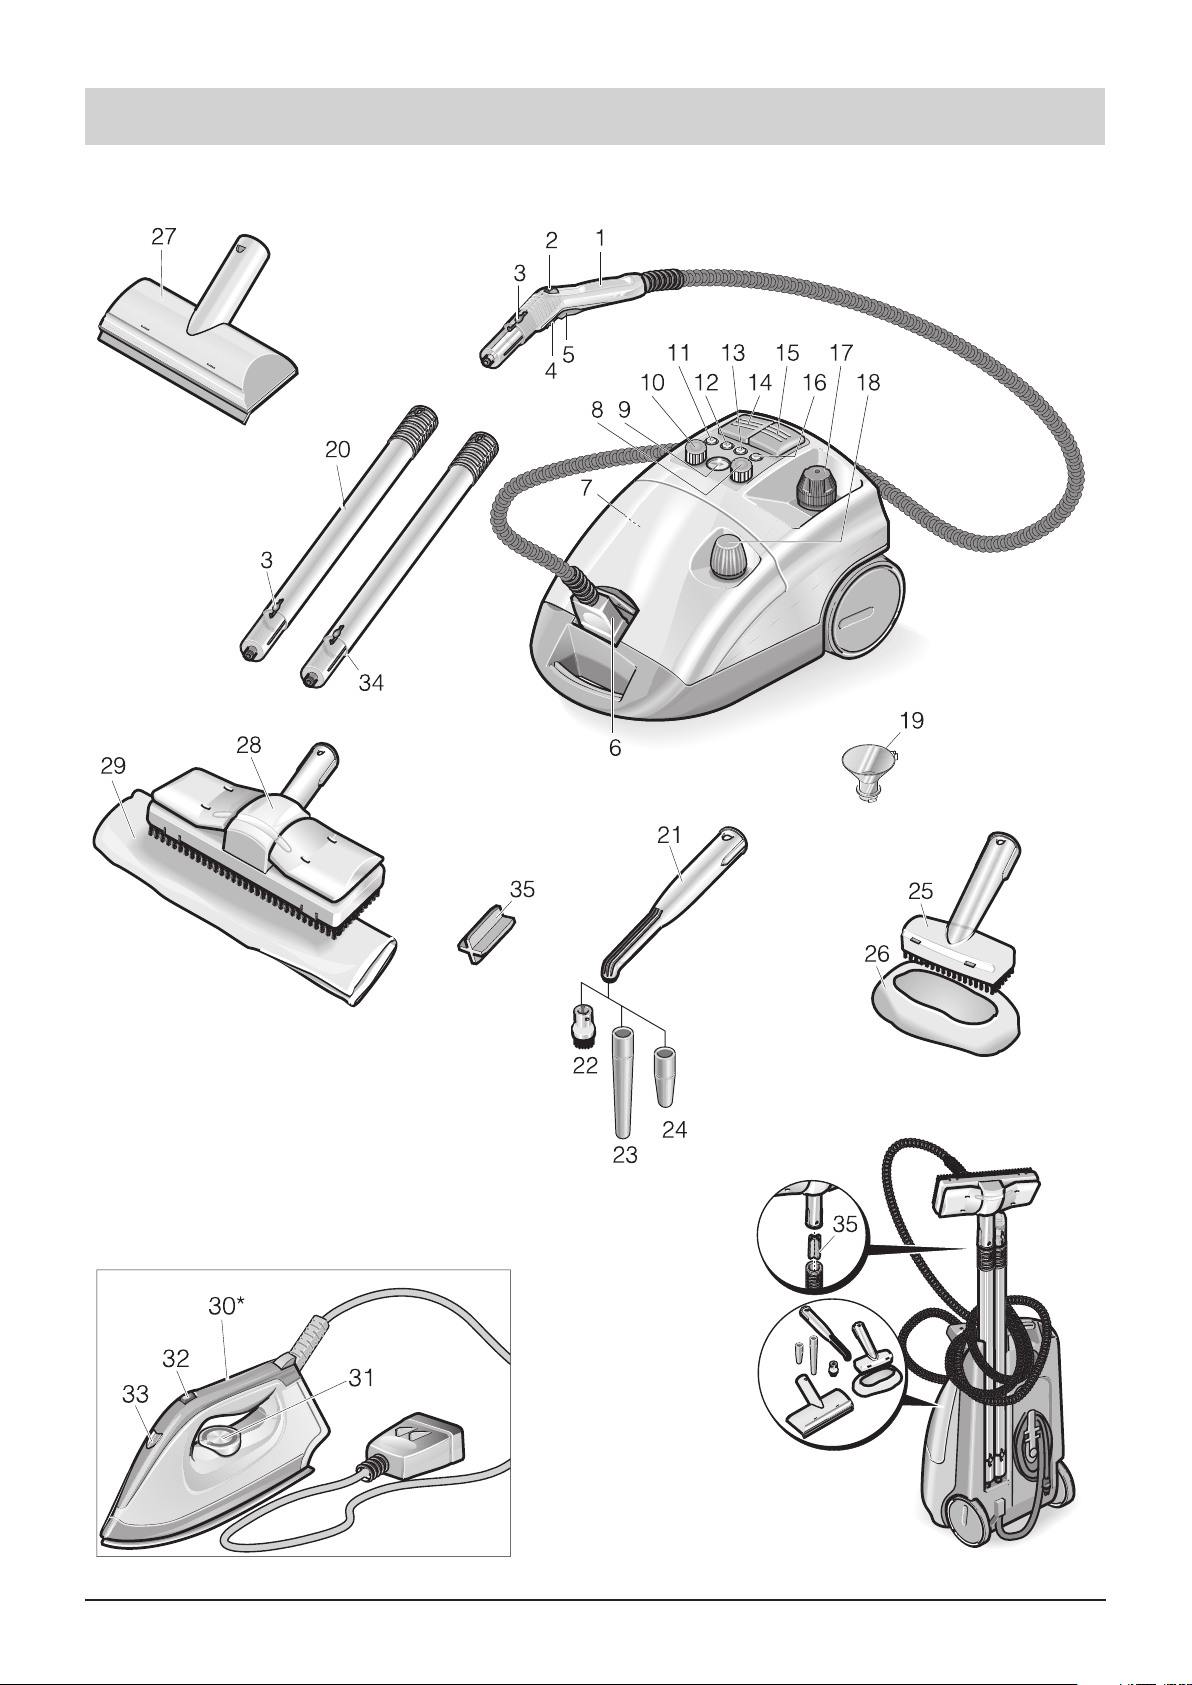
1 Steam pistol
2 Handwheel for steam control
3 Release button
4 Locking mechanism (child lock)
5 Steam switch
6 Modular accessory plug
7 Reset button – Descaling completed
8 VAPOHYDRO control knob
9 Temperature indicator
10 Steam control knob
11 Indicator light – Descaling due (white)
12 Indicator lamp –
Low water warning, additional tank (red)
13 Indicator lamp – Heater (yellow)
14 Heater ON/OFF switch
15 Steam supply switch
16 Indicator lamp –
Low water warning, boiler (red)
17 Boiler cap with safety valve
18 Tank cap
19 Funnel for filling tank
20 Extension tubes
21 Spot nozzle
22 Circular brush
23 Extension
24 Power nozzle (red)
25 Hand nozzle
26 Terry-toweling slip-on
27 Window nozzle*
28 Floor nozzle
29 Large wiping cloth
30 Household iron *
31 Temperature control
32 Steam-ironing switch
33 Indicator lamp – heater for household iron
34 Retaining bracket
35 Floor Nozzle Storage Fitment
* Optional accessory
1.2 Attaching the accessories
• Connect the modular accessory plug to the main
unit. The lugs on the plug must lock into place on
the cover of the main unit socket.
• Attach the required accessory (floor, hand or spot
nozzle) to the steam gun. Push both parts
together until the lock button on the steam gun
snaps into place.
• If required, use the extension tubes. Assemble the
tube sections by pushing one into the other until
the button snaps into place.
• Press the release button to separate the accessories from each other.
1.3 Filling the boiler with water
• Remove the safety cap from the main unit.
• Using the funnel, pour a maximum of 0.5 gal (2
litres) of tap water into the boiler. Hot water
shortens the heating-up time.
Note: With the unit standing on a level surface, the
boiler can be filled up to 0.75 in (2 cm) below the top
of the filler neck.
• Do not use any detergents.
• Refit the safety cap onto the main unit, and ensure
that it is properly tightened.
Additional tank
Fill the additional tank in order to prolong the time
that the cleaner can be used before it requires
refilling.
• Unscrew the cap on the additional tank.
• Using the funnel, pour a maximum of 0.5 gal (2
litres) of tap water into the tank.
• Screw the cap back onto the tank.
1.1 Unpacking the unit
• If you notice any transport damage while
unpacking the unit, please report it to your dealer
immediately.
• The packaging materials should not simply be
disposed of as domestic refuse. Instead, the leftover packaging components should be taken to
an official collection point for recycling.
4 English

1. Starting the unit
1.4 Switching the unit ON
• Plug the unit into a electrical wall outlet, and switch
it on by means of the steam supply switch and the
heater switch. Indicator lamps should be
illuminated.
Note: The full heat rating will only be available if the
modular accessory plug is connected to the main
unit while it is heating up.
• When the heater indicator lamp extinguishes, the
system is ready for use.
Note: Do not place the unit in an upright position
while it is switched ON. Otherwise the heater will
automatically switch OFF after a short interval, and
the red indicator lamp (low water warning) will light
up.
• For transporting the unit, switch the heater OFF
by means of the heater switch.
• When you press the steam switch, steam is
expelled from the steam gun. Always direct the
steam gun at a piece of cloth until the steam flows
evenly out of the nozzle.
• The heater is switched on continually while the
unit is in use (indicator lamp lights up), so that the
pressure inside the boiler is maintained at a
constant level.
• If you have switched the unit on and there is no
water in the boiler, heater indicator lamp will light
up initially before the low-water thermostat
switches the heater off. The low-water indicator
lamp will then light up.
1.6 Switching the unit OFF
• Switch the unit OFF by means of switches.
• Remove the modular plug from the main unit, while
lifting up the socket cover at the same time.
• Remove the plug from the mains socket.
• Any remaining water can be left inside the unit.
1.7 Transporting the unit
• If you have been working with the extension tubes
and the floor nozzle, it is quite easy to transport
the unit.
• Turn the heater OFF with switch, stand the unit
upright, and attach the extension tube to the
retaining bracket on the underside of the main unit.
1.8 Storing the unit
• Place the hand and spot nozzles, together with
the smaller items, in the accessory compartment.
• Wind the cable around the holder on the base of
the main unit. Attach the floor nozzle to one of the
extension tubes, and insert both tubes into the
recesses in the base of the unit.
• Ensure that the brushes are allowed to cool down
without the bristles becoming deformed in the
process.
1.5 Refilling the boiler with water
Note:When there is no water left in the additional
tank, a warning signal is sounded and the LOW
WATER WARNING lamp for the additional tank
illuminates.
• Using the funnel, fill the additional tank with a
maximum of 0,5 gal (2 litres) of tap water.
• When the HEATER indicator lamp extinguishes,
the cleaner is ready for use again.
Note: If the pump does not deliver any water,
although the additional tank is full, it is a sign that
the boiler requires descaling – see 3.1 Descaling
the boiler.
English 5

2. Directions for use
2.1 Important fundamental information
To achieve satisfactory results with a steam
cleaner, it is most important that the initial cleaning
stage is performed thoroughly. This means that
where detergents and other cleaning products have
been used for many years, the immediate objective
must be to strip away the layer that will have built
up. By using a steam cleaner, dirt is lifted off, as
described previously, and picked up by the cloth.
Depending upon the amount to be cleaned off, the
dirt will have been completely removed after the
cleaner has been applied 1 - 2 times. The result is a
floor surface that is free of streaks. The same
applies when cleaning windows. The steam cleaner
cannot remove large amounts of limescale directly.
A description of the procedure for successfully
removing these types of deposits is contained in
the section concerning the cleaning of bathroom
fittings.
2.3 Regulating volume of steam with
rotary knob on main unit
• If you are working with the standard accessories
or the iron, you can control the volume of steam
by adjusting the rotary knob on the main unit.
2.4 Regulating volume of steam with
handwheel on steam gun
• If you are working with the standard accessories
you can regulate the volume of steam with the
handwheel on the steam gun. In this case the
rotary knob on the main unit is inoperative.
Note: If the handwheel is set for a small volume of
steam, it is quite possible that steam may still be
expelled from the nozzle for a short interval after
the steam switch has been released and until the
pressure in the steam hose has dissipated. You can
release the pressure more quickly by turning the
steam volume control to a higher setting.
2.2 Special notes on cleaning
Fabrics
Before steam-cleaning fabrics or textiles, we
recommend that first of all you carry out a test on
an inconspicuous part of the material. Apply plenty
of steam to the test area, and then allow the material
to dry out so that you can determine whether any
changes in colour or shape occur.
Coated or painted surfaces
When steam-cleaning kitchen cabinets or other
items of furniture, doors, parquet flooring, painted
or plastic-coated surfaces, please take into account
that waxes, furniture polish, plastic coatings or paint
may be dissolved or lifted off if they are subjected
to prolonged exposure to the steam jet. Apply only
small amounts of steam directly to these types of
surface, or clean them with a cloth to which the
steam has been applied first.
Glass surfaces / window panes
Glass surfaces may break if they are subjected to
uneven heating. Especially in the case of low
exterior temperatures, you should first of all spray
steam lightly over the whole glass surface in order
to even out any differences in temperature and to
avoid the build-up of tension on the surface of the
glass. Do not apply the steam jet directly to the
sealed parts of the window.
2.5 VAPOHYDRO rotary control knob
• In washrooms or tiled areas, for example, you can
also flush the dirt away instead of wiping it off with
the cloth. This is achieved by varying the moisture
content of the steam by adjusting rotary knob on
the main unit. The greater the amount of moisture
in the steam, i.e. the more water there is in the
steam jet, the better the washing results will be.
If you turn the rotary knob all the way round to “+”,
a jet of hot water is discharged from the nozzle
giving the greatest flushing effect.
• Use the VAPOHYDRO feature together with the
spot nozzle, for example, for cleaning the
bathroom.
• If you are working with cloths (floor nozzle, hand
nozzle), set the VAPOHYDRO rotary control
knob to “–”, so that the steam jet contains as little
moisture as possible. This improves the ability of
the steam to loosen and dissolve the dirt.
Note: If you turn the VAPOHYDRO rotary control
knob to “+”, the boiler will empty more quickly.
6 English

2. Directions for use
2.6 Temperature indicator
• This indicator shows you whether you are
working within the proper temperature range
(green area).
2.7 Steam gun
• The steam can be used without accessories for
the following cleaning jobs:
– Deodorizing clothing and removing creases
from garments;
– Dusting houseplants (maintain a distance of
approx. 12 in (30 cm));
– Damp dusting: apply small amount of steam to
surface and then wipe dry with a clean cloth.
2.8 Spot nozzle
••
• The spot nozzle can be attached either directly to
••
the steam gun or via the extension tubes.
••
• Because the steam temperature and pressure
••
are at their highest immediately the steam leaves
the nozzle, the closer you hold the steam jet to the
object to be cleaned, the better the cleaning
results will be.
••
• You can use the spot nozzle with its various
••
attachments for cleaning the following
– areas that are hard to reach, such as corners,
joints, etc.
– venetian blinds, radiators
– toilets and sanitary installations
– stainless steel, windows, mirrors
– taps and fittings
– coated and enameled surfaces
– initial treatment of stains.
••
• Use the nozzle extension to reach otherwise
••
inaccessible cracks and joints, etc.
••
• The power nozzle increases the velocity at which
••
the steam is discharged from the steam gun. This
makes it particularly suitable for the following, for
example:
– removing particularly stubborn dirt
– blowing steams into corners, cracks,
crevices, etc.
Note:The circular brush is not suitable for cleaning
sensitive surfaces.
2.9 Floor nozzle
• Depending upon the actual cleaning task, the floor
nozzle can be used with the extension tubes. You
can use this nozzle for all large washable wall and
floor surfaces. Place the floor nozzle onto the
folded large cloth, and then pull the cloth under
the retaining clips on each side.
• The best results for wiping up dirt are achieved
when you turn the cloth over, or replace it,
frequently.
• For more effective cleaning of heavily soiled
surfaces, slow down your working speed to allow
the steam more time to penetrate the grime.
• Any traces of detergents left on the floor surface
to be cleaned may form streaks. As a rule these
streaks will disappear after the steam cleaner has
been applied several times.
2.10 Hand nozzle
• Depending upon the actual cleaning task, use the
hand nozzle with the extension tubes.
• You can use the hand nozzle with the cloth for
cleaning:
– small washable surfaces
– upholstery
– sensitive surfaces.
2.11 Optional accessories
Only accessories approved by the manufacturer
may be used with this unit.
Household iron (Order no. 6.959-262)
• Connect the modular plug on the household iron
to the main unit.
Steam-ironing
– Rotate the VAPOHYDRO control knob right
round to “–”.
– For ironing all types of fabrics the temperature
control should be set at least to the
this setting the steam discharged from the iron
prevents the fabric from being overheated.
– The higher the selected temperature, the dryer
and less visible is the steam; the volume of
steam remains the same however.
...
stage. In
English 7

2. Directions for use
– As soon as the lamp on the iron extinguishes, it
is ready for use.
– As soon as you press the switch, a solenoid
valve in the main unit opens and steam flows
out of the base of the iron. If you push the switch
forwards, steam is expelled continuously; if you
push the switch towards the rear, shots of
steam are discharged.
– Begin by directing the steam onto a piece of cloth
until water no longer comes out of the iron.
– Turn the steam volume control on the main unit
to obtain the desired amount of steam.
– You can hold the iron vertically for steaming
curtains, clothes, etc.
Dry-ironing
– If you wish to iron without using steam, switch
the steam supply switch on the main unit to ON,
and the heater switch to OFF.
– Set the temperature dial for the desired fabric
type.
Synthetic fibres Wool Linen
Wallpaper remover (Order no. 2.863-076)
With the wallpaper remover you can use the steam
cleaner for stripping wallpaper.
• Procedure:
– Place the wallpaper remover with its entire
surface on the edge of a sheet of wallpaper.
Allow the steam to penetrate until the wallpaper
is soaked through (approx. 10 sec.).
– Without switching it off, move the wallpaper
remover to a new location. Use a putty knife to
lift the loosened wallpaper, and pull it off
completely.
– The steam may not be able to readily penetrate
woodchip wallpaper that has been painted
several times. In this case we recommend that
you go over the wallpaper with a spiked roller
before steam is applied.
Caddy 6.962-239
Set of circles of bristles
with brass bristles 2.863-075
Window nozzle (Order no. 4.130-145)
• Attach the window nozzle directly to the steam
gun. Use the extension tubes if required.
• Apply steam evenly to the glass surface from a
distance of approx. 8 in (20 cm). Switch off the
steam supply and squeegee the glass surface in
straight passes from top to bottom. Wipe the
rubber lip and the bottom edge of the window dry
after each pass.
Set of circles of bristles 2.863-077
Micro-fibre cloth 6.905-921
8 English
3. Care, Maintenance & Troubleshooting
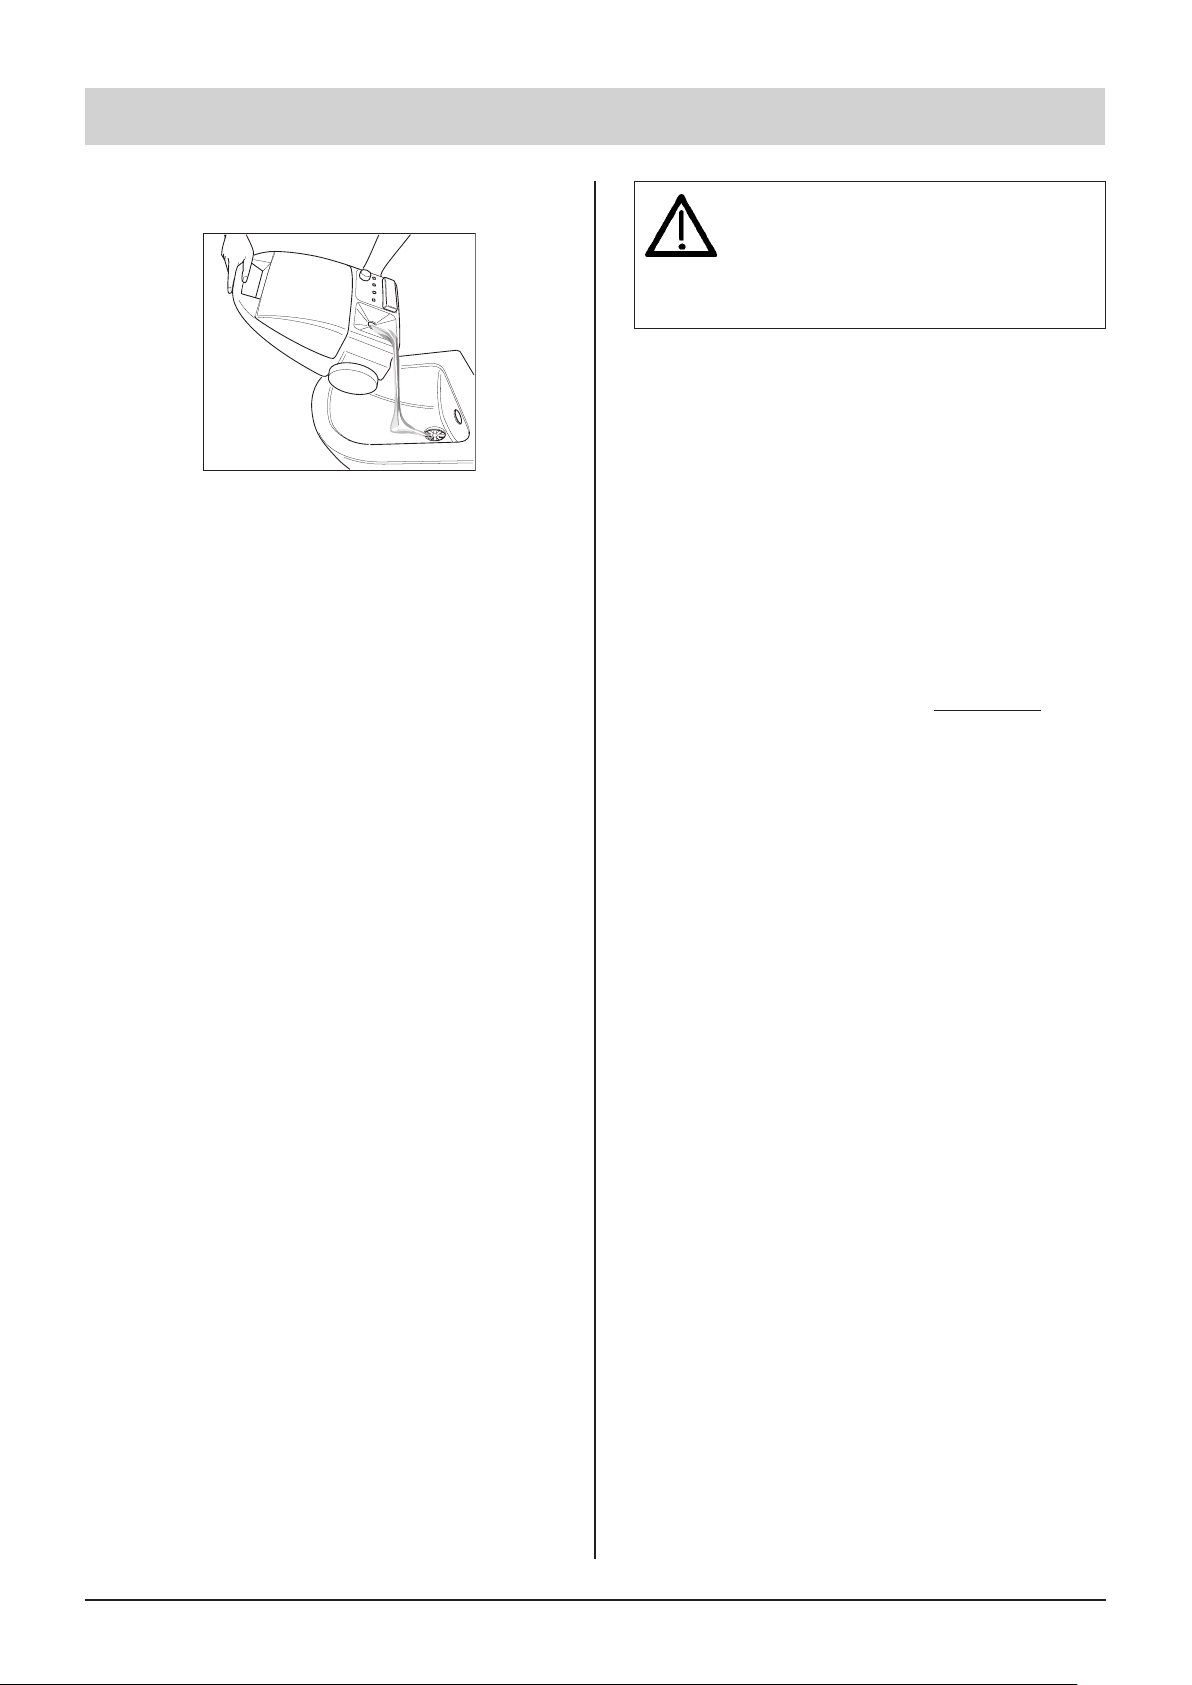
3.1 Cleaning the boiler
Rinsing out the boiler
• To clean the boiler, we recommend that you fill it
with water and shake it vigorously. This should
loosen any scale that has settled at the bottom of
the boiler. If you now pour the water out of the
boiler, the scale will be flushed out at the same
time (see illus.).
• For soft water (up to 1.8 mmol/L) the boiler should
be flushed out after it has been refilled 15 times,
for harder water after every fifth time.
Descaling the boiler
We recommend that you descale the appliance as
soon as the “Descaling due” indicator light
illuminates.
• In order to remove any scale that has built up on
the walls of the boiler, we recommend that you
clean the boiler with Decalcifying Liquid.
The safety cap must not be attached to
the boiler while descaling is being
carried out. Make sure that the cleaner
can not be used while there is any
descaling solution left in the boiler.
• Pour the contents of the boiler out at the side (see
illus.), and rinse out the boiler at least twice with
cold water to ensure that no descaling solution or
deposits are left inside.
• Switch on the cleaner.
• Press the reset button until the “Descaling due”
light extinguishes.
• Your steam cleaner is now ready for use again.
After approx. 50 operating hours, the “Descaling
due” light will illuminate to show that it is time to
descale the appliance once more.
Note: If you use distilled water exclusively, it will
not be necessary to descale the cleaner.
When the “Descaling due” indicator light illuminates, just press the reset button until the light goes
out.
Filter replacement
• When using polluted water the filter can become
blocked. This makes itself apparent either by
extraordinarily long running times of the pump or
a total functional failure. In this case the filter
should be replaced.
• In order to avoid damaging your steam cleaner,
use only products for descaling that have been
officially approved by WINDSOR.
Procedure:
• Unplug the steam cleaner from the electrical
outlet.
• Empty the boiler entirely of any remaining water.
• Dissolve the contents of two bags in 0.5 gal (2
litre) of warm water while continuously stirring the
liquid at the same time.
• Pour the solution into the boiler, and allow to stand
for approx. 8 hours.
3.2 What to do if there is a problem
• If the low-water warning lamp lights up because
the unit has been stood upright although it still
operating, follow the procedure described in the
section “Refilling the boiler with water”.
• If you encounter any other problems with the
cleaner, you should contact your local authorized
customer service agent.
English 9

4. Safety devices
This steam cleaner has been fitted with various
safety devices to provide multiple protection
measures. The most important safety components
are described below.
4.1 Pressure controller
The pressure controller maintains the boiler
pressure at as constant a level as is possible while
the cleaner is in use. The heater is switched off
when the operating pressure inside the boiler
reaches its maximum of 3.2 bar, and switched on
again when the pressure drops as a result of steam
being drawn off.
4.2 Low-water thermostat
As the water inside the boiler is consumed, the
temperature around the heater rises. The low-water
thermostat switches the heater off, and the red lowwater warning lamp lights up. The heater is
prevented from switching on again until the boiler
has cooled down, or it has been refilled with water.
4.3 Safety thermostat
If the low-water thermostat fails and the cleaner
overheats, then the safety thermostat switches the
whole unit off. Contact your authorized WINDSOR
Customer Service agent so that the safety
thermostat can be reset.
4.4 Safety cap
The safety cap seals off the boiler and keeps the
steam pressure inside. If the pressure controller
becomes defective, and the pressure inside the
boiler rises above 5.5 bar, an overpressure valve
opens inside the safety cap, and steam escapes
into the open. Contact your authorized WINDSOR
Customer Service agent before using the cleaner
again.
10 English
 Loading...