


INSTRUCTION
MANUAL
ITE
DIFFERENTIAL
MODEL
1500
IMPORTANT
SAFETY INSTRUCTIONS
When |
using an |
electrical |
appliance, |
|
|
||||
folowed, |
including |
the |
following: |
|
|
|
|||
basic safety
precautions
should
always
be
Read
all
instructions |
before |
||
|
|||
(this |
sewing |
machine) |
|
|
|
||
using
DANGER
To
reduce the
risk
of
electric
shock:
An |
apphance |
|
|
appliance from |
|
Always unplug |
|
should never be left unattended |
when plugged in. Always |
unplug |
|||
theelectric outlet |
immediately after |
using and before |
cleaning. |
||
before relamping, |
Replace bulb |
with |
same type rated |
6 |
watts. |
|
|||||
|
|
|
|
|
|
this
WARNING To reduce the |
risk |
electric shock, or injury to persons: |
|
of
burns,
fire,
1. |
Do |
not
allow
to
be
used
as
a
toy.
Close attention
is
necessary
when
this
appliance
|
is used by or near |
children. |
|
2. |
Use this appliance |
only for its intended use as described in this |
|
|
attachments recommended by the manufacturer |
as contained |
|
3. |
Never operate this |
appliance if it has a damaged |
cord or plug, |
|
|||
manual. Use only |
||
in |
this |
manual. |
if |
it is |
not working |
properly,
if it
has
been
dropped
or
damaged,
or
dropped
into
water,
Return
the
|
appliance to the nearest authorized dealer or service center |
|||
|
electrical or mechanical adjustment. |
blocked, |
||
4. |
Never operate the appliance |
with any air openings |
||
|
||||
|
|
|||
for examination, Keep ventilation
repair, open’
ings
of
the
sewing
machine
and
foot
controller
free
from
the
accumulation
of lint,
|
dust, and loose cloth. |
|
into |
any opening. |
||
5. |
Never |
drop |
or insert any |
object |
||
6. |
Do not |
use |
outdoors. |
|
|
products are |
7. |
Do not |
operate where aerosol (spray) |
||||
being
used
or
where
oxygen
is
being |
administered. |
|
8. To disconnect, |
turn |
|
|
||
all
controls
to
the
off
(0”)
position,
then
remove
plug
from
outlet. 9. Do not
unplug
by
pulling on
cord.
To
unplug,
grasp
the
plug,
not
the
cord.
10. |
Keep |
fingers
away
from
all
moving
parts.
Special
care
is
required
around
the
sewing
ii,
machine needle. Always use the proper
needle
plate.
The
wrong
plate
can
cause
the
needle
to
break.
12.Do
13.Do
not not
use pull
bent needles. or oush fabric
while
stitching.
It
may
deflect
the
needl? causing
it
to
|
break. |
|
|
|
14. |
Unplug |
the sewing |
||
|
such |
as |
threading |
|
machine needle,
when making any |
adjustments in the |
needle |
area, |
changing needle, |
changing presser |
foot, etc. |
|
15. |
Always |
unplug
sewing
machine
from
the
electrical
outlet
when
removing
covers,
lubricating, or when instruction manual.
making
any
other
user
servicing
adjustments
mentioned
in
the
SAVE
THESE
INSTRUCTIONS
iNTRODUCTION
THANK YOU FOR CHOOSING OUR OVERLOCK MACHINE
This overlock machine can stitch dependable seams on all kinds of fabric, both light and heavy, including cotton, wool, rayon, tricot, jersey, and knits.
You do not need a special table for this portable machine.
We suggest that you read this instruction manual carefully before you start to operate the
machine.
FOR YOUR SAFETY
LKeep your eyes on the needles when operating the overlock machine. Do not touch the hand wheel, thecutter or the needles when the machine is running.
2.Turn off the power switch,and pull out the plug from electric socket in the following cases: *When you have finished your sewing.
*When you leave the serger temporarily. *When replacing the parts.
*When cleaning and adjusting the machine.
BEFORE YOU USE
l.Wipe dust and oil off the machine to avoid any stains on the sewing materials.
2.Test sew by using the same sewing materials you intend to sew.
3.Read this instruction manual thoroughly before replacing the cutters and the needles. Follow the instructions for correct replacements and adjustments.
QEPNIENTS
NAME OF MMN COMPONENTS |
3 |
SETTING UP YOUR MACHINE |
4—6 |
The position of thread pole |
4 |
Spool holders |
4 |
Spool caps |
4 |
Connecting the foot control |
5 |
Controlling sewing speed |
5 |
Safety switch |
5 |
Attaching the waste catcher |
6 |
ACCESSORIES |
6 |
USING THE MACHINE |
7 |
Handwheel |
7 |
Front cover |
7 |
Free arm |
7 |
LOOPER THREADING |
8 |
NEEDLE THREADING |
9 |
TEST SEWING |
10 |
ADJUSTING THREAD TENSIONS |
11—12 |
Needle thread tensions |
12 |
Looper thread tensions |
12 |
MACHINE ADJUSTMENT CHART |
13 |
CHANGING THE THREAD |
14 |
BUILTIN POCKET HANDLE |
14 |
ADJUSTMENT OF STITCH LENGTH |
15 |
CUTTING WIDTH |
16 |
CHANGING THE NEEDLE |
17 |
REPLACING THE BULB |
17 |
REPLACING THE CUTTERS |
18 |
THREE THREAD NARROW OR WIDE |
19 |
FREE ARM SEWING |
20 |
CONVERTIBLE PRESSER FOOT |
20 |
ROLLED AND NARROW EDGE |
21—22 |
DIFFERENTIAL FEED |
23—24 |
Differential feed mechanism |
23 |
Adjusting the differential feed |
23 |
Gathering |
24 |
Stretching |
24 |
TROUBLE SHOOTING GUIDE |
25 |
CLEANING AND LUBRICATING |
26 |
SPECIFICATION OF MACHINE |
26 |
—2—


SETTD4 GUöiJA |
||
MACHINE |
|
|
Set your Overlock |
machine on a |
I |
sturdy flat |
||
surface. |
|
|
[THE POSITION |
OF THREAD |
POLE] |
Pull up thread pole |
to its highest |
point before |
threading. |
|
|
Turn the thread pole so the thread |
guides come |
|
right above the spool pins. |
|
|
Positioning |
catches |
|
|
7 |
|
[CONE HOLDERS] |
|
|
|
|
|
|
Both industrial |
cones and |
domestic |
type thread |
|||
spools can be used on this |
machine. |
|
|
|
||
For large diameter industrial cones |
use |
the |
cone |
|||
holders with the large end at |
the top. |
For |
small |
|||
diameter cones. |
use the same |
cone |
holders with |
|||
the small end at |
the top. |
|
|
|
|
|
Spool
holder
A
Normal
[SPOOL CAPS] When using domestic type thread spools, remove the spool holders and place spool caps over the thread spools.
Spool cap
Notch
Domestic type thread spool
—4—
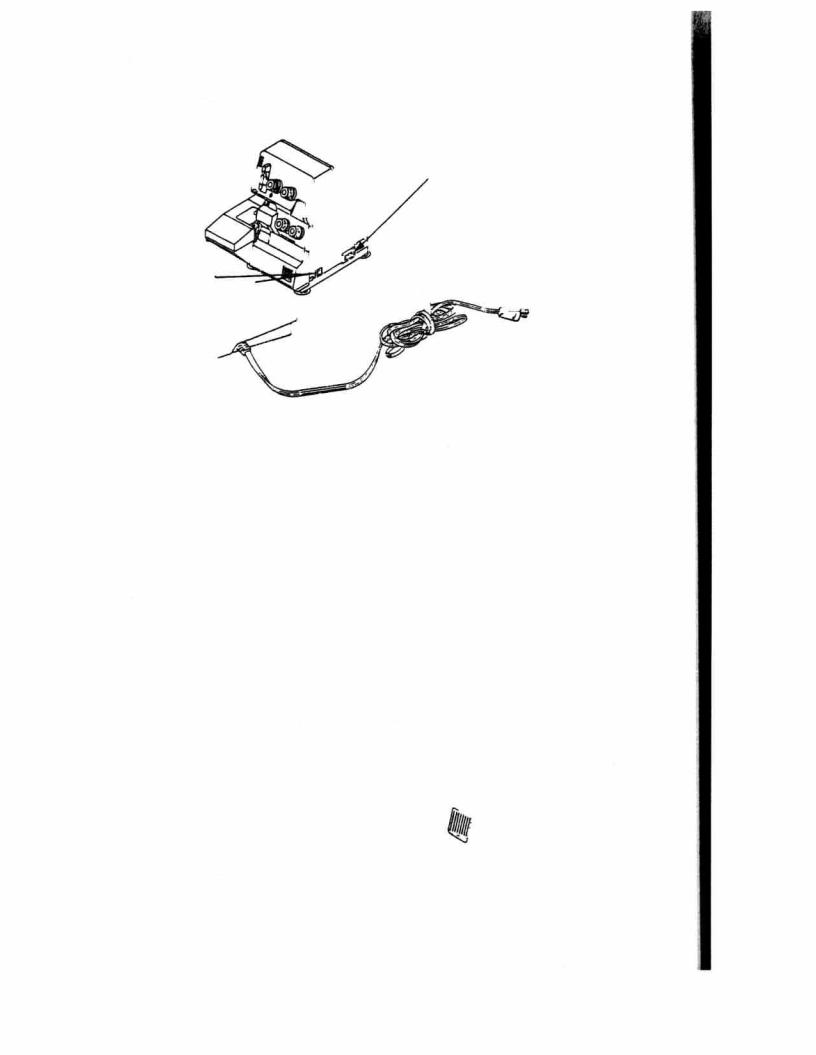
[CONNECTING |
THE FOOT |
CONTROL] |
|
|
|||
|
|
socket and then into main |
socket. |
||||
Push toot control plug into the machine |
|||||||
|
|
||||||
|
controls both the machine |
power |
|||||
Turn on the power switch. This power switch |
|||||||
|
|||||||
|
|
|
|||||
and
sewing
light.
Machine
socket
Power
supply
plug
*
|
Foot control |
|
|
|
|
|
|
|
|
|
|
|
Power supply |
|
|||||||
|
|
|
|
|
|
|
|
|
|
|
|
|
|
# |
|
|
|||||
This |
Sewing Machine |
is |
designed |
to |
be |
used with a Matsushite Foot |
Contro Model |
4C-31 |
6B, Control |
260Z |
|
||||||||||
|
|
|
|
|
|
|
|||||||||||||||
This appliance |
has |
a |
polarized |
plug |
(one blade widerthari |
the |
other). |
To |
reduce the |
risk |
of electric |
||||||||||
|
|
|
|
|
fit |
in |
a |
polarized outlet |
only one |
way, if the |
plug does |
not fit |
fully |
in the |
|||||||
shock, this plug is |
intended to |
||||||||||||||||||||
the proper |
outlet. |
||||||||||||||||||||
outlet, |
reverse |
the |
plug, It |
it still |
does |
not fit, contact a |
gualified |
electrician |
to |
install |
|||||||||||
|
|
|
|
|
|
||||||||||||||||
Do not |
modify |
the |
plug in |
any |
way. |
|
|
|
|
|
|
|
|
|
|
|
|
||||
[CONTROLLING |
SEWiNG SPEED] |
|||||||
|
|
|
|
|||||
The foot control |
regulates |
the sewing speed. |
||||||
|
|
|
||||||
|
|
|
|
|
||||
The sewing |
speed |
can |
be |
adjusted |
by |
|||
increasing |
or |
decreasing |
the |
pressure |
on |
|||
|
||||||||
|
|
|
|
|
|
|
||
the foot |
control. |
|
|
|
|
|
||
|
|
|
|
|
|
|
|
|
[SAFETY SWITCH] |
|
|
|
|
|
|||||
This machine |
|
is |
equipped |
with |
a |
micro |
||||
safety switch. |
|
|
|
|
|
|
|
|
|
|
The |
machine |
is |
automatically |
cut |
off |
|
from |
|||
the |
electricity |
supply |
if either |
the |
tree |
arm |
||||
|
||||||||||
or front cover is |
open. |
|
|
|
|
|
|
|||
Close both free |
arm |
and front |
cover |
before |
||||||
you |
start sewing. |
|
|
|
|
|
|
|
||
Foot
control
—5—
[ATTACHING
THE
WASTE
CATCHER]
The
waste
catcher
catches
the
cut-off
fabnc
as
you
sew,
keeping
your
working
area
clean.
Place
the
waste
catcher
between
the
machine
and
table.
ACCESSORIES
Spare
upper
cutter
Oiler
Needles
Tweezers
Machine
cover
Hexagon |
|
wrench |
key |
|
|
Screwdriver |
|
Brush |
|
Instruction
manual
Spool
caps
Waste
catcher
—6—

|
. |
I |
[USING THE |
MACHINE |
|
|
|
|
[HANDWHEEL] |
|
|
Always turn handwheel toward you,i.e. the same |
||
|
. |
|
direction as on a household sewing machine |
|
|
[FRONTCOVER] |
|
|
|
|||
To |
open front cover, slide |
the |
hollow to the right |
|||
as |
tar as |
it will |
go then |
pull |
front |
cover toward |
you. |
|
|
|
|
|
|
The front |
cover |
won’t close while |
the tree arm is |
|||
open. |
|
|
|
|
|
|
/
[FREE
ARM]
Open
the
tree
arm
for
threading.
Open
the
front
cover
first.
While pushing the release lever, push down ward with your left hand.
the
free
arm
—7—
 Loading...