

Whirlpool VM11D-8P Care And Use
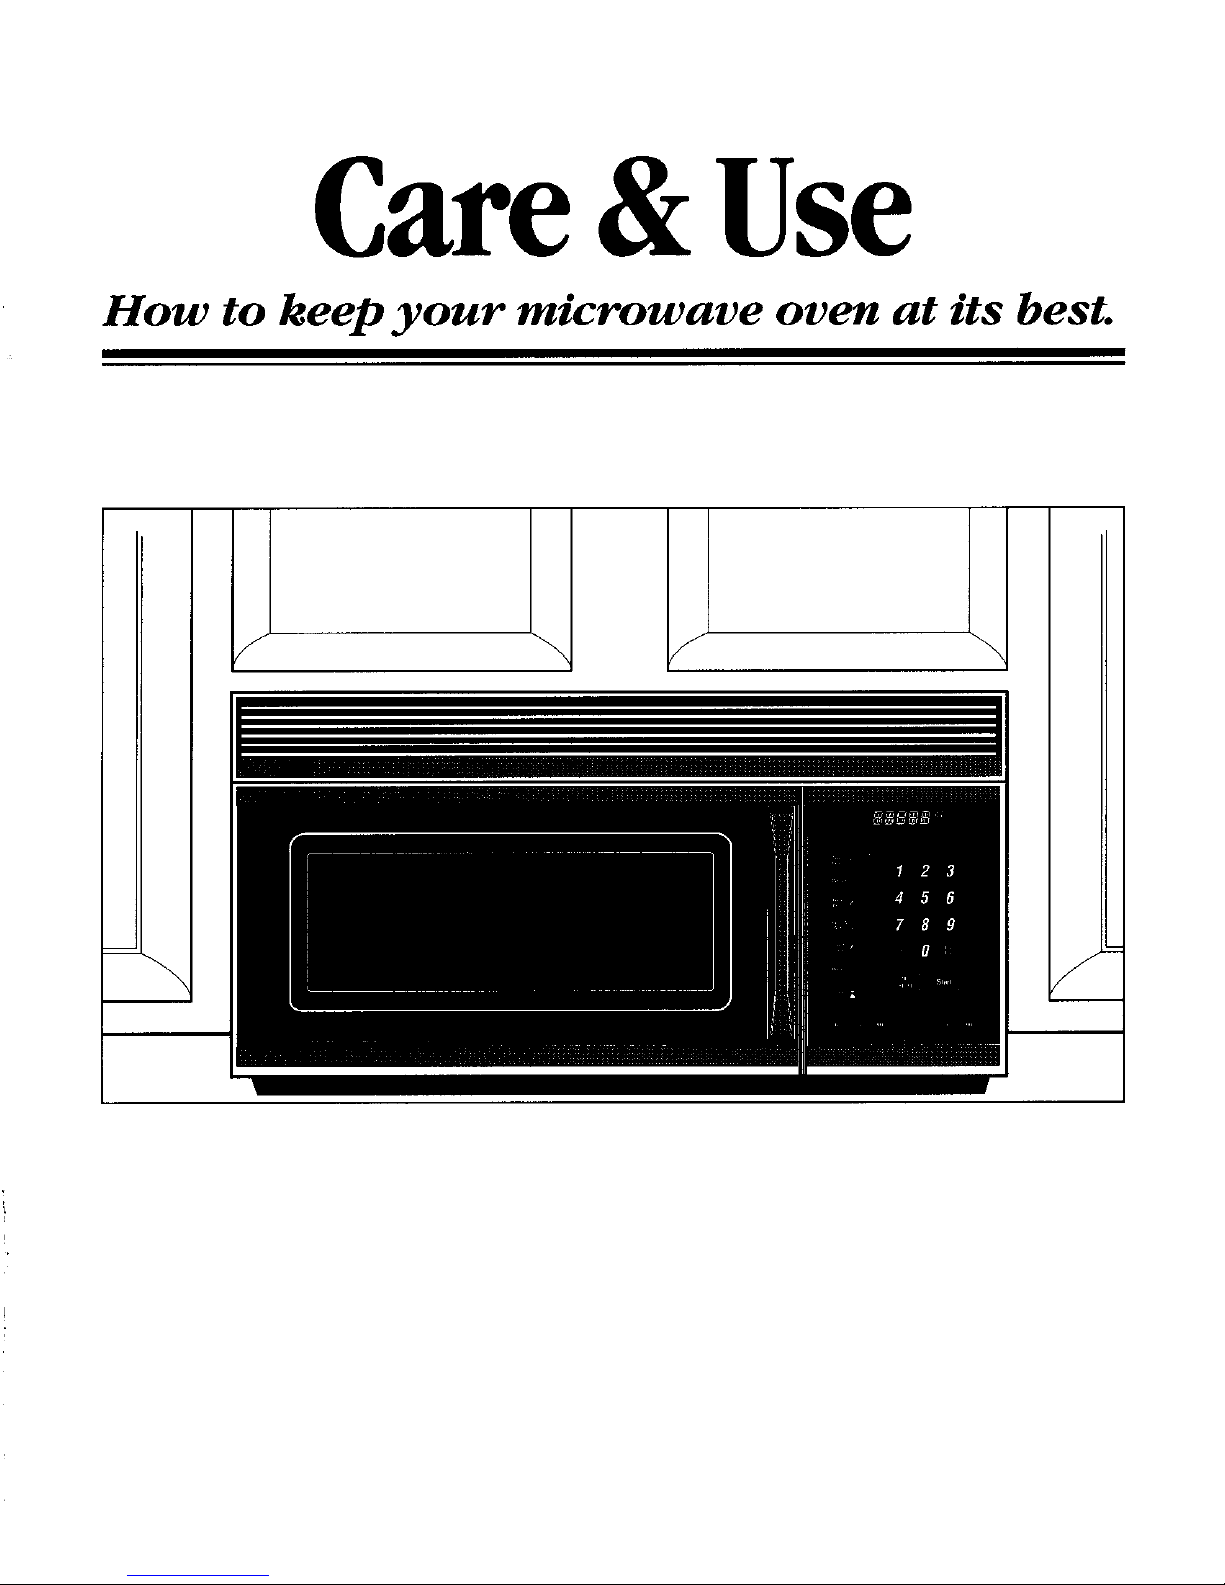
Care &Use
How to keep your microwave oven at its best.
i il
Help us help you...
Before using your oven, This appliance must be registered.
read this book carefully. Please be certain that it is.
Write to:
It is intended to help you operate
and maintain your new microwave Maycor
oven properly. Microwave Records
240 Edwards Street, S.E.
Keep it handy for answers to your Cleveland, TN 37311
questions.
If you don't understand something If you received a
or need more help, write (include damaged oven...
your phone number):
Customer Service Immediately contact the dealer (or
Maycor builder) that sold you the oven.
240 Edwards Street, S.E.
Cleveland, TN 37311 Save time and money.
Before you request service...
Write down the model and Check the Problem Solver in the
serial numbers, back of this book. It lists causes of
You'll find them on a label inside minor operating problems that you
the oven. can correct yourself.
These numbers are also on the All these things are normal
Consumer Product Ownership
Registration Card that came with with your microwave oven.
your microwave oven. Before • Steam or vapor escaping from
sending in this card, please write around the door.
these numbers here: • Light reflection around door or
outer case.
ModelNumber • Dimming oven light and change
in blower sound may occur while
SerialNumber operating at power levels other
Use these numbers in any than high.
correspondence or service calls ° Dull thumping sound while oven
concerning your microwave oven. is operating.
• Some TV-Radio interference
Be sure your microwave might be noticed while using your
oven is registered, microwave oven. It's similar to the
It is important that we know the interference caused by other small
location of your microwave oven appliances and does not indicate a
should a need occur for problem with your oven.
adjustments.
Your supplier is responsible for Microwave power output
registering you as the owner, of this oven is 700 watts.*
Please check with your supplier to
be sure he has done so; also send *750wattsIEC-705TestProcedure
in your Consumer Product
Ownership Registration Card. If
you move, or if you are not the
original purchaser, please write to
us, stating model and serial
numbers.
2
Contents
Before Microwaving ..................... 2
Safety Instructions .................... 2-5
Set the Clock ................................. 6
Features of Your Microwave
Touch Control Panel .............. 6, 7
Features of Your
Microwave Oven ....................... 8
Timer ............................................. 9 (_
Cooking by Time ........................ 10
Cook 'N Watch ........................... 10 _'_
Defrosting ................................... 11
e,*
Cook Code Control ............... 12, 13 r_
Cooking by Temperature ............ 15
Automatic Roasting .............. 16, 17
Care of Your
Microwave Oven ..................... 18
Exhaust Feature .......................... 19
Light Bulb Replacement ............. 20
Grounding Instmctions ............... 21
The Problem Solver .................... 22
If You Need Service .................... 23
Warranty ...................... Back Cover
i
Iml,
OVen,
• Do not use _theoven for :
mixtures. • Plastic cookware--Plast_c
• Don't defrost frozen
container is opened, pressure
can build up. This can cause the
4
Microwaving Tips
m=
a_ d]_c_ by package_e_ • Make sure all eookware used in
........... your microwave oven is suitable
are not, for microwaving. Most glass
casseroles, cooking dishes,
measuring cups, custard cups,
injury,i pottery or china dinnerware which _,,
does not have metallic trim or
glaze with a metallic sheen can be _"
_ey form _ used. Some cookware is labeled
Cooking Wi_ suitable for microwaving.
COvered_i_ plas_e wr_
_t Steama_ay _om h_ds
m
N
e00ki_ne p_aehe_ :_d b0xe_ To
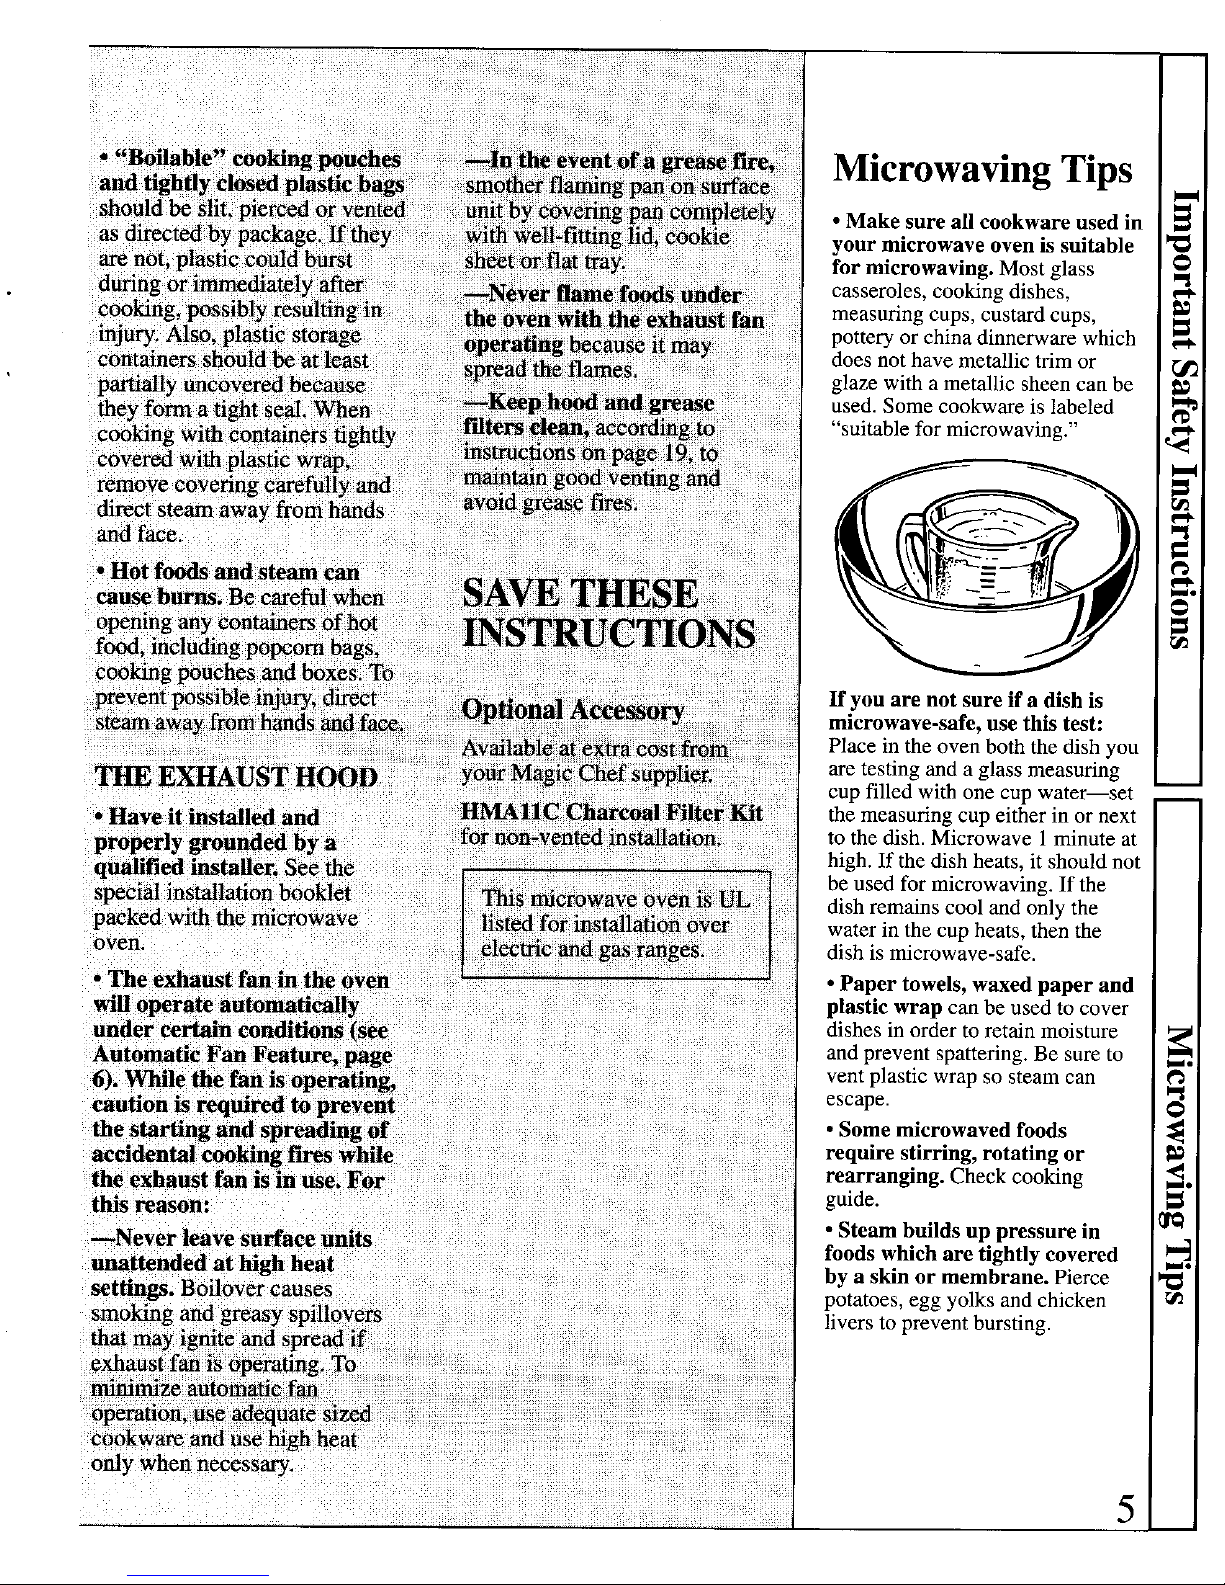
If you are not sure if a dish is
microwave-safe, use this test:
P/ace in the oven both the dish you
are testing and a glass measuring
cup filled with one cup water--set
the measuring cup either in or next
to the dish. Microwave 1 minute at
high. If the dish heats, it should not
be used for microwaving. If the
dish remains cool and only the
water in the cup heats, then the
dish is microwave-safe.
• Paper towels, waxed paper and
plastic wrap can be used to cover
dishes in order to retain moisture
and prevent spattering. Be sure to
vent plastic wrap so steam can
escape.
• Some microwaved foods :_
require stirring, rotating or g_
the exhaust fan rearranging. Check cooking _,
t_ reason: guide.
_ • Steam builds up pressure in _'_
foods which are tightly covered
_q
by a skin or membrane. Pierce _l
potatoes, egg yolks and chicken r_
_:_ay tg_ _d :Spread livers to prevent bursting.
onb
5

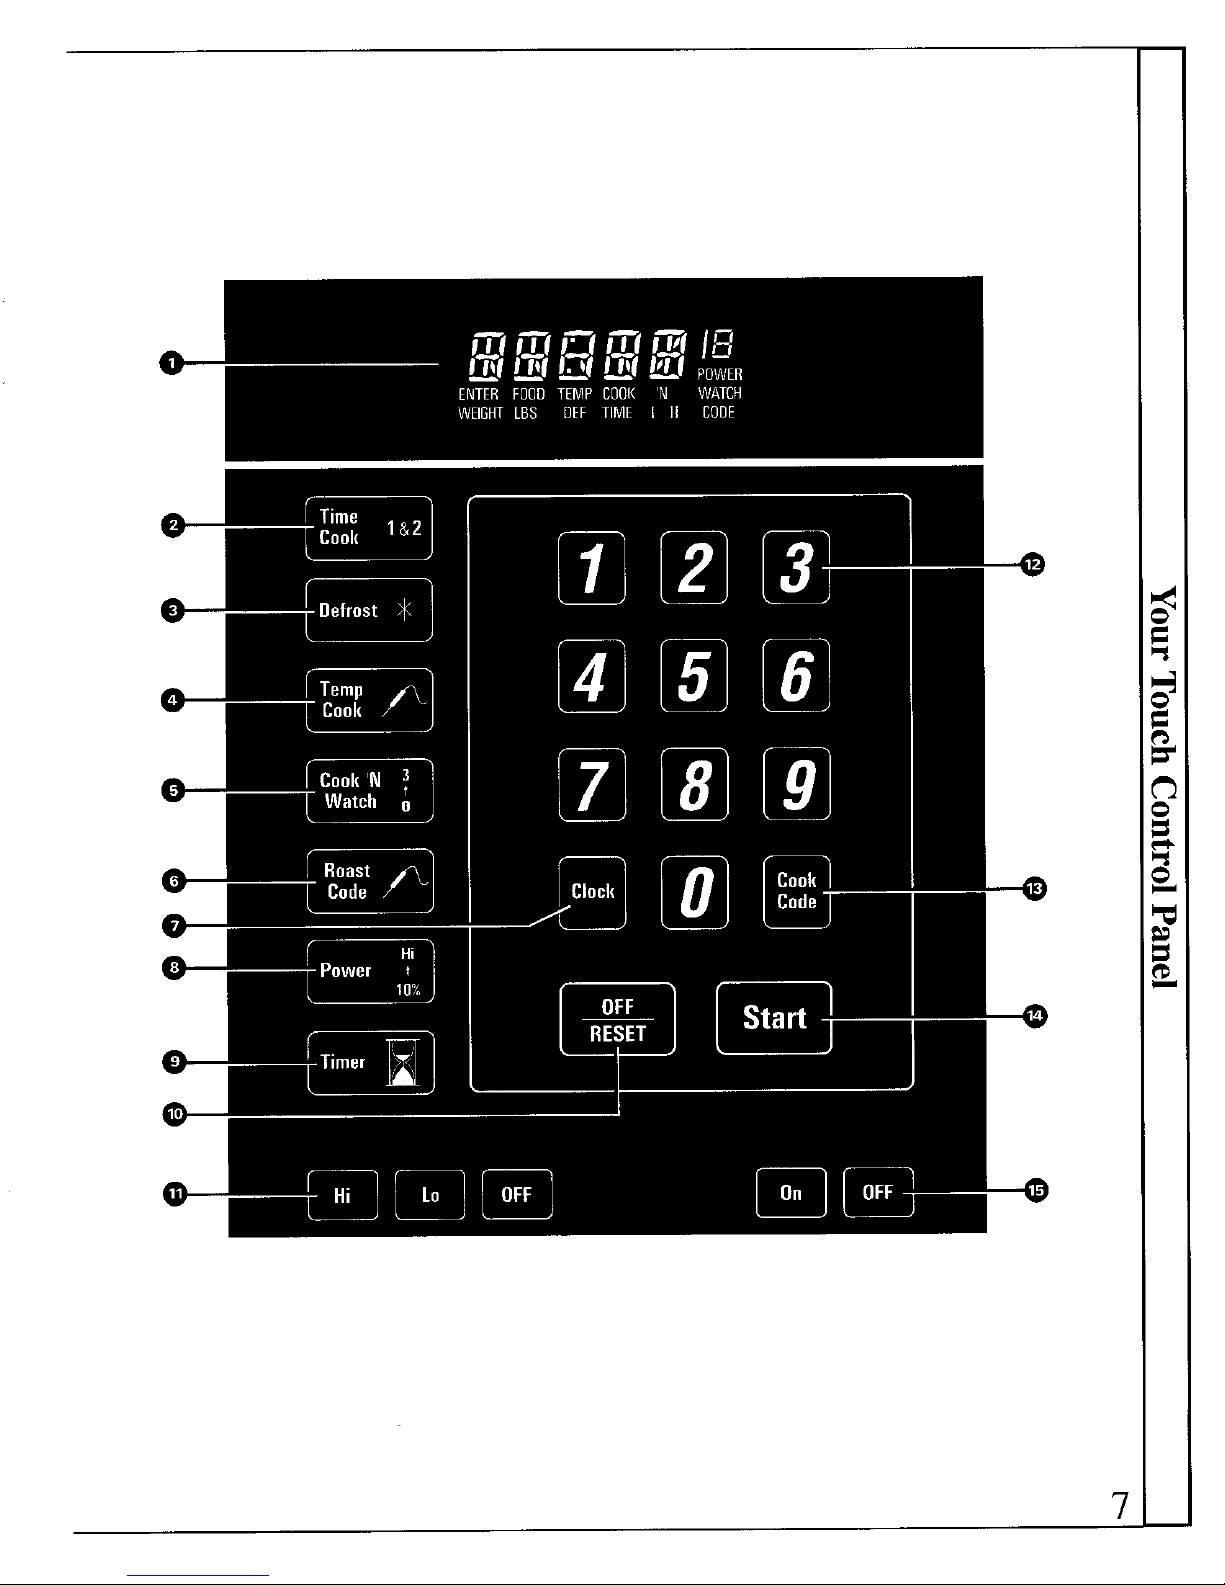
Your Touch Control Panel
The Touch Control Panel allows you to set the oven 8. POWER. Touch this pad before entering another
controls electronically with the touch of a finger. It's power level number if you want to change from
designed to be easy to use and understand, automatic power level 10 (High) for cooking or power
level 3 (Low) for defrosting.
When You Plug in the Oven 9. TIMER. This feature uses no microwave energy. It
functions as either a kitchen timer, as a holding period
The display panel displays five 8's, 18 POWER and all after defrost or as a delay timer before time or
of the oven functions. After 15 seconds, all lights temperature cooking.
disappear and "RESET" appears in the upper portion.
Touch the OFF/RESET pad, set the CLOCK and oven 10. OFF/RESET. When touched, it shuts off the oven
is ready for use. and erases all settings (except time of day).
If power is disrupted at any time, the above sequence 11. EXHAUST FAN. Press HI, LO or OFF for the
recurs, and you must reset CLOCK after touching the different fan speeds.
OFF/RESET pad. 12. NUMBER PADS. Touch these pads'to enter
"PROBE" Appears on the Display cooking time, defrosting time, time of day, temperature
• Probe has been forgotten when Roast Code or Temp or power level.
Cook function is being used. 13. COOK CODE CONTROL. Use this pad as a
short-cut method for entering cooking time and
• Probe is not securely seated in oven wall receptacle, power level.
1. DISPLAY. Displays time of day, time or temperature 14. START. After all selections are made, touch this
during cooking functions, power level being used, pad to start the oven.
cooking mode and instructions.
15. LIGHT. Touch ON to illuminate counter.
2. TIME COOK 1 & 2. Microwave for a preset
amount of time using automatic power level 10. (If
desired, you may change power level after entering AUTOMATIC FAN FEATURE
cooking time.) Cooking appliances installed under the oven may, under
3. DEFROST. Gentle thawing at automatic power level some heavy usage conditions, cause temperatures high
3 (Low). (If desired, you may change power level after enough to overheat some internal parts of the
entering defrosting time.) microwave oven.
4. TEMP COOK. Use the temperature probe to cook To prevent overheating from taking place, the exhaust
by using a preset temperature. Once food reaches preset fan is designed to automatically turn on at a low speed
temperature, oven switches to HOLD setting and if excessive temperatures occur. Should this happen,
maintains that temperature until you touch the the fan cannot be manually turned off, but it will
OFF/RESET pad. automatically turn off when the internal parts have
5. COOK 'N WATCH. Use this pad for short-term cooled. The fan may stay on up to approximately 30
cooking, which automatically turns off after 3 minutes, minutes after the range and microwave oven controls
have been turned off.
6. ROAST CODE. Insert probe, touch this pad and
then number pad for desired code number to slow-cook
or temperature cook meat with automatic preset
program.
7. CLOCK. Touch this pad to enter time of day or
check time of day while microwaving. To set clock,
first touch CLOCK pad and then enter time of day.
For example, if time is 1:30, touch number pads 1, 3
and 0 and "1:30" will appear in display. Then touch
START pad, To reset or change time, simply repeat
above process.
6
ENTER FOOD TEMP C00K 'N WATCH
WEIGHTLBS DEF TIME I II CORE
'7
 Loading...