

Whirlpool PROW 0612IIM, PROW 0614II, PROD 06SCII, PROD 06SVII Installation And Maintenance Manual

INSTALLATION AND
MAINTENANCE
PROW 0612IIM
PROW 0614II
PROD 06SCII
PROD 06SVII
WASHING MACHINE 2-17
TUMBLE DRYER 18-36
SERVICE AND GUARANTEE 37

CONTENTS – WASHING MACHINE
SAFETY 3
Transit screws
General
Child lock on Start/Stop button
Door
Overfill cut-out
Packaging
Transport/Winter storage
Scrapping
PARTS OF THE WASHING MACHINE 4
TECHNICAL INFORMATION 5
Technical data
PROGRAMME CYCLES 6
CHANGING SETTINGS 12-13
Language
Locking the programme
Wash temperature, C or F
Changing preset wash temperature
Child lock
MAINTENANCE 14-15
Emptying/cleaning trap and drain pump
Inspection holes under drum paddles
Cleaning the detergent drawer
Cleaning the outside of the machine
In areas with hard water
TROUBLESHOOTING 16-17
Door will not open
Machine will not start
MECHANICAL INSTALLATION 8-10
Transit screws
Positioning the washing machine
Adjusting the feet
Connecting to water supply
Water intake – mixed or cold water
Connecting to drain
ELECTRICAL INSTALLATION 11
Electrical installation
Connecting to coin mechanism
Error messages
The display is lighting when a
programme is selected, but no
characters or digits are shown
Wrong language displayed
WASHING MACHINE CONTENTS
2
SAFETY
TRANSIT SCREWS
Before the machine can be used the three trans-
it screws must be removed. See chapter ”Mecha-
nical Installation”.
GENERAL
• Read and keep this manual!
• Any electrical work or plumbing must be car-
ried out by qualified tradesmen.
• The machine is not designed to be used by
persons (even children) that are physically or
mentally handicapped or lack experience and
knowledge. Such persons must receive instruc-
tion in how to use the machine from the person
responible for their safety.
• Children must be watched to ensure they do
not play with the machine.
OVERFILL CUT-OUT
If the water level in the machine rises above
normal the overfill cut-out shuts off the water
intake and starts pumping out the water. The
programme resumes when the water level has
dropped.
PACKAGING
Recycle the packaging according to recommen-
dations in your area.
TRANSPORT/WINTER STORAGE
If you intend to transport the machine or store
it over winter in unheated premises, empty the
trap and the drain pump, see the chapter on
Maintenance.
Any questions? Call service.
CHILD LOCK ON
Start/Stop
BUTTON
To prevent accidental button pushes on the
Start/Stop
button you can activate the child lock
function. The
Start/Stop
button then must be held
in for three seconds to activate the machine.
DOOR
The door is opened electrically, so it cannot be
opened until the machine is connected to the
electrical supply! The door can however be ope-
ned in an emergency, see Troubleshooting.
SCRAPPING
At the end of its life the machine must be disa-
bled before being scrapped.
Contact your local recycling centre to find
out where to dispose of it or recycle it.
The machine has been built and marked to
facilitate recycling.
SAFETY WASHING MACHINE
3
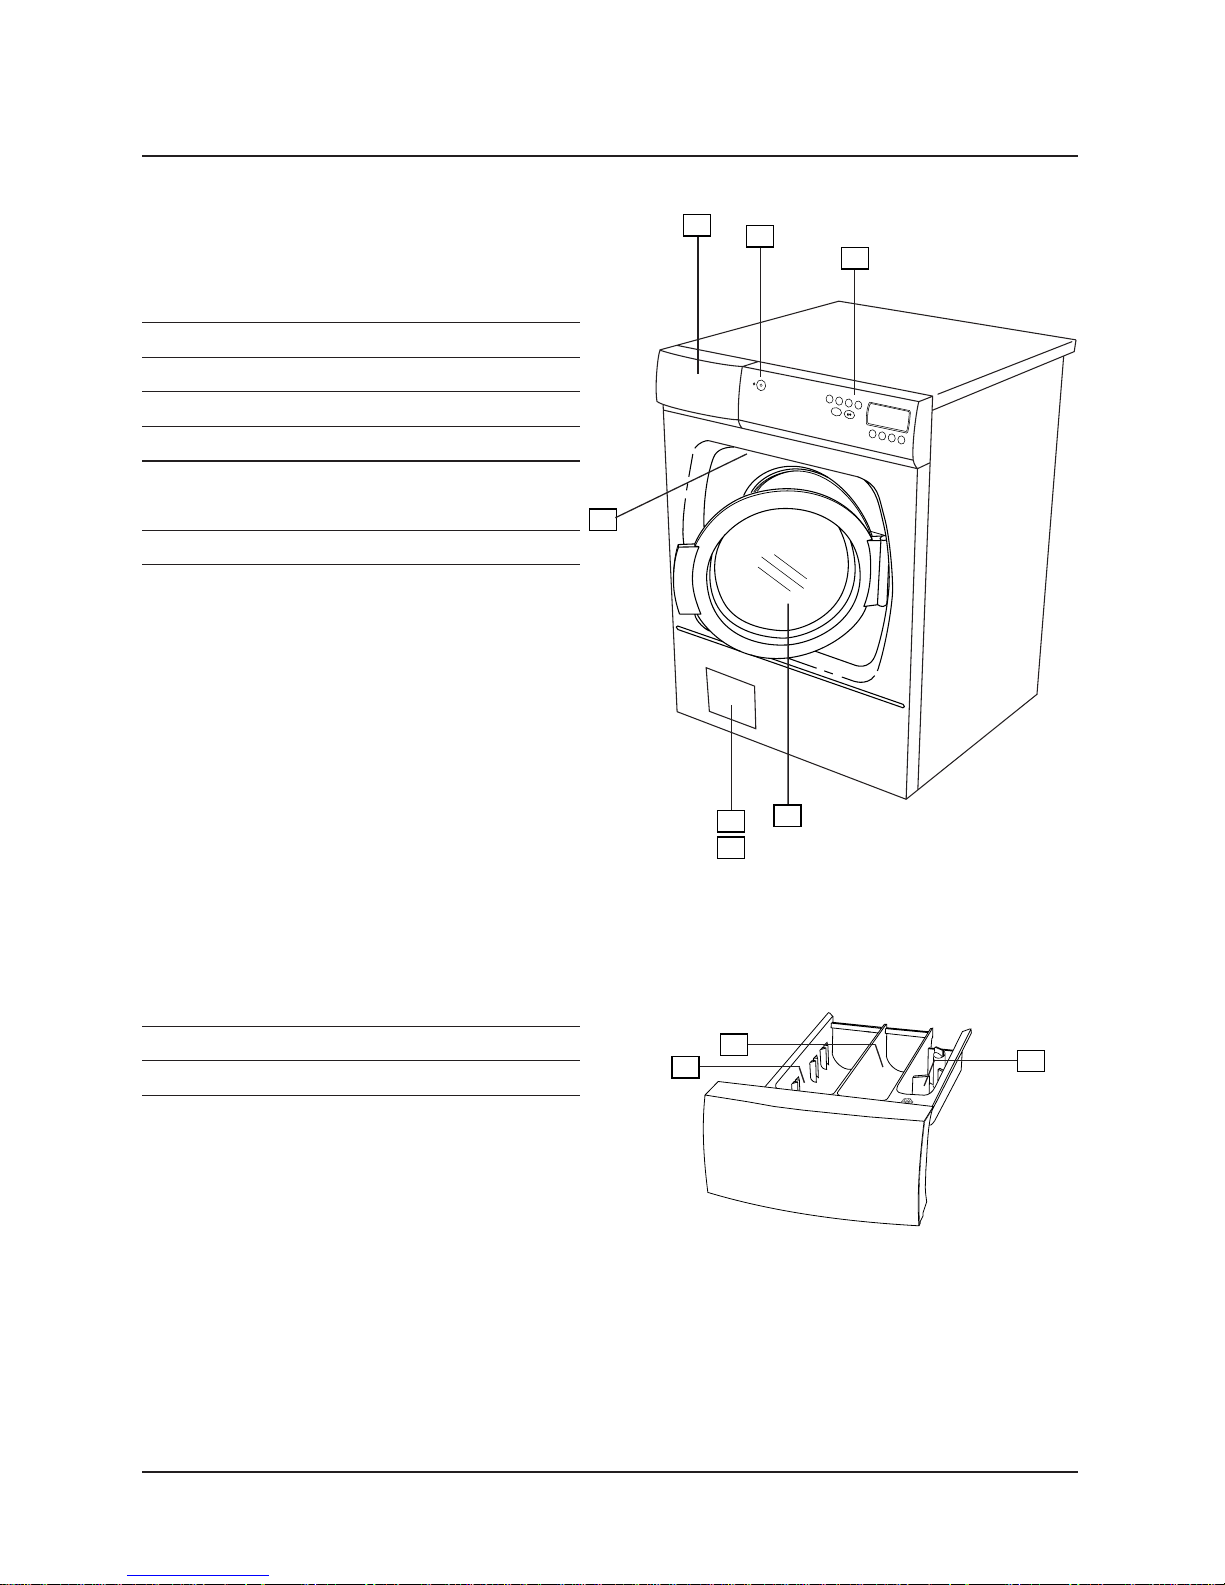
PARTS OF THE WASHING MACHINE
1. DETERGENT DRAWER
2. POWER SWITCH
3. PROGRAMME PANEL
4. RATING PLATE
5. DOOR-DRAIN PUMP/EMERGENCY OPEN
6. DRAIN PUMP/EMERGENCY OPEN (BEHIND
FLAP)
7. DOOR
1
2
3
P
1
P
2
P
3
P4
S
t
a
r
t
/
S
t
o
p
P5
P
6
P
7
P8
4
1. DETERGENT COMPARTMENT – PRE-WASH
2. DETERGENT COMPARTMENT – MAIN WASH
3. FABRIC CONDITIONER COMPARTMENT
7
5
6
1
2
3
WASHING MACHINE PARTS OF THE WASHING MACHINE
4

TECHNICAL INFORMATION
TECHNICAL DATA
Height: 850 mm.
Width: 595 mm.
Depth: 585 mm.
Weight: 73 kg.
Drum capacity: 50 l.
Max wash load: 6.0 kg.
Spin speed PROW 0612IIM: 1200 rpm.
Spin speed PROW 0614II: 1400 rpm.
Power rating: See rating plate.
Element power: See rating plate.
Water pressure: 0.1–1 MPa, 1–10 kp/cm2, 10–100 N/cm2.
Composition of drum and fluid container: Stainless steel.
Composition of casing: Powder-painted and hot-dip galvanized sheet
steel or stainless steel.
Installation: Static on four adjustable, rubber-covered feet.
Water supply: 1.5 m PEX hose.
Drain: 1.7 m polypropylene hose (pump) or 0.4 mm
EPDM rubber hose (valve).
TECHNICAL INFORMATION WASHING MACHINE
5
PROGRAMME CYCLES
EURO
PROGRAMMES
P1 Heavy wash 90°C
P2 Normal wash 60°C
P3 Normal wash 60°C
P4 Normal wash 40°C
P5 Synthetic wash 40°C
P6 Super quick wash 40°C
P7 Wool/hand wash 30°C (1)
P8 Spin
(1) High water level and gentle motor action.
EXPLANATIONS
1/1 (6,0 kg)
1/2 (3,0 kg)
1/3 (2,0 kg)
Rinse
Short spin (3 min)
Long spin (6 min)
Pre wash
Max .load
Main wash
Rinse
Spin
Rinse
Spin
Rinse
Spin
80
110
54
40
25
20
25
4
Length (appr. min)
WASHING MACHINE PROGRAMME CYCLES
6

PROGRAMME CYCLES WASHING MACHINE
7
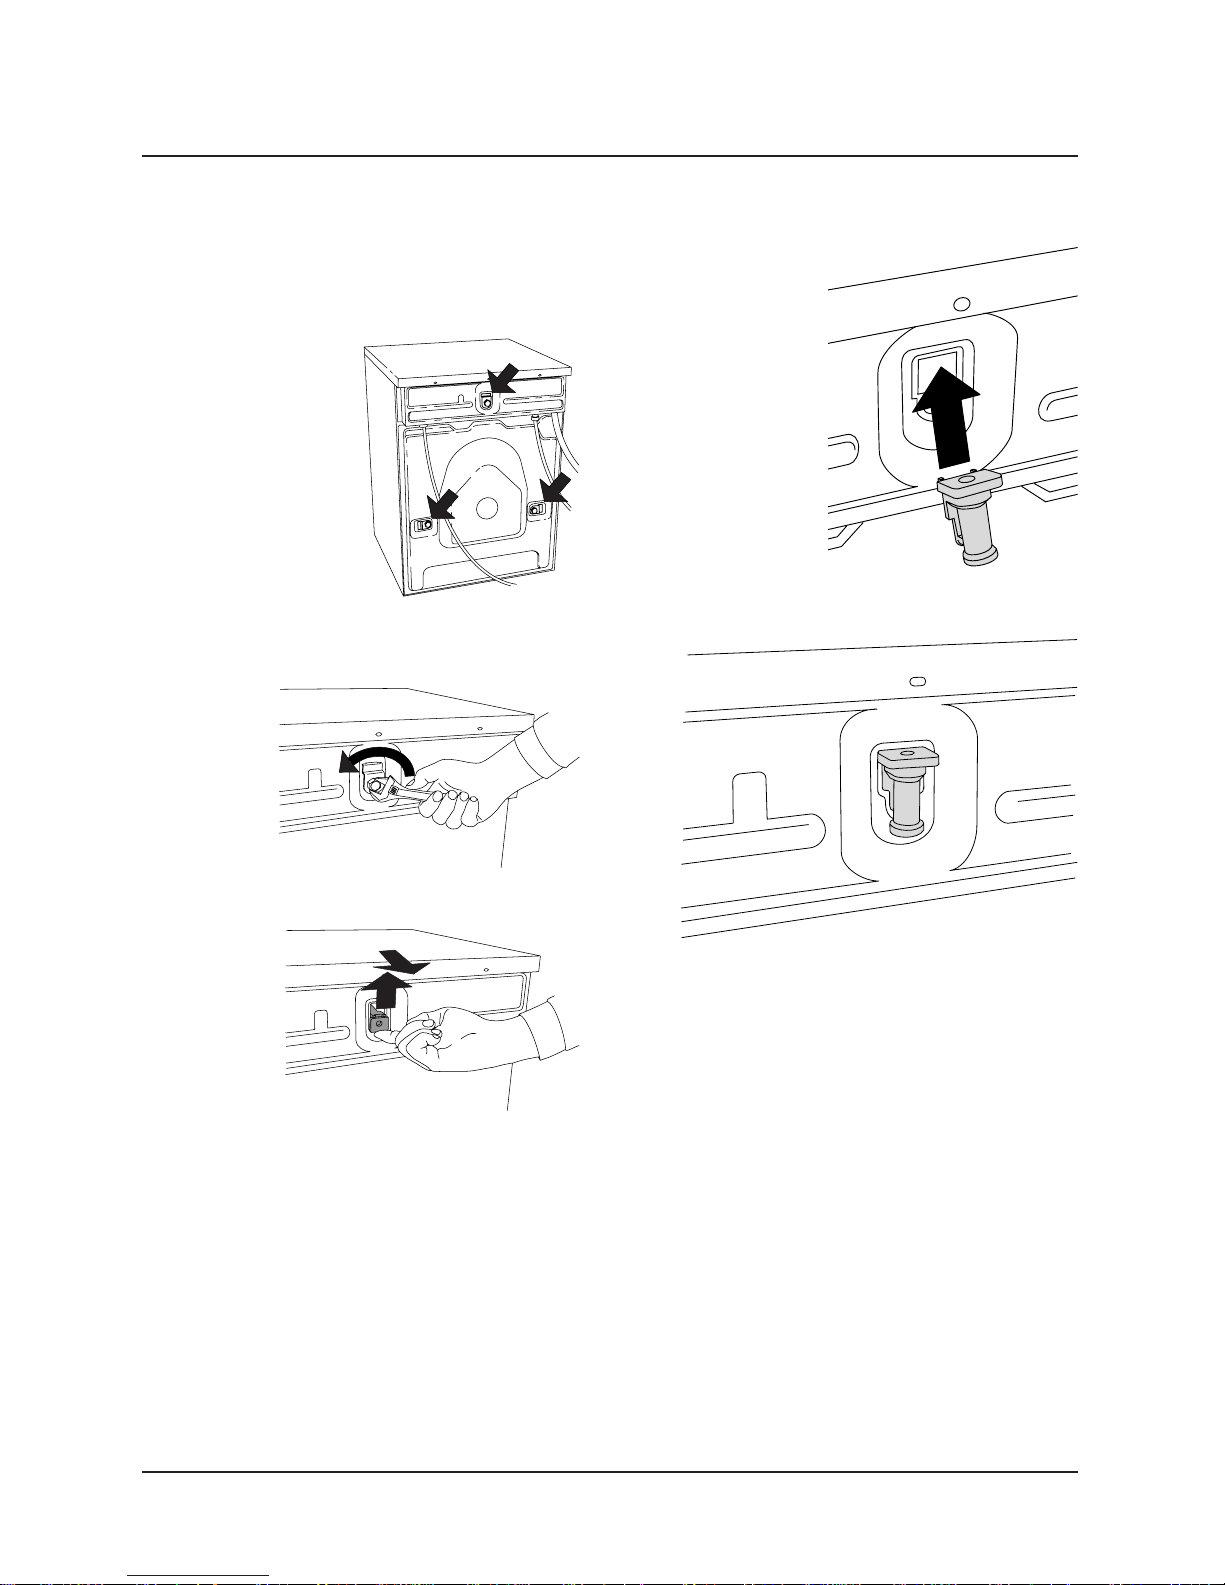
MECHANICAL INSTALLATION
2
1
TRANSIT SCREWS
Before the machine can be used the three trans-
it screws must be removed as described below.
Each transit screw has a washer and a rubber
spacer. The rubber
spacers are used to
protect the screw ho-
les after the screws
have been removed.
1. First unscrew the screw and remove the was-
her.
3. Finally, refit the rubber spacers to cover the
transit holes.
2. Then pull out the rubber spacer.
WASHING MACHINE MECHANICAL INSTALLATION
8
S
t
a
r
t
/
S
t
o
p
P
3
P
1
P
2
P
4
P
7
P
5
P
6
P
8
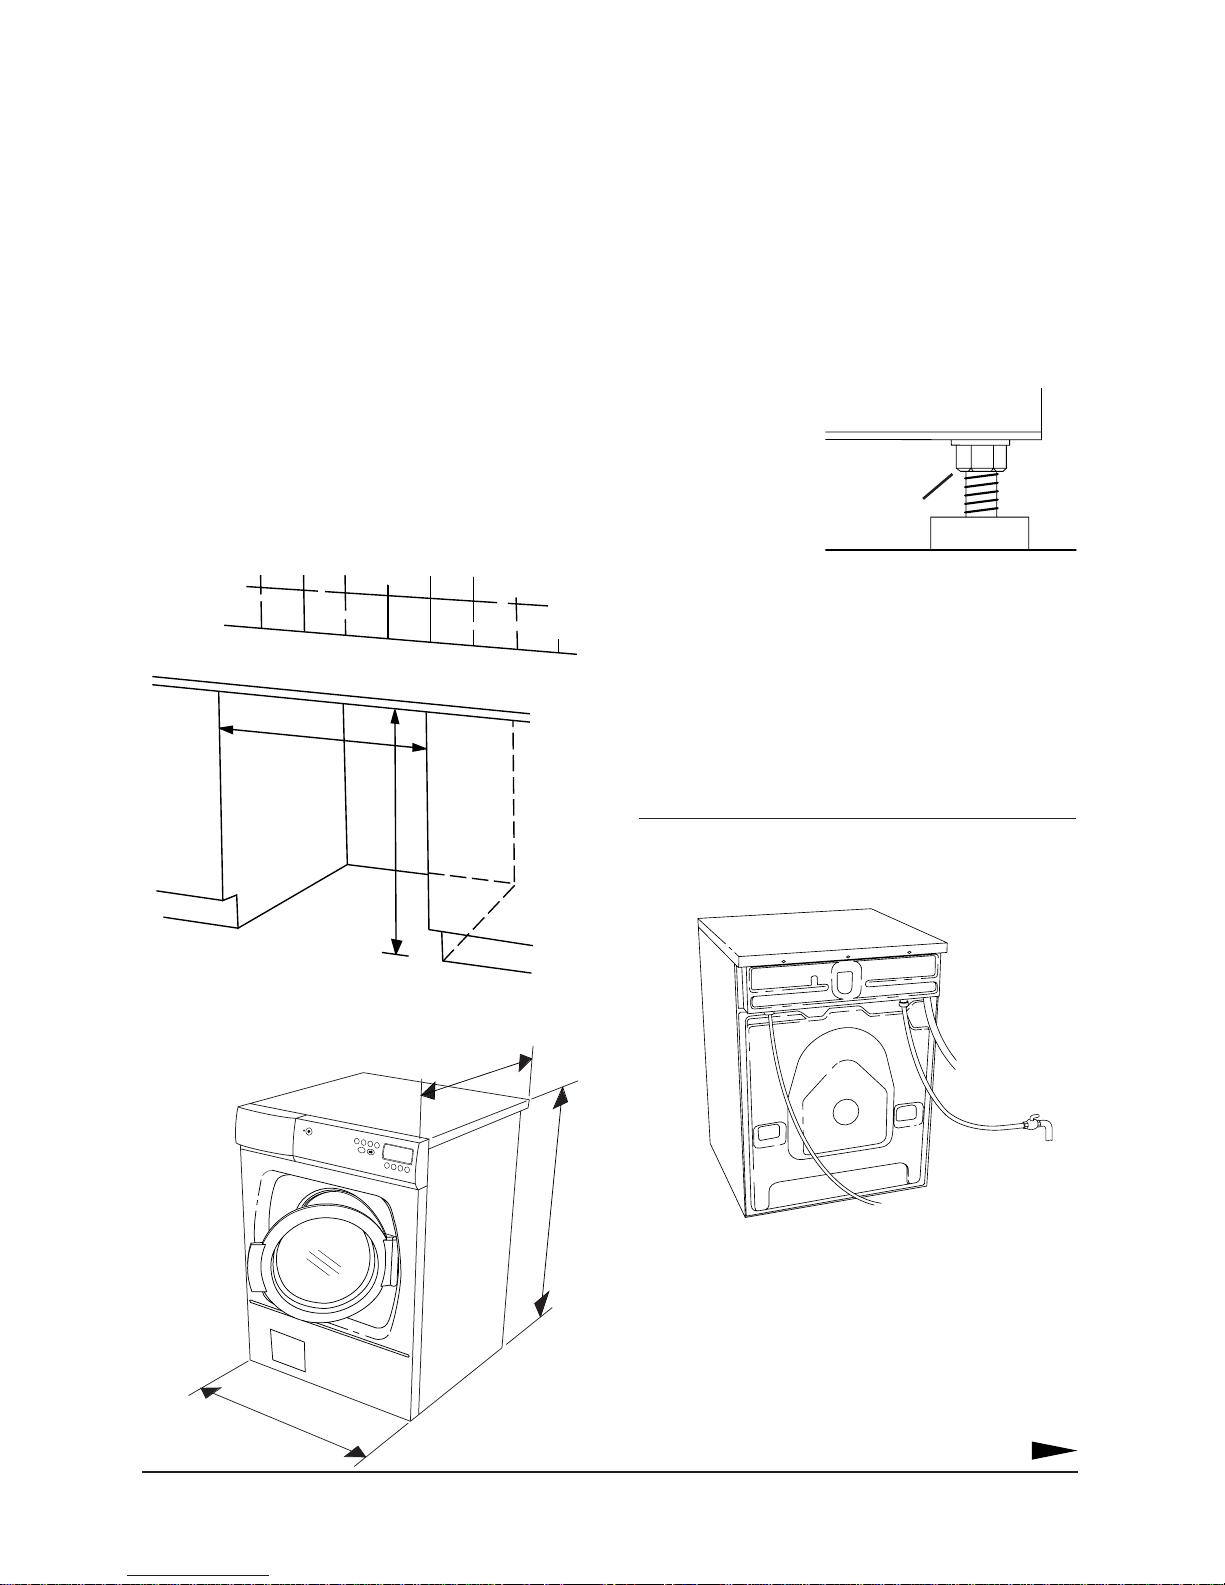
POSITIONING THE WASHING MACHINE
The washing machine can be built-in or free-
standing. It should be positioned so that there
is an electrical socket within easy reach.
The machine can be anchored to the floor, see
enclosed bag containing instructions and parts.
ADJUSTING THE FEET
Adjust the feet so that the machine is level and
A. Built-in
The washing machine can be built in under a
worktop with a working height of 850–900 mm.
Leave a 5 mm gap around the machine. This
also applies between the rear edge of the top
the machine and the wall behind.
min 600 mm
min 850 mm
steady on the floor.
Tighten the lock-
ing nuts.
Locking nut
CONNECTING TO WATER SUPPLY
The machine should be connected to the water
supply by someone who has the necessary skill.
The machine is connected using the supplied
inlet hose.
NOTE!
It is important that you use the inlet hose that
is supplied, not an old hose.
B. Free-standing
The washing machine can be placed alongside
or underneath the tumble dryer.
P
1
P
2
P
3
P
4
P
5
P
6
P
7
P
8
595 mm
MECHANICAL INSTALLATION WASHING MACHINE
585 mm
m
50 m
8
The water pressure must be 0.1–1 MPa
(about 1–10 kp/cm
2
; 10–100 N/cm2).
The water supply pipe must be fitted with a
shut-off valve.
If the supply pipe has just been installed we
recommend that it is flushed out thoroughly
9
first to remove any dirt. Otherwise this could
CONNECTING TO THE DRAIN
clog the intake filter in the machine and block
the water supply.
WATER INTAKE – MIXED OR COLD WATER
On delivery the machine is set to use mixed hot
and cold water (E).
The machine can be set for cold water intake
only. This setting must be made by a qualified
professional. Contact the service division.
To change the water intake setting, do as
follows:
Switch off the power switch, , then
switch it on again so that the machine is in
start-up mode.
Press the
P4
the
P8
button five times, then press
button five times. You have to comple-
te these ten button presses within fifteen se-
conds.
Within three seconds of pressing the
P4
button for the fifth time you must then select
the type of water intake you want by pressing
the
P6, P7
or
P8
buttons.
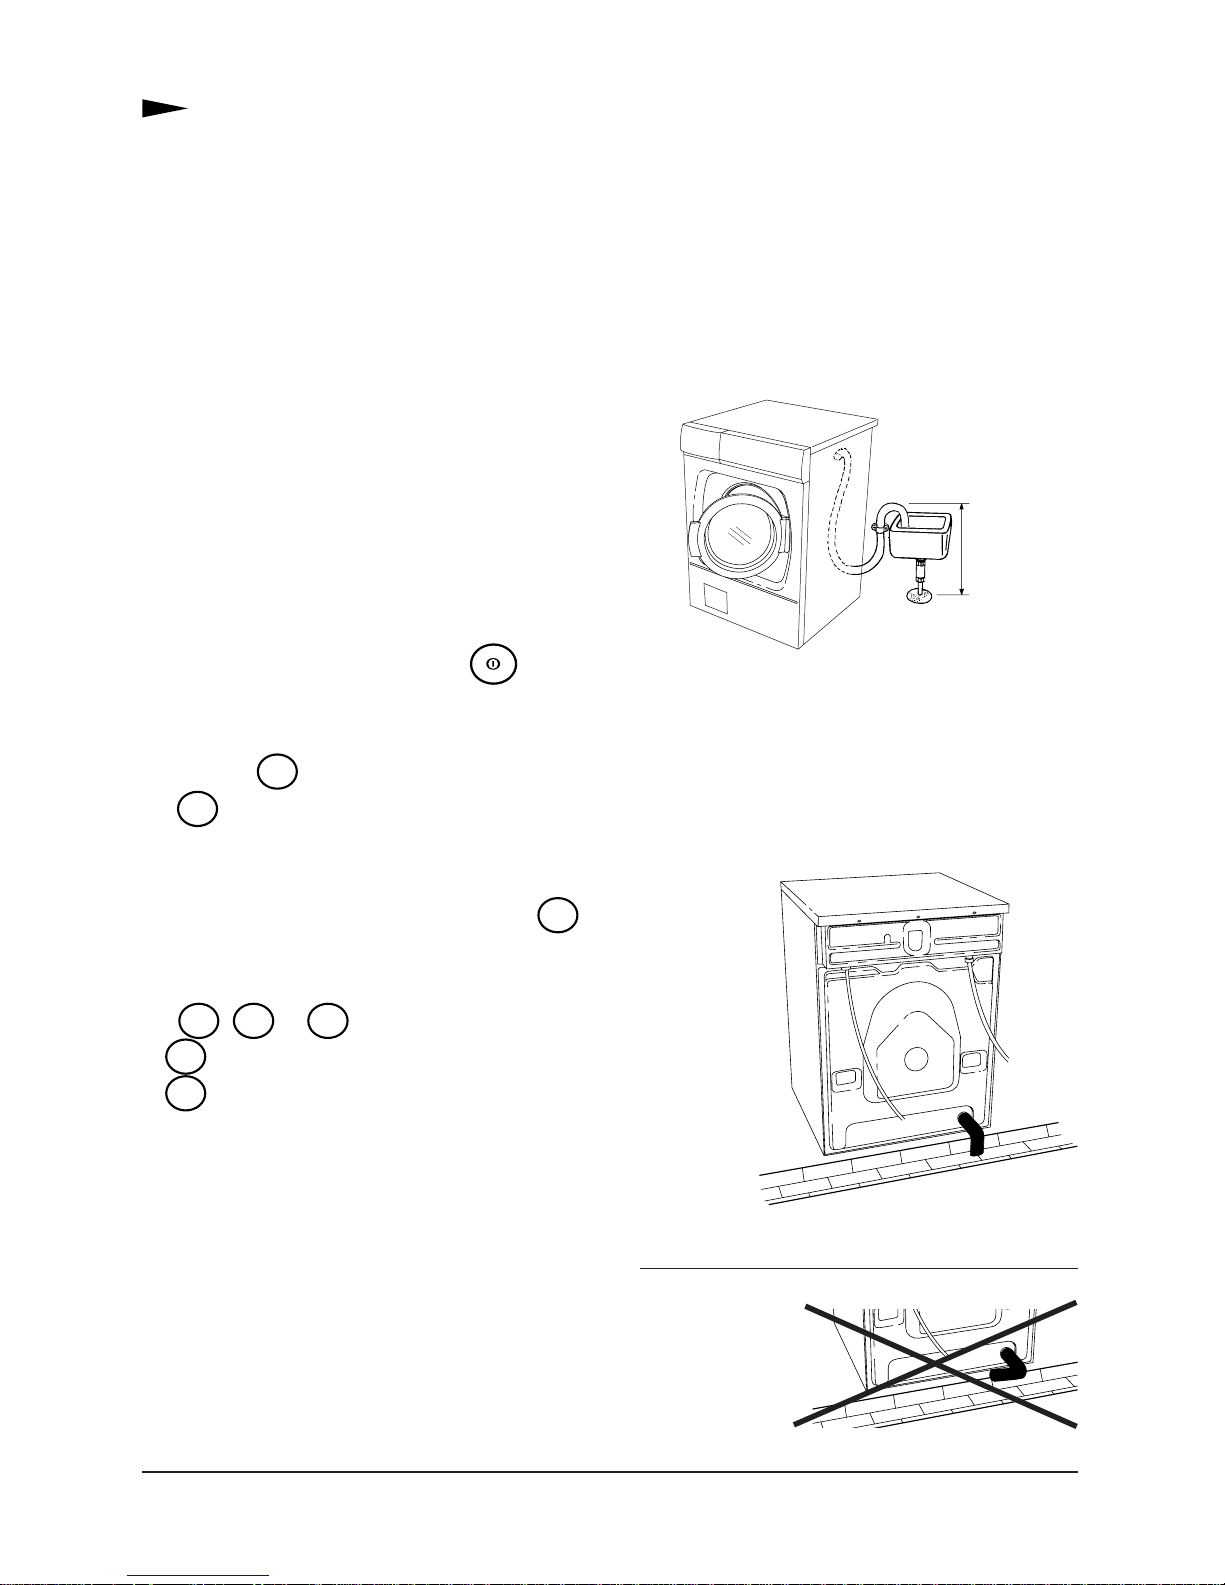
Machine with drain pump
The machine is supplied with a drain hose al-
ready fitted and this should be connected to a
laundry sink, or the like, at a height of 600–900
mm above the floor.
600-900 mm
The lower height (600 mm) is always prefera-
ble. Make sure the drain hose is not kinked.
Machine with drain valve
An outlet hose is supplied with the machine.
This must be connected to the outlet on the
machine
and empty
into a floor
drain or
gutter drain.
P6
to use cold water intake only (C).
P8
to use mixed hot and cold water (E).
A letter C near the bottom right of the dis-
play shows that cold water is being used and
the letter E indicates mixed hot and cold.
WASHING MACHINE MECHANICAL INSTALLATION
10
NOTE!
The end of the outlet hose must be lower than
the lowest
point of the
outlet valve.

ELECTRICAL INSTALLATION
ELECTRICAL INSTALLATION
The washing machine must be connected using
a permanently installed cable through an isola-
ting switch by a qualified electrician.
Power supply
The machine is supplied as single-phase, 230 V,
50 Hz, heat output 3000W and has 16 A.
If an earth leakage circuit breaker is fitted it
must be of type A.
Reconfiguration
The machine can be reconfigured The machine
should be reconfigured as shown in the wiring
diagram underneath the top panel of the mach-
ine.
CONNECTING TO A COIN MECHANISM
Connection to a coin mechanism must be car-
ried out by a qualified electrician.
A special connecting cable is required to con-
nect the machine to a coin mechanism. This
can be ordered as a spare part, art. no. 92 090
95.
Recommendations for choice of coin mechanism
The connecting cable (92 090 95) supplies the
coin mechanism with power (230 V). The coin
mechanism must be able to short-circuit two
signal leads for a period of time (around 0–10
minutes). This is so that the user has time to
load the laundry, select the programme and start
the programme after inserting the coins.
NOTE!
Electrical connection /reconfiguring must be
carried out by a qualified electrician.
ELECTRICAL INSTALLATION WASHING MACHINE
11

CHANGING SETTINGS
Start/Stop
LANGUAGE
You can change the language of the displayed
text.
The languages you can choose from are Dansk,
Deutsch, English, Espanol, Français, Italiano,
Nederlands, Norsk, Portugués, Suomi and
Svenska.
To change language do as follows:
Switch off the power switch, , then switch
it on again so that the machine is in start-up
mode.
Press the
P1
the
P8
button five times, then press
button five times. You have to comple-
te these ten button presses within fifteen se-
conds.
Within three seconds of pressing the
P1
button for the fifth time you should then select
Within three seconds of pressing the
P7
button for the fifth time you should hold in the
programme button for the programme you want
to lock for 5-10 seconds until the information
in the display starts flashing.
Then you can lock the programme by relea-
sing the programme button and pressing the
-button once.
Do the same to unlock the programme.
WASH TEMPERATURE - CENTIGRADE OR FAHRENHEIT
You can change the way the temperature is dis-
played from centigrade (C) to Fahrenheit (F).
To change the temperature display, do as follows:
Switch off the power switch, , then switch
it on again so that the machine is in start-up mode.
Press the
P8
button five times, then press
-
the language you want by pressing the
P7
buttons.
LOCKING A PROGRAMME
P6
or
If for some reason you want to limit the number
of programmes that can be used you can lock
one or more programmes.
No characters or digits are shown on the dis-
play when a locked programme is selected.
To lock or unlock a programme, do as follows:
Switch off the power switch, , then switch
it on again so that the machine is in start-up
mode.
Press the
P7
the
P8
-button five times, then press
-button five times. You have to com-
plete these ten button presses within fifteen se-
P2
the
button five times. You have to comple-
te these ten button presses within fifteen se-
conds.
Within three seconds of pressing the
P2
button for the fifth time you should then press
the
P6
or
P7
buttons to select centigrade
(C) or Fahrenheit (F).
CHANGING PRESET WASH TEMPERATURE
You can change the preset wash temperatures
for each of the programmes. The temperatures
you can choose from are:
Heavy wash - C, 30, 35, …, 85, 90, 95ºC.
Normal wash - C, 30, 35, …, 85, 90, 95ºC.
Light wash, Synthetic wash, Permanent Press -
C, 30, 35, …, 85, 90, 95ºC.
conds.
WASHING MACHINE CHANGING SETTINGS
12
 Loading...