


Whirlpool WOT16224IT, WAT CARE 42SD, WOT24444, WP10R154FN, AWE 8781 GG User Manual
...DEFINITION OF USE
This washing machine is exclusively destined to wash and spin machine washable laundry in quantities which are usual for private households.
•Observe the instructions given in these Instructions for Use and the Programme Chart when using the washing machine.
•Keep these Instructions for Use and the Programme Chart; if you pass on the washing machine to another person, also give him/her Instructions for Use and Programme Chart.
BEFORE USING THE WASHING MACHINE
1. Remove the packaging and check
a.Cut and remove the shrink-wrap.
b.Remove the top protection and the protective corners.
c.Remove the bottom protection by tilting and turning the washing machine on one rear bottom corner. Make sure that the plastic part of the bottom protection
(if available on the model) remains in the packing and not in the machine bottom.
This is important, as otherwise the plastic part could damage the washing machine during operation.
d.Open the lid by pressing it slightly down while raising the handle. Remove the polystyrene cushion (depending on model).
e.Remove the blue protective film from the panel (depending on model).
• After unpacking, make sure that the washing machine is undamaged. If in doubt, do not use the washing machine. Contact After-Sales Service or your local retailer.
• Keep the packaging materials (plastic bags, polystyrene parts, etc.) out of reach of children; they are potentially dangerous.
• If the appliance was exposed to the cold prior to delivery, keep it at room temperature for a few hours before operating.
2. Remove the transport bracket
• The washing machine is fitted with transport screws and a transport bracket to prevent damage during transport. Before using the washing machine you must remove the transport bracket (see “Installation”/“Removal of transport bracket”).
3. Install the washing machine
• Place the washing machine on a flat and stable floor surface.
• Adjust the feet to ensure that the machine is stable and level (see “Installation”/“Adjust the feet”).
• In case of wooden or so-called “floating floors” (for instance certain parquet or laminate floors), place the appliance on a 40 x 60 cm sheet of plywood at least 3 cm in thickness which is secured to the floor.
• Make sure that the ventilation openings in the base of your washing machine (if available on your model) are not obstructed by a carpet or other material.
4. Water supply
•Connect the water supply inlet hose in accordance with the regulations of your local water company (see “Installation”/“Connect the water inlet hose”).
•Water supply: Cold water only
•Tap: 3/4” threaded hose connection
• Pressure: 100-1000 kPa (1-10 bar).
• Only use new hoses for connecting the washing machine to the water supply. Used hoses must not be used anymore and should be discarded.
5. Drain hose
• Firmly connect the drain hose tothe siphon or another outlet for drain water. (see “Installation”/ “Connect the water drain hose”).
• If the washing machine is connected to a built-in drainage system, ensure the latter is equipped with a vent to avoid simultaneous loading and draining of water (siphoning effect).
6. Electrical connection
•Electrical connections must be carried out by a qualified technician in compliance with the manufacturer’s instructions and the current standard safety regulations.
•The technical data (voltage, power and fuses) are given on the rating plate on the rear of the washing machine.
•The washing machine must be connected exclusively by means of a socket with an earth connection in accordance with current regulations. The washing machine must be earthed by law. The manufacturer declines all liability for injury to persons or animals or damage to property deriving directly or indirectly from failure to observe the directions.
•Do not use extension leads or multi sockets.
•Before any maintenance on the washing machine disconnect it from the mains supply.
•Access to the mains plug or to disconnection from the mains supply via a double-pole switch must be ensured at all times following the installation.
•Do not operate the washing machine if it has been damaged during transport. Inform the After-Sales Service.
•Mains cable replacement is only to be carried out by After-Sales Service.
•The washing machine must be connected to an effective earthing installation, in compliance with the regulations in force. In particular, washing machines installed in premises containing a shower or a bath must be protected by a differential residual current device of at least 30 mA. Earthing the washing machine is obligatory under the law.
The manufacturer declines all liability for injury to persons or animals or damage to property deriving either directly or indirectly from failure to observe the directions in these Instructions for Use.
•The washing machine may only be used in the household for the prescribed uses.
Dimensions:
Width: |
400 mm |
Height: |
900 mm |
Depth: |
600 mm |
GB 1
PRECAUTIONS AND GENERAL RECOMMENDATIONS
1. Safety instructions
•The washing machine is appropriate for indoor use only.
•Do not store flammable fluids near the appliance.
•Do not place electrical appliances on the lid of your washing machine.
•Children must be supervised to ensure that they do not play with the appliance.
•This appliance is not intended for use by persons (including children) with reduced physical, sensory or mental capabilities, or lack of experience and knowledge, unless they have been given supervision or instruction concerning use of the appliance by a person responsible for their safety.
•Do not attempt to force the lid open.
•If necessary, the power cable may be replaced with an identical one obtained from our AfterSales Service. The power cable must only be replaced by a qualified technician.
•The Manufacturer is not liable for any damage to laundry resulting from inadequate or incorrect fabric care instructions which have been provided with the garment or article.
2. Packing
•The packaging materials are 100% recyclable and bear the recycling symbol  . Adhere to local regulations when disposing of packaging material
3.Disposing of packaging and old washing machines
•This appliance is marked according to the European directive 2002/96/EC on Waste Electrical and Electronic Equipment (WEEE). By ensuring this product is disposed of correctly, you will help prevent potential negative consequences for the environment and human
health, which could otherwise be caused by inappropriate waste handling of this product.
• The symbol  on the product, or on the documents accompanying the product, indicates that this appliance may not be treated as household waste. Instead it shall be handed over to the applicable collection point for the recycling of electrical and electronic equipment.
Disposal must be carried out in accordance with local environmental regulations for waste disposal. For more detailed information about treatment, recovery and recycling of this product, please contact your local city office, your household waste disposal service or the shop where you purchased the product.
•The washing machine is built from reusable materials. It must be disposed of in compliance with current local waste disposal regulations.
•Before scrapping, remove all detergent residues and cut off the power cable so that the washing machine is made unusable.
4. General recommendations
•Do not leave the washing machine connected when not in use. Turn off the tap.
•Before cleaning or carrying out maintenance switch off the washing machine and disconnect it from the mains supply.
5. EC Declaration of Conformity
•This washing machine has been designed, constructed and distributed in compliance with the safety requirements of EC Directives: 2006/95/EC Low Voltage Directive 2004/108/EC Electromagnetic Compatibility Directive
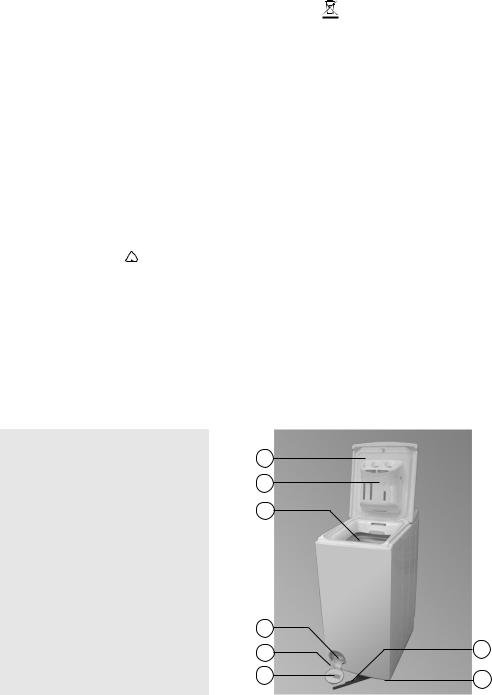
DESCRIPTION OF THE WASHING MACHINE
1. |
Lid |
|
2. |
Detergent dispenser |
1 |
|
||
3. |
Drum |
2 |
4. |
Pump access behind filter |
3 |
5.After-Sales Service sticker (behind the filter cover)
6.Mobility lever (depending on model)
•To move the washing machine: pull the handle out a little bit by hand and pull it out to the stop with the foot.
7. Adjustable feet |
4 |
|
|
|
7 |
|
5 |
6
7
GB 2

INSTALLATION
Removal of transport bracket
The washing machine is fitted with a transport bracket to avoid any possible damage during transport.
IMPORTANT: Before using the washing machine, the transport bracket at the back MUST be removed.
1.Unscrew the two screws “A” and the four screws “B” with a flat screwdriver or a No. 8 hex nut box spanner.
2.Remove the transport bracket.
3.Replace the four outer screws “B” on the machine and tighten them.
4.Clip the two seals “C” supplied into the openings “D” of the washing machine.
Note: do not forget to replace and tighten the four outer screws.
Adjust the feet
Install the washing machine on a level surface, near to electrical, water and drain connections.
If the floor is uneven, adjust the feet (do not insert pieces of wood, cardboard etc. under the feet):
1.Screw out the washing machine´s feet by hand with 2-3 clockwise turns and then slacken the locknut by wrench
2.Adjust the height of the feet by hand.
3.Retighten the locknut by turning it anti-clockwise.
Make sure that the feet are resting correctly on the floor and that the washing machine is perfectly level and stable (use a spirit level).
The washing machine can be installed in an area 40 cm wide and 63 cm deep.
Note: if you install the machine on thick carpet, adjust the feet to ensure that there is sufficient space under the machine for the air to circulate.
 B A
B A
1\3
2
C
D
4
GB 3
Connect the water inlet hose
1.Carefully screw the water inlet hose to the valve on the rear side of the washing machine (“A”); screw the other end of the hose to the tap by hand.
2.Make sure there are no kinks in the hose.
3.Check water-tightness of tap and washing machine connections by turning the tap completely on.
•If the hose is too short, replace it with a suitable length of pressure resistant hose (1000 kPa min, EN 50084 approved type).
If you need a longer waterstop hose, contact our After Sales Service or your dealer.
•Check the inlet hose regularly for brittleness and cracks and replace if necessary.
•The washing machine can be connected without a backflow valve.
Water stop anti-flooding system
(see inlet hose type as shown on the right - depending on model)
•Screw the hose to the water supply tap. Turn the tap fully on and check the water-tightness of the connection.
•The washing machine must not be connected to the mixing tap of a non-pressurized water heater!
•The inlet hose and the plastic enclosure contain (depending on model) electrical components: do not cut the hose and do not immerse the enclosure in water.
•If the flexible hose is damaged, unplug the washing machine from the mains immediately, turn off the tap and replace the hose.
If the flexible hose is too short, replace it with a 3 m Water Stop hose (available from After-Sales Service or from your dealer).
A
Connect the water drain hose
Unhook the drain hose from the left clip, see arrow “A” on picture. |
|
|
|
Important: |
|
|
|
Do NOT loosen the drain hose from the right connection, see |
|
|
|
arrow “B” on picture. Otherwise, there is the risk of leakage and of |
|
|
|
scalding with hot water. |
|
|
|
Firmly connect the drain hose tothe siphon or another outlet for drain |
A |
|
|
water. |
|
|
|
|
|||
If you need to add an extension, use a flexible hose of the same size |
|
|
|
and secure the unions with screw-on hose clips. |
|
|
|
Maximum overall drain hose length: 2.50 m. |
|
|
B |
Maximum drain height: 100 cm. |
|
|
|
Minimum drain height: 55 cm. |
|
|
|
Important: |
|
|
|
Make sure there are no kinks in the drain hose and take precautions |
|
|
|
against it falling while the washing machine is running. |
|
|
|
GB 4
ELECTRICAL CONNECTION
Do not use extension leads or multi sockets.
Electrical connections must be made in accordance with local regulations.
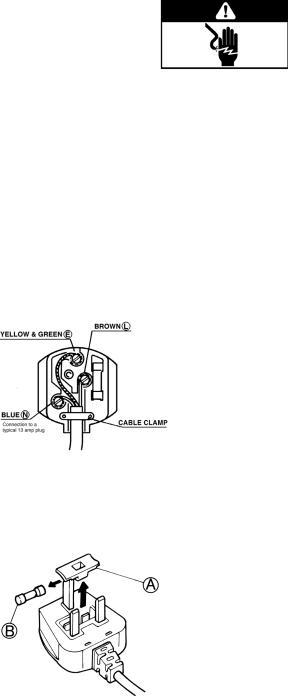
1) Warning - this washing machine must be earthed
This washing machine is normally supplied with a mains lead having a plug fitted in the factory which has been checked for correct earth continuity.
If the fitted plug is not suitable for your socket outlet, or if the machine’s mains lead is not fitted with a plug, you should fit a suitable new, good quality plug by following the instructions in (2) below.
Any unsuitable plug should be cut off and disposed of in order to avoid a possible shock hazard should it be inserted into a socket.
2) CONNECTION TO A REWIRABLE PLUG - to be carried out only by a qualified electrician
The wires in the mains lead are coloured in accordance with the following code:
BLUE - “NEUTRAL” (“N”) BROWN - “LIVE” (“L”)
GREEN AND YELLOW - “EARTH” (“E”)
To fit a new plug, proceed as follows:
2.1) Polarized Plugs (e.g. 3 pin, 13 amp plug conforming to BS 1363A)
a.The GREEN AND YELLOW wire must be connected to the terminal in the plug which is marked with the letter “E” or by
the Earth symbol |
or coloured green and yellow. |
b.The BLUE wire must be connected to the terminal which is marked with the letter “N” or coloured blue.
c.The BROWN wire must be connected to the terminal which is marked with the letter “L” or coloured brown.
2.2) Non-polarized plugs (e.g. 2 pin with side earth contact)
The wire which is coloured GREEN AND YELLOW must be connected to the earth contact. The other two wires should be connected to the two pins, irrespective of colour.
FUSE REPLACEMENT
If the mains lead of this washing machine is fitted with a BS 1363A
13 amp fused plug, replace the fuse only with an A.S.T.A. approved type conforming to BS 1362 and proceed as follows:
Remove the fuse cover (A) and the fuse (B).
Fit the replacement 13 A fuse into the fuse cover. Refit both into the plug.
For all other types of plug, the supply socket should be protected by a 16 A fuse or circuit breaker at the distribution board.
GB 5
 Loading...