

Whirlpool ED26SS User Manual

NO-FROST
REFRIGERATOR-
FREEZER
Model ED26SS
yers. freezers, Refrigerator-Freezers. Ice Makers, Dishwashers. Bwlt-In Ovens and Surtace Unlls, Ranges, Microwave Ovens, Trash Compactors, Room Au Condnlloners. Dehumbdlf
Please read this
Use and Care Guide
before you do anything else.. .
This booklet tells you how to start your refrigerator,
clean it, move shelves and adjust controls. It even
tells you what to do if
formance Monitor and if unfamiliar sounds are
heard.
Treat your new refrigerator with care. Use It only to
do what home refrigerators are designed to do.
symbols
appear on the Per-
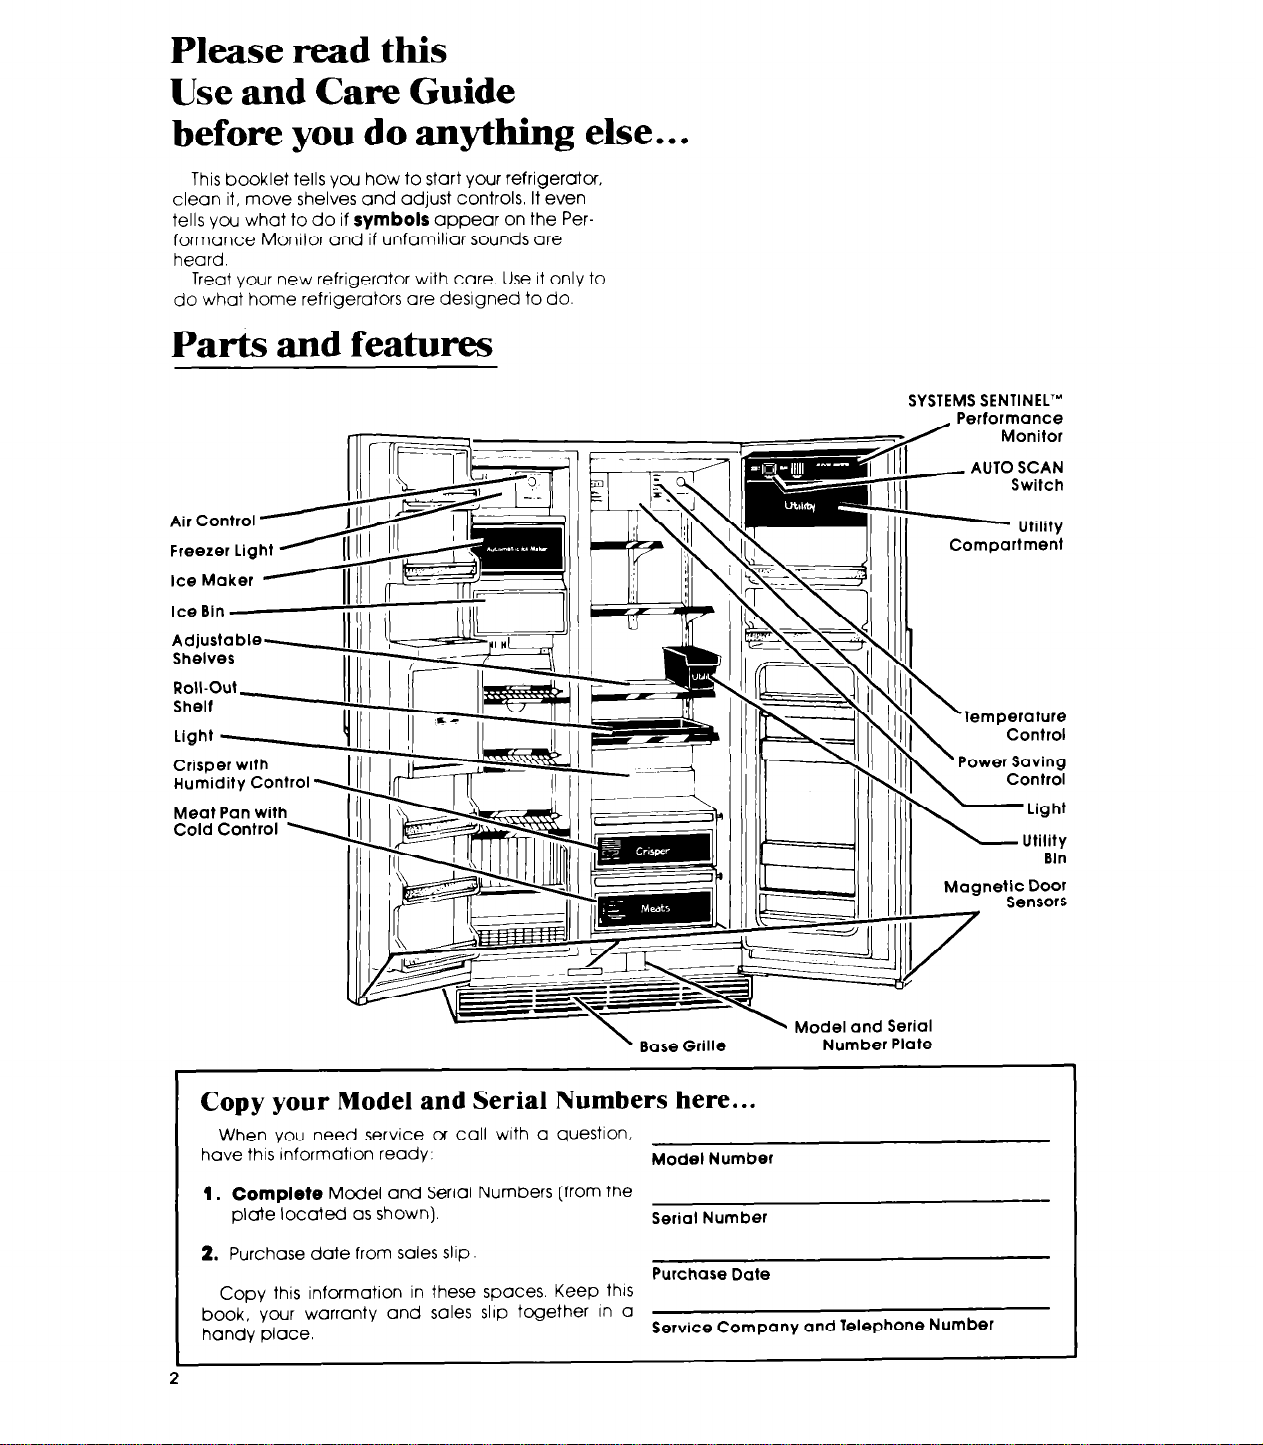
Parts and features
Air Control Freezer Light ’
Ice Maker -
Ice Bln Adjustable-
Shelves
SYSTEMS SENTINEL’”
, Performance
IIll
- Utility
II IllI
Monitor
AUTO SCAN
Switch
Compartment
_ _
Llght Crisper with
Humidity Control Meat Pan with
Cold Control \
’ Base Grille
Copy your Model and Serial Numbers here...
When you need service 01 call with a question,
have this Information ready:
1. Complete
plate located as shown).
2. Purchase date from sales slop.
Copy this information in these spaces. Keep this
book, your warranty and sales slop together in a
handy place.
I
2
Model and Serial Numbers (rrom the
Model Number
Serial Number
Purchase Date
Service Company and Telephone Number
4 II
r’
zr!/
Serial
and
Number Plate
Bin
Magnetic Door
Sensors
BEFORE YOU PLUG IT IN
Install Properly 4
Level Refrrgerator-Freezer
Remove Sales Labels 4
Clean It 4
Plug It In
USING YOUR REFRIGERATOR
Setting the Controls
Power Saving Control
Changrng the Control Settrngs
SYSTEMS SENTINEL Performance
Monrtor
The AUTO SCAN Switch
Reading the Performance Monitor
Adjusting Meat Pan Temperature 8
Adjusting Crisper Humidrty Control 8
AdlustIng Shelves
Cold Water and ice Disper,ser
Removing the Roll-Out Shelf
c 1983 Whirlpool Corporatron
Before you plug it in
Contents
3
4
4
5
5
5
5
6
6
6
8
a
IO
Removing Freezer Shelves
Removing the Freezer Basket
Removing the Crisper, Meat Pan and
Covers
Changing Light Bulbs
Sounds You May Hear
Energy Saving Tips
Removing the Base Grille
CLEANING YOUR REFRIGERATOR
Cleaning Chart
FOOD STORAGE GUIDE
Storing Fresh Food
Freezing and Storrng Frozen Food
VACATION AND MOVING CARE
IF YOU NEED SERVICE OR ASSISTANCE
1 Before Calling for Assistance
2 If You Need Assrstonce
3 If You Need Service
4 If You Have a Problem
10
10
10
10
11
11
11
11
12
13
13
14
17
18
18
19
19
19
IMPORTANT
Before using your refrigerator, you are personally
responsible for making sure that it
l
IS
installed and leveled on a floor that
the weight, and In an area suitable for its size
and use
l
IS
connected only to the right kind of outlet, with
the right electric supply and grounding.
l
IS
used only for jobs expected of home
refrigerators
l
IS
not near an oven, radiator or other heat source.
‘TMK.
will
hold
l
is properly maintained
l
IS out of the weather.
l
IS
used in an area where the room temperature will
not fall below 60” F (16’ C).
l
IS not run where there are explosive fumes.
l
IS not used by children or others who may not
understand how it should be used.
l
IS
not loaded with food before it has time to get
properly cold.
3
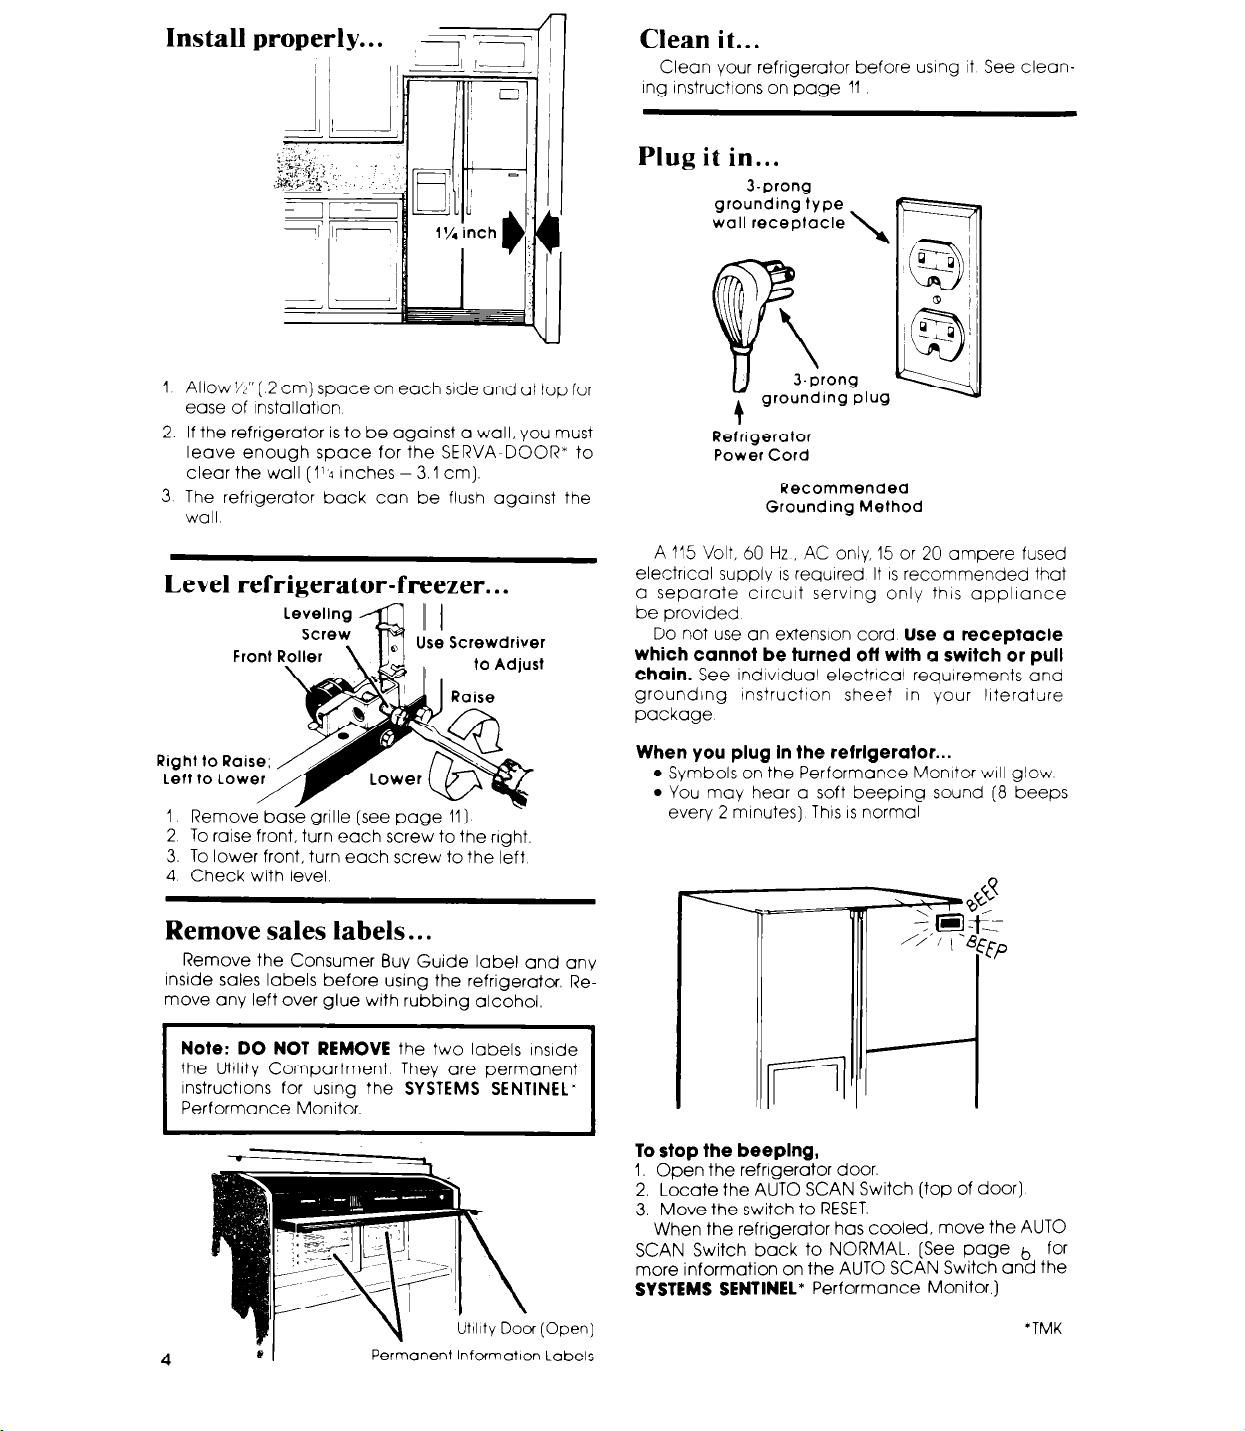
Install properly.. .
1 Allow ‘/2” [ 2 cm) space on each side and at top for
ease of lnstallatlon
2. If the refrigerator is to be against a wall, you must
leave enough space for the SERVA-DOOR’ to
clear the wall (114 inches - 3.1 cm).
3 The refrigerator back can be flush against the
wall
,iT=TfI-l
Level refrigerator-freezer.. .
Use Screwdriver
Clean it...
Clean your refrigerator before using it See clean-
ing instructtons on page 11
Plug it in...
J-prong
grounding type
wall receptacle
Refrigerator
Power Cord
Recommended
Grounding Method
A 115 Volt, 60 Hz, AC only. 15 or 20 ampere fused
electrical supply IS required It IS recommended that
a separate circuit serving only this appliance
be provided
Do not use an extension cord
which cannot be turned off with a switch or pull
chain.
grounding instructton sheet in your literature
package
See Individual electrlcal requirements and
Use a receptacle
1 Remove base grille (see page 11)
2 To raise front, turn each screw to the right.
3. To lower front, turn each screw to the left
4 Check with level.
Remove sales labels.. .
Remove the Consumer Buy Guide label and any
Inside sales labels before using the refrigerator Remove any left over glue with rubbing alcohol.
Note: DO NOT REMOVE
the Uttlllty Compartment. They are permanent
InstructIons for using the
Performance Monitor.
4
Sl
the two labels
SYSTEMS SENTINEL‘
InsIde
1
(Own1
Permanent lnformatlcn Labels
When you plug In the refrigerator...
l
Symbols on the Performance Monitor ~111 glow
l
You may hear a soft beeping sound (8 beeps
every 2 minutes) This IS normal
To stop the beeplng,
I. Open the refrigerator door.
2. Locate the AUTO SCAN Switch (top of door]
3. Move the switch to RESET.
When the refrigerator has cooled, move the AUTO
SCAN Switch back to NORMAL. [See page b for
more information on the AUTO SCAN Switch and the
SYSTEMS SENTINEL*
Performance Monitor.)
‘TMK

Using your refrigerator
Air Control
Temperature Control
Air Outlet
Setting the controls.. .
The Temperature Control IS in the refrlgerotor and
the AIM Control IS In the freezer sectron Wh,er’ the
refrigerator IS plugged in for the first time
54@21
3
1 Set the TEMPERA-
TURE CONTROL to 3
!g5
2 Set the AIR CON-
TROL to 3
Power Saving Control.. .
The Power Saving Control
sole operates eiectrrc heaters around the door
openings These heaters help keep moisture from
formlng on the outside of the refrigerator
on the Control Con-
Changing the control settings.. .
If you need to adjust temperatures in the refriger
ator or freezer, use the settings ilsted in the chart
below
Power Saving Control
Give the refrigerator time to cool down com-
pletely before adding food.
eral hours )
(Thus may take sev-
These settings should be about right for normal
household retrigerator usage.
The controls
juice IS as cold as you lrke and when Ice cream
IS firm
Do not block the alr outlet
Blocking tt con slow the ar movement needed to
keep temperatures at the level you set
OFF
ml
1 Use the “OFF set-
tlng when humiditv- If moisture forms
IS iow
l
Adjust the Temperature Control first
l
Wait ot least 24 hours between adjustments
l
Then adjust the Air Control, If needed.
will
be set about right when mrlk or
on the control panel
2 Use the ‘ON’ setting
on the outslde of the
refrigerator
CONDITION:
TOO WARM
TOO WARM
QUESTIONS? If Refrlaerator
call your
COOL-LINE ’ TOO COLD
service
assistance
telephone
number
(page 19).
Sectlo;
If ICE Isn’t
MADE FAST ENOUGH
If BOTH SECTIONS Door opened often
are TOO WARM
IS
REASONS:
Door opened often
Large amount of food added
Room temperature too warm
Door opened often
Larae amount of food added
Vei cold room temperature
Controls not set correctlv
for vour condrtrons
Heavv ice usaae
Very cold room temperature
Large amount of food added
Very warm or very cold
room temneratrlres
RECOMMENDED SETTINGS:
Temperature Control
Air Control
Temperature Control
Air Control
Temperature Control
Air Control
Temperature Control
Air Control
Temperature Control
Arr Control 2
4
3
3
4
2
3
3
4
3
5
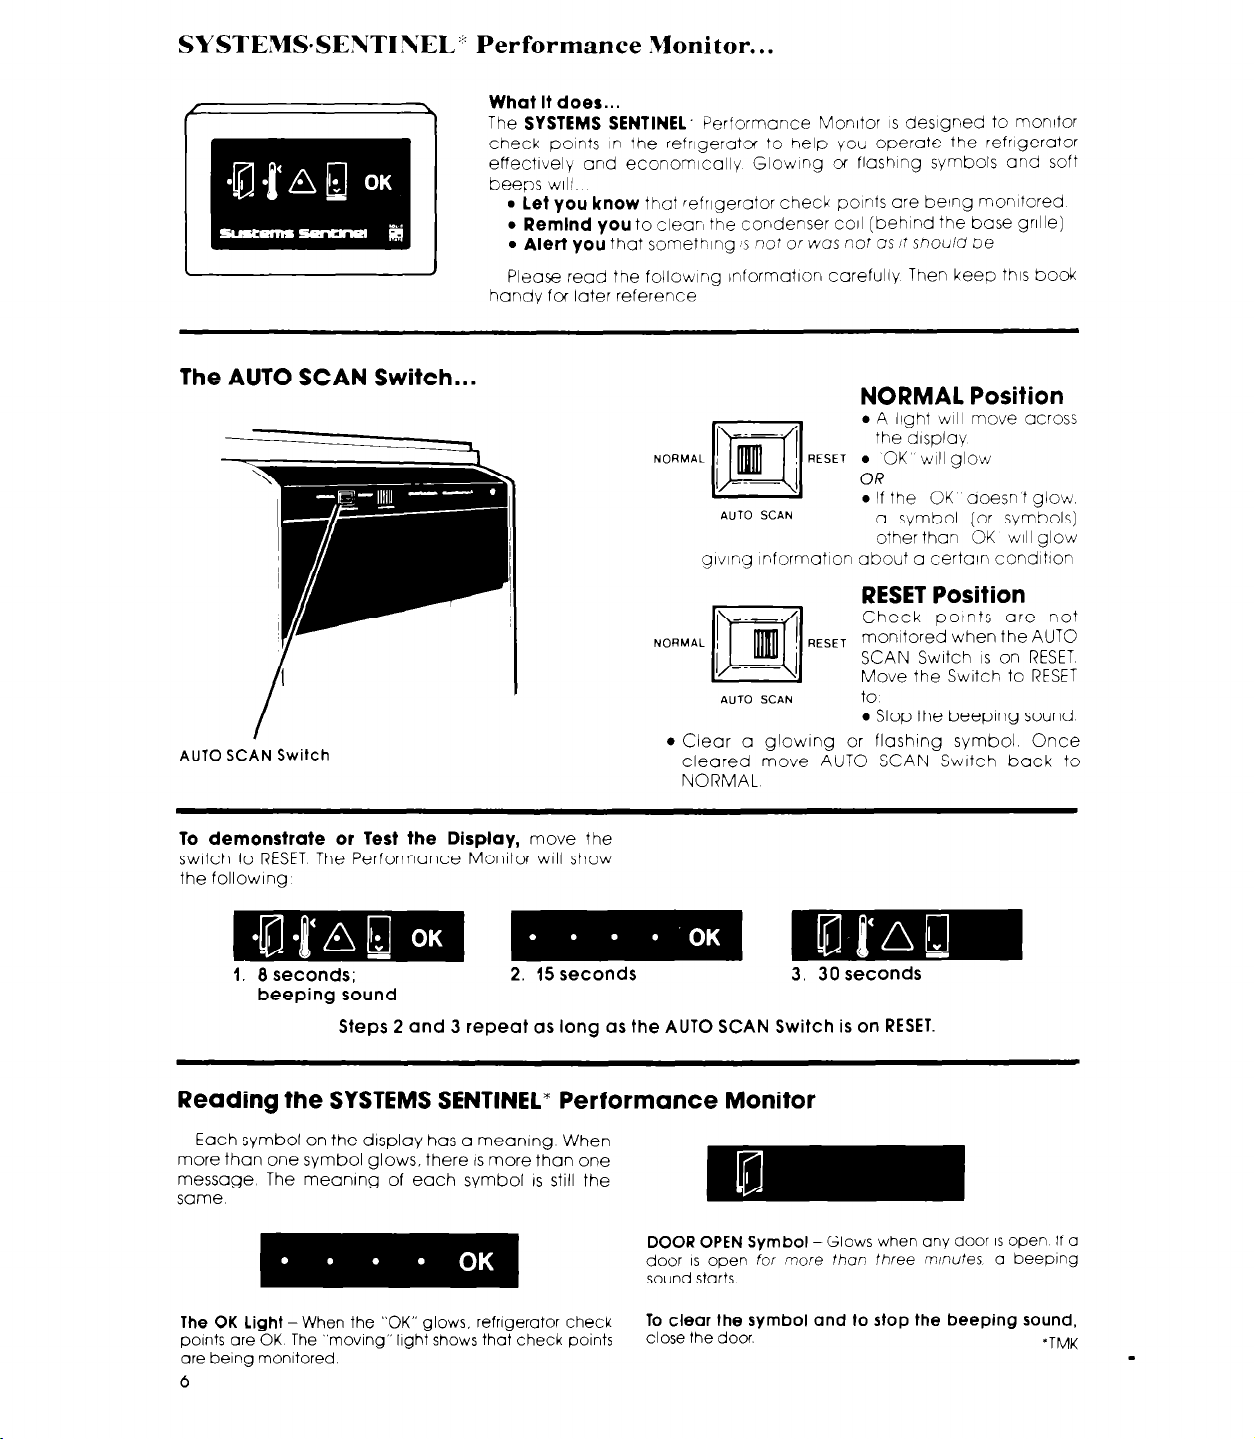
SYSTEMS-SENTINEL” Performance Monitor.. .
What It does...
The
SYSTEMS SENTINEL,
check points in the refrigerator to help you operate the refrigerator
effectively and economically Glowing or flashing symbols and soft
beeps w~li
l
let
you
know
l
Remlnd
l Alert
Please read the following InformatIon carefully Then keep this book
handy foe later reference
you to clear, the condenser co11 (behind the base grille)
you that somethng s not or wos not OS it
Performance Monrtor IS deslgned to monrtor
that refrigerator check points are betng monitored
should be
The AUTO SCAN Switch...
NORMAL
I
AUTO SCAN Switch
To demonstrate or Test the Display,
move the
swatch to RESET The Performance Monitor WIII show
the followrng
B B B
2. 15
1. 8
seconds;
seconds 3. 30 seconds
beeping sound
Steps 2 and 3 repeat as long as the AUTO SCAN Switch is on RESET.
l
NORMAL Position
l
A light
will
move across
the drsplay
RESET .
AUTO SCAN
OK
WIT qlow
l
If the OK aoesn t alow.
a symbol (or symvbols]
other than OK WIII glow
grvlng Information about a certain condition
RESET Position
Check ootnts are not
RESET monitored when the AUTO
SCAN Switch
Move the Swatch to RESET
AUTO SCAN
to
a Stop the beeprng sound
Clear a glowrng or flashing symbol. Once
cleared move AUTO SCAN Switch back to
NORMAL
IS
on RESET
Reading the SYSTEMS SENTINEL* Performance Monitor
DOOR OPEN Symbol -Glows when any door IS open If o
The OK Light-When the “OK” glows, refrrgerotor check
pornts are OK The “moving” light shows that check points
are being monrtored.
6
door IS open
sound starts
To clear the symbol and to stop the beeping sound,
close the door.
for more
than three
minutes
a beeprng
‘TMK
 Loading...