

Whirlpool AWI-1300 Service Manual

Service Manual
Auto Washer
Model : AWI-1300
GREAT TECO WHIRLPOOL CO., LTD
WHIRLPOOL
✔
Caution
: In this Manual, some parts can be changed for improving, their
performance without notice in the parts list. So, if you need the
latest parts information,please refer to PPL(Parts Price List) in
Service Information Center (http://svc.dwe.co.kr).

AUTO WASHER AUTO WASHER AUTO WASHER AUTO WASHER AUTO WASHER AUTO WASHER AUTO WASHER AUTO WASHER AUTO WASHER AUTO
WASHER AUTO WASHER AUTO WASHER AUTO WASHER AUTO WASHER AUTO WASHER AUTO WASHER AUTO WASHER AUTO WASHER AUTO WASHER
AUTO WASHER AUTO WASHER AUTO WASHER AUTO WASHER AUTO WASHER AUTO WASHER AUTO WASHER AUTO WASHER AUTO WASHER AUTO
WASHER AUTO WASHER AUTO WASHER AUTO WASHER AUTO WASHER AUTO WASHER AUTO WASHER AUTO WASHER AUTO WASHER AUTO WASHER
AUTO WASHER AUTO WASHER AUTO WASHER AUTO WASHER AUTO WASHER AUTO WASHER AUTO WASHER AUTO WASHER AUTO WASHER AUTO
WASHER AUTO WASHER AUTO WASHER AUTO WASHER AUTO WASHER AUTO WASHER AUTO WASHER AUTO WASHER AUTO WASHER AUTO WASHER
AUTO WASHER AUTO WASHER AUTO WASHER AUTO WASHER AUTO WASHER AUTO WASHER AUTO WASHER AUTO WASHER AUTO WASHER AUTO
WASHER AUTO WASHER AUTO WASHER AUTO WASHER AUTO WASHER AUTO WASHER AUTO WASHER AUTO WASHER AUTO WASHER AUTO WASHER
WASHING MACHINE
CCoonntteennttss
1. SPECIFICATIONS
...................................................................................................................
2
2. STRUCTURE OF THE W ASHING MACHINE
........................................................................
3
3. FUNCTIONS OF THE CONTROL PANEL
.............................................................................
4
4. WASHING PR OCEDURE AND COURSE SELECTION
FULL AUT OMATIC COURSE
.........................................................................................................
5
RESERVED WASHING
...................................................................................................................
6
PARTIAL SELECTION AMONG WASH, RINSE OR SPIN
.............................................................
6
5. DIRECTIONS FOR INSTALLATION AND USE
INSTALLA TION OF THE UNDER BASE COVER
..........................................................................
7
HOW TO INSTALL ON AN INCLINED PLACE
...............................................................................
7
HOW TO CONNECT THE INLET HOSE
........................................................................................
8
HOW TO CLEAN THE FILTER
........................................................................................................
9
6. FEATURE AND TECHNICAL EXPLANATION
FEATURE OF THE WASHING MACHINE
....................................................................................
10
WATER CURRENT TO ADJUST THE UNBALANCED LOAD
.....................................................
10
FUNCTION FOR SOAK WASH
....................................................................................................
10
AUT OMATIC WATER SUPPLY SYSTEM FOR BLANKET WASH
...............................................
10
FUNCTIONAL PRINCIPLE OF BUBBLE WASHING MA CHINE
.................................................
11
AUT OMATIC DRAINING TIME ADJUSTMENT
.............................................................................
11
AUT OMATIC UNBALANCE ADJUSTMENT
.................................................................................
12
CIRCULATING-WATER COURSE AND LINT FILTER
..................................................................
12
LINT FILTER
..................................................................................................................................
13
RESIDUAL TIME DISPLAY
...........................................................................................................
13
DRAIN MOTOR
.............................................................................................................................
13
GEAR MECHANISM ASS’Y
..........................................................................................................
14
7. DIRECTIONS FOR DISASSEMBLY AND ADJUSTMENT
GEAR MECHANISM ASS’Y REPLACEMENT
.............................................................................
15
8. THE REPAIR METHOD OF GEAR MECHANISM FOR CLUTCH SPRING PROBLEM
THE STRUCTURE OF GEAR MECHANISM............................................................................... 18
HOW TO CHECK THE CLUTCH SPRING PR OBLEM................................................................ 19
THE PROCESS OF DISASSEMBLE............................................................................................ 20
THE RPOCESS OF ASSEMBLE.................................................................................................. 22
9. TROUBLE SHOOTING GUIDE
CONCERNING WATER SUPPLY
.................................................................................................
24
CONCERNING WASHING
...........................................................................................................
25
CONCERNING DRAINING
...........................................................................................................
26
CONCERNING SPINNING
...........................................................................................................
27
CONCERNING OPERATION
........................................................................................................
28
10. PRESENTATION OF THE P.C.B ASS’Y
.....................................................................................
29
APPENDIX
WIRING DIAGRAM
.......................................................................................................................
30
EXPLODED VIEW
.........................................................................................................................
31
PARTS LIST
...................................................................................................................................
35
CIRCUIT DIAGRAM
......................................................................................................................
37

NO. ITEM AWI-1300
1 POWER SOURCE 110V, 60HZ
2 POWER CONSUMPTION 600W
3 MACHINE WEIGHT 47Kg (GROSS: 50Kg)
4 DIMENSION(WXHXD) 630 X 1010 X 670
5 WASHING COURSE
FULL AUT OMATIC 6 COURSE (ST ANDARD/BLANKET/SUIT/ECONOMY/LIGHT/HEAVY)
6 WATER CONSUMPTION NORMAL 270
l
7 WATER HIGH 103
l
LEVEL ● 94
l
SELECTION MIDIUM 87
l
● 77
l
LOW 70
l
● 60
l
E.LOW 43
l
8 OPERATING WATER PRESSURE 0.3~8kgf/cm2(2.94N/cm2~78.4N/cm2)
9 REVOLUTION PER WASH 125~140RPM
MINUTE SPIN 675~695RPM
SUIT COURSE WASH: 65
10 PULSATOR 6WINGS(Ø406mm)
11 WATER LEVEL CONTROL ELECTRONICAL SENSOR
12 ANTI-NOISE PLATE ❍
13 GEAR MECHANISM HELICAL GEAR
14 LINT FILTER ❍
15 SOFTENER INLET ❍
16 FUNCTION FOR SOAK WASH ❍
17 ALARM SIGNAL ❍
18 RESIDUAL TIME DISPLAY ❍
19 AUTO. WATER SUPPLY ❍
20 NEW WATER FLOW WATER FLOW FOR ADJUST THE UNBALANCED LOAD
21 FUNCTION FOR BUBBLE AND RADICAL ❍
22 AUT O RE-FEED WATER ❍
23 AUT O POWER OFF ❍
1. SPECIFICATIONS
2
SPECIFICATIONS
(OPTION)
2. STRUCTURE OF THE WASHING MACHINE
3
STRUCTURE
B
U
B
B
L
E
W
A
S
H
I
N
G
M
A
C
H
I
N
E
W
A
T
E
R
L
E
V
E
L
RES.
W
A
S
H
WASH
S
P
IN
SPIN
R
E
M
.
R
E
S
.
C
O
U
R
S
E
ECO.
ECO.
S
T
A
R
T
H
O
L
D
P
O
W
E
R
R
IN
S
E
RINSE
C
O
U
R
S
E
FUZZY
F
E
E
D
S
O
C
K
BLANKET
LIGHT
HEAVY
SUIT
HIGHT
MEDIUM
LOW
E
.
L
O
W
DETERGENT
H
O
U
R
MIN.
MIN.
BLEACH INLET
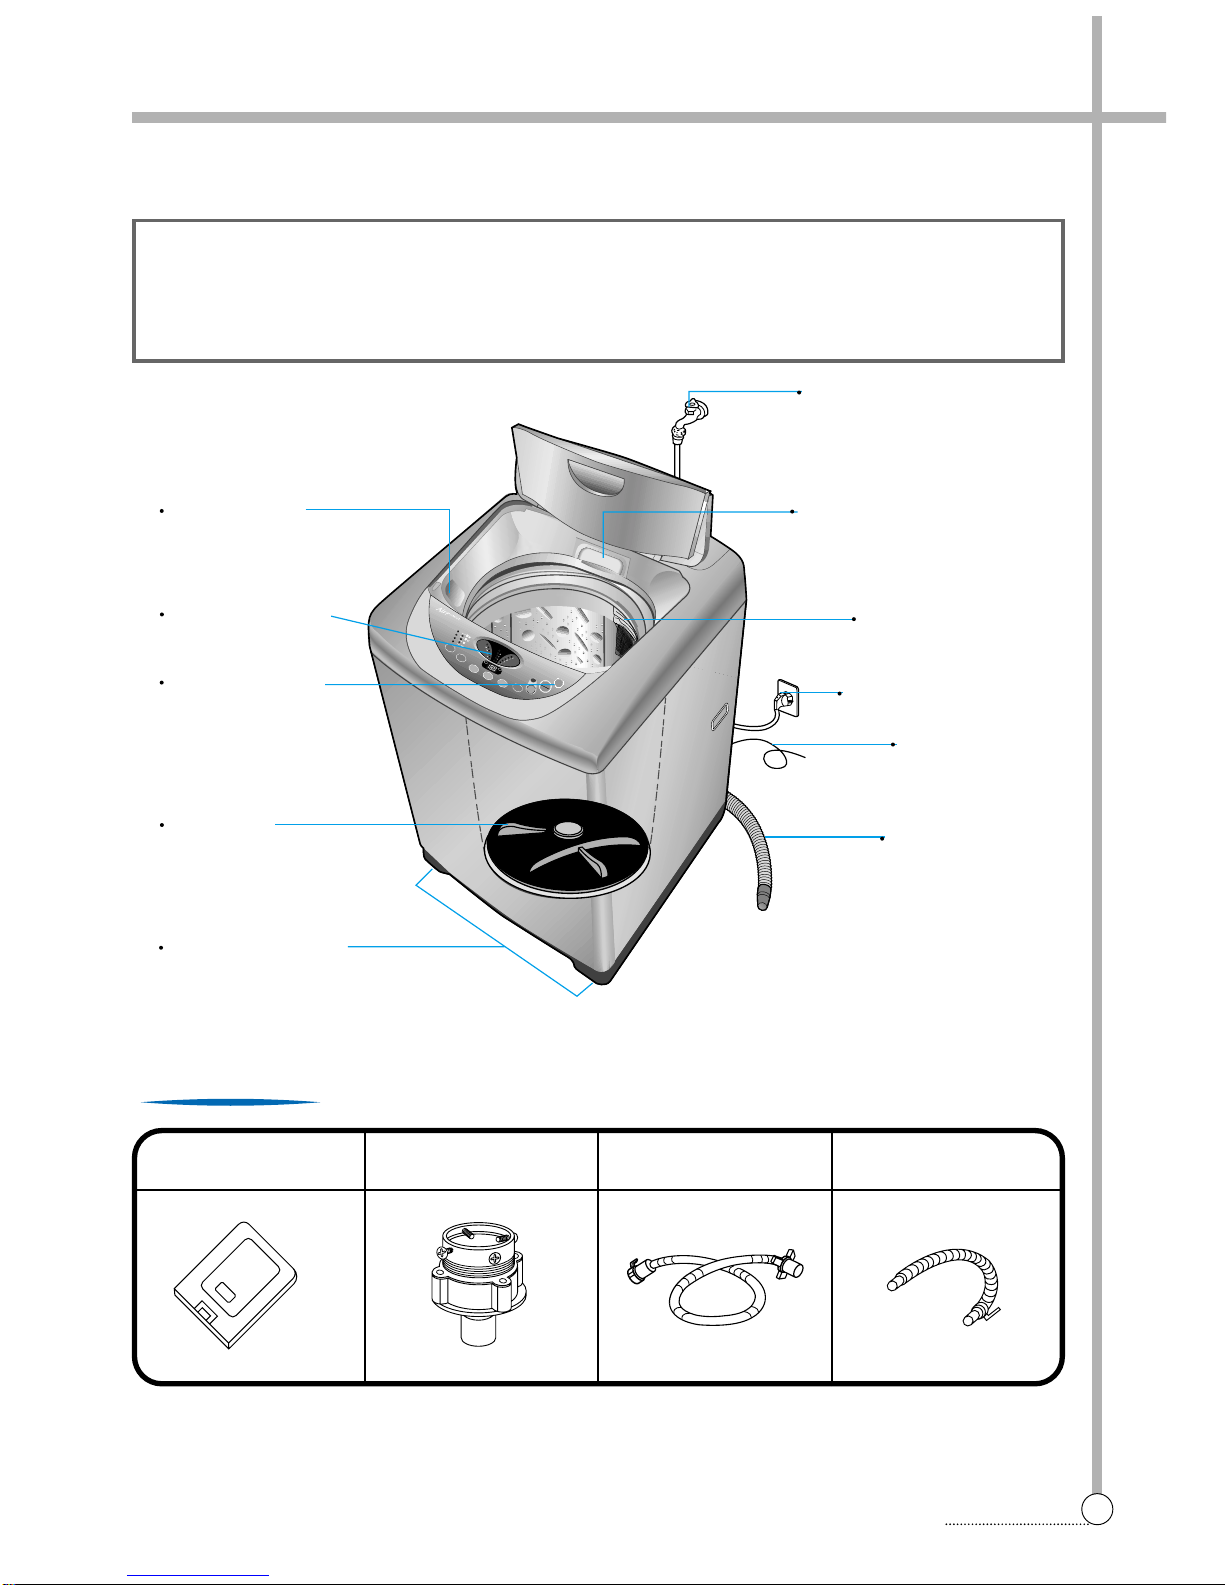
POWER SWITCH
CONTROL PANEL
PULSATOR
ADJUSTABLE LEGS
COLD WATER TAP
After using the washer,
close the water tap.
DETERGENT CASE
LINT FILTER
GROUND WIRE
In case of 3-wire power cord
ground wire will not be provided.
POWER CORD
HOSE DRAIN
COVER UNDER [OPTION] WATER T AP ADAPTER INLET HOSE
HOSE DRAIN O AS [NON-PUMP]
Accessories
UP
The parts and features of your washer are illustrated on this page.
Be come familiar with all parts and features before using your washer.
NOTE
• The drawing in this book may vary from, your washer model. They are designed to show the different features of all models covered by this book, Your model may not include all features.
• Page ref erences are included next to same features.
Refer to those pages for more information about the features .
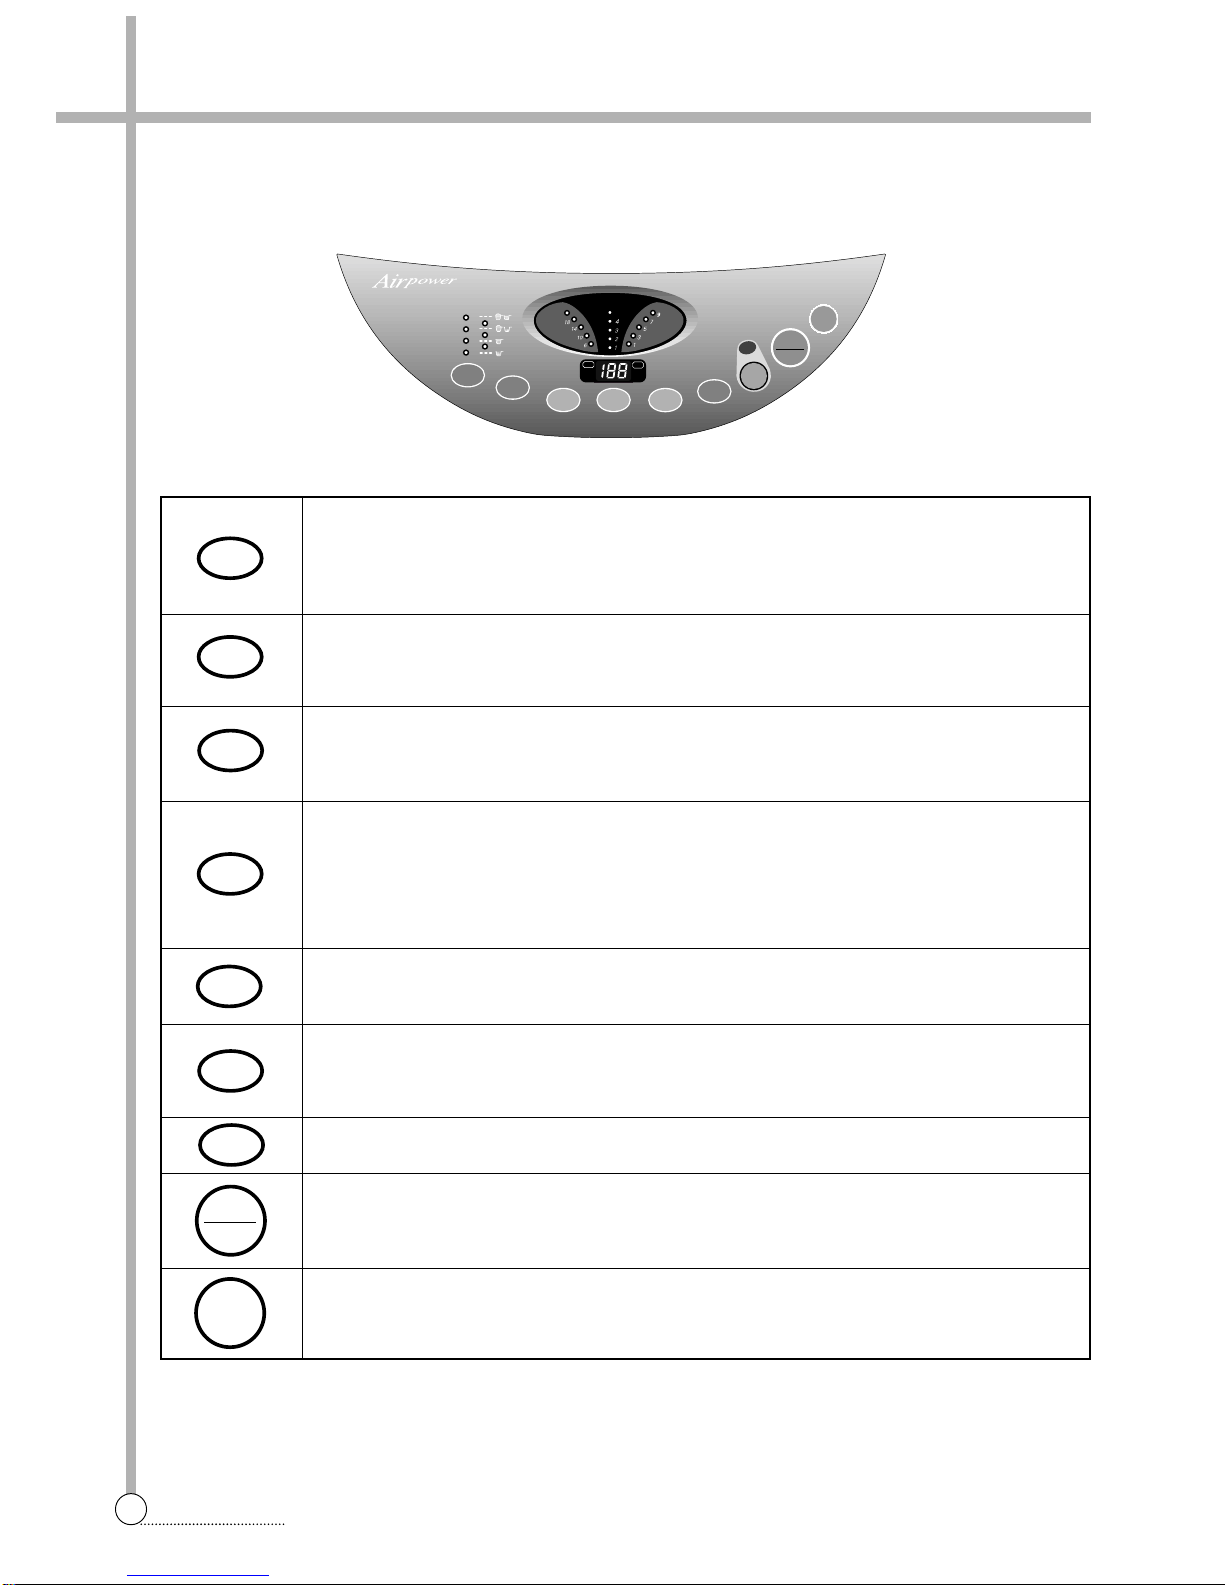
3. FUNCTIONS OF THE CONTROL PANEL
4
CONTROL PANEL
• It can be used to adjust amount of water according to the size of the load to be w ashed.
• As the button is pressed, water level is selected by MEDIUM ➔●➔HIGH ➔●➔E.LOW
➔●➔LOW ➔●➔MEDIUM
• It can be used to pre-engage time for wash
• It can be used to adjust washing time.
• As the button is pressed, you will see the repeated.
6 ➔ 10 ➔ 14 ➔ 18 ➔ SOAK
• This button selects the number of times you w ant to rinse.
• As the button is pressed, it will repeat.
• 1 time rinse ➔ 1 time feed rinse ➔ 2 times rinse ➔ 2 times feed rinse ➔ 3 times rinse ➔
3 times feed rinse ➔ 4 times rinse ➔ 4 times feed rinse.
• In case of the pump model, there is no feed rinse or spra y rinse selector function.
• It can be used to change spin time.
• As the button is pressed, it will repeat. 1 ➔ 3 ➔ 5 ➔ 7 ➔ 9.
• It can be used to select the full-automatic course.
• As the button is pressed, it will selected by following order:
FUZZY ➔ BLANKET ➔ ECONOMY ➔ LIGHT ➔ HEAVY ➔ SUIT
• It can be used to select the economic course.
• Operation and temporary stop are repeated as they are pressed.
• When you want to change course in operating; press the “START/HOLD” button ➔ Select
the course that you want to change ➔press the “START/HOLD” button again.
• Press this switch to turn the power on or off.
After turning off the power, wait for more then 3seconds and then turn it on again.
BUBBLE WASHING MACHINE
WATER
LEVEL
RES.
WASH
WASH
SPIN
SPIN
REM.
RES.
COURSE
ECO.
ECO.
START
HOLD
POWER
RINSE
RINSE
COURSE
FUZZY
FEED
SOCK
BLANKET
LIGHT
HEAVY
SUIT
HIGHT
MEDIUM
LOW
E.LOW
DETERGENT
HOUR
MIN.
MIN.
Control panel has micom sensor.
As the buttons are pressed, the lames indicating the selection of your desired washing program will light up.
WATER
LEVEL
RES.
WASH
RINSE
SPIN
COURSE
ECO.
START
HOLD
POWER
5
PROCEDURE
4. WASHING PROCEDURE AND COURSE SELECTION
1. FUZZY COURSE (SENSOR);
• This selection is for general washing e xcept extraordinary clothes.
• Artificial brain sensor selects properly the various kind of washing condition such as washing time, rinse times, spin
time water level and washes w ell. If y ou w ant to soak, press the “WASH” button to adjust “SOAK” after the course
selection. Procedure to press the button;
2. LIGHT COURSE
• This selection is effective f or w ashing light or less dirty wash. Procedure to press the button;
3. BLANKET COURSE;
• This selection is effective f or blanket, curtain, carpet, etc ...
• Do not wash general-electric blanket absolutely (4kg’s limitation for one-time-wash). Procedure to press the button;
4. SUIT COURSE;
• This selection is effective f or high-quality sweater, underwear, wool, etc ...
• When the washer is operated, selection for water level will be selected “MEDIUM” by automatically in order to pre-
vent the laundry.
• Use detergent that is “Only for dry-cleaning”.
• 1.5kg’s limitation for one-time-wash.
NOTE
• Only cold water should be supplied for washing.
• Be sure to use only the detergent exclusively used for the w asher.
• Do not use the washer to wash leather clothes, or chamois clothes.
• Separate white color/light-colored from colorfast clothes.
■
Full Automatic Course
START/
HOLD
POWER
START/
HOLD
POWER
COURSE
adjust to
"LIGHT"
START/
HOLD
POWER
If necessary, adjust to
water level
COURSE
adjust to
"BLANKET"
START/
HOLD
START/
HOLD
POWER
Put the exclusive
detergent DRYTEN
of 26g into the tub
for dilution with water.
COURSE
adjust to
"SUIT"
(or "WOOL")
After dissolving of
detergent, lamp
will buzzer will
sound.
Put the clothes into
the tub after the
buzzer sounds.
Close the lid and press the
S/H button once again.
6
PROCEDURE
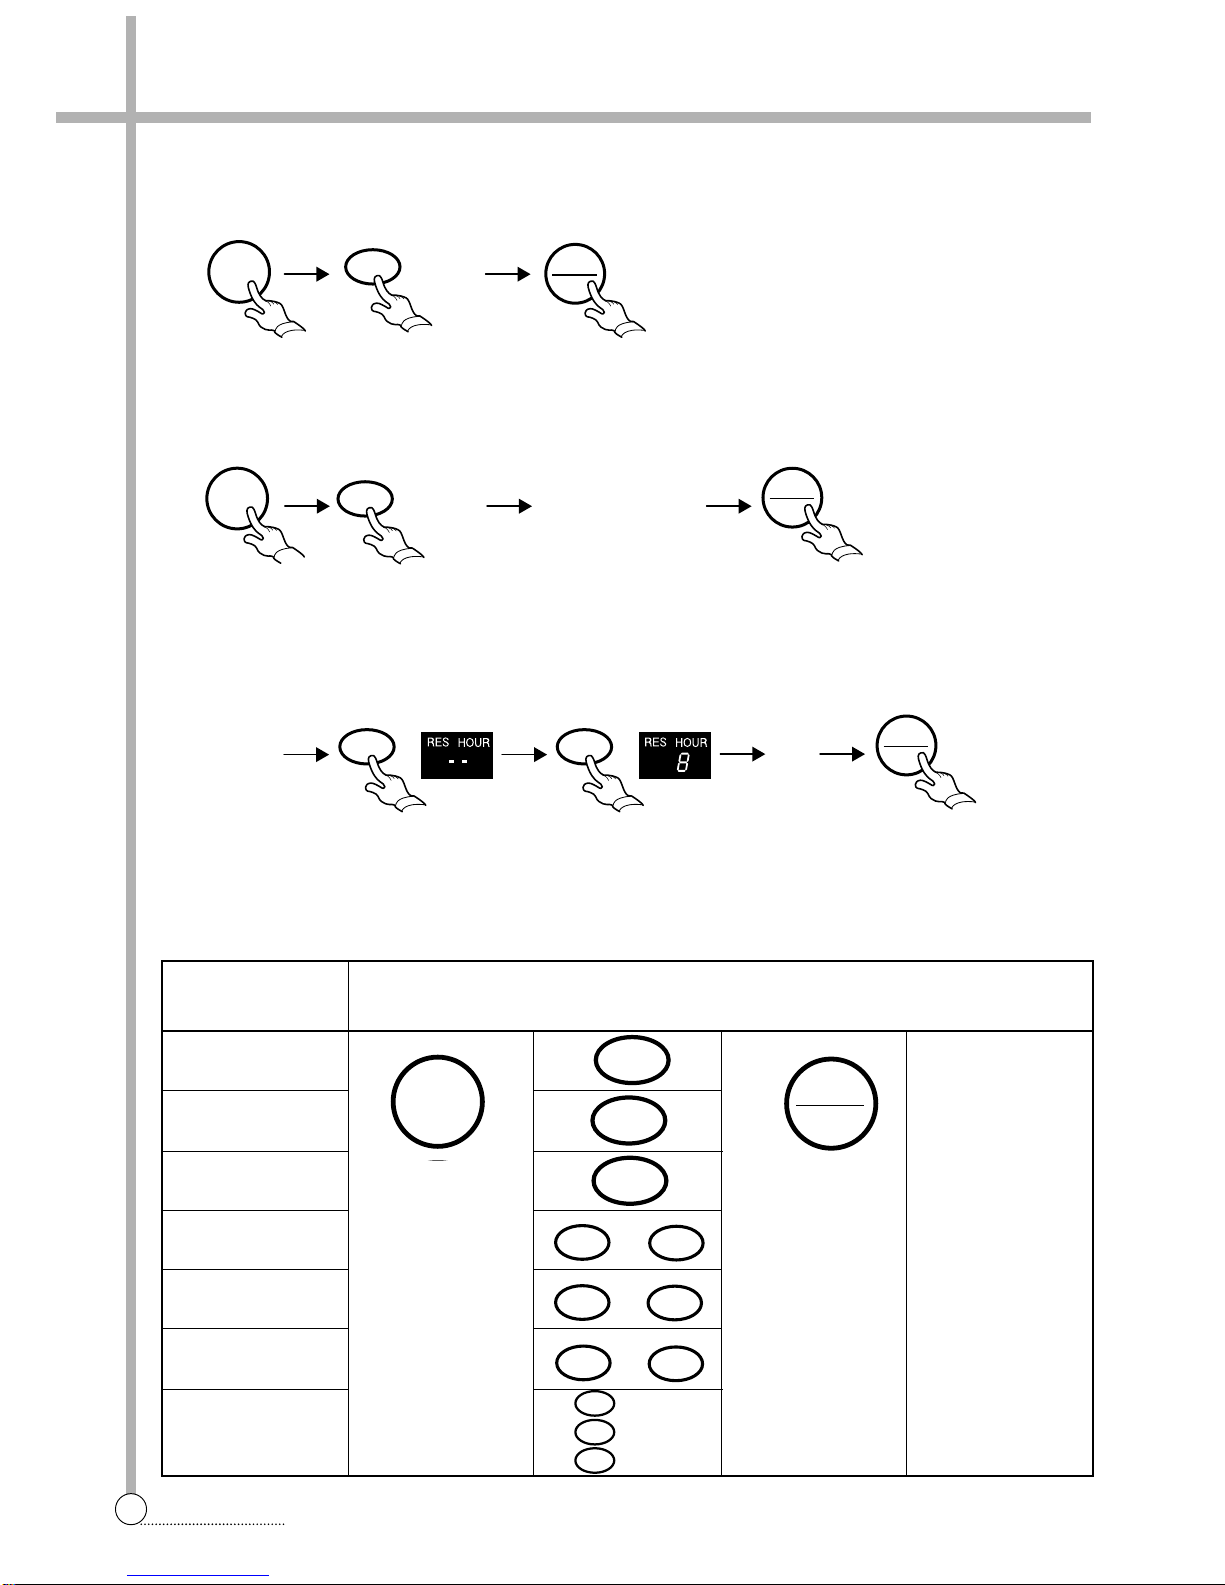
5. HEA VY COURSE;
• This selection is effective f or blue-jean, climbing clothes, ruck sack, sports wear, etc ...
• If you want to soak, press the “WASH” button to adjust to “SOAK” after the course selection.
6. ECONOMY COURSE;
• This selection is effective f or w ashing light or less dirty wash.
• Regulate the quantity of water according to load to be washed. Procedure of press the button;
■
Reserved Washing
• Reservation can be made from 2 hours to 48hours.
example) To make reservation to complete washing in 8hours.
• Now the reservation is mode.
■
Partial Selection Among Wash, Rinse or Spin
Washing contents
Only Wash
Only Rinse
Only Spin
Wash & Rinse
Wash & Spin
Rinse & Spin
Wash ➔
Rinse ➔
Spin
➔
Press the “S/H” button.
If once more
Pressed, the washer
will be stopped.
For keeping
Operation continuously to the set program, press another
time.
End of washing
informed by buzzer.
After the end of the
washing, the power
switch will be turned
off automatically.
Procedure to press the button
START/
HOLD
POWER
COURSE
adjust to
"HEAVY"
START/
HOLD
POWER
COURSE
adjust to
"ECONOMY"
If necessary, adjust to
water level
(default:water
level-low, spin-1min.,
rinse-fixed 1times)
START/
HOLD
adjust to
"MEMORY"
RES.
"
--" shall blink
RES.
adjust to "8"
close
the lid
POWER
WASH
RINSE
SPIN
WASH
WASH
RINSE
RINSE
RINSE
WASH
SPIN
RINSE
SPIN
START
HOLD
➔
➔
➔
➔
➔
7
DIRECTIONS
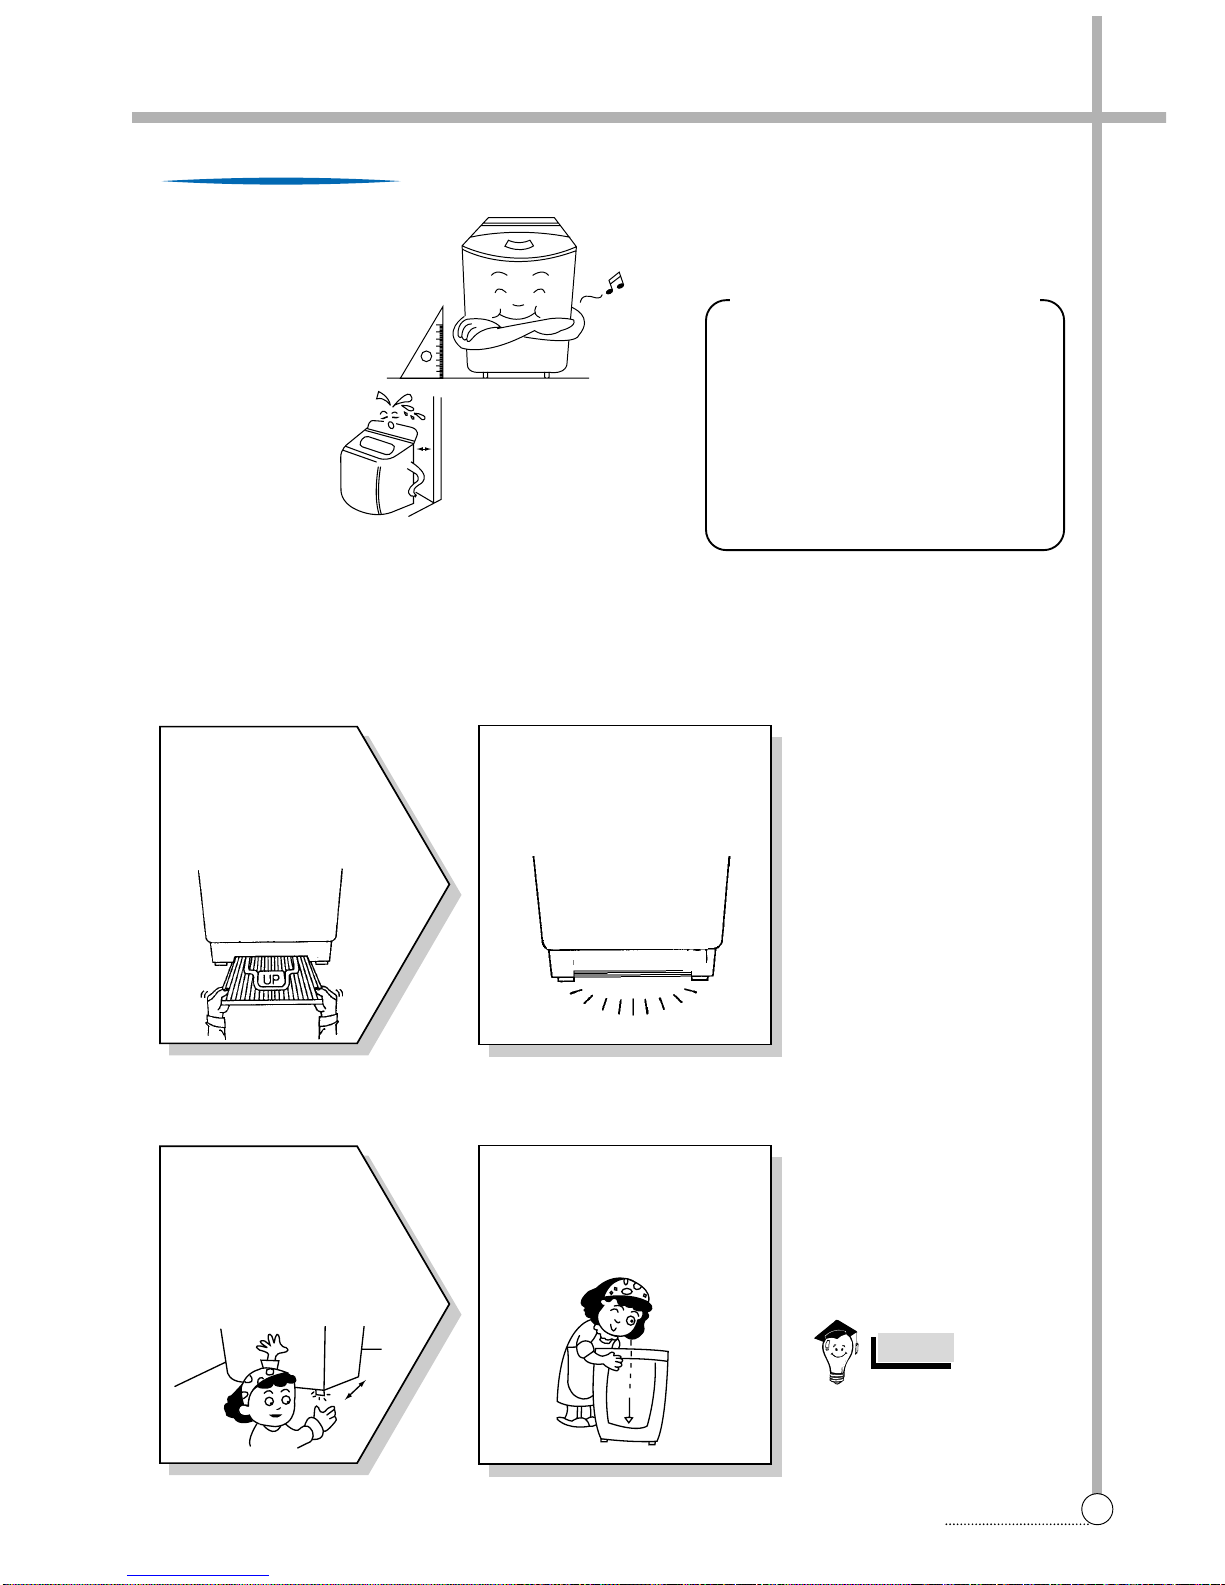
5. DIRECTIONS FOR INSTALLATION AND USE
The openings must not
be obstructed by carpeting when the washing
machine is installed on a
carpeted floor.
■
installation Of The Under Base Cover [Option]
■
How To Install On An Inclined Place
● The place where it would be exposed to
direct sunlight.
● The place nearby a heater or heat appliance.
● The place where it would be supposed to
be frozen in winter.
● The kitchen with coal gas and a damp
place like a bathroom.
NOTES
10Cm
Install the washer on a horizontal
solid floor. If the washer is installed
on an unsuitable floor, it could make
considerable noise and vibration.
Installing Place
Never install in these places
2
Push the noise insulation plate
into the end, which decrease
the noise made by this washer.
1
The packing box
opened, there is a
noise insulation plate.
Please insert this plate
into the bottom area on
the back side.
2
Check the Horizon
Status
Check the position of tub above
the center of the washer.
1
Horizon
Setting
After controlling the height
by turning the adjustable
leg, let the washer put
down to the ground.
Keep the machine body
more than 10cm apart from
the wall surface. It will
make easy cleaning the
drain filter which is equipped
at the back side of it. And if
it comes into contract vibration may occur.
“Back”
“Back”
8
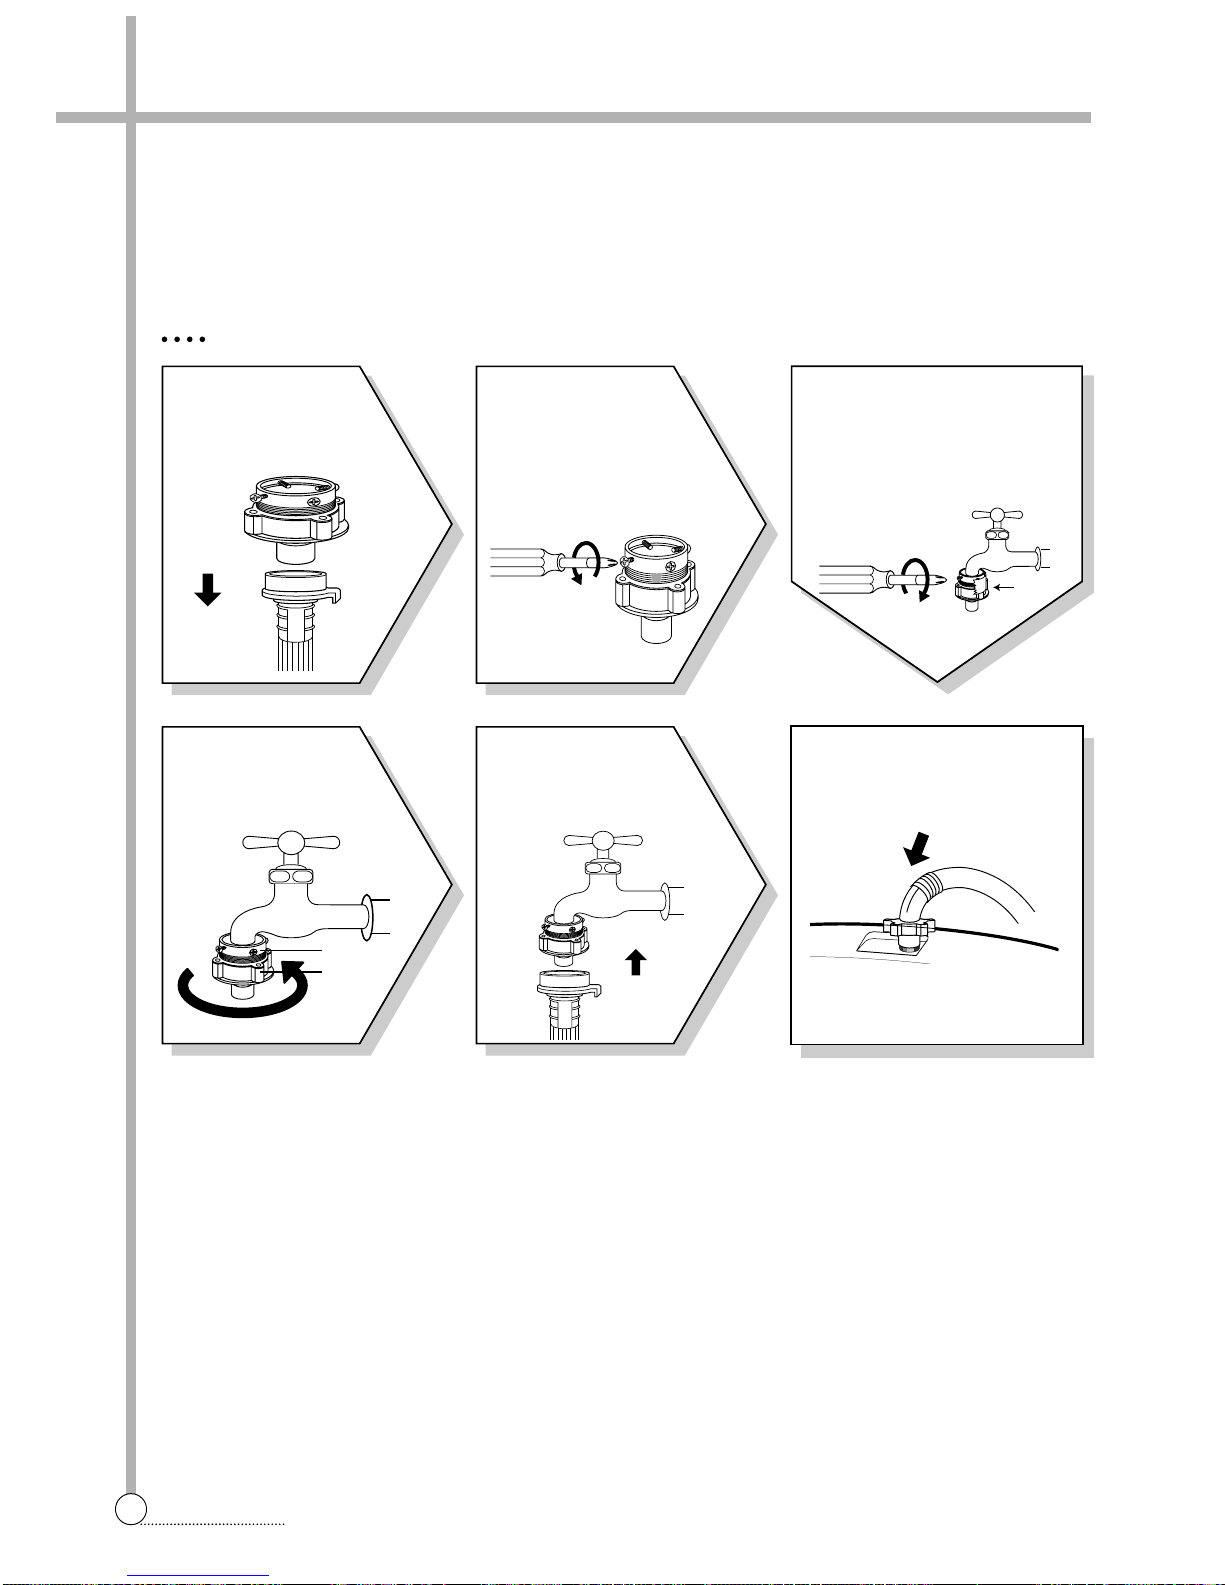
CONNECTION
FOR ORDINARY TAP
6
Connect the inlet hose adapter
of the hose to the water inlet of
the washer by turning it clockwise to be fixed tightly.
• Please check the rubber packing
inside the inlet hose adapter of
the hose.
1
Pull down the collar
of the inlet hose to
separate it from the
water tap adapter.
2
Loosen the four
screws at the water
tap adapter, but don’t
loosen the screws until
they are separated from
the water tap adapter.
4
Remove the tape,
and screw connector
B into connect A tightly.
5
Connect the inlet
hose to the water tap
adapter by puling down
the collar of the hose end.
3
Connect the water tap
adapter to the water tap tighten the four screws evenly
while pushing up the adapter
so that the rubber packing
can stick to the water tap
tightly.
■
How to Connect the Inlet Hose
Be careful not to mistake in supplying between the hot(maximum : 50˚C) and cold water.
In using only one water tap or in case of attached one water inlet valve, connect the inlet hose to the cold water inlet
valve.
Do not over tighten : this could cause damage to couplings.
TAPE
Connector B
Connector A
9
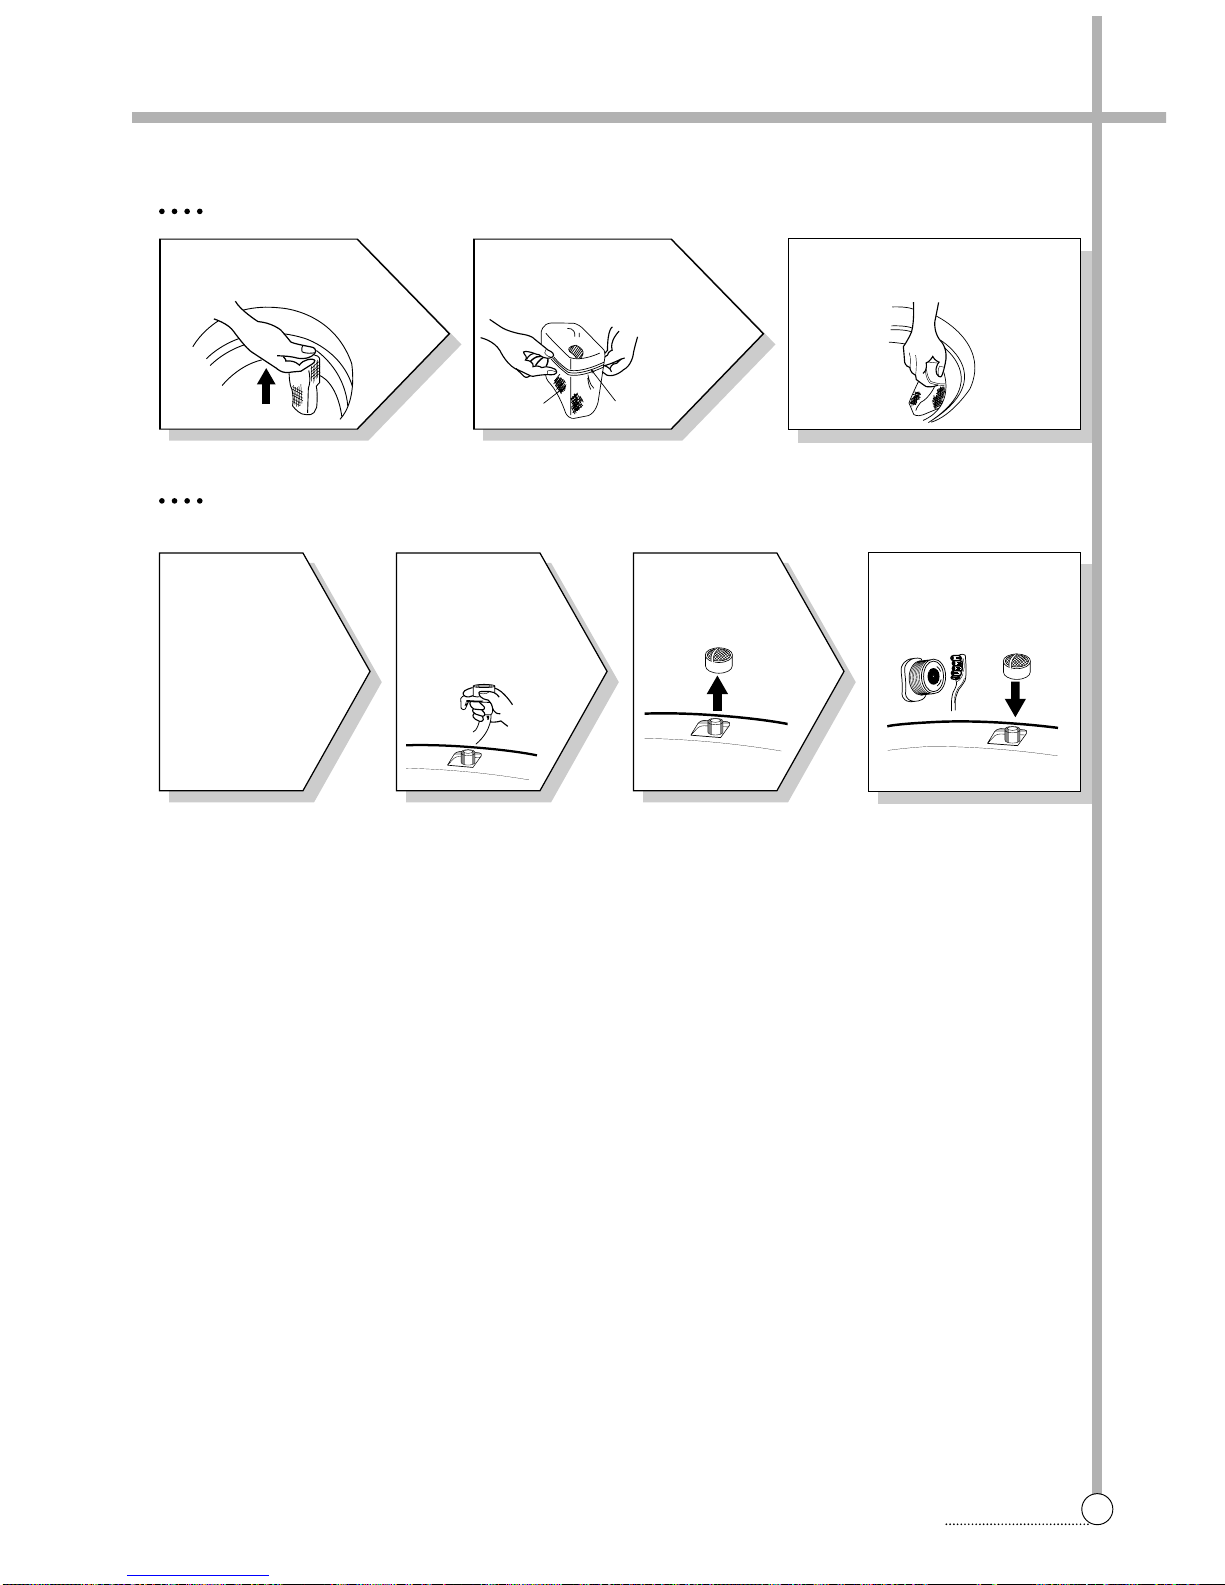
CONVENIENCE
■
How To Clean The Filter
4
Remove the dirt
from the inlet filter
with a brush.
1
Pull the
power plug
out before
cleaning it.
2
Turn off the
water supply
to the washer
and sperate the
inlet hose.
3
Pull the
inlet filter out.
CLEANING THE LINT FIL TER
CLEANING THE WATER INLET FIL TER
• Clean the filter when water leaks from, the water inlet.
3
Return the filter as it was, and
insert the filter frame into the
slot.
1
Pull the Filter frame
upward.
2
Turn the lint filter
inside out, wash to
the lint off with water.
Filter Frame
Lint Filter
10
EXPLANATION
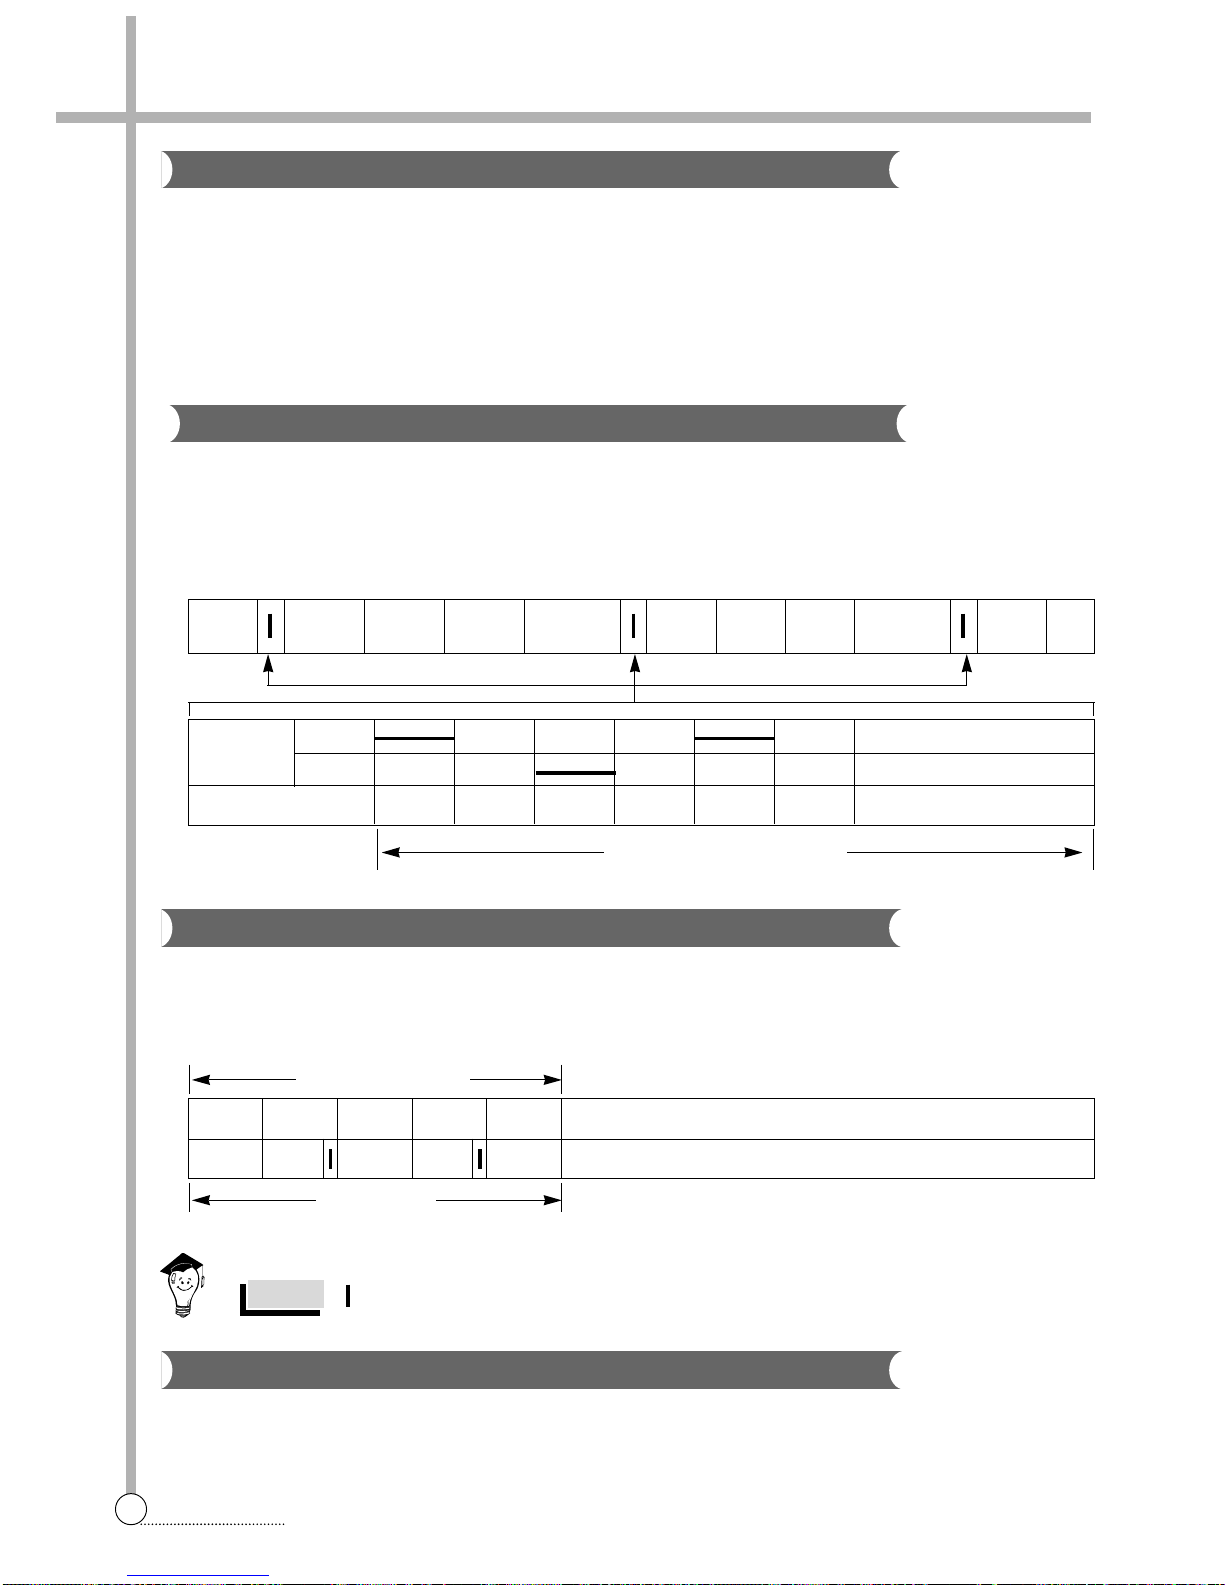
6. FEATURE AND TECHNICAL EXPLANATION
WASH DRAIN SPIN FILL RINSE 1 DRAIN SPIN FILL RINSE 2 DRAIN •••
MOT OR C.W
SINGAL C.C.W
TIME(SEC.) 0.3 0.3 0.3 0.3 0.3 0.3 •••••••
35 SEC. (About 29 Times)
FILL WASH STOP WASH STOP
• 2’ 28’ 2’ 28’
SOAK PROCESS MAIN PROCESS
60 Minute
Feature of the Washing Machine
1 The first applying Radical Technology in the world....go beyond washing, sterilize your clothes and deodorize a
bad smell.
2 The first air bubble washing system in the world.
3 Quiet washing through the innovational low-noise design.
4 The wash effectiveness is much more enhanced because of the air bubble washing system.
5 The laundry detergent dissolves well in water because of the air bubble washing system.
6 The adoption of the water currents to adjust the unbalanced load.
7 One-touch operation system.
Water Current to Adjust the Unbalanced Load
It is a function to prevent eccentricity of the clothes after wash by rotating pulsator C.W and C.C.W for 35
seconds.(But, the SUIT course have no operation of the water currents to adjust the unbalnced load.)
EFFECT
It reduces vibration and noise effectively while spinning.
WATER FLOW
Function for Soak Wash
DISPLAY THE RESIDUAL TIME
When the SOAK WASH is selected, the total wash time increases because 60 minutes for soak process are added to
the time of main process.
PROGRESS
Automatic Water Supply System For Blanket Wash
The water level would be lo wered because the blanket absorbs water at the beginning of washing. Therefore, after 30
seconds, the operation is interrupted to check the water level, and then the water is supplied again until the selected
water level is reached.
‘ ’ mark indicates the operation of the water currents to adjust the unbalanced load.
NOTES
11
EXPLANATION
FUNCTIONAL PRINCIPLE
1 The micom can remember the time from the begining of drain to reset point when the pressure switch reaches to
“OFF” point
2 In case of continuous draining, residual drain time is determined by micom.
Draining time as a whole = D + 90
Residual drain time.
The time remembered by micom.
Draining
Good draining The washer begins spin process after drainage.
condition
Bad draining Draininig time is prolonged.
No draining Program is stopped and gives the alarm.
Drain Time Movement of the Program
Less than
Continue draining
15 minutes
More than
Program stops and gives the alarm with blinked on display lamp.
15 minutes
Automatic Drainning time Adjustment
This system adjusts the draining time automatically according to the draining condition.
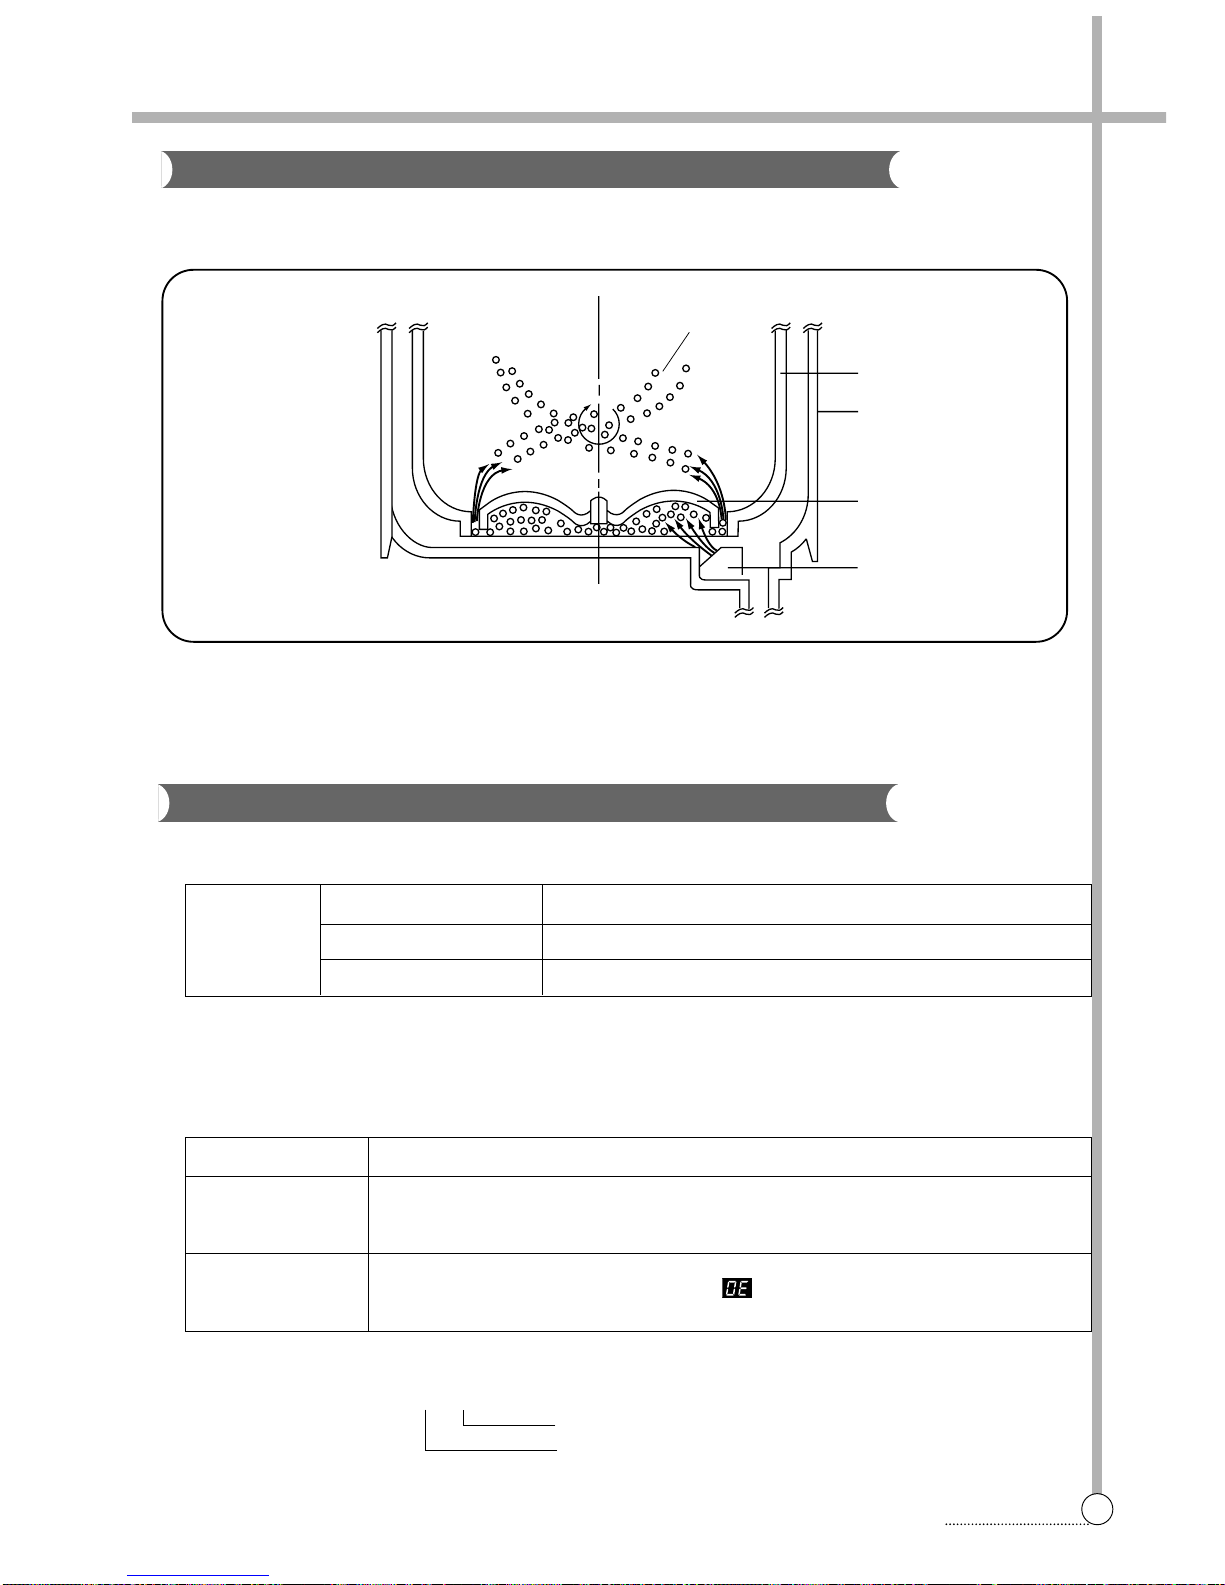
ACROSS SECTION
FUNCTIONAL PRINCIPLE
Bubble generator supplies the air from the bottom of outer tub to the inner space of pulsator, the air is dispersed by
the rotation of pulsator. Air-bubb le is created b y the centrifugal f orce , and rises up .
Air bubble
Tub
Outer tub
Pulsator
Nozzle
Functional Principle of Bubble Washing Machine
 Loading...