

Whirlpool AWD60A Service Manual
TUMBLE DRYER
Service Manual
Model: AWD60A
F eatures
Large drying capacity of 6 kg
Wall-mountable
Electronic control
Tumble Dryer Model:AWD60A
7 program options
Tumble Dryer Model:AWD60A
TABLE OF CONTENTS
Important Safety Instructions
Installation
Wall Mounting Instructions
Rack Fitting Instructions
Operation
Cleaning and Maintenance
Wiring Circuit
1
2
3-5
6
7-8
9
10
11
12
Control Panel
Preparation
Specifications
12
Exploded view
Parts List
Trouble Shooting
12-16
17-18
19-20
Tumble Dryer Model:AWD60A
Page 1
IMPORTANT SAFETY INSTRUCTIONS
Warning
To reduce the risk
of fire, electrical
shock or injury to
persons when using this dryer, please follow
basic precautions and read the following:
The tumble dryer is not to be used if industrial
chemicals have been used for cleaning.
Lint must not be allowed to accumulate around
the tumble dryer.
The appliance must not be installed behind a
lockable door, a sliding door or a door with a
hinge on the opposite side to that of the tumble
dryer in such a way that a full opening of the
tumble dryer door is restricted.
Attention - Rear panel can be hot.
1.
Read all instructions before using this dryer.
2.
The dryer must only be used for its intended
purpose.
3.
Clean lint screen before or after each load.
4.
This appliance is not intended for use by persons
(including children) with reduced physical,
sensory or mental capabilities, or lack of
experience and knowledge, unless they have
been given supervision or instruction concerning
use of the appliance by a person responsible for
their safety . Young children should be supervised to
ensure that they do not play with the appliance.
5.
Do not operate
the dryer if any parts are missing
or broken.
6.
To avoid fire hazard or electrical shock do not
use an adaptor plug or extension cord or remove
the grounding prong from the electrical power
cord. Failure to follow this warning can cause
serious injury, fire or death.
7.
To prevent injury, do not reach into the dryer
if the drum is moving. Wait until the dryer has
stopped completely before reaching into the
drum.
8.
Do not tamper with the controls.
9.
The final part of a tumble dryer cycle occurs
without heat (cool down c
ycle) to cool items
to a temperature that ensures that they
will not
be damaged. Never stop a tumble dryer before
the end of the drying cycle unless all items are
quickly removed and spread out so that the heat
is dissipated.
10.
Do not dry items that have been previously
cleaned in, washed in, soaked in, or spotted with
substances such as cooking oil, acetone, alcohol,
petrol, kerosene, spot removers, turpentine,
waxes and wax removers, etc. Do not store or
use these items on or in the vicinity of the dryer.
Do not place items exposed to cooking oils in
your dryer. Items contaminated with cooking oils
may contribute to a chemical reaction that could
cause a load to catch fire. Oil-affected items can
ignite spontaneously, especially when exposed to
heat sources such as in a tumble dryer. The items
become warm, causing an oxidation reaction in
the oil. Oxidation creates heat.If the heat cannot
escape, the items can become hot enough to
catch fire. Piling, stacking or storing oil-affected
items can prevent heat from escaping and so
create a fire hazard. If it is unavoidable that
fabrics that contain vegetable or cooki
ng oil or
have been contaminated by hair care products
be placed in a tumble dryer they should first be
washed in hot water with extra detergent - this
will reduce, but not eliminate, the hazard.
11. Do not dry unwashed items in the tumble dryer.
12. Fabric softeners, or similar products, should
be used as specified by the fabric softener
instructions.
13. To prevent fire, do not use heat to dry items
containing plastic, foam rubber or similarly
textured rubber-like materials, or items
containing feathers or down.Items such as foam
rubber (
latex foam), shower caps, waterproof
textiles, rubber backed articles and clothes or
pillows fitted with foam rubber pads should not
be dried in the tumble dryer.
14. This dryer must be properly installed in
accordance with the installation instructions
before it is used.
15. Do not install or store this dryer where it will
be exposed to water and /or the weather. Keep
surrounding areas free from the accumulation of
lint, dust and dirt.
16. To prevent shock hazard and assure stability
during operation, the dryer must be installed and
electrically groun
ded by a qualified service person
in accordance with local codes.
17. Do not sit on top of the dryer.
18. If the supply cord is damaged, it must be
replaced by the manufacturer, its service agent
or similarly qualified persons in order to avoid a
hazard.
19. Always disconnect dryer from electrical supply
before attempting any service. Disconnect power
cord by grasping the plug, not the cord.
Do not repair or replace any part of the dryer
or attempt any servicing unless specifically
recommended in the user-maintenance
instructions.
2
1. Before the dryer is removed from service or
discarded, remove the dryer door to prevent
accidental entrapment.
The interior of the dryer, lint screen housing,
exhaust grill and the air intake grill at the rear,
should be cleaned approximately every
18 months by qualified service personnel. An
excessive amount of lint build up in these
areas could result in inefficient drying and
pose a possible fire hazard.
20.

Tumble Dryer Model:AWD60A
Page 2
INSTALLATION
A
C
B
Dimensions
A = 825 mm
B = 560 mm
C = 595 mm
Weight = 30 kg
Packing accessories
Check list of the accessories and materials provided with the machine:
To ensure that the dryer operates normally, please ensure the following:
• The rear of the dryer must not have any restriction to the intake of fresh air.
• Check whether there is any damage to the dryer during transportation.
• A damaged dryer must not be connected. In case of any damage, contact your supplier.
• The dryer must be kept away from flammable substances.
• The surrounding environment must be dry and ventilated.
Name
Owner's
manual
Wall
mounting
kit
Panel film
Drying
rack
Retaining
clip
Warranty
Card
Quantity 1 1 1 1 2 1
Free Standing Instructions
Unpack the dryer and ensure that it is placed on a level floor. Also ensure there is at least a 50 mm air
clearance between the back of the dryer and the wall to allow fresh air flow for efficient operation.
Remove the transport packaging ( fig. 1 ) and remove the dryer rack from the top packaging ( fig. 2 ) .
fig. 1
fig. 2
fig. 3
fig. 4
Remove the tape on the front ( fig. 3 and fig. 4 ), the Wall Mounting kit attached to the Drum with
tape on the inside and the Panel film, before starting the dryer.
Tumble Dryer Model:AWD60A
Page 3
WALL MOUNTING INSTRUCTIONS
The dryer can be mounted on a wall in the inverted position only, by following these
instructions.
Invert the dryer so that the control panel is at the bottom (see figure 4) this allows
easier access to the controls.
1. Determine the location of the dryer on the wall and mark the bracket position.
A minimum of 50 mm is needed between the top of the dryer and the ceiling for ease of
installation.
If mounting above a top load washing machine, allow sufficient room to open the lid of the
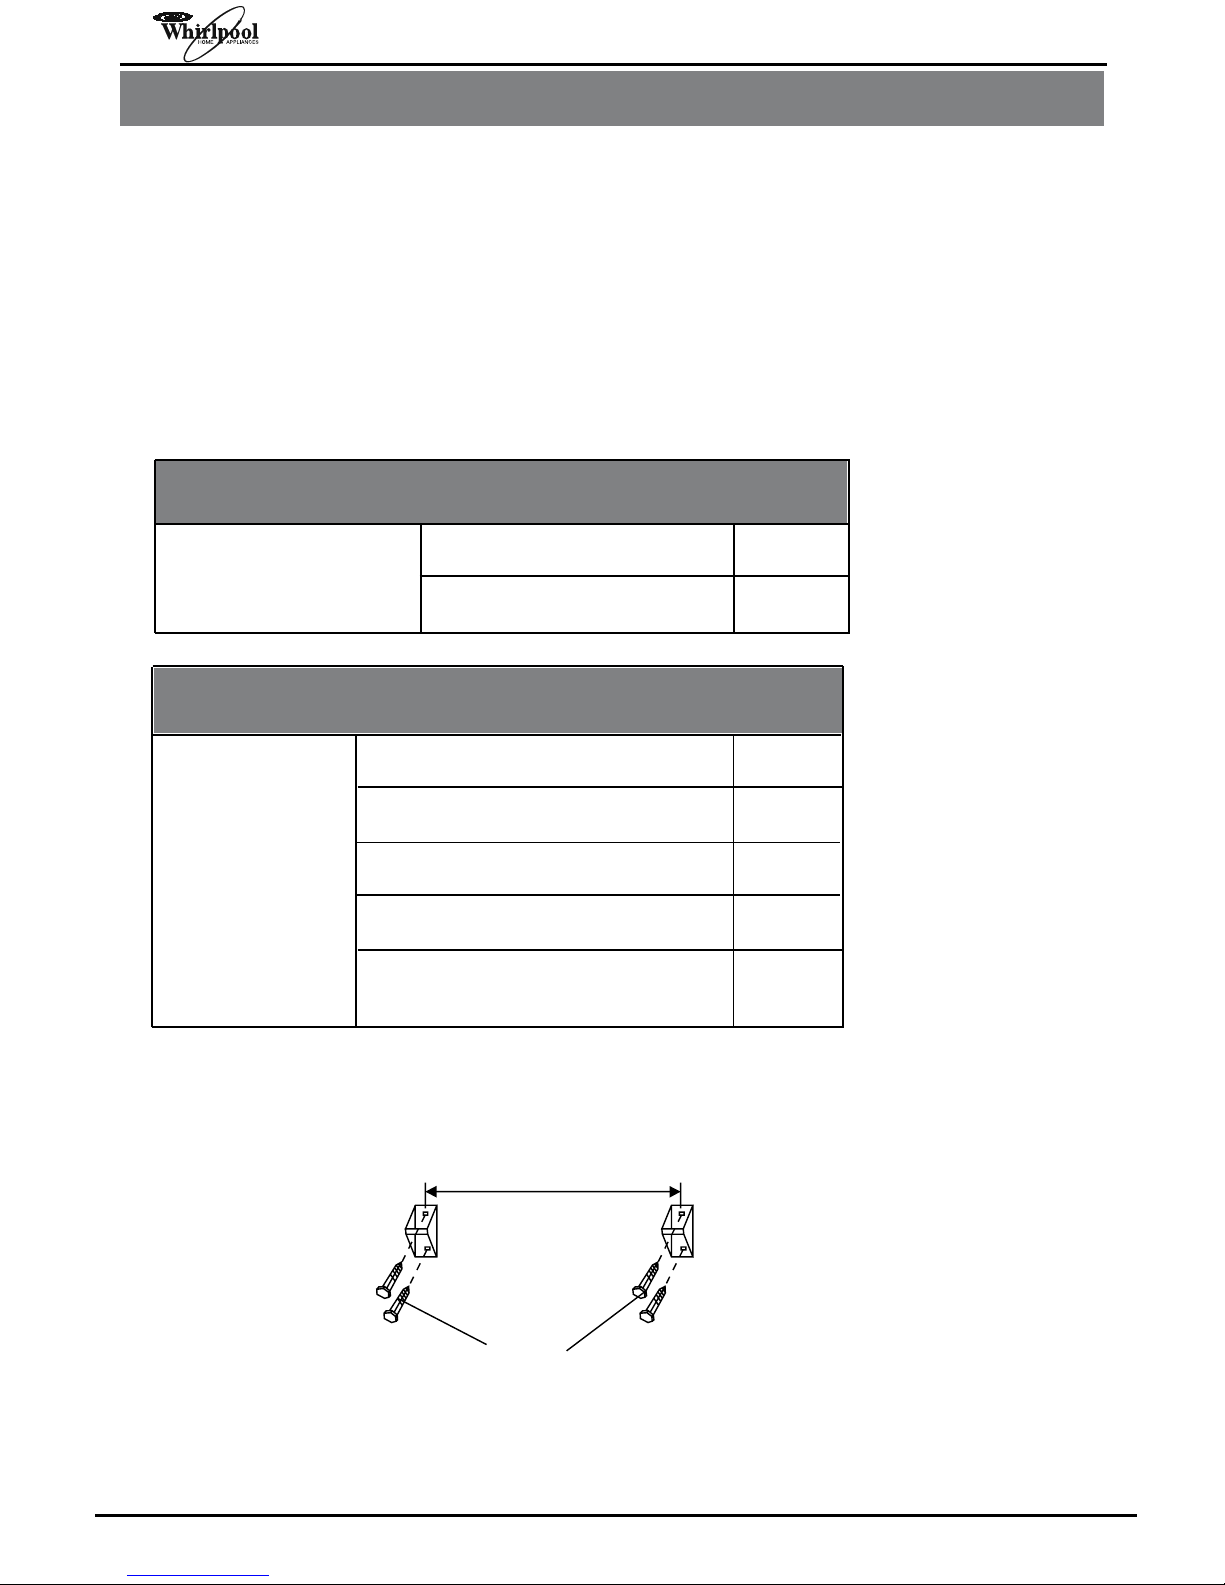
2. Fix the wall hanging brackets to the wall securely (e.g. into the stud).
If the studs are too far apart, fit a timber slat to the studs then mount the brackets onto
the slat. The distance between each bracket is 553 mm as per diagram.
553 mm
Wood screws
washer.
TOOLS REQUIRED
For plaster or Drill & 3 mm bit 1
timber wall Phillips head screw driver 1
Description Plastic spacers 2
Wall hanging brackets 2
Hanging hooks 2
Wood screws, 12 g x 50 mm 4
WALL MOUTING KIT INCLUDES
Screws for hanging hooks
and plastic spacers
6
Warning: Ensure that the screw and nut of the Wall Hanging Brackets are tightened
during installation, if required. Regularly check all the screws and nuts and
tighten, if required. Do not overtighten.
Tumble Dryer Model:AWD60A
Page 4
WALL MOUNTING INSTRUCTIONS
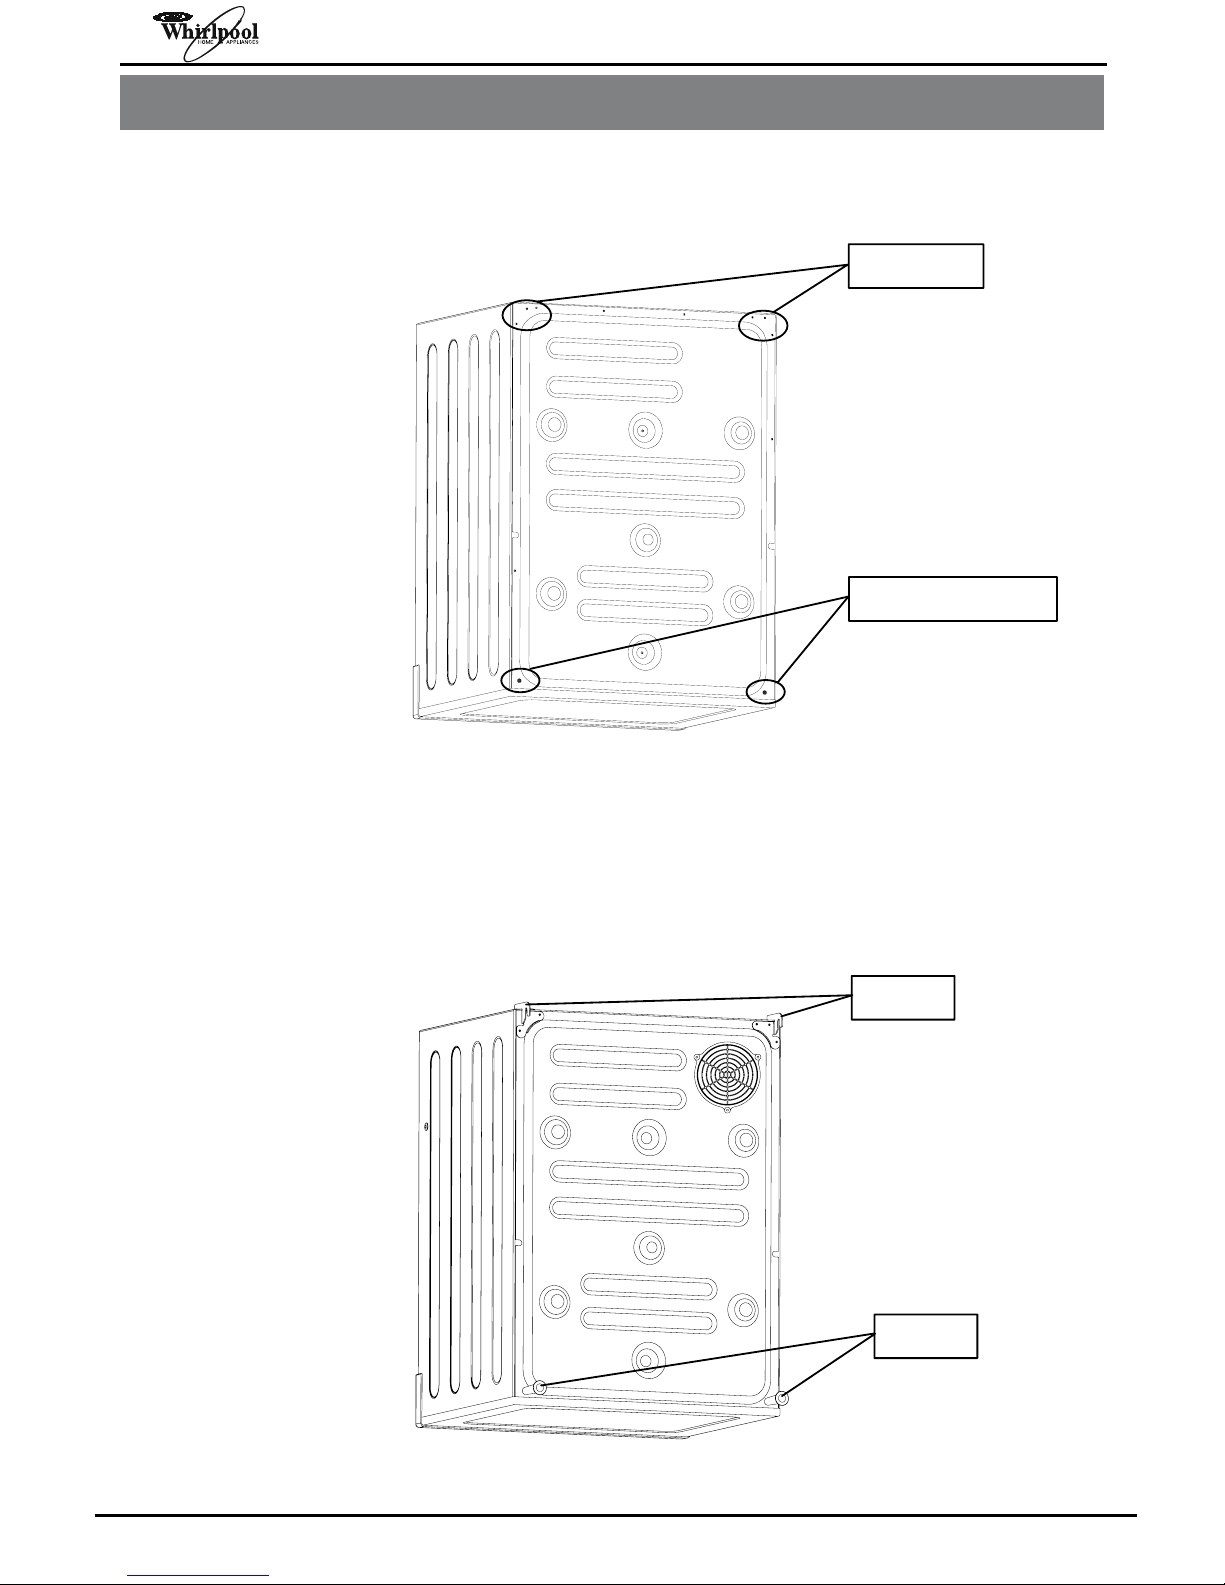
3. To install the hooks to the dryer, position the dryer in the inverted position. Remove
the 2 screws and 2 Plastic plugs as indicated in Fig. 2.
4. Align the hooks as shown in Fig. 3 and refit screws tightly.
Install the spacers provided as shown in Fig. 3.
2 screws
2 Plastic plugs
Fig. 2
Fig. 3
Hooks
Spacers
Tumble Dryer Model:AWD60A
Page 5
WALL MOUNTING INSTRUCTIONS
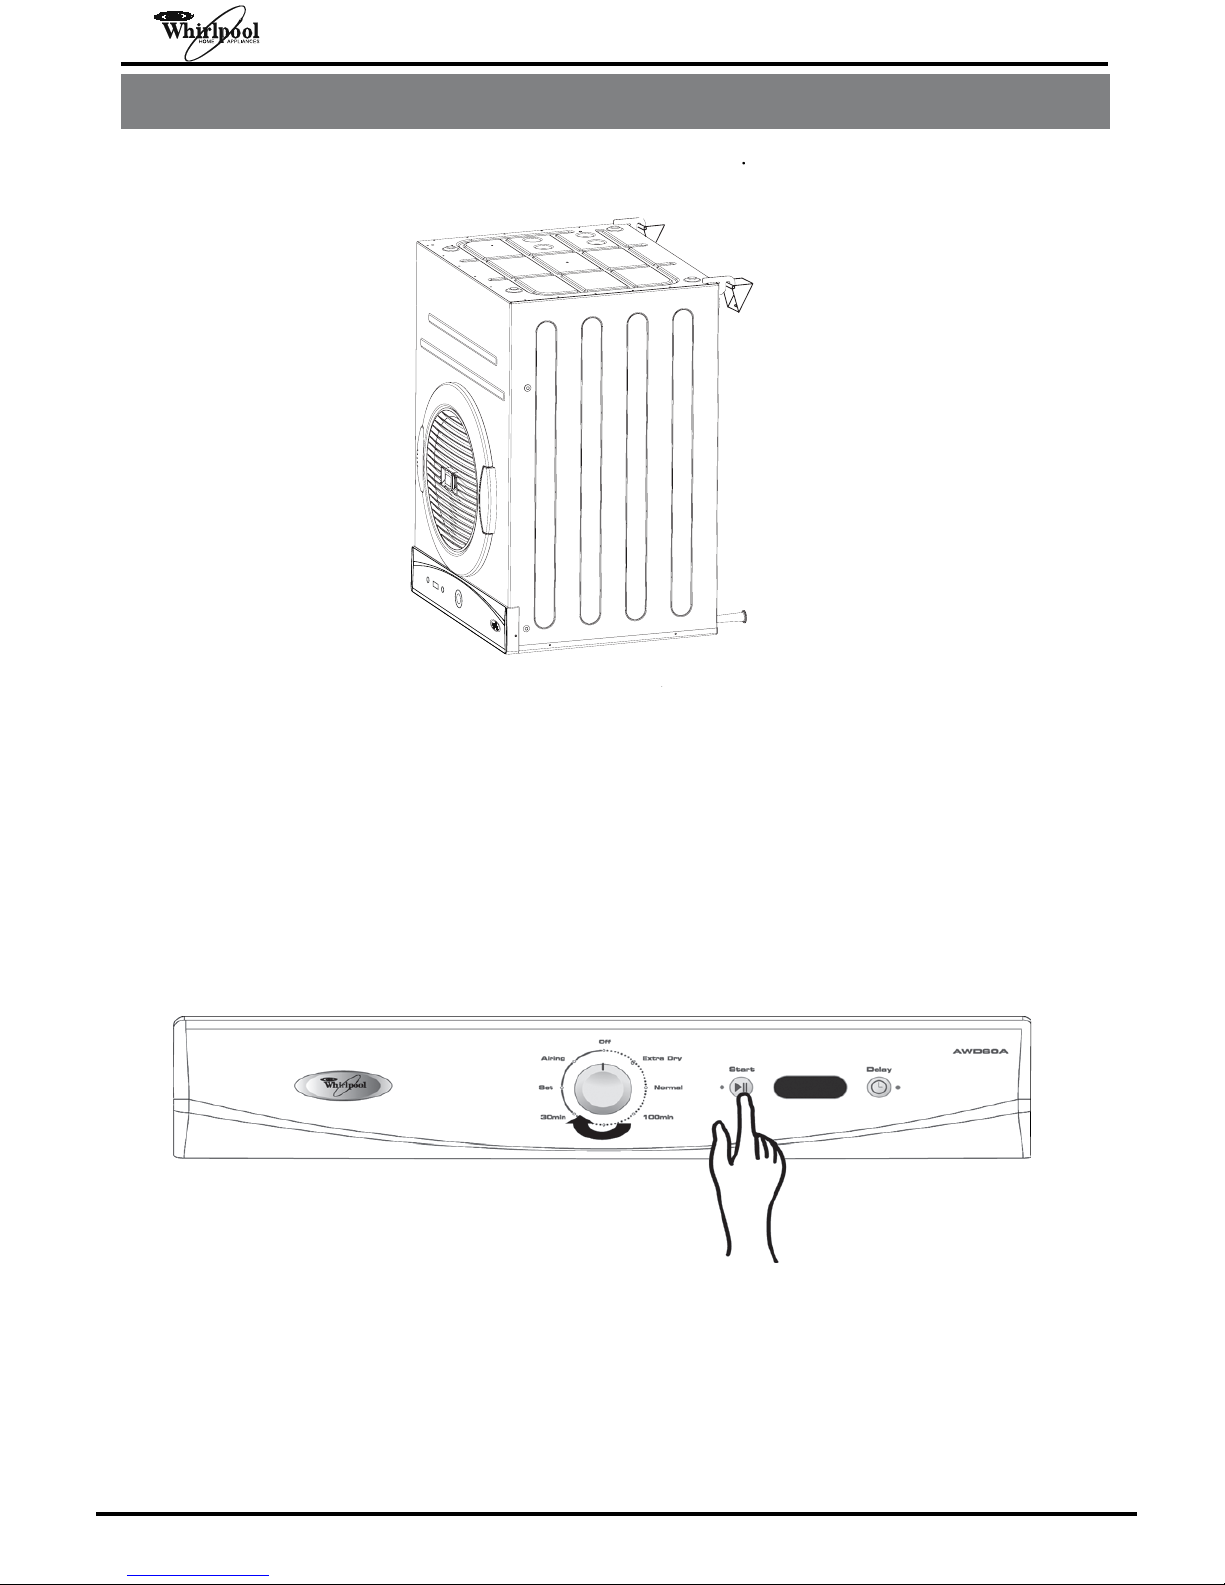
Fig. 4
6. A new control panel film with inverted symbols to suit your inverted dryer is supplied.
To fit this film, pull off the knob then clean surface of old film with a cloth.
Peel the release paper from the back of inverted film then place new control panel film on the
surface so that writing is the correct way around.
7. Press the Start/Pause button and hold it in the pressed position, and at the same time
turn the program dial knob from the OFF position to any other program, until the inversion
is displayed.
Caution:
Plug must be accessible after installation.
5. With assistance, mount dryer onto the wall brackets. See Fig. 4
 Loading...