

Whirlpool APR45130L Owner's Manual

®
WHISPURE
™
AIR PURIFIER
Use & Care Guide
For questions about features, operation/performance, parts,
accessories or service call: 1-866-990-7365
or visit our website at... www.whirlpoolairpurifiers.com
PURIFICADOR DE AIRE
WHISPURE
™
Manual de uso y cuidado
Si tiene preguntas respecto a las características, funcionamiento,
rendimiento, partes, accesorios o servicio técnico,
o visite nuestro sitio de Internet en... www.whirlpoolairpurifiers.com
llame al: 1-866-990-7365
PURIFICATEUR D’AIR
WHISPURE
™
APR451
Guide d’utilisation et d’entretien
Au Canada, pour assistance, installation ou service,
ou visitez notre site Web... www.whirlpoolairpurifiers.com
Table of Contents/Índice/Table des matières ...... 2
Model/Modelo/Modèle: APR45130L
composez le 1-866-990-7365
TABLE OF CONTENTS
AIR PURIFIER SAFETY..................................................................3
INSTALLATION REQUIREMENTS................................................3
Electrical Requirements ...............................................................3
Location Requirements................................................................4
AIR PURIFIER USE.........................................................................4
Starting/Stopping Your Air Purifier ..............................................4
Using the Control Panel ...............................................................5
Using the Remote Control ...........................................................5
ÍNDICE
SEGURIDAD DEL PURIFICADOR DE AIRE.................................9
REQUISITOS DE INSTALACIÓN...................................................9
Requisitos eléctricos....................................................................9
Requisitos de ubicación.............................................................10
USO DEL PURIFICADOR DE AIRE.............................................10
Cómo poner en marcha/detener su purificador de aire ............10
Uso del panel de control............................................................11
Cómo usar el control remoto .....................................................11
TABLE DES MATIÈRES
SÉCURITÉ DU PURIFICATEUR D’AIR .......................................15
SPÉCIFICATIONS D’INSTALLATION .........................................15
Spécifications électriques..........................................................15
Exigences d’emplacement.........................................................16
UTILISATION DU PURIFICATEUR D’AIR...................................16
Mise en marche/arrêt du purificateur d’air ................................16
Utilisation du tableau de commande.........................................17
Utilisation de la télécommande..................................................17
AIR PURIFIER CARE.....................................................................6
Cleaning........................................................................................6
Filter Replacement .......................................................................6
TROUBLESHOOTING ....................................................................7
ASSISTANCE OR SERVICE...........................................................7
In the U.S.A. and Canada.............................................................7
Replacement Filters......................................................................7
WARRANTY ....................................................................................8
CUIDADO DEL PURIFICADOR DE AIRE...................................12
Limpieza .....................................................................................12
Reemplazo del filtro....................................................................12
SOLUCIÓN DE PROBLEMAS......................................................13
AYUDA O SERVICIO TÉCNICO...................................................13
En los EE.UU. y Canadá.............................................................13
Filtros de repuesto .....................................................................13
GARANTÍA.....................................................................................14
ENTRETIEN DU PURIFICATEUR D’AIR ....................................18
Nettoyage ...................................................................................18
Remplacement du filtre..............................................................18
DÉPANNAGE.................................................................................19
ASSISTANCE OU SERVICE.........................................................19
Aux États-Unis et au Canada.....................................................19
Filtres de rechange.....................................................................19
GARANTIE.....................................................................................20
This product earned the ENERGY STAR by meeting strict energy
efficiency guidelines set by the U.S. EPA. U.S. EPA does not
endorse any manufacturer claims of more healthy indoor air from
the use of this product.
The energy efficiency of this ENERGY STAR qualified model is
measured based on a ratio between the model’s CADR for dust
and the electrical energy it consumes, or CADR/Watt.
Este producto obtuvo la designación de ENERGY STAR al haber
cumplido con los estrictos lineamientos de eficiencia de energía
establecidos por la Agencia de Protección del Medioambiente
(EPA) de los Estados Unidos. La Agencia de Protección del
Medioambiente de los Estados Unidos no respalda ninguna
afirmación por parte del fabricante en el sentido de que el uso de
este producto proporciona aire interior más sano.
La eficiencia de energía de este modelo que reúne las
condiciones de ENERGY STAR se mide en relación con la
relación entre el CADR (Índice de emisión de aire limpio) para
polvo del modelo y la energía eléctrica que consume, es decir
CADR/Watt.
Ce produit a reçu la certification ENERGY STAR en satisfaisant
aux directives strictes de rendement énergétique établies par
l’EPA aux É.-U. L’EPA aux É.-U. ne garantit pas l’engagement du
fabricant relatif à un air plus sain du fait de l’utilisation de ce
produit.
Le rendement énergétique de ce modèle certifié ENERGY STAR
est mesuré sur la base d'un ratio entre le débit d’air purifié
(poussière) du modèle et l’électricité consommée, ou le ratio
débit d’air purifié/Watt.
2
AIR PURIFIER SAFETY
Your safety and the safety of others are very important.
We have provided many important safety messages in this manual and on your appliance. Always read and obey all safety
messages.
This is the safety alert symbol.
This symbol alerts you to potential hazards that can kill or hurt you and others.
All safety messages will follow the safety alert symbol and either the word “DANGER” or “WARNING.”
These words mean:
You can be killed or seriously injured if you don't immediately
DANGER
WARNING
All safety messages will tell you what the potential hazard is, tell you how to reduce the chance of injury, and tell you what can
happen if the instructions are not followed.
IMPORTANT SAFETY INSTRUCTIONS
follow instructions.
can be killed or seriously injured if you don't
You
instructions.
follow
WARNING:
Control Device.
WARNING:
Unplug air purifier before servicing.
To Reduce The Risk Of Fire or Electrical Shock, Do Not Use The Air Purifier With Any Solid-State Speed
To Reduce The Risk Of Fire Or Electrical Shock And Injury To Persons, Do Not Use In A Window.
READ AND SAVE THESE INSTRUCTIONS
INSTALLATION REQUIREMENTS
Electrical Requirements
WARNING
Electrical Shock Hazard
Plug into a grounded 3 prong outlet.
Do not remove ground prong.
Do not use an adapter.
Do not use an extension cord.
Failure to follow these instructions can result in death,
fire, or electrical shock.
Electrical Connection
■ To properly install your air purifier, you must determine the
type of electrical connection you will be using and follow the
instructions provided for it here.
■ The air purifier should be connected to a 115 V, 60 Hz, 15- or
20-amp fused 3 prong grounded outlet.
3
Location Requirements
■ You will need a level surface at least 6" (15.2 cm) from heat
sources such as ranges or heaters.
■ Do not block air openings or place air cleaner on a soft
surface such as a bed or sofa.
■ Operate indoors only.
A
A. 6" (15.2 cm) minimum clearance
AIR PURIFIER USE
Starting/Stopping Your Air Purifier
NOTE: Before operating the air purifier, record the date of installation on the HEPA filter. Under normal conditions, the HEPA filter should
be replaced annually, and the pre-filter should be replaced every 3 months. To remove and replace either filter, see “Filter Replacement”
in the “Air Purifier Care” section.
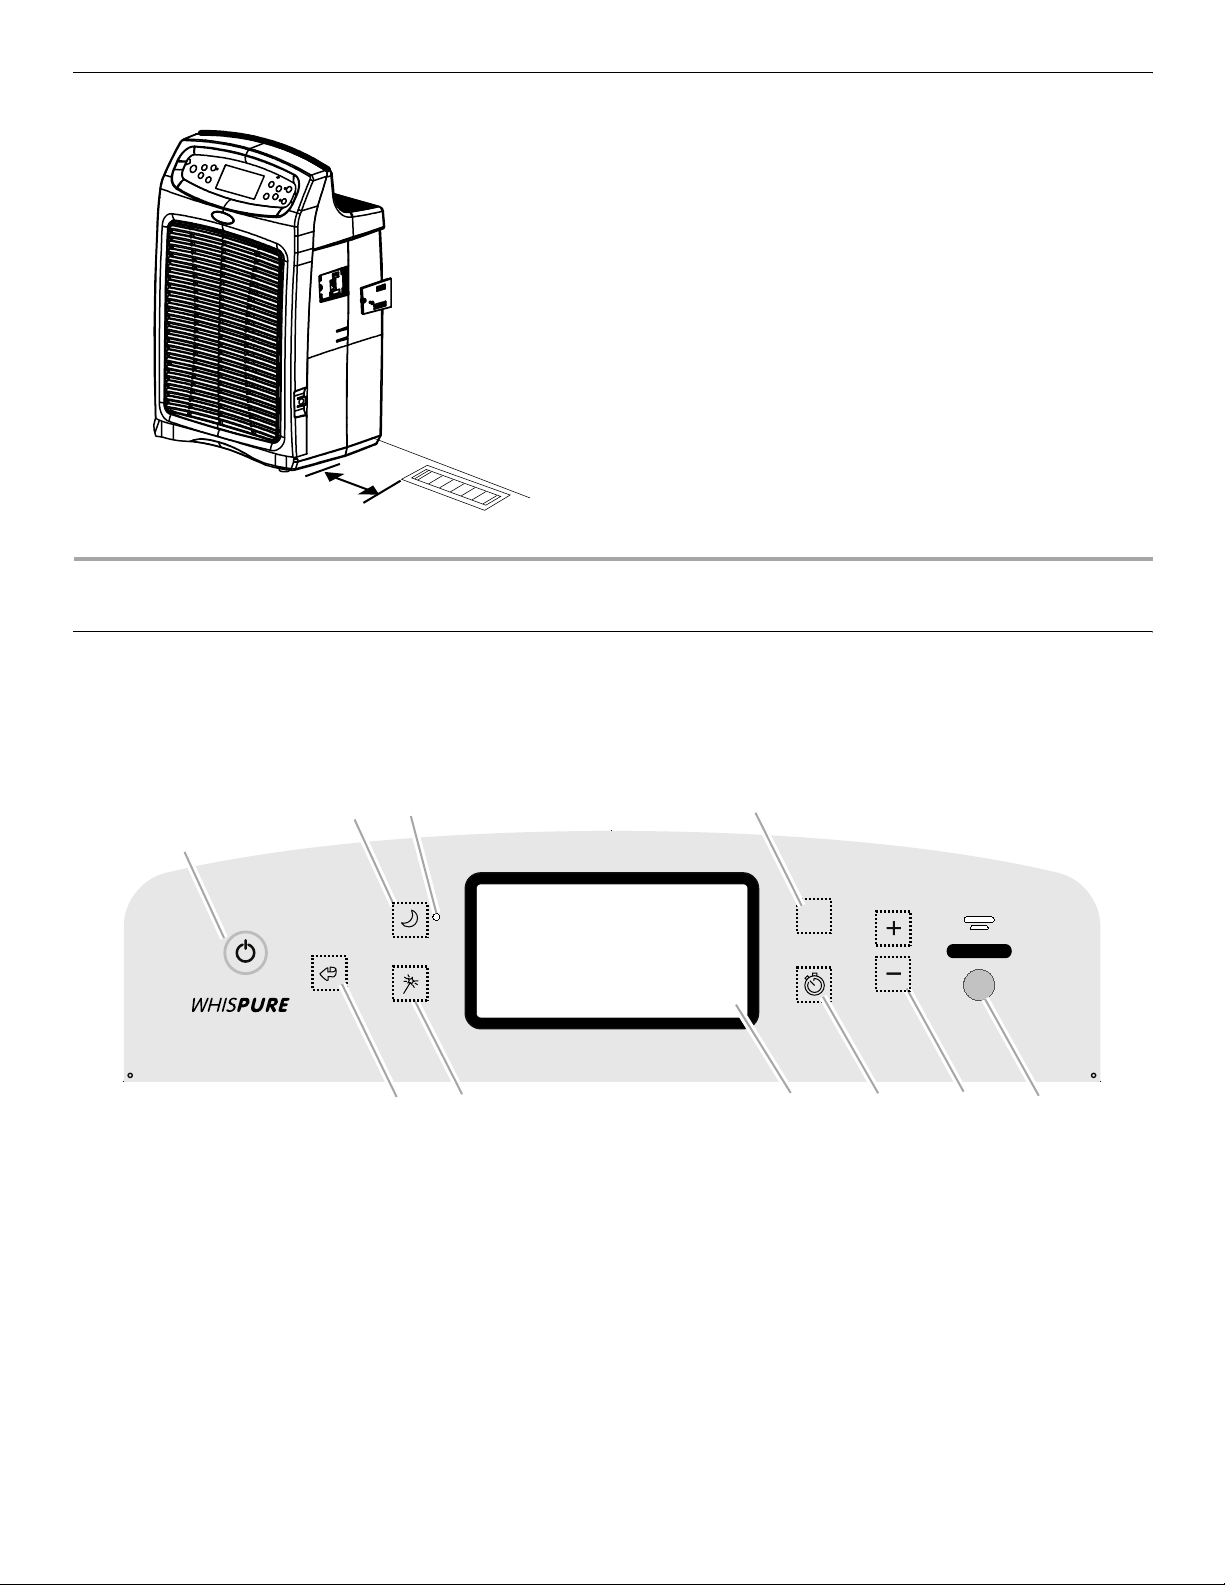
This manual covers several different models. The air purifier you have purchased may have some or all of the features listed.
C
B
D
A
Power
Sleep
Mode
Auto
Filter
Reset
A. Power button
B. Sleep Mode button
C. LED light
IJ
D. Speed button
E. Translucent window for
remote control signal
F. Timer adjustment buttons
Speed Timer
Timer
Adjustment
GEFH
G. Timer button
H. Display
I. Auto mode button
J. Filter Reset button
VOC
4
Using the Control Panel
WARNING
Electrical Shock Hazard
Plug into a grounded 3 prong outlet.
Do not remove ground prong.
Do not use an adapter.
Do not use an extension cord.
Failure to follow these instructions can result in death,
fire, or electrical shock.
1. Plug into a grounded 3 prong outlet.
NOTE: Both filter indicator lights will flash once during a self-
test when the air purifier is turned on or after a power
interruption.
2. Press POWER to turn on the air purifier.
3. Press SPEED to choose the desired fan speed.
4. Press POWER to turn off the air purifier.
LCD Display
Sleep Mode
Press SLEEP MODE to set. Sleep Mode runs on Low fan speed
for 8 hours and then returns to previously selected setting. To exit
before 8 hours, press SLEEP MODE, SPEED, or POWER.
Filter Status Lights
The pre-filter and HEPA filter status lights on the LCD display will
help you to determine when to change your filters. The status
indicator lights will move up from New to Replace at preset
intervals. When the Replace status has been reached, and the
Replace status light is flashing, replace the filter as indicated. See
“Filter Replacement” in the “Air Purifier Care” section.
VOC Sensor
Press AUTO on the control panel to automatically start the fan or
set the fan speed based on the quality of the air detected by the
Volatile Organic Compound (VOC) Sensor.
The VOC LED and icon are displayed on the air purifier control
panel display.
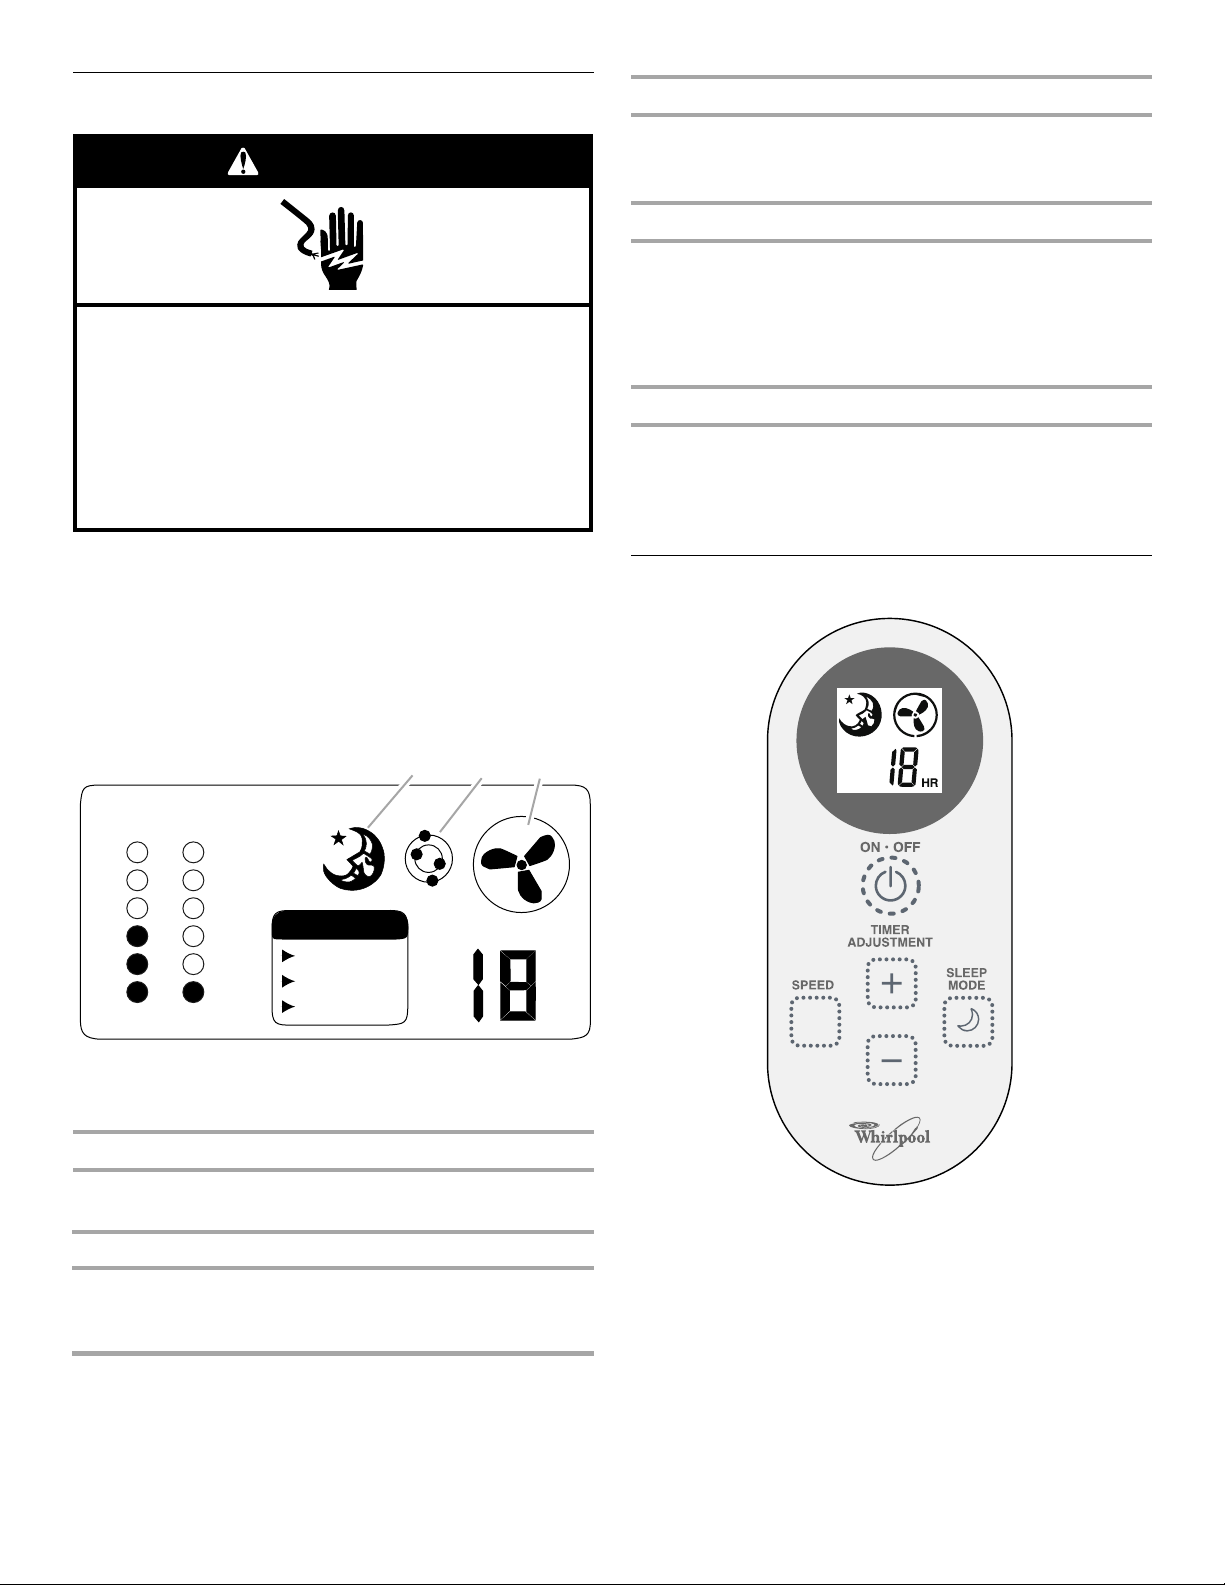
Using the Remote Control
P
U
S
I
R
H
W
E
ABC
PRE
HEPA
REPLACE
AIR QUALITY
FILTER STATUS
NEW
NEW
GOOD
MODERATE
POOR
A. Sleep Mode icon
B. VOC icon
C. Fan speed icon
HR
Fan Speed
Press SPEED until the indicator light comes on for the desired
speed.
Fan Speed Result
Low
Medium
High
Best product sound
Slower cleaning power
Maximum cleaning power
1. Press ON • OFF to turn on the air purifier.
2. Press SLEEP MODE to choose Sleep mode.
3. Press SPEED to choose the desired fan speed.
4. Press the Timer Adjustment plus “+” or minus “-” button to
set the timer from 1 to 18 hours.
5
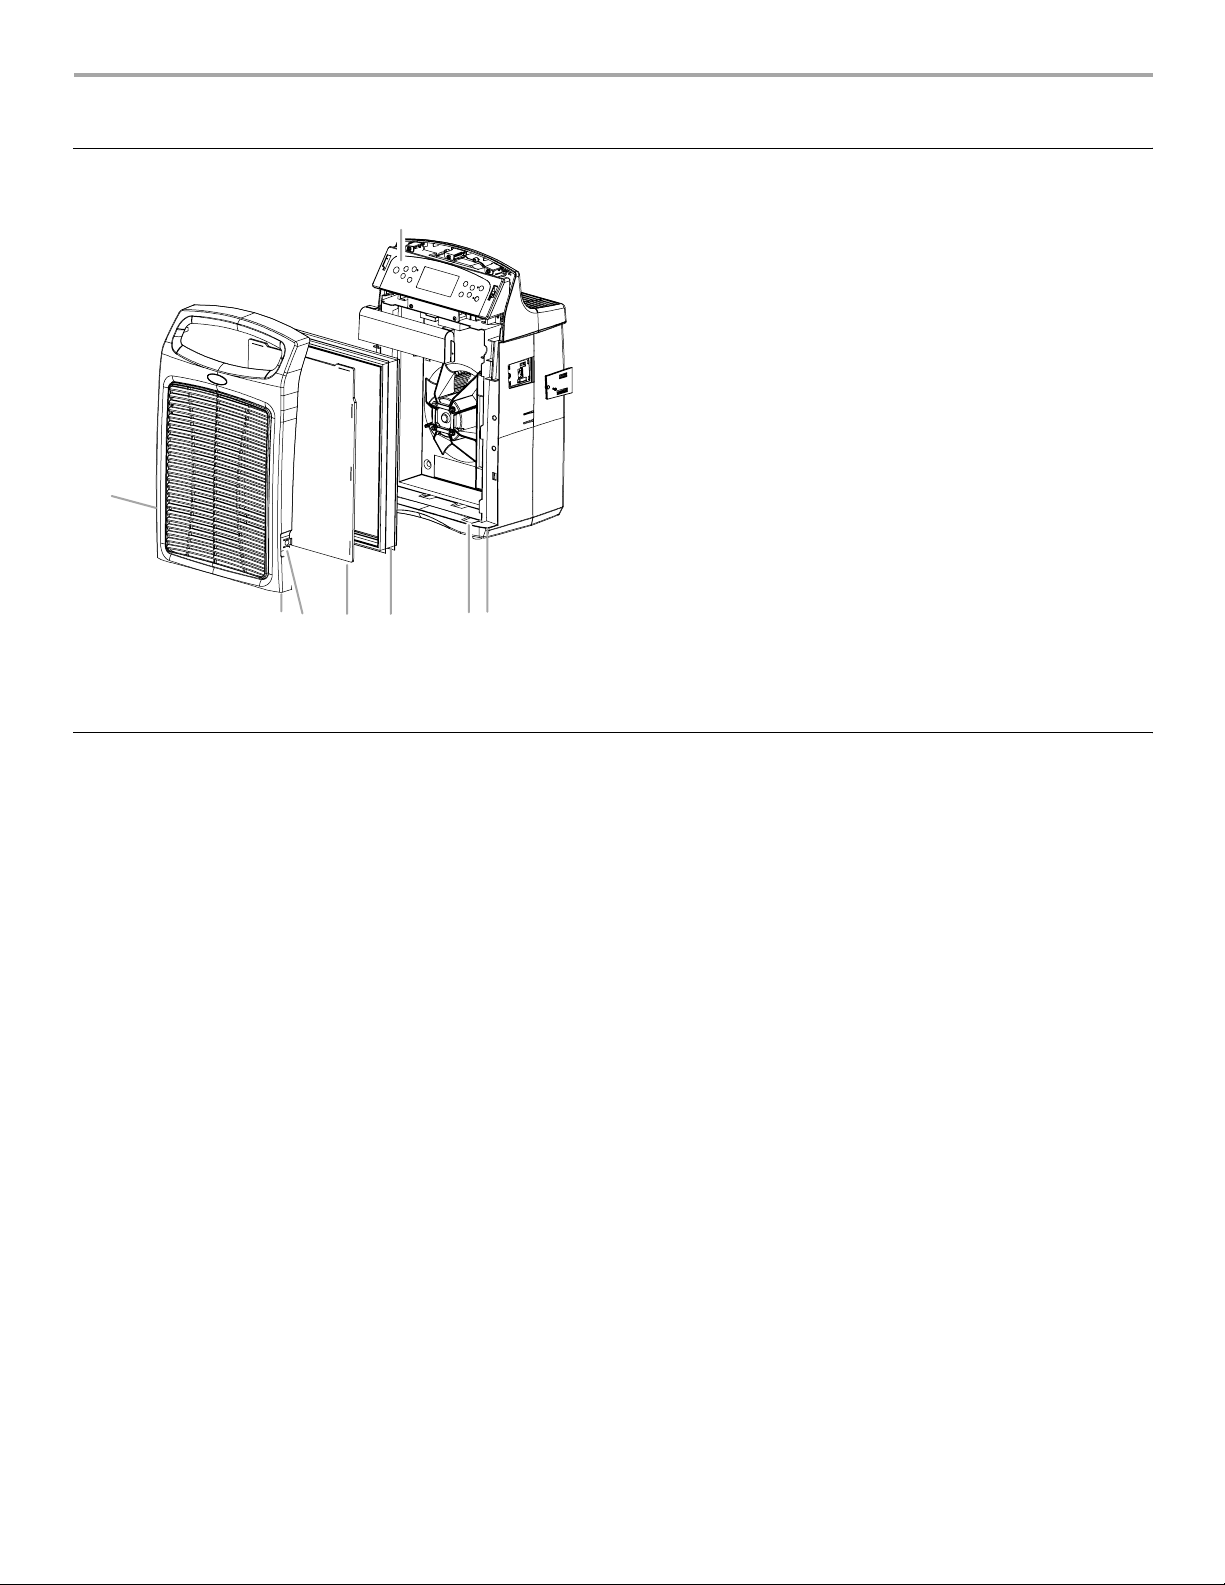
AIR PURIFIER CARE
Cleaning
B
A
1. Press POWER to turn off the air purifier.
2. Unplug air purifier or disconnect power.
3. Place fingers on the front release tabs. Gently push the tabs
in and pull the front grille forward to remove it.
4. Remove both filters and set aside. Do not try to wash and
reuse either the HEPA filter or the pre-filter.
5. Clean the air purifier with a soft, damp cloth.
6. Gently wash the front grille in soapy water.
NOTE: The grille is not dishwasher safe.
7. Reassemble the filters as shown in the previous illustration.
8. Place the top tabs of the front grille into the top slots in the air
purifier. Gently slide the grille forward and down into the
bottom slots until the grille locks into place.
9. Plug in air purifier or reconnect power.
10. Press POWER to turn on the air purifier.
A. Release tabs
B. Control panel
C. Mainframe assembly
A
G
D. Bottom slot
E. HEPA filter
E
F
C
D
F. Pre-filter
G. Front grille
Filter Replacement
NOTE: The filter indicator lights will flash when it is time to
replace either the pre-filter or the HEPA filter. For the most
efficient operation of the air purifier, under normal conditions it is
recommended that you replace the pre-filter every 3 months and
the HEPA filter every year. See “Replacement Filters” in the
“Assistance or Service” section.
1. Press POWER to turn off the air purifier.
2. Unplug air purifier or disconnect power.
3. Place fingers on the front release tabs. Gently push the tabs
in and pull the front grille forward to remove it.
4. Remove and replace the indicated filter. Install the new HEPA
filter in the same direction shown by the arrow located on the
filter frame. Install the new pre-filter by placing it on the tabs.
NOTE: Do not try to wash and reuse either the HEPA filter or
the pre-filter.
5. Place the top tabs of the front grille into the top slots in the air
purifier. Gently slide the grille forward and down into the
bottom slots until the grille locks into place.
6. Plug in air purifier or reconnect power.
7. Press POWER to turn on the air purifier.
8. To reset the HEPA filter status, press the Filter Reset button
1 time. On the LCD display, the HEPA filter status light will
flash. Press the Filter Reset button again and hold for
5 seconds. The HEPA filter timer will reset.
9. To reset the pre-filter status, press the Filter Reset button
2 times. On the LCD display, the pre-filter status light will
flash. Press the Filter Reset button again and hold for
5 seconds. The pre-filter timer will reset.
NOTES:
■ Pressing the Filter Reset button before either filter
indicator light flashes will not reset the filter timer.
■ Use of a non-Whirlpool filter or failure to replace the filter
regularly will invalidate this warranty.
6
 Loading...