

Whirlpool AMD 385, AMD 386 Instructions For Use Manual

Gebrauchsanweisung
Instructions for use
Mode d’emploi
Gebruiksaanwijzing
Istruzioni per l’uso
Brugsanvisning
Bruksanvisning
Käyttöohje
Manual de utilização
Instrucciones para el uso
Instrukcje użytkowania
Használati utasítás
ИнструкциЯ за употреба
Návod k použití
Návod na použitie
Instruc∑iuni de utilizare
Инструкции по эксплуатации

3
ENGLISH Instructions for use Page 4
FRANÇAIS Mode d’emploi Page 43
ESPAÑOL Instrucciones para el uso Página 82
ITALIANO Istruzioni per l’uso Pagina 121
AMD 385 - 386

4
PRECAUTIONS FOR USE
• Never operate the air conditioner with wet
hands.
• Operate the air conditioner at the rated voltage
with tolerance of ±10% of rated for
fluctuation.
The compressor will vibrate if the voltage is too
low, causing damage to the cooling system.
• If you notice anything unusual (e.g. burnt smell),
switch off the power supply immediately and
contact the Whirlpool Authorized Service
Centre nearest you.
If the abnormal condition continues, the air
conditioner could be damaged and could also
cause electrocution or fire.
• Grounding: The unit must be reliably grounded.
The grounding cable must be connected to the
special grounding system in the building.
If the building does not have a grounding
system, ask an expert electrician to install one.
Never connect the grounding cable to a gas
pipe, water pipe, sewage pipe or other unless
the professional considers it reliable.
• Set the room temperature appropriately. The
difference between indoor and outdoor
temperature should be 5°C.
Appropriate adjustment of the temperature
setting serves to reduce consumption.
• When the air conditioner is running, do not
leave doors and windows open in the room.
This will prevent loss of effectiveness of the air
conditioner.
• Never block the air inlet or outlet of indoor and
outdoor unit, as this will decrease the effect of
the air conditioner or cause it to shut down or
even catch fire.
• Spray cans, chemicals and gas tanks must be
placed at least 1m away from the indoor and
outdoor unit; they could cause fire or explosion
• Make sure to mount the outdoor unit on a
sturdy base. If the base is damaged and
unsteady, the unit could fall and cause injury.
• Do not stand or place anything on the outdoor
unit. Persons or objects falling from the unit
could cause injuries.
• Do not repair the air conditioner yourself.
Incorrect repairs could cause electrocution or
fire. Contact the Whirlpool Authorized Service
Centre nearest you for repairs.
• Never reach with your finger or a stick into the
indoor or outdoor unit.
• Never blow the air directly at pets or plants, as
this may harm them.
• Never spray water onto the unit or wash the air
conditioner with water.
• Never let the air conditioner blow on a heat
source. This could put the flame out and cause
carbon monoxide poisoning.
• To avoid any harm to your health, do not blow
the cold air on your body too long or lower the
room temperature too much.
• This air conditioner cannot be used for drying
clothes or chilling foods.
• Do not spray any paint or pesticide on the unit,
or it may cause fire.
• Persistent abnormality indicates that the air
conditioner may be damaged with the
consequent risk of electric shock or fire. This
may cause an electric shock.
• To prevent fire always use a special power
supply circuit.
• Disconnect the air conditioner from the power
supply if it is to be left unused for a long period.
• Ensure that the power supply is suitably
protected by a special circuit with air breaker.
The air conditioner automatically starts or stops
according to requirements. Do not switch the
air conditioner on and off too often as this can
damage the appliance. This may cause an
electric shock or injury.
• Do not cut or damage the external cable. Any
damaged external cable must be replaced by
qualified electricians.
• Physically or mentally disabled people, children
and people without any experience with the
product are only allowed to use the appliance if
they have had specific training on how to
operate the appliance by a person responsible
for their security and well-being. The appliance
is not intended for use by disabled people and
very young children without supervision.
• Children should be supervised to ensure that
they do not play with the appliance (including
remote control).
5
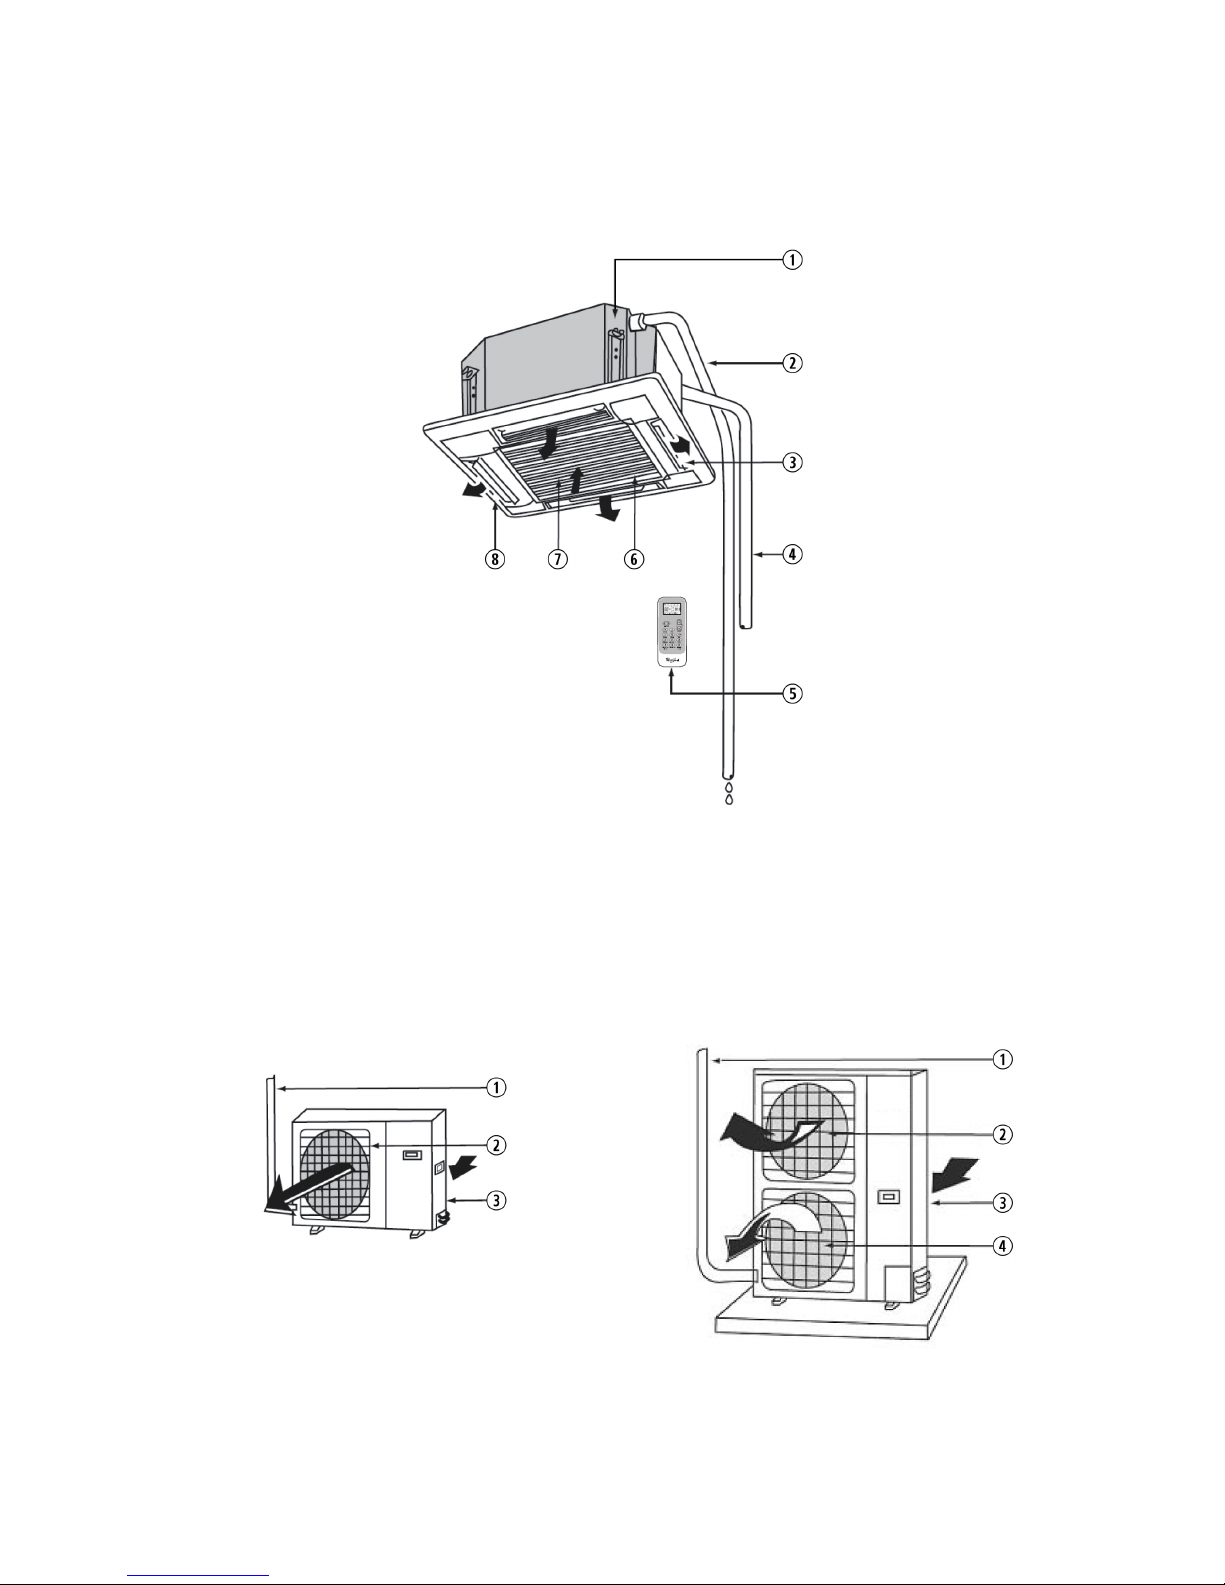
DESCRIPTION OF AIR CONDITIONER
1. Drainage device (built-in).
Drains water removed from the room unit
during cooling
2. Drainage pipe
3. Air flow flap (at air outlet)
4. Refrigerant piping connection electric wire
5. Remote control
6. Air intake grille
7. The built-in air filter removes dust and dirt
8. Air outlet
AMD 385 - 386
Indoor Unit
AMD 385 - Outdoor Unit
AMD 386 - Outdoor Unit
1. Refrigerant pipe
2. Air outlet
3. Air intake
1. Refrigerant pipe
2. Air outlet
3. Air intake
4. Air outlet
6
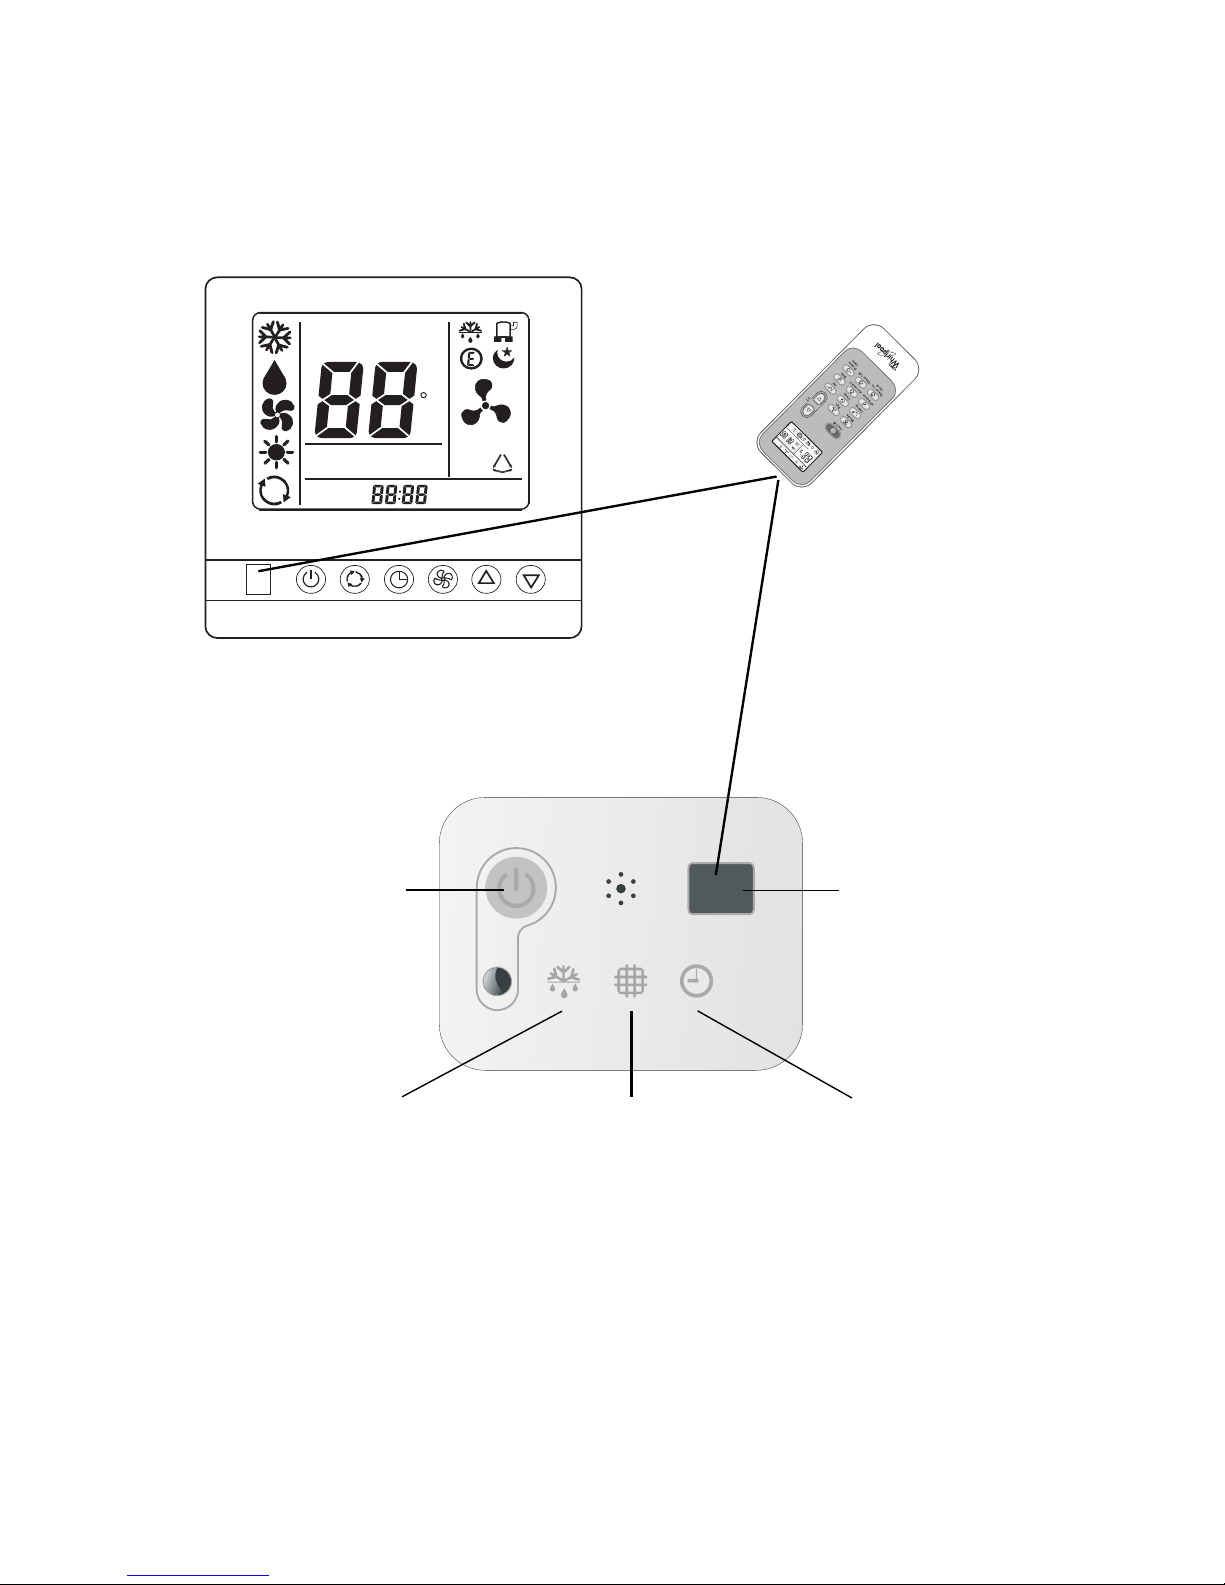
REMOTE CONTROL
SET TEMP
R OOM
T E MP
C
AUT O
NO
.
TIMER O N
T IME R O FF
S E T T IMER
A
WIRE REMOTE CONTROL WIRELESS REMOTE CONTROL
Wire remote control is used for controlling
indoor embedded unit directly
Remote control is used for
controlling embedded display
panel and wire remote control
Emergency switch
The filter clean is resetted
if press the switch.
DISPLAY PANEL
Defrost indicator
It lights on during the
defrost.
It lights off when
defrost finishes.
Filter clean
It lights on when the
filter should be
cleaned.
Timer indicator
It lights on when timer
is in use.
It lights off when timer
finishes.
Signal receiving
section
Receives signal from the
remote control.
Wire remote control is optional and it can be bought separately as an accessory.
For details please contact your dealer / technician.
7
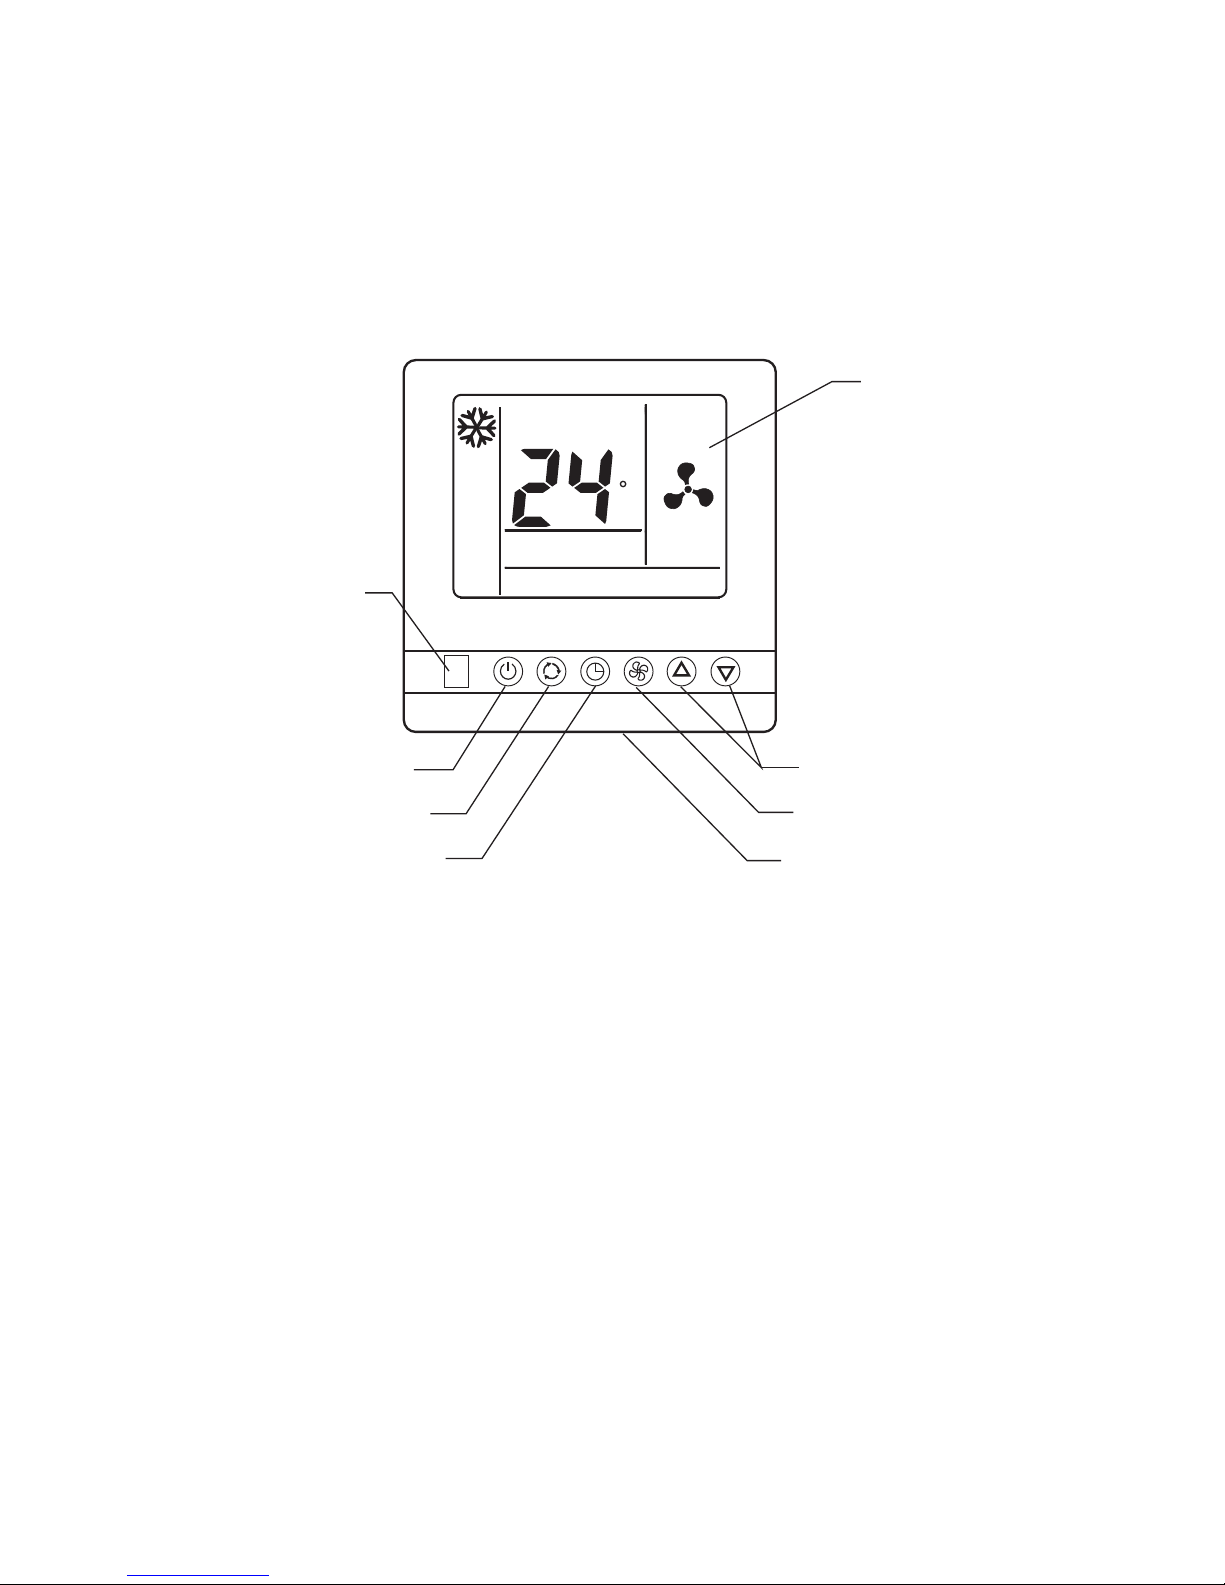
WIRE REMOTE CONTROL
CAUTION:
Never install the wire controller in a place where there is water leakage.
Avoid bumping, throwing, tossing or frequently opening the wire controller.
ROOM TEMP
C
Wireless remoter receiver
ON/OFF button
MODE select button
TIMER/SLEEP button
LCD screen
Room temperature sensor
FAN speed/LOUVER button
TEMP. setting button
8
WIRE REMOTE CONTROL INTRODUCE
1) Room temperature sensor:
Temperature sensor inside the wire remote control switch is set to sense room temperature, and the
temperature will be sent to indoor unit. When do not connect the wire remote control switch, indoor
unit will switch to the temperature sensor which is built into indoor unit.
2) Wireless remoter receiver:
by this receiver, you can use an additional wireless remoter switch to control indoor unit.
3) ON/OFF button:
press this button to turn on or turn off the unit.
4) MODE select button:
Press this button to select COOLING, DEHUMIDIFICATION, FAN, HEATING or AUTO-RUN mode.
COOLING mode, the air conditioner makes the room cool.
DEHUMIDIFICATION mode, the air conditioner reduces the humidity in the room.
FAN mode, the air conditioner makes the room's temperature suitable, providing the soft air flow.
HEATING mode, The air conditioner makes the room warm.
AUTO-RUN mode, The air conditioner runs in right mode according to the temperature of room.
(This mode is invalid for AMD 385)
5) TIMER/SLEEP button:
• Press this button to active sleep mode, and " " will appear in LCD.
Press again to cancel sleep function.
• Press this button for 3 seconds to active timer function.
Press for 5 seconds again to cancel timer function.
For timer function Please refer to timer function introduce.
6) FAN speed/LOUVER button:
• Press this button to change current fan speed. You can select
" "(auto fan speed), " " (low fan speed), " "(medium fan speed),
" "(high fan speed) by each press.
WIRE REMOTE CONTROL INTRODUCE
• Press this button for 2 seconds to active LOUVER function.
7) TEMP Setting button:
Press the couple of buttons to set room temperature you want, when you press SET TEMP sign will
appear in LCD, press " " button to reduce setting temperature, and press " " button to increase
setting temperature.
8) LCD screen
A
A
UTO
9
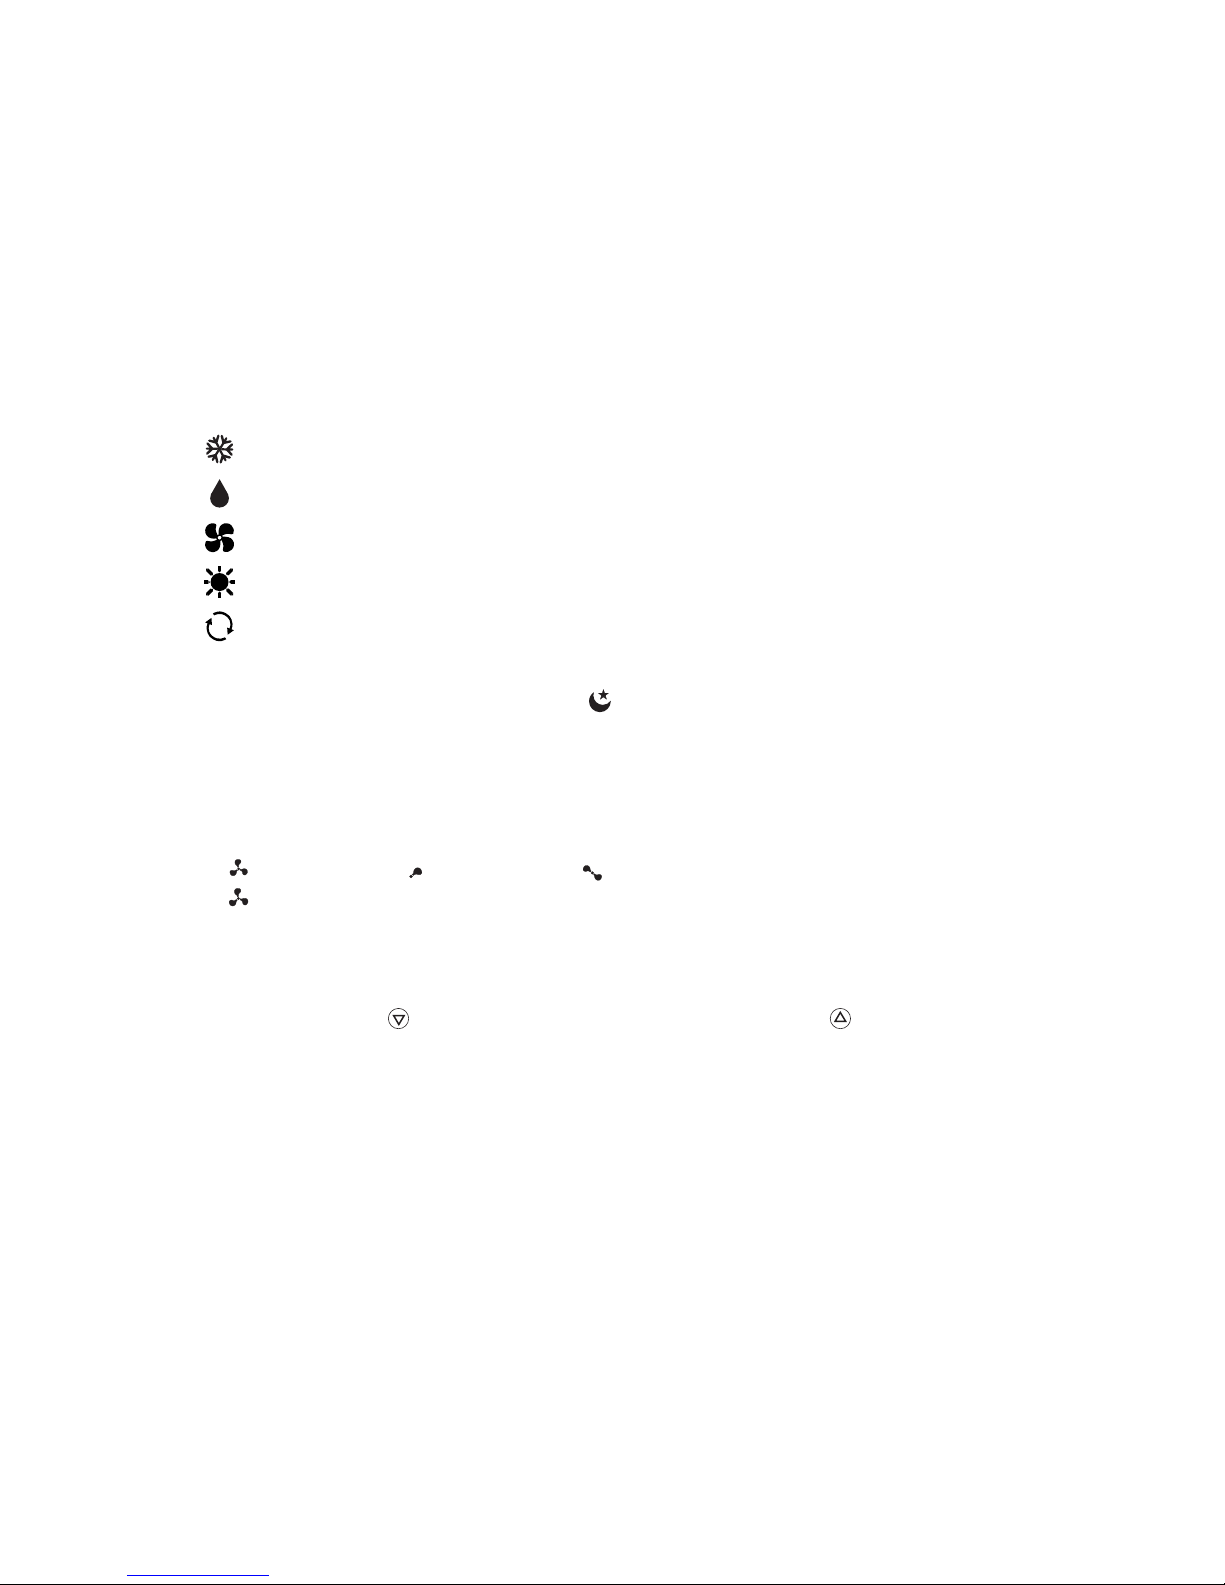
SET TEMP
R OOM
T E MP
C
AUT O
N O
.
T IME R O N
T IME R O F F
S E T T IME R
A
Display room temperature
and setting temperature
Running state sign area
Which indicate the running
state
Flap direction display (Only for
embedded type unit)
Fan speed display
Display timer setting
Mode indication area Which indicate
the current running mode
Operation mode
cooling mode
dehumidification mode
fan mode
heating mode
auto mode
(This mode is invalid for
AMD 385)
Fan speed setting
auto fan
high fan speed
middle fan speed
low fan speed
Temperature display
Room temperature:
Setting temperature:
SET TEMP
C
ROOM
TEMP
C
A
UTO
A
timer on
timer off
timer clock
auto fan
high fan speed
middle fan speed
low fan speed
Flap direction display
swing sign
OPERATION WITH WIRE REMOTE CONTROL
Mode fuction
1) Press MODE button " " to select operation mode:
COOLING mode
DEHUMIDIFICATION mode
FAN mode
HEATING mode
AUTO-RUN mode (This mode is invalid for AMD 385)
2) Press ON/OFF " " button to turn on or turn off the unit.
3) Press TEMP. SETTING " " " " button to set room temperature. The temperature range can be set
from 18°C to 32°C.
A
10
4) Press FAN " " button to set fan speed you want. Of course you can set auto fan and indoor unit will
automatic select fan speed according to the difference between room temperature and setting
temperature.
5) You may turn off the unit by press ON/OFF " " button again.
NOTE: In fan mode, temperature setting is invalid.
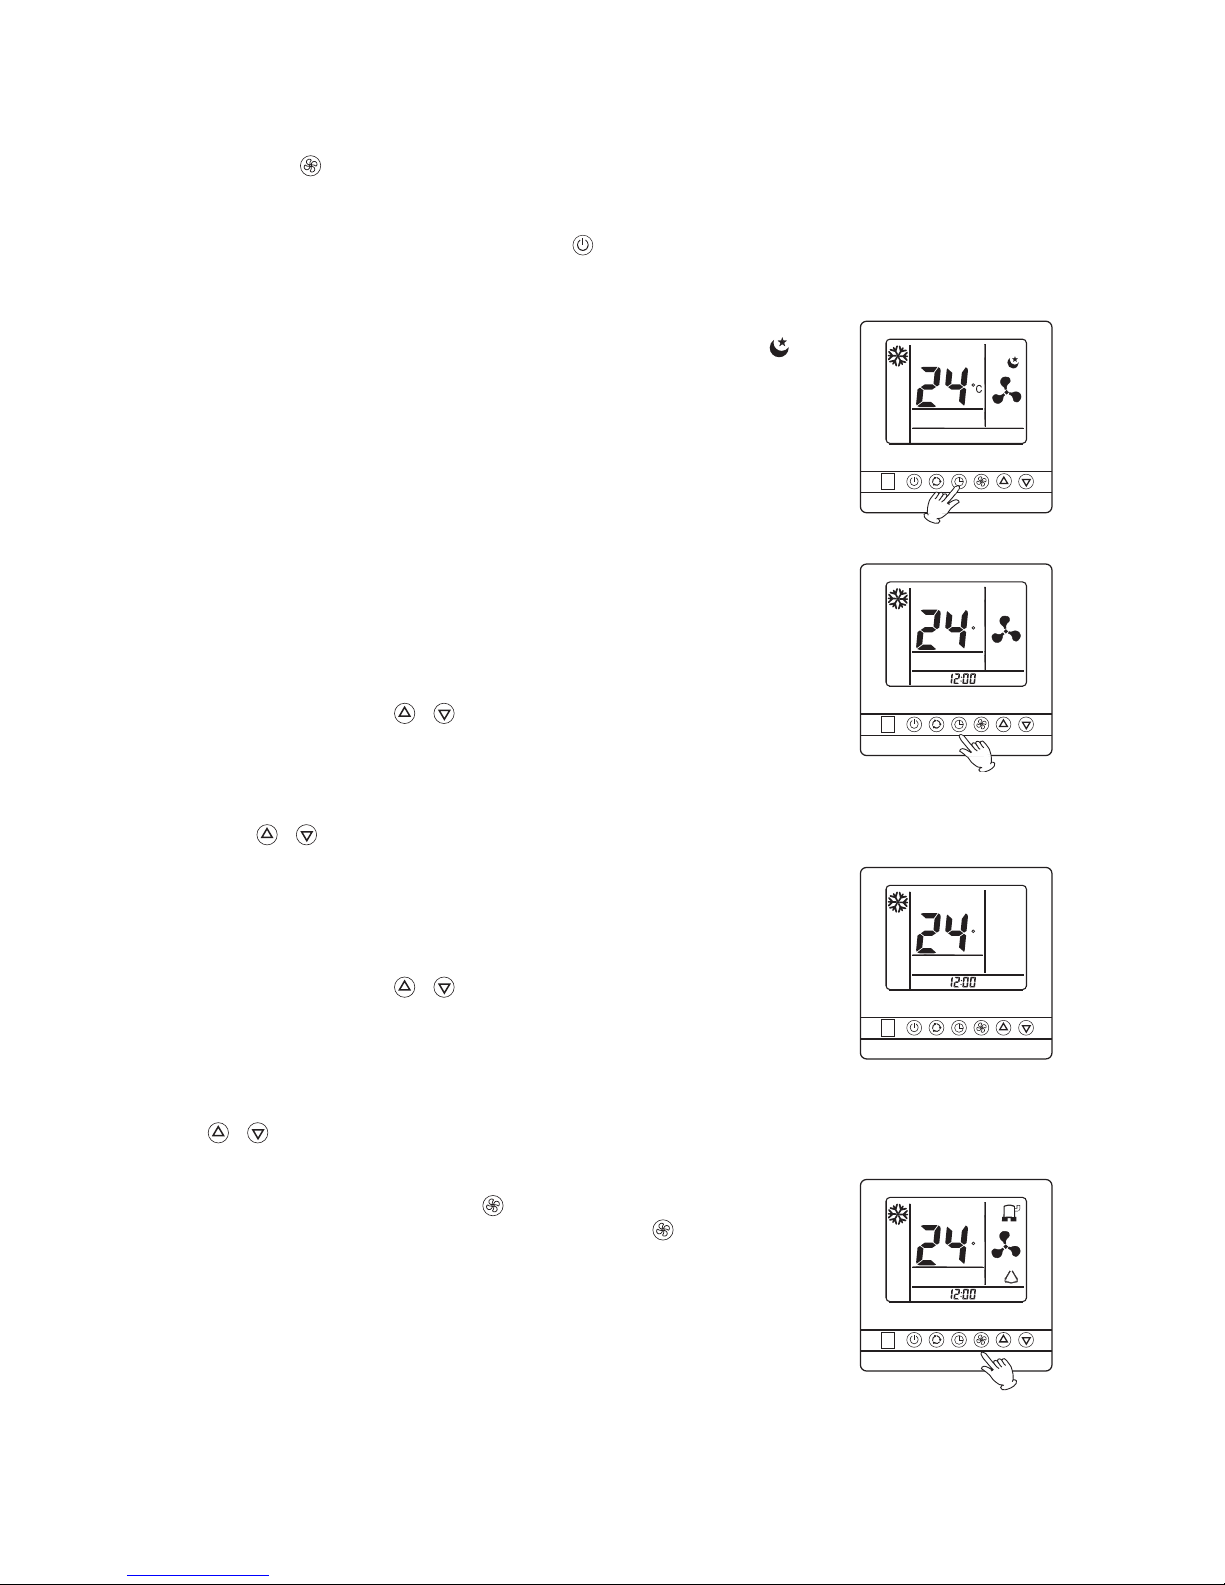
Sleep fuction
Press TIMER/SLEEP button once to active sleep fuction. And sleep sign " " will
appear on LCD. Press TIMER/SLEEP button again to cancel sleep fuction, and
sleep sign on LCD will desappear.
Note: During fan mode, the sleep function is invalid.
Timer function
TIMER OFF mode:
1) You can set timer off when indoor unit is running. By press TIMER/SLEEP
button for 3 second, timer clock appear on LCD, and "TIMER OFF" flag will
twinkle.
2) You can adjust the time after which the indoor unit would turn off
automatically by press " " " " button. The time can be set from 0.5 to 24(or
12) hours in 30 minutes steps.
3) When you have set the time, press TIMER/SLEEP button for 3 seconds again
to active the timer, "TIMER OFF" flag will stop twinkle, and timer begin to work.
4) If you need to cancel "TIMER OFF" , press TIMER/SLEEP button for 3 seconds to active the timer,
press " " " " button set time 00:00, cancel "TIMER OFF" after 5 seconds automatically.
TIMER ON mode:
1) You can set timer on when indoor unit is shut off. By press TIMER/SLEEP
button for 3 second, timer clock appear on LCD, and "TIMER ON" flag will
twinkle.
2) You can adjust the time after which the indoor unit would turn on
automatically by press " " " " button. The time can be set from 0.5 to 24(or
12) hours in 30 minutes steps.
3) When you have set the time, press TIMER/SLEEP button for 3 seconds again
to active the timer, "TIMER ON " flag will stop twinkle, and timer begin to
work.
4) If you need to cancel "TIMER ON", press TIMER/SLEEP button for 3 seconds to active the timer, press
" " " " button set time 00:00, cancel "TIMER ON" after 5 seconds automatically.
Airflow direction control
If the ai r conditioner is on, pess the " " for 2 seconds, " trickle " a sound, then
the louver begin swing. If you need stop swing, press the " " for 2 senconds
again, and the louver stop swing.
ROOM TEMP
ROOM TEMP
C
TIMER OFF
ROOM TEMP
C
TIMER ON
ROOM TEMP
C
TIMER ON
11
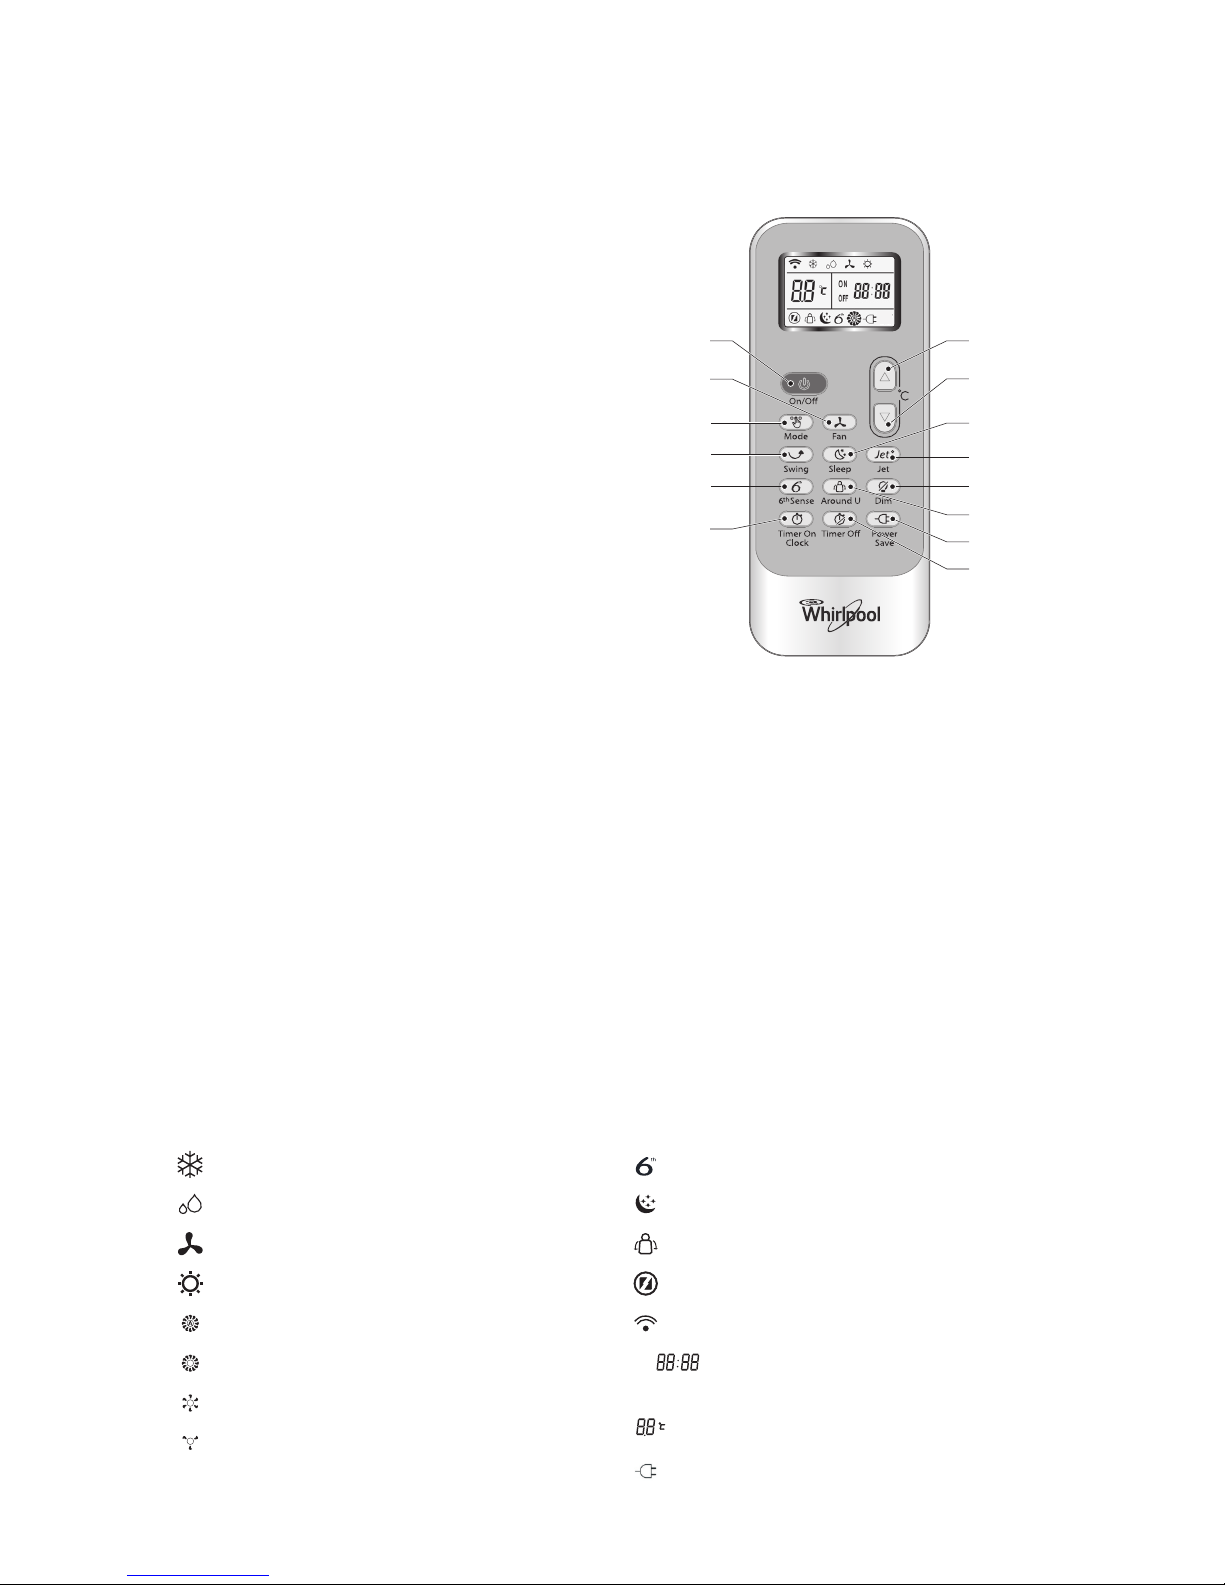
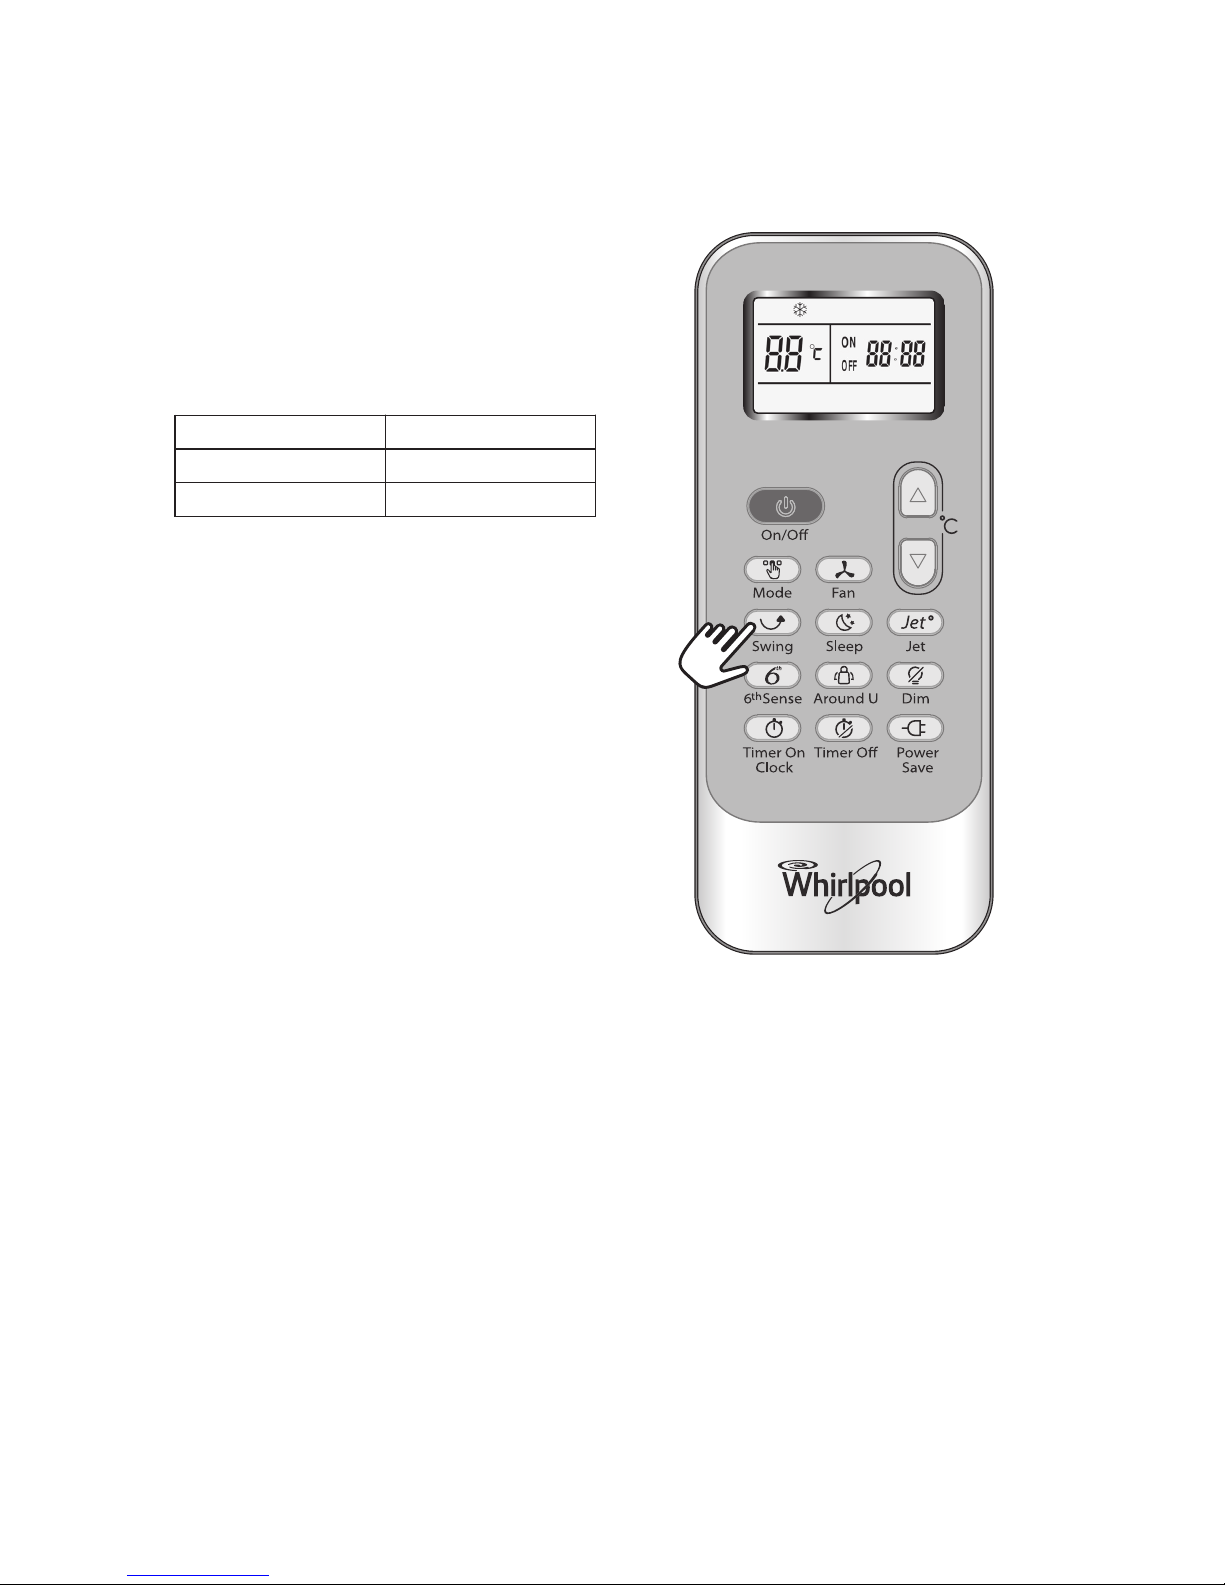
REMOTE CONTROL FUNCTIONS
AND INDICATORS
1. ON/OFF BUTTON
Starts and/or Stops the appliance by pressing
this button.
2. MODE BUTTON
Used to select the operation mode.
3. FAN BUTTON
Used to select fan speed in sequence auto,
high, medium or low.
4-5.TEMPERATURE BUTTON
Used to select the room temperature. Used
to set time in timer mode and real time clock.
6. 6TH SENSE BUTTON
Sets or cancels 6th sense operation.
7. SWING BUTTON
Stops or starts vertical adjustment louver
swinging and sets the desired up/down airflow
direction.
8. SLEEP BUTTON
Sets or cancels Sleep Mode operation.
9. AROUND U BUTTON
When you press this button, the remote
control transmits signal of the actual room
temperature around itself to the indoor unit
every 10 minutes. Therefore please keep the
remote control in a location where it can
transmit the signal to the indoor unit properly.
Press once to set and press again to cancel.
10. TIMER ON/CLOCK BUTTON
Used to set the current time.
Used to set or cancel the timer on operation.
11 TIMER OFF BUTTON
Used to set or cancel the timer off operation.
12. JET BUTTON
Used to start or stop the fast cooling.
13. DIM BUTTON
Used to turn on or turn off display light on
indoor unit.
14. POWER SAVE BUTTON
Used to start or stop the power save
operation.
Note: Power save function is invalid for this
conditioner.
rq
e
t
d
f
i
o
g
s
u
w
y
a
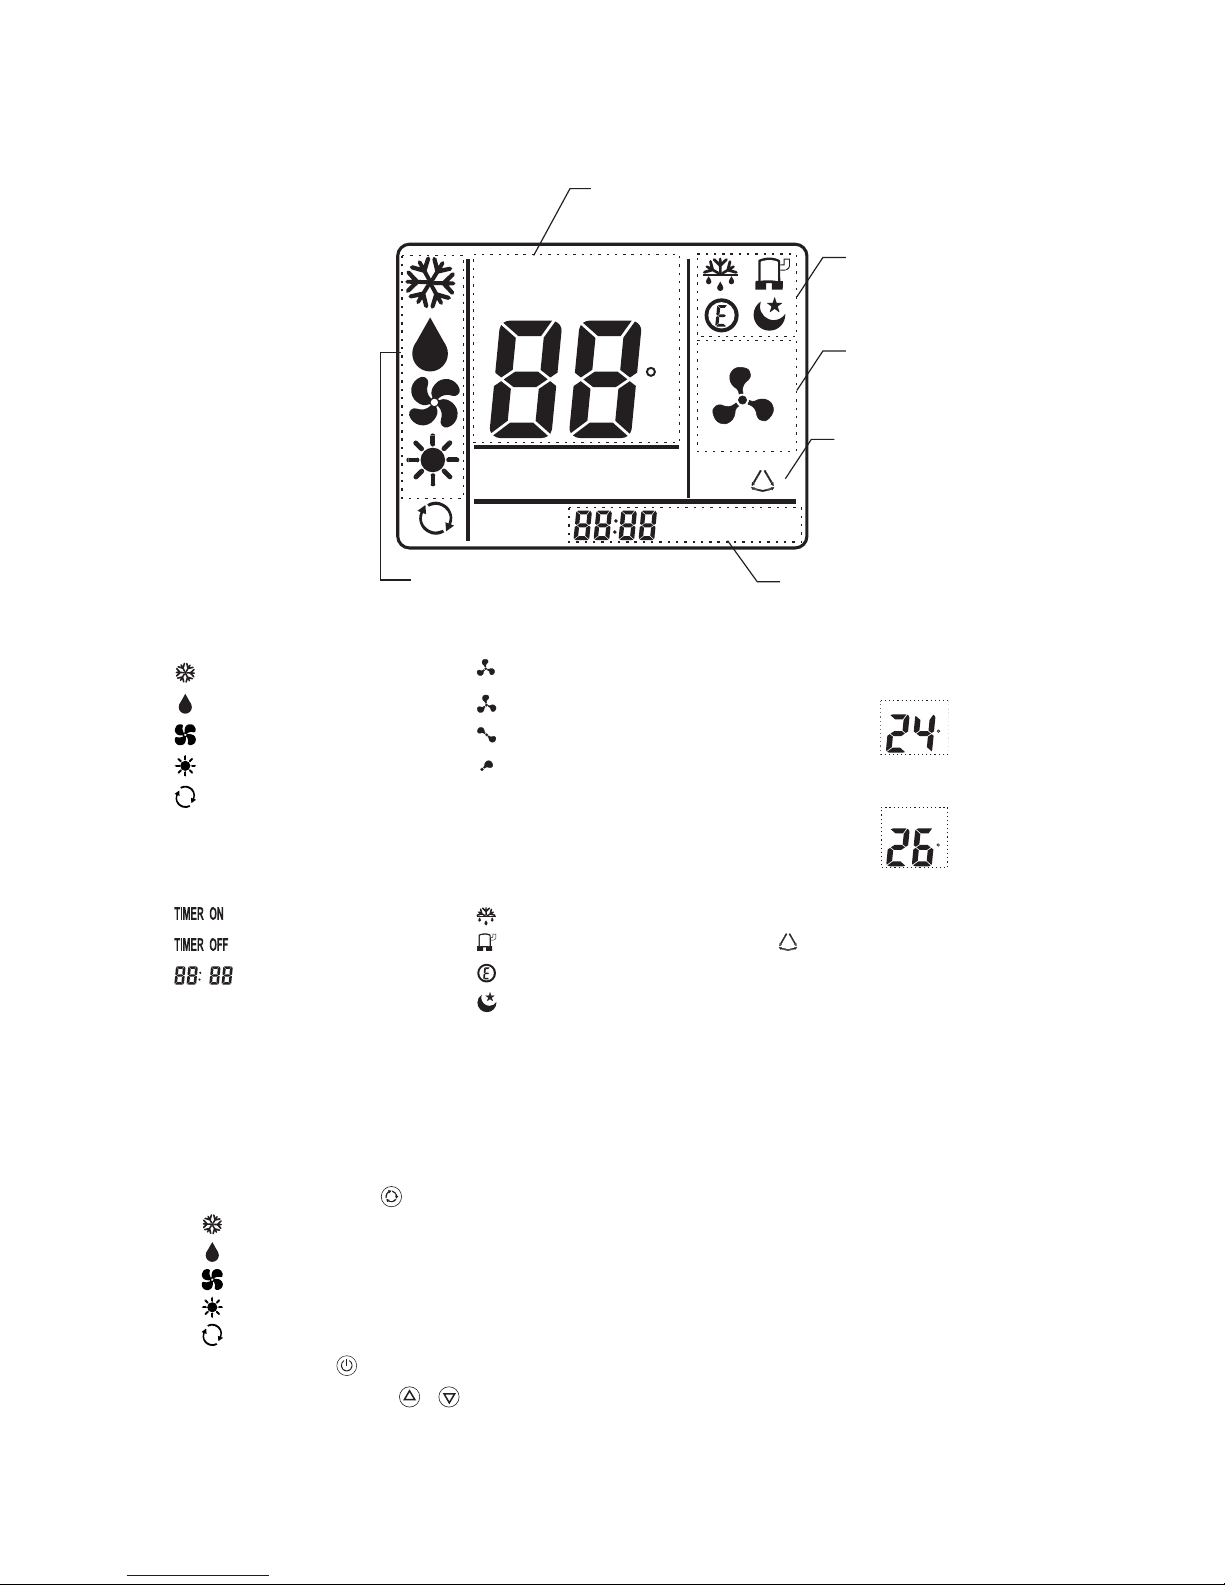
INDICATOR SYMBOLS ON RC DISPLAY
Cooling indicator
Dry indicator
Fan only indicator
Heating indicator
Auto fan speed
High fan speed
Medium fan speed
Low fan speed
6th Sense indicator
Sleep indicator
Around U indicator
Jet indicator
Signal transmission
Display set timer
Display current time
Display set temperature
Power save indicator
O
ON
OFF
12
OPERATING MODE DESCRIPTION
Operation Modes:
1. Selecting mode
Each time MODE button is pressed, the operation
mode is changed in sequence:
COOLING → DRY → FAN ONLY → HEATING
↑
Heating mode is not available for cooling only air
conditioners.
2. FAN mode
Each time the "FAN" button is pressed, the fan
speed is changed in sequence:
Auto → High → Medium → Low
↑
At "FAN ONLY" mode, only "High","Medium" and
"Low" are available.
At "DRY" mode, Fan speed is set at "Auto"
automatically, "FAN" button is ineffective in this
case.
3. Setting temperature
Press once to raise temperature setting by 1
raise °C
Press once to lower temperature setting by 1
lower °C
*Note: Heating mode is NOT available for
cooling only models.
4. Turning on
Press button, when the appliance receives
the signal, the RUNNING indicator of the indoor
unit lights up.
During mode changes wait a few seconds and
repeat the operation if the unit does not respond
at once.
When selection the heating operation, air flow will
start after 2-5 minutes.
Range of available set temperature
*HEATING, COOLING 18°C~32°C
DRY +/-7°C
FAN ONLY unable to set
4
1 2
3
13
AIRFLOW DIRECTION CONTROL
5. Airflow direction control
The louver is automatically adjusted to a certain
angle in accordance with the operation mode after
turning on the unit.
The direction of airflow can be also adjusted to
your own requirement by pressing the "SWING"
button of the remote control.
*Heating mode is only available for heat pump
models.
Louver control (using the remote control)
Use the remote control to set the flow angles.
Swinging airflow
Pressing "SWING" button once, the louver will
swing up and down automatically.
Desired direction airflow
Pressing the "SWING" button again when the
louvers swing to a suitable angle as desired.
Note:
A - Do not turn the louvers manually, otherwise
malfunction may occur. If that happens, turn
off the unit first and cut off the power supply,
then restore power supply again.
B - It is better not to let the louver tilt downward
for a long time at COOLING or DRY mode to
prevent condensed water from dripping.
Operation mode Direction of airflow
COOLING, DRY horizontal
*HEATING, FAN ONLY downward
 Loading...