

Whirlpool AKPM 6580 User And Maintenance Manual
IT
AKPM 6580
User and maintenance manual
Manual do utilizador e de manutenção
Manuale d’uso e manutenzione
Návod k použití a údržbě
Návod na používanie a údržbu
Felhasználói és karbantartási kézikönyv


IMPORTANT SAFETY INSTRUCTIONS
YOUR SAFETY AND THAT OF OTHERS IS PARAMOUNT
This manual and the appliance itself provide important safety warnings, to be read and observed at all times.
This is the danger symbol, pertaining to safety, which alerts users to potential risks to themselves
and others.
All safety warnings are preceded by the danger symbol and the following terms:
DANGER
WARNING
Indicates a hazardous situation which, if not avoided, will cause serious injury.
Indicates a hazardous situation which, if not avoided, could cause serious injury.
All safety warnings give specific details of the potential risk present and indicate
how to reduce risk of injury, damage and electric shock resulting from improper
use of the appliance. Carefully observe the following instructions:
- The appliance must be disconnected from the power supply before carrying
out any installation work.
- Installation and maintenance must be carried out by a qualified technician,
in compliance with the manufacturer’s instructions and local safety
regulations. Do not repair or replace any part of the appliance unless
specifically stated in the user manual.
- Power cable replacement must be carried out by qualified electician.
Contact an authorizes service centre.
- Regulations require that the appliance is earthed.
- The power cable must be long enough for connecting the appliance, once
fitted in its housing, to the power supply socket.
- For installation to comply with current safety regulations, an all-pole
disconnect switch with minimum contact gap of 3 mm must be utilized.
- Do not use multiple plug adapters or extension leads.
- Do not pull the power supply cable in order to unplug the appliance.
- The electrical components must not be accessible to the user after
installation.
- Do not touch the appliance with any wet part of the body and do not
operate it when barefoot.
- This appliance is designed solely for use as a domestic appliance for cooking
food. No other type of use is permitted (e.g.: heating rooms). The
Manufacturer declines all responsibility for inappropriate use or incorrect
setting of the controls.
- This appliance can be used by children aged from 8 years and above and
persons with reduced physical, sensory or mental capabilities or lack of
experience and knowledge if they have been given supervision or
instruction concerning use of the appliance in a safe way and understand
hazards involved. Children shall not play with the appliance. Cleaning and
user maintenance shall not be made by children without supervision.
GB1

- The accessible parts of the appliance may become very hot during use.
Young children should be kept away from the appliance and supervised to
ensure that they do not play with it.
- The appliance and its accessible parts become hot during use. Care should
be taken to avoid touching heating elements. Children less than 8 years old
shall be kept away, unless continuosly supervised.
- During and after use, do not touch the heating elements or interior surfaces
of the appliance - risk of burns. Do not allow the appliance to come into
contact with cloths or other flammable materials until all the components
have cooled sufficiently.
- At the end of cooking, exercise caution when opening the appliance door,
letting the hot air or steam exit gradually before accessing the oven. When
the appliance door is shut, hot air is vented from the aperture above the
control panel. Do not obstruct the vent apertures.
- Use oven gloves to remove pans and accessories, taking care not to touch
the heating elements.
- Do not place flammable materials in or near the appliance: a fire may break
out if the appliance is inadvertently switched on.
- Do not heat or cook sealed jars or containers in the appliance. The pressure
that builds up inside might cause the jar to explode, damaging the
appliance.
- Do not use containers made of synthetic materials.
- Overheated oils and fats catch fire easily. Always remain vigilant when
cooking foods rich in fat and oil.
- Never leave the appliance unattended during food drying.
- If alcoholic beverages are used when cooking foods (e.g. rum, cognac,
wine), remember that alcohol evaporates at high temperatures. As a result,
there is a risk that vapours released by the alcohol may catch fire upon
coming into contact with the electrical heating element.
- Never use steam cleaning equipment.
- Do not touch the oven during the pyrolysys cycle. Keep children away from
the oven during the pyrolysis cycle.(only for ovens with Pyrolisis function).
- Only use the temperature probe recommended for this oven.
- Do not use harsh abrasive cleaners or sharp metal scrapers to clean the
oven door glass since they can scratch the surface, which may result in
shattering of the glass.
- Ensure that the appliance is switched off before replacing the lamp to avoid
the possibility of electric shock.
GB2
Scrapping of household appliances
- This appliance is manufactured with recyclable or reusable materials. Dispose of it in accordance with
local waste disposal regulations. Before scrapping, cut off the power supply cable.
- For further information on the treatment, recovery and recycling of household electrical appliances,
contact your competent local authority, the collection service for household waste or the store where
you purchased the appliance.
INSTALLATION
After unpacking the oven, make sure that it has not been damaged during transport and that the oven
door closes properly. In the event of problems, contact the dealer or your nearest After-sales Service. To
prevent any damage, only remove the oven from its polystyrene foam base at the time of installation.
PREPARING THE HOUSING UNIT
• Kitchen units in contact with the oven must be heat resistant (min 90°C).
• Carry out all cabinet cutting work before fitting the oven in the housing and carefully remove all
wood chips and sawdust.
• After installation, the bottom of the oven must no longer be accessible.
• For correct appliance operation, do not obstruct the minimum gap between the worktop and the
upper edge of the oven.
ELECTRICAL CONNECTION
Make sure the power voltage specified on the appliance dataplate is the same as the mains voltage. The
dataplate is on the front edge of the oven (visible when the door is open).
• Power cable replacement (type H05 RR-F 3 x 1.5 mm2) must be carried out by a qualified electrician.
Contact an authorized service centre.
GENERAL RECOMMENDATIONS
Before use:
- Remove cardboard protection pieces, protective film and adhesive labels from accessories.
- Remove the accessories from the oven and heat it at 200° for about an hour to eliminate the smell
and fumes from the insulating materials and protective grease.
During use:
- Do not place heavy objects on the door as they could damage it.
- Do not cling to the door or hang anything from the handle.
- Do not cover the inside of the oven with aluminium foil.
- Never pour water into the inside of a hot oven; this could damage the enamel coating.
- Never drag pots or pans across the bottom of the oven as this could damage the enamel coating.
- Make sure that the electrical cables of other appliances do not touch hot parts of the oven or become
trapped in the door.
- Do not expose the oven to atmospheric agents.
SAFEGUARDING THE ENVIRONMENT
Disposal of packing material
The packing material is 100% recyclable and is marked with the recycle symbol ( ). The various parts of
the packing must therefore be disposed of responsibly and in full compliance with local authority
regulations governing waste disposal.
Scrapping the product
- This appliance is marked in compliance with European Directive 2002/96/EC, Waste Electrical and
Electronic Equipment (WEEE).
- By ensuring this product is disposed of correctly, you will help prevent potential negative
consequences for the environment and human health, which could otherwise be caused by
inappropriate waste handling of this product.
- The symbol on the product or on the accompanying documentation indicates that it should not be
treated as domestic waste but must be taken to an appropriate collection centre for the recycling of
electrical and electronic equipment.
GB3

Energy saving
- Only pre-heat the oven if specified in the cooking table or your recipe.
- Use dark lacquered or enamelled baking moulds as they absorb heat far better.
- Switch the oven off 10/15 minutes before the set cooking time. Food requiring prolonged cooking will
continue to cook even once the oven is switched off.
DECLARATION OF CONFORMITY
- This oven, which is intended to come into contact with foodstuffs, complies with European
Regulation ( ) n.1935/2004 and has been designed, manufactured and sold in conformity with the
safety requirements of the “Low Voltage” directive 2006/95/CE (which replaces 73/23/CEE and
subsequent amendments), the protection requirements of “EMC” 2004/108/CE.
TROUBLESHOOTING GUIDE
The oven does not work:
• Check for the presence of mains electrical power and if the oven is connected to the electrical supply.
• Turn off the oven and restart it to see if the fault persists.
AFTER-SALES SERVICE
Before calling the After-Sales Service:
1. See if you can solve the problem yourself with the help of the suggestions given in the
“Troubleshooting guide“.
2. Switch the appliance off and back on again it to see if the fault persists.
If after the above checks the fault still occurs, get in touch with the nearest After-sales Service.
Always specify:
• a brief description of the fault;
• the type and exact model of the oven;
• the service number (number after the word Service on the rating plate), located on the right hand
edge of the oven cavity (visible when the oven door is open). The service number is also indicated on
the guarantee booklet;
• your full address;
• your telephone number.
If any repairs are required, please contact an authorised After-sales Service (to guarantee that original
spare parts will be used and repairs carried out correctly).
CLEANING
WARNING
Oven exterior
IMPORTANT: do not use corrosive or abrasive detergents. If any of these products accidentally
comes into contact with the appliance, clean immediately with a damp cloth.
• Clean the surfaces with a damp cloth. If it is very dirty, add a few drops of washing up detergent to the
water. Finish off with a dry cloth.
- Never use steam cleaning equipment.
- Only clean the oven when it is cool to the touch.
- Disconnect the appliance from the power supply.
GB4
Oven interior
IMPORTANT: do not use abrasive sponges or metallic scrapers or scourers. Over time, these can ruin
enamelled surfaces and the oven door glass.
• After every use, allow the oven to cool then clean it preferably while it is still warm in order to remove
built-up dirt and stains caused by food residues (e.g. food with a high sugar content).
• Use proprietary oven detergents and follow the manufacturer’s instructions to the letter.
• Clean the door glass with a suitable liquid detergent. The oven door can be removed to facilitate
cleaning (see MAINTENANCE).
• The top heating element of the grill (see MAINTENANCE) can be lowered (some models only) to clean
the roof of the oven.
N.B.: during prolonged cooking of foods with a high water content (e.g. pizza, vegetables, etc.)
condensation may form on the inside of the door and around the seal. When the oven is cold, dry the
inside of the door with a cloth or sponge.
Accessories:
• Soak the accessories in water with washing up detergent immediately after use, handling them with
oven gloves if still hot.
• Food residues can be easily removed using a brush or sponge.
MAINTENANCE
WARNING
- Use protective gloves.
- Ensure the oven is cold before carrying out the following operations.
- Disconnect the appliance from the power supply.
REMOVING THE DOOR
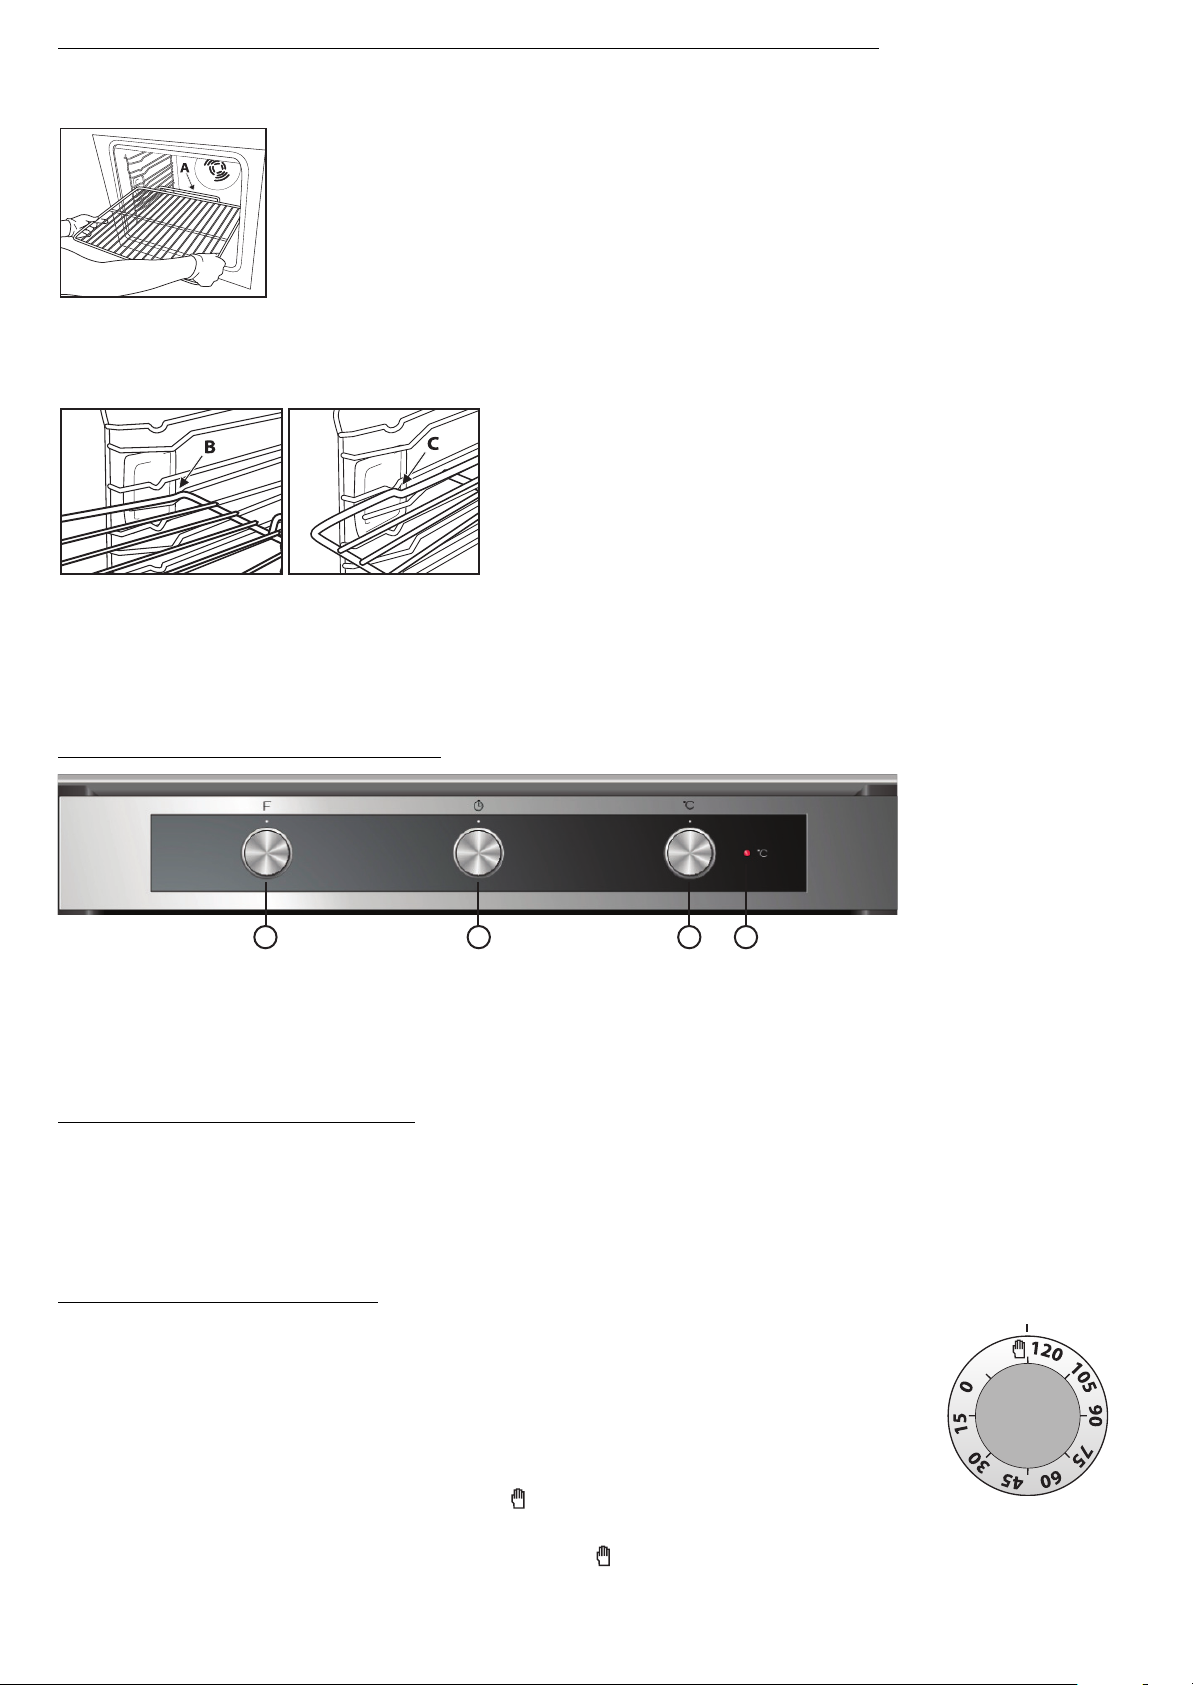
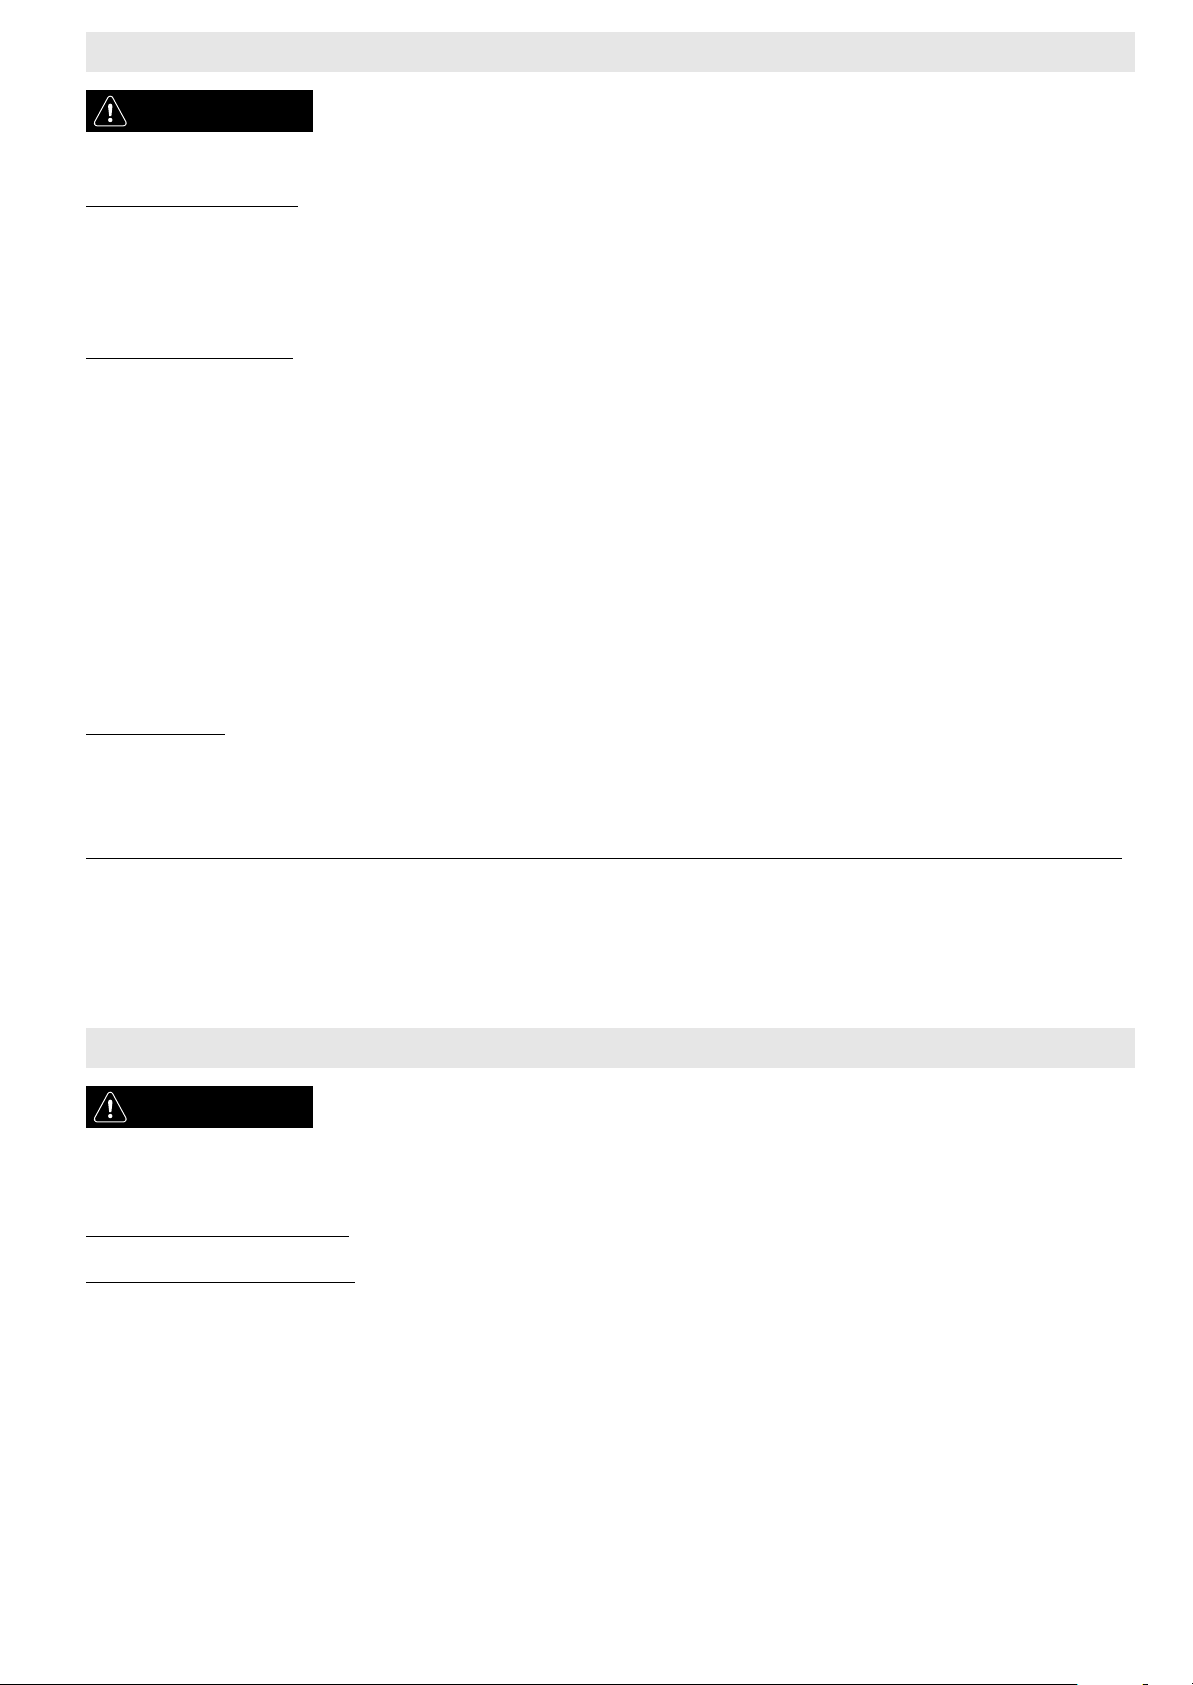
To remove the door:
1. Open the door fully.
2. Lift the catches and push them forwards as far as they will go (Fig. 1).
3. Close the door as far as it will go (A), lift it up (B) and turn it (C) until it is released (D) (Fig. 2).
To refit the door:
1. Insert the hinges in their seats.
2. Open the door fully.
3. Lower the two catches.
4. Close the door.
Fig. 1 Fig. 2
MOVING THE TOP HEATING ELEMENT (SOME MODELS ONLY)
1. Remove the side accessory holder grilles (Fig. 3).
2. Pull the heating element out a little (Fig. 4) and lower it (Fig. 5).
3. To reposition the heating element, lift it up, pulling it slightly towards you, making sure it comes to
rest on the lateral supports.
Fig. 3 Fig. 4 Fig. 5
GB5

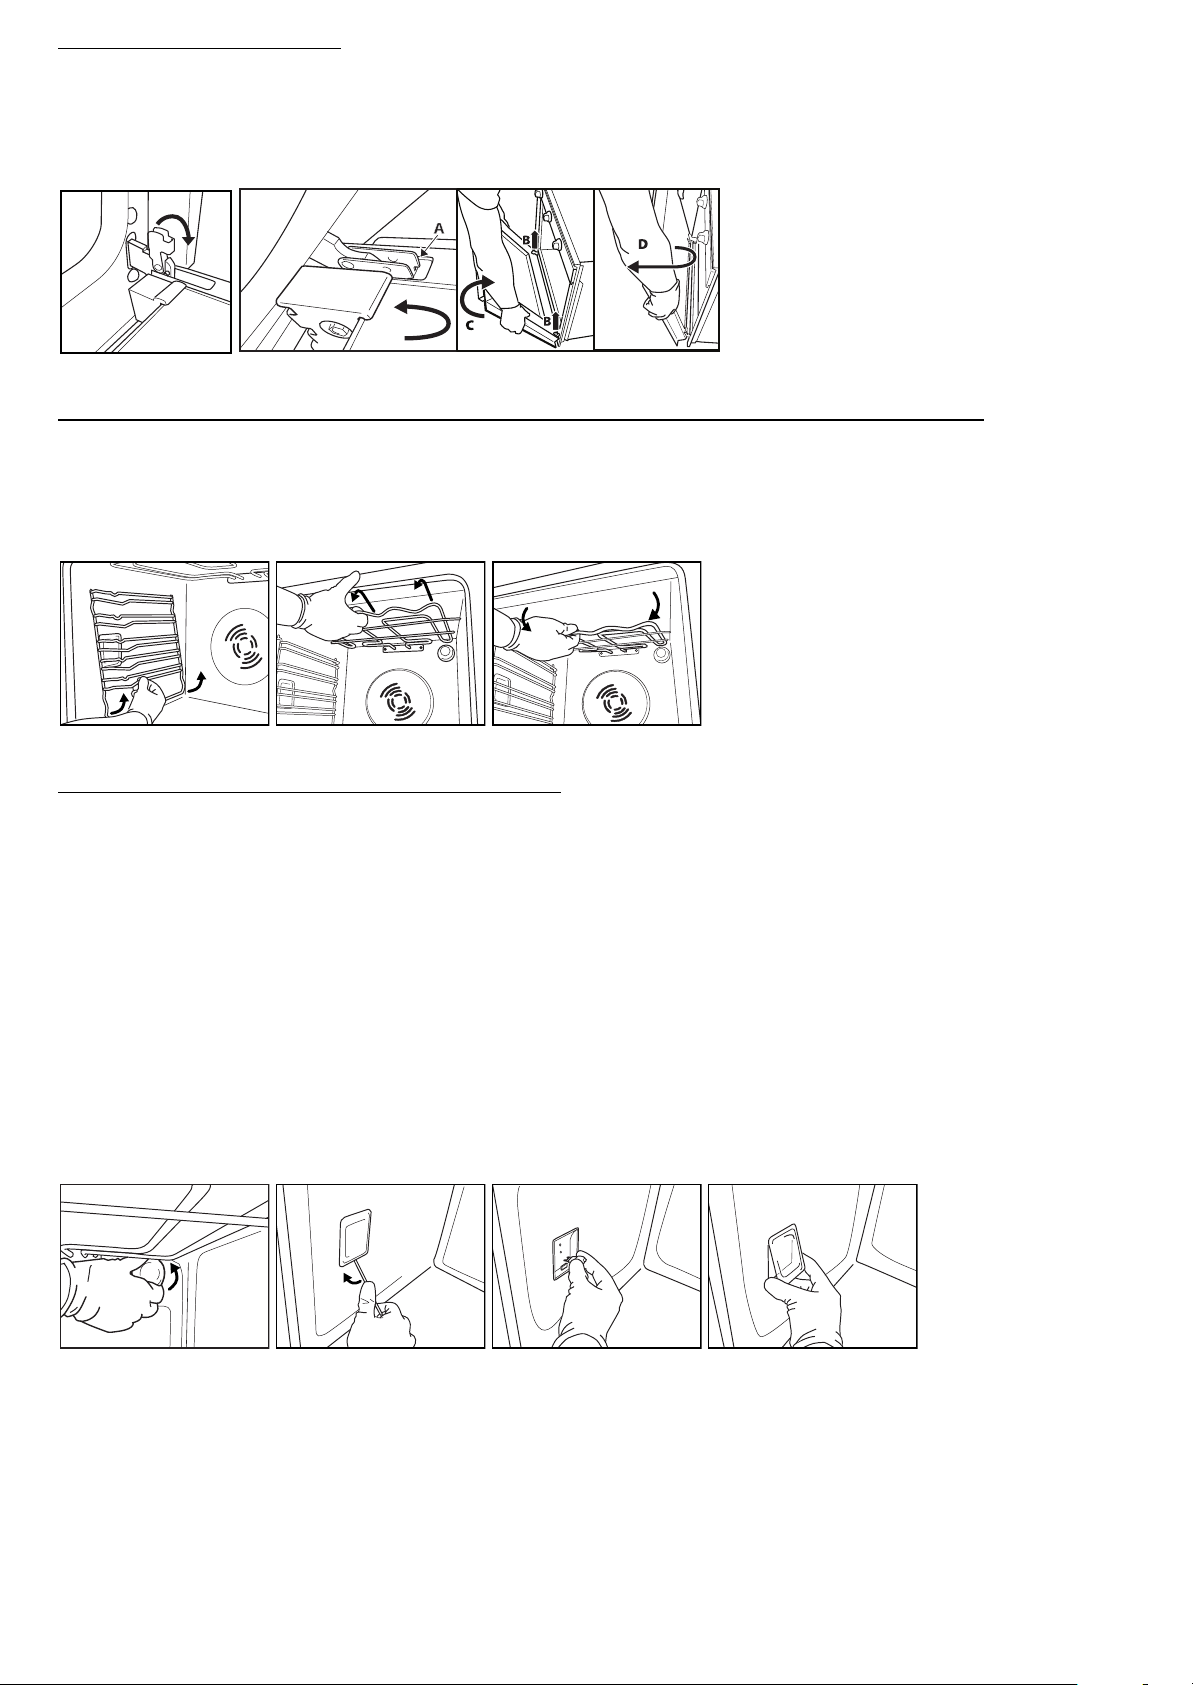
REPLACING THE OVEN LAMP
To replace the rear lamp (if present):
1. Disconnect the oven from the power supply.
2. Unscrew the lamp cover (Fig. 6), replace the lamp (see note for lamp type) and screw the lamp cover
back on.
3. Reconnect the oven to the power supply.
To replace the side lamp (if present):
1. Disconnect the oven from the power supply.
2. Remove the side accessory holder grilles, if present (Fig. 3).
3. Use a screwdriver to prise off the lamp cover (Fig. 7).
4. Replace the lamp (see note for lamp type) (Fig. 8).
5. Reposition the lamp cover, pushing it on firmly until it snaps into place (Fig. 9).
6. Refit the side accessory holder grilles.
7. Reconnect the oven to the power supply.
Fig. 6 Fig. 7 Fig. 8 Fig. 9
N.B.:
- Only use 25-40W/230V type E-14, T300°C incandescent lamps, or 20-40W/230 V type G9, T300°C
halogen lamps.
- Lamps are available from our After-sales Service.
IMPORTANT:
- If using halogen lamps, do not handle with bare hands since fingerprints can damage them.
- Do not use the oven until the lamp cover has been repositioned.
GB6
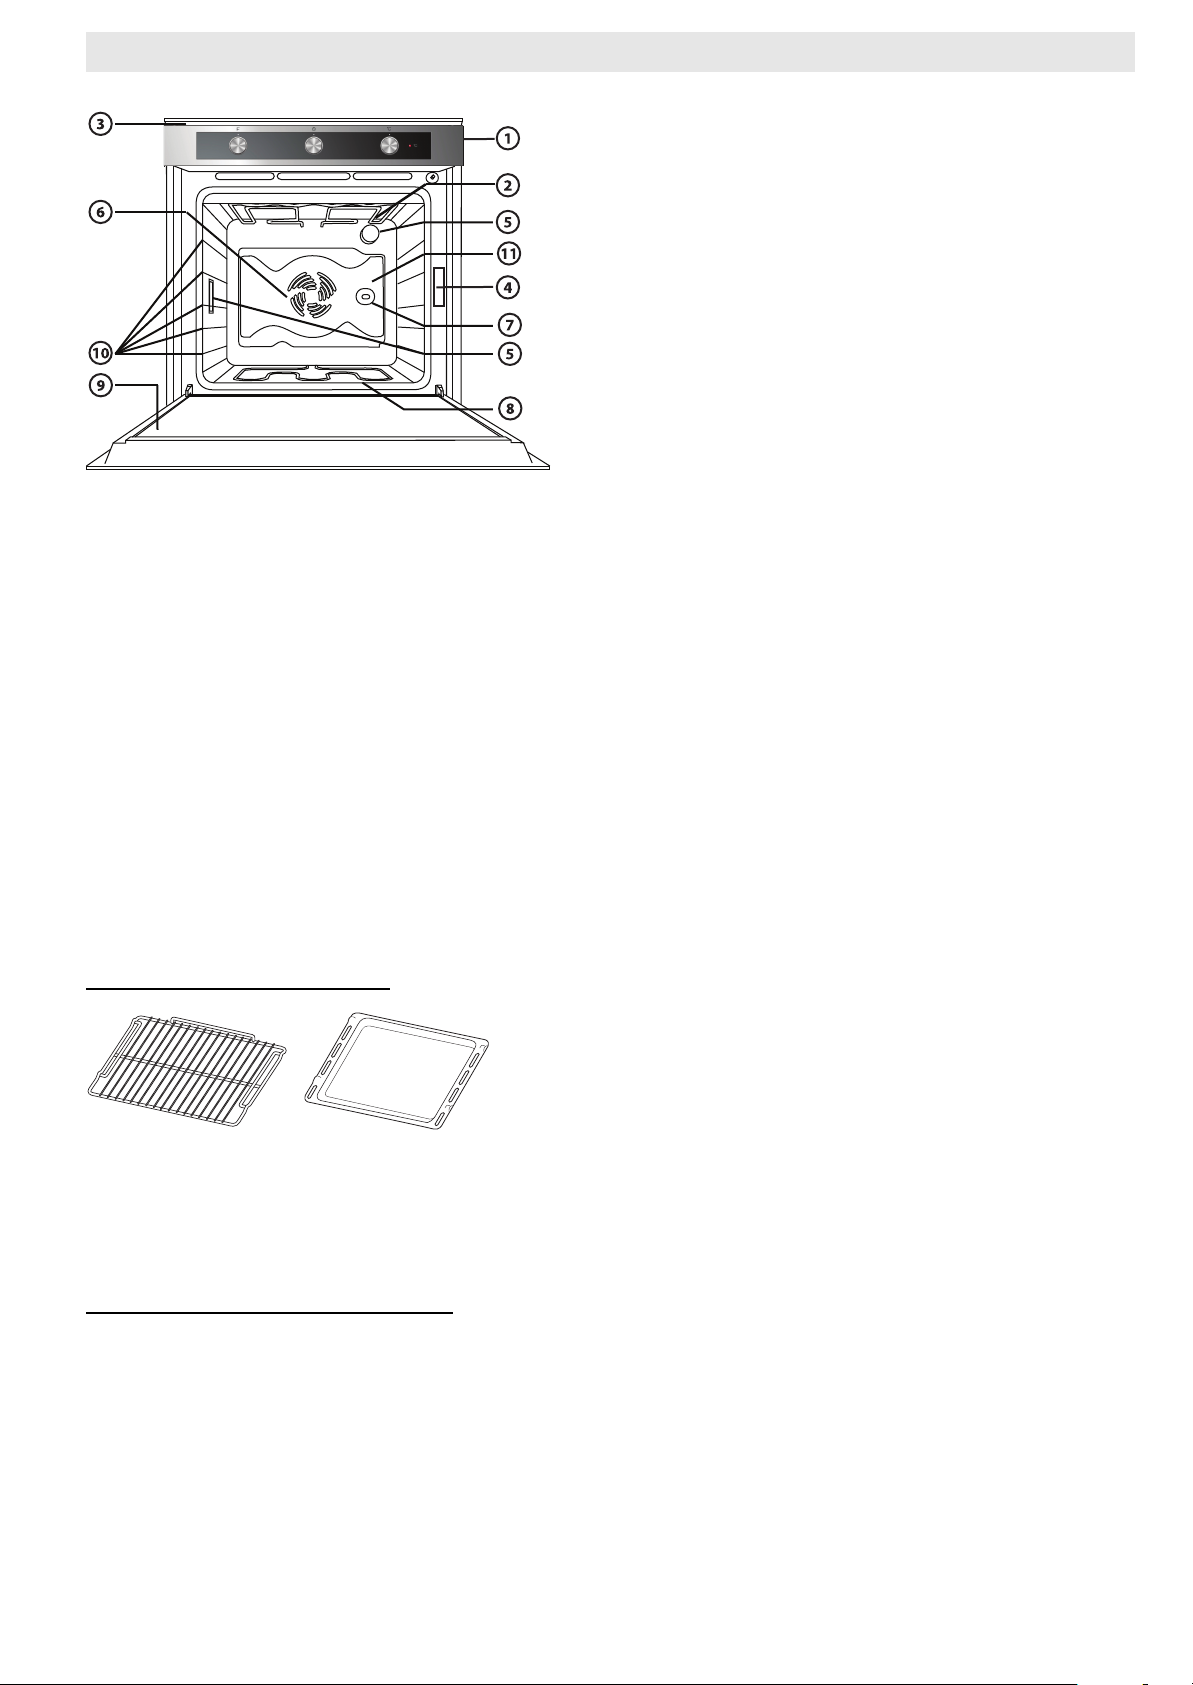
INSTRUCTIONS FOR OVEN USE
FOR ELECTRICAL CONNECTION, SEE THE PARAGRAPH ON INSTALLATION
1. Control panel
2. Upper heating element/grill
3. Cooling fan (not visible)
4. Dataplate (not to be removed)
5. Light
6. Fan
7. Turnspit (if present)
8. Lower heating element (hidden)
9. Door
10. Position of shelves (the number of shelves is indicated on the front of the oven)
11. Rear wall
N.B.:
- During cooking, the cooling fan may switch on at intervals in order to minimise energy consumption.
- At the end of cooking, after the oven in switched off, the cooling fan may continue to run for a while.
- When the oven door is opened during cooking, the heating elements switch off.
ACCESSORIES SUPPLIED
Fig. A Fig. B
A. WIRE SHELF (2): the wire shelf can be used to grill food or as a support for pans, cake tins and other
ovenproof cooking receptacles.
B. DRIP TRAY (1): the drip tray is designed to be positioned under the wire shelf in order to collect fat or
as an oven tray for cooking meat, fish, vegetables, focaccia, etc.
ACCESSORIES NOT SUPPLIED
Other accessories can be purchased separately from the After-sales Service.
GB7
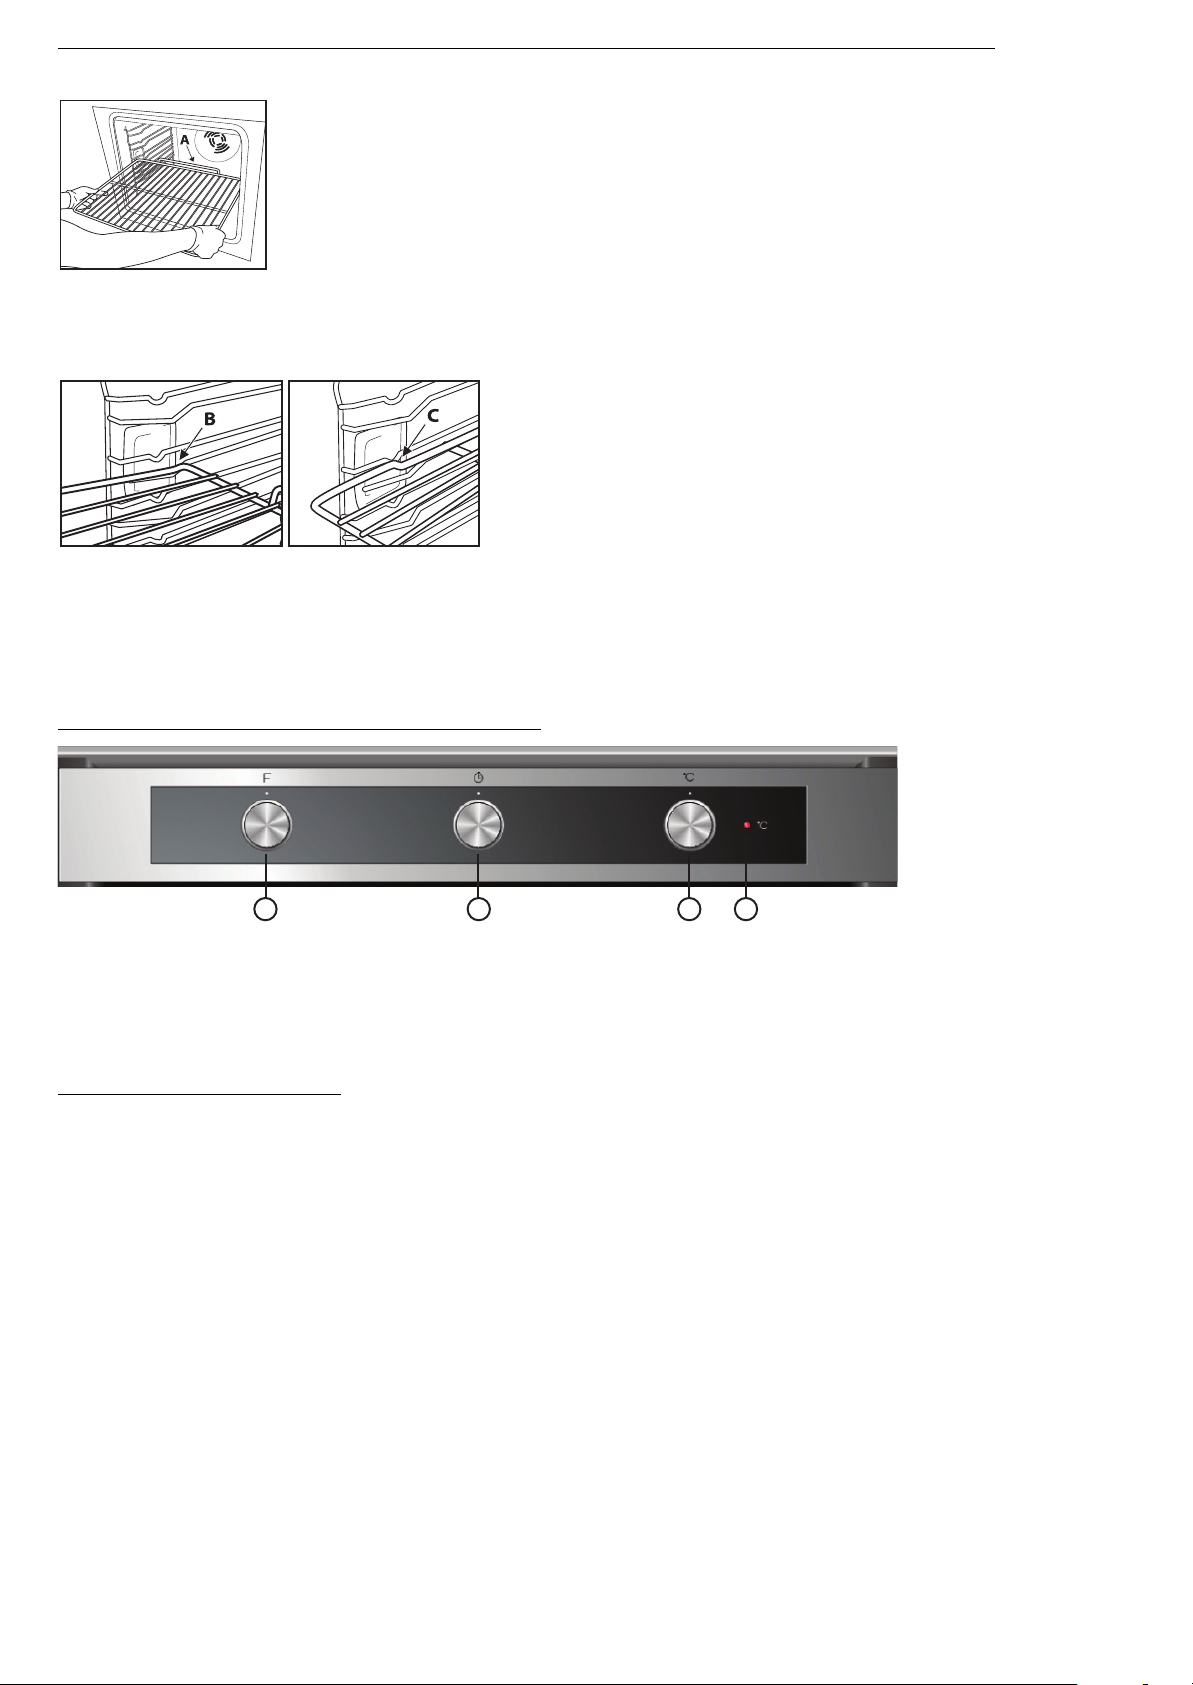
INSERTING WIRE SHELVES AND OTHER ACCESSORIES IN THE OVEN
1 32 4
The wire shelf and other accessories are provided with a locking mechanism to prevent their accidental
removal.
Fig. 1
1. Insert the wire shelf horizontally, with the raised part “A” ’upwards (Fig. 1).
2. Angle the wire shelf when it reaches the locking position “B” (Fig. 2).
Fig. 2 Fig. 3
3. Return the wire shelf to the horizontal position and push it in fully to “C” (Fig. 3).
4. To remove the wire shelf proceed in reverse order.
The other accessories, like the drip tray and baking tray, are inserted in exactly the same way. The
protrusion on the flat surface enables the accessories to lock in place.
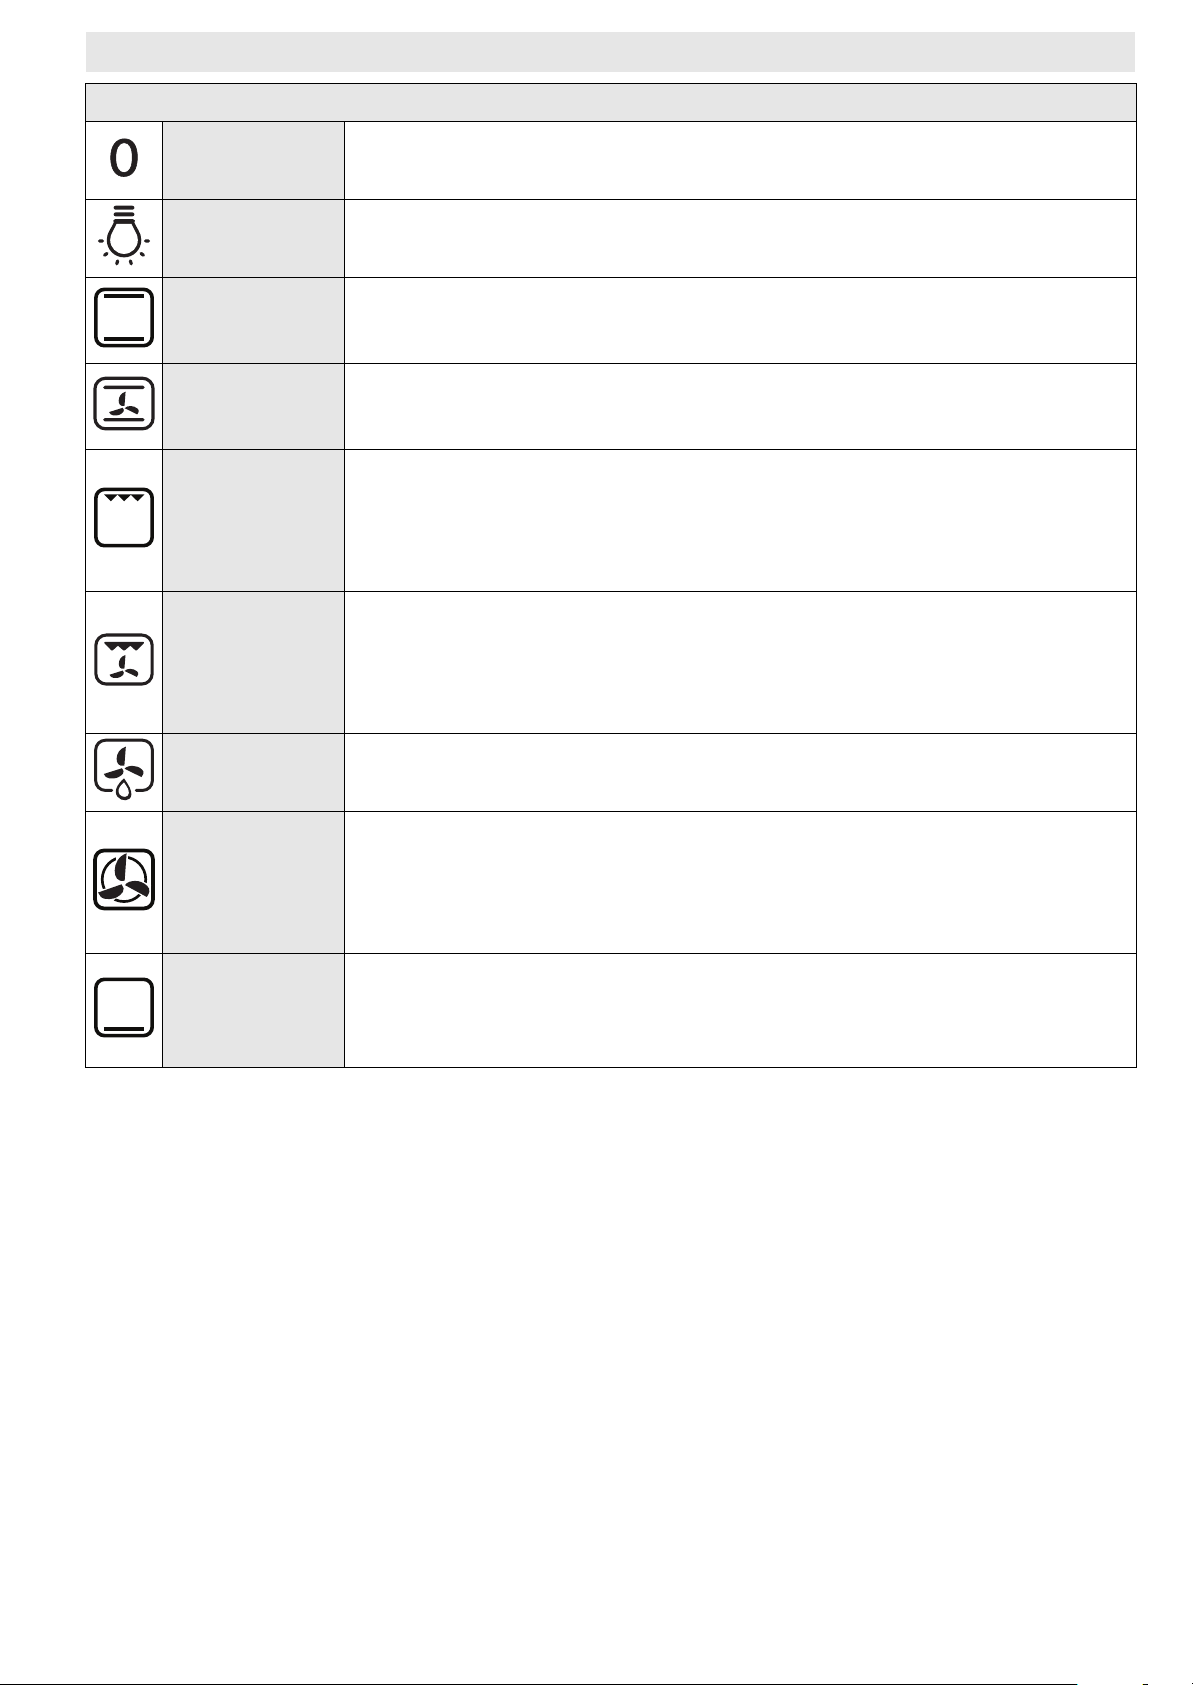
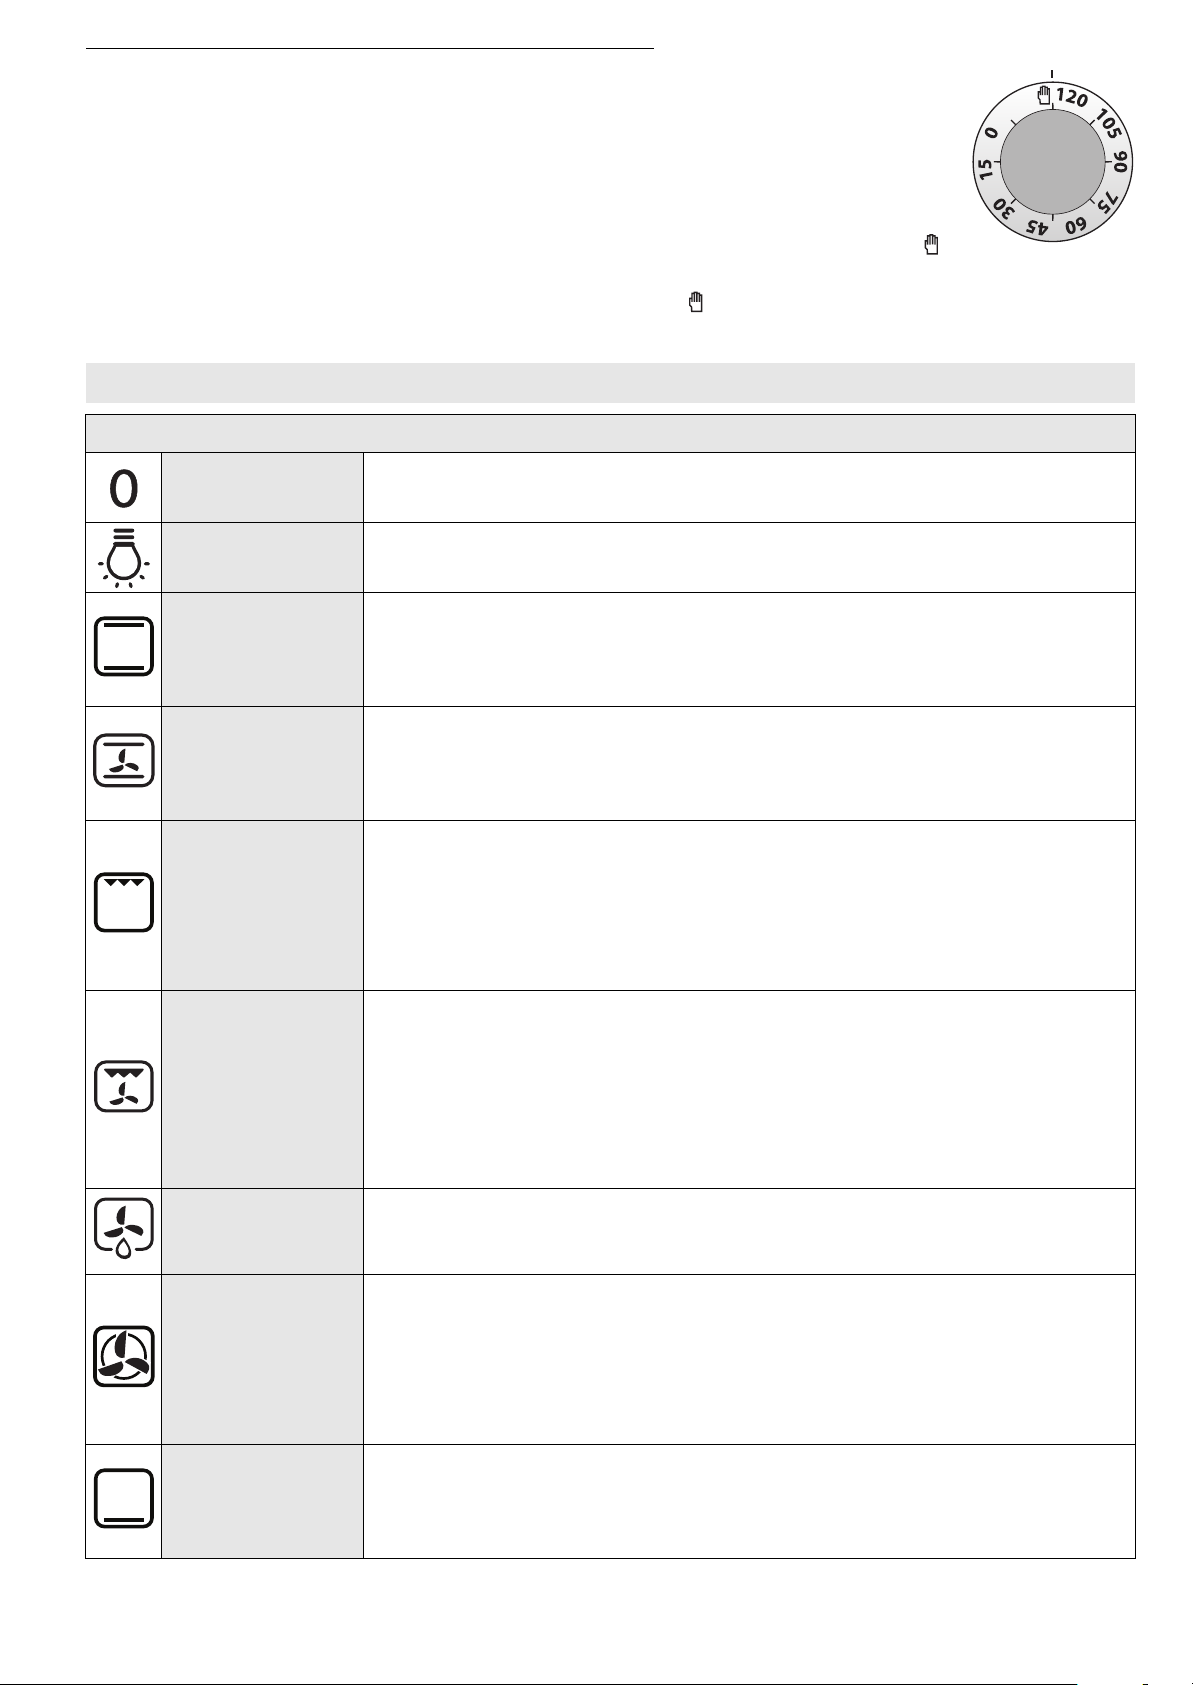
CONTROL PANEL DESCRIPTION
1. Function selector knob
2. Cooking time selector knob
3. Thermostat knob
N.B.:the knobs are retractable. Press the knobs in the middle and they pop up.
4. Thermostat led
HOW TO OPERATE THE OVEN
• Turn the selector knob to the required function.
The oven light switches on.
• Turn the thermostat knob clockwise to the required temperature.
The thermostat led lights up, switching off again when the oven reaches the selected temperature.
At the end of cooking, turn the knobs to “0”.
COOKING TIME SELECTOR
This selector can be used to set a cooking time of between 1 and 120 minutes.
To set cooking time, after selecting the required cooking function, turn the knob right
round in an clockwise direction and then turn it back in the opposite direction to the
desired cooking duration. At the end of the cooking time the oven switches off and the
selector remains positioned at “0”.
To use the oven in manual mode, i.e. without setting a cooking time, make sure that the
programme selector is turned to the symbol “ ”.
ATTENTION:When the selector is positioned at “0” the oven will not switch on.
To switch the oven on, set the selector to the symbol “ ” or set a cooking time.
GB8
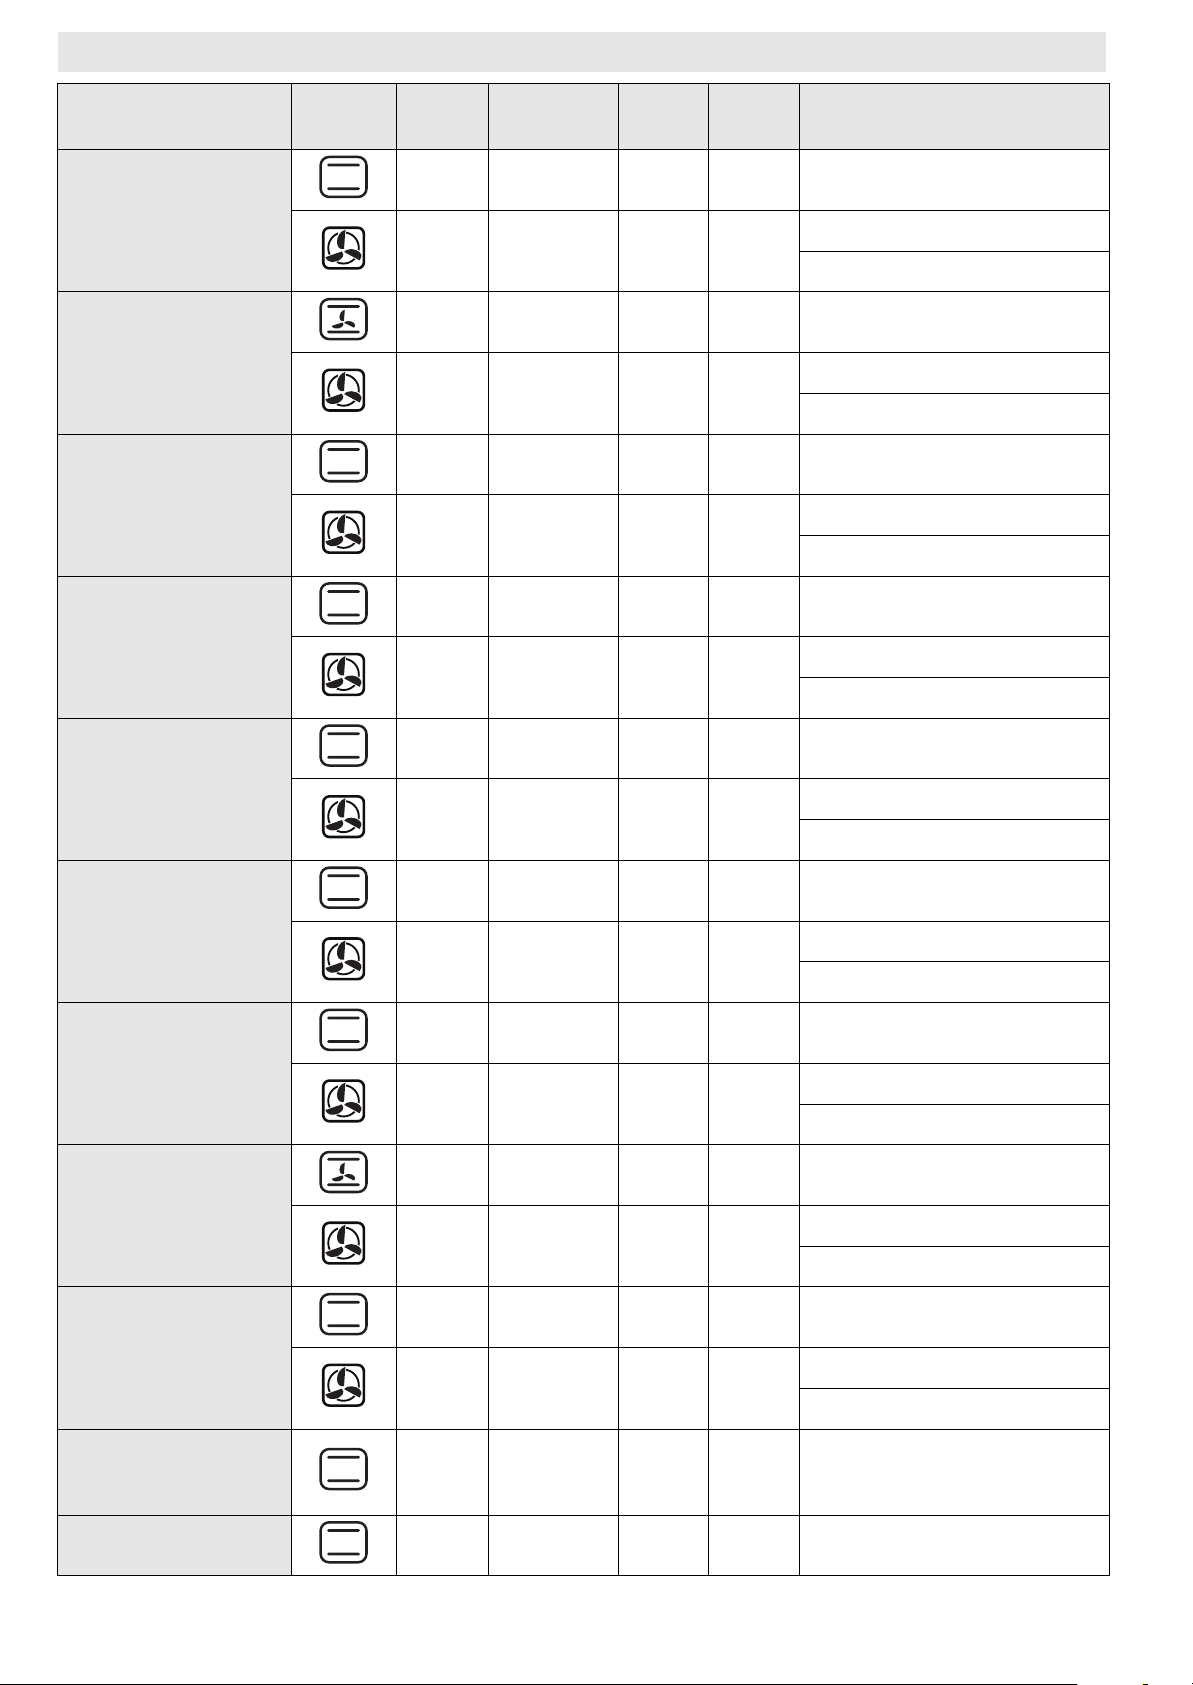
FUNCTION DESCRIPTION TABLE
FUNCTIONS KNOB
OFF To stop cooking and switch off the oven.
LAMP To switch the oven light on/off.
To cook any kind of dish on one shelf only. Use the 3rd shelf. Preheat the oven
CONVENTIONAL
CONVECTION
BAKE
GRILL
TURBO GRILL
to the required temperature. The thermostat led turns off when the oven is
ready and food can be placed in it.
To cook meat and pies with liquid filling (savoury or sweet) on a single shelf.
This function delivers an even, golden, crisp top and base. Use the 3rd shelf.
Preheat the oven before cooking.
To grill steak, kebabs and sausages; to cook vegetables au gratin and toast
bread. Place food on the 4th or 5th shelf. When grilling meat, use the drip tray
to collect the cooking juices. Position it on the 3rd/4th shelf, adding approx.
half a litre of water. Preheat the oven for 3-5 min. During cooking the oven door
must remain closed.
To roast large joints of meat (legs, roast beef, chickens). Position the food on the
middle shelves. Use the drip tray to collect the cooking juices. Position it on the
1st/2nd shelf, adding approx. half a litre of water. It is advisable to turn the
meat over during cooking for more even browning. The oven does not have to
be preheated. During cooking the oven door must remain closed.
DEFROST
FORCED AIR
BOTTOM
To speed up defrosting of food. Place food on the middle shelf. Leave food in its
packaging in order to prevent it from drying out on the outside.
To cook a variety of food requiring the same cooking temperature on a
maximum of two shelves at the same time (e.g.: fish, vegetables, cakes). This
function can be used to cook different foods without odours being transferred
from one food to another. Use the 3rd shelf to cook on one shelf only. To cook
on two shelves, use the 1st and 4th levels. Preheat the oven before cooking.
Use this function after cooking to brown the bottom of the dish. It is advisable
to place the food on the 1st /2nd cooking level. The function can also be used
for slow cooking, such as vegetables and meat stews; in this case use the 3rd
cooking level. The oven does not have to be preheated.
GB9
COOKING TABLES
Recipe Function Pre-
heating
Yes 3 150-175 35-90 Cake tin on wire shelf
Leavened cakes
Yes 1-4 150-170 30-90
Filled pies (cheesecake, strudel, apple
pie)
Biscuits / Tartlets
Choux pastry
Yes 3 150-190 30-85
Yes 1-4 150-190 35-90
Yes 3 160-175 20-45 Drip tray / baking tray
Yes 1-4 150-175 20-45
Yes 3 175-200 30-40 Drip tray / baking tray
Yes 1-4 170-190 35-45
Shelf (from
bottom)
Te mp .
(°C)
Time
(min)
Accessories and notes
Shelf 4: cake tin on wire shelf
Shelf 1: cake tin on wire shelf
Drip tray/baking tray or cake
tin on wire shelf
Shelf 4: cake tin on wire shelf
Shelf 1: cake tin on wire shelf
Shelf 4: wire shelf
Shelf 1: drip tray / baking tray
Shelf 4: oven tray on wire shelf
Shelf 1: drip tray / baking tray
Meringues
Bread / Pizza / Focaccia
Frozen pizza
Savoury pies (vegetable pie, quiche lorraine)
Vols-au-vent / Puff
pastry crackers
Yes 3 100 110-150 Drip tray / baking tray
Shelf 4: oven tray on wire shelf
Yes 1-4 100 130-150
Shelf 1: drip tray / baking tray
Yes 3 190-250 12-50 Drip tray / baking tray
Shelf 4: oven tray on wire shelf
Yes 1-4 190-250 25-50
Shelf 1: drip tray / baking tray
Yes 3 250 10-15
Yes 1-4 250 10-20
Yes 3 175-200 35-55 Cake tin on wire shelf
Yes 1-4 175-190 45-60
Yes 3 175-200 20-30 Drip tray / baking tray
Yes 1-4 175-200 25-45
Shelf 3: drip tray / baking tray
or wire shelf
Shelf 4: oven tray on wire shelf
Shelf 1: drip tray / baking tray
Shelf 4: cake tin on wire shelf
Shelf 1: cake tin on wire shelf
Shelf 4: oven tray on wire shelf
Shelf 1: drip tray / baking tray
Lasagna / Baked
pasta / Cannelloni /
Flans
Lamb / Veal / Beef /
Pork 1 Kg
Yes 3 200 45-55 Oven tray on wire shelf
Yes 3 200 80-110
GB10
Drip tray or oven tray on wire
shelf

Recipe Function Pre-
heating
Shelf (from
bottom)
Te mp .
(°C)
Time
(min)
Accessories and notes
Chicken / Rabbit /
Duck 1 Kg
Turkey / Goose 3 Kg Yes 2 200 80-130
Baked fish / en papillote (fillet, whole)
Stuffed vegetables
(tomatoes, courgettes, aubergines)
To as t Yes 5 200 2-5 Wire shelf
Fish fillets / steaks Yes 5 200 20-30
Sausages / Kebabs /
Spare ribs / Hamburgers
Roast chicken
1-1.3 Kg
Yes 3 200 50-100
Yes 3 175-200 40-60
Yes 2 175-200 50-60 Oven tray on wire shelf
Yes 5 200 30-40
- 2 200 55-70
Drip tray or oven tray on wire
shelf
Drip tray or oven tray on wire
shelf
Drip tray or oven tray on wire
shelf
Shelf 4: wire shelf (turn food
halfway through cooking)
Shelf 3: drip tray with water
Shelf 5: wire tray (turn food
halfway through cooking)
Shelf 4: drip tray with water
Shelf 2: wire shelf (turn food
two thirds of the way through
cooking if necessary)
Shelf 1: drip tray with water
Oven tray on wire shelf (turn
Roast Beef rare 1 Kg - 3 200 35-45
Leg of lamb / Shanks - 3 200 60-90
Roast potatoes - 3 200 45-55
Vegetables gratin - 3 200 20-30 Oven tray on wire shelf
Lasagna & Meat Yes 1-4 200 50-100*
Meat & Potatoes Yes 1-4 200 45-100*
food two thirds of the way
through cooking if necessary)
Drip tray or oven tray on wire
shelf (turn food two thirds of
the way through cooking if
necessary)
Drip-tray / baking tray (if
necessary, turn food two
thirds of the way through
cooking)
Shelf 4: oven tray on wire shelf
Shelf 1: drip tray or oven tray
on wire shelf
Shelf 4: oven tray on wire shelf
Shelf 1: drip tray or oven tray
on wire shelf
Shelf 4: oven tray on wire shelf
Fish & Vegetables Yes 1-4 175 30-50*
* Cooking time is approximate. Food can be removed from the oven at different times depending on
personal preference.
GB11
Shelf 1: drip tray or oven tray
on wire shelf

RECOMMENDED USE AND TIPS
How to read the cooking table
The table indicates the best function to use for any given food, to be cooked on one or more shelves at the
same time. Cooking times start from the moment food is placed in the oven, excluding pre-heating (where
required). Cooking temperatures and times are purely for guidance and will depend on the amount of food
and type of accessory used. Use the lowest recommended values to begin with and, if the food is not
cooked enough, then move on to higher values. Use the accessories supplied and preferably dark coloured
metal cake tins and oven trays. You can also use pans and accessories in pyrex or stoneware, but bear in
mind that cooking times will be slightly longer. To obtain best results, carefully follow the advice given in
the cooking table for the choice of accessories (supplied) to be placed on the various shelves.
Cooking different foods at the same time
Using the “FORCED AIR” function, you can cook different foods which require the same cooking
temperature at the same time (for example: fish and vegetables), using different shelves. Remove the food
which requires less cooking time and leave food which requires longer cooking time in the oven.
Desserts
- Cook delicate desserts with the conventional function on one shelf only. Use dark coloured metal
cake tins and always position them on the wire shelf supplied. To cook on more than one shelf, select
the forced air function and stagger the position of the cake tins on the shelves, aiding optimum
circulation of the hot air.
- To check whether a raising cake is cooked, insert a wooden toothpick into the centre of the cake. If
the toothpick comes out clean, the cake is ready.
- If using non-stick cake tins, do not butter the edges as the cake may not rise evenly around the edges.
- If the cake “sinks” during cooking, set a lower temperature the next time, perhaps reducing the
amount of liquid in the mixture and mixing more gently.
- For sweets with moist fillings (cheesecake or fruit pies) use the “CONVECTION BAKE” function”. If the
base of the cake is soggy, lower the shelf and sprinkle the bottom of the cake with breadcrumbs or
biscuit crumbs before adding the filling.
Meat
- Use any kind of oven tray or pyrex dish suited to the size of the piece of meat being cooked. For roast
joints, it is best to add some stock to the bottom of the pan, basting the meat during cooking for
added flavour. When the roast is ready, let it rest in the oven for another 10-15 minutes, or wrap it in
aluminium foil.
- When you want to grill meat, choose cuts with an even thickness all over in order to achieve uniform
cooking results. Very thick pieces of meat require longer cooking times. To prevent the meat from
burning on the outside, lower the position of the wire shelf, keeping the food farther away from the
grill. Turn the meat two thirds of the way through cooking.
To collect the cooking juices it is advisable to place a drip-tray with half a litre of water directly under the
grill on which the meat is placed. Top-up when necessary.
Turnspit (only in some models)
Use this accessory to evenly roast large pieces of meat and poultry. Place the meat on the spit rod, tying it
with string if chicken, and check that it is secure before inserting the rod in the seat located on the front
wall of the oven and resting it on the respective support. To prevent smoke and to collect cooking juices,
it is advisable to place a drip-tray with half a litre of water on the first level. The rod has a plastic handle
which must be removed before starting to cook, and used at the end of cooking to avoid burns when
taking the food out of the oven.
Pizza
Lightly grease the trays to ensure the pizza has a crispy base. Scatter the mozzarella over the pizza two
thirds of the way through cooking.
GB12

INSTRUÇÕES DE SEGURANÇA IMPORTANTES
A SUA SEGURANÇA E A DOS OUTROS É MUITO IMPORTANTE
Este manual e o próprio aparelho incluem avisos de segurança importantes, os quais deverá ler e cumprir
em todas as situações.
Este é o símbolo de perigo, relativo à segurança, que alerta para potenciais riscos para o utilizador
ou para terceiros.
Todas as mensagens relativas à segurança são precedidas do símbolo de perigo e dos termos
seguintes:
PERIGO
ADVERTÊNCIA
Indica uma situação perigosa que, caso não seja evitada, provocará uma
lesão grave.
Indica uma situação perigosa que, caso não seja evitada, poderá provocar
uma lesão grave.
Todos os avisos de segurança fornecem detalhes específicos do eventual risco
presente e indicam a forma de reduzir esse risco de lesões, danos ou choques
eléctricos resultantes do uso incorrecto do aparelho. Cumpra cuidadosamente
as instruções seguintes:
- Antes de qualquer intervenção de instalação o aparelho deve ser desligado
da corrente eléctrica.
- A instalação e a manutenção devem ser efectuadas por um técnico
qualificado, em conformidade com as instruções do fabricante e com as
normas de segurança locais. Não repare nem substitua nenhuma parte do
aparelho a menos que tal seja especificamente indicado no manual de
utilização.
- A substituição do cabo de alimentação deve ser efectuada por um
electricista especializado. Contacte um centro de assistência técnica
autorizado.
- A ligação à terra do aparelho é obrigatória segundo a lei em vigor.
- O cabo de alimentação deve ser suficientemente comprido para ligar o
aparelho à tomada de alimentação depois de inserido no respectivo local.
- Para que a instalação esteja em conformidade com as normas de segurança
actuais, deverá utilizar um disjuntor multipolar com uma distância mínima
entre os contactos de 3 mm.
- Não utilize fichas múltiplas ou extensões.
- Não puxe o cabo de alimentação para retirar a ficha da tomada.
- Os componentes eléctricos não devem ser acessíveis ao utilizador após a
instalação.
- Não toque no aparelho com partes do corpo molhadas e não o utilize
descalço.
- Este aparelho destina-se exclusivamente a ser utilizado como
electrodoméstico para a cozedura de alimentos. Não são permitidos outros
tipos de utilização (por ex.: aquecer divisões). O fabricante declina toda e
qualquer responsabilidade por uma utilização inadequada ou por uma
regulação errada dos comandos.
PT13

- Este aparelho pode ser usado por crianças de idade superior a 8 anos e por
pessoas com capacidades físicas, sensoriais ou mentais reduzidas ou com
experiência e conhecimentos inadequados, apenas se forem vigiados ou se
tiverem aprendido a usar o aparelho em condições de segurança e se
estiverem conscientes dos perigos que ele pode comportar. As crianças não
devem brincar com o aparelho. A limpeza e a manutenção não devem ser
efectuadas por crianças, a menos que sejam vigiadas por adultos.
- As partes acessíveis do aparelho podem ficar muito quentes durante a
utilização. Mantenha as crianças afastadas do aparelho e vigie-as para que
não brinquem com o mesmo.
- O aparelho e os seus componentes acessíveis ficam quentes durante a
utilização. Preste atenção para não tocar nas resistências. As crianças de
idade inferior a 8 anos devem ser mantidas afastadas do aparelho a menos
que sejam sempre vigiadas.
- Durante e após a utilização, não toque nas resistências ou nas superfícies
internas do aparelho para evitar queimaduras. Não permita que o aparelho
entre em contacto com roupa ou outro material inflamável enquanto os
componentes não tiverem arrefecido o suficiente.
- No final da cozedura, abra a porta do aparelho com cuidado, deixando sair
gradualmente o ar quente ou o vapor antes de aceder ao seu interior. Quando
a porta do aparelho está fechada o ar quente sai pela abertura situada por
cima do painel de controlo. Não obstrua as aberturas de ventilação.
- Utilize luvas adequadas para fornos para retirar panelas e acessórios, tendo
o cuidado de não tocar nas resistências.
- Não coloque materiais inflamáveis no interior ou junto do aparelho. Se o
aparelho for ligado inadvertidamente, pode incendiar-se.
- Não aqueça nem cozinhe utilizando latas ou recipientes hermeticamente
fechados no aparelho. A acumulação de pressão que se cria no interior
poderá fazer explodir a lata e danificar o aparelho.
- Não utilize recipientes feitos em materiais sintéticos.
- Os óleos e a gordura sobreaquecidos poderão provocar facilmente um
incêndio. Esteja sempre atento quando cozinhar alimentos ricos em gordura e
em óleo.
- Nunca deixe o aparelho sem vigilância durante a secagem de alimentos.
- Se utilizar bebidas alcoólicas para cozinhar alimentos (por exemplo, rum,
conhaque, vinho), lembre-se que o álcool evapora a temperaturas elevadas.
Em virtude disso, poderá ocorrer o risco de os vapores libertados pelo álcool
se incendiarem ao entrarem em contacto com a resistência eléctrica.
- Nunca utilize equipamentos de limpeza a vapor.
PT14

- Não toque no forno durante o ciclo de limpeza pirolítica. As crianças devem
ser mantidas à distância do forno durante o ciclo de pirólise (apenas para
fornos com função de Pirólise).
- Utilize apenas a sonda de temperatura fornecida ou recomendada para este
forno.
- Não utilize detergentes abrasivos agressivos ou utensílios metálicos
cortantes para limpar o vidro da porta do forno, pois podem riscar a
superfície e quebrar o vidro.
- Certifique-se de que o aparelho está desligado antes de substituir a
lâmpada para evitar choques eléctricos.
Eliminação de electrodomésticos
- Este aparelho é fabricado com materiais recicláveis ou reutilizáveis. Elimine-o em conformidade com as
normas de eliminação de resíduos locais. Antes de o eliminar, inutilize-o cortando o cabo de alimentação.
- Para obter mais informações sobre o tratamento, recuperação e reciclagem de electrodomésticos,
contacte as autoridades locais competentes, o serviço de recolha de desperdícios domésticos ou a
loja onde adquiriu o aparelho.
INSTALAÇÃO
Após ter desembalado o forno verifique se o aparelho não ficou avariado durante o transporte e se a porta
fecha correctamente. Caso surjam problemas, contacte o revendedor ou o Serviço Pós-Venda mais
próximo. Para evitar a ocorrência de eventuais danos, retire o forno da sua base de espuma de polistireno
apenas durante a instalação.
PREPARAÇÃO DO MÓVEL DE EMBUTIR
• Os móveis em contacto com o forno devem ser resistentes ao calor (mín. 90°C).
• Execute todos os trabalhos de corte no móvel antes de instalar o forno e remova cuidadosamente
todas as lascas de madeira e o serrim.
• Após a instalação, a base do forno não deverá ficar acessível.
• Para uma operação correcta do aparelho, não obstrua a abertura mínima existente entre o tampo e a
extremidade superior do forno.
LIGAR O FORNO À REDE ELÉCTRICA
Verifique se a tensão eléctrica especificada na chapa de características do aparelho corresponde à tensão
da rede eléctrica. A chapa de características está situada na extremidade frontal do forno (visível com a
porta aberta).
• A substituição do cabo eléctrico (tipo H05 RR-F 3 x 1,5 mm2) deve ser efectuada por um técnico
qualificado. Contacte um centro de assistência técnica autorizado.
RECOMENDAÇÕES GERAIS
Antes de utilizar:
- Retire as protecções de cartão, a película de protecção e as etiquetas adesivas dos acessórios.
- Retire os acessórios do forno e aqueça-os a 200°C durante cerca de uma hora para eliminar os cheiros
e os fumos do material isolante e das gorduras de protecção.
Durante a utilização:
- Não coloque objectos pesados na porta pois poderão danificá-la.
- Não se pendure na porta nem coloque objectos pendurados na pega.
- Não tape o interior do forno com papel de alumínio.
- Nunca deite água no interior de um forno quente; poderá danificar o revestimento de esmalte.
- Nunca arraste panelas e tachos pelo fundo do forno pois poderá danificar o revestimento de esmalte.
- Certifique-se de que os cabos eléctricos de outros aparelhos não entram em contacto com as partes
quentes do forno nem ficam presos na porta.
- Evite a exposição do forno aos agentes atmosféricos.
PT15
CONSELHOS PARA A PROTECÇÃO DO AMBIENTE
Eliminação da embalagem
O material da embalagem é 100% reciclável, conforme confirmado pelo símbolo de reciclagem ( ). Não
elimine os diversos materiais de acondicionamento descuidadamente. Seja responsável e cumpra as
normas locais relativas à eliminação de resíduos.
Eliminação do produto
- Este aparelho está classificado de acordo com a Directiva Europeia 2002/96/CE, sobre Resíduos de
equipamento eléctrico e electrónico (REEE).
- Ao assegurar a eliminação correcta deste produto, estamos a proteger o ambiente e a saúde humana
contra riscos potencialmente negativos.
- O símbolo no aparelho ou na documentação que o acompanha indica que este produto não deve
ser tratado como um resíduo doméstico, mas sim depositado nos devidos locais de recolha para a
reciclagem de aparelhos eléctricos e electrónicos.
Poupança de energia
- Aqueça previamente o forno apenas se tal procedimento estiver especificado na tabela de cozedura
ou na receita.
- Utilize formas para o forno lacadas de preto ou esmaltadas porque absorvem melhor o calor.
- Desligue o forno 10 a 15 minutos antes do tempo de cozedura definido. Os alimentos que necessitem
de uma cozedura mais prolongada continuarão a ser cozinhados mesmo com o forno desligado.
DECLARAÇÃO DE CONFORMIDADE
- Este forno, que se destina a entrar em contacto com produtos alimentares, está em conformidade
com a norma ( ) n.º 1935/2004 e foi concebido, fabricado e comercializado em conformidade com
os requisitos de segurança da directiva de “Baixa tensão” 2006/95/CE (a qual substitui a directiva 73/
23/CEE e subsequentes amendas), os requisitos de protecção da directiva “EMC” 2004/108/CE.
GUIA PARA A RESOLUÇÃO DE PROBLEMAS
O forno não funciona:
• Verifique se há energia eléctrica e se o forno está ligado electricamente.
• Desligue e volte a ligar o forno, para verificar se a avaria ficou resolvida.
SERVIÇO DE ASSISTÊNCIA TÉCNICA
Antes de contactar o Serviço Pós-Venda:
1. Tente solucionar o problema sozinho com a ajuda das sugestões fornecidas na secção “Guia para a
resolução de problemas”.
2. Desligue e volte a ligar o aparelho para verificar se a avaria ficou resolvida.
Se o problema persistir após essas verificações, contacte o Serviço Pós-Venda mais próximo.
Indique sempre:
• uma breve descrição do problema;
• o tipo e o modelo exacto do forno;
• o numero de Assistência (é o numero que se encontra após a palavra Service na chapa das
características), na margem interna direita da cavidade do forno (visível com a porta aberta).
O número de assistência também está indicado no manual de garantia;
• a sua morada completa;
• o seu número de telefone.
Se for necessário efectuar alguma reparação, contacte um Serviço Pós-Venda autorizado (para garantir a
utilização de peças sobresselentes originais e de uma reparação correcta).
PT16
LIMPEZA
AVISO
- Nunca utilize equipamentos de limpeza a vapor.
- Limpe o forno apenas quando estiver frio ao toque.
- Desligue o aparelho da corrente eléctrica.
Exterior do forno
IMPORTANTE: não utilize detergentes corrosivos ou abrasivos. Se algum desses produtos entrar em
contacto acidental com o aparelho, limpe imediatamente com um pano húmido.
• Limpe as superfícies com um pano húmido. Se estiver muito sujo, acrescente à água alguns pingos de
detergente para a loiça. Termine a limpeza com um pano seco.
Interior do forno
IMPORTANTE: não utilize esponjas abrasivas ou raspadores e polidores metálicos. Com o decorrer
do tempo, estes poderão danificar as superfícies esmaltadas e o vidro da porta do forno.
• Após cada utilização, deixe o forno arrefecer e depois limpe-o, de preferência ainda morno, para remover a
sujidade acumulada e os resíduos de alimentos (por ex. alimentos com um elevado teor de açúcar).
• Utilize detergentes específicos para forno e siga rigorosamente as instruções do fabricante.
• Limpe o vidro da porta com um detergente líquido adequado. A porta do forno pode ser removida
para facilitar a limpeza (consulte a secção MANUTENÇÃO).
• A resistência superior do grelhador (consulte a secção MANUTENÇÃO) pode ser rebaixada (apenas
em alguns modelos) para limpar o tecto do forno.
NOTA: durante a cozedura prolongada de alimentos com um elevado teor de água (por ex. piza,
legumes, etc.) poderá ocorrer condensação no interior da porta e em redor da vedação. Com o forno
frio, seque com um pano ou uma esponja.
Acessórios:
• Coloque os acessórios em água com detergente para loiça imediatamente após a respectiva
utilização, pegando neles com luvas adequadas para fornos, caso estejam quentes.
• Os restos de alimentos podem ser retirados com uma escova adequada ou com uma esponja.
Limpeza da parede traseira e dos painéis laterais catalíticos do forno (se existentes):
IMPORTANTE: não utilize detergentes corrosivos ou abrasivos, escovas ásperas, polidores de
panelas ou sprays para fornos que possam danificar a superfície catalítica e destruir as suas
propriedades de limpeza automática.
• Utilize o forno vazio com a função cozedura convenção a 200°C durante cerca de uma hora.
• De seguida, deixe arrefecer o forno antes de retirar quaisquer resíduos de alimentos com uma esponja.
MANUTENÇÃO
AVISO
REMOÇÃO DA PORTA
Para remover a porta:
1. Abra a porta na totalidade.
2. Levante os dois trincos e empurre-os o mais possível para a frente (Fig. 1).
3. Feche a porta o mais possível (A), levante a porta (B) e rode-a (C) até ficar solta (D) (Fig. 2).
- Utilize luvas de protecção.
- Certifique-se de que o forno está frio antes de realizar as operações
seguintes.
- Desligue o aparelho da corrente eléctrica.
PT17
Para reinstalar a porta:
1. Insira as dobradiças nos respectivos suportes.
2. Abra a porta na totalidade.
3. Baixe os dois travões.
4. Feche a porta.
Fig. 1 Fig. 2
DESLOCAÇÃO DA RESISTÊNCIA SUPERIOR (APENAS EM ALGUNS MODELOS)
1. Retire as grelhas do suporte lateral para acessórios (Fig. 3).
2. Puxe a resistência ligeiramente para fora (Fig. 4) e baixe-a (Fig. 5).
3. Para reposicionar a resistência, levante-a, puxando ligeiramente na sua direcção, e certifique-se de
que fica assente nos suportes laterais.
Fig. 3 Fig. 4 Fig. 5
SUBSTITUIÇÃO DA LÂMPADA DO FORNO
Para substituir a lâmpada traseira (se existente):
1. Desligue o forno da corrente eléctrica.
2. Desaperte a cobertura da lâmpada (Fig. 6), substitua a lâmpada (consulte a nota para ver o tipo de
lâmpada) e aparafuse novamente a cobertura da lâmpada.
3. Ligue o forno novamente à corrente eléctrica.
Para substituir a lâmpada lateral (se existente):
1. Desligue o forno da corrente eléctrica.
2. Retire as grelhas do suporte lateral para acessórios, se existentes (Fig. 3).
3. Utilize uma pequena chave de fendas para retirar a cobertura da lâmpada (Fig. 7).
4. Substitua a lâmpada (consulte a nota para ver o tipo de lâmpada) (Fig. 8).
5. Volte a colocar a cobertura da lâmpada e empurre-a contra a parede para que encaixe correctamente (Fig. 9).
6. Volte a colocar as grelhas do suporte lateral para acessórios.
7. Ligue o forno novamente à corrente eléctrica.
Fig. 6 Fig. 7 Fig. 8 Fig. 9
NOTA:
- Utilize apenas lâmpadas incandescentes de 25-40 W/230 V tipo E-14, T300°C, ou lâmpadas
halogéneas de 20-40 W/230 V tipo G9, T300°C.
- As lâmpadas estão disponíveis no nosso Serviço Pós-Venda.
IMPORTANTE:
- Caso utilize lâmpadas halogéneas, não as manuseie com as mãos nuas para evitar danificá-las
com impressões digitais.
- Não colocar o forno em funcionamento sem voltar a posicionar a cobertura da lâmpada.
PT18
INSTRUÇÕES DE UTILIZAÇÃO DO FORNO
PARA EFECTUAR AS LIGAÇÕES ELÉCTRICAS, CONSULTE O PARÁGRAFO RELATIVO À INSTALAÇÃO
1. Painel de controlo
2. Resistência superior/grelhador
3. Ventoinha de arrefecimento (não visível)
4. Placa de dados (não remover)
5. Luz
6. Ventilador
7. Espeto (se existente)
8. Resistência inferior (não visível)
9. Porta
10. Posição das calhas (o número do nível é indicado na parte frontal do forno)
11. Parede traseira
NOTA:
- Durante a cozedura, é possível que a ventoinha de arrefecimento se active e desactive para reduzir o
consumo energético.
- No final da cozedura, depois de desligar o forno, a ventoinha de refrigeração poderá continuar a
funcionar durante algum tempo.
- Abrir a porta durante a cozedura desactiva as resistências.
ACESSÓRIOS INCLUÍDOS
Fig. A Fig. B
A. GRELHA (2): Deve ser usada para cozinhar alimentos ou como suporte para panelas, tartes e
qualquer outro recipiente apropriado para forno.
B. PINGADEIRA (1): Deve ser colocada debaixo da grelha para recolher gordura ou pode ser utilizada
como placa, para cozinhar carne, peixe, legumes, pão pita, etc.
ACESSÓRIOS NÃO INCLUÍDOS
Pode adquirir separadamente outros acessórios no Serviço Pós-venda.
PT19
INTRODUÇÃO DA GRELHA E OUTROS ACESSÓRIOS NO INTERIOR DO FORNO
1 32 4
A grelha e outros acessórios possuem um sistema de bloqueio que evita a extracção involuntária.
Fig. 1
1. Introduza a grelha na horizontal, com a parte “A” virada para cima (Fig. 1).
2. Incline a grelha em correspondência com a posição de bloqueio “B” (Fig. 2).
Fig. 2 Fig. 3
3. Coloque a grelha na posição horizontal e empurre-a até estar completamente introduzida “C” (Fig. 3).
4. Para retirar a grelha proceda no sentido inverso.
Para os outros acessórios, como pingadeira, tabuleiro para bolos, a introdução é feita da mesma forma. A
saliência presente na parte plana permite o bloqueio.
DESCRIÇÃO DO PAINEL DE COMANDOS
1. Botão de selecção de funções
2. Botão de programação da duração da cozedura
3. Botão do termóstato
NOTA:os botões são retrácteis. Prima o centro do respectivo botão para o extrair da sua posição.
4. Indicador luminoso do termóstato
COMO LIGAR O FORNO
• Rode o botão selector para a função desejada.
A lâmpada do forno acende-se.
• Rode o botão do termóstato para a direita para a temperatura desejada.
O indicador luminoso do termóstato acende-se e apaga-se quando o forno atingir a temperatura
seleccionada.
No final da cozedura, rode os botões para a posição “0”.
PT20
PROGRAMADOR DE DURAÇÃO DA COZEDURA
Este programador permite programar um tempo de 1 até 120 minutos.
Para programar a duração, após ter sido seleccionada a função de cozedura, rode
completamente o botão para a direita, e volte a colocá-lo depois no tempo de cozedura
desejado, rodando para a esquerda. No final do tempo de cozedura programado, o
forno apaga-se e o programador fica posicionado no “0”.
Para utilizar o forno no modo manual, isto é, sem a programação de um tempo de
cozedura, certifique-se de que o botão do programador está posicionado no símbolo “ ”.
ATENÇÃO:Quando o programador está posicionado no “0, o forno não se acende.
Para acender o forno, posicione o programador no símbolo “ ” ou então programe a
duração da cozedura.
TABELA DE DESCRIÇÃO DE FUNÇÕES
BOTÃO DE FUNÇÕES
OFF Para interromper a cozedura e desligar o forno.
LÂMPADA Para ligar/desligar a lâmpada no interior do forno.
Para cozinhar qualquer tipo de alimento apenas numa calha. Utilize o 3°
CONVENCIONAL
COZEDURA CON-
VECÇÃO
GRELHADOR
TURBO GRILL
DESCONGELAÇÃO
AR FORÇADO
AQUECIMENTO
INTERIOR
nível. Aqueça previamente o forno à temperatura desejada. Quando o
indicador luminoso do termóstato se apagar, o forno está pronto para se
introduzirem os alimentos.
Para cozinhar carne e bolos com recheio líquido (salgado ou doce) numa
única calha. Esta função permite obter uma superfície e base uniformemente
tostadas e crocantes. Utilize o 3° nível. Aqueça previamente o forno antes de
introduzir os alimentos.
Para grelhar costeletas, espetadas, salsichas; gratinar legumes ou tostar pão.
Sugere-se que coloque o alimento no 4° ou 5° nível. Para grelhar carne, é
aconselhável utilizar uma pingadeira para recolher o líquido da cozedura.
Coloque-a no 3°/4° nível, adicionando cerca de meio litro de água. Aqueça
previamente o forno durante 3-5 min. Durante a cozedura, a porta do forno
deve permanecer fechada.
Para assar pedaços grandes de carne (pernil, rosbife, frango). Coloque os
alimentos nos níveis centrais. É aconselhável utilizar uma pingadeira para
recolher o líquido da cozedura. Coloque-a no 1°/2° nível, adicionando cerca
de meio litro de água. Sugerimos que vire a carne durante a cozedura para
que fique dourada de forma homogénea de ambos os lados. Não é
necessário pré-aquecer o forno. Durante a cozedura, a porta do forno deve
permanecer fechada.
Para agilizar a descongelação dos alimentos. É aconselhável posicionar os
alimentos no nível central. Sugerimos que deixe o alimento na embalagem
para impedir a desidratação da superfície.
Para cozinhar em, no máximo, duas calhas em simultâneo, alimentos
inclusivamente distintos, que exijam a mesma temperatura de cozedura (ex.:
peixe, legumes, sobremesas). A função permite cozinhar sem transmitir
odores de uns alimentos para os outros. É aconselhável utilizar o 3° nível para
cozeduras numa única calha. Para cozeduras em duas calhas utilize o 1º e 4º
nível, aquecendo previamente o forno antes da cozedura.
Utilize esta função no fim da cozedura para tostar os alimentos. Sugere-se
que coloque os alimentos no 1° ou 2° nível. A função pode também ser
utilizada para cozedura lente, por exemplo estufados de legumes e carne.
Neste caso, utilize o 3º nível. Não é necessário pré-aquecer o forno.
PT21
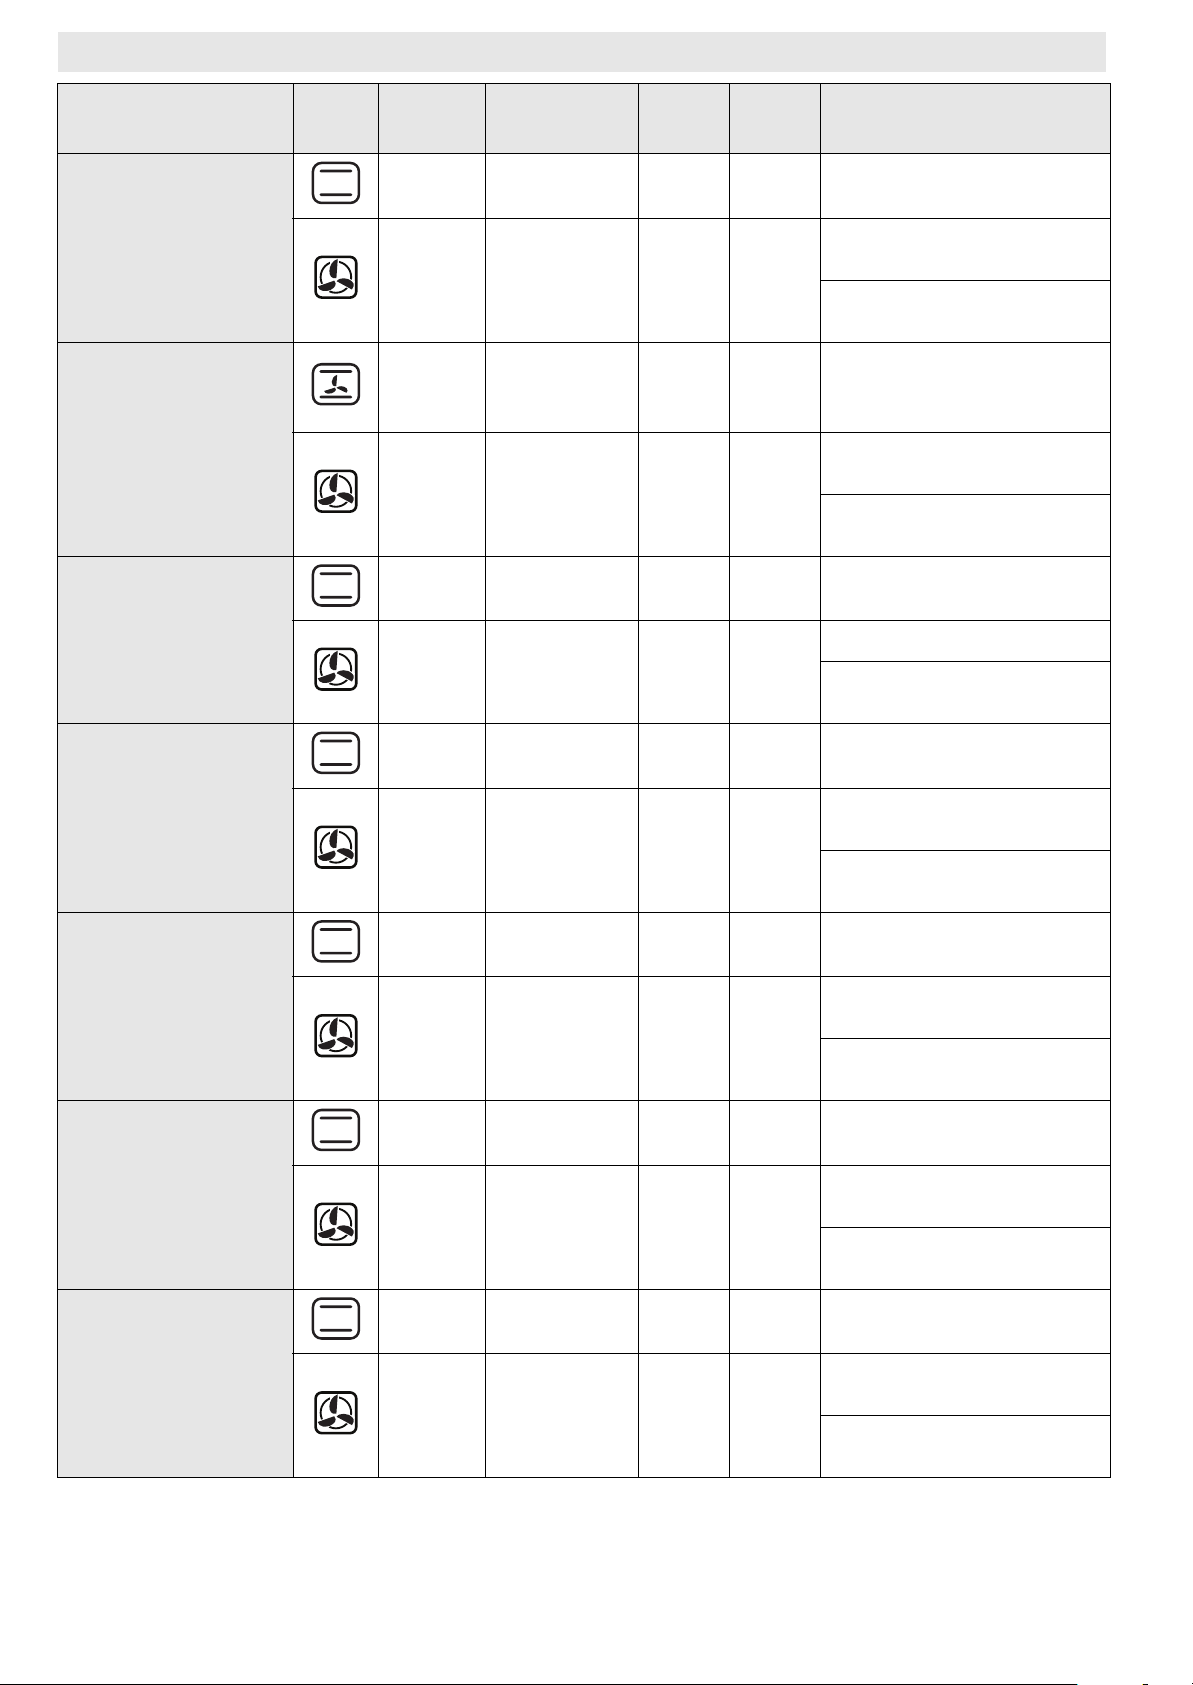
TABELA DE COZEDURA
Receita Função Préaque-
cimento
Sim 3 150-175 35-90 Forma para assar na grelha
Bolos com levedura
Sim 1-4 150-170 30-90
Sim 3 150-190 30-85
Tartes recheadas
(cheese cake, strudel,
tarte de fruta)
Sim 1-4 150-190 35-90
Sim 3 160-175 20-45
Biscoitos / queques
Sim 1-4 150-175 20-45
Nível (a partir
de baixo)
Te mp .
(°C)
Te mp o
(°C)
Acessórios e notas
Nív. 4: forma para assar na
grelha
Nív. 1: forma para assar na
grelha
Pingadeira/tabuleiro para
bolos ou forma para assar
na grelha
Nív. 4: forma para assar na
grelha
Nív. 1: forma para assar na
grelha
Pingadeira/tabuleiro para
bolos
Nív. 4: grelha
Nív. 1: pingadeira/placa
para doces
Massa cozida para
pães
Merengue
Pão / Pizza / Pãezinhos
Sim 3 175-200 30-40
Sim 1-4 170-190 35-45
Sim 3 100 110-150
Sim 1-4 100 130-150
Sim 3 190-250 12-50
Sim 1-4 190-250 25-50
Sim 3 250 10-15
Pingadeira/tabuleiro para
bolos
Nív. 4: tabuleiro de assar na
grelha
Nív. 1: pingadeira/placa
para doces
Pingadeira/tabuleiro para
bolos
Nív. 4: tabuleiro de assar na
grelha
Nív. 1: pingadeira/placa
para doces
Pingadeira/tabuleiro para
bolos
Nív. 4: tabuleiro de assar na
grelha
Nív. 1: pingadeira/placa
para doces
Nív. 3: Pingadeira/tabuleiro
para bolos ou grelha
Pizza congelada
Nív. 4: tabuleiro de assar na
grelha
Sim 1-4 250 10-20
Nív. 1: pingadeira/placa
para doces
PT22
 Loading...