

Whirlpool ACM220 Instructions For Use Manual
ACM220
Please read this manual first.
Dear Customer,
We would like you to obtain best performance with your product that has been
manufactured in modern facilities and passed through strict quality control
procedures.
Therefore, we advise you to read through this User Manual carefully before using
your product and keep it for future reference. If you hand over the product to
someone else, deliver the User Manual as well.
The User Manual will help you use the product in a fast and safe way.
• Read the User Manual before installing and operating the product.
• You must strictly observe the safety instructions.
• Keep this User Manual within easy reach for future reference.
• Also read other documents supplied with the product.
Remember that this User Manual may also be applicable for several other
models.
Differences between models are explicitly identified in the manual.
Explanation of symbols
Throughout this User Manual the following symbols are used:
Important information or useful hints about usage.
Warning for hazardous situations with regard to life and property.
Warning for electric shock.
Warning for risk of fire.
Warning for hot surfaces.
Table of Contents
1 General information 4
Overview ............................................... 4
Technical specifications ........................ 5
Accessories .......................................... 6
2 Important safety instructions 7
General safety ...................................... 7
Safety for children .............................. 8
Safety when working with electricity .. 9
Intended use ...................................... 9
3 Installation 10
Before installation ............................... 10
Installation and connection ................. 11
Disposal .............................................. 13
Disposing of packaging material ...... 13
Future Transportation ...................... 13
Disposing of the old product ............ 13
4 Preparation 14
Tips for saving energy ........................ 14
Initial use ............................................. 14
First cleaning of the appliance ......... 14
Initial heating .................................... 14
5 How to use the hob 16
General information about cooking ..... 16
Using the hobs .................................... 16
6 How to operate the oven 18
General information on baking, roasting
and grilling ..................................... 18
How to operate the electric oven ........ 19
Operating modes ............................. 19
Cooking times table ......................... 20
How to operate the grill ....................... 21
Cooking times table for grilling ........ 21
7 Maintenance and care 22
General information ............................ 22
Cleaning the hob ................................. 22
Cleaning the control panel .................. 22
Cleaning the oven ............................... 23
Removing the oven door ..................... 23
Replacing the oven lamp .................... 23
8 Troubleshooting 25
3 | EN
1 General information
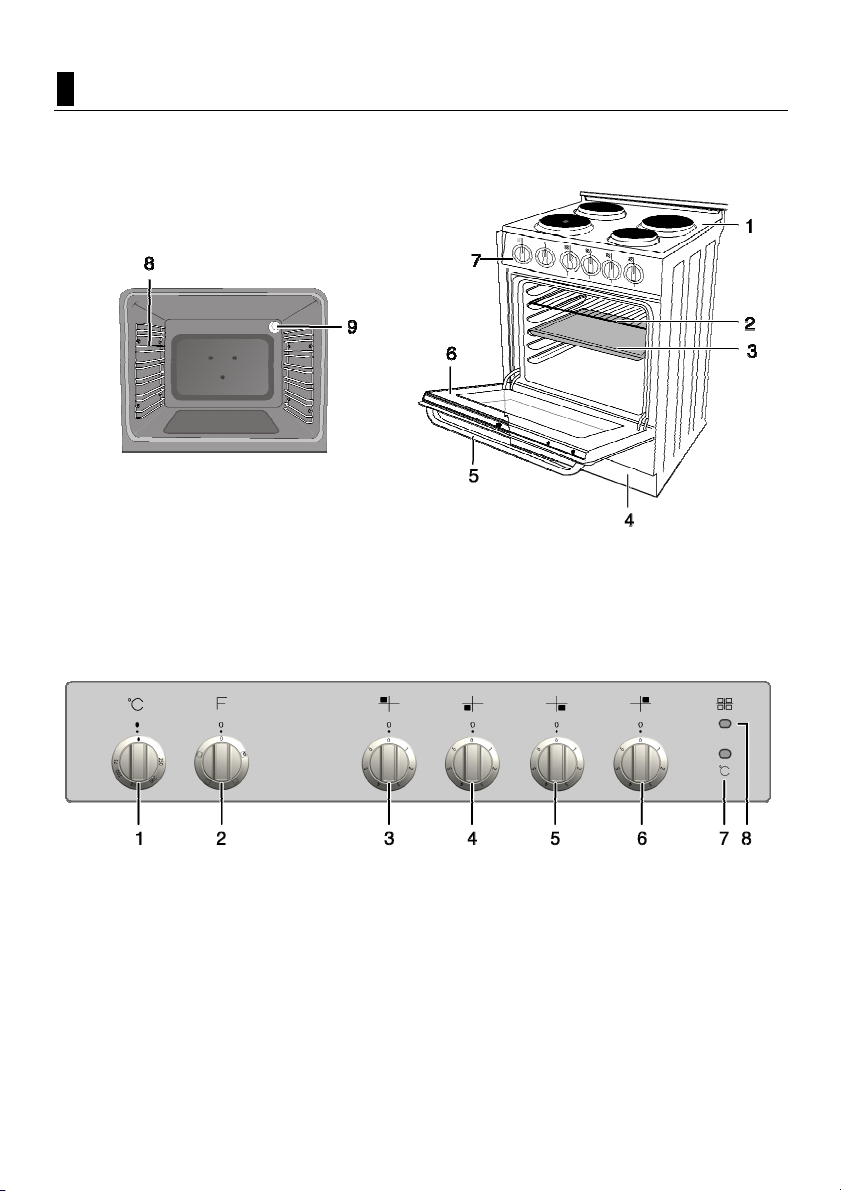
Overview
1 Burner plate
2 Wire shelf
3 Tray
4 Bottom part
5 Handle
1 Thermostat knob
2 Function knob
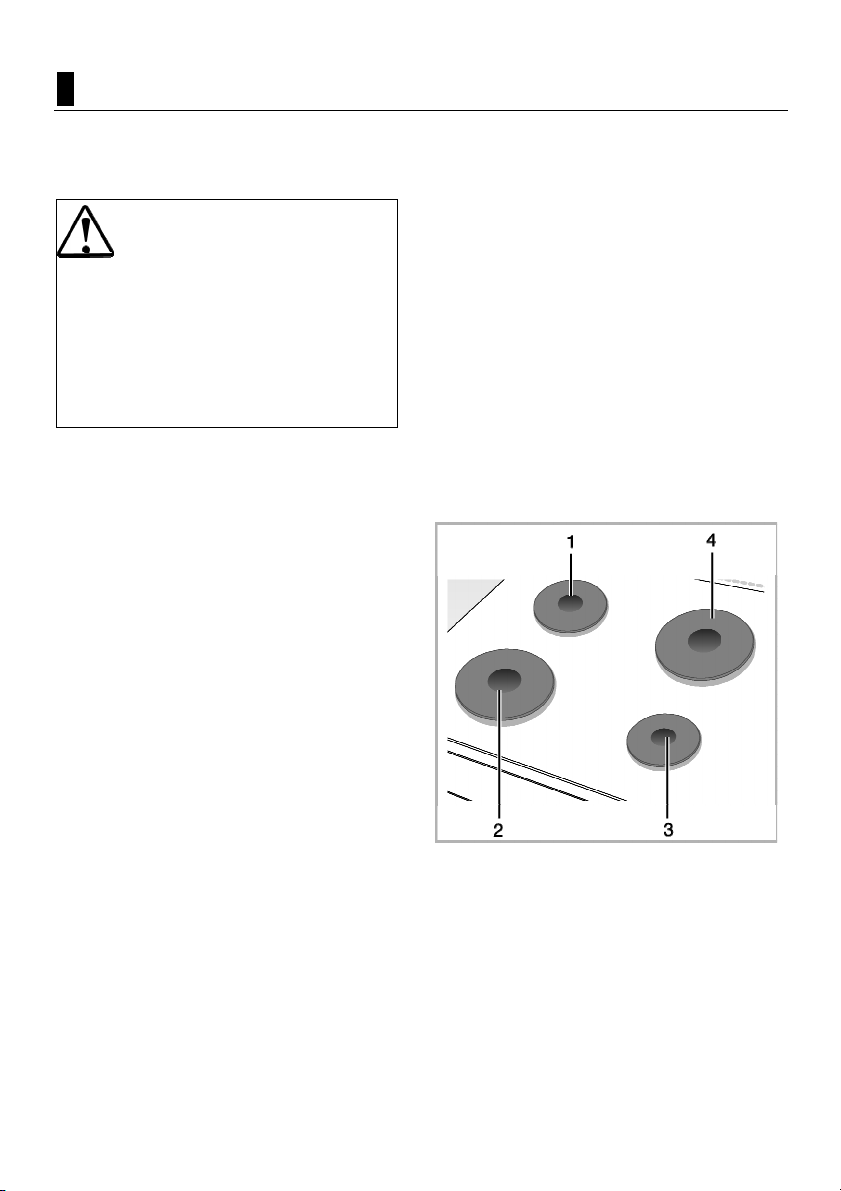
3 Hotplate Rear left
4 Hotplate Front left
6 Front door
7 Control panel
8 Shelf positions
10 Lamp
5 Hotplate Front right
6 Hotplate Rear right
7 Thermostat lamp
8 Warning lamp
4 | EN

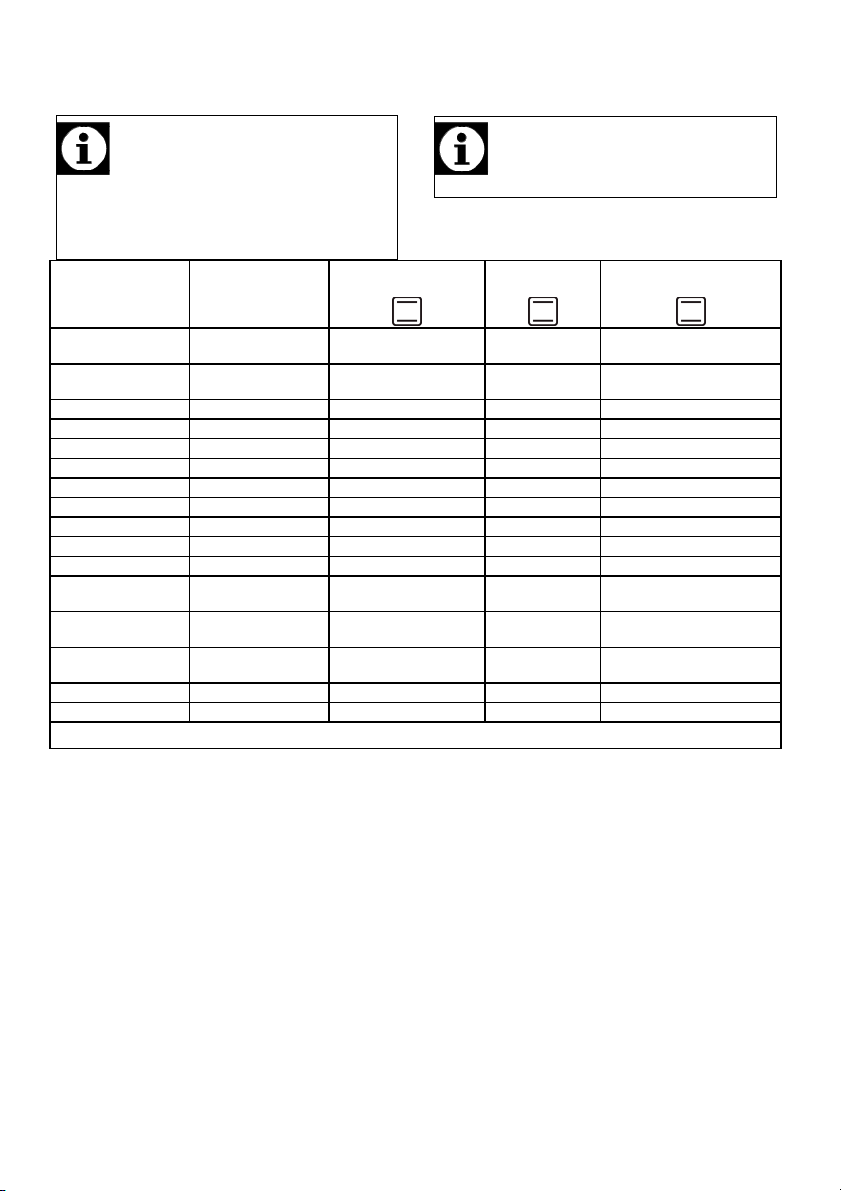
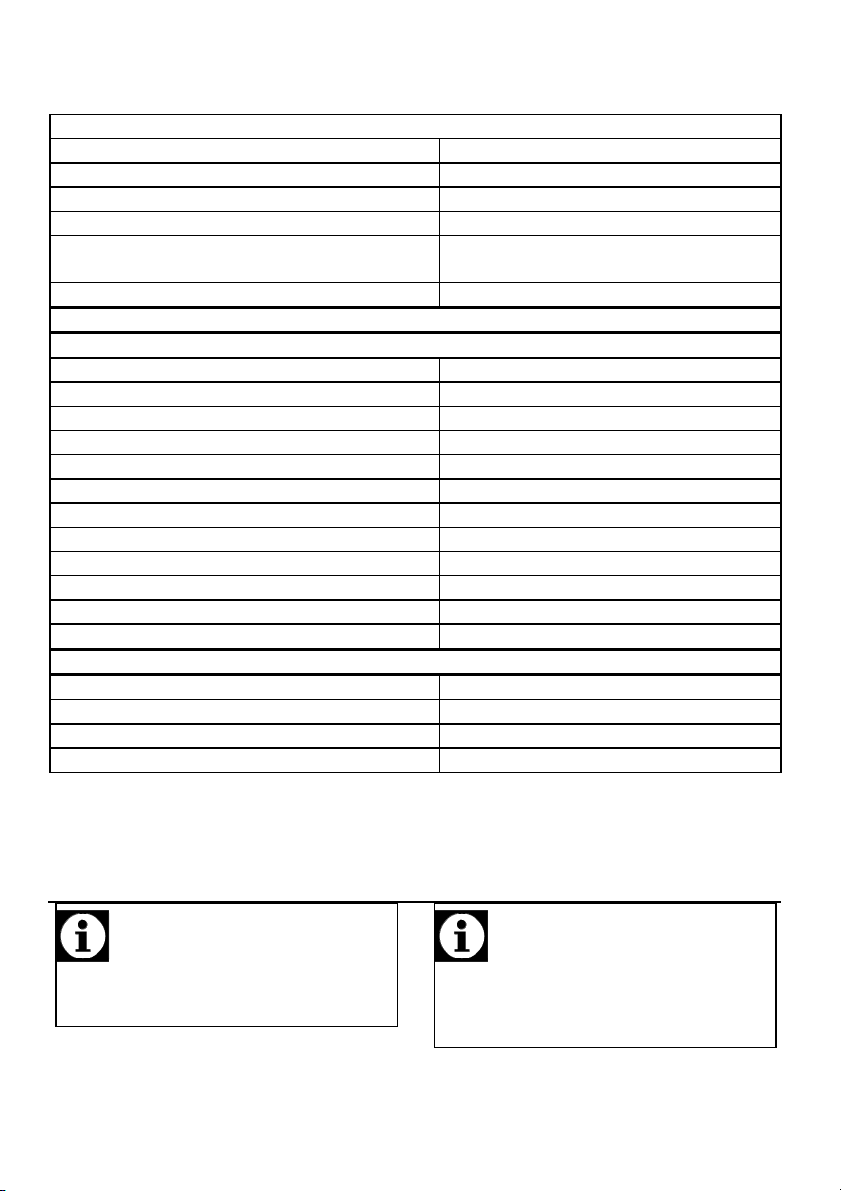
Technical specifications
#
GENERAL
External dimensions (height / width / depth) 900 mm/500 mm/600 mm
Voltage / frequency 220/240 V ~/380-415 V 3N ~ 50 Hz
Total power consumption 7.9 kW
Fuse min. 25 A
Cable type / section H05VV-FG 3 X 2,5 mm2
Cable length max. 2 m
HOB
Burners
Rear left
Dimension 145 mm
Power 1000 W
Front left
Dimension 180 mm
Power 2000 W
Front right
Dimension 145 mm
Power 1500 W
Rear right
Dimension 180 mm
Power 1500 W
OVEN/GRILL
Main oven
Energy efficiency class# A
Inner lamp 15–25 W
Grill power consumption 1.6 kW
Basics: Information on the energy label of electrical ovens is given in accordance with
the EN 50304 standard. Those values are determined under standard load with
bottom-top heater or fan assisted heating (if any) functions.
Energy efficiency class is determined in accordance with the following prioritization
depending on whether the relevant functions exist on the product or not. 1-Cooking
with eco-fan, 2- Turbo slow cooking, 3- Turbo cooking, 4- Fan assisted bottom/top
heating, 5-Top and bottom heating.
Hotplate
Hotplate
Hotplate
Hotplate
Conventional oven
Important
Technical specifications may be
changed without prior notice to
improve the quality of the product.
Important
Figures in this manual are
schematic and may not exactly
match your product.
5 | EN
Important
A
Values stated on the product labels
or in the documentation
accompanying it are obtained in
laboratory conditions in accordance
with relevant standards. Depending
on operational and environmental
conditions of the product, these
values may vary.
Accessories
Important
ccessories supplied can vary
depending on the product model.
Not every accessory described in
the user manual may exist on your
product.
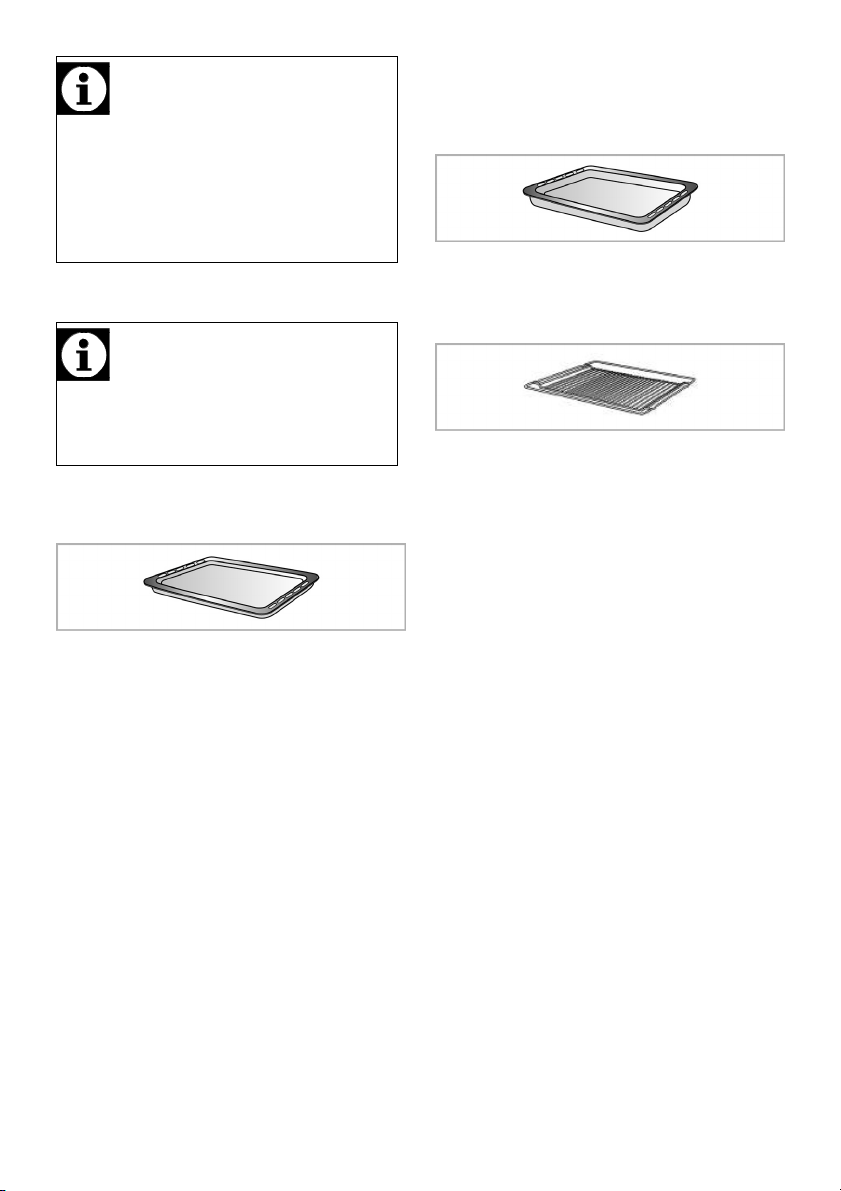
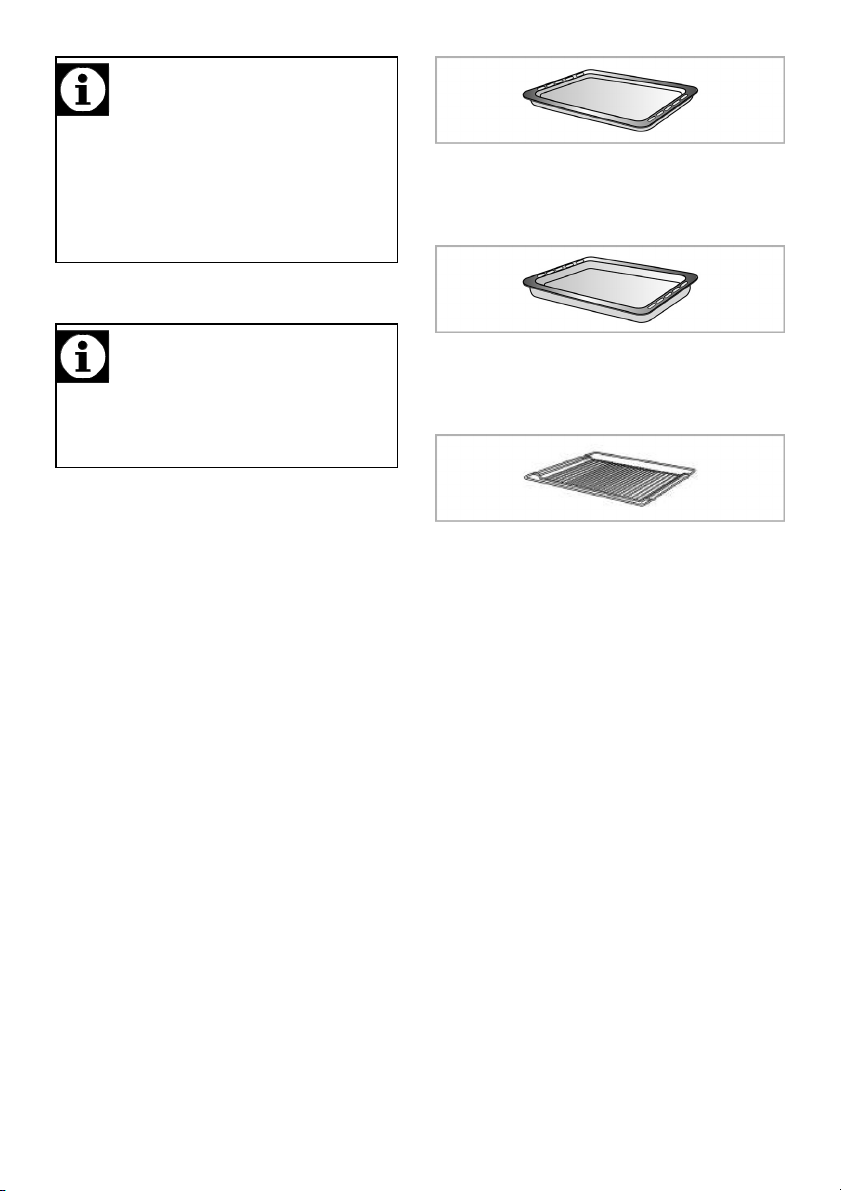
Oven tray
Used for pastries, frozen foods and big
roasts.
Deep tray
Used for pastries, large roasts, juicy
dishes, and for collecting the fat while
grilling.
Wire Shelf
Used for roasting and for placing the
food to be baked, roasted or cooked in
casserole dishes to the desired rack.
6 | EN

2 Important safety instructions
A
This section contains safety
instructions that will help you avoid risk
of injury and damage. All warranties
will become void if you do not follow
these instructions.
General safety
WARNING: The appliance and its
accessible parts become hot
during use. Care should be taken
to avoid touching heating
elements.
Children less than 8 years old
shall be kept away, unless
continuously supervised.
This appliance can be used by
children aged from 8 years and
above and persons with reduced
physical, sensory or mental
capabilities or lack of experience
and knowledge if they have been
given supervision or instruction
concerning use of the appliance
in a safe way and understand
hazards involved. Children shall
not play with the appliance.
Cleaning and user maintenance
shall not be made by children
without supervision.
WARNING:
become hot during use. Young
children should be kept away.
Do not use harsh abrasive
cleaners or sharp metal scrapers
to clean the oven door glass
since they can scratch the
surface, which may result in
shattering of the glass.
ccessible parts may
WARNING: Ensure that the
appliance is switched off before
replacing the lamp to avoid the
possibility of electric shock.
WARNING: Unattended cooking
on a hob with fat or oil can be
dangerous and may result in fire.
NEVER try to extinguish a fire
with water, but switch off the
appliance and then cover flame
e.g. with a lid or a fire blanket.
WARNING: Danger of fire: do
not store items on the cooking
surface. This appliance is not
intended to be operated by
means of an external timer or
separate remote-control
system.
WARNING: If the surface is
cracked, switch off the appliance
to avoid possibility of electric
shock.
• Connect the product to an earthed
outlet/line protected by a fuse of
suitable capacity as stated in the
"Technical specifications" table.
Have the earthing installation made
by a qualified electrician while
using the product with or without a
transformer. Our company shall not
be liable for any problems arising
due to the product not being
earthed in accordance with the
local regulations.
• If the supply cord is damaged, it
must be replaced by the
manufacturer, its service agent or
similary qualified persons in order
to avoid a hazard.
7 | EN
• Do not operate the product if it is
defective or has any visible
damage.
• Do not carry out any repairs or
modifications on the product.
However, you may remedy some
troubles that do not require any
repairs or modifications. See
Troubleshooting, page 25.
• Never wash down the product with
water! There is the risk of electric
shock!
• Never use the product when your
judgment or coordination is
impaired by the use of alcohol
and/or drugs.
• Product must be disconnected
from the mains during installation,
maintenance, cleaning and repair
procedures.
• Be careful when using alcoholic
drinks in your dishes. Alcohol
evaporates at high temperatures
and may cause fire since it can
ignite when it comes into contact
with hot surfaces.
• Do not heat closed tins and glass
jars in the oven. The pressure that
would build-up in the tin/jar may
cause it to burst.
• Do not place any flammable
materials close to the product as
the sides may become hot during
use.
• Do not place baking trays, dishes
or aluminium foil directly onto the
bottom of the oven. The heat
accumulation might damage the
bottom of the oven.
• Keep all ventilation slots clear of
obstructions.
• Product may be hot when it is in
use. Never touch the hot burners,
inner sections of the oven, heaters
and etc.
• Always use heat resistant oven
gloves when putting in or removing
dishes into/from the hot oven.
• Do not use the product with front
door glass removed or cracked.
• Rear surface of the oven gets hot
when it is in use. Make sure that
the gas/electrical connection does
not contact the rear surface;
otherwise, connections can get
damaged.
• Do not trap the mains cable
between the oven door and frame
and do not route it over hot
surfaces. Otherwise, cable
insulation may melt and cause fire
as a result of short circuit.
• Make sure that the product function
knobs are switched off after every
use.
Important
The appliance is not intended to
be operated by means of an
external timer or seperate remote
control.
Safety for children
• Electrical and/or gas products are
dangerous to children. Keep
children away from the product
when it is operating and do not
allow them to play with the product.
• Accessible parts of the appliance
will become hot whilst the
appliance is in use. Children
should be kept away until the
product has cooled down.
• "CAUTION: Accessible parts may
be hot when the grill is in use.
Young children should be kept
away."
8 | EN
• Do not place any items above the
appliance that children may reach
for.
• When the door is open, do not
load any heavy object on it and do
not allow children to sit on it. It
may overturn or door hinges may
get damaged.
• The packaging materials will be
dangerous for children. Keep the
packaging materials away from
children. Please dispose of all
parts of the packaging according to
environmental standards.
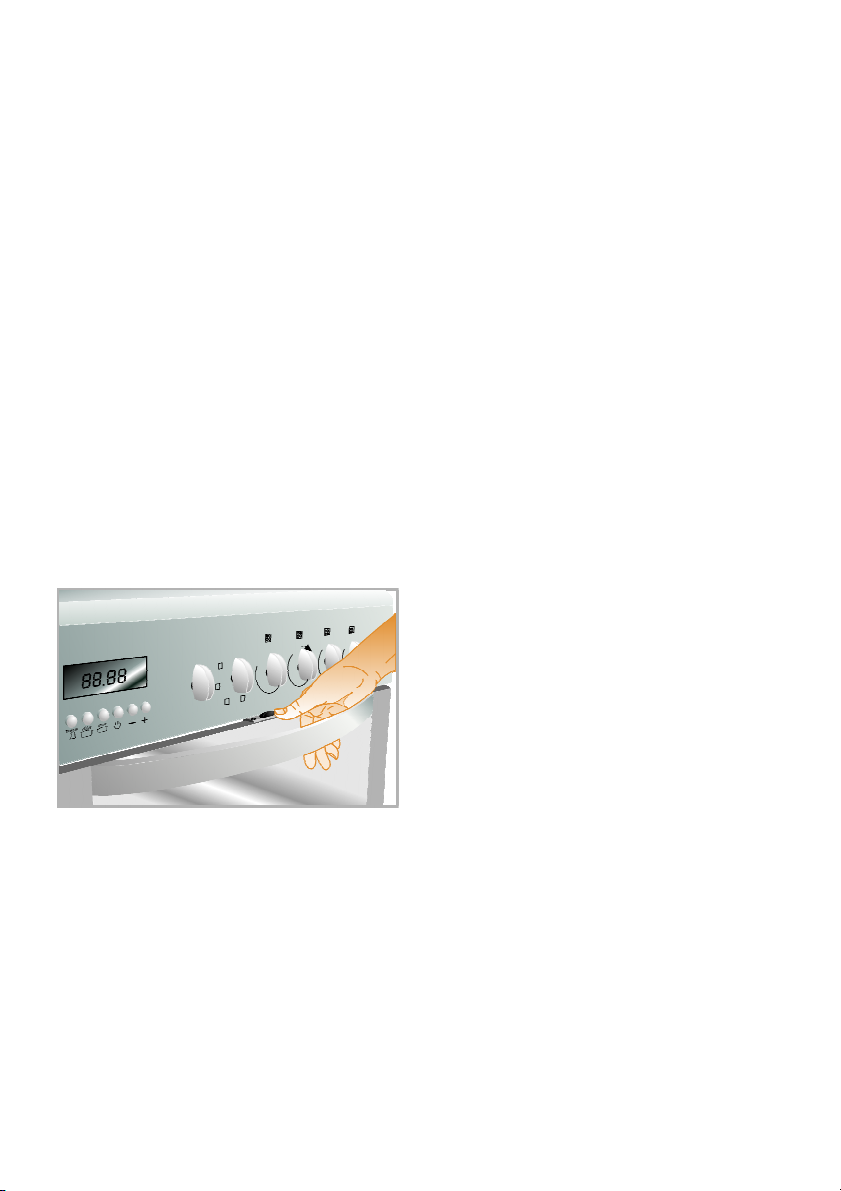
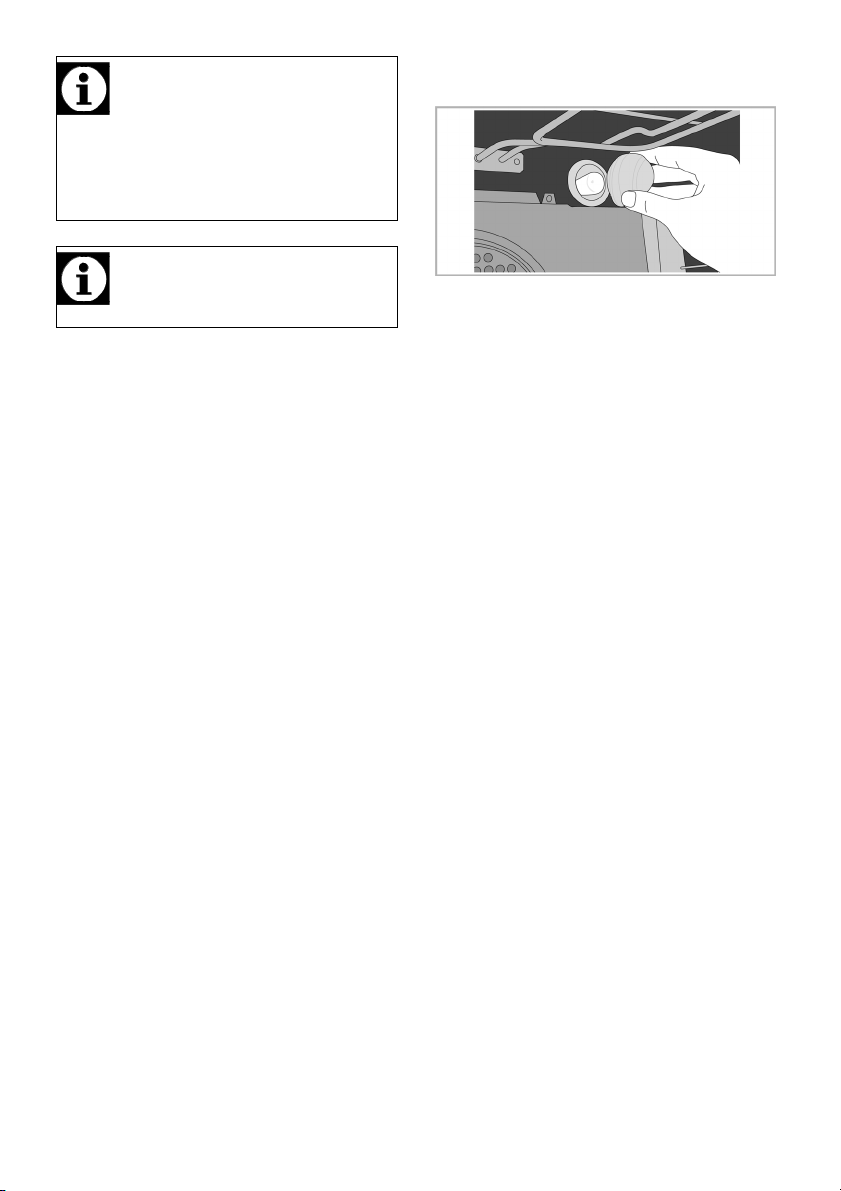
Child lock
The cooker has child lock system on
the oven door.
To open the oven door, push to the
plastic button slightly down and pull the
door handle.
When close the door, child lock will be
locked itself.
SAVE THESE INSTRUCTIONS
Safety when working with
electricity
Defective electric equipment is one of
the major causes of house fires.
• Any work on electrical equipment
and systems should only be carried
out by authorized and qualified
persons.
• In case of any damage, switch off
the product and disconnect it from
the mains. To do this, turn off the
fuse at home.
• Make sure that fuse rating is
compatible with the product.
Intended use
This product is designed for domestic
use. Commercial use will void the
guarantee.
"CAUTION: This appliance is for
cooking purposes only. It must not be
used for other purposes, for example
room heating."
This product should not be used for
warming the plates under the grill,
drying towels, dish cloths etc. by
hanging them on the oven door
handles. This product should also not
be used for room heating purposes.
The manufacturer shall not be liable for
any damage caused by improper use
or handling errors.
The oven can be used for defrosting,
baking, roasting and grilling food.
9 | EN
3 Installation
Product must be installed by a qualified
person in accordance with the
regulations in force. The manufacturer
shall not be held responsible for
damages arising from procedures
carried out by unauthorized persons
which may also void the warranty.
Important
Preparation of location and
electrical and gas installation for
the product is under customer’s
responsibility.
DANGER
The product must be installed in
accordance with all local gas
and/or electrical regulations.
DANGER
Prior to installation, visually
check if the product has any
defects on it. If so, do not have it
installed.
Damaged products cause risks for
your safety.
Before installation
To ensure that critical air gaps are
maintained under the appliance, we
recommend that this appliance is
mounted on a solid base and that the
feet do not sink into any carpet or soft
flooring.
The kitchen floor must be able to carry
the weight of the appliance plus the
additional weight of cookware and
bakeware and food.
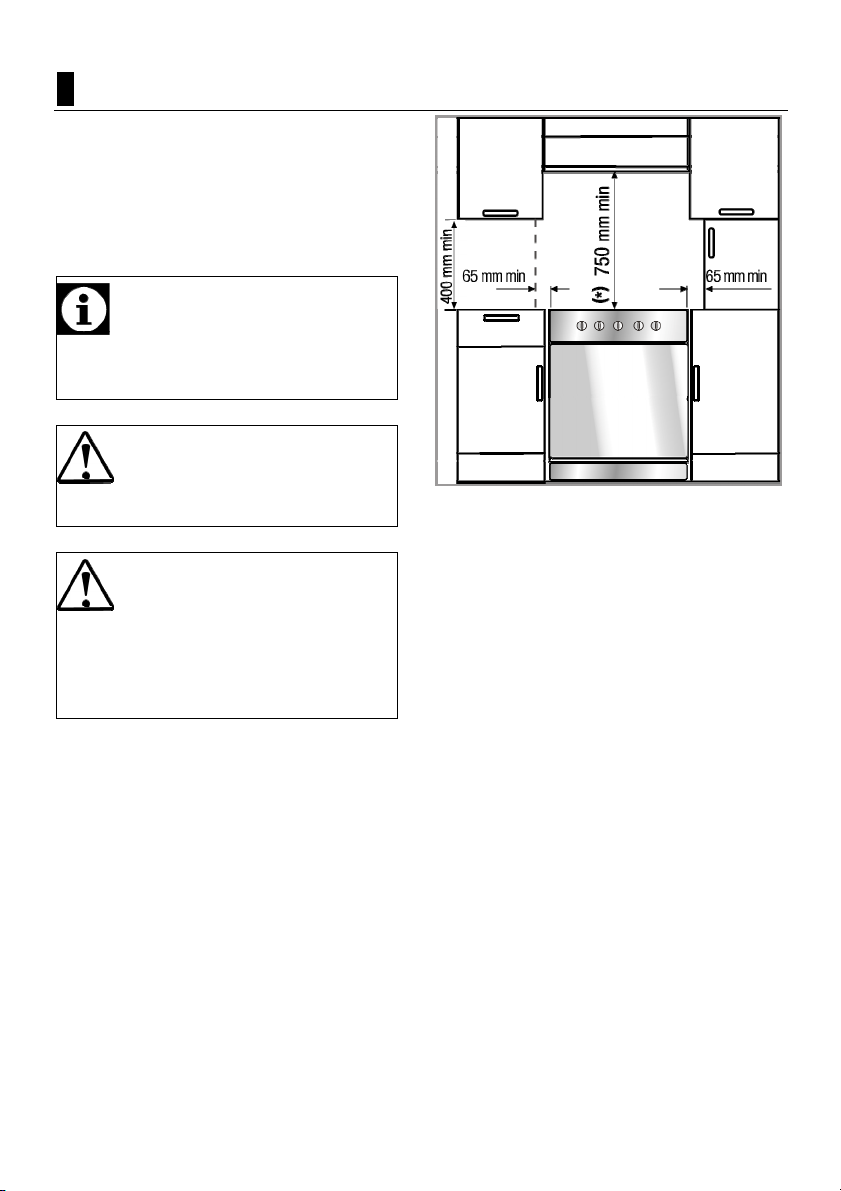
• It can be used with cabinets on
either side but in order to have a
minimum distance of 400mm
above hotplate level allow a side
clearance of 65mm between the
appliance and any wall, partition or
tall cupboard.
• It can also be used in a free
standing position. Allow a minimum
distance of 750 mm above the hob
surface.
• (*) If a cooker hood is to be
installed above the cooker, refer to
cooker hood manufacturer'
instructions regarding installation
height (min 650 mm).
• The appliance corresponds to
device class 1, i.e. it may be
placed with the rear and one side
to kitchen walls, kitchen furniture or
equipment of any size. The kitchen
furniture or equipment on the other
side may only be of the same size
or smaller.
10 | EN
• Any kitchen furniture next to the
appliance must be heat-resistant
(100 °C min.).
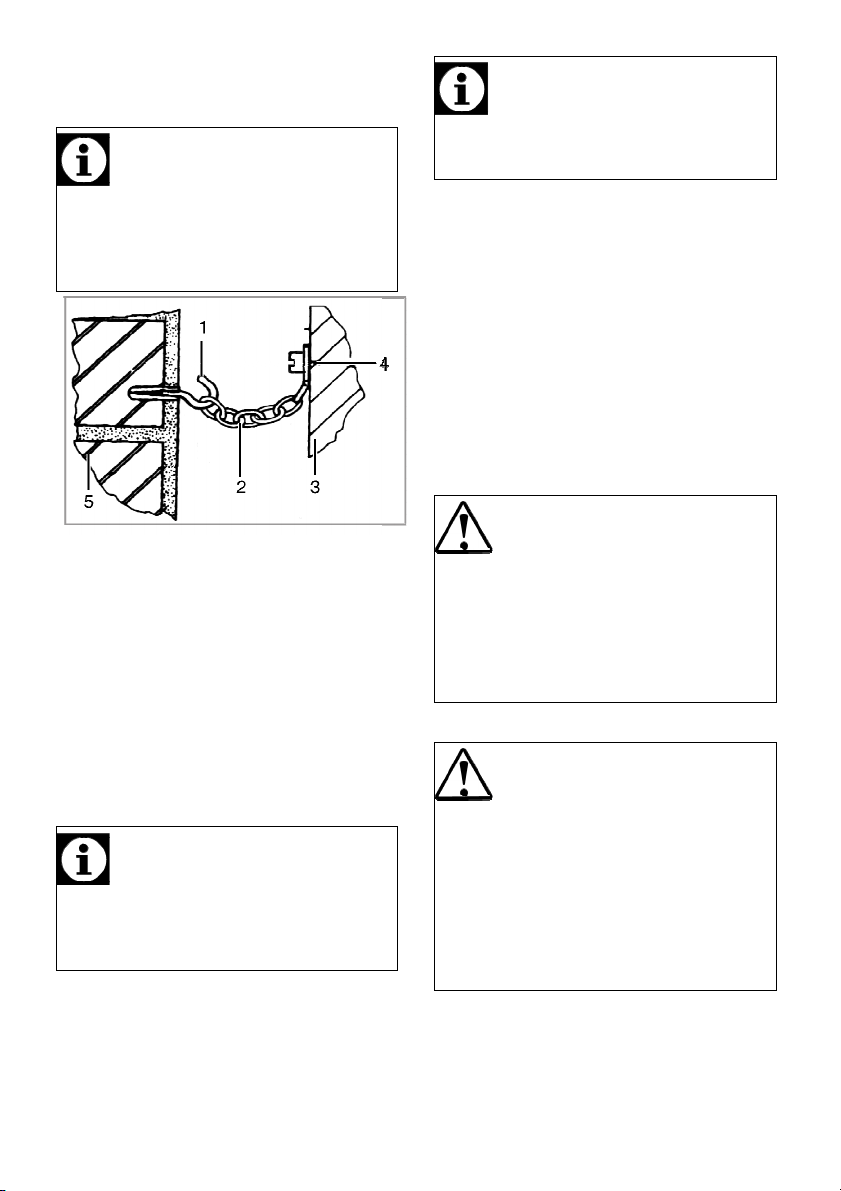
Important
The appliance must be secured
against overbalancing by using the
supplied chain on your oven.
Fasten hook (1) to the kitchen wall
(5) and connect safety chain (2) to
the hook.
1 Hook (is not supplied)
2 Safety chain (supplied and mounted
to oven)
3 Rear of cooker
4 Firmly fix chain to cooker rear
5 Kitchen wall
NOTICE
Material damage!
The door and/or handle must not be
used for lifting or moving the
appliance.
Electrical connection
Connect the product to a grounded
outlet/line protected by a fuse of
suitable capacity as stated in the
"Technical specifications" table. Have
the grounding installation made by a
qualified electrician while using the
product with or without a transformer.
Our company shall not be liable for any
damages that will arise due to using
the product without a grounding
installation in accordance with the local
regulations.
DANGER
Risk of electric shock, short
circuit or fire by unprofessional
installation!
The appliance may be connected
to the mains supply only by an
authorized qualified person and the
appliance is only guaranteed after
correct installation.
Installation and connection
Product can only be installed and
connected in accordance with the
statutory installation rules.
Important
Do not install the appliance next to
refrigerators or freezers. The heat
emitted by the appliance will lead to
an increased energy consumption
of cooling appliances.
• Carry the product with at least two
persons.
• Product must be placed directly on
the floor. It must not be placed onto
a base or a pedestal.
DANGER
Risk of electric shock, short
circuit or fire by damage of the
mains lead!
The mains lead must not be
clamped, bent or trapped or come
into contact with hot parts of the
appliance.
If the mains lead is damaged, it
must be replaced by a qualified
electrician.
The mains supply data must
correspond to the data specified on the
type label of the product. The rating
plate is either seen when the door or
11 | EN
the lower cover is opened or it is
located at the rear wall of the unit
depending on the unit type.
Power cable of your product must
comply with the values in "Technical
specifications" table.
DANGER
Risk of electric shock!
Before starting any work on the
electrical installation, please
disconnect the appliance from the
mains supply.
Connecting the power cable
1. If it is not possible to disconnect all
poles in the supply power, a
disconnection unit with at least 3
mm contact clearance (fuses, line
safety switches, contactors) must
be connected and all the poles of
this disconnection unit must be
adjacent to (not above) the product
in accordance with IEE directives.
Failure to obey this instruction may
cause operational problems and
invalidate the product warranty.
Additional protection by a residual
current circuit breaker is recommended.
If a cable is supplied with the
product:
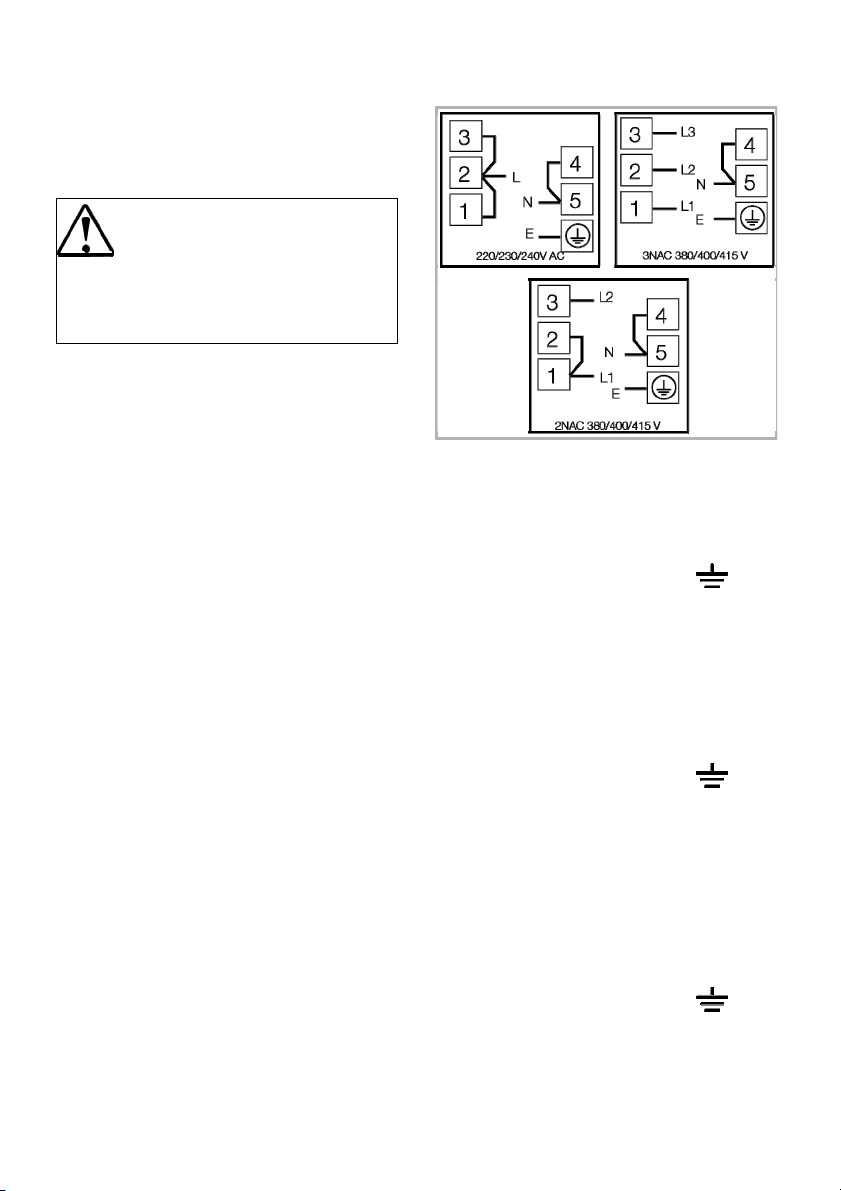
2. For single-phase
connection,connect as identified
below:
• Brown cable = L (Phase)
• Blue cable = N (Neutral)
• Green/yellow cable = (E)
(Ground)
3. For double-phase
connection,connect the wires as
identified below:
• Brown cable = L1 (Phase 1)
• Black cable = L2 (Phase 2)
• Blue cable = N (Neutral)
• Green/yellow cable = (E)
(Ground)
4. For three-phase connection,
connect the wires as identified
below:
• Brown cable = L1 (Phase 1)
• Black cable = L2 (Phase 2)
• Black cable = L3 (Phase 3)
• Blue cable = N (Neutral)
• Green/yellow cable = (E)
(Ground)
• Push the product towards the
kitchen wall.
12 | EN

• Hook safety chain.
• Adjusting the feet of oven
Vibrations during use may cause
cooking vessels to move. This
dangerous situation can be
avoided if the product is level and
balanced.
For your own safety please ensure
the product is level by adjusting the
four feet at the bottom by turning
left or right and align level with the
work top.
Final check
1. Reconnect the product to the mains.
2. Open gas supply.
Disposal
cardboard onto the inside of the
oven door that lines up with the
position of the trays. Tape the oven
door to the side walls.
• Do not use the door or handle to lift
or move the product.
NOTICE
Do not place other items on the top
of the appliance. The appliance
must be transported upright.
Important
Check the general appearance of
your product for any damages that
might have occurred during
transportation.
Disposing of the old product
Disposing of packaging material
Packaging materials are dangerous to
children. Keep packaging materials in a
safe place out of reach of children.
Packaging materials of the product are
manufactured from recyclable
materials. Dispose of them properly
and sort in accordance with recycled
waste instructions. Do not dispose of
them with normal domestic waste.
Future Transportation
• Keep the product's original carton
and transport the product in it.
Follow the instructions on the
carton. If you do not have the
original carton, pack the product in
bubble wrap or thick cardboard and
tape it securely.
• To prevent the wire grill and tray
inside the oven from damaging the
oven door, place a strip of
Dispose of the old product in an
environmentally friendly manner.
This equipment bears the selective
sorting symbol for waste electrical and
electronic equipment (WEEE). This
means that this equipment must be
handled pursuant to European
Directive 2002/96/EC in order to be
recycled or dismantled to minimize its
impact on the environment. For further
information, please contact local or
regional authorities.
Refer to your local dealer or solid
waste collection centre in your area to
learn how to dispose of your product.
Before disposing of the product, cut off
the power cable plug and make the
door lock (if any) unusable to avoid
dangerous conditions to children.
13 | EN
4 Preparation
Pots with thick bottom will provide
Tips for saving energy
The following information will help you
to use your appliance in an ecological
way, and to save energy:
• Use dark coloured or enamel
coated cookware in the oven since
the heat transmission will be better.
• While cooking your dishes, perform
a preheating operation if it is
advised in the user manual or
cooking instructions.
• Do not open the door of the oven
frequently during cooking.
• Try to cook more than one dish in
the oven at the same time
whenever possible. You can cook
by placing two cooking vessels
onto the wire shelf.
• Cook more than one dish one after
another. The oven will already be
hot.
• You can save energy by switching
off your oven a few minutes before
the end of the cooking time. Do not
open the oven door.
• Defrost frozen dishes before
cooking them.
• Use pots/pans with cover for
cooking. If there is no cover,
energy consumption may increase
4 times.
• Select the burner which is suitable
for the bottom size of the pot to be
used. Always select the correct pot
size for your dishes. Larger pots
require more energy.
• Pay attention to use flat bottom
pots when cooking with electric
hobs.
a better heat conduction. You can
obtain energy savings up to 1/3.
• Vessels and pots must be
compatible with the hotplates.
Bottom of the vessels or pots must
not be smaller than the hotplate.
• Keep the hotplates and bottom of
the pots clean. Dirt will decrease
the heat conduction between the
hotplate and bottom of the pot.
• For long cookings, turn off the
hotplate 5 or 10 minutes before the
end of cooking time. You can
obtain energy savings up to 20%
by using the residual heat.
Initial use
First cleaning of the appliance
NOTICE
The surface may get damaged by
some detergents or cleaning
materials.
Do not use aggressive detergents,
cleaning powder/cream or any
sharp objects.
1. Remove all packaging materials.
2. Wipe the surfaces of the appliance
with a damp cloth or sponge and
dry with a cloth.
Initial heating
Heat up the product for about 30
minutes and then switch it off. Thus,
any production residues or layers will
be burnt off and removed.
14 | EN
WARNING
Hot surfaces may cause burns!
Do not touch the hot surfaces of
the appliance. Use oven gloves.
Keep children away from the
appliance.
2. Close the oven door.
3. Select the highest grill power; see
How to operate the grill, page 21.
4. Operate the oven about 30 minutes.
5. Turn off your grill; see How to
operate the grill, page 21
Electric oven
1. Take all baking trays and the wire
grill out of the oven.
2. Close the oven door.
3. Select Static position.
4. Select the highest grill power; See
How to operate the electric oven,
page 19.
5. Operate the oven for about 30
minutes.
6. Turn off your oven; See How to
operate the electric oven, page 19
Grill oven
1. Take all baking trays and the wire
grill out of the oven.
Hot plate
1. Any production residues or
conservation layers must be burnt
before the first use. Operate the
hotplate at middle temperature level
for 8 minutes without any vessel on
it. No pots or containers should be
placed onto the hotplate during this
procedure.
Important
Smell and smoke may emit during
first heating. Ensure that the room
is well ventilated.
15 | EN
5 How to use the hob
• Put appropriate amount of food in
General information about
cooking
DANGER
Risk of fire by overheated oil!
When you heat oil, do not leave it
unattended.
Never try to extinguish the fire
with water! When oil has caught
fire, immediately cover the pot or
pan with a lid. Switch off the hob if
safe to do so and phone the fire
service.
• Before frying foods, always dry
them well and gently place into the
hot oil. Ensure complete thawing of
frozen foods before frying.
• Do not cover the vessel you use
when heating oil.
• Place the pans and saucepans in a
manner so that their handles are
not over the hob to prevent heating
of the handles. Do not place
unbalanced and easily tilting
vessels on the hob.
• Do not place empty vessels and
saucepans on cooking zones that
are switched on. They might get
damaged.
• Operating a cooking zone without a
vessel or saucepan on it will cause
damage to the product. Turn off the
cooking zones after the cooking is
complete.
• As the surface of the product can
be hot, do not put plastic and
aluminum vessels on it.
Such vessels should not be used
to keep foods either.
• Use flat bottomed saucepans or
vessels only.
16 | EN
saucepans and pans. Thus, you
will not have to make any
unnecessary cleaning by
preventing the dishes from
overflowing.
Do not put covers of saucepans or
pans on cooking zones.
Place the saucepans in a manner
so that they are centered on the
cooking zone. When you want to
move the saucepan onto another
cooking zone, lift and place it onto
the cooking zone you want instead
of sliding it.
Using the hobs
1 Hotplate 14-16 cm
2 Hotplate 18-20 cm
3 Hotplate 14-16 cm
4 Hotplate 18-20 cm is list of advised
diameter of pots to be used on
related burners.
Using hotplates
Hob knobs can be turned in both
directions in a way that will provide
temperature control in steps.
NOTICE
If the hob is equipped with hotplates
featuring Booster function, relevant
hotplate will be marked with a red
dot.
Turning on the hotplates
Use hotplate knobs to operate the
hotplates. Move the hotplate knobs to
the relevant level in order to obtain the
desired cooking level.
Overheating protection
1000 Hotplates that have a power
above 1000 W are equipped with an
overheating protection. Overheating
protection decreases the power of the
hotplate in following cases:
• There is no vessel or saucepan on
the hotplate.
• There is an empty vessel or
saucepan on the hotplate.
• The bottom of the vessel or
saucepan is not flat.
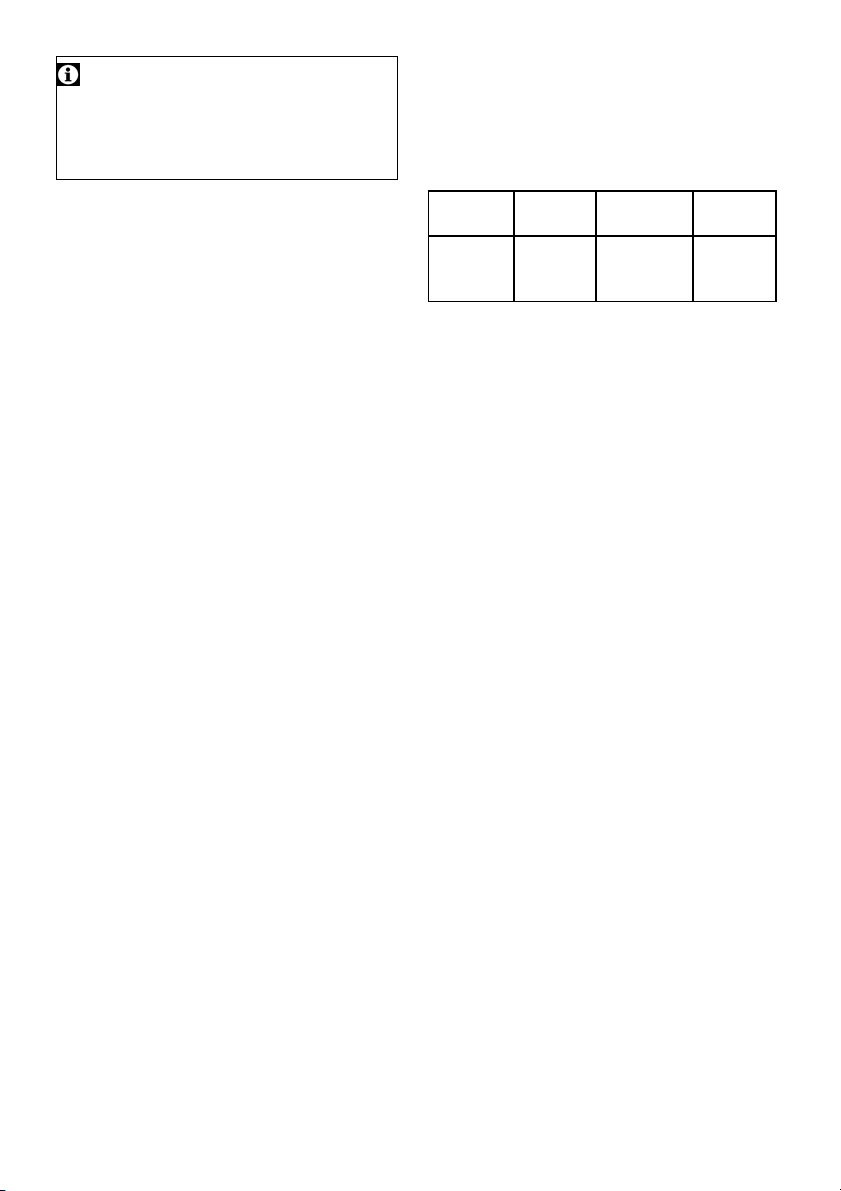
Cooking
level
warming stewing,
1 2 —3 4 —6
cooking,
simmering
roasting,
boiling
Turning off the hotplates
Turn the hotplate knob to OFF (upper)
position.
17 | EN
6 How to operate the oven
• Fish should be placed on the
General information on baking,
roasting and grilling
DANGER
Risk of scalding by hot steam!
Take care when opening the oven
door as steam may escape.
Tips for baking
• Use non-sticky coated appropriate
metal plates or aluminum vessels
or heat-resistant silicone molds.
• Make best use of the space on the
rack.
• Place the baking mold in the
middle of the shelf.
• Select the correct rack position
before turning the oven or grill on.
Do not change the rack position
when the oven is hot.
• Keep the oven door closed.
Tips for roasting
• Treating whole chicken, turkey and
big-piece meats with dressings
such as lemon juice and black
pepper before cooking will increase
the cooking performance.
• It lasts about 15 to 30 minutes
longer to roast the meat with bones
when compared to roasting the
same size of meat without bones.
• Each centimeter of the meat
thickness requires approximately 4
to 5 minutes of cooking time.
• Let meat rest in the oven for about
10 minutes after the cooking time
is over. The juice is better
distributed all over the roast and
does not run out when the meat is
cut.
middle or lower rack in a heatresistant plate.
Tips for grilling
When meat, fish and poultry are grilled,
they quickly get brown, have a nice
crust and do not get dry. Flat pieces,
meat skewers and sausages are
particularly suited for grilling as are
vegetables with high water content
such as tomatoes and onions.
• Distribute the pieces to be grilled
on the wire shelf or in the baking
tray with wire shelf in such a way
that the space covered does not
exceed the size of the heater.
• Slide the wire shelf or baking tray
with grill into the desired level in
the oven. If you are grilling on the
wire shelf, slide the baking tray to
the lower rack to collect fats. Add
some water in the tray for easy
cleaning.
NOTICE
Fire danger due to food which is
unsuitable for grilling!
Only use food for grilling which is
suitable for intensive grilling heat.
Do not place the food too far in the
back of the grill. This is the hottest
area and fat food may catch fire.
18 | EN
How to operate the electric
oven
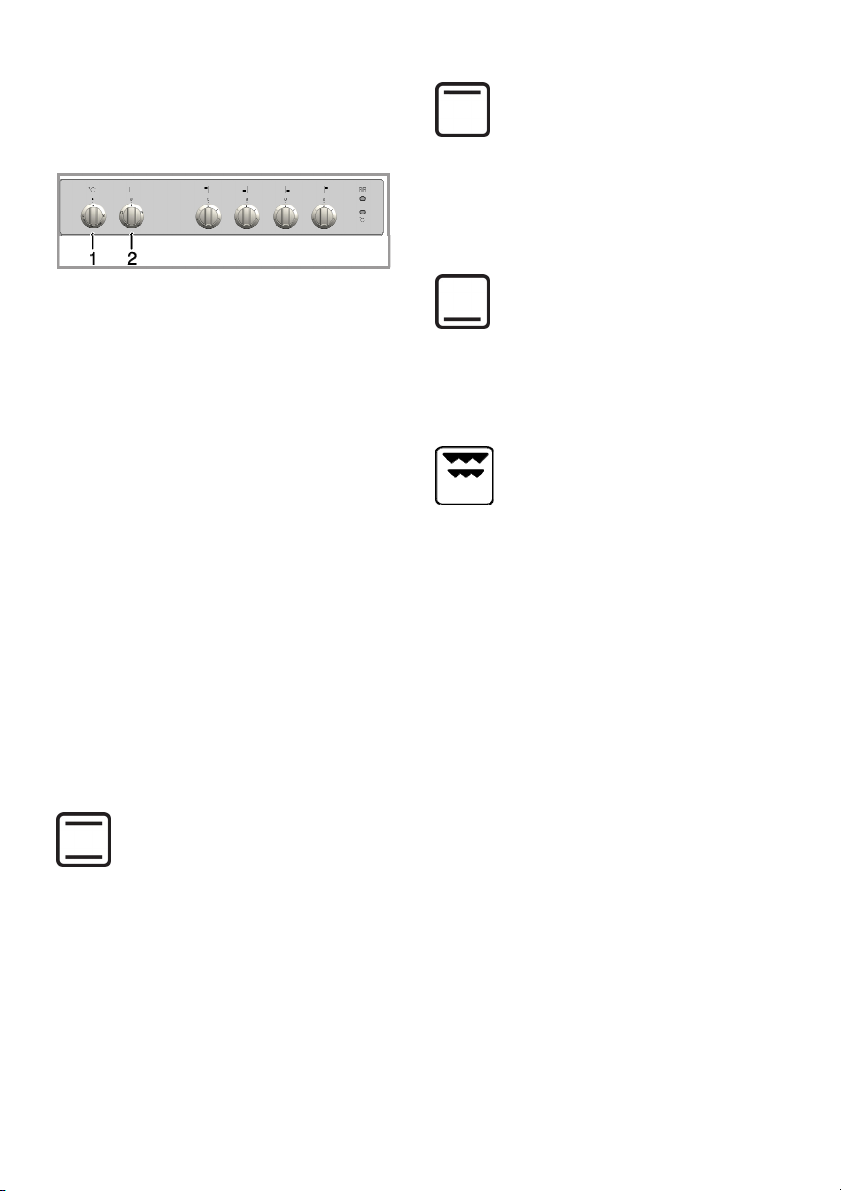
Select temperature and operating
mode
1 Thermostat knob
2 Function knob
1. Set the Temperature knob to the
desired temperature.
2. Set the Function knob to the desired
operating mode.
» Oven heats up to the adjusted
temperature and maintains it. During
heating, temperature lamp stays on.
Switching off the electric oven
Turn the function knob and
temperature knob to off (upper)
position.
Operating modes
The order of operating modes shown
here may be different from the
arrangement on your product.
Top and bottom heating
Top and bottom heating are in
operation. Food is heated
simultaneously from the top
and bottom. For example, it is
suitable for cakes, pastries, or
cakes and casseroles in
baking moulds. Cook with one
tray only.
Top heating
Bottom heating
Full grill
Only top heating is in
operation. For example, it is
suitable for cakes with bright
surface and food which you
desire to have browned from
the top.
Only bottom heating is in
operation. It is suitable for
pizza and for subsequent
browning of food from the
bottom.
Large grill at the ceiling of the
oven is in operation. It is
suitable for grilling large
amount of meat.
• Put big or mediumsized portions in
correct rack position
under the grill heater
for grilling.
• Set the temperature to
maximum level.
• Turn the food after half
of the grilling time.
19 | EN
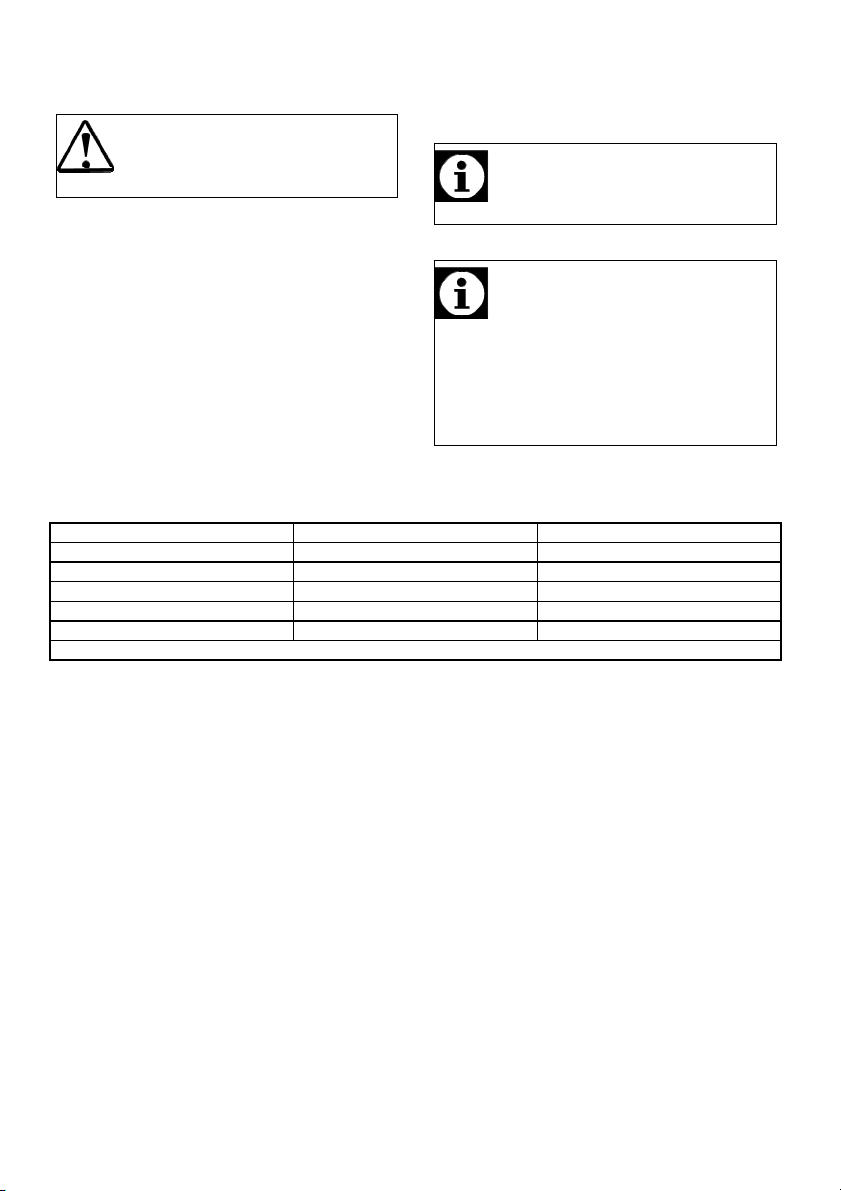
Cooking times table
Baking and roasting
Important
The values indicated in the table
below are data indicative. They may
vary according to the type of food
as well as your preferences of
cooking.
Dish Cooking vessel Rack position
Important
Level 1 is the bottom level in the
oven.
Temperature
(°C)
Cooking time (approx. in
min.)
Cakes in tray
Cakes in mould
Cookie Oven tray 3 170 ... 190 25 ... 35
Crispy mille-feuille Oven tray 3 180 ... 190 25 ... 35
Donut Oven tray 3 160 ... 180 25 ... 35
Pastries Oven tray 3 200 40 ... 50
Leaven Roasting tray 3 200 35 ... 45
Rich pastry Oven tray 3 180 ... 190 25 ... 35
Dough pastry Oven tray 3 180 ... 190 40 ... 50
Lasagna Deep tray 3 170 ... 180 40 ... 50
Pizza Oven tray 3 200 ... 220 15 ... 20
Steak Oven tray 3
Leg of lamb Oven tray 3
Roasted chicken Oven tray 3
Turkey (5.5 kg) Oven tray 3 25 min. 220 * 180 ... 240
Fish Oven tray 3 200 15 ... 25
Oven tray 24 ...
26 cm
Cake mould 18 ...
22 cm
3 170 ... 180 25 ... 35
3 170 ... 180 35 ... 45
15 min.
250/max *
15 min.
250/max *
15 min.
250/max *
* then 150
110 ... 120
70 ... 90
60 ... 70
20 | EN
Switching off the grill
#
# #
How to operate the grill
1. Turn the Function knob to Off (top)
WARNING
Hot surfaces may cause burns!
Close oven door during grilling.
Switching on the grill
1. Turn the Function knob to the
desired grill symbol.
2. Then, select the desired grilling
temperature.
3. If required, perform a preheating of
about 5 minutes.
» Temperature light turns on.
Cooking times table for grilling
Grilling with electric grill
Food Insertion level Grilling time (approx.)
Fish 3...4 20...25 min.
Sliced chicken 3...4 15...20 min.
Lamb chops 3...4 12...15 min.
Roast beef 3...4 15...25 min. #
Veal chops 3...4 15...25 min.
depending on thickness
position.
NOTICE
Do not use the upper level for
grilling.
NOTICE
Fire danger due to food which is
unsuitable for grilling!
Only use food for grilling which is
suitable for intensive grilling heat.
Do not place the food too far in the
back of the grill. This is the hottest
area and fat food may catch fire.
21 | EN
7 Maintenance and care
A
General information
Service life of the product will extend
and the possibility of problems will
decrease if the product is cleaned at
regular intervals.
DANGER
Risk of electric shock!
Switch off the electricity before
cleaning appliance to avoid an
electric shock.
DANGER
Hot surfaces may cause burns!
llow the appliance to cool down
before you clean it.
• Clean the product thoroughly after
each use. In this way it will be
possible to remove cooking
residues more easily, thus avoiding
these from burning the next time
the appliance is used.
• No special cleaning agents are
required for cleaning the product.
Use warm water with washing
liquid, a soft cloth or sponge to
clean the product and wipe it with a
dry cloth.
• Always ensure any excess liquid is
thoroughly wiped off after cleaning
and any spillage is immediately
wiped dry.
• Do not use cleaning agents that
contain acid or chloride to clean
the stainless or inox surfaces and
the handle. Use a soft cloth with a
liquid detergent (not abrasive) to
wipe those parts clean, paying
attention to sweep in one direction.
NOTICE
The surface may get damaged by
some detergents or cleaning
materials.
Do not use aggressive detergents,
cleaning powder/cream or any
sharp objects.
Important
Do not use steam cleaners for
cleaning.
Cleaning the hob
Electric hobs
1. Turn off the hotplates and wait until
they cool down.
2. If necessary, clean the plates with
a cleaning agent (you can obtain
cleaners/softeners from specialty
stores).
3. Warm only for a few minutes after
cleaning in order to have their top
section dried.
4. Apply a thin layer of machine oil
onto the top surface of the hob
regularly in order to protect it.
Cleaning the control panel
Clean the control panel and control
knobs with a damp cloth and wipe
them dry.
22 | EN
NOTICE
Damage of the control panel!
Do not remove the control knobs for
control panel cleaning.
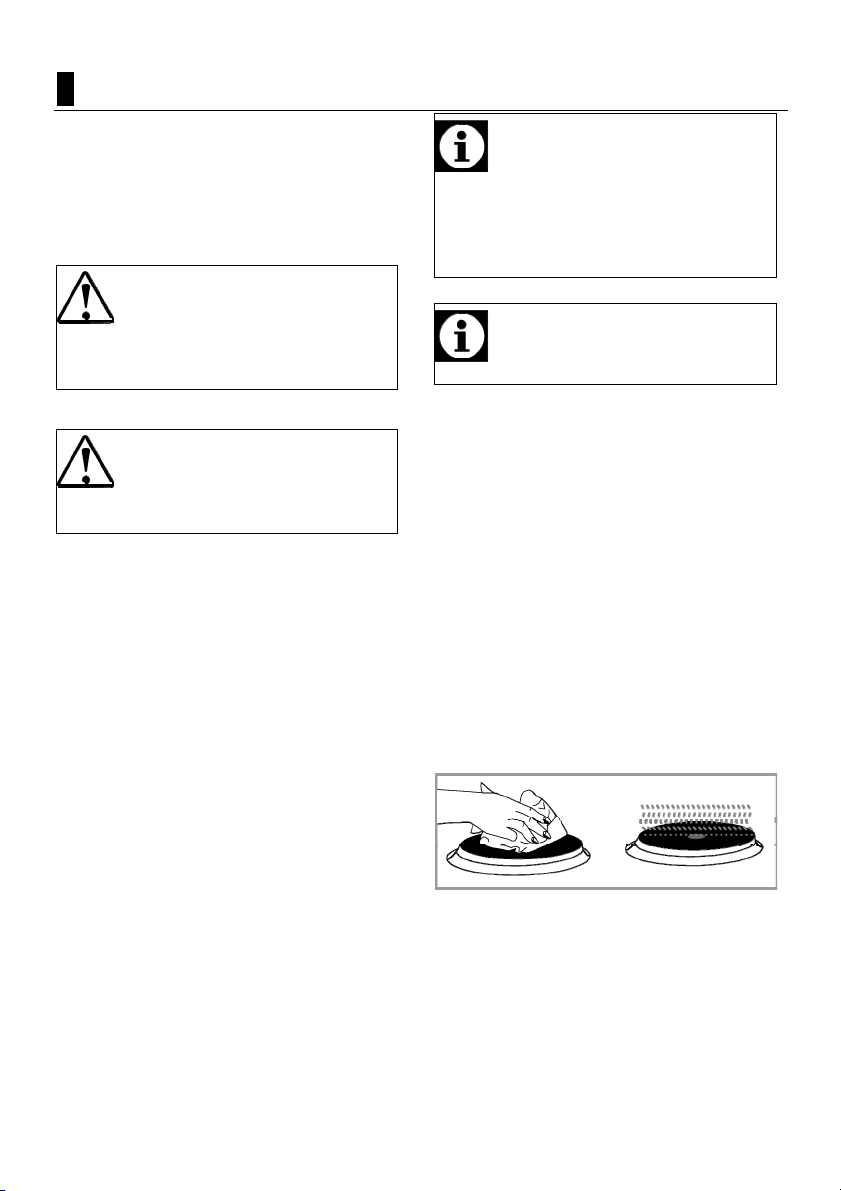
Cleaning the oven
To clean the side wall
To clean the side wall, unscrew the 4
screws on the steel rack. After cleaning
operation, assemble the steel rack to
the oven body again.
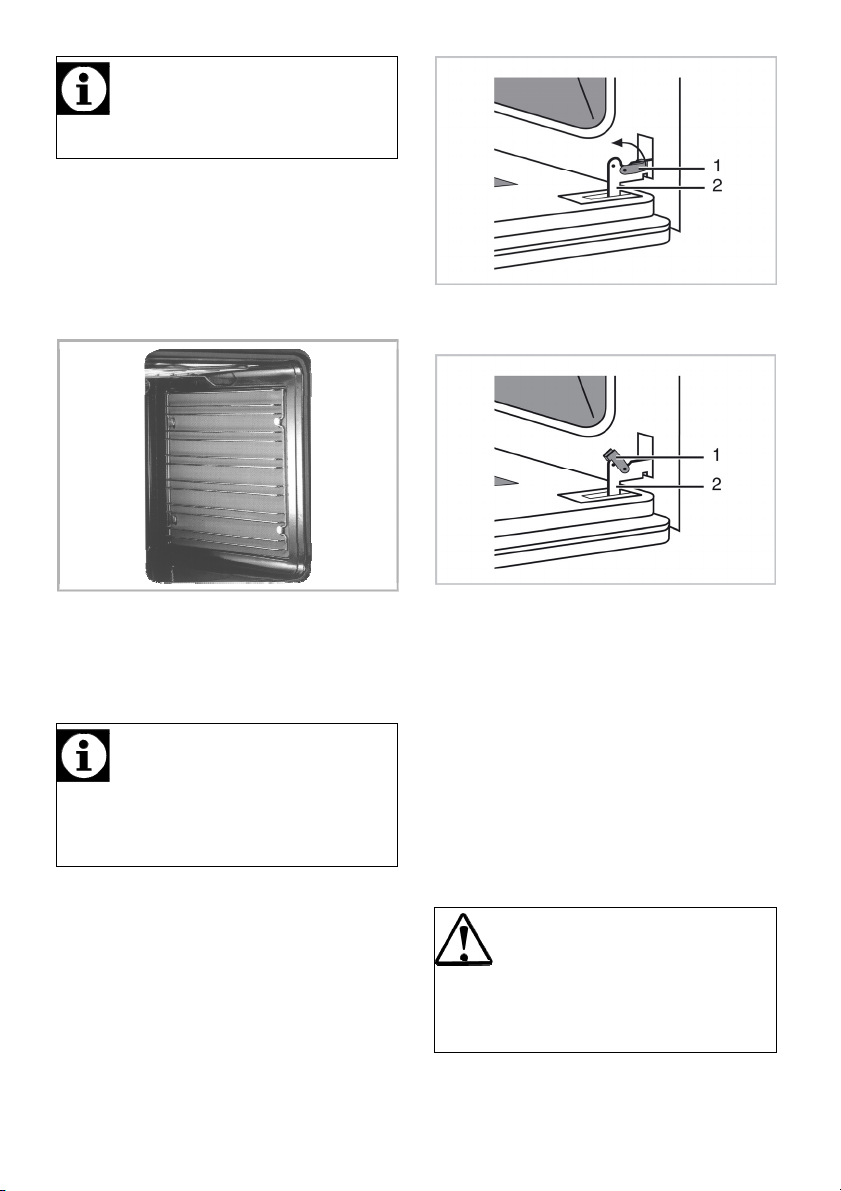
1 Hinge clamp
2 Hinge
Clean oven door
To clean the oven door, use warm
water with washing liquid, a soft cloth
or sponge to clean the product and
wipe it with a dry cloth.
Important
Don't use any harsh abrasive
cleaners or sharp metal scrapers
for cleaning the oven door. They
could scratch the surface and
destroy the glass.
Removing the oven door
Oven door can be removed in order to
clean the inside of oven easily.
1. Open the oven door completely.
2. Press the hinge clamps located at
both sides of the door backwards.
3. Move the oven door to a slightly
inclined position.
4. Raise the oven door forwards with
your two hands.
5. Once you complete cleaning,
perform the same procedure in
reverse order to reinstall the oven
door.
Once you complete cleaning, perform
the same procedure in reverse order to
reinstall the oven door.
Replacing the oven lamp
DANGER
Hot surfaces may cause burns!
Make sure that the appliance is
switched off and cooled down in
order to avoid the risk of an
electrical shock.
23 | EN
Important
A
The oven lamp is a special electric
light bulb that can resist up to
300 °C. See Technical
specifications, page 5 for details.
Oven lamps can be obtained from
uthorised Service Agents.
2. Turn the glass cover counter
clockwise to remove it.
NOTICE
Position of lamp might vary from the
figure.
If your oven is equipped with a
round lamp:
1. Disconnect the product from mains.
3. Remove the oven lamp by turning it
counter clockwise and replace it
with the new one.
4. Install the glass cover.
24 | EN

8 Troubleshooting
Oven emits steam when it is in use.
It is normal that steam escapes during operation. This is not a fault.
Water drops occur during cooking
The vapour that arises during cooking can condense and form water droplets when it hits
cold surfaces of the product. This is not a fault.
Product does not operate.
The mains fuse is defective or has tripped. Check fuses in the fuse box. If necessary,
replace or reset them.
Oven light does not work.
Oven lamp is defective. Replace oven lamp.
Power is cut. Check if there is power. Check the fuses in
the fuse box. If necessary, replace or reset
the fuses.
Oven does not heat.
Function and/or Temperature are not set. Set the function and the temperature with
the Function and/or Temperature knob/key.
Power is cut. Check if there is power. Check the fuses in
the fuse box. If necessary, replace or reset
the fuses.
Important
Consult the Authorised Service Agent or the dealer where you have purchased the
product if you can not remedy the trouble although you have implemented the
instructions in this section. Never attempt to repair a defective product yourself.
25 | EN
Läs denna bruksanvisning först.
Bästa kund,
Vi vill att du ska få bästa möjliga prestanda på din produkt, som har tillverkats i
moderna fabriker och gått igenom strikta kvalitetskontroller.
Därför råder vi dig att läsa igenom denna bruksanvisning innan du använder
produkten och sparar den för framtida referens. Om du ger produkten till någon
annan ska du se till att bruksanvisning också följer med.
Bruksanvisningen hjälper dig att använda produkten på ett snabbt och
säkert sätt.
• Läs bruksanvisningen innan du installerar och startar produkten.
• Du måste följa säkerhetsinstruktionerna.
• Förvara bruksanvisningen lättåtkomlig för framtida referens.
• Läs även de övriga dokumenten som följer med produkten.
Kom ihåg att den här bruksanvisningen även kan gälla flera andra modeller.
Skillnader mellan modeller är uttryckligen angivna i den här bruksanvisningen.
Förklaring av symboler
I den här bruksanvisningen används följande symboler:
Viktig information eller användbara användartips.
Varning för situationer som kan vara livsfarliga eller farliga för egendom.
Varning för elektrisk stöt.
Varning för brandrisk.
Varning för heta ytor.
Innehållsförteckning
1 Allmän Information 28
Översikt ................................................. 28
Tekniska specifikationer ....................... 29
Tillbehör ................................................. 30
2 Viktiga säkerhetsinstruktioner
31
Allmän säkerhet .................................... 31
Barnsäkerhet ...................................... 33
Säkerhet vid arbete med el ............... 33
Avsedd användning ........................... 33
3 Installation 34
Före installationen ................................ 34
Installation och anslutning .................... 35
Avyttring ................................................. 36
Avfallshantering av emballage ......... 36
Framtida transport .............................. 37
Avfallshantering av den uttjänta
podukten ........................................ 37
4 Förberedelser 38
Tips för att spara energi ....................... 38
Initial användning .................................. 38
Den första rengöringen av produkten38
Initial uppvärmning ............................ 38
5 Så här använder du hällen 40
Allmän information om tillagning .......... 40
Använda hällen ..................................... 40
6 Så här använder du ugnen 42
Allmän information om bakning, stekning
och grillning ..................................... 42
Så här använder du den elektriska ugnen
.......................................................... 42
Användningslägen ............................. 43
Tabell över tillagningstider ................ 43
Så här förbereder du grillen ................. 44
Tabell för tillagningstider för grillning 44
7 Underhåll och rengöring 45
Allmän information ................................ 45
Rengöra hällen ...................................... 45
Rengöra kontrollpanelen ...................... 45
Rengöra ugnen ..................................... 46
Ta bort ugnsluckan ............................... 46
Byta ugnslampan .................................. 46
8 Felsökning 48
27 | SV

1 Allmän Information
Översikt
1 Brännarplatta
2 Trådhylla
3 Tråg
4 Nedre del
5 Handtag
1 Termostatreglage
2 Funktionsreglage
3 Hetplatta Vänster bak
4 Hetplatta Vänster fram
6
鐍 rämre lucka
7 Kontrollpanel
8 Hyllpositioner
10 Lampa
5 Hetplatta Höger fram
6 Hetplatta Höger bak
7 Termostatlampa
8 Varningslampa
28 | SV
Tekniska specifikationer
#
ALLMÄNT
Yttre mått (höjd/bredd/djup) 850 mm/500 mm/600 mm
Volt/frekvens 230/400 V ~ 50 Hz
Total energiförbrukning 7.9 kW
Säkring min. 25 A
Kabeltyp/sektion H05VV-FG
3 X 2,5 mm2
Kabellängd max. 2 m
HÄLL
Brännare
Vänster bak
Dimension 145 mm
Energi 1000 W
Vänster fram
Dimension 180 mm
Energi 2000 W
Höger fram
Dimension 145 mm
Energi 1500 W
Höger bak
Dimension 180 mm
Energi 1500 W
UGN/GRILL
Huvudugn
Energieffektivitet klass# A
Innerlampa 15–25 W
Grillenergiförbrukning 1.6 kW
Grundläggande information: Information om energiangivelser för elektriska ugnar
anges i enlighet med EN 50304-standard. Dessa värden bestäms under
standardladdning med över-undervärme eller varmluftsfunktioner (om det finns).
Energieffektivitetsklass bestäms i enlighet med följande prioritering, beroende på om
produkten har funktionerna eller inte. 1-Tillagning med eko-fläkt, 2- Turbo långsamt
tillagning, 3- Turbotillagning, 4- Varmlufts under/över, 5-Över- och undervärme.
Hetplatta
Hetplatta
Hetplatta
Hetplatta
Traditionell ugn
Viktigt
De tekniska specifikationerna kan
ändras utan föregående
meddelande, för att förbättra
produktens kvalitet.
Viktigt
Siffrorna i den här
bruksanvisningen är endast i
beskrivande syfte och kanske inte
exakt stämmer överens med din
produkt.
29 | SV
Viktigt
Värden på produktetiketter och i
medföljande dokumentation är
hämtade från
laboratorieförhållanden i enlighet
med relevanta standarder. Dessa
värden kan variera beroende på
användnings- och
miljöförhållanden.
Tillbehör
Viktigt
Vilka tillbehör som medföljer kan
variera beroende på modell. Alla
tillbehör som beskrivs i den här
bruksanvisningen kanske inte följer
med din produkt.
Ugnsplåt
Används för bakverk, fryst mat och
stora stekar.
Långpanna
Används för bakverk, stora stekar,
saftiga rätter och för att samla upp fett
vid grillning.
Ugnsgaller
Används vid grillning och för att placera
mat som ska bakas, grillas eller tillagas
i grytliknande kärl.
30 | SV
 Loading...