


Before Getting Started
Kit Contents
!NetCenter™ network hard drive
!5 ft. (1.8m) Ethernet cable
!AC adapter with power cord
!Installation CD with EasyLink™ software utilities and additional product documentation
!Quick Install Guide
!Vertical Stands
Quick Install Guide
NetCenter Network Hard Drive
|
|
|
|
|
NetCenter |
|||
AC adapter |
Stands |
|
|
Quick Install Guide |
||||
|
|
|||||||
with power cord |
|
|
|
|
|
|
|
|
|
|
|
|
|
|
|
||
|
|
|
|
|
|
|
|
|
|
|
|
|
|
|
|
|
|
|
|
|
|
|
|
|
|
|
|
|
Ethernet |
cable |
Installation CD |
||||
|
|
|
|
|
|
|
|
|
Power button |
|
|
|
Power button light |
|
|
|
|
|
|
|
|
|
USB 2.0 ports |
|
|
|
|
|
|
|
|
|
|
|
|
|
||||
|
|
|
|
|
|
|
|
|
|
|
|
|
|
|
Ethernet port |
|
|
|
|
|
|
|
|
|
|
|
|
|
|
|
|
|
|
|
|
|
|
|
|
|
|
|
|
|
|
|
DC power supply socket |
|
|
|
|
|
|
|
|
|
|
|
|
|
|
|
|
|
|
|
|
|
|
|
|
|
|
|
|
|
|
|
Reset button |
|
|
|
|
|
|
|
|
|
|
|
|
|
|
|
|
|
|
|
|
|
|
Vertical stands |
|
|
|
|
|
|
|
|
Kensington security slot |
|
|
|
|
|
|
|
|
|
|
|
|
|
|
||
|
|
|
|
|
|
|
|
||||||||
|
|
|
|
|
|
|
|||||||||
Installing the Stands
1
1.Place the NetCenter upside down on a clean and steady surface.
2
2.Press a stand onto the bottom panel of the unit until it snaps firmly into place. Repeat this step for the other stand.
– 1 –
1 Connecting the NetCenter
Connecting the Cables
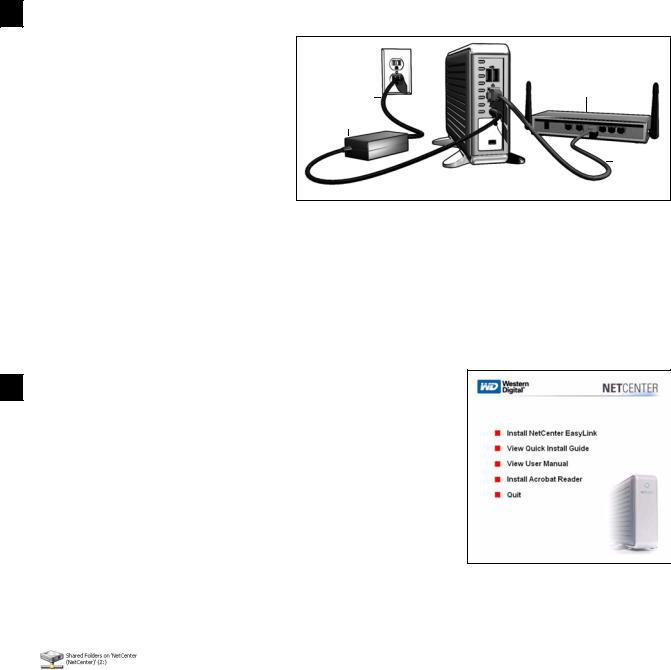
1.Connect the AC adapter into the DC power supply socket located on the back of the NetCenter and the power cord connector into an electrical outlet.
2.Connect one end of the Ethernet cable into the Ethernet port on the NetCenter and the other end directly into a router or network switch port.
For more information on connecting devices to the NetCenter, refer to the user manual on the CD or download it from the WD Web site at www.westerndigital.com.
Power cord
AC adapter
Router
Ethernet cable
Powering Up the NetCenter
1.Wait 5 seconds after connecting the power cable. Press the power button to turn on the drive.
2.Watch the power button light and wait for the indicator to glow a steady blue.
Color |
Indicates |
|
Amber (steady) |
Wait. NetCenter is booting up. |
|
Amber (flashing) |
NetCenter problem detected. See the Troubleshooting |
|
section in the user manual or contact Technical Support at |
||
|
||
|
support.wdc.com. |
|
Blue (steady) |
NetCenter is ready for setup or use. |
|
Blue (flashing) |
Drive activity. NetCenter is being accessed. |
2 Setting Up the NetCenter and EasyLink
1.Insert the CD into your CD-ROM drive. When the program autoruns and displays the NetCenter main menu, click Install NetCenter EasyLink.
2.In the Welcome screen, click Next.
3.Read the license agreement; select I accept the terms of the license agreement; and click Next.
4.Click Install to begin installation.
5.The Launch NetCenter EasyLink now option is automatically checked. If you wish to create an EasyLink shortcut on the desktop, click Create a shortcut on my Desktop. Click Finish to continue with the initial setup.
6.EasyLink scans the local network for any NetCenter drives connected to your network and displays the drive(s) found. Select the NetCenter drive you wish to set up. Then click Next.
Double-clicking the selected NetCenter drive launches My Computer which displays the shared folders.
Note: If you plan to connect multiple NetCenter drives to your network, assign a unique name for each.
7.Shared folders, if any, are displayed. To automatically assign a drive letter to a shared folder, check the box next to it and click Next.
8.Click Yes to create shortcuts of the shared folders on your desktop.
9.Click Finish to begin using the NetCenter. Congratulations! NetCenter and EasyLink installation is now complete. If this is the first time you are connecting the NetCenter, you must click Settings to launch NetCenter Manager so you can set the user name and password.
Important: Before using the NetCenter, WD recommends setting the user name and password to protect the NetCenter Manager from unauthorized access.
To access a shared folder, double-click its drive icon on the desktop or in My Computer. To set advanced options for NetCenter, click Settings. For more information on advanced settings, refer to the user manual in the CD or download it from the WD Web site at www.westerndigital.com.
– 2 –
 Loading...