


41085
Table of contents
 Loading...
WEST BEND
Automatic Bread & Dough Maker
To prevent personal injury or property damage, read and follow the instructions and/or warnings in this care use instructional manual.
IMPORTANT SAFEGUARDS
When using electrical appliances, basic safety precautions should always be followed to reduce the risk of fire, property damage,
electrical shock and/or personal injury, including the following:
• Read all instructions before using.
• Do not touch hot surfaces. Use handles or knobs. Always use potholders or oven mitts to handle hot bread pan or hot bread.
• Do not put hand inside oven chamber after bread pan is removed. Heating unit will still be hot.
• To protect against electric shock, do not place cord, plug or appliance in water or other liquid.
• Close supervision is necessary when any appliance is used by or near children.
• Unplug from outlet when not in use and before cleaning. Allow to cool before putting on or taking off parts and before
cleaning appliance.
• Avoid contacting moving parts.
• Do not operate appliance with a damaged cord or plug or after the appliance malfunctions or has been damaged in any
manner.
• The use of accessory attachments not recommended by The West Bend Company may result in fire, electrical shock or
personal injury.
• Do not use outdoors.
• Do not let cord hang over edge of table, counter or surface area, or touch hot surfaces.
• Do not place appliance on or near a hot gas or electrical burner, or in a heated oven.
• Do not use appliance for other than intended use.
• To disconnect power, press stop button to turn control off, then remove plug from wall outlet. Never pull on the cord.
• Extreme caution must be used when moving appliance during operation.
SAVE THESE INSTRUCTIONS
Your bread maker needs no special care other than cleaning. See warranty section in this booklet for service details. Do not
attempt to repair it yourself. For household use only.
An off odor from motor may be noted with first use, which is normal and will disappear with use.
ELECTRIC CORD STATEMENT
CAUTION: Your bread maker has a short cord as a safety precaution to prevent personal injury or property damage resulting
from pulling, tripping or becoming entangled with the cord. Do not allow children to be near or use this bread maker without
close adult supervision. If you must use a longer cord set or an extension cord when using the bread maker, the cord must be
arranged so it will not drape or hang over the edge of a counter-top, tabletop or surface area where it can be pulled on by children
or tripped over. To prevent electrical shock, personal injury or fire, the electrical rating of the extension cord you use must be the
same or more than the wattage of the bread maker (wattage is stamped on backside of bread maker).
IMPORTANT SAFETY INSTRUCTIONS
This appliance has a polarized plug (one blade is wider than the other). As a safety feature, this plug will fit in a polarized outlet
only one way. If the plug does not fit fully in the outlet, reverse the plug. If it still does not fit, contact a qualified electrician.
Never use with an extension cord unless plug can be fully inserted. Do not attempt to defeat this safety feature.
Your West Bend® Automatic Bread & Dough Maker was designed for use with 120 volt, 60 hz electrical service ONLY. Use of
your bread and dough maker with a converter or transformer will destroy the electronic control and will void your warranty.
L4979 The West Bend Company

IMPORTANT INFORMATION ON PROTECTING ELECTRONIC CONTROL
To protect bread maker’s electronic control against possible damage caused by surges in electrical power line, we recommend using a
surge protector device, available in the electronic department of most discount/hardware stores. Simply plug surge protector into the
electrical outlet, then plug bread maker cord into receptacle of surge protector.
HELPFUL HINTS FOR SUCCESSFUL BREAD BAKING
To ensure great baking results in your West Bend Bread and Dough Maker, please take a few minutes to review the following tips and
read the basic instructions in the front section of this book. Please pay close attention on how to measure ingredients, as this is the
most important step in bread machine baking and the difference between success and failure.
IMPORTANT TIPS TO KEEP IN MIND WHEN MAKING BREAD ARE:
• Make sure knead bar is in pan before adding ingredients. Simply match hole in bar with shape of shaft and slide on. You may
need to twist bar slightly to slide all the way down on shaft.
• Always use fresh ingredients.
• Measure ingredients accurately using correct measuring cups and spoons:
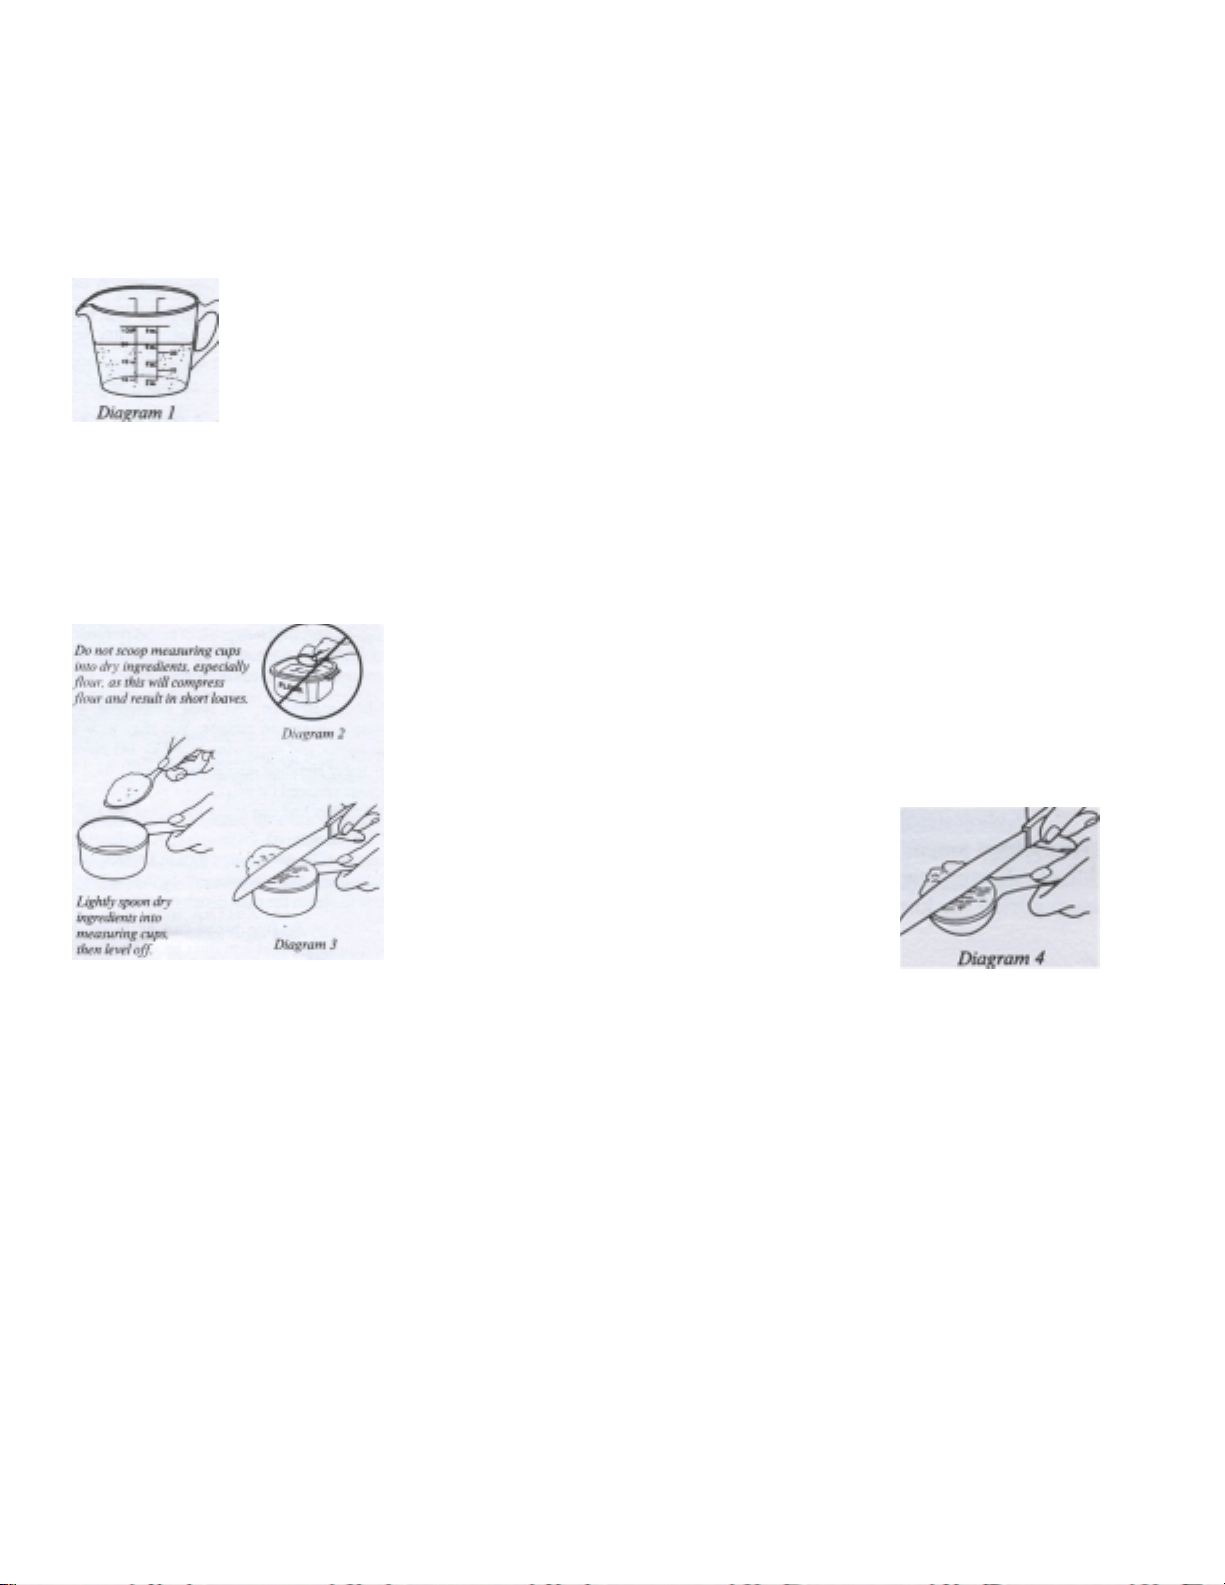
USE see-through glass or plastic measuring cups with graduated markings for liquids. Measure liquids at eye
level for accuracy.
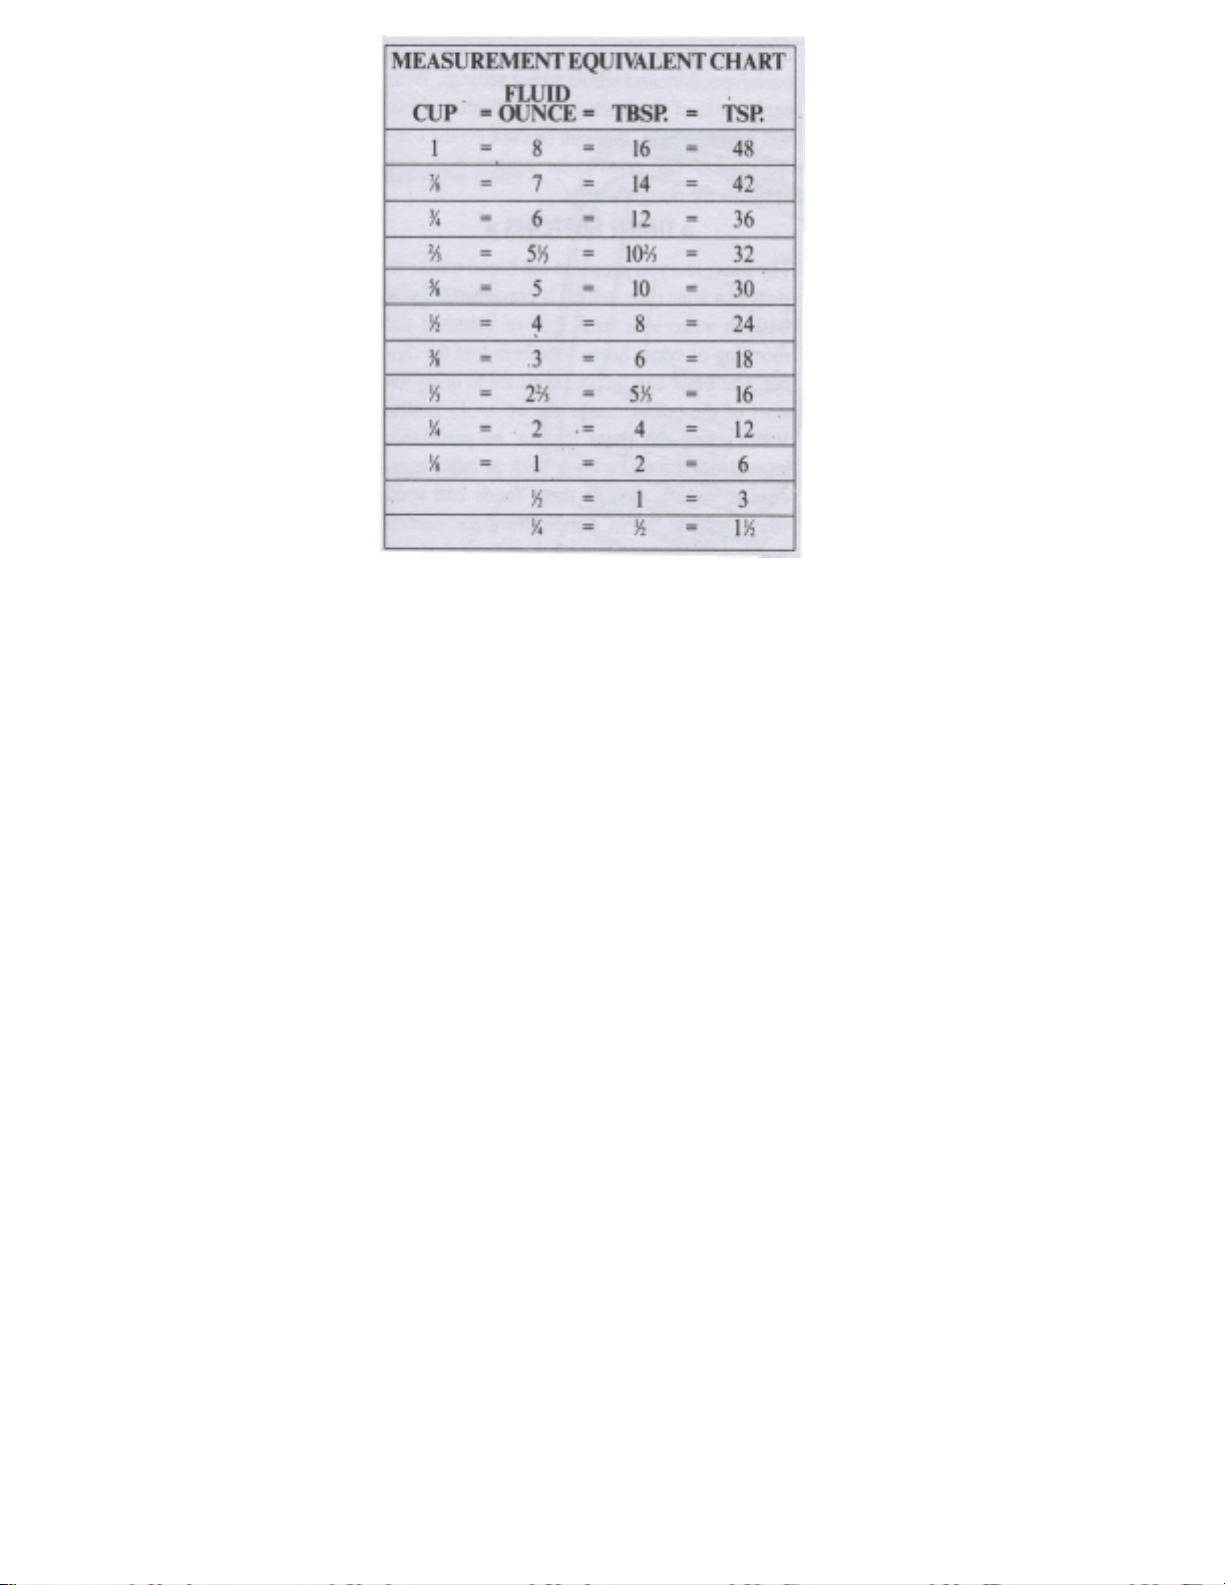
USE set of solid, nesting type measuring cups for dry ingredients. ALWAYS SPOON DRY INGREDIENTS,
especially bread flour, into measuring cups, then level with a knife.
DO NOT SCOOP measuring cups into flour as this will cause dough to be too dry and result in short loaves.
USE set of graduated measuring spoons for smaller quantities of ingredients, measuring level, not rounded or
heaping.
• Add ingredients to pan in this order: 1) all liquid ingredients first including butter or margarine, 2) all dry ingredients, EXCEPT
YEAST, putting salt in one corner of pan to keep away from yeast. 3) level dry ingredients in pan, 4) make a slight well in center
and add yeast.
• Lock pan securely in machine. Simply hold pan with FRONT side facing you and angle back edge of pan into oval shaped
holder to lock hooks into notches. Then push front of pan down to lock in place.
• Make bread and crust color and loaf size selections first, then turn machine on.
• Feel free to check dough during knead cycle for any minor adjustment that may be needed. After 8-10 minutes of kneading,
open cover to look at and touch dough. (Opening cover at this time does not affect performance). Dough should be in a ball
between knead bars and feel a bit sticky. This is perfect and needs no adjustment. If dough is very sticky and clinging to sides or
in one corner of pan, it is too wet and needs flour. Add 1 tablespoon flour at a time until dough forms into a soft ball. If dough is
too dry and separates into 2 balls on knead bars, add lukewarm water, ½ tablespoon to 1 tablespoon at a time until dough becomes
soft and elastic and a bit sticky to the touch. When making any adjustment, always allow flour or water to be blended into dough
thoroughly, about 1 minute, before making any further adjustments.
1

“QUICK START” STEPS FOR MAKING FIRST LOAF OF BREAD
You are probably very anxious to start using your new bread maker without having the time to read this book from cover to cover.
Follow these “Quick Start” steps for making that first loaf of bread, whether using the mix included with your bread maker or one of
the recipes in this book. And while you are enjoying that first slice of freshly baked bread, sit back and read the book to ensure
successful baking results each and every time. It contains very important information on the proper use of your bread maker.
“QUICK START” STEPS FOR USING BREAD MIX INCLUDED WITH BREAD MAKER
Unlock pan from machine by lifting up on front edge. Remove pan. Wash pan and knead bars as recommended in “CLEAN BEFORE
USING” section. Make sure knead bars are positioned correctly on shafts in bottom of pan. See Diagram 8 on page 10.
1. Measure 1¼ cups (10 ounces) lukewarm water in glass or plastic see-through measuring cup. Make sure water level is exactly at the
1¼ cup marking, at “EYE LEVEL”. Pour water into bread pan.
2. Open bag of dry ingredients and pour into pan on top of water. Level ingredients with knife, pushing some into corners of pan.
3. Make a well in center of dry ingredients; add yeast from packet included with mix.
4. Lock pan into bread maker with FRONT side facing you. See Diagram 10 on page 11. Close door. Plug bread maker into electrical
outlet.
5. The bread maker is already preprogrammed for making the bread mix. After the machine is plugged in, indicator arrows will point
to the basic/specialty bread setting, medium crust color and 1½ lb. loaf size. The process time of 3:30 (3 hours, 30 minutes) will
appear in display as this is the time needed to make the bread mix. Press start/stop button to turn machine on. Red on light will glow,
colon between hours and minutes will flash and time will count down in minutes so you always know how much time remains until
bread is done.
As machine advances, an alert will sound during the knead cycle as a reminder to add any ingredients called for in a recipe. Ignore this
alert when using the bread mix included with your machine as no additional ingredients need to be added.
When done, 0:00 will appear in display and audible alert will sound. Turn bread maker off by holding start/stop button down until red
ON light goes out, about 4 seconds. Open door. Using hot pads or oven mitts, carefully lift front edge of bread pan up to unlock then
lift pan out of machine. Shake bread out of pan. Cool on rack 15 to 30 minutes before slicing.
See “Clean After Each Use” section in this book for cleaning pan and knead bar.
“QUICK START” STEPS FOR MAKING A RECIPE IN THIS BOOK
Choose one of the many bread recipes included in this book and follow the basic steps that follow. Either a 1½ or 2 pound loaf of
bread can be made depending on the size loaf desired.
Unlock pan from machine by lifting up along front edge. Remove pan. Wash pan and knead bar as recommended in “Clean Before
Using” section in this book.
1. Read “MEASURING INGREDIENTS ACCURATELY” section in this booklet, as this is VERY IMPORTANT.
2. Add all liquid ingredients to pan first then butter or margarine followed by the dry ingredients, except the yeast. Level dry
ingredients pushing some into the corners of pan. Make a well in center of dry ingredients and add the recommended amount of yeast
for the type being used and loaf size.
3. Lock pan into bread maker with FRONT side facing you. See Diagram 10. Close door. Plug bread maker into electrical outlet.
4. Press bread select button until arrow points to recommended bread setting given in recipe. Next, press crust color button until arrow
points to desired crust color: LIGHT, MEDIUM or DARK. The press loaf size button until arrow points to the size loaf being
prepared, 1½ lb. or 2 lb. The process time will appear in display for the program selected. Press start/stop button to turn machine on.
Red on light will glow, colon between hours and minutes will flash and time will count down in minutes so you always know how
much time remains until bread is done.
As machine advances, an alert will sound during the knead cycle as a reminder to add any ingredients called for in a recipe. If no
additional ingredient(s) need to be added, simply ignore this alert.
When done, 0:00 will appear in display and audible alert will sound. Turn bread maker off by holding start/stop button down until red
ON light goes out, about 4 seconds. Open door. Using hot pads or oven mitts carefully lift front edge of pan up to unlock, then lift pan
out of machine. Shake bread out of pan. Cool on rack 15 to 30 minutes before slicing.
See “Clean After Each Use” section in this book for cleaning pan and knead bar.
2

OTHER TIPS TO KEEP IN MIND WHEN USING YOUR BREAD MAKER
1. DO NOT REMOVE the bread pan or touch any moving parts when bread maker is in operation. If you need to stop the bread
maker during operation, hold the start/stop button down for 4 seconds or until the red ON light goes out.
2 BE SURE to allow adequate ventilation around the bread maker when it is in operation. Keep it out of drafts and direct sunlight and
at least 4 inches away from walls, cabinets and other appliances, especially heating and cooling appliances which can interfere with
the internal bread maker temperatures and affect the loaf of bread being prepared.
3. DO NOT IMMERSE base of bread pan in water or other liquid as this can damage the bearings on the bottom of the pan that turns
the knead bars. See “Clean After Each Use” section for further details.
4. ALWAYS place bread maker on a DRY, STABLE, heatproof countertop or table during use. Since the bread maker contains a
motor, some vibration occurs during the knead cycle.
5. AVOID touching bread maker during the bake cycle as exterior surfaces become hot. ALWAYS use potholders when removing
and handling the bread pan after baking.
6. FOLLOW instructions as given for best results. TH E MOST IMPORTANT STEP IN BREAD MAKING IS TO MEASURE
INGREDIENTS ACCURATELY. See “MEASURING INGREDIENTS ACCURATLEY” section in this booklet.
7. DO NOT EXCEED the ingredient capacity of the bread maker. See “Know Your Ingredients” section in this booklet. Use only
fresh ingredients.
8. ALWAYS ADD INGREDIENTS in the order listed in the recipes. Add liquid ingredients to the bread pan first, the butter or
margarine next, followed by the dry ingredients and finally the yeast in the very center. Before adding the yeast, ALWAYS tap the
pan to settle the dry ingredients, then level off the ingredients, pushing into the corners to prevent liquid from seeping up. Then add
the yeast to the very center of the pan, making a slight well in the center of the dry ingredients. This sequence is very important,
especially when using the delay start timer of your bread maker to prevent over fermentation of the yeast.
9.IN THE EVENT OF A P OWER OUTAGE, the bread maker will turn off and automatically resume where it left off in the cycle if
power is restored within 5 to 10 seconds. If power is not restored in 5 to 10 seconds, the bread maker will remain off when power is
restored. If this occurs, you will need to remove the contents from the bread pan and start over using fresh ingredients. The red ON
light will remain off and the display will reset to the default setting; basic/specialty, medium crust, 1½ lb. loaf, with 3:30 in display.
10. DO NOT COVER bread maker with anything during operation as this can cause malfunction.
11. DO NOT TOUCH control panel buttons after bread maker has been turned ON as this will interrupt the cycle. Turn bread maker
OFF after completion of cycle.
12. DO NOT LEAVE bread make plugged into electrical outlet when not in use to prevent it from being accidentally turned ON.
KNOW YOUR INGREDIENTS
Although bread making seems very basic, it is a science and the proportions of ingredients are critical. Read the following information
to better understand the importance each ingredient plays in the bread making process. Also, always make sure your ingredients are
fresh.
• FLOUR is the main ingredient in making bread. It provides structure and food for the yeast. Several different types of flour
can be used in your bread maker, but DO NOT USE all-purpose flour, cake flour or self-rising flour as poor results will be
obtained. BREAD FLOUR SHOULD be used in your bread maker as it contains more gluten-forming proteins than all-purpose
flour and will provide tall, well formed loaves with good structure. Several different brands of bread flour are available for use in
your bread maker.
• WHOLE WHEAT FLOUR can be used in your bread maker at the whole wheat setting. This flour contains the entire
wheat kernel, including the bran and germ; therefore, breads made with 100% or a high percentage of whole wheat flour will be
lower in height and heavier in texture than bread made with bread flour. The whole wheat setting on your machine has a longer
knead time to better develop the structure of wheat breads for optimum results.
3

• RYE FLOUR can be used in combination with bread flour in the preparation of rye or pumpernickel bread. But, it cannot be
used alone as it does not contain enough protein to develop adequate gluten for structure.
SPECIAL NOTE ON FLOUR
How to make minor adjustments for dough: All flours are affected by growing conditions, milling, storage, humidity and even the
manufacturer. While not visibly different, you may need to make some minor adjustments when using different brands of flour as
well as compensating for the humidity in your area. Always store flour in an airtight container. Store whole grain flours (whole
wheat, rye) in refrigerator to prevent them from becoming rancid.
Measure the amount of flour as directed in each recipe but make any adjustment after the first 8 to 10 minutes of continuous kneading.
Feel free to check the condition of the dough during the knead cycle as this is the only time you can make any minor adjustment:
• Open cover and touch dough. If it feels a little sticky and there is a slight smear under both knead bars, no adjustment is
necessary.
• If dough is very sticky, clinging to the sides of pan or in one corner, and is more like a batter than a dough, add one
tablespoon flour. Allow it to work in before making any further adjustment.
• If dough is dry and the machine seems to be laboring during kneading or the dough is not being kneaded between the two
bars, add one tablespoon lukewarm water at a time. Once again, allow it to work in before making any further adjustments.
• The dough is just right near the end of the kneading cycle when it is soft to the touch, smooth in appearance and just a bit
sticky, leaving a slight residue on your fingers-the feel of perfect dough. The bottom of the bread pan will also be clean of any
dough residue.
• DO NOT EXCEED 4 cups of bread flour for the 2 pound loaf or 3⅓ cups bread flour for the 1½ pound loaf. Breads
containing whole wheat, cereals or oats should not exceed a total of 3½ cups for the 1½ pound loaf or 4½ cups for the 2 pound
loaf.
•
CAUTION: Be careful to avoid knead bars as possible finger pinching could occur
• SUGAR AND OTHER SWEETENERS provide food for the yeast, add height and flavor to the bread and give the crust a
golden color. Types of sweeteners that can be used include sugar, brown sugar, honey, molasses, maple syrup, corn syrup and
fruits, whether dried or fresh. When using a liquid sweetener such as honey or molasses, the total amount of liquid in the recipe
will need to be reduced slightly by the same measurement of liquid sweetener used. A special tip when measuring sticky liquid
sweeteners is to coat the measuring spoon with vegetable oil before measuring. This will help the liquid sweeteners slide right
out.
DO NOT USE ARTIFICIAL SWEETENERS as a substitute for sugar and other natural sweeteners as the yeast will not react
properly and poor results will be obtained.
• MILK enhances flavor and increases the nutritional value of bread. Any type of milk (whole, 2%, 1%, skim, buttermilk or
canned evaporated milk) can be used. Refrigerated milk must always be warmed to 75-85° F before adding to bread pan. Warm
in a glass measuring cup in microwave or in a small pan on top of the range. DO NOT HEAT MILK ABOVE 100° F AS THIS
COULD AFFECT THE YEAST.
• WATER used in combination with dry milk is a good substitute for regular milk and must be used when using the timer
feature as regular milk can spoil when left at room temperature for several hours. Use lukewarm water, about 75-85° F, for best
results. DO NOT USE WATER ABOVE 100° F AS THIS COULD AFFECT THE YEAST.
Using too much liquid can cause the bread to collapse during the bake cycle. During humid weather, slightly less liquid may be
needed, as the flour will absorb moisture from the air. In dry weather, slightly more liquid may be needed as flour can lose
moisture. When you experience a severe change in weather, it is best to check the condition of the dough during the knead cycle
as noted in the FLOUR paragraph for any minor adjustment that may be needed.
Water and milk are mostly interchangeable in recipes. Eliminate dry milk in recipes when substituting milk for water. Check
dough during the knead cycle for any minor adjustments. Slightly more milk may be needed when substituting for water.
• BUTTER, MARGARINE, OTHER FATS and OILS serve several purposes as they tenderize the bread, add flavor and
richness and contribute to the storage life of bread by retaining moisture. An excess of fat, however, can inhibit rising, so
accuracy is critical.
Butter, margarine and solid shortening are interchangeable in recipes. You may wish to cut butter and margarine into four (4)
pieces for faster blending during the knead cycle. Low-fat or fat-free bread can be made by substituting equal amounts of
unsweetened applesauce or plain nonfat yogurt for the amount of fat recommended in the recipe. Watch dough as it kneads for
any minor adjustments, which may be necessary.
4

• EGGS add color, richness and leavening to bread. Use large eggs. No premixing is needed. Egg substitutes can be used in
place of fresh eggs. One egg equals ¼ cup of egg substitute. To reduce cholesterol, you can substitute two (2) egg whites for each
large egg in the recipes without affecting the end result. Watch the dough during the knead cycle for any needed adjustments. A
special tip when using eggs is to run them under warm water for about one minute before cracking, as this helps the egg slide out
of the shell better.
• SALT has several functions in making bread. It inhibits the yeast growth while strengthening the gluten structure to make
the dough more elastic, plus it adds flavor. Use ordinary table salt in your bread maker. Using too little or eliminating the salt
will cause the dough to over-rise. Using too much can prevent the dough from rising as high as it should. “Light” salt can be
used as a substitute for ordinary table salt, providing it contains both potassium chloride and sodium. Use same amount as
recommended for table salt. When adding salt to pan, add to one corner to keep it away from yeast, especially when using timer
as the salt can retard its growth.
• YEAST is a living organism, which, through fermentation, feeds on carbohydrates in flour and sugar to produce carbon
dioxide gas, which makes the bread rise. Active dry, fast rising or bread machine yeast can be used in your bread maker. Use
only the amount stated in the recipe. Using a little more can cause the dough to over-rise and bake into the top of bread maker.
Fast rising yeast and bread machine yeast are virtually the same and interchangeable with one another.
DO NOT USE COMPRESSED CAKE YEAST. Recipes in this book were tested using only active dry, fast rising and bread
machine yeast.
Keep yeast stored in the refrigerator. You may find it handy to purchase yeast in glass jars so as to measure the exact amount
without having to waste any. If using yeast packed in a ¼-ounce foil envelope, it is best to open a fresh envelope every time you
bake. If you save the unused amount from the open envelope, store in a dry, airtight container in the refrigerator. Date the
container and use promptly. Do not mix old and new yeast in a recipe. A ¼-ounce foil envelope of yeast contains 2¼ teaspoons.
ALWAYS MAKE SURE YEAST IS FRESH AND HAS NOT EXPIRED THE “USE B Y “ DATE PRINTED ON THE
JAR OR ENVELOPE.
• VITAL WHEAT GLUTEN is the gluten protein, which has been rinsed from wheat flour and then dried. Vital gluten will
increase the protein content in flour to product a higher loaf of bread with lighter texture. About the only time you may wish to
consider adding vital gluten is for 100% whole wheat bread or recipes containing a high percentage of whole wheat or other
whole grain flours or cereals. As a guideline, add one (1) teaspoon vital gluten per cup of flour used in the recipe. Check the
dough during kneading; you may need to add a little water as the vital gluten absorbs liquid. Vital gluten can be obtained at
most health food stores. Do not use gluten flour, as this contains less protein and is less effective.
Or, to increase the protein content, you can use a large egg as a substitute for vital gluten. Just add it to the liquid in the bottom
of pan and reduce the recommended amount of liquid in recipe by two (2) ounces (¼ cup). Again, check the condition of the
dough during the knead cycle.
• CINNAMON AND GARLIC: Adding too much cinnamon or garlic can affect the texture and size of the loaf. Cinnamon
can break down the structure of the dough, affecting height and texture, and garlic can inhibit the yeast activity. Use only the
amount of cinnamon and garlic recommended in the recipe; don’t be generous.
MEASURING INGREDIENTS: THE KEY TO SUCCESSFUL BREAD MAKING
The most important part of bread making is to MEASURE THE INGREDIENTS PRECISELY AND ACCURATELY. You may
need to adjust your measuring habits, but the rewards for doing so will be great. Follow these very important tips:
• READ the recipe first and organize the ingredients in the order in which they are added to the pan. Many bread disasters
occur because an ingredient was left out or added twice.
• DO NOT EXCEED the ingredient capacity of the bread maker. Use only fresh ingredients.
• ALWAYS ADD INGREDIENTS in the order listed: liquid ingredients first, then butter or margarine, dry ingredients next
and finally yeast in the very center. Before adding yeast, ALWAYS tap the pan to settle dry ingredients into corners of pan to
5
prevent liquid from seeping up. Make a slight well in center of dry ingredients and place the yeast in the well. This sequence is
very important, especially when using the timer to prevent yeast from getting wet before bread making begins.
1. ALWAYS use standard glass or plastic “see-through” liquid measuring cups to measure liquids. Place cup on flat surface and
measure at “eye level”, not at an angle. The liquid level line MUST be right to the measurement marking, not above or below. A
“looks close enough” measurement can spell disaster in bread making.
SPECIAL TIP: Place liquid measuring cup on inside of kitchen cabinet to measure at eye level.
Liquid level must be exact to markings on liquid measuring cups. Too much or too little liquid will affect the
height of the loaf.
2. ALWAYS use standard dry measuring cups (cups that nest together) to measure dry ingredients, especially flour. Dry measuring
cups are those that nest together.
ALWAYS SPOON dry ingredients into the measuring cup, then level with a knife. DO NOT SCOOP measuring cups into dry
ingredients, especially flour, as it compresses the ingredients into the cup and causes the dough to be dry and result in a short loaf. See
Diagrams 2 and 3.
SPECIAL TIP: To lighten flour before measuring, move a spoon through it several times.
All ingredients measured in
measuring spoons must be level, not
rounded or heaping.
3. ALWAYS use standard measuring spoons for ingredients such as yeast, salt, sugar, dry milk and small amounts of honey, molasses
or water. The measurements MUST BE LEVEL, not rounded or heaping as a little difference can affect the bread. See Diagram 4.
DO NOT USE TABLEWARE AS MEASURING SPOONS as these vary in size and will not be accurate.
USING BREAD MIXES IN YOUR BREAD MAKER
Pre-packaged bread mixes can be used in your bread maker. Follow the directions for making a 1½ pound loaf or 2 pound loaf. Use
the basic/specialty bread setting for most mixes unless preparing a 100% whole wheat or natural grain mix, which would require the
whole whe a t bread setting. Add the recommended amount of liquid to the bread pan first, then flour mixture and finally the yeast.
Select desired crust color, loaf size and start the bread maker. The time delay feature can be used with bread mixes providing no
perishable ingredients are used such as milk and eggs, which can spoil when left at room temperature for several hours.
MAKE YOUR OWN MIXES
To save time, money and energy, you can prepare your own mixes and store them in the refrigerator until ready to use. Simply
measure all dry ingredients in the recipes EXCEPT YEAST into a plastic bag or seal-able container. Label the type of bread and loaf
size. When ready to use, let the flour mixture stand at room temperature 15 minutes. Add recommended liquids, then the dry flour
mixture to pan. Level and add yeast to the center. Program and start the bread maker. Use time delay if recipe recommends its use.
6
ADAPTING YOUR FAVORITE BREAD/DOUGH RECIPES
After you have prepared some of the recipes in this book, you may wish to adapt your own conventional bread recipes. Some
experimentation will be required and you will need to check the condition of the dough during the knead cycle for any adjustments
needed. Either use on of the recipes in this book that is similar to your recipe as a guide, or use this formula:
For each cup of flour used in recipe use: For Example, based on the formula to the left using 4 cups of flour start with:
3 ounces liquid, 75-85° F 12 ounces liquid, 75-85° F
½ tablespoon sweetener 2 tablespoons fat
½ teaspoon salt 4 cups of bread flour
½ tablespoon fat (butter/margarine) 1½ teaspoons salt
scant ¾ teaspoon active dry or 2 tablespoons sweetener
½ teaspoon bread machine/fast rise yeast 2 teaspoons active dry yeast or bread machine/fast rise yeast
Add ingredients to pan in recommended sequence: liquids first, then fat, then all dry ingredients except yeast. Level dry ingredients in
pan. Make a slight well and add yeast to well. Program for basic/specialty setting, medium crust and correct loaf size setting. After
8 to 10 minutes of continuous kneading, check the condition of dough. It should be soft, a bit sticky with a slight smear under the
knead bars. If too wet and sticky, add one (1) tablespoon of flour at a time until dough gathers into a ball and does not cling to sides
of pan. If too dry and motor is laboring, add one (1) tablespoon liquid at a time until the dough becomes more pliable. Do not exceed
4 cups of flour for a 2 lb. loaf; 3 to 3⅓ cups of flour are needed for a 1½ lb. loaf to evenly fill the pan.
HIGH ALTITUDE ADJUSTMENT
Reduced air pressure at high altitudes causes yeast gases to expand more rapidly and the dough to rise more quickly. The dough can
rise so much that when it begins to bake, it will collapse due to overstretching of the gluten structure. To slow the rising of the dough
at high altitudes, reduce the amount of yeast by ¼ teaspoon at a time until you find the right amount. You can also reduce the amount
of liquid by 2 to 3 teaspoons. Some experimentation will be needed when using your bread maker at high altitudes. Make notes on
the amount of yeast and liquid used for future reference.
7
8
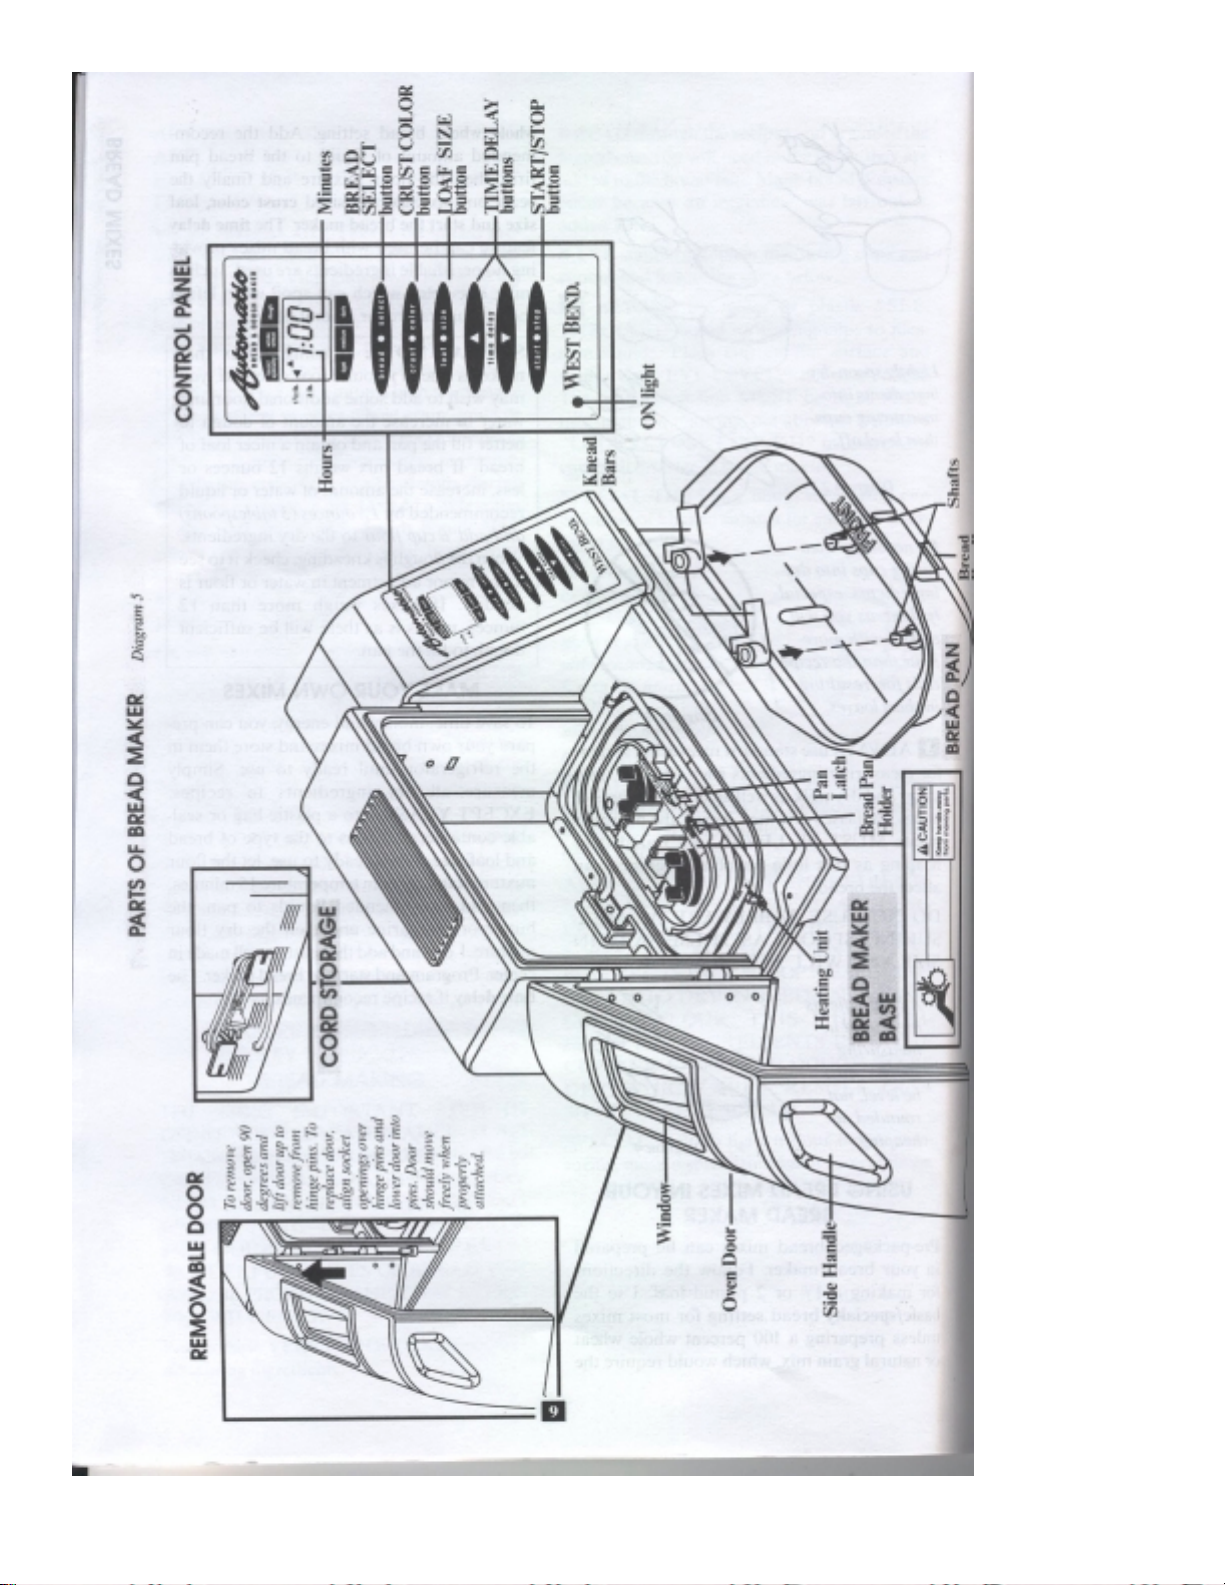
BECOMING FAMILIAR WITH CONTROL PANEL
Before using your bread maker, it is important that you understand how to use the control panel as this is the “brains” of the machine.
Review the following features to better understand what each button is designed to do and the options that are available to you when
using this machine.
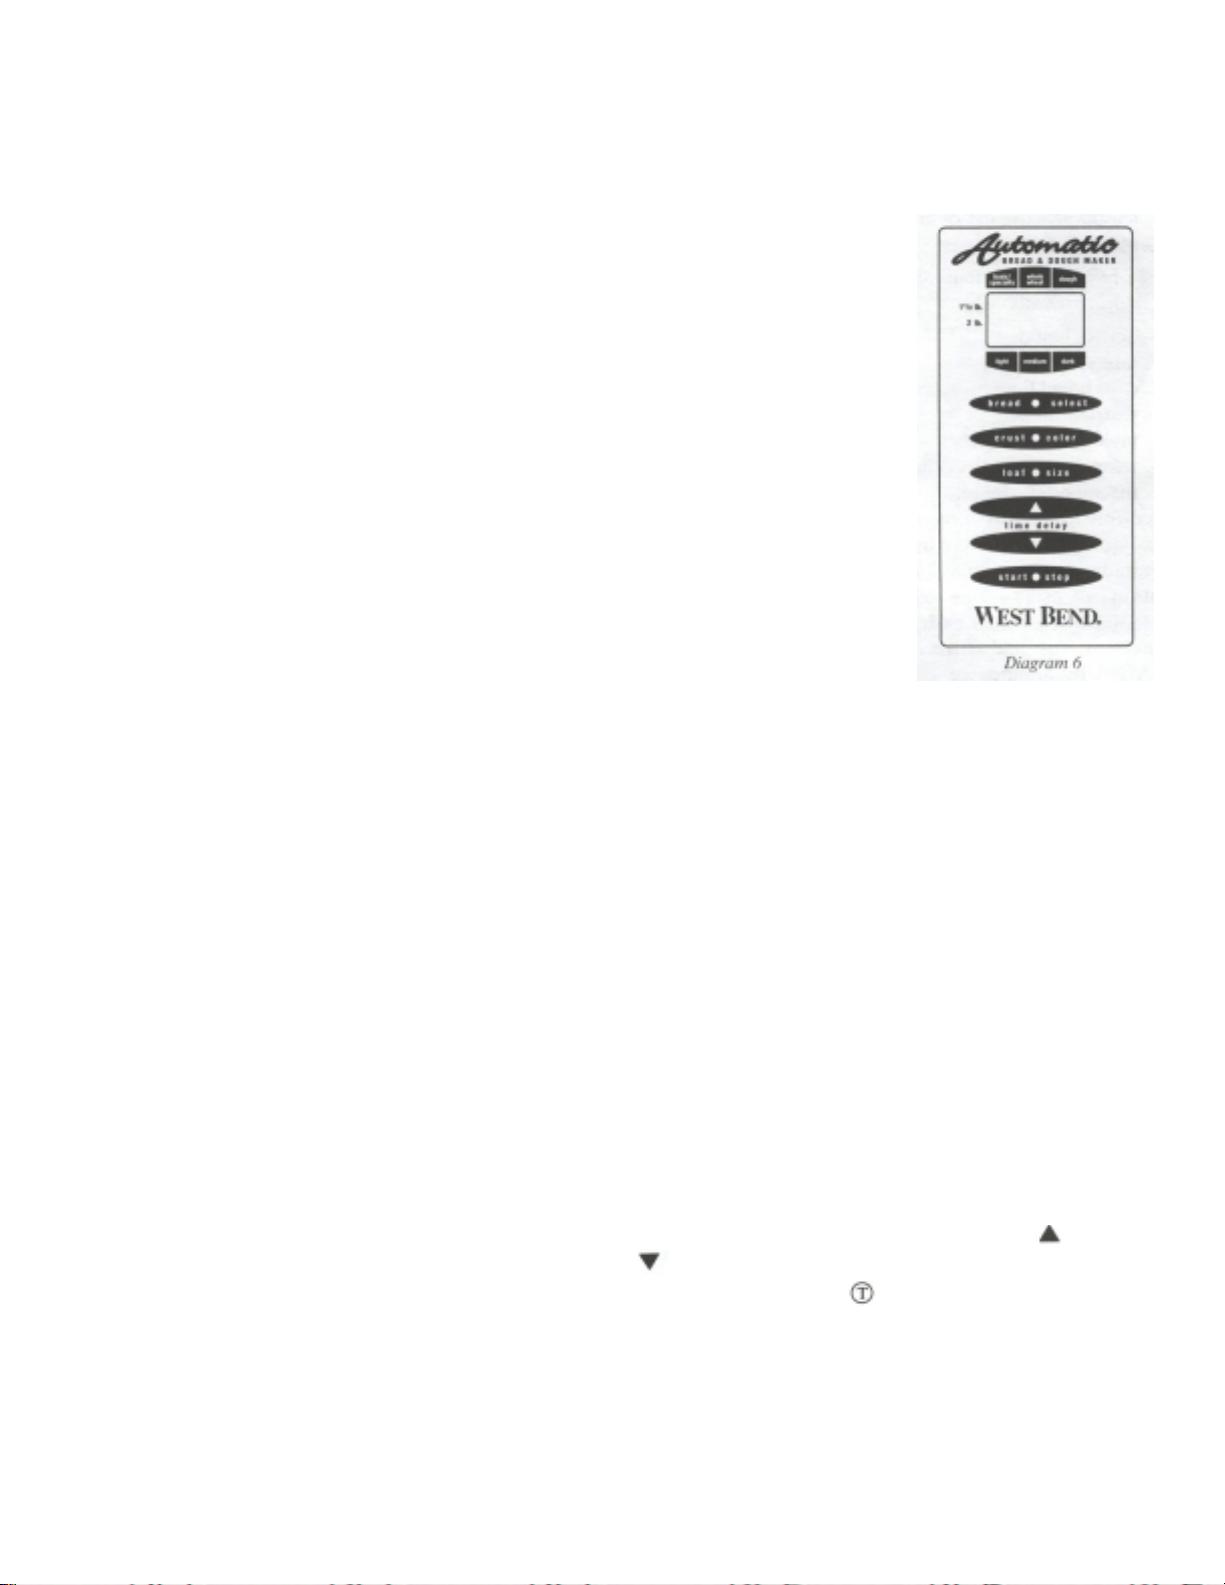
BREAD SELECT BUTTON
The BREAD SELECT button lets you choose two different bread settings as well as a dough setting.
With each press of the BREAD SELECT button, the indicator arrow will point to a bread or dough
setting on the control panel. The time required to complete each also appears in the display as follows:
basic/specialty …………….3:30 (medium crust)
whole whe a t …………………3:40 (medium crust)
dough ……………………...1:40
The basic/specialty setting can be used for almost any bread recipe containing at least 50% bread
flour. If a recipe contains less than 50% bread flour, then use the whole wheat settings as these
settings feature a longer knead cycle, which is beneficial for whole grain flours.
The dough setting is used when you wish to make dough for hand shaping and baking in your own
oven, such as dinner rolls.
When using the basic/specialty, whole wheat and dough settings, an audible alert will sound during
the knead cycle as a reminder to add ingredients, such as nuts, raisins, etc. if recommended in recipe. If
not adding extra ingredients, ignore this alert or use it as a checkpoint to check the condition of the dough for any minor adjustment
that may be necessary.
CRUST COLOR BUTTON
The crust color button lets you choose three different crust colors for yeast bread. With each press of the crust color button, the
indicator arrow will point to light, medium or dark on the control panel. Select the desired crust color you wish for the bread recipe
you are preparing. The crust color button does not apply to the dough setting.
LOAF SIZE BUTTON
The loaf size button lets you select between making 1½ and 2 pound loaves of bread and recipes for both sizes are included in this
book. With each press of the loaf size button, the arrow indicator will alternately point to the 1½ lb. and 2 lb. setting on the control
panel. Selecting the loaf size is important as the programming is different to ensure the optimum results for both sizes. The loaf size
button does not apply to the dough setting.
TIME DELAY BUTTONS
The TIME DELAY buttons let you program the bread maker to start at a later time, which is especially convenient if you wish to
wake up to a fresh loaf of bread in the morning or come home to a fresh loaf for dinner. The timer can be programmed to delay the
start of the bread maker for up to 13 hours at all settings. When using the time delay feature, no perishable ingredients should be
used, such as milk, eggs, cheese, yogurt, etc. as these foods can spoil when held at room temperature for several hours. Simply
prepare the recipe you wish to make, place the bread into the bread maker, program the bread select, crust color and loaf size, then
enter the number of hours and minutes from when you start the bread maker to when you want the bread done. The (up)
delay button will scroll up in 10 minute intervals, whereas the (down)
See “HOW TO USE TIME DELAY” section in this book for more details. The recipes with the
delay mode
.
time delay button will scroll down in 10 minute intervals.
symbol can be used in the time
time
START/STOP BUTTON
Use the start/stop button to turn bread maker on and off. Before starting the machine, you must first program the bread select and
crust color and loaf size if applicable, plus the time delay if being used. To start the bread maker, press start/stop button once.
9

When on, red signal light under the word ON will glow. To turn off, press and hold start/stop button down for about three (3)
seconds or until the red ON light goes out.
Once you have started the bread maker, the colon between hours and minutes will flash and minutes will begin to count down.
When process time elapses, 0:00 will appear in display and audible alert will sound to let you know the bread is done. Turn off by
pressing start/stop button until red light goes out. Remove bread pan using oven mitts and shake loaf out of pan onto cooling rack.
Cool before slicing.
If the bread pan is not removed immediately after baking, machine will automatically go into keep warm mode for up to three (3)
hours to keep bread warm. The red ON light will remain lit during this time. If machine is not turned off during keep warm period,
machine will automatically turn off.
If using dough setting, machine will automatically turn off upon completion of cycle, red light will go out, alert will sound and
display will reset to dough setting. Remove the pan containing the dough and shape/form as desired for conventional baking. Do not
leave pan containing dough inside machine after completion of cycle as dough will continue to rise and could overflow the pan. See
Dough section for more details.
TOO HOT/TOO COLD WARNING
If inside of oven chamber is too hot or too cold for bread making, the word “Hot” or “Col” will appear in display along with alert
sounding to indicate that machine cannot be turned on. You will need to remove pan and allow chamber to cool or warm accordingly.
Typically “Hot” will appear in display when you make consecutive loaves and forget to turn machine off between loaves. Allow
chamber to cool with door open 10 to 15 minutes or until machine can be turned on without warning going off. If “Col” appears in
display, move bread maker to a warmer area for 15 minutes or until machine can be turned on without warning going off. If oven is
too hot, the yeast can be killed; if too cold, the growth of the yeast will be retarded.
CLEAN BEFORE USING
Lift pan up along front edge to unlock from bread maker, then lift out.
SPECIAL NOTE: The bread pan is not immersible and should never be washed in an automatic dishwasher.
Immersing the pan in water can cause damage to the bearings that turns the knead bars. Dishwasher cleaning
can reduce the non-stick qualities of the non-stick finish, causing the bread to stick in the pan.
Only two parts, the bread pan and knead bars, need to be cleaned before making bread. Simply fill bread pan with a small amount of
warm water and dishwashing detergent. The knead bars lift off shafts in bottom of pan. You may need to twist the bars slightly to
remove. Wash the inside of the pan and knead bar with a soft dishcloth or sponge. Empty the bread pan and rinse the inside and knead
bars with warm water and dry with a soft cloth. Do not use any abrasive scouring pads or cleansers on bread pan or knead bar as
damage to the non-stick coating can occur. Wipe the inside of chamber and outside surfaces of machine with a soft damp cloth if
necessary, dry with a soft cloth.
CAUTION: To prevent personal injury or electric shock, do not immerse bread maker base, its cord or plug in water or other liquid.
HOW TO USE—BASIC STEPS IN MAKING BREAD
1. Position knead bars onto shafts in bottom of pan, matching hub shape to shaft shape. Make sure both knead bars are pushed down
onto shafts all the way. You may need to twist bars slightly to drop in place. See
Diagram 8.
2. Add ingredients to pan in order listed in recipe, MAKING SURE, to add any liquid
ingredients first, followed by dry ingredients, then butter or margarine and lastly the
yeast. After the dry ingredients are added to the pan, tap to settle, then level dry
ingredients, pushing some of the dry mixture into the corners of the pan. This will
prevent any liquid from seeping up from the corners. Make a slight well in center of
dry ingredients and add the yeast to the well. This is especially important when using
the time delay to prevent the yeast from getting wet before the bread making process begins.
10
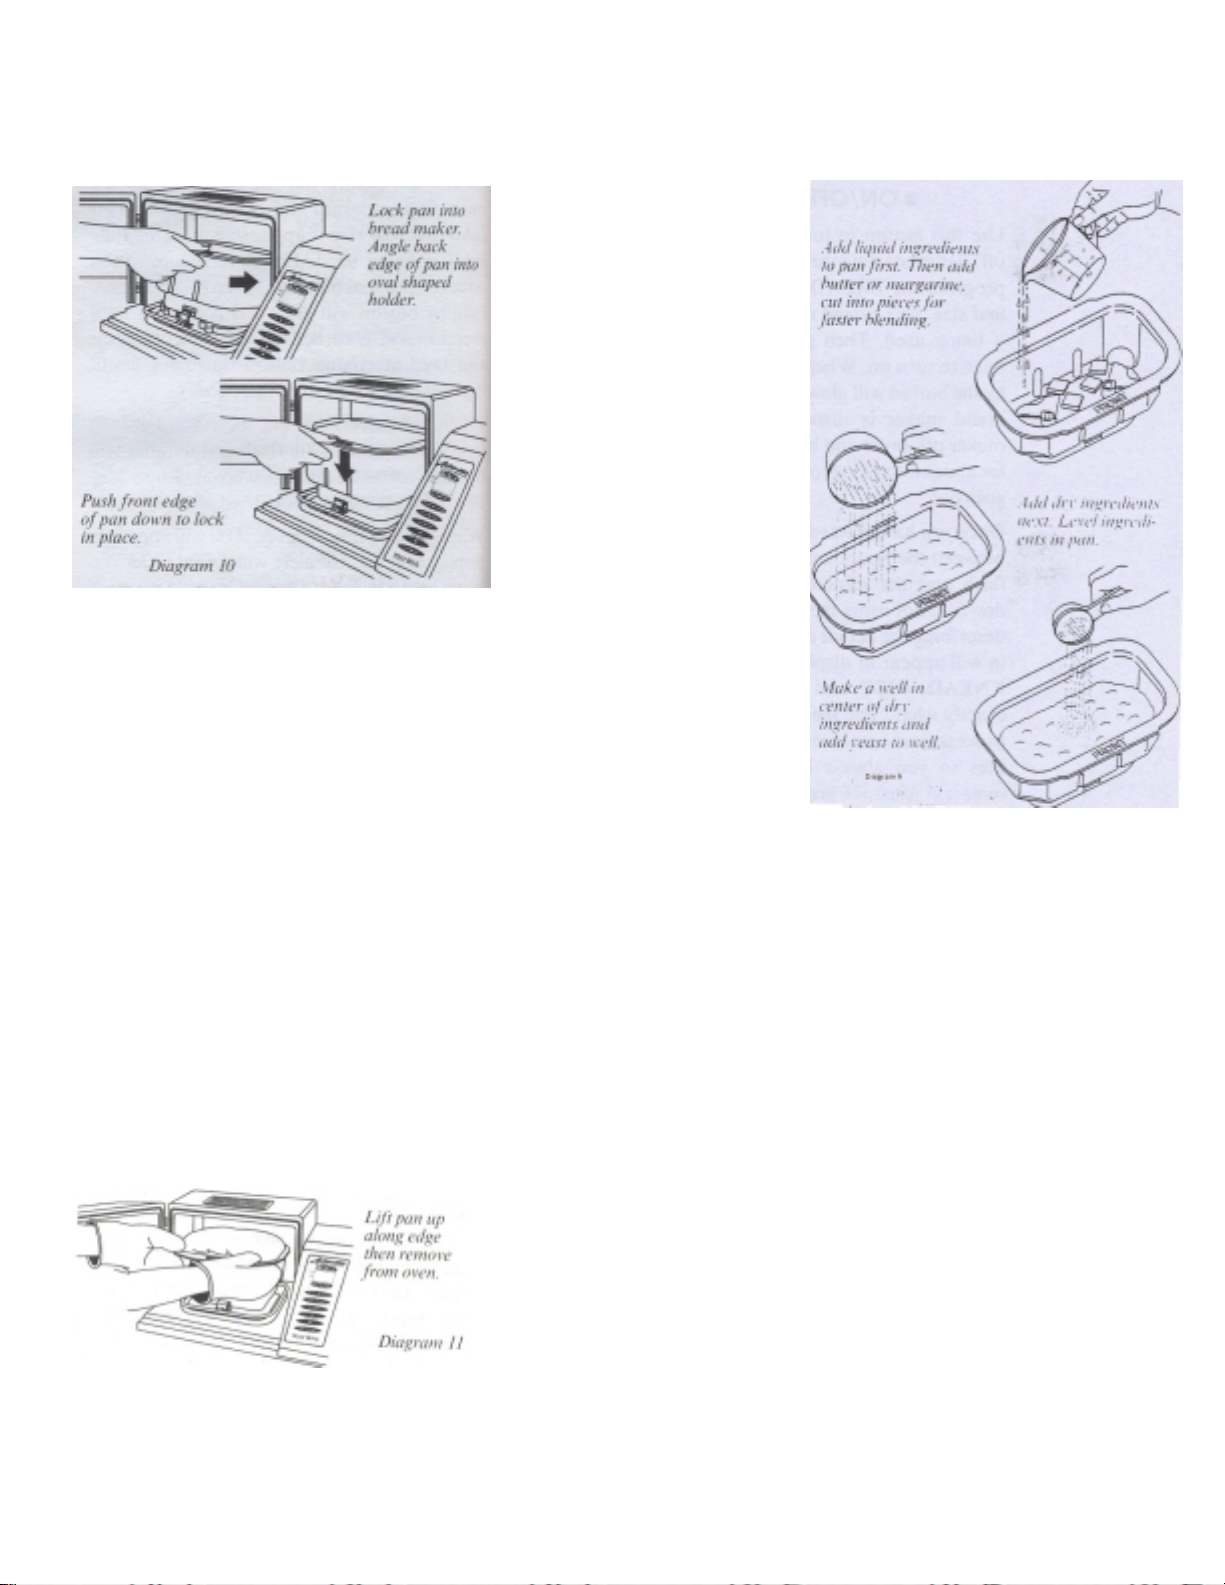
3. Lock pan into bread maker by angling back edge of pan into oval shaped holder. Then firmly push front edge of pan down to lock in
place. See Diagram 10 for more details. If pan does not lock securely, remove pan and reposition until secured. Pan must always be
locked in place for bread maker to function properly. Always make sure the side of pan marked FRONT is positioned to the front.
Close door.
4. Plug bread maker cord into a 120 volt AC electrical outlet ONLY. Press the bread
select button for type of bread being made. Then press crust color button for desired
color, light, medium or dark. Press loaf size button for the size loaf being prepared, 1½
or 2 lb. The total process time for the selections made will appear in display. Program
time delay if being used.
5. Press the start/stop button once to turn machine on. When on, red light will glow and
colon between hours and minutes will flash. After bread maker has been turned on,
programmed setting cannot be changed. To change settings, hold start/stop button down
until red light goes out. Then program control as desired and turn back on. The bread making process will then begin. You may hear
faint clicking sounds which is normal as gentle heat is being provided to warm the pan and ingredients for best results. As cycle
advances, an alert will sound during the knead cycle as a reminder to add any extra ingredients if the recipe recommends doing so.
Simply open door and add the ingredients to the pan on top of dough. The added ingredients will be mixed in during the remainder of
the knead cycle. DO NOT STOP THE MACHINE TO ADD INGREDIENTS. If no ingredients are to be added, simply ignore this
alert when it sounds or use it as a checkpoint to check the condition of the dough to make sure it is right.
CAUTION: To avoid burn injury, do not touch door, glass window, vent or sidewalls of bread maker during the bake cycle, as these
surfaces are hot.
6. When cycle is complete, 0:00 will appear in display and audible alert will sound. Turn bread maker off by holding start/stop button
down until light goes out. The just completed program will reappear in display. Unplug cord from electrical outlet.
It is best to remove bread immediately from machine for a crispier crust. Open door and remove bread pan using oven mitts. To
unlock pan, lift up along front edge to unlock then remove pan from machine. If pan does not unlock easily, tap upward along front
edge of pan until pan unlocks. Handle bread pan carefully as it is hot. See diagram
11.
CAUTION: To avoid burn injury, always use oven mitts to remove the hot bread
pan from bread maker and when removing the baked loaf of bread from pan. Do
not allow oven mitts to touch the hot heating element in bottom of bread maker
when removing pan.
11
Loading...