


Rotary Oven
Instruction Manual
Register this and other West Bend® Housewares products through our website:
www.westbend.com
Important Safeguards............................................................................................... |
2 |
Heat Precautions...................................................................................................... |
2 |
Electricity Precautions .............................................................................................. |
3 |
Precautions For Use Around Children...................................................................... |
4 |
Fire Precautions ....................................................................................................... |
4 |
Using Your Rotary Oven ....................................................................................... |
5-6 |
Suggested Settings & Cooking Times...................................................................... |
7 |
Recipes ................................................................................................................. |
8-9 |
Cooking Tips ............................................................................................................ |
9 |
Cleaning Your Rotary Oven ..................................................................................... |
9 |
Warranty................................................................................................................. |
10 |
SAVE THIS INSTRUCTION MANUAL FOR FUTURE REFERENCE

IMPORTANT SAFEGUARDS
To prevent personal injury or property damage, read and follow all instructions and warnings.
When using electrical appliances, basic safety precautions should always be followed including the following:
•Read all instructions, including these important safeguards and the care and use instructions in this manual.
•Do not use appliance for other than intended use. This device is not intended to heat oil or other liquids.
•The use of accessory attachments not recommended by West Bend® Housewares may cause injuries.
•Do not attempt to repair this appliance yourself.
•Do not store any item on top of the appliance when in operation.
•Do not leave unit unattended while plugged into outlet.
•Do not operate when the appliance is not working properly or when it has been damaged in any manner. For service information see warranty page.
•Use extreme caution when removing baking tray from unit when hot.
•For household use only.
To prevent burns, personal injury or property damage, read and follow all instructions and warnings.
Heat Precautions
•Do not touch hot surfaces. Use handles and knobs where provided. Use hot pads or oven mitts when handling hot surfaces.
•Do not move an appliance containing hot foods.
•Be extremely cautious of steam as you lift the cover.
•Allow unit to cool completely after use before storing.
•Do not touch heating elements as serious burns may result.
•Set baking tray on hot pad, trivet or other heat protective surface. Do not set hot baking tray directly on the counter, table or other surface.
•Do not use this appliance on the stovetop, under the broiler, in the freezer, or in the oven.
2

To prevent electrical shock, personal injury or property damage, read and follow all instructions and warnings.
Electricity Precautions
•To protect against electric shock, do not immerse cord, plugs, or other electric parts in water or other liquids.
•Do not operate any appliance with a damaged cord or plug.
•Do not operate when the appliance is not working properly or when it has been damaged in any manner.
•Do not use outdoors, near a gas or electric burner, in a heated oven, refrigerator or freezer.
•Do not clean with metal scouring pads. Pieces can break off of the pad and touch electrical parts, creating a risk of electrical shock.
•Do not plug cord into wall outlet unless all controls are set to OFF position.
•Always turn control to OFF and unplug the appliance from outlet when not in use and before cleaning. Allow unit to cool completely before putting on or taking off parts and before cleaning.
•Your Rotary Oven has a short cord as a safety precaution to avoid pulling, tripping or entanglement. Position the cord so that it does not hang over the edge of the counter, table or other flat surface area.
•While use of an extension cord is not recommended, if you must use one, make sure the cord has the same or higher wattage as the Rotary Oven (wattage is stamped on the underside of the unit). Position the extension cord so that it does not hang over the edge of the counter, table or other flat surface area.
•Use an electrical outlet that accommodates the polarized plug on the Rotary Oven. On a polarized plug, one blade of the plug is wider than the other. If the plug does not fit fully into the outlet or extension cord, reverse the plug. If the plug still does not fit fully, contact a qualified electrician. Do not alter the plug.
•Do not use an outlet or extension cord if the plug fits loosely or if the outlet or extension cord feels hot.
•Keep the cord away from hot parts of the appliance and hot surfaces during operation.
3

To prevent burns or other personal injuries to children, read and follow all instructions and warnings.
Precautions For Use Around Children
•Always supervise children.
•Do not allow children to operate or be near the Rotary Oven, as the outside surfaces are hot during and after use.
•Do not allow cord to hang over any edge where a child can reach it. Arrange cord to avoid pulling, tripping or entanglement.
To prevent fire, personal injury or property damage, read and follow all instructions and warnings.
Fire Precautions
•Do not use around or near flammable materials. A fire may occur if the Rotary Oven is covered or touching flammable material, including curtains, draperies, walls, and the like, when in operation.
•Do not leave appliance unattended when in use.
•Failure to clean baking tray may result in fire hazard.
•Do not allow any food or other materials to touch heating elements.
•Do not cover baking tray or line Rotary Oven with aluminum foil.
•Remove any plastic or cardboard wrapping from food before placing into Rotary Oven.
•Unplug Rotary Oven and close cover if fire is observed.
SAVE THESE INSTRUCTIONS
4
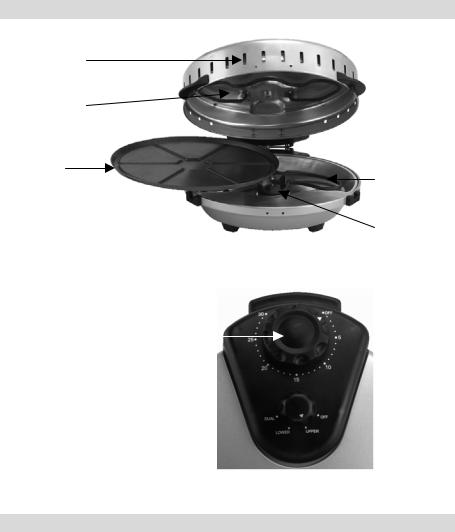
Using Your Rotary Oven
Venting Holes
Upper Heating
Element
Removable
Baking Pan
Timer Selection
Heating Element Power 
Control Switch
(Dual – Lower – Upper
– Off)
Lower
Heating
Element
Drive Shaft
Before First Use
Remove all packing materials. Wash removable baking tray in warm, soapy water. Rinse and dry. Use a soft damp cloth to wipe all packing dust from the Rotary Oven. DO NOT IMMERSE ROTARY OVEN OR CORD IN WATER OR ANY
OTHER LIQUID.
5

Using Your Rotary Oven
1.Place Rotary Oven on a dry, level, heat-resistant surface, away from any edge.
2.Open cover and position baking tray into Rotary Oven aligning the recessed area in center of tray over the rotating drive in center of base. Do NOT operate Rotary Oven without baking tray properly positioned on the rotating drive.
3.Remove food to be cooked from box or wrapper and cardboard tray. Place food onto baking tray, centering and/or spacing evenly, for best results. Do not cover baking tray or line Rotary Oven with aluminum foil.
4.Close cover. With timer and heat selection control at OFF position, plug cord into a 120 volt AC electric outlet ONLY.
5.Select heat source by setting heat selection control at DUAL (upper and lower heat at the same time), UPPER, or LOWER.
6.Set timer for desired cook time. For suggested cooking times refer to cooking guide in this booklet rather than food-packaging recommendations, as most foods will cook faster in the Rotary Oven than in a conventional oven. Remember: When setting timer for less than 15 minutes, you must turn time past the 15 minute mark and then back to the number of minutes you wish to time. This must be done to activate timer and turn appliance on. The baking tray will rotate as the food is cooked. Note: If tray does not rotate, turn timer and heat selection control to “OFF”, unplug from electrical outlet and allow unit to cool completely. DO NOT BLOCK OR INSERT ANY OBJECT INTO VENTING HOLES AS YOU MAY CAUSE HARM TO YOURSELF OR THE APPLIANCE. Using care not to touch heating elements, check to be sure the baking tray is positioned correctly onto rotating drive in bottom of base, food is centered on baking tray and food does not extend beyond the baking tray area. The Rotary Oven does not require preheating.
7.Alert will sound; indicating selected cooking time has elapsed. Turn heat selection control to OFF, open cover and check food for doneness. If additional cooking time is needed, close cover, reset timer to desired time and heat selection control to desired heat setting. To prevent over browning check cooking progress by looking through window in cover. If necessary the cover can be opened to check doneness. When the cover is opened the baking tray will stop rotating. However, as the heating elements will remain hot, foods will continue to cook, therefore, cover should not be left open for extended periods of time. The baking tray will begin rotating again when the cover is closed.
8.When food is done, turn timer to “OFF” if it is not already at “OFF”. Turn heat selection control to “OFF”. Unplug unit from electrical outlet. Open cover. Using a non-metal spatula carefully remove food from baking tray and place onto a serving tray, cooling rack or cutting board. DO NOT CUT PIZZA OR OTHER FOODS ON BAKING TRAY AS SCRATCHING MAY OCCUR.
6

Suggested Settings and Cooking Times
FOOD |
HEAT |
APPROXIMATE |
HEAT |
APPROXIMATE |
|
SETTING |
COOK TIME IN |
SETTING |
COOK TIME IN |
|
1 |
MINUTES |
2 |
MINUTES |
Pizza – |
|
|
|
|
9-12 inch |
Dual |
10-12 |
|
|
Frozen, regular |
|
|
||
crust |
|
|
|
|
Frozen, regular |
Dual |
10-12 |
|
|
crust, extra |
|
|
|
|
toppings |
|
|
|
|
Frozen, self |
Lower |
8-10 |
Dual |
8-10 |
rising |
|
|
|
|
Frozen, stuffed |
Lower |
6-7 |
Dual |
11-13 |
Crust |
|
|
|
|
Fresh/Deli |
Dual |
9-11 |
|
|
Other Foods |
|
|
|
|
Precooked |
Dual |
7 |
|
|
Chicken |
|
|
|
|
Nuggets, frozen |
|
|
|
|
Pizza Rolls |
Dual |
7 |
|
|
Fish Sticks, |
Dual |
6 |
|
|
frozen |
|
|
|
|
Buffalo Wings |
Dual |
10 |
|
|
Hash Brown, |
Dual |
10 |
|
|
patties |
|
|
|
|
Garlic Bread, |
Dual |
5 |
|
|
frozen slices |
|
|
|
|
Cocktail |
Dual |
5 |
|
|
Wieners |
|
|
|
|
Precooked |
Dual |
15 |
|
|
Breakfast |
|
|
|
|
Sausage |
|
|
|
|
|
|
|
|
|
Note: Cooking times and settings are suggestions only. You may find that your personal taste requires longer or different settings. Experiment with the Rotary Oven until you are satisfied with the results.
7

Recipes
Try some of our favorite recipes using the West Bend® Housewares, LLC Rotary Oven that we have included on the following pages to get you started.
NOTE: You must turn the timer past the 15-minute mark and then back to the desired amount of time (if less than 15-minutes) to start machine.
During heating some expansion/contraction sounds may be noted which is normal.
|
|
Quesadilla Appetizers |
6 |
|
8-inch flour tortillas |
1 |
Lb. |
Ground beef |
1.25 |
Oz. |
Package taco seasoning |
|
|
|
2¼ |
Oz. |
Can, sliced black olives, drained |
1 |
Cup |
Shredded cheddar cheese |
1 |
Cup |
Shredded Monterey Jack cheese |
1.Prepare meat filling following directions on taco seasoning package.
2.Spread tortilla with desired amount of meat filling. Top with black olives, shredded cheddar and Monterey Jack cheese.
3.Place prepared Quesadilla onto baking tray. Close cover; set heat selection knob at Dual and timer for 3 minutes. Cook until meat is bubbly and cheese is melted.
4.Set time and heat selection knob to OFF position, unplug from electrical outlet. Open cover. Using a spatula carefully remove food from baking tray and place on cutting board. Using a knife cut each Quesadilla into 8 wedges. Place food onto serving platter.
Mini Rueben Appetizers
Loaf, cocktail rye bread
Sauerkraut, drained
Sliced dried corned beef.
Thousand Island dressing
Shredded Swiss cheese
1.Spread 1 side of each slice of rye bread with approximately 1 tablespoon Thousand Island dressing. Top each slice with desired amount of dried corned beef, sauerkraut and Swiss cheese.
2.Place each Reuben onto baking tray. Close cover. Set heat selection knob at Lower and timer for 3 minutes. Set heat selection knob to Upper and set timer for 3 minutes. Cook until heated through and nicely browned.
3.Set timer and heat selection knob to OFF, unplug from electrical outlet. Open cover. Using a spatula carefully remove each Reuben from baking tray and place onto serving plate.
8

Mini Apple Pies
Refrigerated pie crust
Apple pie filling
Powdered sugar frosting
1.With piecrust at room temperature, lay crust flat onto cutting board and cut each crust into eighths (⅛). Place approximately 1-tablespoon apple pie filling in center of each crust section. Fold ends and sides of pie crust over filling, sealing edges.
2.Place onto baking tray. Close cover. Set heat selection to Upper and timer for 3 minutes. Then set to Dual for 2-3 minutes of additional cooking. Cook until heated through and nicely browned.
3.Set timer and heat selection knob to OFF, unplug from electrical outlet. Open cover. Using a spatula carefully remove pies from baking tray and place onto cooling rack. Drizzle with frosting while warm. Place onto serving tray.
Cooking Tips
1.There are some instances where over cooking a pizza will cause the rising crust to raise so high it touches the upper heating element, causing the crust and some of the toppings to burn. Constant monitoring when cooking is always needed but especially critical on self-rising crust pizzas.
2.Suggested cooking times and heat selections are to be used as a guide only. Experiment with cooking times and heat selections for maximum results and your preferred doneness.
3.Rotary Oven will not operate unless timer is set. Timer must be turned past the 15-minute mark for Rotary oven to begin cooking and then back to desired amount of time if less than 15-minutes.
4.Some snack foods require turning for even and thorough heating.
Cleaning Your Rotary Oven
DO NOT ATTEMPT TO CLEAN ROTARY OVEN UNLESS COMPLETELY COOLED.
1.Turn all control settings to “OFF”. Unplug unit from electrical outlet.
2.Baking tray is immersible and can be washed in warm, soapy water. Rinse and dry thoroughly.
3.Rotary Oven and cord are not immersible. Use a soft damp cloth to clean interior and exterior of appliance.
Do not remove any components from appliance except for baking tray. Some natural discoloration on interior on appliance will occur – this is normal.
9

Product Warranty
Appliance 1 Year Limited Warranty
West Bend® Housewares, LLC warrants this appliance from failures in the material and workmanship for 1 year from the date of original purchase, provided the appliance is operated and maintained in conformity with the West Bend® Housewares, LLC Instruction Manual. Any failed part of the appliance will be repaired or replaced without charge at West Bend® Housewares, LLC discretion. This warranty applies to household use only.
The West Bend® Housewares, LLC warranty does not cover any damage, including discoloration, to any non-stick surface of the appliance. The West Bend® Housewares, LLC warranty is null and void, as determined solely by West Bend® Housewares, LLC, if the appliance is damaged through accident, misuse or abuse, scratching, overheating, or if the appliance is altered in any way or if used outside of a household setting.
This warranty gives you specific legal rights. You may also have other rights, which may vary from state to state.
THIS WARRANTY IS IN LIEU OF ALL IMPLIED WARRANTIES, INCLUDING WARRANTIES OF MERCHANTABILITY, FITNESS FOR A PARTICULAR PURPOSE, PERFORMANCE, OR OTHERWISE, WHICH ARE HEREBY EXCLUDED. IN NO EVENT SHALL WEST BEND® HOUSEWARES, LLC BE LIABLE FOR ANY DAMAGES, WHETHER DIRECT, IMMEDIATE, INCIDENTAL, FORESEEABLE, CONSEQUENTIAL, OR SPECIAL, ARISING OUT OF OR IN CONNECTION WITH ITS APPLIANCE.
If you think the appliance has failed or requires service within its warranty period, return it to the original place of purchase. For further details please contact the West Bend® Housewares Customer Service Department at (262) 334-6949 or e-mail us at housewares@westbend.com. Return shipping fees are non-refundable. Hand-written receipts are not accepted. West Bend Housewares is not responsible for returns lost in transit.
Valid only in USA and Canada
Replacement Parts
Replacement parts may be ordered direct from West Bend® Housewares, LLC by ordering online at www.westbend.com: Replacement Parts. Or you may call or e-mail the service department at the number/e-mail address listed above, or by writing to us at:
West Bend Housewares, LLC
Attn: Customer Service
P.O. Box 2780
West Bend, WI 53095
Be sure to include the catalog/model number of your appliance (located on the bottom/back of the unit) and a description and quantity of the part you wish to order. Along with this include your name, mailing address, Visa/MasterCard number, expiration date and the name as it appears on the card. Checks can be made payable to West Bend Housewares, LLC. Call Customer Service to obtain purchase amount. Your state’s sales tax and a shipping/processing fee will be added to your total charge. Please allow two (2) weeks for delivery.
This manual contains important and helpful information regarding the safe use and care of your new West Bend® Housewares, LLC product. For future reference, attach dated sales receipt for warranty proof of purchase and record the following information:
Date purchased or received as gift: ______________________________________________________
Where purchased and price, if known: ____________________________________________________
Item Number and Date Code (shown bottom/back of product): _____________________________________
10
L5558B 08/05 West Bend® Housewares, LLC. |
A Focus Products Group Company Printed in China |
 Loading...