


 Loading...
Video Colposcope
Directions for Use
REF 88000A/88001A/89000A/88007/89001A/88007/88002A/88004A/88006A/89006A

Video Colposcope
Directions for Use
REF 88000A/88001A/89000A/88007/89001A/88007/88002A/88004A/88006A/89006A

ii |
Welch Allyn Video Colposcope |
Copyright 2005 Welch Allyn. All rights are reserved. No one is permitted to reproduce or duplicate, in any form, this manual or any part thereof without permission from Welch Allyn.
Welch Allyn assumes no responsibility for any injury to anyone, or for any illegal or improper use of the product, that may result from failure to use this product in accordance with the instructions, cautions, warnings, or statement of intended use published in this manual.
Welch Allyn® is a registered trademark of Welch Allyn.
For information about any Welch Allyn product, call Welch Allyn Technical Support
:
USA |
+1 800 535 6663 |
Australia |
+61 2 9638 3000 |
|
|
+1 315 685 4560 |
|
|
|
Canada |
+1 800 561 8797 |
China |
+86 |
21 6327 9631 |
European Call Center |
+353 46 90 67790 |
France |
+33 |
1 60 09 33 66 |
Germany |
+49 7477 9271 70 |
Japan |
+81 |
3 3219 0071 |
Latin America |
+1 305 669 9003 |
Netherlands |
+31 |
157 505 000 |
Singapore |
+65 6419 8100 |
South Africa |
+27 |
11 777 7555 |
United Kingdom |
+44 207 365 6780 |
Sweden |
+46 |
85 853 6551 |
Manual Part Number 880324 Ver. C
Welch Allyn
4341 State Street Road
Skaneateles Falls, NY 13153 USA
www.welchallyn.com
Printed in USA

iii
Contents
1 - Introduction . . . . . . . . . . . . . . . . . . . . . . . . . . . . . . . . . . . . . . . . . . . . . 1
Indications For Use . . . . . . . . . . . . . . . . . . . . . . . . . . . . . . . . . . . . . . . . . . . . . . . . 1
Symbols . . . . . . . . . . . . . . . . . . . . . . . . . . . . . . . . . . . . . . . . . . . . . . . . . . . . . . . . 1
Warnings and Cautions. . . . . . . . . . . . . . . . . . . . . . . . . . . . . . . . . . . . . . . . . . . . . 2
Warnings . . . . . . . . . . . . . . . . . . . . . . . . . . . . . . . . . . . . . . . . . . . . . . . . . . . . 2
Cautions . . . . . . . . . . . . . . . . . . . . . . . . . . . . . . . . . . . . . . . . . . . . . . . . . . . . . 3
2 - Components . . . . . . . . . . . . . . . . . . . . . . . . . . . . . . . . . . . . . . . . . . . . 5
Video Colposcope . . . . . . . . . . . . . . . . . . . . . . . . . . . . . . . . . . . . . . . . . . . . . . . . . 5
Front View. . . . . . . . . . . . . . . . . . . . . . . . . . . . . . . . . . . . . . . . . . . . . . . . . . . . . . . 7
Side Views . . . . . . . . . . . . . . . . . . . . . . . . . . . . . . . . . . . . . . . . . . . . . . . . . . . . . . 8
Back View . . . . . . . . . . . . . . . . . . . . . . . . . . . . . . . . . . . . . . . . . . . . . . . . . . . . . . . 9
Bottom View . . . . . . . . . . . . . . . . . . . . . . . . . . . . . . . . . . . . . . . . . . . . . . . . . . . . . 9
Vertical Stand . . . . . . . . . . . . . . . . . . . . . . . . . . . . . . . . . . . . . . . . . . . . . . . . . . . 10
Swing Arm Stand . . . . . . . . . . . . . . . . . . . . . . . . . . . . . . . . . . . . . . . . . . . . . . . . 10
Monitor . . . . . . . . . . . . . . . . . . . . . . . . . . . . . . . . . . . . . . . . . . . . . . . . . . . . . . . . 11
Printer . . . . . . . . . . . . . . . . . . . . . . . . . . . . . . . . . . . . . . . . . . . . . . . . . . . . . . . . . 12
3 - Connections and Assembly . . . . . . . . . . . . . . . . . . . . . . . . . . . . . . . 13
Connecting Video Colposcope with Monitor . . . . . . . . . . . . . . . . . . . . . . . . . . . 13 Connecting Video Colposcope with Optional VCR/Video Printer . . . . . . . . . . . . 14 Assembly . . . . . . . . . . . . . . . . . . . . . . . . . . . . . . . . . . . . . . . . . . . . . . . . . . . . . . 15 General Precautions . . . . . . . . . . . . . . . . . . . . . . . . . . . . . . . . . . . . . . . . . . . 15 Video Colposcope. . . . . . . . . . . . . . . . . . . . . . . . . . . . . . . . . . . . . . . . . . . . . 15 Vertical Stand Assembly. . . . . . . . . . . . . . . . . . . . . . . . . . . . . . . . . . . . . . . . 16 Swing Arm Stand Assembly. . . . . . . . . . . . . . . . . . . . . . . . . . . . . . . . . . . . . 16 Setting Up Video Colposcope. . . . . . . . . . . . . . . . . . . . . . . . . . . . . . . . . . . . 18
4 - Operation . . . . . . . . . . . . . . . . . . . . . . . . . . . . . . . . . . . . . . . . . . . . . . 19
Power Switch . . . . . . . . . . . . . . . . . . . . . . . . . . . . . . . . . . . . . . . . . . . . . . . . . . . 19
Lamp Ignition . . . . . . . . . . . . . . . . . . . . . . . . . . . . . . . . . . . . . . . . . . . . . . . . . . . 19
Focus and Zoom Controls. . . . . . . . . . . . . . . . . . . . . . . . . . . . . . . . . . . . . . . . . . 19
Mag Index Control . . . . . . . . . . . . . . . . . . . . . . . . . . . . . . . . . . . . . . . . . . . . . . . 20
Green Filter Control . . . . . . . . . . . . . . . . . . . . . . . . . . . . . . . . . . . . . . . . . . . . . . 20
Polarization Filter Control . . . . . . . . . . . . . . . . . . . . . . . . . . . . . . . . . . . . . . . . . . 20
Illumination Beam Director . . . . . . . . . . . . . . . . . . . . . . . . . . . . . . . . . . . . . . . . . 20
Vertical Height Adjustment Ring (Vertical Colposcope Model Only) . . . . . . . . . 21
Swing Arm Height Adjustment (Swing Arm Colposcope Model Only) . . . . . . . 21
Positioning Video Colposcope. . . . . . . . . . . . . . . . . . . . . . . . . . . . . . . . . . . . . . . 21
iv |
Contents |
Welch Allyn Video Colposcope |
Remote Video Functions. . . . . . . . . . . . . . . . . . . . . . . . . . . . . . . . . . . . . . . . . . . 21
5 - Maintenance . . . . . . . . . . . . . . . . . . . . . . . . . . . . . . . . . . . . . . . . . . . 23
Disinfecting Solutions . . . . . . . . . . . . . . . . . . . . . . . . . . . . . . . . . . . . . . . . . . . . . 23
Video Colposcope Cleaning . . . . . . . . . . . . . . . . . . . . . . . . . . . . . . . . . . . . . . . . 23
Lens Cleaning . . . . . . . . . . . . . . . . . . . . . . . . . . . . . . . . . . . . . . . . . . . . . . . . . . . 23
Camera Lens . . . . . . . . . . . . . . . . . . . . . . . . . . . . . . . . . . . . . . . . . . . . . . . . 23
Illumination Beam Director Lens . . . . . . . . . . . . . . . . . . . . . . . . . . . . . . . . . 24
Replacing Lamp . . . . . . . . . . . . . . . . . . . . . . . . . . . . . . . . . . . . . . . . . . . . . . . . . 24
Replacing Fuses . . . . . . . . . . . . . . . . . . . . . . . . . . . . . . . . . . . . . . . . . . . . . . . . . 25
Troubleshooting . . . . . . . . . . . . . . . . . . . . . . . . . . . . . . . . . . . . . . . . . . . . . . . . . 27
6 - Specifications . . . . . . . . . . . . . . . . . . . . . . . . . . . . . . . . . . . . . . . . . . 29
Video Colposcope . . . . . . . . . . . . . . . . . . . . . . . . . . . . . . . . . . . . . . . . . . . . . . . . 29
Video Monitor . . . . . . . . . . . . . . . . . . . . . . . . . . . . . . . . . . . . . . . . . . . . . . . . . . . 30
Agency Approvals . . . . . . . . . . . . . . . . . . . . . . . . . . . . . . . . . . . . . . . . . . . . . . . . 31
Guidance and Manufacturer’s Declaration . . . . . . . . . . . . . . . . . . . . . . . . . . . . . 32
Emissions and Immunity Information . . . . . . . . . . . . . . . . . . . . . . . . . . . . . 32
7 - Service . . . . . . . . . . . . . . . . . . . . . . . . . . . . . . . . . . . . . . . . . . . . . . . . 37
Technical Assistance . . . . . . . . . . . . . . . . . . . . . . . . . . . . . . . . . . . . . . . . . . 37
Service Manual/Spare Parts . . . . . . . . . . . . . . . . . . . . . . . . . . . . . . . . . . . . . 37
Warranty . . . . . . . . . . . . . . . . . . . . . . . . . . . . . . . . . . . . . . . . . . . . . . . . . 39
1
1 Introduction
Thank you for purchasing the Welch Allyn Video Colposcope. Follow the operation and maintenance instructions found in this manual and your Video Colposcope will provide you with many years of reliable service. Please read these instructions thoroughly before attempting to use your new Video Colposcope.
IMPORTANT: The material outlined in this manual should be reviewed and understood prior to operation of the equipment.
Indications For Use
For examination of the tissues of the vagina, cervix, and external genitalia, to investigate, by means of magnification, abnormal cervical cytology or suspicious lesions of the lower female genital tract. Also used for corresponding biopsy and treatment, when indicated.
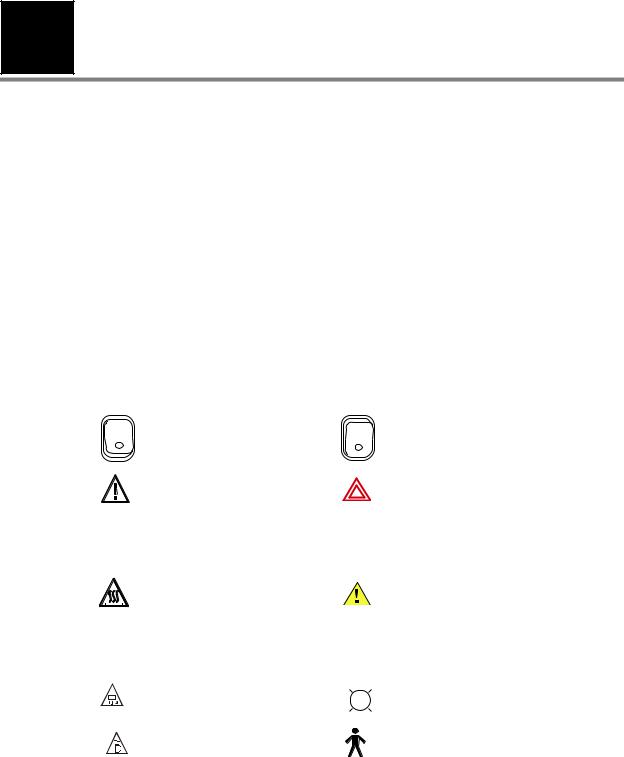
Symbols
|
|
|
|
|
|
On: Power: Connects to the |
|
|
|
Off: Power: Disconnects from the |
||
|
|
|
|
|
|
low voltage supply. |
|
|
|
low voltage supply. |
||
|
|
|
|
|||||||||
|
|
|
|
|
|
|
||||||
|
|
|
|
|
|
Attention: Consult user's |
|
|
|
Warning: A warning statement in |
||
|
|
|
|
|
|
manual for additional |
|
|
|
this manual identifies a condition or |
||
|
|
|
|
|
|
information. |
|
|
|
practice, which if not corrected or |
||
|
|
|
|
|
|
|
|
|
|
|
|
discontinued immediately, could |
|
|
|
|
|
|
|
|
|
|
|
|
lead to patient injury, illness, or |
|
|
|
|
|
|
|
|
|
|
|
|
death. |
|
|
|
|
|
|
High temperatures |
|
|
|
Caution: A caution statement in |
||
|
|
|
|
|
|
|
|
|
|
|
|
this manual identifies a condition or |
|
|
|
|
|
|
|
|
|
|
|
|
practice, which if not corrected or |
|
|
|
|
|
|
|
|
|
|
|
|
|
|
|
|
|
|
|
|
|
|
|
|
|
discontinued immediately, could |
|
|
|
|
|
|
|
|
|
|
|
|
lead to equipment failure, |
|
|
|
|
|
|
|
|
|
|
|
|
equipment damage, or data loss. |
|
|
|
|
|
|
Risk of fire. Replace fuses as |
|
|
|
High-intensity light |
||
|
|
|
|
|
|
|||||||
|
|
|
|
|
|
|||||||
|
|
|
|
|
|
marked. |
|
|
|
|
|
|
|
|
|
|
|
|
|
|
|
|
|
|
|
|
|
|
|
|
|
|
|
|||||
|
|
|
|
|
|
Power supply of unit is |
|
|
|
Type B Equipment |
||
|
|
|
|
|
|
|
|
|
||||
|
|
|
|
|
|
|
|
|
||||
|
|
|
|
|
|
energized whenever power |
|
|
|
|
||
|
|
|
|
|
|
|
|
|
|
|||
|
|
|
|
|
|
|
|
|||||
|
|
|
|
|
|
cord is plugged in. |
|
|
|
|
||

2 |
Introduction |
Welch Allyn Video Colposcope |
Warnings and Cautions
Familiarize all operating personnel with the general safety information in this summary. Specific warnings and cautions are also found throughout this manual.
Warnings
A warning statement in this manual identifies a condition or practice, which if not corrected or discontinued immediately, could lead to patient injury, illness, or death.
WARNING Users of this equipment should be thoroughly trained in the appropriate medical procedures. Furthermore, they should take the time to read and understand these instructions before performing any procedure. They should also read and understand the instructions for any other equipment used in conjunction with the Video Colposcope (i.e. electrosurgical generators). Failure to do so may result in injury to the patient and/or damage to the Video Colposcope.
WARNING The Video Colposcope should not be operated in the presence of flammable or explosive gases (i.e., anesthetics) or chemicals, or installed in areas where these materials are commonly used.
WARNING Keep all liquids away from electrical equipment to avoid the possibility of shock and instrument damage.
WARNING The lamp is extremely bright. DO NOT stare directly into illumination lens when the lamp is lit.
WARNING Video Colposcope user should adhere to the operating conditions found in this manual. Otherwise, instrument damage may occur and/or operator/ patient safety may be compromised.
WARNING All signal input and output (I/O) connectors are intended for connection to only peripheral devices (example: monitor, video printer, VCR, PC, DV Converter) that are in compliance with IEC 60601-1 (General Requirements for Safety, Medical Electrical Equipment) or other IEC standards (for example IEC 60950, Information Technology Equipment - Safety) as appropriate to the nature of the peripheral device. Connecting additional peripherals to the Video Colposcope may increase the risk associated with chassis or patient leakage currents. To maintain operator and patient safety, the User should consider the system leakage current requirements of IEC 60601-1-1 (Medical Electrical Equipment, Safety Requirements for Medical Electrical Systems). The user should measure leakage currents accordingly to confirm that no electric shock hazard exists. An isolation transformer that is in compliance with IEC 60601-1 used to power the additional peripherals may be used to control the system leakage current to comply with the requirements of IEC 60601-1-1.
WARNING If peripheral devices (example: monitor, video printer, VCR ,other) do not comply with IEC 60601-1-1 (Medical Electrical Equipment, Safety Requirements for Medical Electrical systems), they must be kept out of the patient area (6 feet minimum from patient).
WARNING DO NOT use a converter adapter that will convert the three-prong AC plug to a two-prong line plug. The power supply in the Video Colposcope will not be properly grounded and electric shock might result.

Directions for Use |
Introduction |
3 |
WARNING For safety, the Video Colposcope should only be coupled to a grounded 110-120 VAC hospital-grade outlet (220 - 240 volt, 50 cycle international).
WARNING The lamp operates at a high temperature. DO NOT attempt to remove the lamp before allowing it to cool. Allow at least five minutes for the lamp to cool before replacing. Replace with Welch Allyn lamp #09800-U only.
Cautions
A caution statement in this manual identifies a condition or practice, which if not corrected or discontinued immediately, could lead to equipment failure, equipment damage, or data loss.
Caution Federal law restricts sale of this device to, or to the order of, a physician or other appropriately licensed medical professional.
Caution Occasionally inspect the power cord for signs of cuts, abrasions or dents.
Caution The Video Colposcope should never be stored or operated in areas where it could get wet or could be exposed to any environmental conditions like extreme temperature or humidity, direct sunlight, dust, etc.
Caution All service to the Video Colposcope must be performed by Welch Allyn or by an authorized repair center.
Caution There are no user servicable parts (other than the lamp and fuses) in this unit or in its accessories. Any attempt to disassemble and/or repair this unit will result in voiding of the warranty.
Caution The Video Colposcope is cooled via a fan located in the back of the unit. The fan draws air in from beneath the Video Colposcope and exhausts the air out the back of the Video Colposcope. To avoid overheating, verify that the unit is no less than 6" from a wall.
Caution Do not clean illumination lens with alcohol. Do not touch optical or illumination lenses except as described in Maintenance section of this manual.
Caution The colposcope can be damaged if the unit is transported while holding the handle. The unit should be transported by grasping the pole.
Caution Do not sterilize.
Caution Do not spray or allow solution to drip into the air vents.
Caution Do not immerse any part of the unit in cleaning solutions.
4 |
Introduction |
Welch Allyn Video Colposcope |
5
2 Components
Video Colposcope
88000A
Video Colposcope and vertical stand with vertical stand hardware kit:
•Allen wrench
•Allen bolt
•Mounting washer
•Spacer
89000A
Video Colposcope and swing arm stand with swing arm hardware kit:
•Allen wrench
•Bolt

6 |
Components |
Welch Allyn Video Colposcope |
All illustrations are for reference only.
88600 S-Video Cable
761076-0 Power Cord
Optional Accessories
09800-U
Replacement Lamp
88500
RS-232 Interface Cable
488307-9
Replacement Fuse (2 required)
88010 Cervical Model
88040
Dust Cover for Vertical Stand
89040
Dust Cover for Swing Arm
Directions for Use |
Components |
7 |
88030
Vertical Stand with Base Only
89030
Swing Arm Stand with Base Only
Monitor. For specifications see “Video Monitor” on page 30. Contact Welch Allyn for details.
VCR/Printer. Contact Welch Allyn for details.
Image Capture System. Contact Welch Allyn for details.
Note Only accessories and components indicated in this manual are to be used with the Welch Allyn Video Colposcope system.
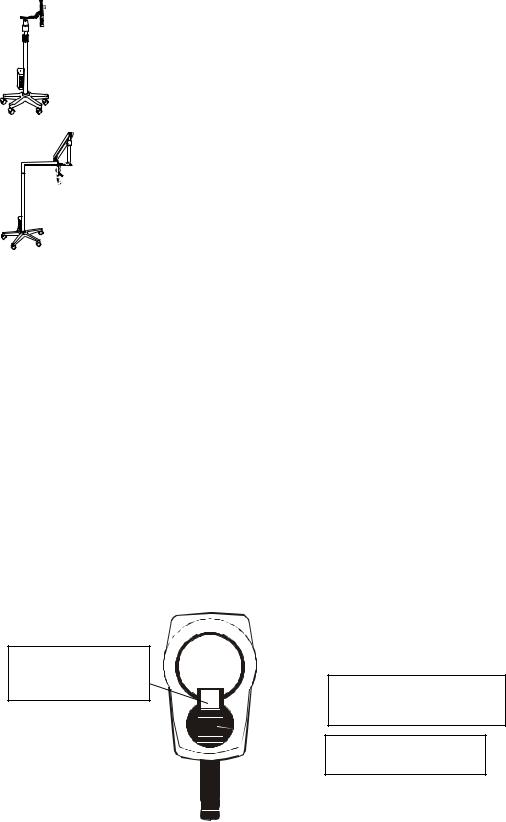
Front View
Illumination Beam Director Lens. Provides light for the examination.
Camera Lens. The lens that  establishes the magnification and field of view.
 Illumination Beam Director.
Directs lamp beam.
8 |
Components |
Welch Allyn Video Colposcope |
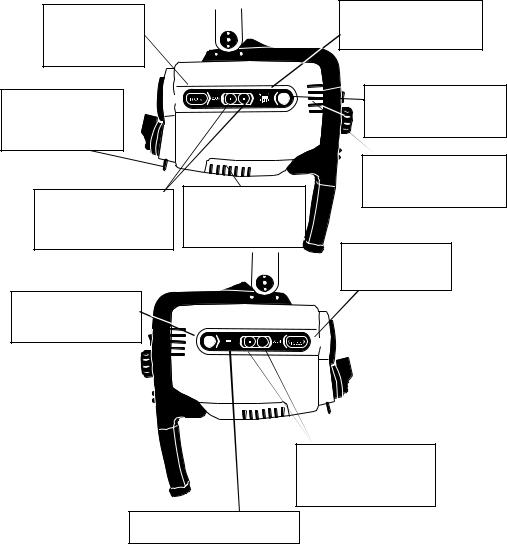
Side Views
Fine Focus control button. Pressing < or > adjusts the focus. 
Polarization filter control. Adjusts the proportion of glare removed from the image.
Zoom control button.
Pressing + or - increases or decreases magnification accordingly.
Mag button. Displays magnification index on screen.
 FINE
FINE 
slots. Allow air to enter and leave unit, cooling internal components.
MAG |
FINE |
INDEX |
|
Green filter LED indicator.
Illuminates if the electronic green filter is on.
Green filter button. Pressing turns the electronic green filter on or off.
Ventilation slots. Allow air to enter and leave unit, cooling internal components.
Fine Focus control button. Pressing < or > adjusts the focus.
Zoom control button.
Pressing + or - increases or decreases magnification accordingly.
Mag LED indicator. Illuminates if
Mag Index is on.

Directions for Use
Back View
Ventilation slots. Allow air to enter and leave unit, cooling internal components.
Remote video function buttons.
Allows use of remote printing and saving functions with appropriate accessory device.
Components 9
Power switch. Power control for the Video Colposcope.
 Attachment knob. Fastens handle to Video Colposcope.
F
C
V
Video Colposcope handle. For positioning the colposcope in the proper up/down, left/right position.
Bottom View
Ventilation slots. Allow air to enter and leave unit, cooling internal components.
Lamp access door. Removes for lamp replacement. (Note: If door is not properly closed, interlock power switches will not activate and the lamp will not start.)
Mounting piece. Allows the Video Colposcope to attach to the stand. On the swing arm model, the mounting piece is located at the top of the colposcope. On the vertical stand model, the mounting piece is located at the bottom of the colposcope.
Loading...