Wayne-Dalton 9200, 9600, 9900 User Manual

9900 Thermowayne™ 9600 Thermogard® 9200 Foamcore™
Torsion Spring
Installation Instructions and Owners Manual
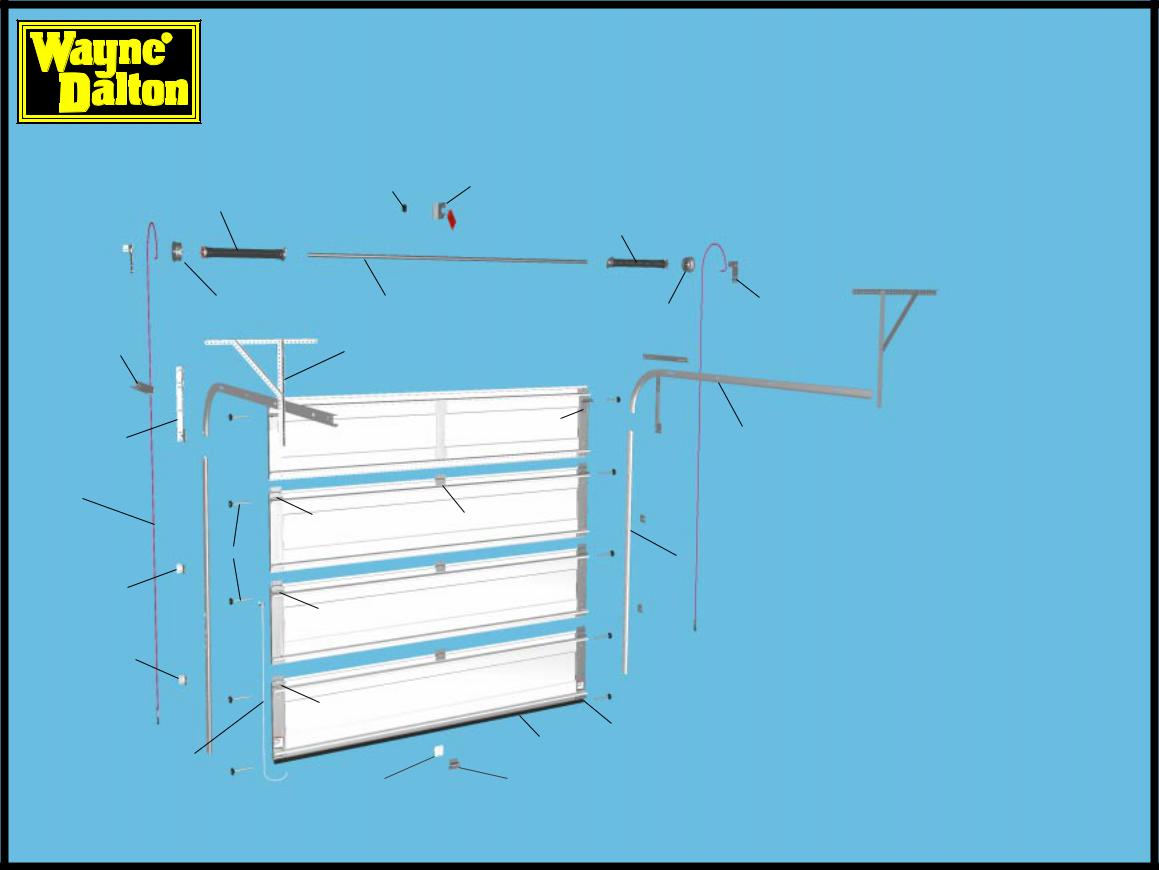
END BEARING BRACKET 
HORIZONTAL
ANGLE
FLAGANGLE
COUNTERBALANCE CABLE
TL-2 JAMB
BRACKET
TL-1 JAMB
BRACKET
|
NYLON CENTER |
CENTER BEARING |
RIGHT HAND WOUND |
BUSHING |
BRACKET |
TORSION SPRING (RED) |
|
LEFT HAND WOUND |
|
|
|
|
|
TORSION SPRING (BLACK) |
LEFT HAND CABLE
TORSION TUBE
DRUM RIGHT HAND CABLE DRUM
REAR SUPPORT ASSEMBLY (NOT SUPPLIED)
TOP BRACKET
|
#3 END HINGE |
CENTER HINGE |
|
|
|
ROLLER |
|
VERTICAL |
|
|
TRACK |
|
#2 END HINGE |
|
#1 END HINGE
BOTTOM BRACKET
PULL ROPE & |
ASTRAGAL |
|
|
SCREW EYE |
|
END BEARING BRACKET
HORIZONTAL TRACK
Parts List
TOP BRACKET BASE |
# 158044 |
TOP BRACKET SLIDE |
# 158046 |
ROLLER |
# 154489 |
VERTICAL TRACK |
1 PAIR |
TL-1 JAMB BRACKET |
# 261965 |
TL-2 JAMB BRACKET |
# 261966 |
TL-3 JAMB BRACKET |
# 261967 |
HORIZONTAL TRACK |
1 PAIR |
12” FLAGANGLE (LEFT) |
# 240380 |
12” FLAGANGLE (RIGHT) |
# 240381 |
15” FLAGANGLE (LEFT) |
# 240382 |
15” FLAGANGLE (RIGHT) |
# 240383 |
22-1/16” HORIZ. ANGLE |
# 292536 |
80” HORIZ. ANGLE (RIGHT) |
# 292539 |
80” HORIZ. ANGLE (LEFT) |
# 292538 |
TORSION SPRING (RED) |
AS REQUIRED |
TORSION SPRING (BLACK) |
AS REQUIRED |
COUNTERBALANCE CABLES |
1 PAIR |
CABLE DRUM (RIGHT) |
# 284653 |
CABLE DRUM (LEFT) |
# 284654 |
END BEARING BRACKET (LEFT) |
# 279134 |
END BEARING BRACKET (RIGHT) |
# 103415 |
CENTER BEARING BRACKET |
# 100298 |
NYLON CENTER BUSHING |
# 103336 |
# 6 SCREW EYE |
# 100362 |
60” PULL ROPE |
# 274884 |
OUTSIDE STEP PLATE |
INSIDE STEP PLATE |
NOTE: DEPENDING ON YOUR DOOR MODEL, SOME PARTS |
|
||
|
|
LISTED MAY NOT BE SUPPLIED IF NOT NECESSARY. |
© Copyright 2002 Wayne-Dalton Corp. |
PART NO. 248438 |
Rev.2 02/02 |

IMPORTANT
SAFETY NOTICES
Wayne-Dalton Corp.
P.O. Box 67
Mt. Hope, Ohio 44660
Read these instructions carefully before attempting installation. If in question about any of the procedures, do not perform the work. Instead, have a qualified door agency do the installation or repairs.
1.Wear protective gloves during installation to avoid possible cuts from sharp metal edges.
2.It is always recommended to wear eye protection when using tools, otherwise serious eye injury could result.
3.Avoid installing your new door on windy days. Door could fall during the installation and cause damage and personal injury.
4.If the door is to be electrically operated at any time, all pull ropes MUST be removed to prevent injury or death to children who may become entangled in the rope. The locking mechanism MUST also be disengaged.
5.Operate door ONLY when properly adjusted and free of obstructions.
6.Should the door become hard to operate or completely inoperative, a qualified door agency should correct the problem to prevent damage to the door or serious personal injury.
7.DO NOT PERMIT children to play with the garage door or the electrical controls. Fatal injury could result, should the child become entrapped between the door and the floor.
8.To prevent serious injury or death, avoid standing in the open doorway or walking through the doorway while the door is moving.
9.Door is constantly under EXTREME SPRING TENSION. To prevent possible serious injury or death, adjustments, repairs, removal or installation, ESPECIALLY of SPRING ASSEMBLIES, CABLES or BOTTOM CORNER BRACKETS, should be performed ONLY by qualified door service people.
10.If your existing garage door opener does not have a reversing mechanism, you should consider purchasing one that has up to date safety features. These features can prevent opener related property damage or personal injury.
11.Check all bolted connections monthly during the lifetime of the door to prevent damage or personal injury caused by loose connections.
12.Definition of key words used in this manual:
WARNING! -- Indicates a potentially hazardous situation which, if not avoided, could result in serious injury or death.
IMPORTANT! -- Required step for safe and proper door operation.
NOTE: -- Information assuring proper installation of the door.
MAINTENANCE AND PAINTING
INSTRUCTION FOR
PREPAINTED STEEL DOORS
MAINTENANCE
While factory-applied finishes for steel garage doors are so durable that they will last many years longer than ordinary paints, it is desirable to clean them thoroughly on a routine basis. Apparent discoloration of the paint may occur when it has been exposed in dirt-laden atmospheres for long periods of time. Slight chalking may also cause some change in appearance in areas of strong sunlight. A good cleaning will generally restore the appearance of these coatings and render repainting unnecessary. An occasional light cleaning will also help maintain an aesthetically pleasing appearance. To maintain the original finish of the garage doors, the only regular maintenance necessary is that of annual washing. Mild solutions of detergents or household ammonia will aid in the removal of most dirt, and the following are recommended levels:
One cup of Tide™, or other common detergents, which contain less than 0.5% phosphate, dissolved into five gallons of warm water. NOTE: The use of detergents containing greater than 0.5% phosphate is not recommended for use in general cleaning of garage doors. CAUTION: NEVER MIX CLEANSERS OR DETERGENTS WITH BLEACH.
SURFACE PREPARATION FOR PAINTING
Wax on the surface must be removed or paint peeling/flaking will result. To remove this wax, it will be necessary to lightly scuff the surface with a gray (not green!) 3M ScotchBrite pad saturated with soapy water. A final wipe and rinse should be done with clean water only, to remove any loose dust or soap film.
Surface scratches, which have not exposed the metal substrate, can be lightly buffed or sanded with 0000 steel wool or No. 400 sand paper to create a smoother surface. Care must be taken to not expose the substrate under the paint (see Note No. 2). Once this exposed condition exists, the likelihood for rusting is greatly increased. See the following paragraph if the metal substrate is observed.
Exposed substrate must be treated to prevent rust from forming (see Note No. 2). Sand the exposed area lightly and paint with high quality metal primer to protect from corrosion. Follow drying time on primer can label before applying topcoat.
The surface to be recoated must not be to smooth or the repaint material will not adhere to it (see Note No. 2). It is advisable to test a representative area to evaluate adhesion. If poor adhesion is observed, the surface must be abraded by sanding or buffing using grades mentioned above. Care must be taken to not expose the substrate under the paint.
PAINTING
After the surface has been properly prepared it must be allowed to dry thoroughly, then coated immediately with a premium quality latex house paint. Follow the paint label directions explicitly. Oil base paint is not recommended. Please note that if substrate is exposed, painting with latex paint may cause accelerated rusting of steel.
NOTES:
1.Repainting of finish painted steel doors cannot be warranted as this condition is totally beyond door manufacturer’s control.
2.If the steel door surface has a finish painted textured surface representing wood grain, stucco, etc., this step should not be attempted as danger of exposing substrate is greatly increased.
3.Consult a professional coatings contractor if in doubt about any of the above directions.
4.Follow directions explicitly on the paint and solvent container labels for proper applications of coatings and disposal of containers. Pay particular attention to those directions involving acceptable conditions in which to paint.
ACRYLIC GLAZING CLEANING INSTRUCTIONS:
1. To clean acrylic glazing wash with plenty of nonabrasive soap or detergent and water. Use the bare hand to feel and dislodge any caked dirt or mud. A soft, grit-free cloth, sponge or chamois may be used to wipe the surface. Do not use hard or rough cloth that will scratch the acrylic glazing. Dry with a clean damp chamois.
2.Grease and oil may be removed with kerosene or a good grade of naphtha (No aromatic content.). Users of these solvents should become familiar with their properties to handle them safely.
3.Do not use: Window cleaning fluids, scouring compounds, gritty cloths, leaded or ethyl gasolines, or solvents such as alcohol, acetone, carbon tetrachloride, etc.
© Copyright 2002 Wayne-Dalton Corp. |
© Copyright 2002 Wayne-Dalton Corp. |

IMPORTANT!
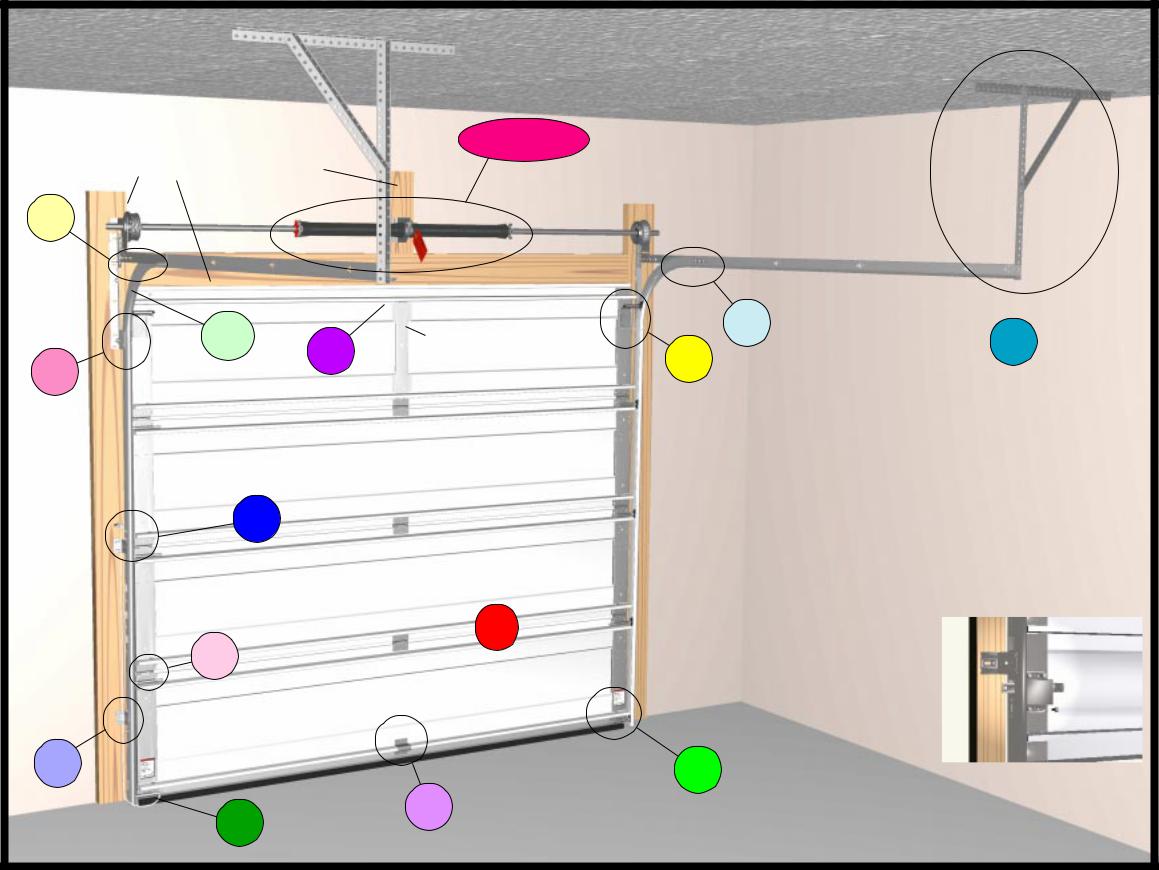
JAMBS, HEADER, AND SPRING PAD MUST BE SECURELY ATTACHED TO FRAMING MEMBERS. CHECK BEFORE INSTALLING NEW DOOR.
11
10 9
1
6
7
3
19
12 - 17 IMPORTANT!
REAR SUPPORT ASSEMBLIES MUST BE SECURELY ATTACHED TO CEILING FRAMING MEMBERS ADEQUATE TO HOLD THE WEIGHT OF THE DOOR.
NOTE: |
|
2 |
|
|
|
18 |
||
DOORS WITH OPERATORS, |
8 |
IMPORTANT! |
||||||
SEE STEP 21 |
|
|||||||
DOOR OPENING PREPARATION IS CRITICAL FOR PROPER |
||||||||
|
|
|
||||||
|
|
|
DOOR INSTALLATION. CHECK THE OPENING TOP, AND |
|||||
|
|
|
SIDES TO ENSURE IT IS LEVEL AND SQUARE. CORRECT IF |
|||||
|
|
|
NECESSARY BEFORE INSTALLING NEW DOOR. |
|||||
|
|
|
IMPORTANT! |
|
||||
|
|
|
IF INSTALLING A REPLACEMENT DOOR, CHECK THE OPENING |
|||||
|
|
|
SIZE AND NEW DOOR SIZE, MAKING SURE THEY MATCH |
|||||
|
|
|
BEFORE REMOVING EXISTING DOOR. |
|||||
|
|
|
NOTE: |
|
||||
|
|
|
SINGLE WIDE DOOR SHOWN IN ILLUSTRATION (SOME |
|||||
|
|
|
LIGHTER WEIGHT DOORS ARE SUPPLIED WITH ONE (1) |
|||||
|
|
|
TORSION SPRING) |
|
||||
|
5 |
|
|
|
|
|
||
|
|
|
|
NOTE: SIDE LOCK INSTALLA- |
|
|||
|
|
|
|
TION OPTIONAL |
|
|||
|
|
|
|
|
SIDE LOCK |
|
||
|
|
|
|
|
INSTALLATION |
|
||
|
|
|
|
|
|
|
|
|
|
|
|
|
|
INSTALLATION IS ON SECOND |
|
||
|
|
|
|
|
SECTION OF DOOR. SECURE |
|
||
|
|
|
|
|
THE LOCK TO THE SECTION |
|
||
|
|
|
|
|
WITH (4) 1/4-20 X 5/8” SELF |
|
||
|
|
4 |
|
|
DRILLING SCREWS. SQUARE |
|
||
|
|
|
|
LOCK ASSEMBLY WITH DOOR IMPORTANT! IT IS RECOM- |
||||
20 |
NOTE: |
|
|
|
SECTION AND HOLE IN |
MENDED THAT SIDE LOCKS BE |
||
|
|
|
VERTICAL TRACK. THE SIDE |
|||||
STEP PLATE |
|
|
|
REMOVED IF AN OPERATOR IS |
||||
|
|
|
LOCK SHOULD BE SPACED |
|||||
|
|
|
INSTALLED ON THE DOOR. |
|||||
|
OPTIONAL |
|
|
|
APPOX. 1/8” FROM THE |
|||
|
|
|
|
|
|
|||
|
|
|
|
|
SECTION EDGE. |
|
||
|
|
|
|
|
|
|
|
|
 Loading...