


R
Cordless Power Roller
Owner’s Manual
Gude d’utilisation • Manual del propietario
Quick-start
Easy does it from setup to cleanup:
1
Install the batteries Insérer les piles Instalar las pilas
2
Attach the strap Fixer la bandoulière Conectar la correa
3 |
4 |
Remove the drive housing |
Attach the hoses |
Enlever du logement du mécanisme |
Fixation des tuyaux flexibles |
Extraer el mecanismo impulsor |
Conectar las mangeras |
5 |
|
6 |
|
Fill the fluid tank |
Attach the drive housing |
||
Remplir le réservoir à liquides |
Fixation du logement du mécanisme |
||
Llenar el depósito de fluidos |
Conectar el mecanismo impulsor |
||
9
Cleanup
Nettoyage
Limpieza
7
Press the on/off switch Appuyer sur le bouton marche/arrêt
Oprimir el botón de encendido / apagado
8
Apply paint Appliquer la peinture Aplicar pintura
Read this manual for complete instructions.
Ce manuel contient les instructions complètes.
Lea este manual para obtener instrucciones completas.
Need help? Call us first for answers fast.
Call Wagner toll-free if you have any comments or problems with this Wagner product.
 1-800-328-8251
Wagner Technical Service
Weekdays: 8:00 - 4:30 Central time Weekends: 9:00 - 4:00 Central time
1770 Fernbrook Lane, Minneapolis, MN 55447
Form No. 0156934C |
Español |
Français |
English |
9709 |
|
|
|||
|
|
|
|
|
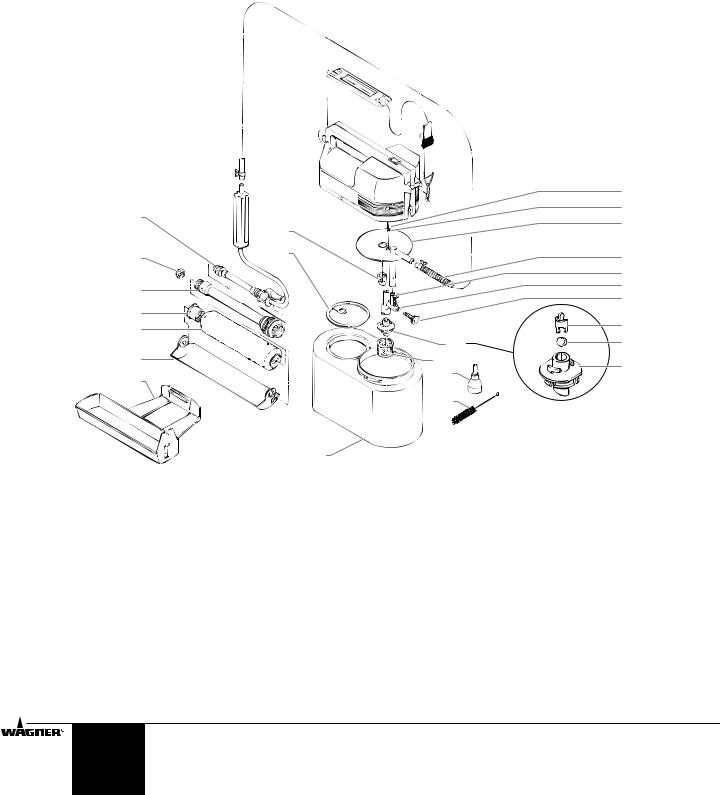
Table of Contents |
Product Registration Card |
PRODUCT REGISTRATION. . . . . . . . . . . . . . . . . . . . . . . . . . . . 2 PARTS LISTING . . . . . . . . . . . . . . . . . . . . . . . . . . . . . . . . . . . . 2 ASSEMBLING THE ROLLER . . . . . . . . . . . . . . . . . . . . . . . . . . 3
Installing the batteries and attaching the strap
Removing and Attaching the Drive Housing to the Fluid Tank Attaching the Fluid Hose
Filling the Fluid Tank
USING THE ROLLER . . . . . . . . . . . . . . . . . . . . . . . . . . . . . . . . 3
Pump On/Off Switch Applying Paint
CLEANUP. . . . . . . . . . . . . . . . . . . . . . . . . . . . . . . . . . . . . . . . 4-5
Quick Cleanup Detailed Cleanup
STORING THE ROLLER . . . . . . . . . . . . . . . . . . . . . . . . . . . . . . 5
25
24
26
Send in your Wagner product registration card. Proper registration will serve as proof of purchase in the event your original receipt becomes misplaced or lost. Returning this card will not affect warranty coverage, but may expedite the processing of your warranty and enable you to contact us in the event of loss or theft. The additional information will also help us to develop new products that best meet your needs and desires. THANK YOU!
Accessories
9” x 3/8” roller cover . . . . . . . . . . . . . . . . . . . . . . . . . . . . 0155206 9” x 3/4” roller cover . . . . . . . . . . . . . . . . . . . . . . . . . . . . 0155209 9” x 1-1/4” roller cover . . . . . . . . . . . . . . . . . . . . . . . . . . . 0155209 Ball check assembly . . . . . . . . . . . . . . . . . . . . . . . . . . . . 0156270 Check valve assembly. . . . . . . . . . . . . . . . . . . . . . . . . . . 0156276

 1
1
2
3
4
 5
5
23 |
27 |
6 |
|
|
|
7 |
|
22 |
|
8 |
|
|
9 |
||
|
|
||
21 |
|
11 |
|
20 |
|
||
|
12 |
||
|
10 |
||
19 |
14 |
13 |
|
18 |
15 |
||
|
|||
|
|
||
|
16 |
|
|
|
17 |
|
Parts Listing
1 |
0156400 |
Strap Assembly |
15 |
0156421 |
Adapter, Faucet |
2 |
0156595 |
Piston |
16 |
0280346 |
Brush |
3 |
0327312 |
O-Ring |
17 |
0156607 |
Container, Fluid |
4 |
0156596 |
Pump, Upper |
18 |
0156606 |
Tray, Roller |
5 |
0327226 |
Clip, Spring |
19 |
0156566 |
Shield, Splatter |
6 |
0156471 |
Spring, Anti-kinking |
20 |
0155206 |
Roller Cover, 3/8" |
7 |
0327327 |
O-Ring |
|
0155208 |
Roller Cover, 3/4" Opt. |
8 |
0156579 |
Pump, Lower |
21 |
0156556 |
Cap, End |
9 |
0156276 |
Valve Cap Assembly |
22 |
0156559 |
Core, Roller |
10 |
0156270 |
Inlet Valve Assembly |
23 |
0245401 |
Seal |
11 |
0156582 |
Retainer, Inlet Ball |
24 |
0156290 |
Arm, Roller |
12 |
0156464 |
Ball, Inlet |
25 |
- - - - - - |
Drive Housing |
13 |
0156580 |
Body, Valve |
26 |
0156585 |
Cap, Pump Retaining |
14 |
0016551 |
Filter |
27 |
0156409 |
Cover |
R |
English |
2 |
©1997 Wagner Spray Tech. All rights reserved. |
|
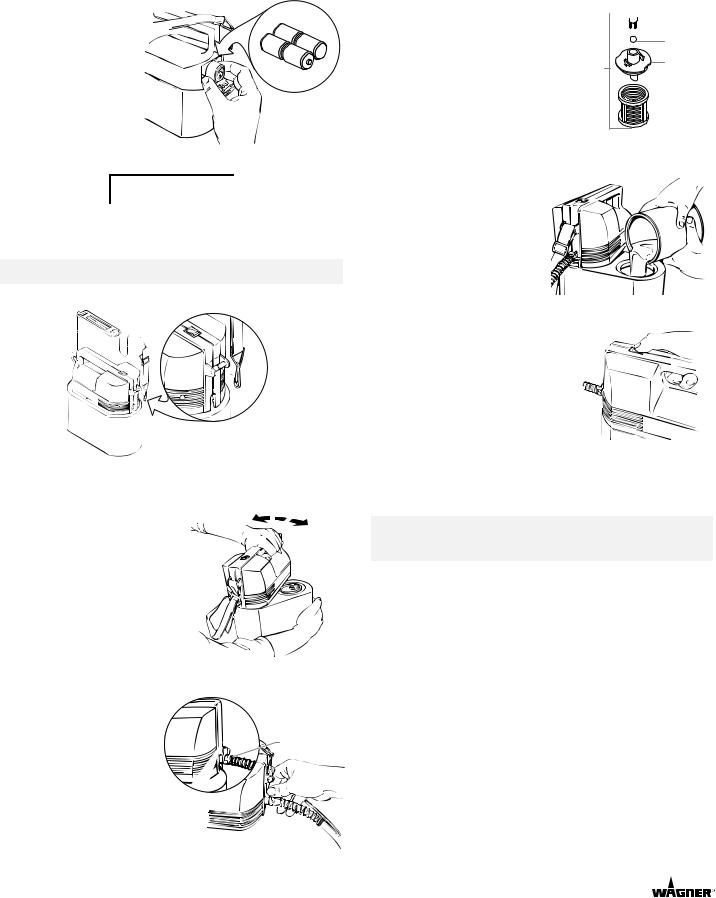
Assembling the Roller
Installing the Batteries and Attaching the Strap
1. Open the battery |
+ |
|
|
|
|
door. The battery |
|
|
|
||
door is located on |
- |
- |
|
+ |
- |
+ |
- |
+ |
|||
|
|
||||
the drive housing. |
|
|
|
||
|
|
|
|
||
2.Insert the batteries in the proper direction.
 CAUTION
Improper installation of batteries may cause batteries to overheat and leak acid. Acid may cause severe injury and/or property damage.
NOTE: Use high quality alkaline batteries only.
3. Attach the strap to the loops on the drive housing.
Removing and Attaching the Drive Housing to the Fluid Tank
Open
Close
1.Remove the drive housing by turning the drive housing counterclockwise.
2.Attach the drive housing by setting it onto the fluid tank at a 90° angle and turning clockwise.
Attaching the Fluid Hose
1.Slide the fluid hose through 

the anti-kinking spring and  the spring clip.
2. Push the fluid hose to the |
Fluid Hose |
port on the side of the |
|
drive housing. |
|
3.Slide the spring clip over the fitting to keep the hose securely in place.
4.Slide the anti-kinking spring up against spring clip.
Checking the Inlet Valve
If the unit is new or has been stored for an extended period of time the inlet ball can become stuck and the pump may be difficult to prime. To check:
1.Turn the valve body counterclockwise and pull down to remove.
2.Shake the inlet valve assembly gently. If it does not rattle, remove the inlet ball retainer and clean the ball.
3.Reassemble the inlet valve.
Filling the Fluid tank

 Inlet Ball
Retainer
Ball
Inlet Ball
Inlet Valve Holder
Assembly
1. Place the drive housing on the fluid tank at a 90° angle.
2. Remove the fluid tank cap and fill the tank with paint.
3. Wipe the lip, threads, and body of the fluid tank to remove any spilled or splattered material.
4. Replace the cap and lock the drive housing securely onto the fluid tank.
Using the Roller
The On/Off switch has two speeds for controlling the paint flow – High and Low. Choose the setting which is appropriate for your application. If too much paint is being delivered to the roller on High speed, use the Low speed setting. If paint flow is still too great, shut the roller off, then turn back on when more paint is needed.
Applying Paint
Begin rolling as paint appears to saturate the roller cover. If paint is flowing faster than you can roll,turn the pump off until more paint is needed.
NOTE: Do not place the roller below the level of the paint when not in use. Paint will siphon to roller even if motor and pump are turned off.
©1997 Wagner Spray Tech. All rights reserved. |
3 |
English |
|
|
|
|
|
R
Cleanup
A thorough cleaning after each use of the roller is important to keep it in good working order.
NOTE: When using latex paint, use warm soapy water for cleaning parts. When using oil paint, the appropriate solvent is often mineral spirits. Always follow the paint manufacturer's recommendations for appropriate solvent. Not recommended for lacquer and other hard solvents.
 CAUTION
Do not turn the roller upside down or on its side. If liquid gets inside the drive housing it could damage the unit.
Quick Cleanup
The following steps outline the basic cleanup procedures. For more detailed instructions on how to perform each step, refer to the Detailed Cleanup section in this manual.
1. Clean the roller cover. |
2. Remove paint in hose. |
3. Empty fluid tank. |
4. Clean hose. |
5. Clean roller handle. |
6. Remove the pump assembly. |
7. Remove and clean the valves. 8. Clean the pump assembly.
9. Clean and lubricate the |
10. Reassemble the pump and |
piston and O-ring. |
attach it to the drive housing. |
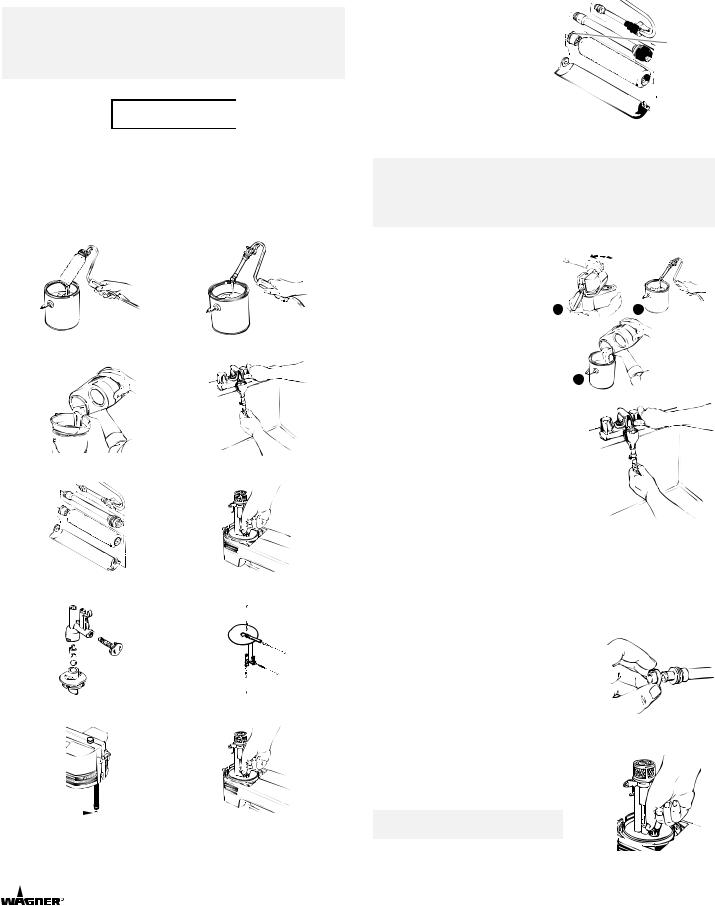
Detailed Cleanup
Cleaning the Roller Cover
1.Pull one end of the splatter shield out of the end cap and slip opposite end off of the roller handle.
2.Press the locking tab and remove the roller cover and roller core.
3.Unscrew the end cap and slide the roller cover off of the roller core.


 Tab
Tab
End Cap

 Core
Core


 Cover
Cover

 Shield
4. Clean the roller cover with the appropriate solvent.
NOTE: For latex, clean roller cover, core and end cap thoroughly in warm soapy water.
For oil-based paints, clean roller cover, core and end cap in the appropriate solvent recommended by the paint manufacturer.
Removing Paint from the Hose and Container
1. Remove the drive housing from fluid container.
2. |
Hold the roller handle over |
|
|
|
the paint pail and run the |
1 |
2 |
|
pump to remove excess |
|
|
|
paint from hose and pump. |
|
|
3. |
Pour remaining paint from |
|
|
|
container back into paint pail. |
|
|
Cleaning the Hose |
|
3 |
|
Thoroughly |
|
|
|
For Latex:
1. Remove the hose from the motor compartment.
2. Insert the hard plastic tube of the faucet adapter into the paint hose.
3. Push the adaptor over a faucet.
4. Slowly increase the water pressure and run water through the hose and handle until the water come out clean.
For Oil:
1.Fill the paint container with the appropriate solvent recommended by the paint manuafacturer.
2.Circulate the solvent through hose and roller arm for several minutes.
Cleaning the Roller Handle Assembly
1. Remove the seal from the end of the roller handle. Note the direction of the lip for correct replacement.
2. Clean the handle and seal thoroughly.
3. Apply a thin layer of petroleum jelly to the seal.
4. Replace the seal in the proper direction.
Removing the Pump from the Drive Housing
1. Turn the retaining nut on the pump counterclockwise.
2. Pull out the pump assembly.
NOTE: The piston will remain attached.
3. Wipe excess paint off of the piston. 

 4. Apply a thin layer of petroleum jelly to the pump O-Ring.
R |
English |
4 |
©1997 Wagner Spray Tech. All rights reserved. |
|
|
|
|
NOTE: Remove the pump carefully or the piston may come off. If the piston comes off, reassemble by sliding piston onto the brass piston connecting rod.
NOTE: Wipe excess paint off the drive housing with an appropriate solvent. DO NOT IMMERSE UNIT IN SOLVENT OR OTHER LIQUID.
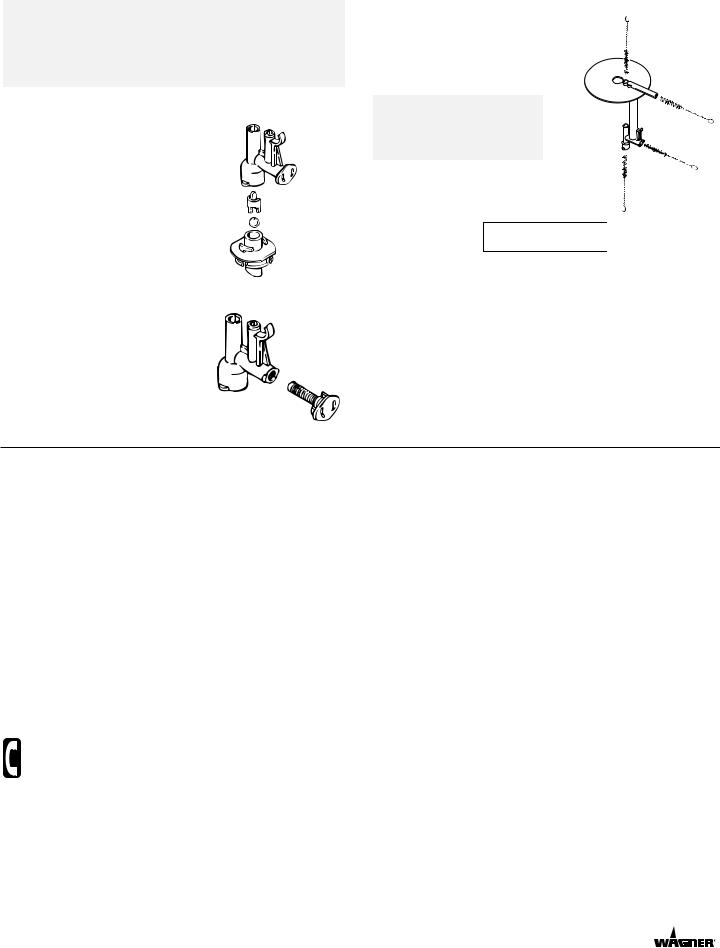
Cleaning the Valves
Cleaning the Inlet Valve
1. Press down on the locking tab and pull the valve assembly out.
2. Turn valve body counterclockwise and remove.
3.Remove the ball retainer and inlet ball.
4. Remove the filter basket and thoroughly clean all parts in warm, soapy water or the appropriate solvent.
Cleaning the Outlet Valve
1. Turn valve cap assembly counter clockwise remove.
2. Clean all parts in warm, soapy water or the appropriate solvent.
Cleaning the Pump Housing
1. Clean pump housing with warm, soapy water or the appropriate solvent using the brush supplied.
2. Apply a thin layer of petroleum jelly to the pump O-Ring.
NOTE: Be sure to clean all small parts thoroughly. Paint will act as an adhesive when dry.
Storing the Roller
 CAUTION
Clean, dry, and lubricate the system thoroughly before storing. Do not store with liquids inside unit. Storing the unit in cold temperatures can cause the liquids to freeze and expand, causing pressure to build and break parts. Let the equipment come up to room temperature before operating.
When storing the roller for more than a day, take the following precautions:
1.Remove the batteries.
2.Remove the hose from the pump fitting.
3.Store the hose in a large loop. If it is bent, it could be damaged.
Troubleshooting
Problem
The pump will not run.
The motor and piston run but there is little or no fluid flow.
Paint leaks from the roller core. Roller cover slides on the wall.
Cause
There is little or no power.
The batteries are not in properly.
The pump on/off button was not pressed.
The pump has seized up.
The batteries are low. The fluid hose is leaking.
The inlet, outlet, or relief valves are dirty. The fluid in the fluid tank is low.
The piston O-ring is worn.
The piston has slipped off the brass axle.
The seal is not in place.
Too much paint pumped to roller.
The seal is not lubricated.
Solution
Put in new high quality alkaline batteries. Put the batteries in properly.
Press and release the pump on/off button.
Clean the piston and pump housing.
Put in new high quality alkaline batteries. Tighten the fluid hose securely.
Clean the inlet and outlet valves. Fill the fluid tank.
Replace the piston O-ring.
Snap the piston back on the axle
Check and place the seal properly.
Press and release the pump on/off button to turn the the pump off until more paint is needed.
Remove the seal, lubricate and replace.
Have you tried the recommendations above and are still having problems? In the United States, call our toll-free consumer service at 1-800-328-8251 Monday through Friday between 8:00 AM and 4:30 PM Central time or between 9:00 AM and 4:00 PM Saturday or Sunday, or contact an authorized service center.
©1997 Wagner Spray Tech. All rights reserved. |
5 |
English |
|
|
|
|
|
R
 Loading...