


Contents Index
1
User’s manual for
Windows® & Macintosh®
Bamboo Touch (CTT-460)
Bamboo Pen (CTL-460)
Bamboo & Bamboo Fun (CTH-460, CTH-461, CTH-661)
Setting up
Navigate with touch
Customize touch
ExpressKeys
Use a pen
Customize a pen
Troubleshooting
Contents Index
1
Contents Index
2
Bamboo
User’s Manual for Windows® & Macintosh®
Version 1.0, Rev E1209
Copyright © Wacom Co., Ltd., 2009
All rights reserved. No part of this manual may be reproduced except for your express personal use. Wacom reserves the right to revise this publication without obligation to provide notification of such changes.
Wacom does its best to provide current and accurate information in this manual. However, Wacom reserves the right to change any specifications and product configurations at its discretion, without prior notice and without obligation to include such changes in this manual.
The above year indicates when this manual was prepared. However, the date of release to the users of the “manual” is simultaneous with the introduction into the market of the applicable Wacom product.
Reuse, recycling, and recovery. You are urged to recycle this product when replacing it with a newer product or when it has outlived its useful life by bringing it to an appropriate collection point for recyclable materials in your community or region. By doing this, you can help improve the environment of your community as well as minimize the potential negative effects created should any hazardous substance that may possibly be present within waste material reach the environment during the disposal process.
Within the European Union, users are required not to dispose of Waste Electrical and Electronic Equipment (WEEE) as unsorted municipal waste, according to the Directive 2002/96/EC of the European Parliament and of the Council of 27 January 2003, or the corresponding local laws of the Member States. Products for which this is applicable will be marked with the WEEE symbol shown at the beginning of this note unless this is not feasible because of the size or the function of the product. Wacom products are subject to the Directive 2002/96/EC and therefore you should always collect them separately and bring them to the appropriate collection point in your community or region.
Wacom tablet products comply with the European Union RoHS Directive 2002/95/EC (RoHS Directive).
Bamboo is a trademark and Wacom is a registered trademark of Wacom Co., Ltd.
Adobe, Photoshop, and Reader are either registered trademarks or trademarks of Adobe Systems Incorporated in the United States and/or other countries. Microsoft, Windows, and Vista are either registered trademarks or trademarks of Microsoft Corporation in the United States and/or other countries. Apple, the Apple logo, and Macintosh are registered trademarks of Apple Computer, Inc., registered in the U.S. and other countries. Any additional company and product names mentioned in this documentation may be trademarked and/or registered as trademarks. Mention of third-party products is for information purposes only and constitutes neither an endorsement nor a recommendation. Wacom assumes no responsibility with regard to the performance or use of these products.
ExpressKey is a registered trademark of Ginsan Industries, Inc., and is used with permission.
Contents Index
2

Contents Index
3
TABLE OF CONTENTS
About the manual
Navigating the manual
YOUR BAMBOO
Identify your tablet model
Bamboo Touch tablet
Bamboo & Bamboo Fun tablets
Bamboo Pen tablet
Pen
Pen holder
SETTING UP YOUR BAMBOO
Ergonomics
Configuring the tablet orientation
Understanding the tablet active area
Working with multiple monitors
Control panel basics
USING YOUR BAMBOO
The touch experience with Bamboo Navigating with touch Customizing touch
ExpressKey basics Customizing the ExpressKeys
The pen experience with Bamboo Holding the pen
Using the pen on the tablet Positioning
Clicking
Dragging
Using the pen buttons
Writing and drawing with pressure sensitivity Erasing
Eye-hand coordination exercise Customizing pen input
CUSTOMIZING YOUR BAMBOO
Opening the control panel
Control panel overview
5 |
Customize your touch experience |
37 |
|
6 |
Setting the touch speed |
37 |
|
7 |
Setting the touch functions |
38 |
|
Setting tablet and ExpressKey functions |
39 |
||
7 |
|||
Disabling touch |
40 |
||
8 |
|||
Customize your pen experience |
41 |
||
9 |
|||
Setting the tip and eraser feel, |
|
||
10 |
|
||
and double-click distance |
42 |
||
11 |
|||
Setting the pen button functions |
43 |
||
11 |
|||
Setting the tablet mapping |
44 |
||
12 |
|||
Portion of screen area |
46 |
||
12 |
|||
Portion of tablet area |
47 |
||
14 |
|||
Setting the pen speed in mouse mode |
48 |
||
15 |
|||
Customizing the Pop-up Menu |
49 |
||
17 |
|||
Button functions |
50 |
||
17 |
|||
PROBLEMS WITH YOUR BAMBOO? |
54 |
||
18 |
|||
Testing your tablet |
55 |
||
18 |
|||
Testing a pen |
56 |
||
19 |
|||
Troubleshooting tables |
57 |
||
25 |
|||
General problems |
57 |
||
26 |
|||
Touch input problems |
58 |
||
26 |
|||
Pen input problems |
59 |
||
27 |
|||
Windows-specific problems |
60 |
||
27 |
|||
Mac-specific problems |
61 |
||
28 |
|||
Technical support options |
63 |
||
28 |
|||
Obtaining driver downloads |
64 |
||
30 |
|||
APPENDIX |
65 |
||
30 |
|||
Caring for Bamboo |
66 |
||
31 |
|||
Replacing the pen nib |
66 |
||
32 |
|||
Uninstalling the software |
67 |
||
33 |
|||
Pen and digital ink capabilities in Windows Vista |
68 |
||
34 |
|||
About the Windows Vista Tablet PC Input Panel |
69 |
||
34 |
|||
Product specifications |
70 |
||
35 |
|||
General specifications |
70 |
||
35 |
|||
Bamboo Touch tablet (model CTT-460) |
70 |
||
36 |
|||
Bamboo tablet (model CTH-460) |
70 |
||
|
Contents Index
3

Contents Index
Pen (model LP-160E), for Bamboo |
71 |
Bamboo Fun small tablet (model CTH-461) |
71 |
Bamboo Fun medium tablet (model CTH-661) |
71 |
Pen (model LP-161E), for Bamboo Fun |
71 |
Bamboo Pen tablet (model CTL-460) |
72 |
Pen (model LP-160), for Bamboo Pen |
72 |
Product information |
73 |
Ordering parts and accessories |
73 |
Radio and television interference |
74 |
FCC notice |
74 |
Industry Canada (Canada only) |
75 |
CE declaration |
75 |
Precautions |
76 |
Warnings |
76 |
Cautions |
77 |
Contents Index
|
4 |
License and Warranties |
|
(Worldwide, except for Europe, |
|
Africa and Middle East) |
78 |
Software License |
78 |
Limited Warranty |
78 |
Warranty Service in the U.S.A. and Canada |
79 |
Warranty on Sales outside of |
|
the U.S.A. and Canada |
80 |
Licence warranty conditions |
|
(Europe, Africa and Middle East) |
81 |
Software Licence Agreement |
81 |
Limited Warranty |
82 |
GLOSSARY |
84 |
INDEX |
87 |
4

Contents Index
5
ABOUT THE MANUAL
This manual provides quick access to information about Bamboo. The information is common to Windows and Macintosh computers and Windows screen captures are shown, unless otherwise noted.
•Go directly to table of contents or index topics by clicking on them.
•Your Bamboo introduces you to the many features of the Bamboo tablet.
•Setting up your Bamboo is a quick guide to understanding how the tablet works.
•Using your Bamboo gives you the basics on working with your tablet. It describes how to use Bamboo, and includes exercises for new users.
•Customizing your Bamboo describes how to optimize Bamboo for the way you like to work.
•Problems with your Bamboo? Then check this section for test and troubleshooting guidelines, and find answers to most common questions.
•The appendix includes tips on product care, a how-to on uninstalling the software, your license and warranty, and more. Also included is an overview of the pen and digital inking capabilities found in Microsoft Windows Vista.
Note: This manual does not describe how to install your Wacom tablet. Please refer to your product Quick Start Guide and to the automated software installer (located on the Bamboo Installation CD) for details.
If you are new to electronic documentation, be sure to read navigating the manual.
•SMALL CAPITAL LETTERS are used to identify the names of keyboard keys, dialog boxes, and control panel options.
•You can use your viewer zoom-in tool to increase the size of the manual on your display screen.
•The following information is not included with this product: information about your specific computer hardware or operating system, or information about your application software. Your best source for this information is the set of manuals and discs that came with your hardware, operating system, or application.
•Pen-equipped models: In addition to the built-in inking support found within Microsoft Windows Vista, many graphics applications also support pressure sensitivity and the pen eraser (when equipped). You can find a listing of applications that support these features on Wacom’s web site (see product information).
•For information on how best to use Bamboo features within a specific application, see the instructions in that application’s manuals.
Wacom’s philosophy is to continually improve all of its products. As a result, engineering changes and improvements are made from time to time. Therefore, some changes, modifications, and improvements may not be covered in this manual.
Contents Index
5

Contents Index
6
NAVIGATING THE MANUAL
Use the navigation controls to move through the manual:
|
Go to front page. |
Contents |
Go to table of contents. |
Index |
Go to index. |
|
Go back to previous view. |
|
Page back, or page forward. |
topic |
Go to topic. |
|
Topic continued. |
Adobe® Reader® provides additional tools for using and printing the manual. See the Adobe Reader help for more information.
Contents Index
6

Contents Index
7
YOUR BAMBOO
This section introduces you to Bamboo. The quickest way to learn about your Bamboo tablet is to become familiar with its appearance and features.
•Not all product models are available in all regions.
•Your Bamboo tablet cannot be used with other Wacom pens or input devices, including those from a previous version Bamboo tablet. Nor can a pen from your new Bamboo tablet be used with other Wacom tablets or a previous version Bamboo tablet.
Identify your tablet model
Bamboo Touch tablet
Bamboo & Bamboo Fun tablets
Bamboo Pen tablet
Pen
Pen holder
IDENTIFY YOUR TABLET MODEL
Each tablet model within the Bamboo family has a specific feature set.
TABLET MODEL |
TOUCH INPUT |
PEN INPUT |
EXPRESSKEYS |
|
|
|
|
Bamboo Touch |
X |
|
X |
(model CTT-460) |
|
|
|
Bamboo |
X |
X |
X |
(model CTH-460) |
|
|
|
Bamboo Fun small |
X |
X |
X |
(model CTH-461) |
|
|
|
Bamboo Fun medium |
X |
X |
X |
(model CTH-661) |
|
|
|
Bamboo Pen |
|
X |
|
(model CTL-460) |
|
|
|
Icons are located near some of the topic headings in this manual to help you quickly identify sections that have information specific to touch or pen input.
•Touch input is identified by this icon:
•Pen input is identified by this icon:
Icons do not appear in common sections that may apply to all Bamboo tablet models.
Model-specific notes may be used as necessary.
Contents Index
7
Contents Index
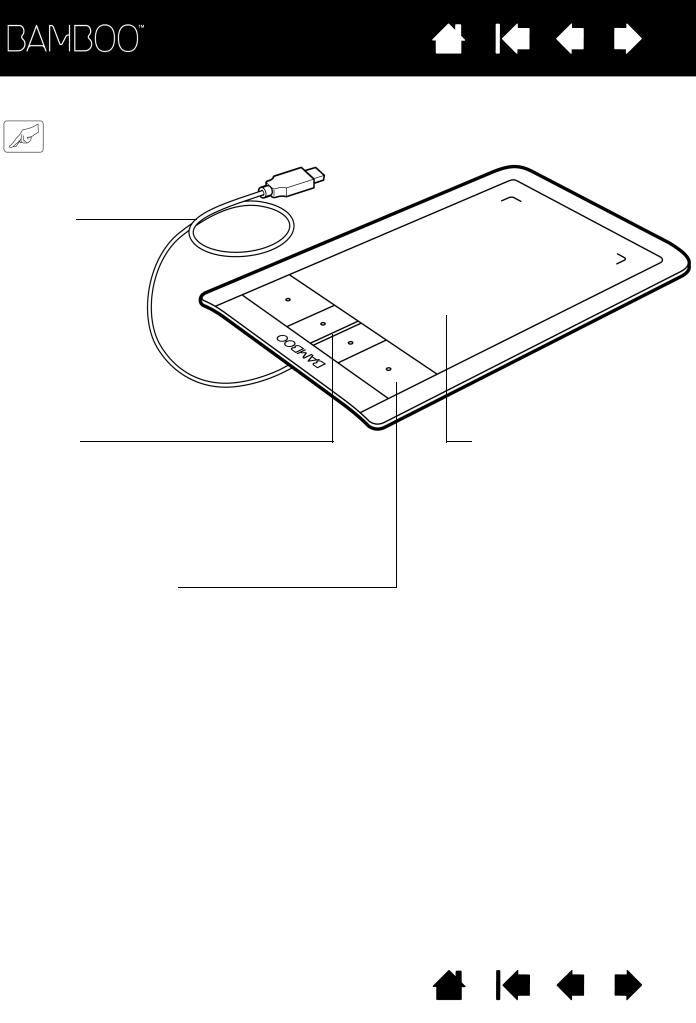
BAMBOO TOUCH TABLET
USB cable
Status LED
Glows white when your Bamboo tablet is connected to an active USB port.
Brightens when you touch the active area of the tablet or press an ExpressKey.
Customizable ExpressKeys
Contents Index
8
Bamboo Touch
(model CTT-460) shown.
Active area
Use singleor two-finger input for clicking and navigating with touch. Use two-finger input for gestures that control other functions, such as scrolling and zooming.
Learn about the touch experience with Bamboo.
8
Contents Index
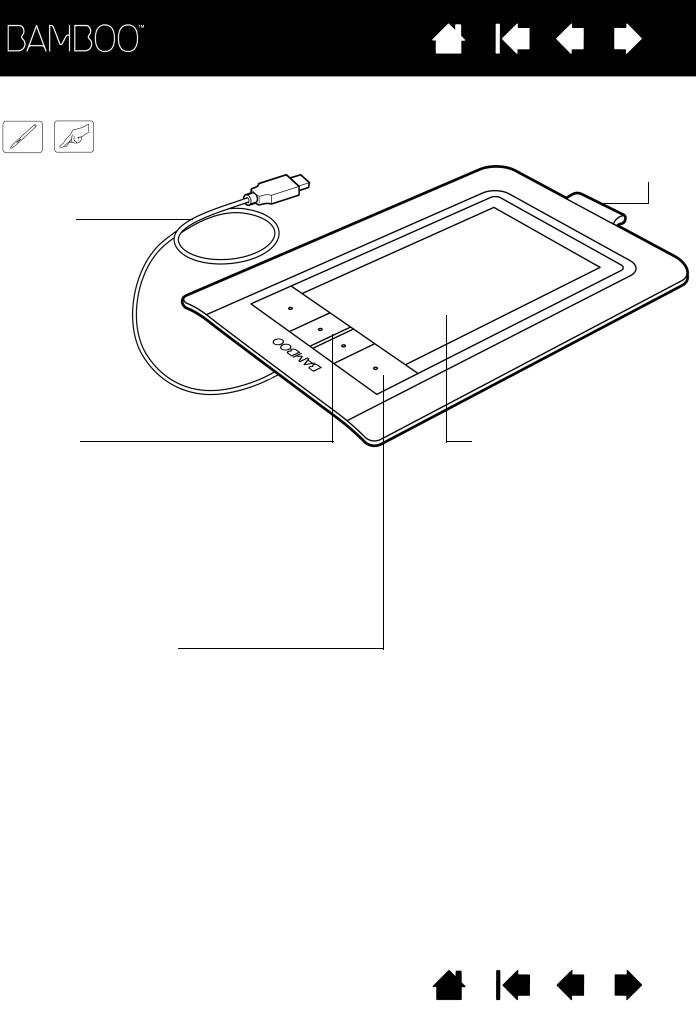
BAMBOO & BAMBOO FUN TABLETS
USB cable
Status LED
Glows white when your Bamboo tablet is connected to an active USB port. Brightens when you touch the active area or press an ExpressKey.
Glows amber when the pen is active, and brightens when the pen tip touches the tablet surface or when you press a pen button.
Customizable ExpressKeys
Contents Index
9
Pen holder
Bamboo
(model CTH-460) shown.
Active area
Includes the touch sensor.
Use singleor two-finger input for clicking and navigating with touch. Use two-finger input for gestures that control other functions, such as scrolling and zooming.
Learn about the touch experience with Bamboo.
This is also the active area for pen input. Learn about your pen and the pen experience with Bamboo.
9
Contents Index
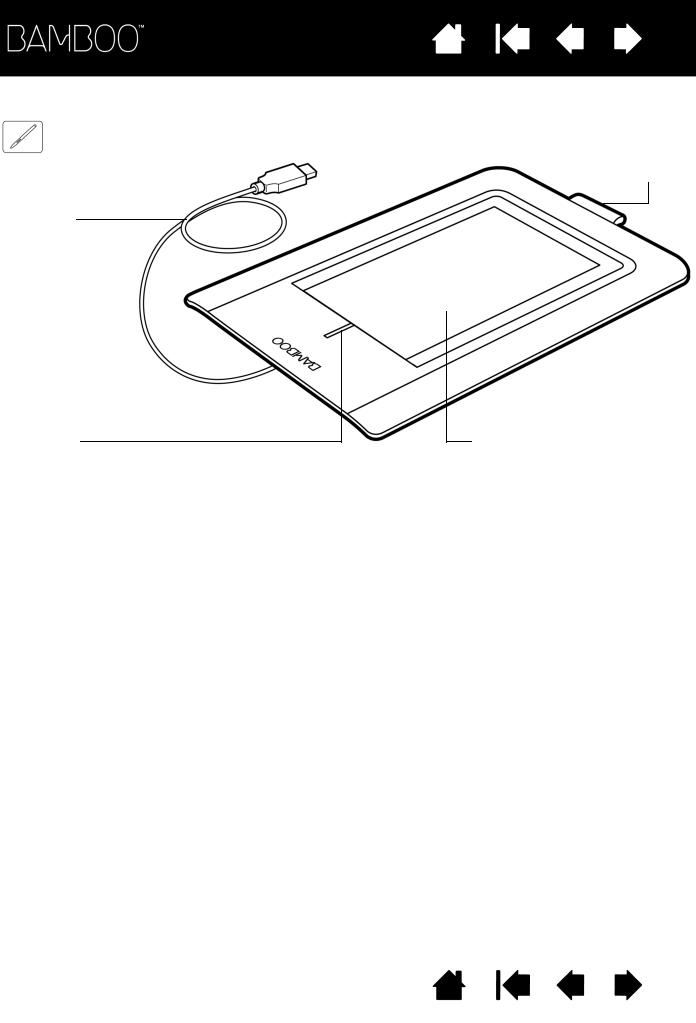
BAMBOO PEN TABLET
USB cable
Status LED
Glows white when your Bamboo tablet is connected to an active USB port.
Brightens when the pen is active.
Contents Index
10
Pen holder
Bamboo Pen
(model CTL-460) shown.
Active area
This is the active area for pen input. Learn about your pen and the pen experience with Bamboo.
10
Contents Index
11
PEN
Eraser (when equipped) |
|
|
|
Pen (when equipped) |
||
|
|
|
||||
|
|
|
|
|
|
A pressure-sensitive freehand tool for image editing and creating natural- |
|
|
|
|
|
|
looking pen strokes. It is also efficient for document annotation and taking |
|
|
|
|
|
|
notes in applications that support handwriting recognition. |
|
|
|
|
|
|
The pen is cordless and battery free. It is ideally suited to enhance your |
|
|
|
|
|
|
workflow by enabling the pen and digital ink features found within Microsoft |
|
|
|
|
|
|
Windows Vista and Office 2007. Take advantage of digital mark-up for |
|
|
|
|
|
|
collaborative editing and use digital ink to take notes in applications that |
|
|
|
|
|
|
support handwriting recognition. |
|
|
|
|
|
|
Important: When not in use, place the pen into the pen holder or lay |
|
|
|
|
|
|
it flat on your desk. The eraser end of the pen should be inserted |
|
|
|
|
|
|
first into the loop. To maintain the sensitivity of your pen, do not |
Pen buttons |
|
|
|
|
store the pen in a container where it will rest on the tip or eraser. |
|
|
|
|
|
Leaving the pen on the tablet may interfere with screen cursor |
||
|
|
|
|
|
|
|
|
|
|
|
|
|
positioning when using other pointing devices, or may prevent your |
|
|
|
|
|
|
computer from going to sleep. |
Replaceable nib |
|
|
|
|
||
(pen tip) |
|
|
|
|
|
|
|
|
|
|
|
|
|
PEN HOLDER
Use the pen holder (when equipped) to store the pen when it is not in use. The pen holder does not apply to Bamboo Touch.
Insert the pen into the pen holder as shown.
•The eraser end of the pen should be inserted first into the loop.
•Do not wedge the pen buttons inside the loop, otherwise they may be continually depressed and possibly fail.
Important: You can also lay the pen flat on your desk. Leaving the pen on the tablet may interfere with screen cursor positioning when using other pointing devices, or may prevent your computer from going to sleep.
Wacom recommends that you do not store the pen in a stand or holder other than the one provided with your Bamboo tablet. The pen may be damaged if it falls out of an unsuitable stand. The sensitivity of your pen may be affected if the pen is stored in a container where it rests on the tip or eraser.
Contents Index
11
Contents Index
12
SETTING UP YOUR BAMBOO
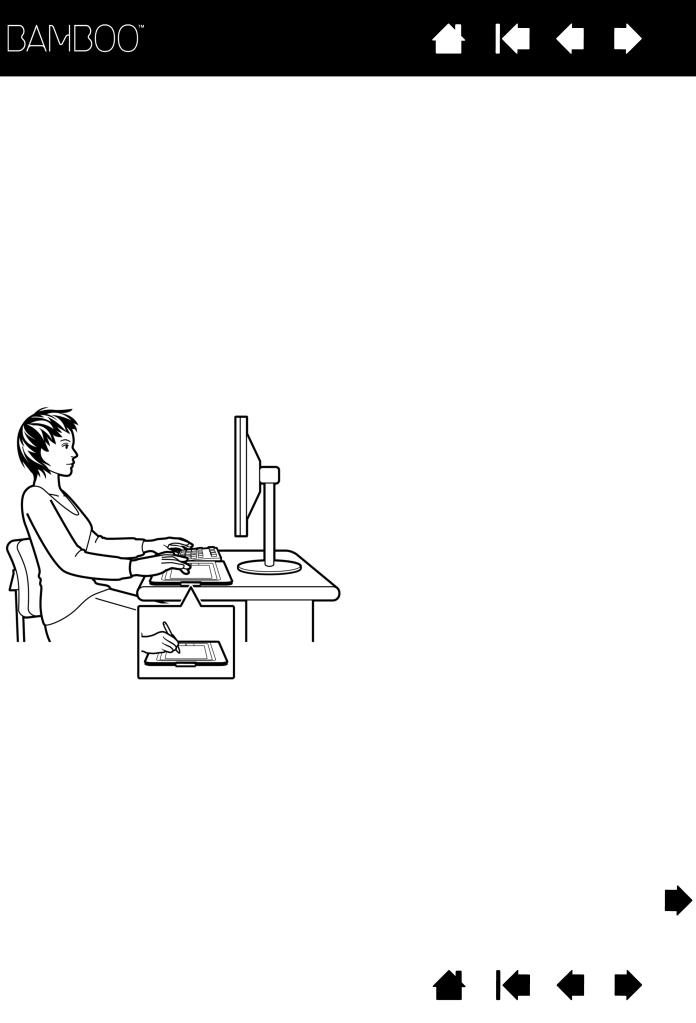
To minimize fatigue, comfortably organize your work area. Position your tablet, pen (if equipped), and keyboard for easy access without unnecessary reaching. Adjust your monitor so you can view it comfortably with a minimum of eyestrain. For best results, position the tablet so the screen cursor follows the same direction as your hand movements on the tablet.
Ergonomics
Configuring the tablet orientation
Understanding the tablet active area
Working with multiple monitors
Control panel basics
ERGONOMICS
• Take short breaks between tasks to stretch and relax your muscles.
• Use a gentle grip when working with the pen.
• When not actively working with touch, you can rest your fingers and palm on the tablet. Touch data will not be sent when you touch the tablet active area with more than two fingers.
• Alternate tasks and tools throughout the day.
• Maintain a good posture at all times. Minimize awkward postures and repetitive movements that cause discomfort.
• Change your position if you feel any discomfort due to your work position.
• For right-handed use, position the tablet so the input (active) area is located to the right of the ExpressKeys. If using the tablet as a primary pointing device and mouse replacement, consider placing it to the right of your keyboard.
• For left-handed use, position the tablet with the input area to the left of the ExpressKeys. See configuring the tablet orientation for details. If using the tablet as a primary pointing device and mouse replacement, consider placing it to the left of your keyboard.
• If using the tablet primarily as a creative tool, consider placing the tablet below the keyboard, centered with respect to your monitor.
Note regarding RSI: Wacom makes no representation, promise or guarantee that Wacom products will cure or prevent, in whole or in part, mouse-induced repetitive stress symptoms, injuries or conditions. Individual results may vary. Always obtain competent medical advice to determine the most appropriate treatment for your specific situation.
Contents Index
12

Contents Index
13
As you work, you will discover many ways of interacting with your Bamboo tablet. For example:
Visual browsing
Use two fingers on the tablet surface to scroll through and navigate visual media within an application.
Photo editing
Use the pressure-sensitive pen (when equipped) to edit images within a photo or image editing application.
Annotation
Simplify document reviews by using the pen (when equipped) to digitally mark-up and annotate documents.
Presentation
Quickly swipe (flick) two fingers across the tablet surface to quickly move between slides in a presentation.
For details on these and other ways to work with your tablet, see the touch experience with Bamboo or the pen experience with Bamboo.
Contents Index
13

Contents Index
14
CONFIGURING THE TABLET ORIENTATION
You are prompted to choose a default tablet orientation during the initial installation process using the Bamboo Installation CD. At the log-in and user switching screens, the tablet orientation will use the default orientation that was selected when the driver was installed. To change the default orientation, reinstall the driver using the Bamboo Installation CD and when prompted select a new default orientation.
You can also change how your tablet is oriented using the following procedure. However, the default orientation used at the log-in screen will not be affected.
To set up your Bamboo for right-handed operation:
•Open the Bamboo control panel and select the TABLET tab. Choose the RIGHT HANDED option. The tablet driver automatically configures all aspects of the tablet for correct right-handed use.
•Next, physically rotate your tablet so the tablet ExpressKeys are positioned to the left.
To set up your Bamboo for left-handed operation:
•Open the control panel and select the TABLET tab. Choose the LEFT HANDED option. The tablet driver automatically configures all aspects of the tablet for correct left-handed use.
•Next, physically rotate your tablet so the tablet ExpressKeys are positioned to the right.
Contents Index
14
Contents Index
15
UNDERSTANDING THE TABLET ACTIVE AREA
Depending on your tablet model, Bamboo can accept touch input, pen input, or both. Note, however, that pen and touch input cannot be used at the same time.
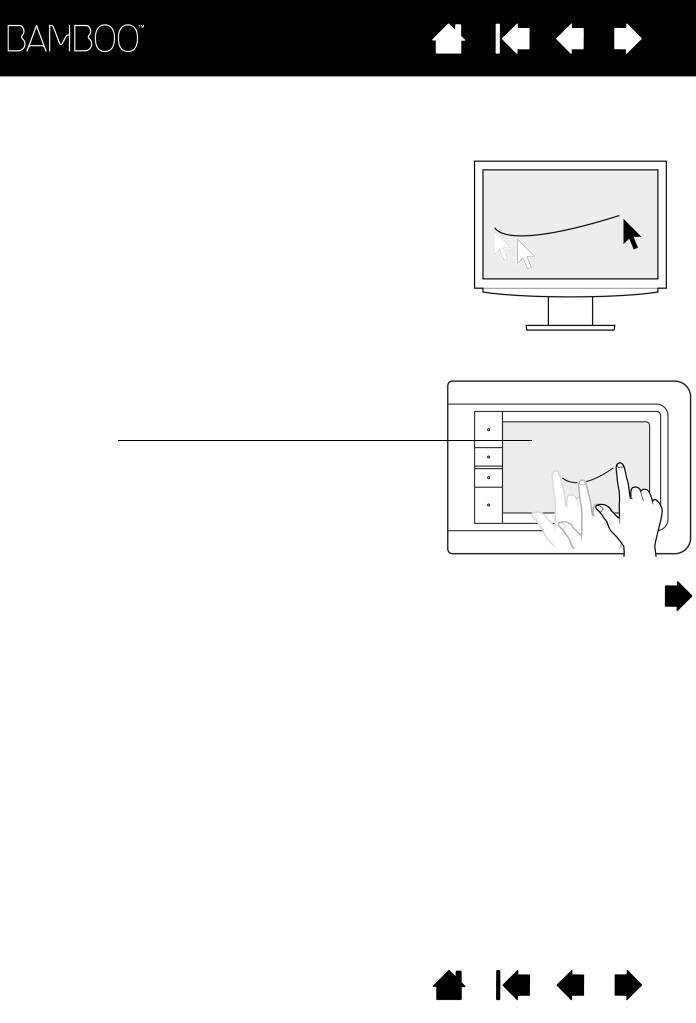
Touch input
On touch-sensitive tablet models, slide your finger across the active area to position the screen pointer.
Use singleor two-finger input for clicking and navigating.
Use two-finger input for gestures that control other functions, such as scrolling and zooming.
Learn about the touch experience with Bamboo.
Tablet active area
The area of your Bamboo tablet that senses touch or pen input.
For tablet models that support both pen and touch input:
•Touch input is disengaged whenever the pen tip or eraser is within the tablet proximity range. Lift the pen and your hand away from the tablet active area to re-enable touch input.
•The pen input area is slightly larger than the touch sensor area.
Contents Index
15
Contents Index
16
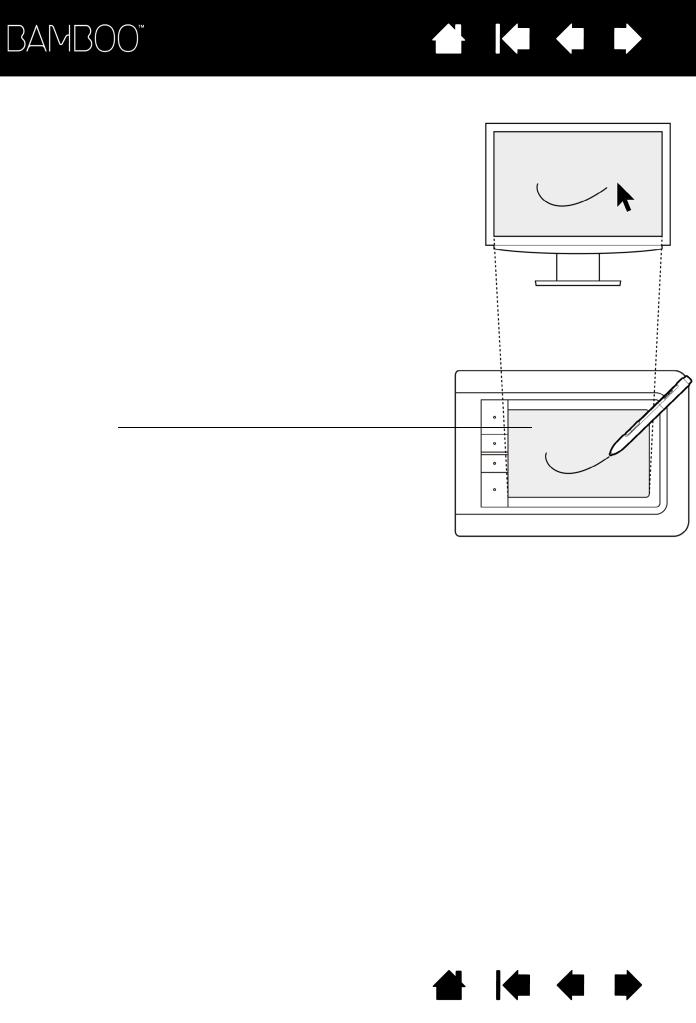
Pen input
The pen works only on the active area of tablet models that support pen input.
Wherever you place the pen on the tablet, the screen pointer will jump to the corresponding point on the screen. The screen pointer indicates pen position, and follows the movement of the pen across the tablet surface.
Learn about the pen experience with Bamboo.
Note: For tablets that support pen input, the active area is a mapped representation of your computer screen(s). By default it uses the entire screen or all screens if you have multiple displays. You can customize the mapping relationship for pen input by setting the tablet mapping.
Tablet active area
The area of your Bamboo tablet that senses touch or pen input.
For tablet models that support both pen and touch input:
•Touch input is disengaged whenever the pen tip or eraser is within the tablet proximity range. Lift the pen and your hand away from the tablet active area to re-enable touch input.
•The pen input area is slightly larger than the touch sensor area.
Contents Index
16
Contents Index
17
WORKING WITH MULTIPLE MONITORS
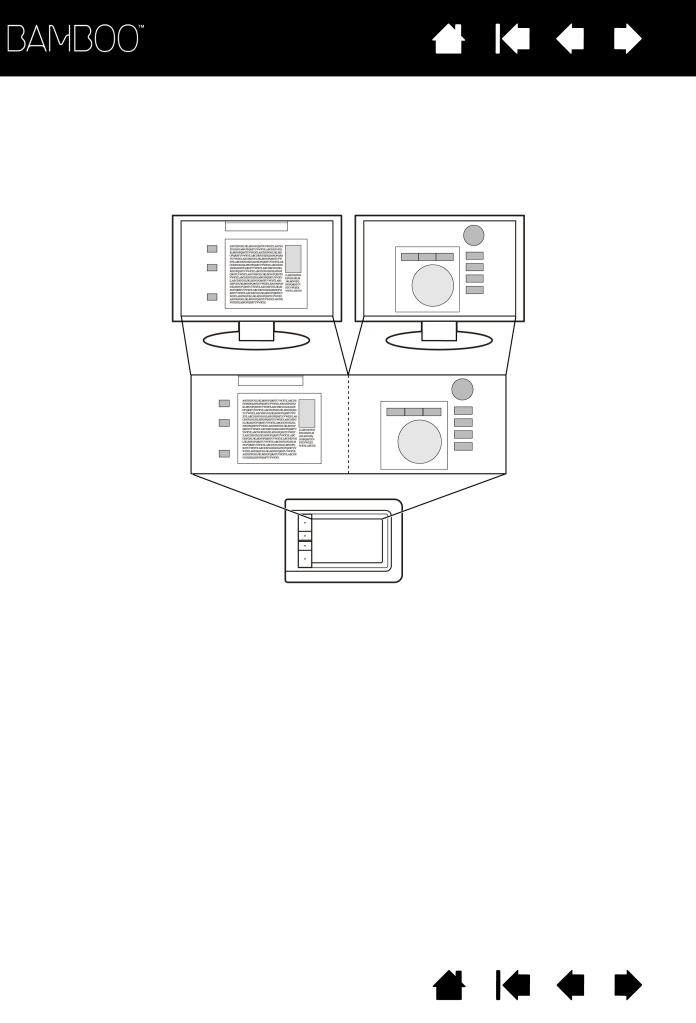
If your computer is equipped with more than one monitor, Bamboo will map to your monitors based upon how they are configured in the display properties control panel.
•If more than one monitor is in use and you are in extended monitor mode, the tablet maps to all monitors as if they were one large display. The below image illustrates a tablet mapping to the entire system desktop, which is displayed on the two monitors.
Monitor 1 |
Monitor 2 |
•If your monitors are in mirror mode (both monitors display the same content), the tablet maps to the entire space on each monitor and the screen cursor is displayed on each monitor simultaneously.
See your hardware and operating system documentation for details on configuring your computer and operating system for use with multiple monitors.
Note: The pen can also be customized to map to a single monitor, or to a portion of the monitor area. See setting the tablet mapping.
CONTROL PANEL BASICS
After mastering the basics of using your Bamboo tablet, you may want to customize the way touch or pen input works. The Bamboo control panel is where you customize your Bamboo tablet settings.
Opening the control panel
Control panel overview
Contents Index
17

Contents Index
18
USING YOUR BAMBOO
If you are new to using Bamboo, read the following sections.
The touch experience with Bamboo
The pen experience with Bamboo
THE TOUCH EXPERIENCE WITH BAMBOO
Bamboo is designed to enhance the way you work. Touch input enables you to interact with a computer using only your fingertips on the Bamboo tablet.
First learn the basic actions to navigate and perform typical mouse operations. Then learn the gestural movements to control other functions such as scrolling, zooming, and rotating.
Touch input is activated whenever you touch the tablet’s active area.
•Oneand two-finger input only is recognized by the tablet. When not actively working with touch, you can rest your fingers and palm on the tablet. Touch data will not be sent when you touch the tablet active area with more than two fingers.
•When using two-finger input methods, you can generally position your fingers as far apart as you find comfortable. However, be aware that touching the tablet with your fingers set too closely together may be interpreted as coming from a single finger, or confused with which finger initiated or performed an action or gesture.
•As you learn the different input methods, experiment with what works best for you. Take care to prevent accidental touch input. For example, if your small finger or the palm of your hand touches the active area of the tablet while you are navigating or performing a touch action, then your input may be interrupted or you may trigger an unanticipated right-click.
Note: For tablet models that support both pen and touch input, the pen disengages touch input whenever the pen tip or eraser is within the tablet proximity range. Lift the pen and your hand away from the tablet active area to re-enable touch input.
Navigating with touch
Customizing touch
ExpressKey basics
Customizing the ExpressKeys
Contents Index
18
Contents Index
19
NAVIGATING WITH TOUCH
The touch input feature of your Bamboo tablet enables you to control a computer using only your fingertips on the tablet surface. See understanding the tablet active area.
Before learning how to control your computer with touch input, familiarize yourself with the following concepts:
CONCEPT |
DESCRIPTION |
|
|
Track |
Touch and move a single finger across the tablet surface. |
|
|
Tap |
Touch and lift a single finger from the tablet. |
|
|
Pan |
Touch the tablet surface with two fingers and move them in the same |
|
direction. |
|
|
Swipe |
Touch the tablet surface with two fingers and move them in the same |
|
direction at a relatively high speed. |
|
|
Pinch |
Touch the tablet with two fingers spaced slightly apart. While still |
|
touching the tablet surface, move or ‘pinch’ your fingers together. |
|
|
Expand |
Touch the tablet with two fingers spaced closely together. While still |
|
touching the tablet surface, move your fingers apart. |
|
|
Twist |
Touch the tablet with two fingers spaced slightly apart and move |
|
(rotate) them in a circular fashion, or move them in opposing directions. |
|
You can also hold one finger stationary and track your other finger |
|
around the stationary finger. |
You can customize your touch experience and also use the ExpressKeys to perform some touch functions.
Contents Index
19
Contents Index
20
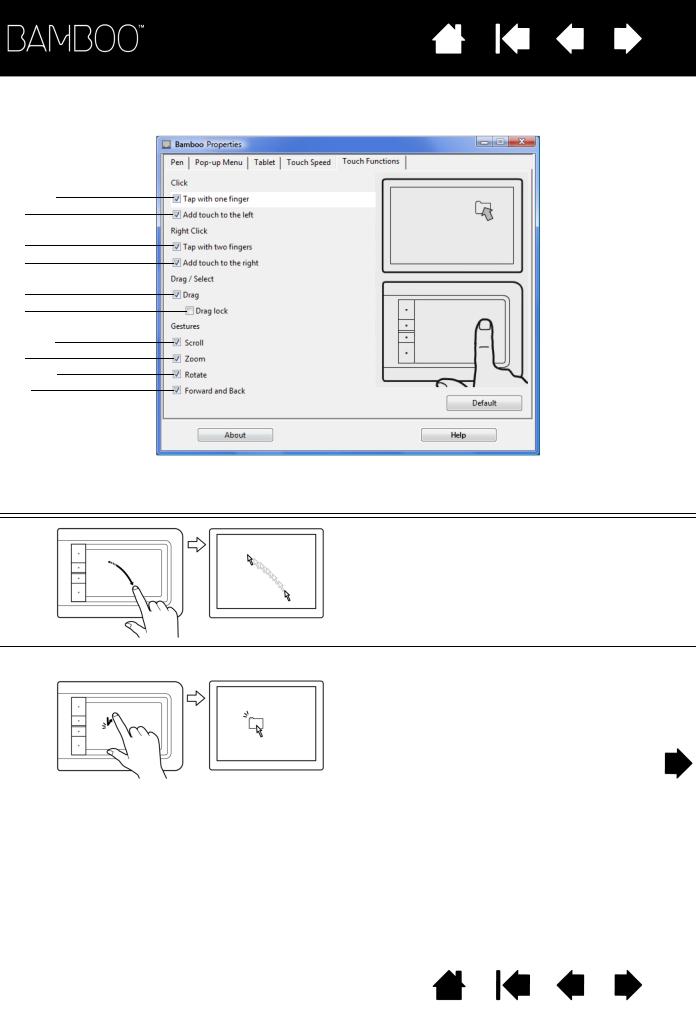
Touch input options can be enabled or disabled within the Bamboo control panel and are dependent upon application support. Touch actions and gestures are available when selected in the TOUCH FUNCTIONS tab.
1A, 1B
2
3
4
5
6
7A, 7B
8
9A, 9B
10
BASIC ACTIONS enable you to navigate and perform typical mouse operations.
Track
Use a single finger to move the screen cursor.
Touch and slide your finger across the tablet surface.
1A |
TAP WITH ONE FINGER |
Click (single-finger tap) |
Using a single finger, track to an item. Lift your finger and tap to select.
Alternatively, you can track to an item and then press an ExpressKey set to CLICK.
Contents Index
20
Contents Index
21
1B |
TAP WITH ONE FINGER |
Double-click |
Using a single finger, track to an item. Lift your finger and tap twice.
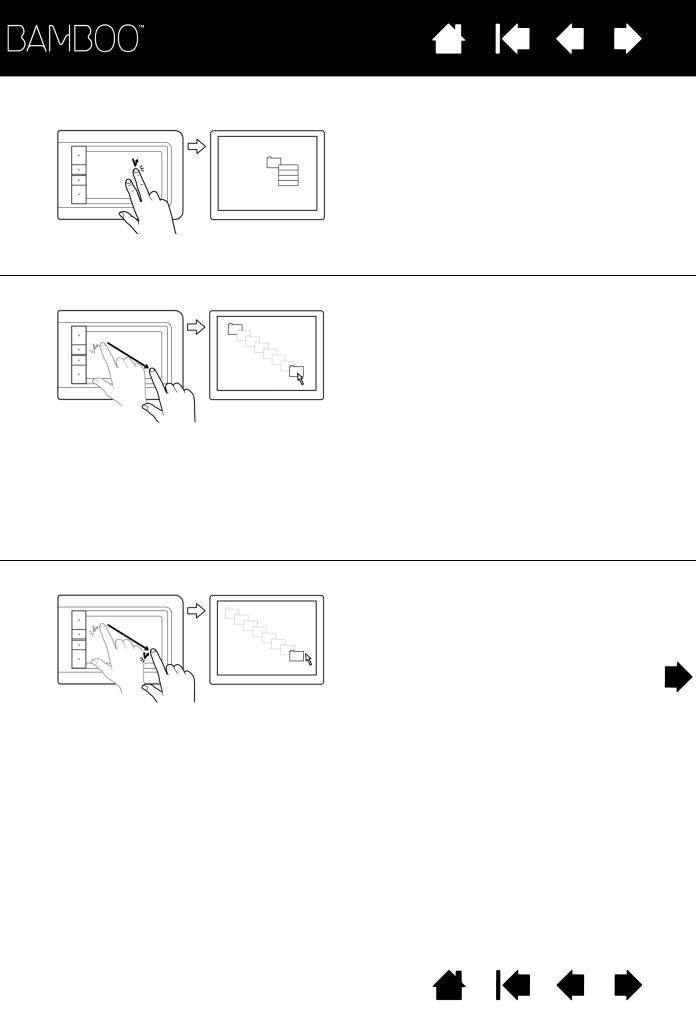
2 |
ADD TOUCH TO THE LEFT |
Select and drag (add touch to left) |
Using a single finger, track to an item. Select by touching your thumb or a second finger to the left of that finger. (If you will be dragging an item or selecting blocks of text, we recommend using two fingers instead of your finger and thumb).
• To move the selected item, continue moving both fingers across the tablet.
• To highlight a text block, continue moving both fingers across the tablet as you select text.
• You can also extend a drag without releasing the selection. To do this, lift the first finger and move your second finger to a new position. Then again touch the first finger to the tablet and continue to drag with both fingers.
Lift your thumb or second finger to release.
Note: If the tablet is set for left-handed orientation, touch to the right of the primary finger.
3 |
TAP WITH TWO FINGERS |
Right-click (two-finger tap) |
To right-click and bring up a context menu at the screen cursor position, tap the tablet surface with two fingers spaced slightly apart. Use a quick tapping motion with both fingers at the same time.
You can then track to an option in the menu and select it by tapping your finger.
Alternatively, you can open a context menu by tracking to an item and then pressing an ExpressKey set to RIGHT CLICK.
Contents Index
21
Contents Index
22
4 |
ADD TOUCH TO THE RIGHT |
Right-click (add touch to right) |
Using a single finger, track to an item. Then with a second finger touch and release to the right of that finger. Releasing your finger issues a right-click and brings up a context menu at the screen cursor position.
You can then track to an option in the menu and select it by tapping your finger.
Note: If the tablet is set for left-handed orientation, touch to the left of the primary finger.
5 |
DRAG |
Select and drag (DRAG LOCK disabled) |
Using a single finger, tap on an item to select. Then track (slide) your finger across the tablet to drag. Lift your finger to release the item. You can also select and drag with two fingers.
Alternatively, you can drag by tracking to an item, pressing an ExpressKey set to CLICK, and then continuing to move your finger across the tablet surface. Release the ExpressKey to release the item.
Tip: You can select and drag multiple items on the system desktop.
• For Windows, press the CTRL or SHIFT key as you tap to select multiple items.
• For Macintosh, press the SHIFT or COMMAND key as you tap to select multiple items.
6 |
DRAG LOCK |
Drag lock (DRAG LOCK enabled) |
Using a single finger, tap on an item to select. Then track (slide) your finger across the tablet to drag. Tap again to release the item.
Contents Index
22
Contents Index
23
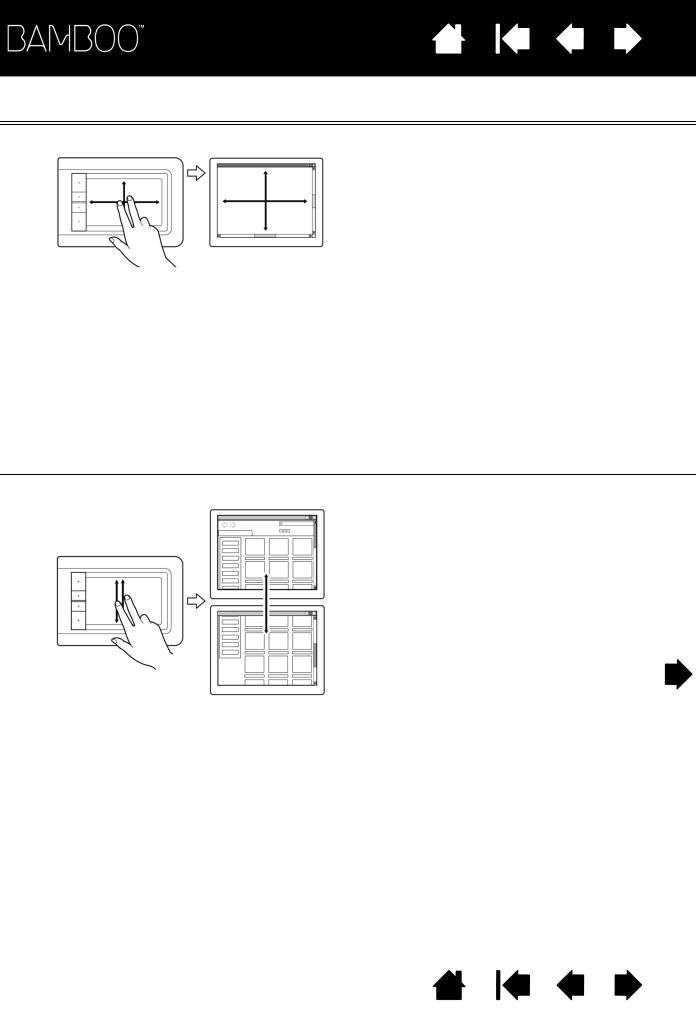
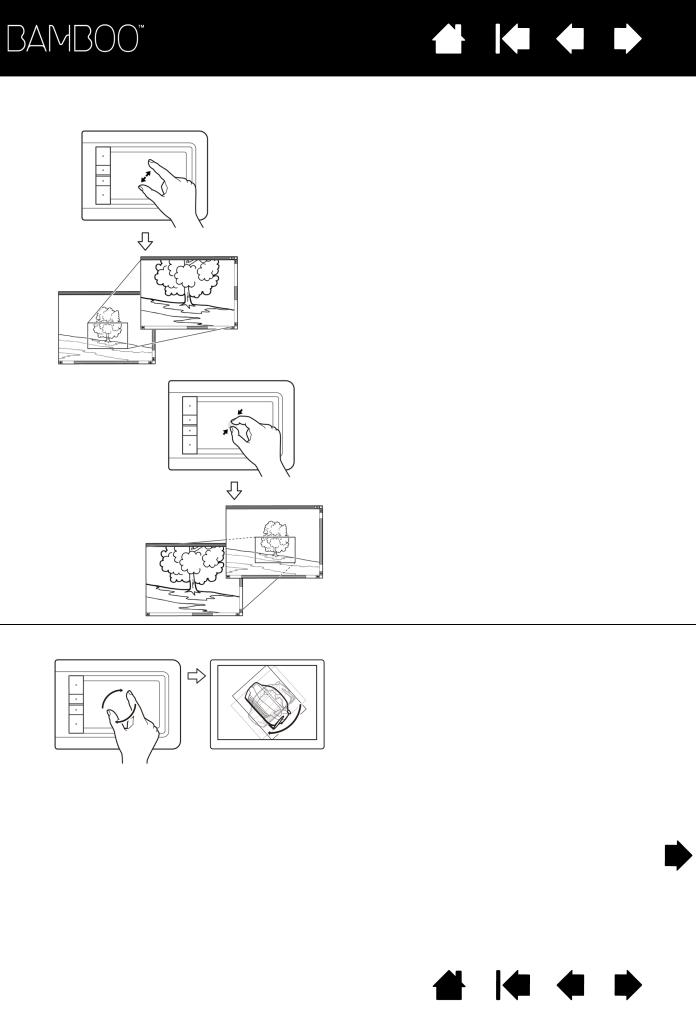
GESTURES enable you to control functions such as scroll, zoom, and rotation.
7A |
GESTURES SCROLL |
Scroll |
Place two fingers on the tablet surface. Using a smooth motion, move your fingers together in parallel.
• Scroll up by moving your fingers in an upward motion.
• Scroll down by moving your fingers in a downward motion.
• Scroll left by moving your fingers in a leftward motion.
• Scroll right by moving your fingers in a rightward motion.
Tips:
Flick your fingers at the end of the gesture to continue scrolling for a short time after your fingers leave the tablet.
For windows that scroll vertically and horizontally, move your fingers in any direction and the document view will follow.
7B |
GESTURES SCROLL |
Fast scroll |
Quickly move (or flick) two fingers together, lifting your fingers at the end of the motion.
• Fast scroll up by flicking your fingers in an upward motion.
• Fast scroll down by flicking your fingers in a downward motion.
Note: Fast scrolling works only for vertical scrolling.
Contents Index
23
Contents Index
24
8 |
GESTURES ZOOM |
Zoom |
First place two fingers on the tablet surface.
• Zoom-in by moving (expanding) your fingers away from one another.
• Zoom-out by moving (pinching) your fingers toward one another.
Note: If zoom functions do not operate correctly within Adobe Photoshop®, verify that the ZOOM WITH SCROLL WHEEL function is selected within the Photoshop PREFERENCES options.
9A |
GESTURES ROTATE |
Rotate (two finger rotate) |
Place two fingers diagonally on the tablet surface and then rotate them clockwise or counterclockwise.
For best recognition of this gesture, start with your fingers positioned diagonally on the tablet surface and keep them at least 25 mm (1 inch) apart.
Note: The rotation gesture may work differently depending on the application you are working with. For example, rotation may work smoothly, in 90-degree increments, or not at all.
Contents Index
24
Contents Index
25
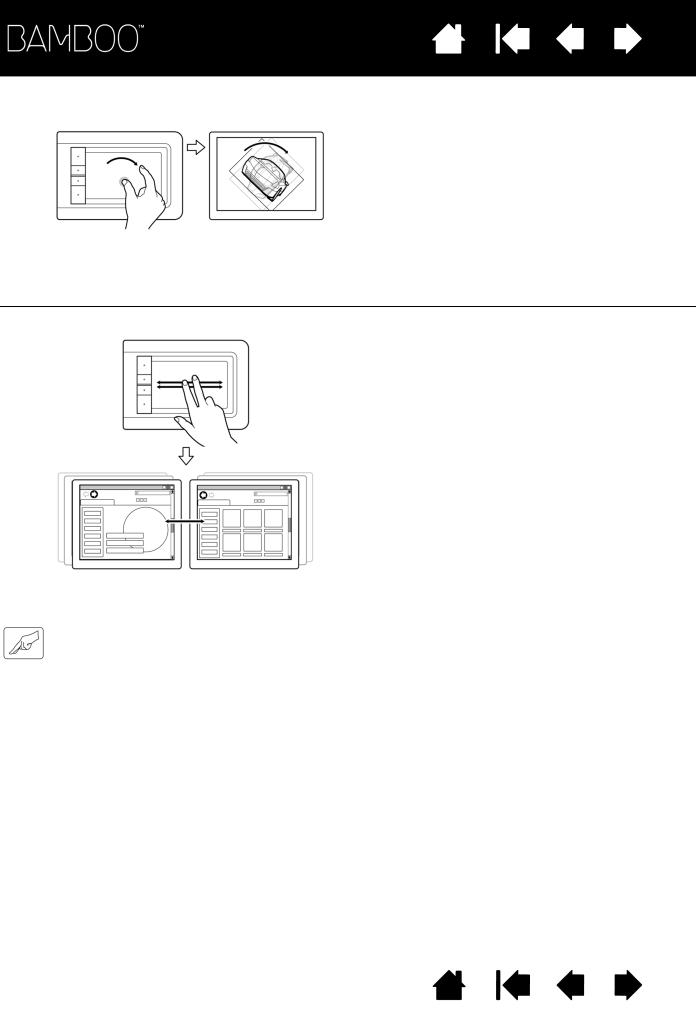
9B |
GESTURES ROTATE |
Rotate (rotate around finger) |
Place two fingers diagonally on the tablet surface. Keep one finger stationary and move the other finger around it.
For best recognition of this gesture, start with your fingers positioned diagonally on the tablet surface and keep them at least 25 mm (1 inch) apart.
Note: The rotation gesture may work differently depending on the application you are working with. For example, rotation may work smoothly, in 90-degree increments, or not at all.
10 |
GESTURES FORWARD & BACK |
Forward or Back (swipe right or left) |
Quickly swipe (or flick) two fingers together, lifting your fingers at the end of the motion.
• Send a ‘Forward’ command in most browsers and picture viewers by flicking your fingers in a generally rightward motion.
• Send a ‘Back’ command in most browsers and picture viewers by flicking your fingers in a generally leftward motion.
Tips:
Swiping is similar to using the right and left arrow keys in document viewers.
Use the swipe gestures to page forward or back in most web browsers.
CUSTOMIZING TOUCH
Use the Bamboo control panel to customize the touch input options for the way you like to interact with your tablet and computer.
Opening the control panel
Control panel overview
Customize your touch experience
Contents Index
25

Contents Index
26
EXPRESSKEY BASICS
Most Bamboo tablet models feature customizable ExpressKeys. Note that ExpressKeys are not available for Bamboo Pen (model CTL-460).
ExpressKeys
Press individual keys to perform frequently used functions or keystrokes. ExpressKeys can also be used to modify touch or pen input properties as you work.
Consider some of these alternate ways of using the keys:
•Set a key to a commonly used keyboard shortcut.
•Set a key to launch a commonly used file or application, such as your email program.
•Choose from any of the other available functions.
Note: The ExpressKeys can be operated in combination with one another. For example, if you program one key to simulate the CTRL key and another to simulate an ALT keystroke, when you press both keys at the same time a CTRL+ALT is simulated.
ExpressKeys configuration when positioned on the left side of the tablet (RIGHT HANDED orientation)
ExpressKey default settings:
TOUCH TOGGLE
(FORWARD for Bamboo Touch)
ExpressKeys configuration when positioned on the right side of the tablet (LEFT HANDED orientation)
BACK
RIGHT CLICK
CLICK
CUSTOMIZING THE EXPRESSKEYS
Use the Bamboo control panel to customize the ExpressKey options.
Opening the control panel
Control panel overview
Setting tablet and ExpressKey functions
Contents Index
26
Contents Index
27
THE PEN EXPERIENCE WITH BAMBOO
Bamboo is designed to enhance the way you work. Bamboo tablet models equipped for pen input enable you to interact with a computer using the pen on the active area of the tablet. The pen is cordless, battery free, and pressure-sensitive.
Note: For Bamboo tablets that support both pen and touch input, the pen disengages touch input whenever the pen tip or eraser is within the tablet proximity range. Lift the pen and your hand away from the tablet active area to re-enable touch input. If you experience unintended touch input from your hand, manually disable touch by pressing an Expresskey set to Touch Toggle. After you are done working with the pen, press the ExpressKey again to re-enable touch. See also setting tablet and ExpressKey functions.
Holding the pen
Using the pen on the tablet
Customizing pen input
ExpressKey basics
Customizing the ExpressKeys
Customizing the Pop-up Menu
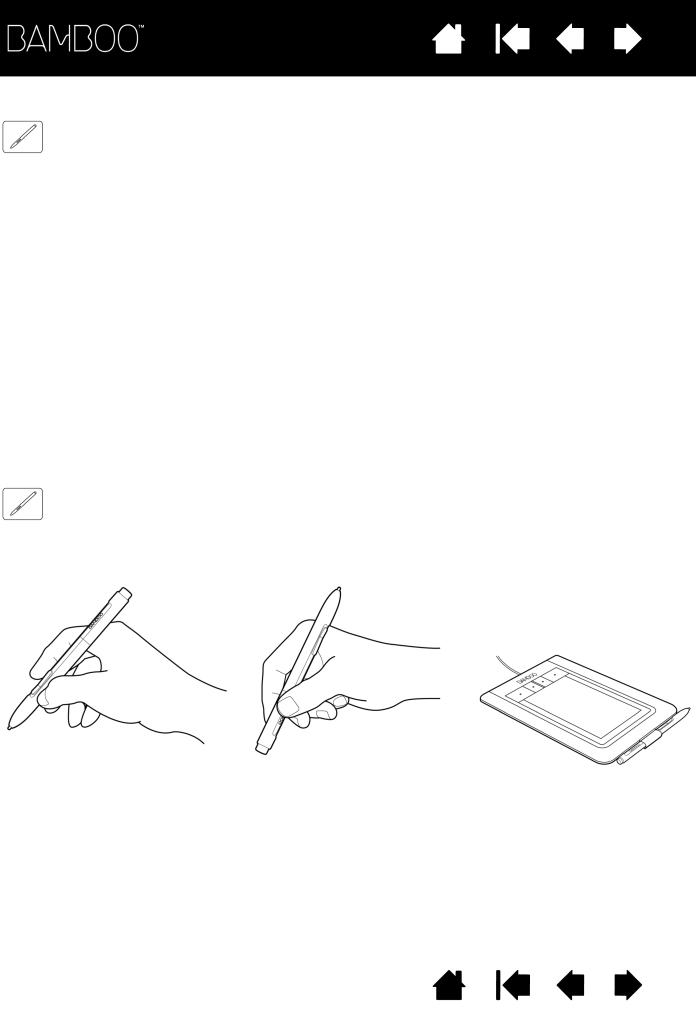
HOLDING THE PEN
Hold the pen like you would hold a normal pen or pencil. Make sure the pen buttons are in a convenient location where you can toggle them with your thumb or forefinger, but not accidently press them while drawing or positioning with the pen. Tilt the pen in any way that feels most comfortable.
When you are not using the pen, store it in the pen holder. The eraser end of the pen should be inserted first into the loop.
Position for drawing and navigation |
Position for erasing |
Important: When not in use, place the pen in the pen holder or lay it flat on your desk. To maintain the sensitivity of your pen, do not store the pen in a container where it will rest on the tip or eraser (when equipped). Leaving the pen on the tablet may interfere with screen cursor positioning when using other pointing devices, or may prevent your computer from going to sleep.
Contents Index
27
 Loading...