


Winter Warm |
Small Insert |
Homeowner’s |
Installation |
and Operating |
Manual |
For Use in North America |
SAFETY NOTICE: IF THIS APPLIANCE IS NOT PROPERLY INSTALLED, OPERATED AND MAINTAINED, A HOUSE FIRE MAY RESULT.
TO REDUCE THE RISK OF FIRE, FOLLOW THE INSTALLATION INSTRUCTIONS. FAILURE TO FOLLOW INSTRUCTIONS MAY RESULT IN PROPERTY DAMAGE, BODILY INJURY OR EVEN DEATH. CONTACT LOCAL BUILDING OFFICIALS ABOUT RESTRICTIONS AND INSTALLATION INSPECTION REQUIREMENTS IN YOUR AREA.
Do Not Discard This Manual: Retain for Future Use
2000888 5/06 Rev. 13

WinterWarm Small Insert
Introduction
Thank you for purchasing a Vermont Castings WinterWarm Small Insert, an efficient fireplace carefully engineered to bring you the latest in wood combustion principles and modern foundry technology.
While it can be used to transform a traditional masonry fireplace into a powerful heater, it is also designed to be installed into a listed factory-built fireplace where no masonry fireplace and chimney exists.
Whichever installation you have chosen, you can count on years of comfortable heating and pleasurable fire-view- ing if you operate and maintain it according to the directions in this Owner’s Guide.
The WinterWarm Small Insert has been tested and listed by Inchcape Testing Services / Warnock Hersey Inc. of Middleton, Wisconsin according to ANSI/UL 1482 for the United States and ULC S628 for Canada. The WinterWarm Small Insert is listed to, and in compliance with, the standards set forth by the Federal Environmental Protection Agency, 40 CFR Part 60.532(b), as stated on the permanent label attached to each appliance.
This manual describes the installation and operation of the WinterWarm Small Insert catalytic-equipped wood heater. This heater meets the U.S. Environmental Protection Agency’s emission limits for wood heaters sold after July 1, 1990. Under specific test conditions this heater has been shown to deliver heat at a rate ranging from 8,700 to 31,000 Btu/Hr.
For more complete details on WinterWarm Small Insert performance and specifications, please refer to Page 3. The WinterWarm Small Insert is designed, tested and listed for burning wood. Do not burn other fuels.
We recommend that you hire a professional installer to install your WinterWarm Small Insert, or to advise you on the installation should you attempt to install it yourself.
Please read the sections of this manual which apply to your installation before you install and use your WinterWarm Small Insert.
Failure to follow these instructions may result in property damage, bodily injury or even death.
Save These Instructions for Future Reference
Table of Contents |
|
Specifications ......................................................... |
3 |
Installation .............................................................. |
4 |
Operation................................................................ |
9 |
Maintenance......................................................... |
14 |
Catalytic Combustor Appendix ............................. |
20 |
Replacement Parts............................................... |
21 |
Proposition 65 Warning: Fuels used in gas, woodburning or oil fired appliances, and the products of combustion of such fuels, contain chemicals known to the State of California to cause cancer, birth defects and other reproductive harm.
California Health & Safety Code Sec. 25249.6
The WinterWarm Small Insert is designed, tested and listed for burning wood. Do not burn other fuels.
The WinterWarm Small Insert is not listed for mobile home installations.
Failure to follow these instructions may result in property damage, bodily injury or even death.
WARNING
This fireplace has not been tested with an unvented gas log set. To reduce the risk of fire or injury, do not install an unvented gas log set into this fireplace.
2 |
2000888 |
WinterWarm Small Insert
Specifications
WinterWarm Small Insert
EPA Emissions Rating....................... |
gph, catalytic 2.1* |
Range of heat output* ................. |
8,700 - 31,100 Btu/hr |
Maximum heat output**........................... |
30,000 Btu/hr |
Area heated***............................................ |
1,000 sq. ft. |
Size of wood splits.................................... |
18” (460mm) |
Fuel Capacity ........................................ |
30lbs. (13.5kg) |
Loading.................................................................. |
Front |
Flue size..................................................... |
6” (150mm) |
Fireplace Insert weight ......................... |
285lbs. (130kg) |
Primary Air Control ........................ |
Manual/thermostatic |
Secondary Air Control ............................ |
Self-regulating |
Glass panel ......................... |
High-temperature ceramic |
Flue exit position ..................................................... |
Top |
Blower rating ...............................110cfm. (115V, 60Hz) *Under specific test conditions used during EPA emissions standard testing.
**This value can vary depending on how the unit is operated, and the type and moisture content of the fuel used. Figure shown is based on maximum fuel consumption obtained under laboratory conditions and on average efficiencies.
***These values are based on operation in buildingcode conforming homes under typical winter climate conditions in New England. If your home is of nonstandard construction (e.g. unusually well insulated, not insulated, built under ground, etc.) or if you live in a more severe or more temperate climate, these figures amy not apply. Since so many variables affect performance, consult your Vermont Castings’ Authorized Dealer to determine realistic expectations for your home.
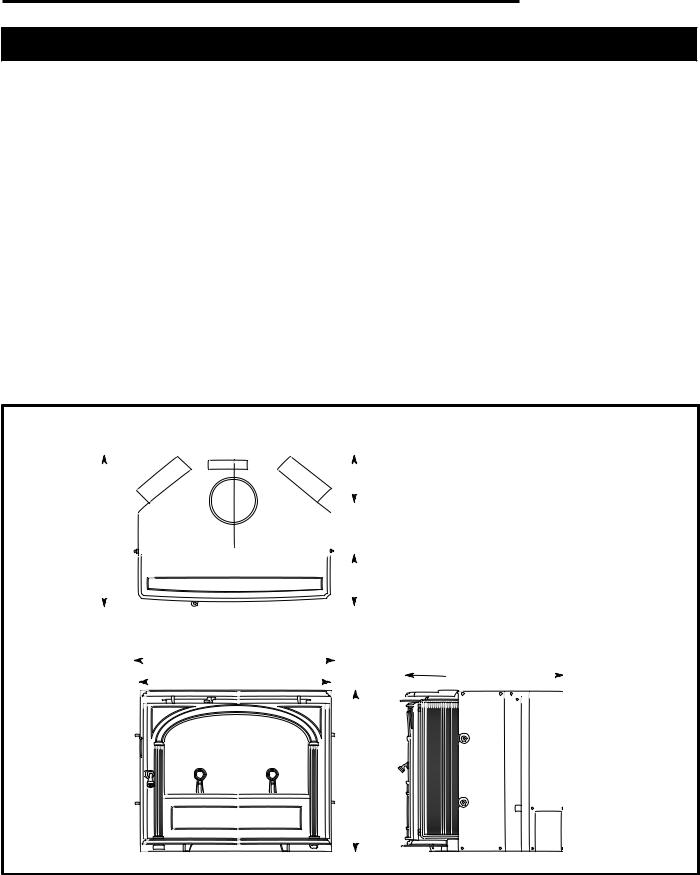
 16 " (420mm)
6 " (160mm)
21 " (535mm)
 13" (330mm)
6 " (165mm)
26" (660mm) |
|
25 " (650mm) |
21 " (535mm) |
|
21 " (535mm)
0888
Fig. 1 WinterWarm Small Insert dimensions.
2000888 |
3 |

WinterWarm Small Insert
Installation
Installing the WinterWarm Small Insert into an existing masonry or factory-built fireplace is an effective way to add an efficient heater to your home. The existing fireplace and chimney must meet certain requirements.
Requirements for Existing Fireplaces
The WinterWarm Small Insert is listed for installation within a properly built masonry or heat circulating, ma- sonry-type fireplace that is constructed in accordance with the requirements of recognized building codes. A heat-circulating masonry-type fireplace must conform to building code standards for masonry fireplaces, and must consist of a factory-built metal firebox with air circulation pathways that are surrounded by masonry materials. Air circulation pathways must not be blocked by the insert or surround panels.
The fireplace and chimney must be clean and structurally sound. Have them inspected by a qualified professional chimney sweep, a mason, or your Vermont Castings’ Authorized Dealer before the WinterWarm Small Insert is installed. Any deterioration (cracks, loose mortar or loose bricks) must be repaired.
Codes may permit removal of the damper in order to make a positive connection for the vent between the firebox and the chimney. However, the fireplace should not be modified in any way without first checking with your local building inspector or fire marshal. Provision should be made to restore the fireplace to its original condition if the insert is removed. Do not remove bricks or mortar that may jeopardize the compliance of the fireplace with local building codes.
The WinterWarm Small Insert is also listed for installation in tested and listed factory-built fireplaces. Listings for factory-built fireplaces include meeting standards for both the firebox and chimney. Review the owner’s manual, and inspect the fireplace for metal tags or labels which give information concerning installation of inserts into the factory-built fireplace. Codes may permit removal of the damper in order to install a chimney liner. Codes may also permit removal of external trim pieces which do not affect the operation of the unit, as long as the pieces are stored on or within the fireplace for re-assembly if the insert is removed. Air flow within and around the fireplace shall not be altered (louvers or cooling air inlet or outlet ports may not be blocked). Louvered surrounds are permitted. Again, check with
local authorities before making any modifications.
Requirements for Existing Chimneys
Chimney requirements differ for the U.S. and Canada. Specifications for each are listed below. Connect the insert to the chimney in accordance with local codes and the requirements of the listing agency as specified in this manual.
Chimney Height / U.S. and Canada
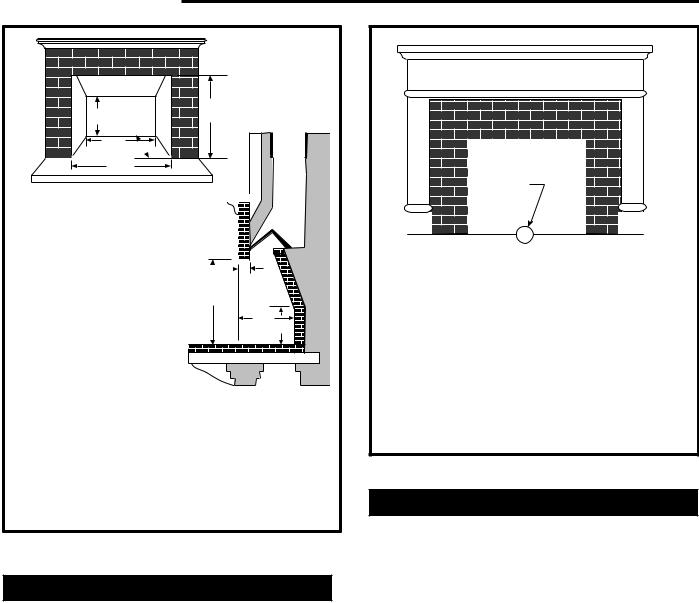
Chimney height should be no less than 15’ (4.5m) above the hearth and no more than 35’ (10.5m).
The chimney should extend at least 3’ (914m) above the highest point where it passes through a roof, and at least 2’ (610mm) higher than any portion of a building
within 10’ (3m). (Fig. 2) |
|
|
|
0 To 10' |
|
|
2' Min. 3' |
0 To 10' |
|
Min. |
|
|
|
2' Min. 3' |
|
|
Min. |
|
Reference |
AC617 |
|
Point |
|
Fig. 2 |
The 2’-3’-10’ rule for chimneys. |
|
Do not connect your WinterWarm small insert to a chimney flue serving another appliance.
U.S.
In the U.S. (ANSI/NFPA 211, 1988), when installed in a masonry fireplace:
•A connector must extend from the flue collar to the flue liner.
•The cross sectional area of the flue must be less than or equal to three times the area of the flue collar. If larger, the chimney must be re-lined.
•Means must be provided to prevent room air passing to the chimney cavity.
•Provision must be made for removal of the insert to clean the chimney flue.
4 |
2000888 |

When the insert is installed in a factory-built fireplace:
•The factory-built chimney must meet type HT requirements of UL 103, ULC S629M or UL 1271988, or be re-lined from the insert to the chimney top.
General Considerations / U.S.
•While not required in most jurisdictions in the U.S., CFM Corporation strongly recommends a full stainless steel chimney liner be installed formthe insert to the chimney top to increase overall performance and reduce yearly maintenance.
•A masonry chimney must be well-constructed and must meet minimum code requirements. The chimney flue should have a code-approved liner made of masonry or pre-cast refractory tiles, straight or flexible stainless steel pipe, or a poured-in-place liner. An unlined chimney must be relined professionally.
•The chimney must have a nominal flue size of 6” (150mm) diameter, but no greater than 3 times larger. A chimney larger than this must be relined.
Be aware that a chimney originally designed for fireplace use may perform differently when used to vent an air-controlled appliance such as your WinterWarm Small Insert - even if the flue is less than 3 times larger than the flue collar. For example, a chimney on an outside wall may not heat up enough to sustain an adequate draft. Such a flue can often be improved if it is relined to reduce its size and/or insulated to keep it warmer.
•A positive flue connection must be made between the Insert and the first masonry tile or prefabricated metal chimney section. A positive flue connection consists of a plate that seals or replaces the fireplace damper and a section of chimney connector that passes through the plate into the chimney. The chimney connector must be a minimum equivalent to a 6” (150 mm) diameter opening and must be 24 gauge or heavier stainless steel.
Chimney Connection systems are available from a variety of manufacturers. Your Vermont Castings dealer can recommend a system that will best meet the re-
quirements of your particular installation.
Sealing Requirements / U.S.
•The chimney must be sealed off from room air, either by a plate at the damper level or by sealing the fireplace opening.
2000888
WinterWarm Small Insert
•Unused openings to the flue must be sealed with masonry to the thickness of the chimney wall. Openings sealed with pie plates or wallpaper are a hazard. In the event of a chimney fire, flames and smoke may be forced from the openings.
Canada
In Canada (CAN/CSA-B365-M91, Section 5), whether installed in a m or factory built fireplace:
•A full chimney liner meeting ULC S635, Class III (stainless steel) must be installed from the insert to the chimney top, and securely attached to both. The damper may be removed to accommodate the liner.
•The opening of the fireplace around the insert must be sealed to prevent room air passing to the fireplace cavity.
•Existing air-circulation chambers in a fireplace with a steel liner may not be blocked.
•Provision must be made for removal of the insert to clean the chimney flue.
•A permanent metal warning label must be affixed to the back of the fireplace stating the fireplace may have been altered to accommodate the insert, and may be unsafe to use as a conventional fireplace. (A Fireplace Modification Tag is included in the hardware bag inside the WinterWarm Small Insert.)
Minimum Fireplace Dimensions
The WinterWarm Small Insert will fit most masonry and factory-built fireplaces. To confirm that it will fit yours, measure the lintel depth, plus the height, width, and depth of your fireplace and hearth. Compare them to the measurements in the accompanying chart. If you choose to install a new hearth over an existing fireplace hearth, be sure to take its thickness into consideration when measuring both front and back height of the
fireplace.
The unit can be installed virtually flush with the fireplace opening or it can extend up to 6³⁄” (172mm) onto the hearth. Figure 3 gives minimum and maximum dimensions for fireplaces which will accommodate the WinterWarm Small Insert.
NOTE: The clearance between the WinterWarm Small Insert and the mantel, top trim and side trim cannot be reduced by installing shields.
Another requirement to consider is the clearance for movable items such as tables, bookcases, rugs, furnishings, and your woodbox. All combustible materials of this type should be a minimum of 48” (1220mm) from the front surface of the WinterWarm Small Insert. Be sure that family members are aware of this requirement as well, so they too will keep objects a safe distance
from the WinterWarm Small Insert. |
5 |
|
WinterWarm Small Insert
E |
|
D,J |
|
|
|
|
B |
C |
|
|
|
|
A,I |
|
Fireplace Minimums |
|
|
|
|
|
|
||||
A. Width at Face |
26¹⁄ ” (673mm) |
|
|
|
|
|
|
|||
B. Width at |
|
|
|
|
|
|
|
|
|
|
9” depth |
26¹⁄ ” (673mm) |
|
|
|
||||||
C. Depth1 |
14¹⁄ ” (370mm) |
|
|
|
||||||
D. Height at Face |
21¹⁄ ” (540mm) |
|
|
|
|
|
||||
H |
|
|
||||||||
|
|
|
||||||||
E. Height at |
|
|
|
|
|
|
|
|
|
|
|
|
|
|
|
|
|
|
|
|
|
15¹⁄ ” depth |
21¹⁄ ” (540mm) D,J |
|
|
|
||||||
C |
E |
Fireplace Maximums |
|
|
H. Lintel depth |
9¹⁄ ” (240mm) |
FP1084 |
I. Width2 |
44¹⁄ ” (1130mm) |
|
J. Height2 |
31” (770mm) |
|
1.The minimum depth must be maintained from the floor of the fireplace to a height of 21¹⁄” (540mm)
2.Though the WinterWarm Small Insert will fit into larger fireplaces, the decorative optional CFM Corporation Surround Panels will not completely cover the fireplace opening if these dimensions are exceeded. Custom made trim pieces may be used.
Fig. 3 Use these measurements to confirm that the WinterWarm Small Insert will fit into your masonry fireplace.
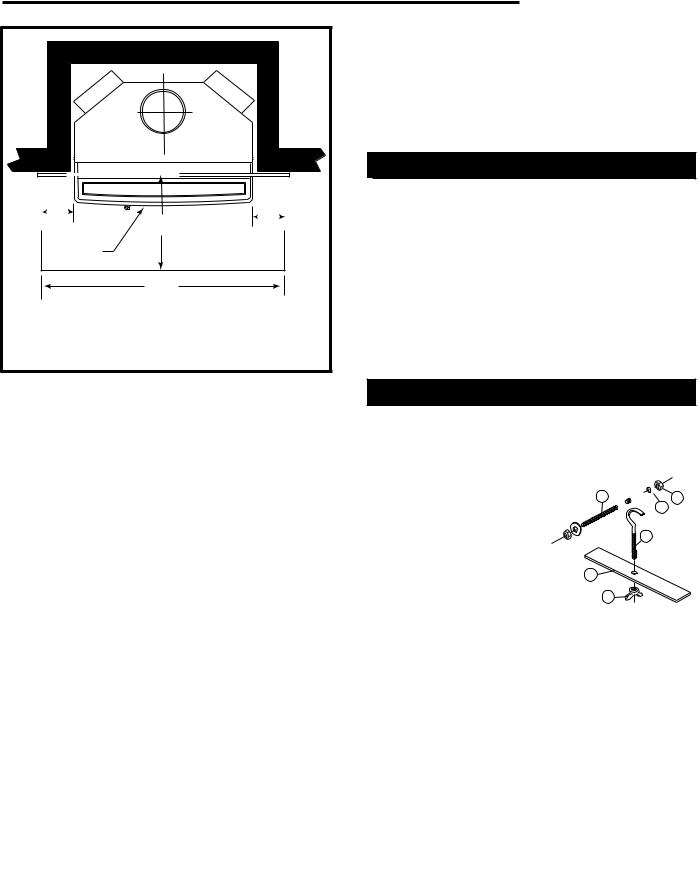
Clearance Requirements
After confirming that your fireplace is the right size, check the clearance to combustibles. First mark with tape the exact center of your fireplace opening on the hearth. Measure the side clearance from this point.
Measure the top trim and/or mantel clearances from the finished hearth surface. Measure the front clearance (to furnishings, etc.) from the fireplace face. (Fig. 4)
A
B
Measure side trim clearance from here
|
|
X |
C |
|
|
|
|
FP1085 |
|
|
|
|
|
|
|
Fireplace Clearances |
|||
A. Mantel* |
34” (865mm) |
|||
B. Top Trim* |
34” (865mm) |
|||
C. Side Trim** |
20¹⁄ ” (510mm) |
|||
* for more details on mantel and top trim, see Note below. ** Where side trim extends more than 2” (50mm) from the
fireplace facing, the side clearance must be no less than 20⁄” (525mm).
Measure the side clearance (C) from the exact center of your fireplace opening on the hearth (X). Measure the top trim (B) and/or mantel clearances (A) from the finished hearth surface. Measure the front clearance (to furnishings, etc.) from the fireplace face.
Fig. 4 Observe these clearances to combustible trim.
Hearth Requirements
In some fireplaces, the hearth in front of the fireplace opening is brick, stone, slate, or some other non-com- bustible material that is in direct contact with concrete poured over earth. These are the only hearths that are considered noncombustible. In other fireplaces, the brick or concrete hearth in front of the fireplace opening is supported by heavy wooden framing. Because neither brick nor concrete has good insulating properties, heat radiated by the fire will pass downward through the hearth to the wooden framing. Such hearths are considered combustible.
Unless the fireplace and hearth are constructed over a completely non-combustible surface (such as unpainted concrete over dirt), a floor protector must be used
in front of and to the sides of the door as protection against spilled coals and embers. Floor protectors must extend at least 8” (203mm) from the side of the door opening, making the protector 41” (1041mm) wide. In addition, the floor protector must extend from the front door opening a minimum of 16” (406mm) in the United States and 18” (457mm) in Canada. (Fig. 5)
6 |
2000888 |
B |
A |
|
|
B |
|
|
|
||
|
|
|
|
|
Shadow |
|
|
|
|
Tray |
|
|
|
|
|
C |
|
|
|
United States |
Canada |
|
||
A. 16“ |
(410 mm) |
18” |
(460 mm) |
|
B. 8” |
(203 mm) |
8” |
(203 mm) |
|
C. 41” |
(1040 mm) |
41” |
(1040 mm) |
FP1095 |
Fig. 5 Unless your fireplace and hearth are constructed over a dirt floor (or unpainted concrete over dirt), you must use a floor protector that satisfies the above requirements.
The approved construction of a floor protector calls for a minimum of 24 gauge galvanized sheet metal or equivalent such as 7/16” Durock® or Wonderboard® or other listed floor protector. The floor protector may be covered with a noncombustible decorative material if desired.
Custom-made floor protectors may be used if they offer the same protection as the approved floor protector described in the preceding paragraph. Durock® or Wonderboard® have a standard K value of 0.84. Cus- tom-built floor protectors must have a K value equal to, or less than 0.84, meaning that heat will transfer at the same rate or more slowly than the tested standard.
To calculate the thickness required for an alternate material to result in a K value of 0.84, first determine the alternate material’s K factor. This information should be available from your local building supply yard. Then, use the following formula to calculate the value:
(K factor |
|
||
of alternate |
|
||
material) |
(Required thickness of |
||
|
X (7/16" [11mm]) = |
||
(0.84) |
alternate material) |
||
|
|||
|
|
||
Let’s use brick as an example, since it is a commonly used hearth material. Its K factor is 5.0.
(5.0) |
X (7/16" [11mm]) = 2.6" (65mm) |
(0.84) |
WinterWarm Small Insert
That is, when using brick for the hearth extension, the brick must be a minimum of 2.6” (65mm) thick. Once you know the K factor of a given material, you can use this same formula to calculate its required thickness for approved hearth protection.
The WinterWarm Small Insert has two leveling screws at the front to accomodate hearth irregularities.
Optional Surround Packages
Custom-made surround panels may be made from any noncombustible material.
CFM Corporation offers both steel and cast iron Surround panel kits, each in two sizes.
|
Enclosure Area |
Steel Surround Trim Kits: |
|
6”, #2970......................... |
36¹⁄ ” x 27” (927 x 686 mm) |
10”, #2971..................... |
44¹⁄ ” x 31” (1130 x 787 mm) |
Cast Iron Surround Trim Kits: |
|
7”, #2972...................... |
40” x 28¹⁄ ” (1016 x 724 mm) |
10”, #2973....................... |
45” x 31” (1143 x 787 mm) |
Installing the WinterWarm Small Insert
The hardware bag included with your WinterWarm contains the Draw-down assembly components that provide a means to secure the chimney connector to the Insert. Be sure you have the following items:
1, 1/4-20 x 6³⁄ ” Threaded Rod (A) 2, 1/4” Washers (B)
2, Hex Head Nuts (C)
1, 1/4-20 x 2” Hook (D) 1, 1” x 6” Steel Bar (E)
1, 1/4-20 Wing Nut (F)
1.Remove or Disable the Fireplace Damper.
A 


 C
C 

 B
B
D
E
F
If codes allow, remove the damper. Many dampers can be removed simply by removing a cotter pin and/or a set screw.
If it is not permissible or possible to remove the damper, secure the damper in the fully open position.
~ NOTE: CANADIAN INSTALLATIONS ~
In accordance with CAN/CSA B365-M91, you must permanently secure the Fireplace Modification Tag to the rear of the fireplace cavity if you have modified the fireplace in any way to accommodate installation of a fireplace insert. This tag is in the hardware bag included with your Insert.
2.Install the Chimney Connector System. Be sure any chimney connector or adapter is properly installed and secured in place.
2000888 |
7 |
WinterWarm Small Insert
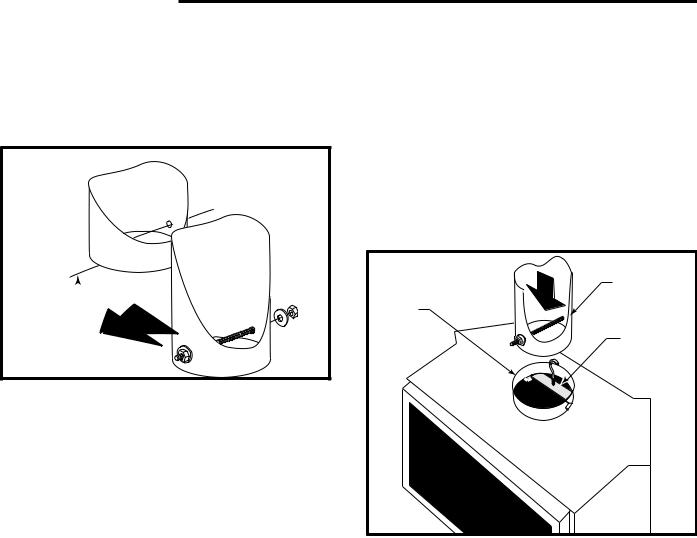
3.Install the Chimney Connector Starter Pipe. (Not supplied)
•Mark and drill two 5/16”, (8mm) holes 1⁄” (41mm) from the lower edge of the pipe. Locate the holes on an axis that will be perpendicular to the fireplace opening when the pipe is installed. (Fig. 6)
1 "  (35mm)
Fireplace
Front
FP1097
Fig. 8 Install the threaded rod inside the Starter Pipe (not a supplied item, starter pipe is available from the Chimney Connector manufacturer).
•Install the threaded rod (A), into the starter pipe using washers and hex nuts (B,C),on the outside of the pipe. Tighten the nuts, but do not distort the pipe opening. (Fig. 6)
•Secure the starter pipe to the chimney connector. (Fig. 7)
4.Install the Floor Protector. Make sure the floor protector satisfies the requirements discussed on Page
6.
5.Install the Optional Outside Air Adapter. Follow the instructions provided with the kit.
6.Install the Optional Surround Kit. Follow the instructions provided with the kit.
7.Slide the Firebox into Position. At least two people will be needed to move the firebox. Position the firebox so the flue collar lines up with the connector.
Use the leveling screws at the front of the Insert to adjust the level. Route the power cord to the side nearest the power supply and test the fans.
8.Join the Chimney Connector to the Flue Collar.
•Assemble the draw-down hook and bar (D,E,F).
•From inside the firebox, reach up through the flue collar and engage the hook over the threaded rod inside the starter pipe. Position the steel bar behind the two tabs within the flue collar and then turn the wing nut clockwise to draw the starter pipe down. (Fig. 7)
9.Connect the Blower power cord to the power supply.
This completes installation of your WinterWarm Small Insert.
Seat the Starter |
Starter Pipe |
|
Pipe on the two |
||
|
||
tabs inside the flue |
|
|
collar |
|
Draw-down Bar Assembly
FP1098
Fig. 7 Attach starter pipe to flue collar.
8 |
2000888 |
 Loading...