


MX-350
Owner’s
Manual

MX-350 Owner’s Manual © 2004 Universal Remote Control, Inc.
The information in this manual is copyright protected. No part of this manual may be copied or reproduced
in any form without prior written consent from Universal Remote Control, Inc. UNIVERSAL REMOTE CON-
TROL, INC. SHALL NOT BE LIABLE FOR OPERATIONAL, TECHNICAL OR EDITORIAL ERRORS/OMIS-
SIONS MADE IN THIS MANUAL. The information in this manual may be subject to change without prior
notice. MX-350 is a registered trademark of Universal Remote Control, Inc. Power of Simple is a trademark of
Universal Remote Control, Inc. All other brand or product names are trademarks or registered trademarks of
their respective companies or organizations.
500 Mamaroneck Avenue, Harrison, NY 10528
Phone: (914) 835-4484 Fax: (914) 835-4532
Thank You!
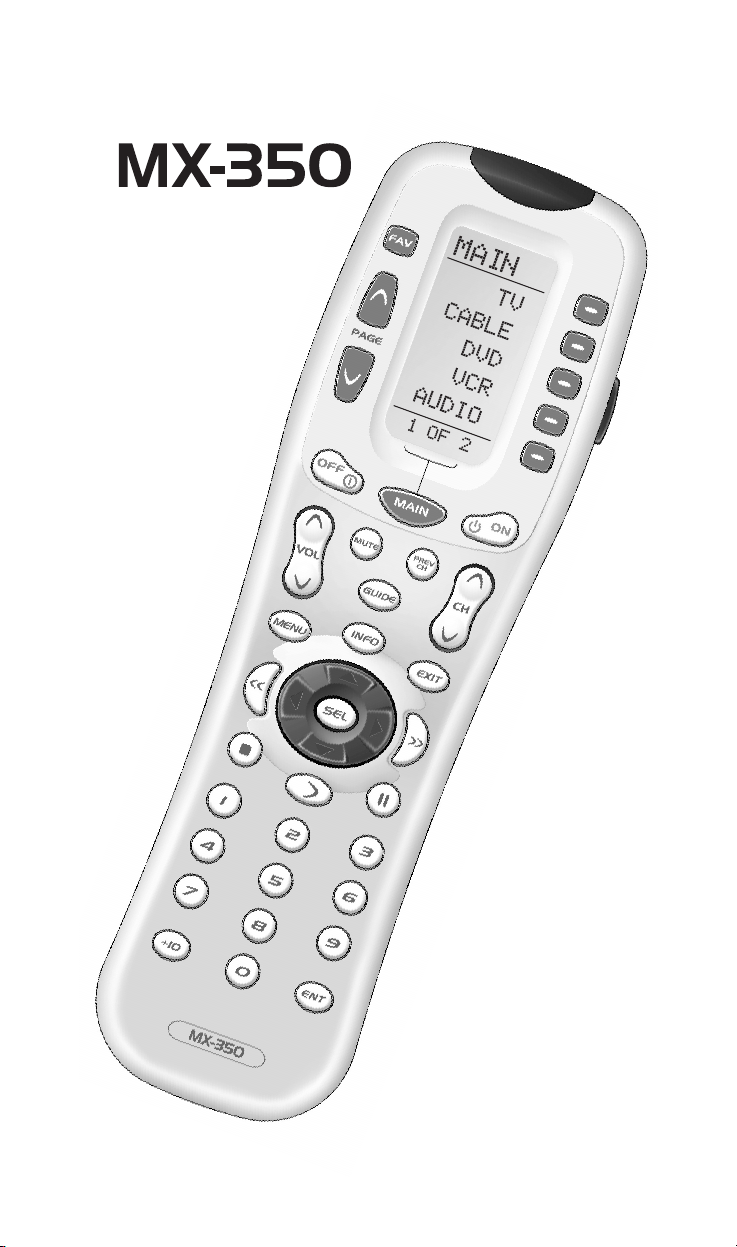
Thank you for purchasing the MX-350 Pre-Programmed and
Learning Remote Control. This manual is designed to assist you
step-by-step as you setup the MX-350 to replace all of your
remote controls and automate your home entertainment system.
TM

1
Table of Contents
Getting Started 2
Button Layout 3
Basic Setup 5
Pre-Programmed Method 5
Learning Method 9
Volume Control Punch Through 12
Advanced Operation 14
Advanced Setup 16
Editing Button Labels 16
Macro Button Setup 19
Favorite Channel Setup 21
Hiding and Adding Pages 23
Erasing 25
Cloning One MX-350-NPK-NPK to Another 26
Recalling Pre-Programmed Settings 27
Utilizing Optional RF Base Stations 28
IR/RF Signal Setting 31
ID # - Setting Base Station Address 33
EMITT - Setting IR Emitter Outputs 34
BLAST - Setting the Front Panel Blaster On or Off 35
Pre-Programmed Code Tables 37
Frequently Asked Questions 61
Warranty 62
Specifications 63
Federal Communication Commission Interference Statement
64
2
Getting Started
Congratulations!
You’ve purchased one of the most advanced and easy to setup control sys-
tems available. The MX-350’s built-in library includes thousands of different
brands and models of remote controls. In most systems, all you have to do
to setup the MX-350 is enter which brands and models you own. If you own
a component too new to be in the library, the MX-350 uses advanced learn-
ing technology to quickly set each MX-350 button, one at at time. Setting up
your MX-350 to replace all your existing remote controls can be done in a
few minutes. Basic Setup is described on pages 5 to 13.
The MX-350’s exciting advanced features automate and customize operation
in many ways. You could use Macro Setup to power on all of your compo-
nents and start the show with the press of one button! With the MX-350’s
unique Favorite Channel capability, you can tune in a channel with the
press of one button instead of entering the entire channel number. Any of
the button names on the display can be edited as you like. It is best to
delay any Advanced Setup (described on pages 14 to 36) until after you
finish Basic Setup.
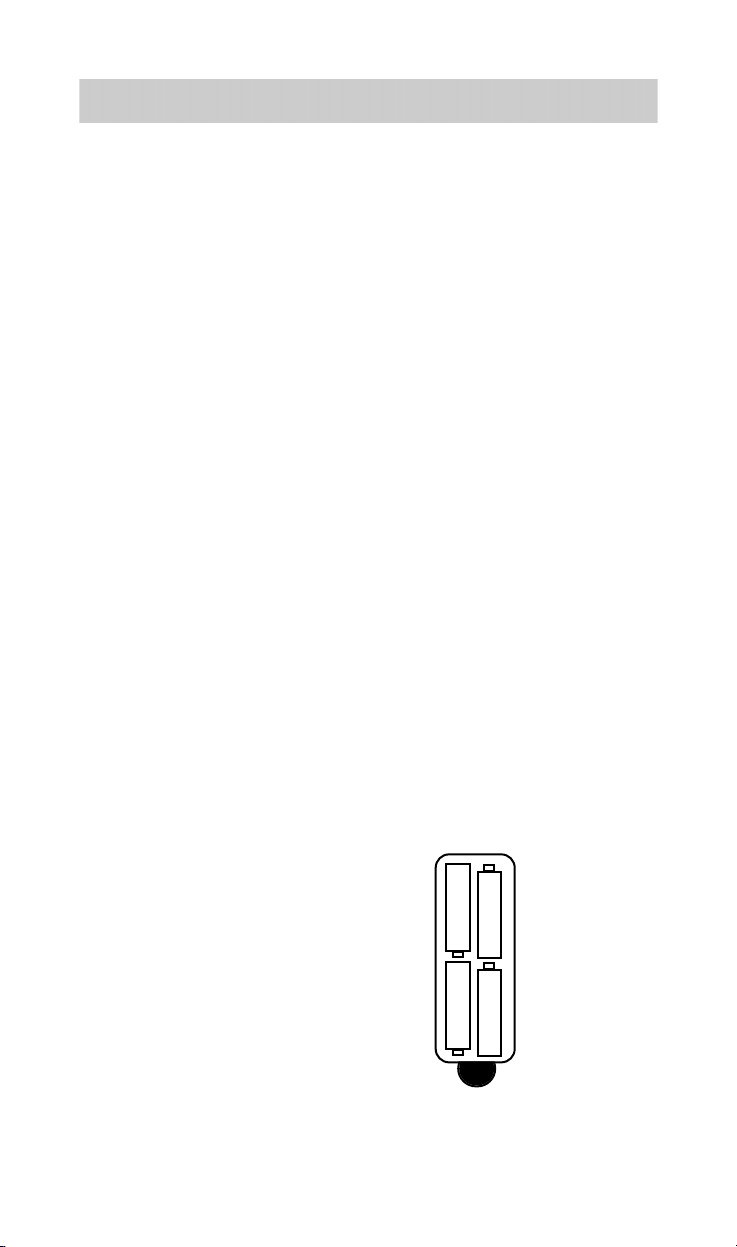
Battery Installation
Remove the battery compartment cover by pressing up the cover lock.
Insert four AAA batteries into the battery compartment as shown in the
diagram.
The MX-350
+
+
+
+
-
-
-
-
3
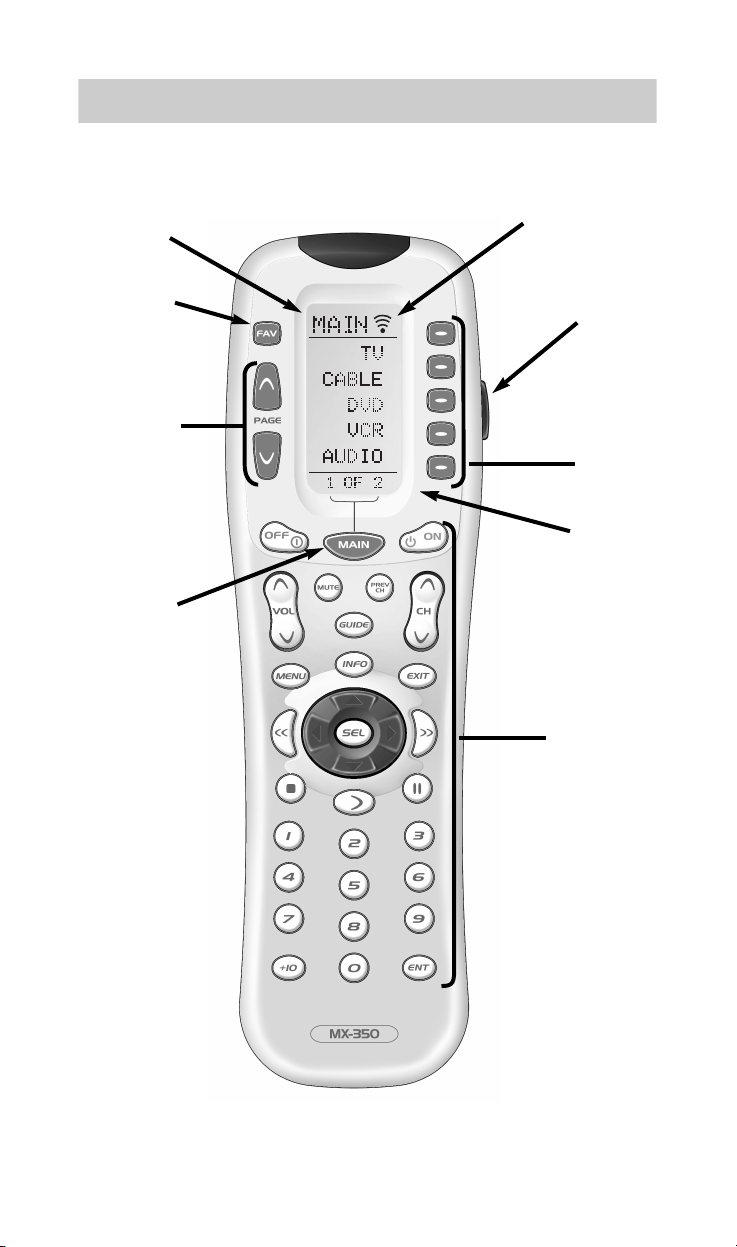
MAIN
Button
takes you
to the
MAIN
Menu.
Screen
Labeled
Display
Buttons
LIGHT
Button
PAGE
Numbers
FUNCTION
Buttons
TITLE
FAVORITE
CHANNEL
Button
PAGE
Buttons
change the
page of
Display
Buttons.
Button Layout
Universal Remote Control, Inc.
Transmitting
“Busy” Signal
Indicator*
*Note: When a command, macro or favorite channel is being transmitted, an icon will appear
in the top right corner of the display. While the MX-350 is “busy”, it will ignore a button push.
4
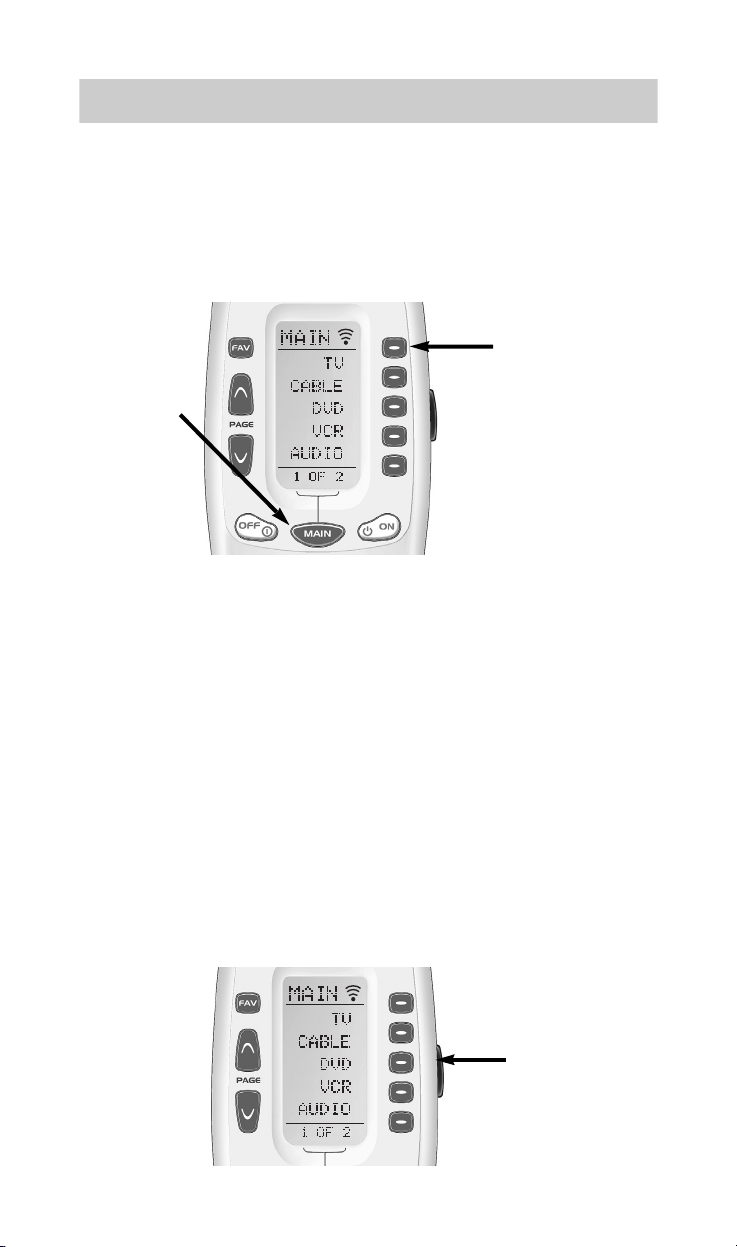
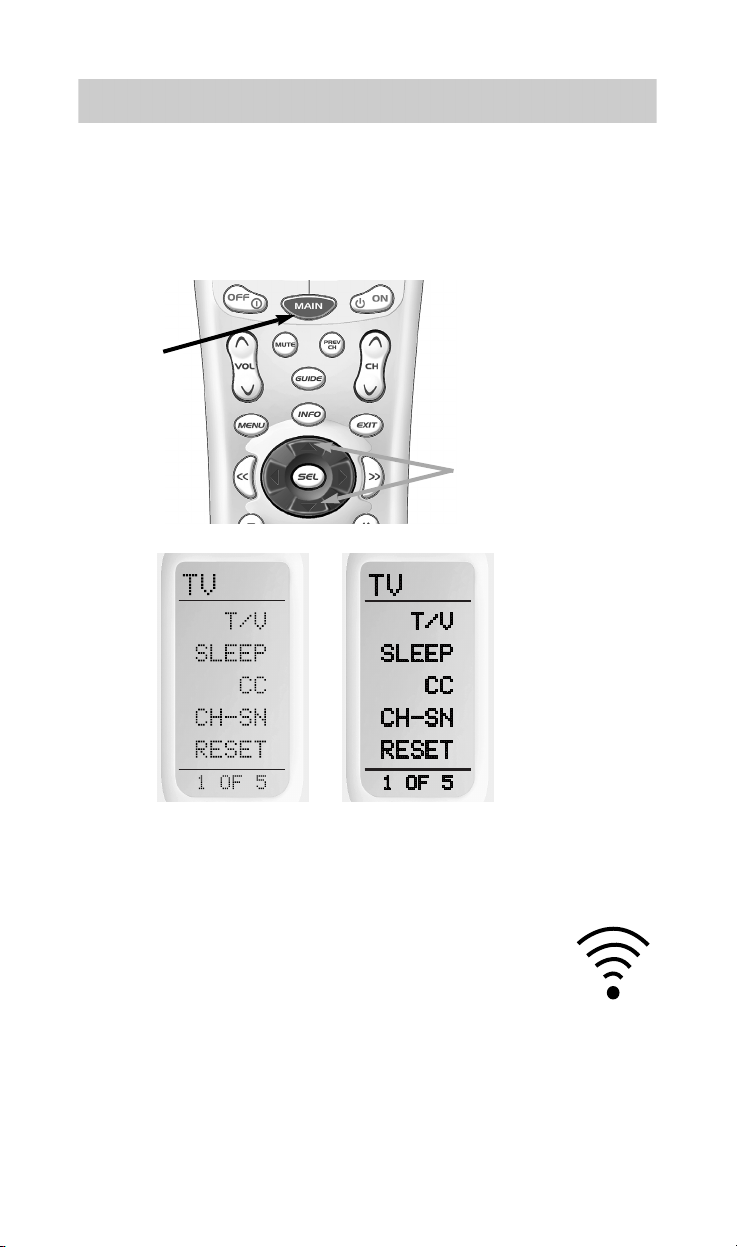
The MX-350
Selecting a New DEVICE Changes
All Button Commands Instantly
The MX-350 can operate ten different devices even though it is only one
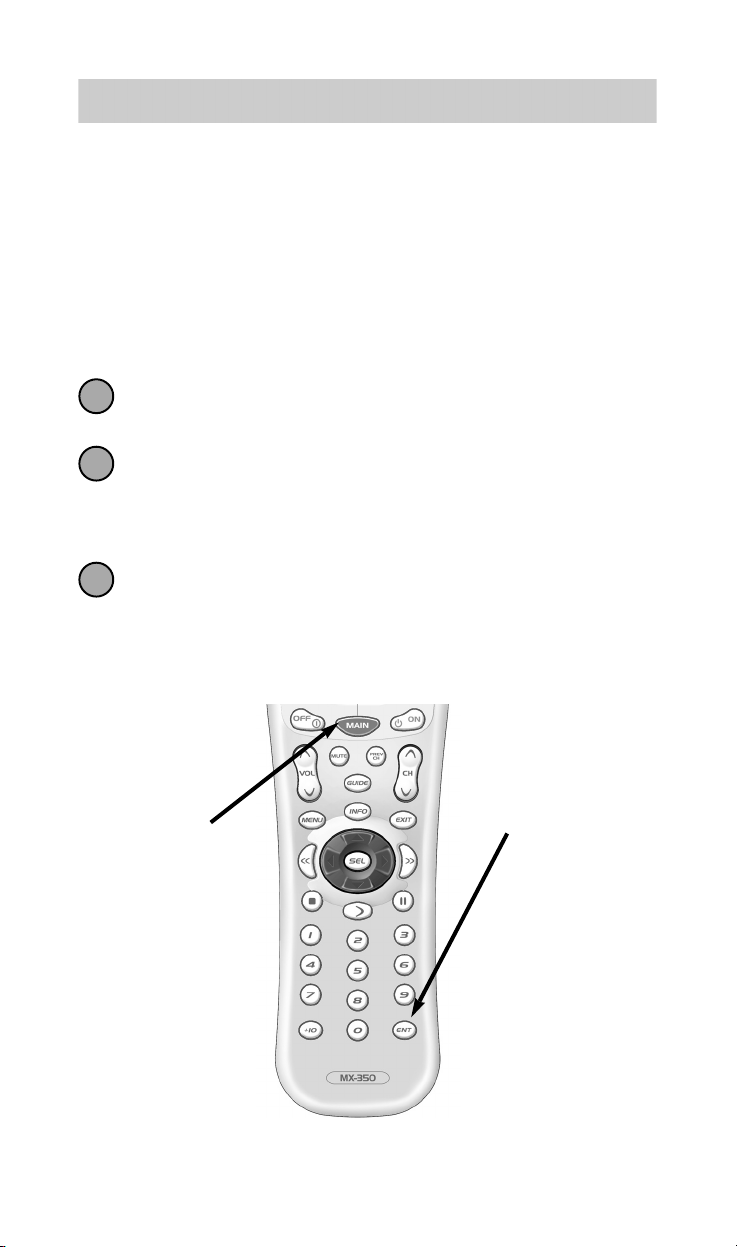
remote control. Let’s try it now! Press the MAIN button, then press the TV
DEVICE button.
The top of the screen changes from MAIN to TV. Now all of the buttons
change their function to operate a TV. Press the page buttons. Watch the
labels of the display buttons change with each press. There are eight pages
of display buttons already labeled for TV operation. To operate another
component (e.g., VCR, DVD etc.), press the MAIN button to return to the
MAIN menu. The MAIN menu displays five of your Devices on the
screen. Simply press one of the screen-labeled Device buttons to operate
another device. If you don’t see the device name you want, then use the
PAGE buttons to display the remaining five devices on page 2 of the
MAIN menu.
Light Button
Press the LIGHT button to backlight all the buttons. To turn off the back-
lighting, press the LIGHT button again, or just wait ten seconds (the back-
lighting automatically shuts itself off).
TV
DEVICE
Button
MAIN
Button
LIGHT
Button
5
Basic Setup
You can start setting up your MX-350 using either the Pre-Programmed
Method or the Learning Method. However, all the buttons of the MX-350 are
setup at once with the Pre-Programmed Method, so it is usually faster than
the one-button-at-a-time Learning Method.
Pre-Programmed Method
Power on the A/V component you wish to setup, so that you can test
codes by sending power off commands.
Refer to the pre-programmed code tables on pages 38 - 59 and
write down the code numbers listed for your A/V component. The
code numbers are listed by categories of devices, then by brand.
See page 37 for a category list.
Press and hold both the MAIN and ENT (Enter) buttons for approxi-
mately three seconds. The top of the display will show “SETUP”.
You are in SETUP mode now.
Note: You have 30 seconds to perform a step while you are in SETUP mode. If
you don’t press a button within that time, the MX-350 will time out and return to
normal operation.
MAIN
Button
ENT
Button
1
2
3
Universal Remote Control, Inc.
6
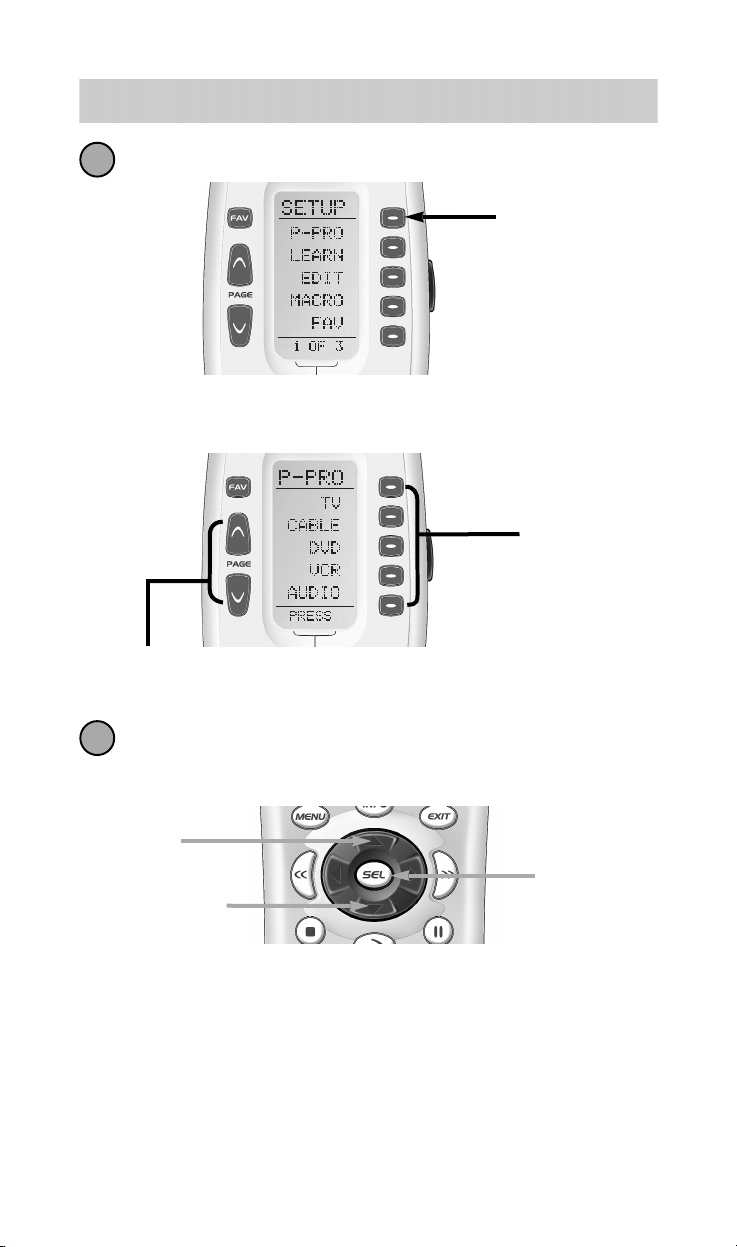
Press the P-PRO button to select the Pre-Programmed Method.
The display changes so that you can select which Device button to
setup.
In this step you choose the name of the device you’d like to setup.
Use the cursor UP or DOWN buttons to change the flashing name.
When it is correct, press the SELECT button.
For Example: I wanted to setup the TV Device button first, so I pressed the
cursor UP or DOWN until “TV” was flashing in the display.
The bottom of the display will flash “FROM TABLE”.
P-PRO
Button
The MX-350
4
5
UP
SELECT
DOWN
Press a Page button to display the
other five Device names.
First
Five
Device
Names
7
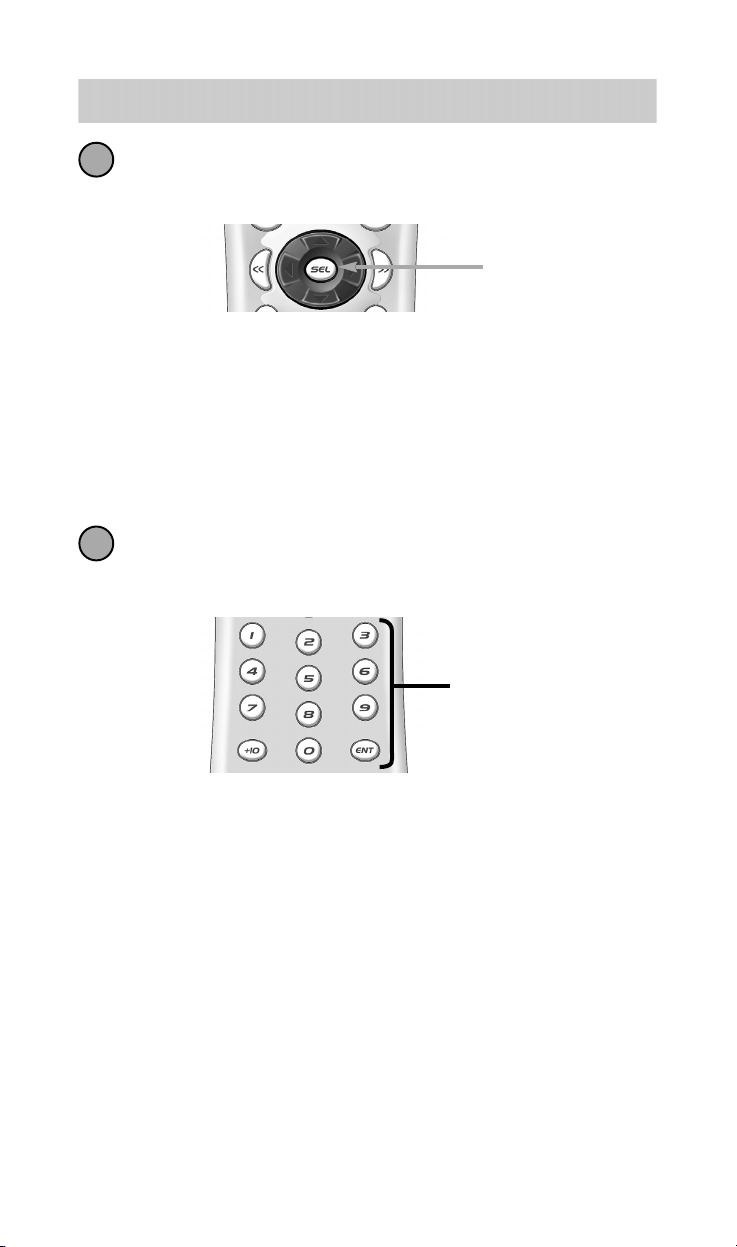
In this step you verify the type of component you plan to operate
with this device button. If the flashing name is correct, press
SELECT.
If the name flashing in the display is incorrect (for example, you are setting up
AUX to operate a Laser Disc Player), use the UP and DOWN buttons to
change the flashing name to the correct type of component.
Note: Each name that appears in the display may include several types of
components. For example, the DVD category includes DVD players and
Laser Disc Players. See page 37 for a list of component types each Code
Table contains.
Point the MX-350 at the component, then enter the first three digit
code number from your notes using the numbered buttons. After
you enter each three digit number, look at the component to see if
it turned off.
Continue to enter code numbers until the component powers off.
For Example: I have a Sony TV. I found the code numbers 070, 139,147,
126, 185, 194 and 085 under Sony in the TV TABLE. Using the numbered
buttons on the MX-350, I entered 070 and looked at the TV. It didn’t turn off,
so I entered 139, then 147 and so on, until I found the code that powered
off the TV.
6
7
SELECT
Use the
number
buttons to
enter the
code
number.
Universal Remote Control, Inc.
8
Note: If a component fails to turn off after you have entered all of the code
numbers listed for your brand, you can scan through the other brands in the
table using the UP and DOWN buttons (there is a chance that your
component was actually manufactured by another brand). However, most of
the code tables are so large it is usually faster to use the Learning Method on
Page 9.
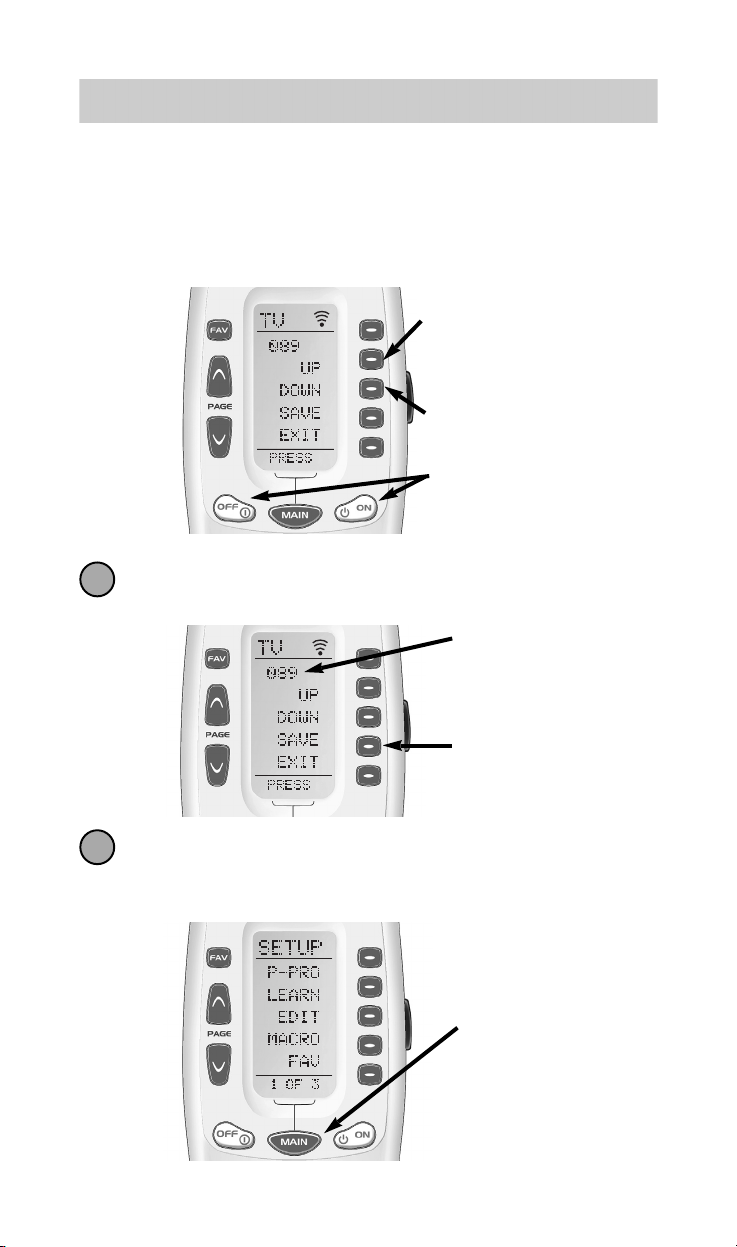
When the component turns off, save the code number you entered
by pressing the SAVE button that appears on the screen.
Exit SETUP mode by pressing the MAIN button two times. When
the display shows “MAIN”, you are back in normal operating
mode.
SAVE
Button
Code
Number
You
Entered
MAIN
Button
The MX-350
8
9
Scan Up to the next Code
Number
Scan Down to the previous
Code Number
Press Power On or Power
Off to test if the device
powers off.

9
Repeat steps one through nine for each of your devices. If you are
missing any commands, use the learning method, described next
Learning Method
The MX-350 can learn commands from your old remote controls one-but-
ton-at-a-time by following these simple steps:
Line-up the MX-350 with your old remote control, head-to-head,
one or two inches apart.
On the MX-350, press and hold the MAIN and ENT (Enter) buttons at
the same time for approximately three seconds. The top of the dis-
play will show “SETUP”. You are in SETUP mode now.
Note: You have 30 seconds to perform a step while you are in SETUP mode. If
you don’t press a button within that time, the MX-350 will time out and return to
normal operation.
Press the LEARN button.
The top of the screen will change to “LEARN”.
10
Universal Remote Control, Inc.
LEARN
Button
1
2
3

The display will show a list of the first five devices.
Select the device you would like to teach commands to by pressing
the Device button.
Now, press any button you want to teach a command to.
Note: If you don’t see the display button you would like to teach, use the
PAGE buttons. The only buttons you can’t teach are the PAGE and MAIN but-
tons.
Once you press a button, the top of the display will change from
“LEARN” to “READY”.
10
The MX-350
4
5
6
Press any
of the
Device
Buttons.
Press
any
Button.
11
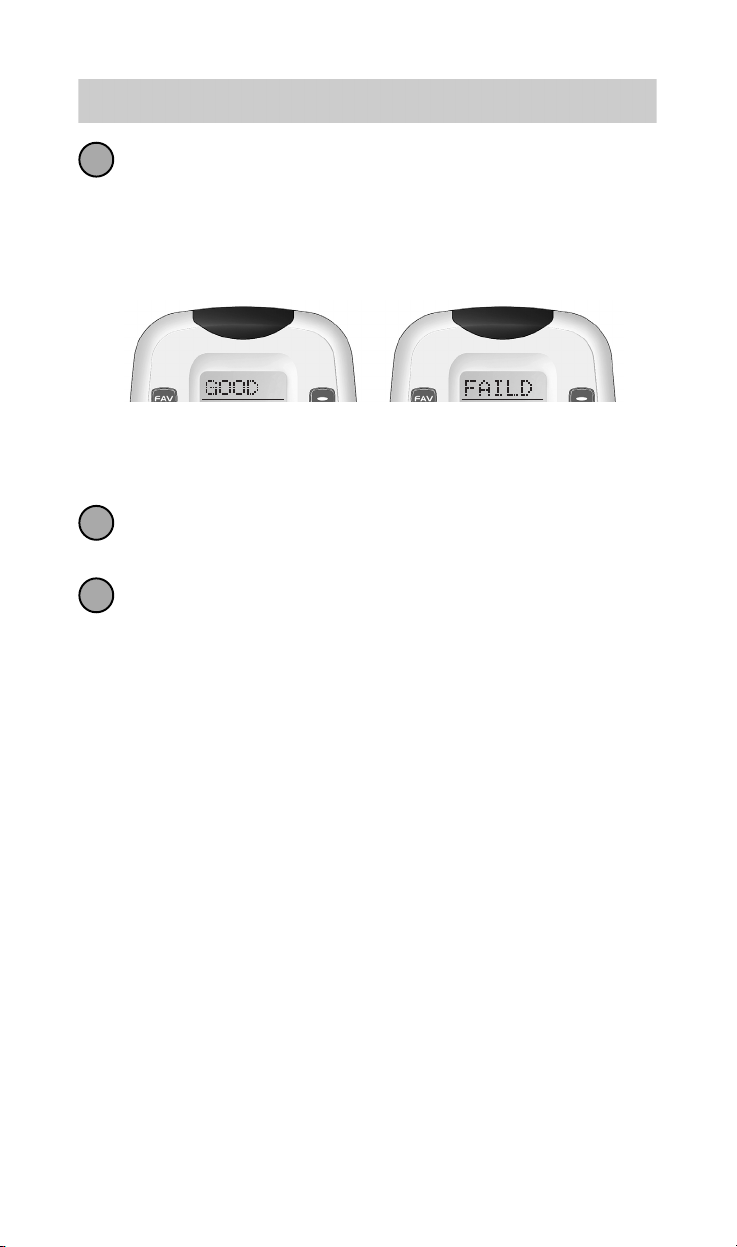
Press and hold the button you want on your old remote control until
the display changes to either “GOOD” or “FAILED”.
If the “GOOD” label appears on top of the display, you were successful.
Now, press the next button you wish to teach. Keep repeating steps 6
through 7 until you have learned all the buttons you want.
If the “FAILED” label appears on top of the display, try to teach the
same button in MX-350 once again by repeating steps 6-7.
Continue to teach any commands from any of your remote controls
by repeating steps 5-7 (to go back to step five, press MAIN once).
Once you completed teaching all the buttons, return to normal opera-
tion by pressing the MAIN button twice. Test all your new commands.
If any of them don’t work, try learning again using these notes:
7
8
9
Move to another room. Plasma TVs, sunlight, halogen or
quartz lighting can interfere with the learning process.
Although the old remote control seems to work fine,
change the batteries to fresh alkaline batteries.
Vary the distance between the remote controls
gradually. Try 1/4”, 1”, 2”and so on, up to 4 feet.
Tap the button on the original remote control instead of
pressing and holding it during the learning process.
Universal Remote Control, Inc.
Volume Control Punch Through
In most home entertainment systems, the sound volume is only con-
trolled by one device. In some systems, it is the TV speakers that make
the sound, so you would use the TV device on the MX-350 to raise and
lower the volume. In another system, it might be a surround sound
receiver and speakers that control the sound, so you would use the
MX-350’s AUDIO device to adjust the volume. Constantly switching the
MX-350 to TV or AUDIO to adjust the volume is inconvenient in daily
life.
You can use Punch Through to set the MX-350’s volume buttons to always
control the sound in your system. That way when the MX-350 is set to
VCR or DVD, the volume up, down and mute buttons will work perfect-
ly without switching back to AUDIO or TV. Here’s how:
Enter Setup mode by pressing and holding both MAIN and ENT for
three seconds. The top of the display show you are in SETUP mode
now.
Note: You have 30 seconds for each step, otherwise the MX-350 will time
out automatically.
Press the PAGE UP button to get to page 2 of the SETUP menu.
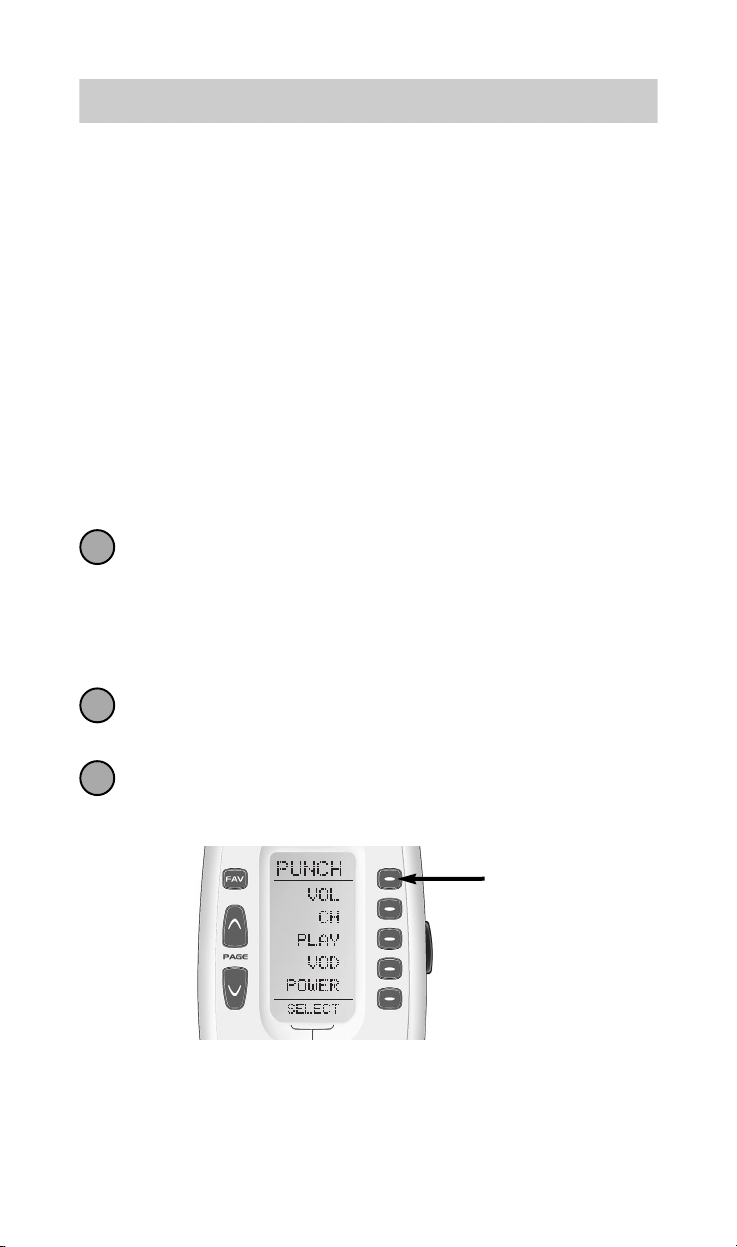
Press the PUNCH button.
Press the VOL button. The display confirms by displaying “VOL” at the
top of the screen. This sets up the group of three buttons (Volume Up,
Volume Down and Mute) in one action!
The bottom of the display flashes ”PUNCH TO”.
12
The MX-350
1
2
3
Select
Volume
13
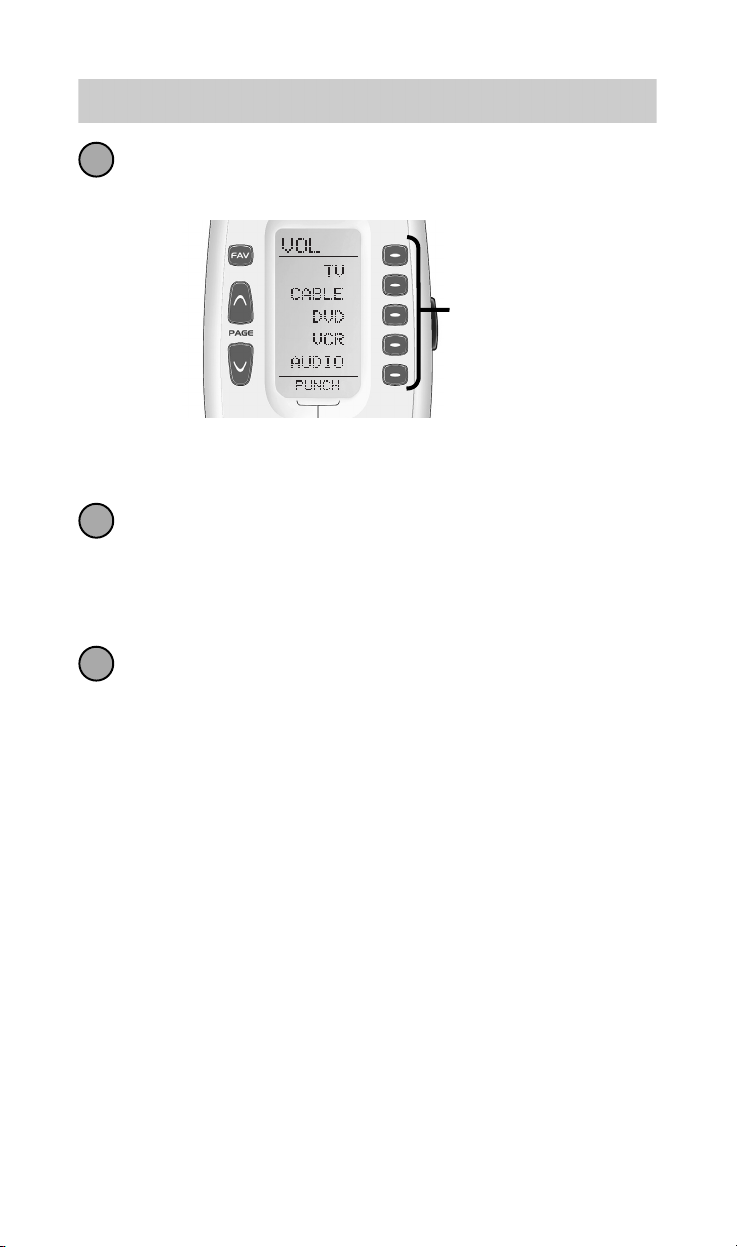
Press the device button for the device that doesn’t have volume
control commands yet (i.e.,DVD). This is the device you are going
to PUNCH TO for the volume and mute commands.
Note: If you wish to PUNCH to the MAIN device, press the POWER OFF
button at this time.
The bottom of the display will then flash “PUNCH FROM”. Now
you select the device that has the volume commands you want
(i.e.,TV for systems using the TV speakers, AUDIO for systems with
surround sound receivers). The bottom of the
display will flash “SAVED”.
Repeat steps 3-5 until all your devices operate the volume perfect-
ly. Press the MAIN button twice to return to normal operating
mode and test your Punch Through settings.
Note: The Punch Through feature is not limited to
volume and can also be applied to channel or other functions. If you find
yourself switching to a particular device frequently to use a group of con-
trols, consider using Punch Through for another group, as listed here:
VOL - Volume Up, Volume Down and Mute
CH -
Channel Up, Channel Down, Prev. Channel and Number buttons (0-9, +10, ENT)
PLAY - Play, Stop, Pause, Rewind and Fast Forward
VOD - Guide, Menu, Info, Exit, Up, Down, Left, Right, Sel
POWER - Power On and Power Off
6
4
5
Universal Remote Control, Inc.
Select
the Device
you want to
“Punch To”
14
Advanced Operation
Setting Backlight Options
You can adjust the amount of time that the MX-350 backlight stays on by
entering the SETUP mode and proceeding to page two (using the PAGE
UP button), then pressing the LIGHT button on the display (not the
Backlight button). Then enter the amount of time you would like the
light to stay on using the number pad (0-99 seconds). After making your
selection, press the SAVE button.
If you don’t want backlighting at all (this extends battery life), press the ON
button that appears on the screen. The ON will change to OFF. Press the
SAVE button. Exit the setup mode by pressing the MAIN button.
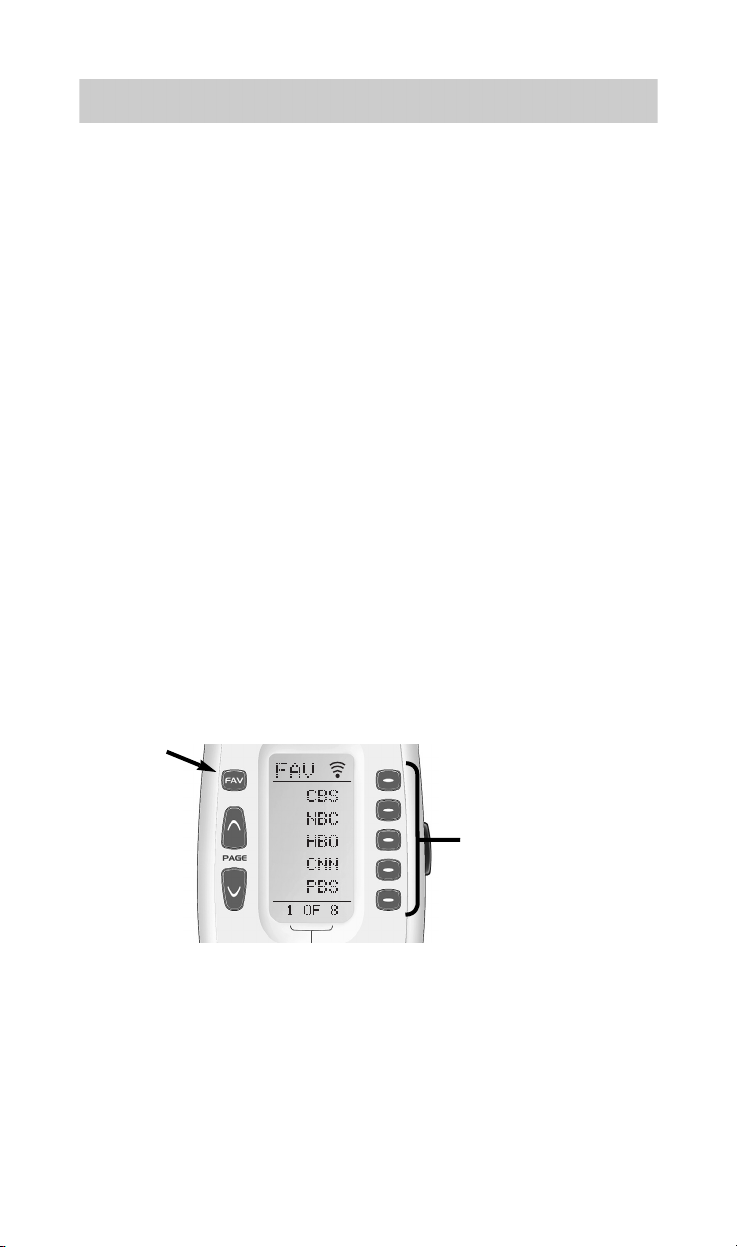
The FAV Button
When you press the FAV button, the display changes to a list of your
favorite TV channels. Each button can be set to instantly select the channel
on your TV. There are eight pages of five favorite channel buttons for a total
of 40. Simply touch the PAGE buttons to display the other favorite chan-
nels. To return to the last device you viewed, press MAIN once (a second
press will take you to the MAIN menu).
To setup your Favorite Channel buttons go to page 21.
The MX-350
Favorite
Channel
Buttons
FAV
Button
15
Adjusting Contrast
You can make the text darker by pressing both the MAIN and cursor UP
buttons at the same time. To make the text appear lighter, press both the
MAIN and cursor DOWN buttons at the same time.
Transmitting (Busy Signal) Icon
When a command is being transmitted, an icon will appear in
the top right corner of the display. It is a useful aid when setting
up Macros and FAVs, since it flashes with every step of a
sequence of commands.
Contrast set low.
Cursor
Up & Down
Buttons
MAIN
Button
Contrast set high.
Universal Remote Control, Inc.
16
Advanced Setup
After you’ve finished all your basic setup, you can choose to make opera-
tion easier by customizing the MX-350 just the way you want, using the
Advanced Setup features described in this section.
Editing Button Labels
You can change the name of any of the display buttons (including
Favorite Channels) by following these steps:
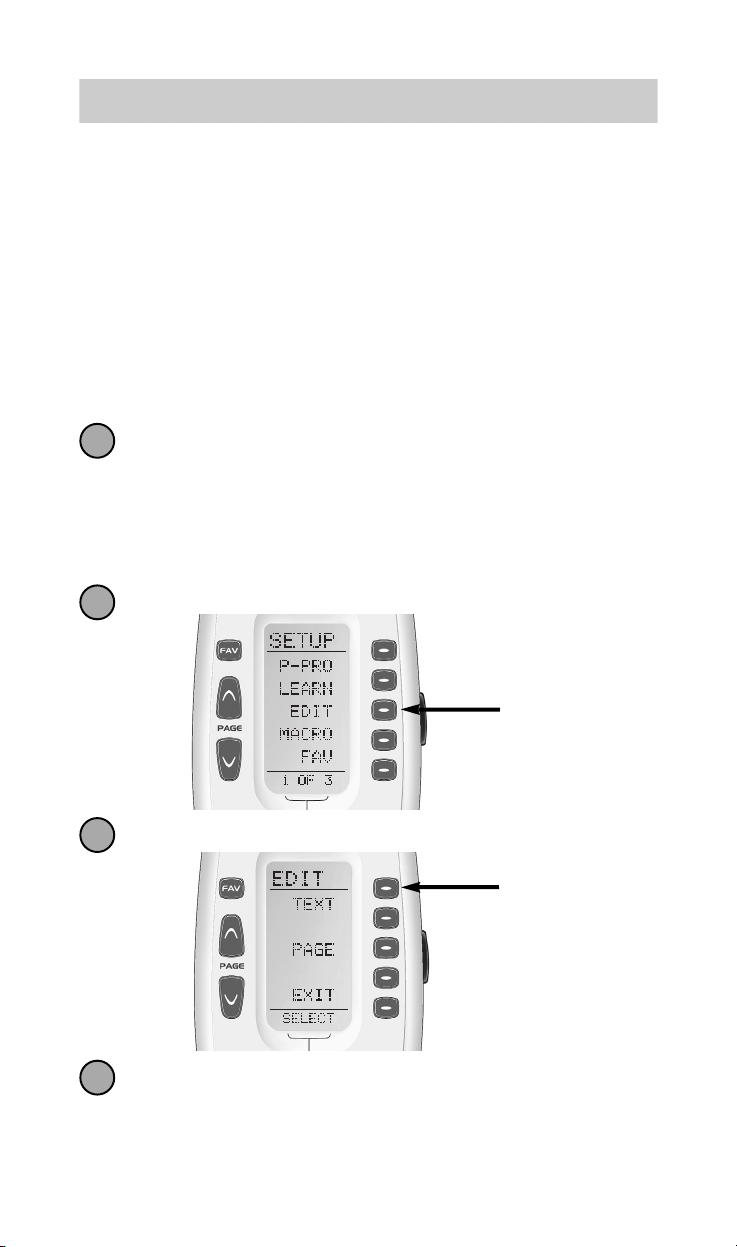
Press and hold both the MAIN and ENT (Enter) buttons for approx-
imately three seconds. The top of the display will show “SETUP”.
You are in SETUP mode now.
Note: You have 30 seconds to perform a step while you are in SETUP mode. If you don’t
press a button within that time, the MX-350 will time out and return to normal operation.
Press the EDIT button.
The display changes to the EDIT menu. Press the TEXT button.
The screen displays the list of devices and “EDIT” will appear at
the top of the screen. Navigate to the device and page where there
is a button label you want to EDIT, selecting between the FAV,
MAIN, DEVICE, then using the PAGE button.
The MX-350
TEXT
Button
1
2
3
4
EDIT
Button
17
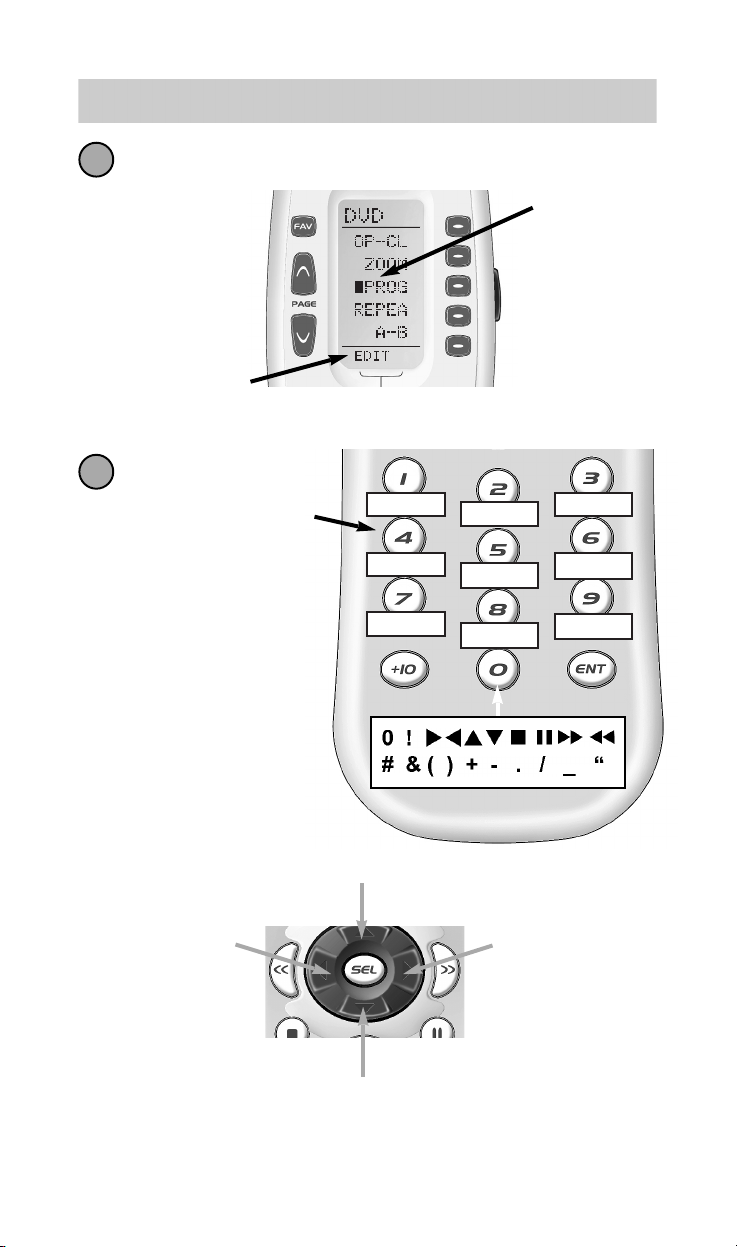
Press the button you wish to edit. The first character of your button
label blinks.
5
Blinking
Character
EDIT flashes at the bottom of the screen.
Universal Remote Control, Inc.
A,B,C,1
D,E,F,2
G,H,I,3
J,K,L,4
M,N,O,5
P,Q,R,6
S,T,U,7
V,W,X,8
Y,Z,9
DOWN Cursor
button deletes the currently
blinking character.
UP Cursor
button deletes ALL text.
LEFT Cursor
button
moves blinking
character left.
RIGHT Cursor
button
moves blinking
character right.
Change the character by
using any of the number
keys. Each press of the
same number button selects
the next character of that
number’s group, as shown
here.
Once the character you
want appears, move to the
next space by pressing the
RIGHT cursor button.
6
18
When you are finished editing the button, press the button you
edited and “SAVED” will flash at the bottom of the display.
To change any other button labels on the same device, press the next
button, then repeat steps 6-8. If you wish to edit a button on another
device, press the MAIN button once, then repeat Steps 4-8.
Once you’ve finished editing buttons, press the MAIN button four
times to return to normal operation.
Edit the MAIN Menu Title or a MAIN Menu Device Label
You can change the title of the MAIN Menu or a MAIN Menu device
label by following these steps after you’ve entered TEXT Edit mode
(described in the steps one through four in the preceding pages).
Once you’ve entered TEXT Edit mode, the top of the screen displays
EDIT and the first five devices of the MAIN Menu. There are five
pages you can access via the Page UP or DOWN buttons.
When the
top of the screen says EDIT, pressing a device button jumps to the pages for
that device so that you can edit a device’s LCD buttons normally. However,
if you continue to tap the Page button, the top of the screen will change
from EDIT to MAIN. While it says MAIN, there are three pages of LCD but-
tons. The first two list the Devices of the MAIN Menu and enable you to
change the device names when pressed. The third page titled MAIN has only
one entry for the LCD buttons; “MAIN”. When you press the corresponding
hard button, you can relable the MAIN title itself.
Select the title to edit by pressing the adjacent hard button.
Edit the text (described on steps 5 and 6 on page 17).
Press the button you edited to save the changes. Here’s an example:
The MX-350
7
8
9
1
2
3
4
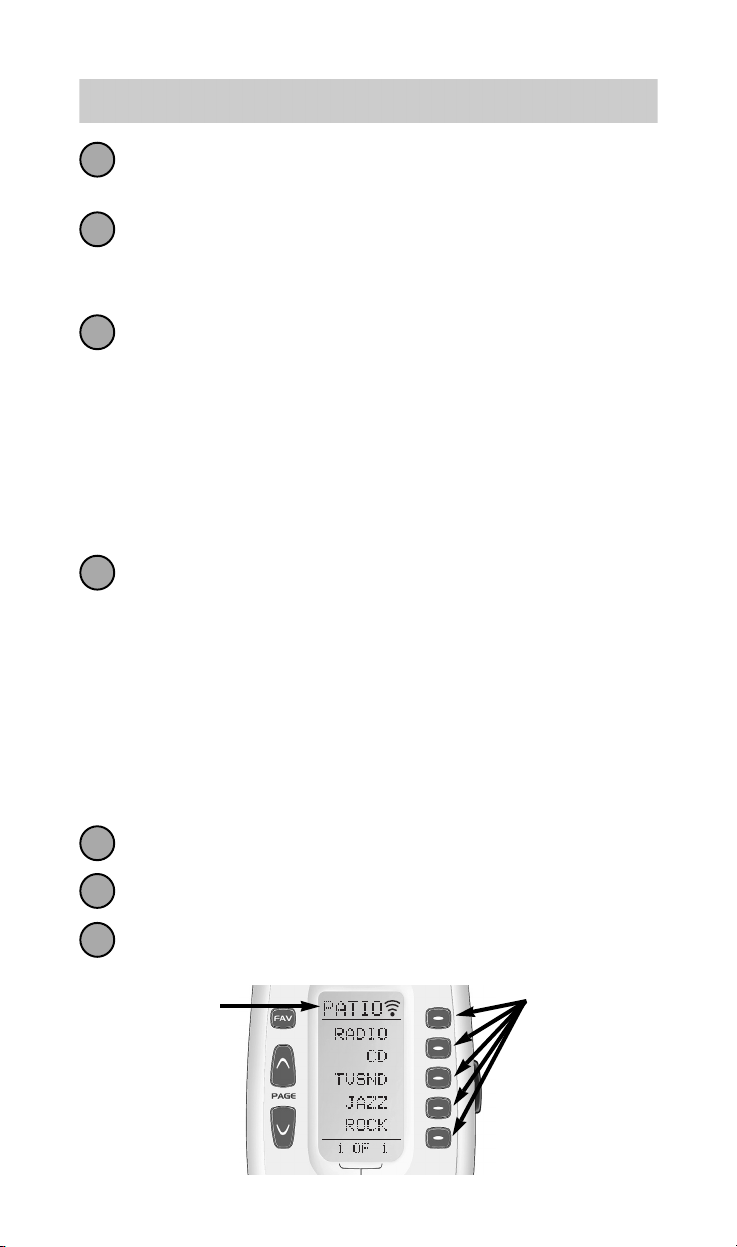
Each of the MAIN
menu device but-
tons has been cus-
tom labeled for
the activities the
user likes to use
out on the Patio.
The MAIN Menu
title has been
changed to PATIO,
so whenever the
MAIN button is
pressed, the user is
reminded that this is
the Patio remote.
19
Macro Button Setup
Imagine turning on your TV, your DVD player and your surround sound
receiver by pressing a single button on your MX-350! What would nor-
mally take three remotes and three button pushes, the MX-350 can
accomplish with the press of one button. We call that a “Macro”. Any
of the Display buttons, the Power On or the Power Off buttons (on any
Device or Page) can be set to be Macro buttons!
To setup a macro button, follow these easy steps:
Enter the SETUP mode by pressing and holding both MAIN and
ENT for three seconds.
Note: You have 30 seconds for each step, otherwise the MX-350 will time
out automatically.
Press the MACRO button. The top of the display will show
“MACRO”. The bottom of the display will flash “SELECT”.
Navigate to the Device and Page where there is a button you would
like to set as a Macro button using the MAIN, DEVICE, and PAGE but-
tons.
Advanced Options:
If you wish to set one of the DEVICE buttons as a macro, on step 3, press the
Page Up button twice. The top of the display changes to MAIN, and you can
navigate to MAIN page 1 or page 2 before going on to Step 4.
Another option for DEVICE button macros is to only send the macro if the but-
ton is pressed and held. This is setup by entering a delay as the first step of the
macro. The amount of delay determines how long the user must press the but-
ton before the macro is sent. The advantage of this option is that a normal
press of the DEVICE button will simply switch devices without issuing the
macro.
Press the button you want to set as a Macro button. The top of the
screen will display the label of the button you selected. At the bot-
tom of the screen it displays “STEP0”, indicating that no macro
steps have been entered yet.
Universal Remote Control, Inc.
1
2
3
4
 Loading...