


 Loading...
UDW-10003 Video Surveillance System
User’s Manual
What’s in the Box
Portable receiver with 3-inch color LCD display |
Portable video camera |
|
Camera stand |
|
|
|
|
|
|
|
|
|
|
|
AV cable |
USB cable |
|
Two AC adapters |
Software CD |
If any items are missing or damaged, contact our Customer Care Line immediately. Never use damaged products!
Need Help? Get answers 24/7 at our website: www.uniden.com.
If You... |
Contact Uniden’s... |
Phone Number |
have a question or problem |
Customer Care Line* |
817-858-2929 or 800-297-1023 |
|
|
|
need a replacement part or accessory |
Parts Department* |
800-554-3988 |
|
|
|
need special help due to a disability |
Accessibility Help Line |
800-874-9314 (voice or TTY) |
|
|
|
* During regular business hours, Central Standard Time. Visit our website for detailed business hours.
Important Safety Instructions!
This manual contains important information about this product’s operation. If you are installing this product for others, you must leave this manual or a copy with the end user.
When using your equipment, always follow basic safety precautions to reduce the risk of fire, electric shock and injury to persons, including the following:
►This equipment is NOT waterproof. DO NOT expose it to rain or moisture.
►DO NOT immerse any part of the product in water. Do not use this product near water, e.g., near a bath tub, wash bowl, kitchen sink or laundry tub, in a wet basement or near a swimming pool.
►To avoid any risk of electric shock from lightning, avoid handling any electronic devices (except battery powered ones) during an electrical storm.
►Use only the power cord and/or batteries indicated in this manual. Never dispose of any batteries in a fire: they may explode. Check with local codes for possible special disposal instructions.
►Never tug or pull on any power cord: be sure to leave some slack in the cord when placing your equipment, and always use the plug to unplug cord from the wall outlet.
►Never leave power cords where they can become crushed, cut, or frayed; when running power cords, avoid letting them rub against any sharp edges or lie across any high traffic areas where people might trip over them.
►Do not use the device if the adapter cords or plugs have been damaged, the unit has been exposed to liquids, or the unit has been dropped or is damaged.
Warnings to Parents and Other Users
Failure to follow these warnings and the assembly instructions could result in serious injury or death. This product is not designed or intended for use as a medical monitor, nor should this product be used as a substitution for medial or parental supervision. Always be sure that both the transmitter and receiver are working properly and are within range of each other.
►STRANGULATION HAZARD. Keep the adapter cords out of the reach of children.
►WARNING: KEEP OUT OF THE REACH OF CHILDREN. This product is not a toy and is not intended for use by any children under the age of 13. If you are between the ages of 13 and 18, review these terms, conditions and safety warnings with your parents or guardian to make sure that you and your parent or guardian understand these terms, conditions, and safety warnings.
►Allow for proper ventilation when units are in use. Do not cover the camera or receiver with any object such as a blanket. Do not place it in a drawer or in any location which would muffle the sound or interfere with the normal flow of air.
SAVE THESE INSTRUCTIONS!
For best results:
To avoid damage to your equipment, follow these simple precautions:
►Do not drop, puncture or disassemble any part of the equipment. There are no user-serviceable parts inside.
►Do not expose the equipment to high temperatures, and avoid leaving the equipment in direct sunlight for more than a few minutes. Heat can damage the case or electrical parts.
►Do not place heavy items on top of the equipment or expose the equipment to heavy pressure.
►Remove the power adapter during long periods between usages.
►Clean only with a dry cloth.
Failure to follow the instructions in this operating manual will void the warranty. Uniden assumes no liability for damages to property or injury to persons caused by improper handling or failure to comply with these safety instructions.
Contents |
|
Important Safety Instructions!......... |
2 |
Warnings to Parents and Other |
|
Users .................................................... |
2 |
For best results:..................................... |
3 |
Getting Started.................................. |
4 |
Connect the Power..................................... |
4 |
Charge the batteries........................... |
4 |
Check the Video Signal............................. |
5 |
Learning Your System....................... |
6 |
Get to Know the Camera.......................... |
6 |
What the buttons do........................... |
6 |
What the lights mean......................... |
6 |
Using the camera mount................... |
7 |
Get to Know the Receiver........................ |
8 |
What the buttons do........................... |
8 |
What the lights mean......................... |
9 |
What the connections do.................. |
9 |
Using the Menu......................................... |
10 |
Using Zoom Mode.................................... |
11 |
Pan and tilt in zoom mode............. |
11 |
Understanding Night Vision................. |
11 |
Connecting to Your TV............................ |
12 |
Reducing pixellation......................... |
12 |
Multiple Camera Features............. |
13 |
Pairing Cameras......................................... |
13 |
Some things to know about |
|
pairing cameras:............................. |
13 |
Changing to a Different Camera......... |
14 |
Setting Up a Scan...................................... |
15 |
Using Quad Display.................................. |
16 |
To enter quad display....................... |
16 |
To exit quad display.......................... |
16 |
Solving Problems........................... |
17 |
Unstable or Weak Signal........................ |
18 |
Weak signal and video |
|
performance.................................... |
18 |
Noise or Static............................................ |
19 |
Resetting Your System............................ |
20 |
Additional Information.................. |
21 |
Product Specifications............................ |
21 |
Polymer-Lithium Battery |
|
Warning ...................................... |
22 |
Recycling and Disposal |
|
Information................................. |
22 |
FCC Compliance Information........ |
23 |
Part 15 Compliance Statement..... |
23 |
RF Exposure Information................. |
23 |
IC Compliance Information........... |
23 |
Radio Equipment Notice................. |
23 |
CE Compliance Information.......... |
23 |
One-year Limited Warranty........... |
24 |
Getting Started
Connect the Power
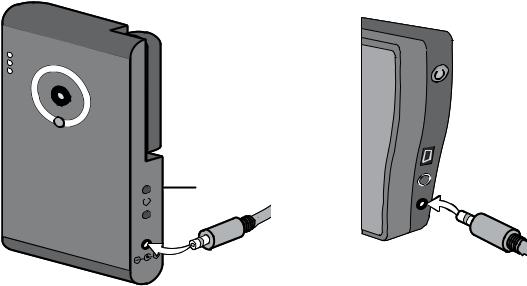
1.Connect one AC adapter to the camera’s power input and the other to the receiver’s power input. (The two adapters are exactly the same.)

 POWER
POWER
button
POWER
button
LINK
2.Connect the other end of each adapter to a standard 120 volt AC indoor outlet.
3.Press the Power button on both the receiver and the camera; the bottom light on the left (the Power status light) should turn on.
If... |
Try... |
a Power status light |
- reconnecting the AC adapter |
doesn’t come on |
- seeing if the power outlet is controlled by a wall switch |
|
|
Charge the batteries
The batteries in your camera and receiver will charge whenever the power is connected. Let the batteries charge completely (about 8 hours) before you unplug the camera and receiver to move them around. (You can still use the camera and receiver: just keep them plugged in.)

Check the Video Signal
As soon as the receiver powers on, it detects
the camera and shows the video on the display. The icons at the top of the screen tell you what’s going on with the camera and receiver.
The table below shows the different status icons and what they mean. Since the icons appear based on the state of the camera and receiver, you won’t see all of these icons at the same time.
Signal |
Channel |
Charge |
status |
status |
status |
1
Icon |
|
|
|
|
|
|
|
|
|
|
What it means |
|
||
|
|
|
|
|
|
|
|
|
|
|
|
The signal from the camera is 1-low, 2-fair, 3-good, or 4-perfect. |
||
|
|
|
|
|
|
|
|
|
|
|
|
|||
|
|
|
|
|
|
|
|
|
|
|
|
|||
|
|
|
|
|
|
|
|
|
|
|
|
|
|
|
|
|
|
|
|
|
|
|
|
|
|
|
There is no signal from the camera. |
||
|
|
|
|
|
|
|
|
|
|
|
|
|
|
|
1 |
2 |
|
|
3 |
|
|
|
4 |
The video currently on the display comes from the camera connected |
|||||
|
|
|
|
|
to channel 1, 2, 3, or 4. |
|||||||||
|
|
|
|
|
|
|
|
|
|
|
|
|||
|
|
|
|
|
|
|
|
|
|
|
|
The battery is charging. This icon disappears when the battery is full. |
||
|
|
|
|
|
|
|
|
|
|
|
|
|
|
|
|
|
|
|
|
|
|
|
|
|
|
|
The video is currently zoomed in. |
||
|
|
|
|
|
|
|
|
|
|
|
|
|
|
|
|
|
|
|
|
|
|
|
|
|
|
||||
|
|
If... |
|
|
|
|
|
|
|
Try... |
||||
|
|
|
|
|
||||||||||
|
|
the signal status icon shows no bars |
|
- making sure the camera is turned on |
||||||||||
|
|
or the display says No Signal |
|
- re-pairing the camera and receiver (see page 13) |
||||||||||
|
|
|
|
|
||||||||||
|
|
the signal status icon shows one or |
|
see page 18 for tips on improving video quality |
||||||||||
|
|
two bars or the video quality is poor |
|
|||||||||||
|
|
|
|
|||||||||||
|
|
there is a lot of static on the receiver |
|
see page 19 for tips on avoiding interference |
||||||||||
|
|
|
|
|
|
|
|
|
|
|
|
|
|
|
Learning Your System
Get to Know the Camera
What the buttons do |
|
Battery |
|||||
|
status |
||||||
Button |
What it does |
||||||
Link |
|||||||
POWER |
Turn the camera on. Press |
status |
|||||
and hold to turn it off. |
Power |
||||||
|
|
||||||
|
|
|
|
|
status |
||
Link |
Enter pairing mode. |
||||||
|
|
||||||
|
|
|
|
|
|
||
What the lights mean |
|
|
|||||
Power Status light |
|
|
|
||||
|
|
|
|
|
|
||
|
State |
|
What it means |
|
|
||
|
|
|
|
|
|
|
|
|
|
On |
|
The camera is on. |
|
|
|
|
|
|
|
|
|
|
|
|
|
Off |
|
The camera is off. |
|
|
|
|
|
|
|
|
|
|
|
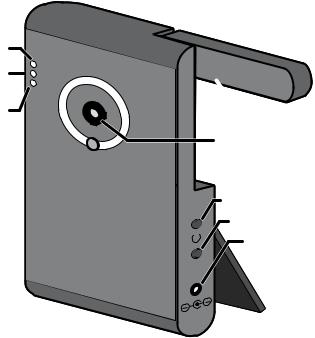
Link Status light
LINK
 Antenna
Lens
POWER
LINK
Power connector
 Stand
Stand
State |
What it means |
Flashing |
The camera is in pairing mode. |
|
|
Orange |
The camera is connected to the receiver. |
|
|
Off |
The camera is in standby. |
|
|
Battery Status light
State |
What it means |
|
|
Green |
The battery is charging. |
|
|
Red |
The battery is low; the camera will turn off in 3 minutes. |
|
|
Off |
The battery is fully charged. |
|
|

Using the camera mount
The camera has a built-in stand so you can place it on any flat surface. If you want to place your camera on a wall or a ceiling (or even if you just want to secure it to a flat surface), you can use the included camera mount.
(You might want to bring the receiver along when you mount the camera; it’s much easier to get the the camera into the right position when you have the display handy.)
1.Hold the base of the mount where you want to attach it, and mark the location of the screw holes.
2.Use the included screws and anchors to attach the base to the wall or ceiling.
3.Attach the camera to the mounting screw. Tighten it a few turns, then turn it to the direction you want.
|
Tighten the brace against |
1 |
Attach the camera |
2 |
to the mounting |
||
the camera to |
|
screw and turn it |
|
|
secure it |
|
to the desired |
|
in place. |
|
direction. |
Mounting
Camera screw brace
Mounting
post
Post
lock
Screw holes
3
Loosen the wingnut to unlock the mounting post.
4 |
Adjust the post to |
the correct angle, |
then tighten the wingnut to lock the post into place.
4.Tighten the camera brace up against the back of the camera to secure it into place.
5.Unlock the mounting post by turning the wingnut to the left a few turns.
6.Set the mounting post to the correct angle, then tighten the wingnut until the post is locked into place.
Get to Know the Receiver
Front
Status lights: |
Antenna |
|
|
|
|
Battery |
|
|
Power |
|
Speaker |
BUTTONS: |
|
UP |
MENU/OK |
|
|
|
|
|
LEFT |
VOL− OK |
RIGHT |
VOL+ |
||
DOWN |
|
|
SELECT |
|
ZOOM |
CAMERA |
|
|
What the buttons do
Side (right)
Stand
POWER
USB output
Audio/video
output
Power input 

Button |
What it does |
MENU/ok |
- Open and close the menu |
|
|
|
- In zoom mode: pan to the left side of the zoom area. |
LEFT |
- In the menu: cycle through the available options for the selected menu item. |
|
- In quad display: go to channel 4. |
|
|
|
- In zoom mode: pan to the right side of the zoom area. |
RIGHT |
- In the menu: cycle through the available options for the selected menu item. |
|
- In quad display: go to channel 3. |
|
|
|
- In zoom mode: pan to the top of the zoom area. |
Up |
- In the menu: move the cursor up one line. |
|
- In quad display: go to channel 1. |
|
|
Loading...