


 Loading...

Precautions
Before you use this scanner, please read and observe the following:
EARPHONE WARNING!
Be sure to use only the recommended optional monaural earphone
(EP009). You may also use a 32Ω stereo headset. Use of an incorrect earphone or stereo headset may be potentially hazardous to your hearing. The output of the phone jack is monaural, but you will hear in both headphones of a stereo headset.
Set the volume to a comfortable audio level coming from the speaker before plugging in the monaural earphone or a stereo headset of proper impedance (32Ω ). Otherwise you might experience some discomfort or possible hearing damage if the volume suddenly becomes too loud because of the Volume Control or Squelch Control setting. This may be particularly true of the type of earphone that is placed in the ear canal.
WARNING!
Uniden does not represent this unit to be waterproof. To reduce the risk of fire or electrical shock, do not expose this unit to rain or moisture.
GENERAL BATTERY WARNING!
Do not short-circuit any Battery.
Do not discard Batteries in a fire; they may explode.
Nickel-Cadmium Battery Warning
When using Nickel-Cadmium Batteries with this product, take note of the following warnings:
Do not charge Nickel-Cadmium Batteries with any charger other than the one supplied with this product. Using another charger may damage the Batteries, or cause them to explode.
i
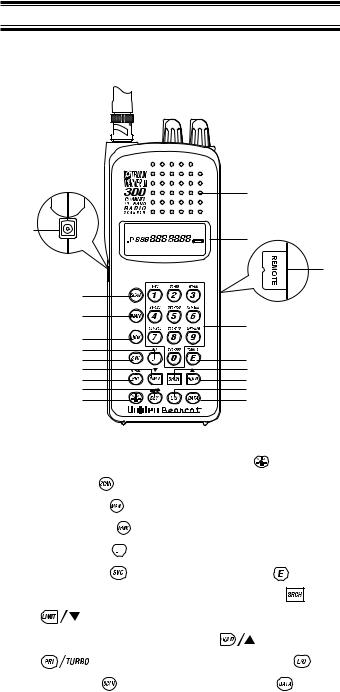
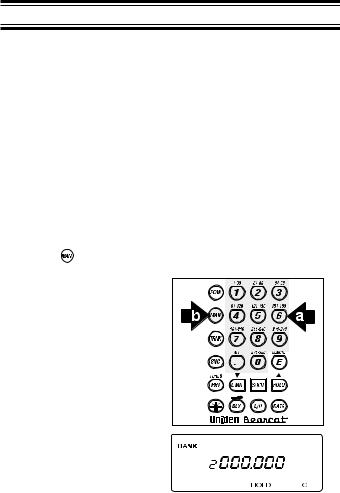
Front View
1
2
3
4
5
6
7
8
9
10
BANK |
1 |
2 |
3 |
4 |
5 |
6 |
7 |
8 |
9 |
10 |
TRUNK 


 ATT
ATT
BATT
DATA POLICE RR AIR MRN UHFCB SCAN SEARCH PRI HOLD DLY L/O 
11
12
13
14
15
16
17
18
19
1. |
DC Power Jack |
|
10. |
Light |
|
2. |
Scan Key |
|
11. |
Speaker |
|
3. |
Manual Key |
|
12. |
Display |
|
4. |
Trunking Key |
|
13. |
Remote jack |
|
5. |
Decimal Key |
/ATT |
14. |
Keypad |
|
6. |
Service Key |
|
15. |
Enter Key |
/Remote |
7. |
Limit Key/Down Key |
16. |
Search Key |
|
|
|
|
|
17. |
Hold Key/Up Key |
|
8. |
Priority Key/Turbo Key |
|
|
|
|
|
|
|
18. |
Lockout Key |
|
9. |
Delay Key |
|
19. |
Data Key |
|
|
/ Lock Key |
|
|
|
|
ii
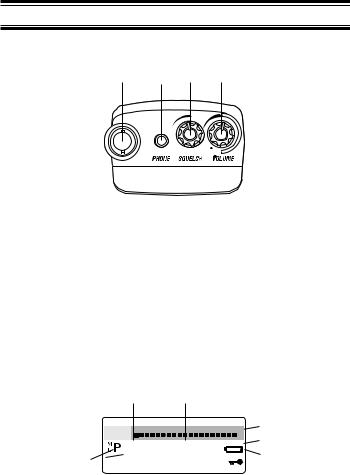
Top View and Display
20 21 22 23
20.Antenna Connector
21.Earphone Jack
22.Squelch Control
23.On/Off Volume Control
|
|
24 |
|
|
|
25 |
|
|
|
|
|
|
|
|||
|
|
BANK |
1 |
2 |
3 |
4 |
5 |
6 |
7 |
8 |
9 |
10 |
|
|
||
33 |
|
|
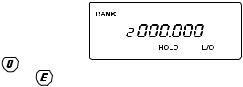
888 888.8888 BATT |
|
|
|||||||||||
32 |
|
TRUNK |
|
|
|
|
|
|
|
|
|
|
|
|
|
|
|
|
|
|
|
|
|
|
|
|
|
|
|
ATT |
|||
|
|
|
|
|
|
|
|
|
|
|
|
|
||||
|
|
|
|
|
|
|
|
|
|
|
|
|
|
|
|
|
31 |
|
DATA POLICE |
RR |
AIR |
MRN UHF CB |
|||||||||||
|
SCAN SEARCH |
PRI HOLD DLY L/O |
|
|
|
|
|
|||||||||
|
|
|
|
|
|
|
|
|
|
|
||||||
|
|
|
|
|
|
|
|
|
|
|
|
|
|
|
|
|
26
27
28
3029
24.Channel Display
25.Frequency Display
26.Bank/Activity Indicators
27.Attenuate Indicator
28.Battery Low Indicator
29.Keypad Lockout Indicator
30.Mode Indicators
31.Priority Channel Indicator
32.Bank/Trunk Indicators
33.Trunk System Indicators

CONTENTS
Introduction . . . . . . . . . . . . . . . . . . . . . . . . . . . . . . . . . . . 3 Important Notice . . . . . . . . . . . . . . . . . . . . . . . . . . . . . . . 4 Terminology. . . . . . . . . . . . . . . . . . . . . . . . . . . . . . . . . . . 5 What is Scanning? . . . . . . . . . . . . . . . . . . . . . . . . . . . 5 What is Searching? . . . . . . . . . . . . . . . . . . . . . . . . . . 5 What is Trunk Tracking? . . . . . . . . . . . . . . . . . . . . . . 5 Feature Highlights . . . . . . . . . . . . . . . . . . . . . . . . . . . . . . 7 Where to Obtain More Information . . . . . . . . . . . . . . . . . 9 Information on the Internet . . . . . . . . . . . . . . . . . . . . . 9 Included with Your Scanner . . . . . . . . . . . . . . . . . . . . . 10 Setup . . . . . . . . . . . . . . . . . . . . . . . . . . . . . . . . . . . . . . . 11 Installing the Battery Pack . . . . . . . . . . . . . . . . . . . . 11 Charging the Battery Pack . . . . . . . . . . . . . . . . . . . . 12 Low Battery Indicator . . . . . . . . . . . . . . . . . . . . . . . . 12 Adapter Safety Feature . . . . . . . . . . . . . . . . . . . . . . 12 Flexible Antenna . . . . . . . . . . . . . . . . . . . . . . . . . . . 13 Belt Clip . . . . . . . . . . . . . . . . . . . . . . . . . . . . . . . . . . 13 Basic Operation. . . . . . . . . . . . . . . . . . . . . . . . . . . . . . . 14 Turn the Scanner On . . . . . . . . . . . . . . . . . . . . . . . . 14 Setting the Squelch . . . . . . . . . . . . . . . . . . . . . . . . . 14 Keylock. . . . . . . . . . . . . . . . . . . . . . . . . . . . . . . . . . . 15 LCD Back Light . . . . . . . . . . . . . . . . . . . . . . . . . . . . 15 Auto Light . . . . . . . . . . . . . . . . . . . . . . . . . . . . . . . . . 15 Programming. . . . . . . . . . . . . . . . . . . . . . . . . . . . . . . . . 16 Duplicate Frequency Alert . . . . . . . . . . . . . . . . . . . . 18 Programming Tips . . . . . . . . . . . . . . . . . . . . . . . . . . 18 Deleting a Stored Frequency . . . . . . . . . . . . . . . . . . 19 Scanning . . . . . . . . . . . . . . . . . . . . . . . . . . . . . . . . . . . . 20 RF Attenuation Feature . . . . . . . . . . . . . . . . . . . . . . 21 Setting the Delay Mode . . . . . . . . . . . . . . . . . . . . . . 22 Channel Lockout . . . . . . . . . . . . . . . . . . . . . . . . . . . 23 Lockout Tips . . . . . . . . . . . . . . . . . . . . . . . . . . . . . . . 24 Restore a Locked Out Channel . . . . . . . . . . . . . . . . 25 Restore All Locked-Out Channels . . . . . . . . . . . . . . 25 Priority Scan . . . . . . . . . . . . . . . . . . . . . . . . . . . . . . . 26 Changing the Priority Channel . . . . . . . . . . . . . . . . . 27 Searching . . . . . . . . . . . . . . . . . . . . . . . . . . . . . . . . . . . 28 Setting a Search Range . . . . . . . . . . . . . . . . . . . . . . 28 Turbo Search . . . . . . . . . . . . . . . . . . . . . . . . . . . . . . 28 Search Hold Feature . . . . . . . . . . . . . . . . . . . . . . . . 29 Data Skip . . . . . . . . . . . . . . . . . . . . . . . . . . . . . . . . . 29 Frequency Skip . . . . . . . . . . . . . . . . . . . . . . . . . . . . 30 Storing Search Frequencies. . . . . . . . . . . . . . . . . . . 30 SVC Scanning . . . . . . . . . . . . . . . . . . . . . . . . . . . . . . . . 32 SVC Scan Lockout . . . . . . . . . . . . . . . . . . . . . . . . . . 34 Programming with SVC Scan. . . . . . . . . . . . . . . . . . 35
Trunk Tracking . . . . . . . . . . . . . . . . . . . . . . . . . . . . . . . 36 Types of Trunking Systems . . . . . . . . . . . . . . . . . . . 36 EDACS® Tracking . . . . . . . . . . . . . . . . . . . . . . . . . . 38 Setting the Squelch . . . . . . . . . . . . . . . . . . . . . . . . . 39 Programming Trunking Frequencies . . . . . . . . . . . . 39 Searching a Trunked Bank. . . . . . . . . . . . . . . . . . . . 42 Changing the Display Mode . . . . . . . . . . . . . . . . . . . 42 Frequency Find Mode . . . . . . . . . . . . . . . . . . . . . . . 43 Direct Entry ID Hold Mode . . . . . . . . . . . . . . . . . . . . 43 ID Lockout . . . . . . . . . . . . . . . . . . . . . . . . . . . . . . . . 44 Restore a Single ID . . . . . . . . . . . . . . . . . . . . . . . . . 44 Restore all IDs . . . . . . . . . . . . . . . . . . . . . . . . . . . . . 45 Searching Tips . . . . . . . . . . . . . . . . . . . . . . . . . . . . . 45 Channel Activity Indicators . . . . . . . . . . . . . . . . . . . . 46 Scan Lists. . . . . . . . . . . . . . . . . . . . . . . . . . . . . . . . . 48 Programming ID Scan Lists Manually . . . . . . . . . . . 48 ID Scan Mode . . . . . . . . . . . . . . . . . . . . . . . . . . . . . 52 Setting Priority in Trunking Mode . . . . . . . . . . . . . . . 53 Programming Scan Lists During Search . . . . . . . . . 54 Deleting a Stored ID . . . . . . . . . . . . . . . . . . . . . . . . . 54 Moving between Scan List Memories . . . . . . . . . . . 55 Multi-Track . . . . . . . . . . . . . . . . . . . . . . . . . . . . . . . 55
Fleet Map Programming . . . . . . . . . . . . . . . . . . . . . . . . 56 Selecting Trunking Programming Mode . . . . . . . . . . 56 Selecting a Preset Fleet Map . . . . . . . . . . . . . . . . . . 57 Programming a Fleet Map . . . . . . . . . . . . . . . . . . . . 58 Programming a Hybrid System . . . . . . . . . . . . . . . . 59 Setting the Base and Offset frequencies for
Motorola VHF/UHF trunked systems . . . . . . . . . . . . 60 Toggling the Status Bit . . . . . . . . . . . . . . . . . . . . . . . 61 Remote Interface. . . . . . . . . . . . . . . . . . . . . . . . . . . . . . 62 Connecting the scanner . . . . . . . . . . . . . . . . . . . . . . 62 SmartScan Mode . . . . . . . . . . . . . . . . . . . . . . . . . . . 64 Remote (PC Control) Mode . . . . . . . . . . . . . . . . . . . 70 Clone Mode . . . . . . . . . . . . . . . . . . . . . . . . . . . . . . . 72 Care and Maintenance . . . . . . . . . . . . . . . . . . . . . . . . . 74 General Use . . . . . . . . . . . . . . . . . . . . . . . . . . . . . . . 74 Location . . . . . . . . . . . . . . . . . . . . . . . . . . . . . . . . . . 74 Cleaning . . . . . . . . . . . . . . . . . . . . . . . . . . . . . . . . . . 74 Repairs . . . . . . . . . . . . . . . . . . . . . . . . . . . . . . . . . . . 75 Birdies . . . . . . . . . . . . . . . . . . . . . . . . . . . . . . . . . . . 75 Troubleshooting. . . . . . . . . . . . . . . . . . . . . . . . . . . . . . . 76 Specification . . . . . . . . . . . . . . . . . . . . . . . . . . . . . . . . . 78 Appendix . . . . . . . . . . . . . . . . . . . . . . . . . . . . . . . . . . . . 79 Preset Fleet Maps . . . . . . . . . . . . . . . . . . . . . . . . . . 79 User Defined Fleet Maps . . . . . . . . . . . . . . . . . . . . . 81 One Year Limited Warranty . . . . . . . . . . inside back cover
2

Introduction
The UBC 245XLT is a state-of-the-art radio with TrunkTracking™ and automatic scanning capabilities. It can store frequencies such as police, UHF CB, marine, railroad, air, amateur, and other communications into 10 banks of 30 channels each.
With the new SmartScanner™ feature, you can also automatically program your scanner by downloading directly from our Uniden/Bearcat national frequency database via a PC or external modem.
Use your new scanner to monitor:
■UHF High Band UHF 800/900 MHz Trunked Radio Systems (the trunked radio network does not operate solely for Public use)
■Police and Fire Departments (including rescue and paramedics)
■Trunking for Motorola and EDACS* systems
■Business/Industrial Radio
■Utilities
■Marine and amateur (ham radio) bands
■Air band
Frequency Range |
Steps |
Transmission |
66 - 88 MHz |
12.5 kHz |
VHF Low Band |
108-137 MHz |
12.5 kHz |
Aircraft Band |
137-144 MHz |
5 kHz |
Land Mobile |
144-148 MHz |
5 kHz |
2 Meter Ham |
148-174 MHz |
12.5 kHz |
VHF High Band |
406-420 MHz |
12.5 kHz |
Land Mobile |
420-450 MHz |
12.5 kHz |
70cm Ham |
450-470 MHz |
12.5 kHz |
UHF Band |
470-512 MHz |
12.5 kHz |
Land Mobile |
806-956 MHz |
12.5 kHz |
“800” Band |
|
|
|
EDACS* - analogue only
3

Important Notice
■This scanning radio can be sold legally in Australia and New Zealand only. This unit may be illegal for sale in other countries.
■The installation, possession, or use of this scanning radio in a motor vehicle may be prohibited, regulated, or require a permit in certain states, cities, and/or local jurisdictions. Your local law enforcement officials should be able to provide you with information regarding the laws in your community.
■Changes or modifications to this product not expressly approved by Uniden, or operation of this product in any way other than as detailed by this Operating Guide, could void your authority to operate this product.
■The screen displays used in this manual are representations of what might appear when you use your scanner.
4

Terminology
What is Scanning?
Unlike standard AM or FM radio stations, most two-way communications do not transmit continuously. The
UBC 245XLT scans the channels you program until it finds an active frequency.
Scanning stops on an active frequency and remains on that channel as long as the transmission continues. When the transmission ends, the scanning cycle resumes until another transmission is received.
What is Searching?
The UBC 245XLT can search each of its 10 bands to find active frequencies. This is different from scanning because you are searching for frequencies that have not been programmed into your scanner. You can choose between two speeds while searching. Turbo Search, a new feature for Uniden scanners, can search the VHF FM bands at up to 300 channels per second.
What is Trunk Tracking?
Conventional scanning is a simple concept. You enter a radio frequency in your scanner’s memory which is used by someone you want to monitor. So when your scanner stops on a frequency, you usually know who it is, and more importantly, you can stop on a channel and listen to an entire conversation. This type of scanning is easy and fun.
As the demand for public communications has increased, many public radio users don’t have enough frequencies to meet their needs, and this has created a serious problem. Trunking radio systems solve this problem.
5
In a trunked radio system, which contains up to 28 different frequencies, radio users are divided into groups, often called talk groups, and these talk groups are assigned specific IDs. When someone in a talk group uses their radio, a brief burst of data is broadcast before each transmission. The trunking system computer uses this data to temporarily assign each radio in a talk group to an available frequency. If the group using a frequency stops broadcasting or pauses between replies for a few seconds, they are removed from the frequency so another talk group can use it.
Sharing of the available public service frequencies, or trunking, allows cities, counties, or other agencies to accommodate hundreds of users with relatively few frequencies. Following a conversation on a trunked system using a scanner is difficult, if not impossible, because when there’s a short break during the conversation you’re monitoring, it’s possible that the talk group will be assigned to a completely different frequency in the trunked system. This type of scanning is difficult and frustrating.
TrunkTracker™ changes this! Not only does your new UBC 245XLT scan channels like a conventional scanner, it actually follows the users of a trunked radio system. Once you know a talk group’s ID, you won’t miss any of the action.
If you’re a new scanner enthusiast, you may want to read the first part of this manual and use your scanner in conventional mode before you begin trunk tracking. Understanding scanning fundamentals and its terminology will make trunk tracking much easier. But if you’re already an experienced scanner operator, you may want to go to
Trunk Tracking on page 36 now.
6
Feature Highlights
■Trunk Tracking — Follow UHF High Band UHF 800/900 MHz trunked radio systems just as if conventional two-way communications were used.
■Multi-Track — Track more than one trunking system at a time and scan conventional and trunked systems at the same time.
■300 Channels — Program one frequency into each channel. You must have at least one channel programmed to use the Scan mode.
■10 Bands, 10 Banks — Includes 10 bands, with Aircraft and 800 MHz. 10 banks with 30 channels each are useful for storing similar frequencies to maintain faster scanning cycles or for storing all the frequencies of a trunked system.
■66 MHz-956 MHz — Indicates the range of frequencies that can be searched within the bands of your scanner.
Note: The frequency coverage is not continuous.
■10 Priority Channels — You can assign one priority channel in each bank. Assigning a priority channel allows you to keep track of activity on your most important channel(s) while monitoring other channels for transmissions.
■Preprogrammed Service (SVC) Scan — Allows you to toggle through preprogrammed police, railroad, aircraft, marine, and UHF CB frequencies.
■Unique Data Skip — Allows your scanner to skip unwanted data transmissions and reduces birdies.
■Memory Backup — If the battery completely discharges or if power is disconnected, the frequencies programmed in your scanner are retained in memory.
■Manual Channel Access — Go directly to any channel.
■LCD Back Light — An LCD light remains on for 15 seconds when  is pressed.
■Autolight — Automatically turns the light on when it finds a transmission.
7
■Battery Save — In manual mode, your scanner automatically reduces its power requirements to extend the battery™s charge.
■Attenuator — Reduces the signal strength.
■SmartScanner™* — Automatically program your UBC245XLT with all the frequencies and t… talk groups for your local area by accessing our national database with your PC or just an external modem. (No PC required)
■Turbo Search — Increases the search speed to 300 steps per second. This applies only to transmission bands with 5 kHz steps.
* the SmartScanner feature is not yet utilised in Australia and New Zealand but may become available in the future.
8

Where to Obtain More
Information
Information on the Internet
If you have access to the Internet, you may want to visit www. trunktracker.com or www. bearcat1.com/free.htm*
For more information about Uniden and our other products, visit www.uniden.com.au
Note: The trunktracker and bearcat web sites are designed for the American market. Tough they have good reference material.
9
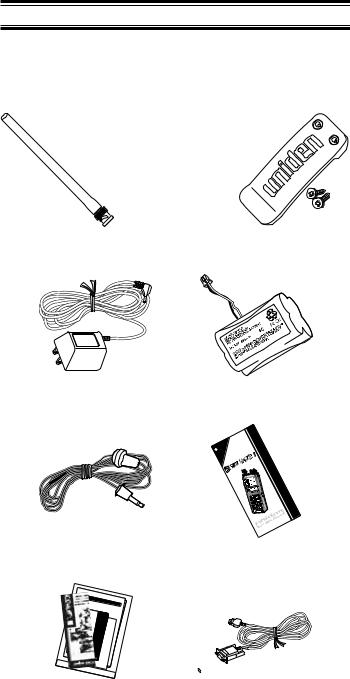
Included with Your Scanner
If any of these items are missing or damaged, immediately contact your place of purchase .
Antenna |
Belt Clip |
AC Adapter
Earphone
860- |
XLT |
Channel Base |
|
|
Scanner |
860XLT |
|
Channel |
|
Base Scanner |
|
Operating
Guide
and Other Printed
Material
Battery Pack
|
|
.com |
|
|
|
|
300 |
|
|
|
|
|
|
|
|
- |
|
our |
at |
ker |
|
|
|
LT |
|
|
Visit |
Website |
|
|
|
|
Channel |
||
|
|
|
5X |
|
||||
|
.trunktrac |
|
|
24 |
|
|
|
|
|
www |
|
BC |
|
|
|
|
|
|
|
U |
|
|
|
|
T |
|
|
|
|
|
|
|
|
|
r |
|
|
|
|
|
|
|
|
unk |
|
|
|
|
|
|
|
|
T |
|
|
|
|
|
|
|
|
racking |
|
|
|
|
|
|
|
|
Scanner |
|
|
|
|
|
|
|
|
Guide |
|
|
|
|
|
|
|
|
Operating |
Operating Guide |
||||||||
Remote Interface Cable
10
Setup
These are helpful guidelines when using your new scanner:
■If your scanner receives interference or electrical noise, move the scanner or its antenna away from the source.
■If you need to improve reception, use an optional antenna designed for multi-band coverage. (You can purchase this type of antenna at a local electronics store.)
■Use the included earphone or an optional stereo headset with proper impedance for private listening. Read the precautions on the inside front cover of this Guide.
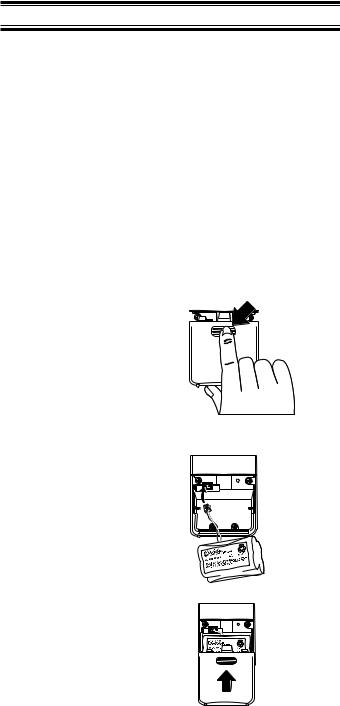
Installing the Battery Pack
1. Open the cover.
10 BAND
66-88 MHz
108-137 MHz
137-144 MHz
144-148 MHz
148-174 MHz
406-420 MHz
420-450 MHz
450-470 MHz
470-512 MHz
806-956 MHz
2. Insert the battery pack.
3. Replace cover and press down until it clicks into place.
10 BAND COVERAGE UBC235XLT
66-88 MHz |
12.5 kHz |
VHF Low Band |
108-137 MHz |
12.5 kHz |
Aircraft Band |
137-144 MHz |
5 kHz |
Land Mobile |
144-148 MHz |
5 kHz |
2 Meter Ham |
148-174 MHz |
12.5 kHz |
VHF High Band |
406-420 MHz |
12.5 kHz |
Land Mobile |
420-450 MHz |
12.5 kHz |
70cm Ham |
450-470 MHz |
12.5 kHz |
UHF Band |
470-512 MHz |
12.5 kHz |
Land Mobile |
806-956 MHz |
12.5 kHz |
“800” Band |
11
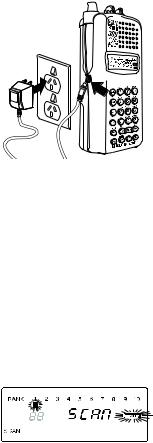
Charging the Battery Pack
Use the AC Adapter/Charger to power the UBC 245XLT from an AC outlet.
 0
0
Use only the supplied AC Adapter
(AAD-245U)
You can use your scanner while the battery charges. To fully charge the battery, leave the AC Adapter/Charger connected for 14 — 16 hours.
Note: Disconnect the AC Adapter/Charger from the unit when charging is complete.
Low Battery Indicator
When the Battery Pack is low and needs to be charged, the battery icon appears in the display. You will also hear a beep every 15 seconds as an audible alert.
12
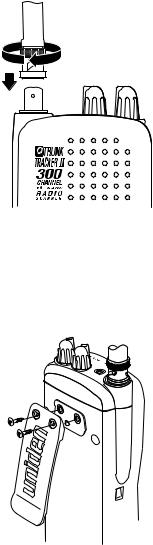
Flexible Antenna
Attach the flexible antenna to the
BNC connector.
Belt Clip
Do not tighten the screws too tight.
You can damage the case or clip.
13
Basic Operation
Note: Fold out the Front Cover to see the Controls and Indicators while reading this Guide.
Turn the Scanner On
Turn the VOLUME control clockwise out of the detent position. u bc245 flashes twice in the display. The scanner automatically starts scanning.
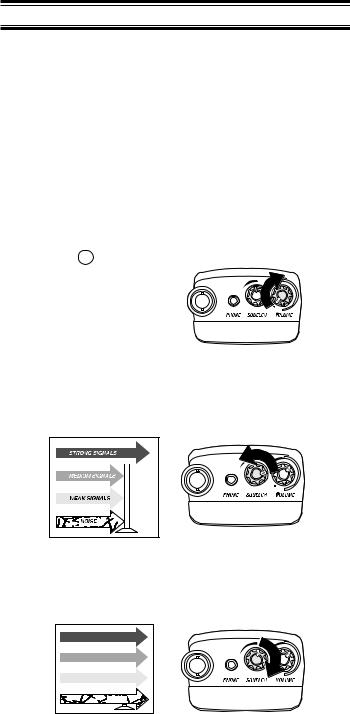
Setting the Squelch
To set the squelch, you must be in the Manual mode, and you should not be receiving a signal on your scanner.
1.Press  until you do not hear a signal.
2. Make sure that the VOLUME is set to a comfortable listening level.
3.Think of the Squelch Control as a gate. Turn SQUELCH fully counter-clockwise. This raises the “Squelch Gate” so high that only very strong signals can get through.
4.Turn SQUELCH fully clockwise until you hear a hiss. This lowers the “Squelch Gate” so that everything gets through—noise, weak signals, and strong signals.
STRONG SIGNALS |
MEDIUM SIGNALS |
WEAK SIGNALS |
NOISE |
14
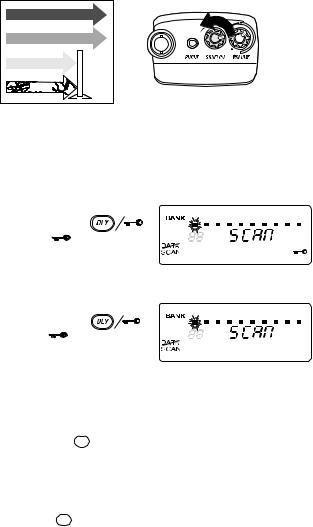
5.Turn SQUELCH back counter-clockwise just until the hiss stops. Now the “Squelch Gate” allows only clear signals through.
STRONG SIGNALS |
MEDIUM SIGNALS |
WEAK SIGNALS |
NOISE |
Keylock
Key Lock prevents accidental key entries during conventional scanning or while in trunk tracking mode.
1. To lock the keypad,
press and hold |
1 |
2 |
3 |
4 |
5 |
6 |
7 |
8 |
|
|
|
|
|
|
|
|
|
||
until the |
symbol |
|
|
|
|
|
|
|
|
appears in the lower |
|
|
|
|
|
|
|
|
|
right of the display. |
|
|
|
|
|
|
|
|
|
2. To unlock the keypad,
press and hold |
1 |
2 |
3 |
4 |
5 |
6 |
7 |
8 |
|
|
|
|
|
|
|
|
|
||
until the |
symbol in |
|
|
|
|
|
|
|
|
the lower right of the |
|
|
|
|
|
|
|
|
|
display turns off. |
|
|
|
|
|
|
|
|
|
9 10
9 10
LCD Back Light
Press and release 

 to turn the LCD light on. It remains on for 15 seconds and then goes out.
Auto Light
Press and hold 

 until you hear 2 short beeps. The scanner will automatically turn the light on for 5 seconds, whenever a transmission is found.
15
Programming
Before the UBC245XLT can begin conventional scanning, you must program a frequency into at least one channel. Repeat this procedure for each channel you want to program.
1.Select frequencies from your dealer, from various sources.
Here’s a list of sample frequencies you should try.
|
476.425 MHz |
UHF CB CH1 |
|
476.450 MHz |
UHF CB CH2 |
|
476.475 MHz |
UHF CB CH3 |
|
476.500 MHz |
UHF CB CH4 |
2. |
Press . |
|
3. |
Select a channel. |
|
a. Enter the channel number.
b. Then press  .
.
1 |
2 |
3 |
4 |
5 |
6 |
7 |
8 |
9 |
10 |
16
4.Enter the frequency.
a.Enter the frequency number.
b.Then press  .
.
1 |
2 |
3 |
4 |
5 |
6 |
7 |
8 |
9 |
10 |
Note: To clear a mistake while entering the frequency, |
|
||||||||||
press |
repeatedly until the display is cleared. |
|
|||||||||
If you enter a |
1 |
2 |
3 |
4 |
5 |
6 |
7 |
8 |
9 |
10 |
|
frequency which is |
|||||||||||
outside the scanner’s |
|
|
|
|
|
|
|
|
|
|
|
|
|
|
|
|
|
|
|
|
|
||
frequency bands, a |
|
|
|
|
|
|
|
|
|
|
|
distinctive beep |
|
|
|
|
|
|
|
|
|
|
|
sounds and Error |
|
|
|
|
|
|
|
|
|
|
|
appears in |
|
|
|
|
|
|
|
|
|
|
|
the display. |
|
|
|
|
|
|
|
|
|
|
|
Press |
and go back |
|
|
|
|
|
|
|
|
|
|
to Step 4. |
|
|
|
|
|
|
|
|
|
|
|
(See the Table on page 3 or the Band List on the back of the scanner).
17

Duplicate Frequency Alert
If you enter a frequency which is stored in another channel, you hear a beep and the other channel displays.
Press to clear and start again.
BANK |
1 |
2 |
3 |
4 |
5 |
6 |
7 |
8 |
9 |
10 |
—OR—
Press again to store the frequency in both channels.
n
Programming Tips
nGroup similar frequencies into adjacent channels.
For example, program police frequencies in channels 1 through 10 and fire/emergency into channels 11 through 20, and so on.
nPut the frequency that you listen to the most or the most important frequency into a Priority channel.
nTo quickly program a series of channels, start with the lowest number channel.
For example, when you are programming five new frequencies into Channels 4 through 8, start with Channel 4. After you finish programming a channel, press  or
or 
 to go to the next higher channel.
nWrite down your programmed channels and frequencies in some convenient place in case the scanner memory is lost.
n
18
Deleting a Stored Frequency
To delete a stored |
1 |
2 |
3 |
4 |
5 |
6 |
7 |
8 |
9 |
10 |
|
frequency: |
|||||||||||
|
|||||||||||
a. Select a |
|
|
|
|
|
|
|
|
|
|
|
|
|
|
|
|
|
|
|
|
|
|
|
channel. |
|
|
|
|
|
|
|
|
|
|
|
b. Press . |
|
|
|
|
|
|
|
|
|
|
|
c. Then press |
. |
|
|
|
|
|
|
|
|
|
|
Note: Channels with no frequencies are automatically locked out.
19
Scanning
1. After programming |
1 |
2 |
3 |
4 |
5 |
6 |
7 |
8 |
9 |
10 |
|
frequencies, simply |
|||||||||||
|
|
||||||||||
press |
to begin |
|
|
|
|
|
|
|
|
|
|
scanning. |
|
|
|
|
|
|
|
|
|
|
|
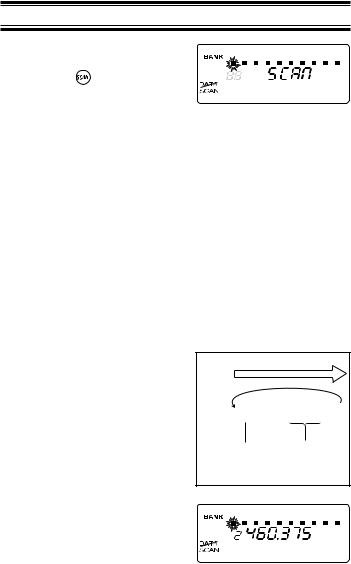
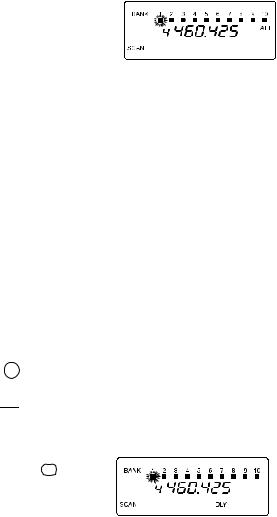
2.The bank indicators selected for scanning appear in the display, and the bank being currently monitored flashes. You can deselect banks from active scanning by pressing their number on your keypad. The indicator for each deselected bank turns off, and the bank’s channels are not scanned.
Note: One Bank must always be active. You cannot deactivate all ten banks at the same time. If you try to turn all the banks off, the first bank is automatically selected.
To restore a bank to active scanning, press the bank’s number on your keypad. The bank’s indicator will display again.
3.During normal
scanning the scanner SCAN skips unprogrammed
or locked 


 out channels. CHANNELS1 2 3 4 5 6 7 8 9 10
Frequency |
Frequency not |
Locked Out |
entered |
(L/O) |
|
4. When a transmission |
1 |
2 |
3 |
4 |
5 |
6 |
7 |
8 |
9 |
10 |
is received, the LCD |
||||||||||
|
back light comes on for five seconds and the scanner stops on that channel, provided that you have selected the Auto Light feature. When the transmission ends, scanning resumes automatically.
20
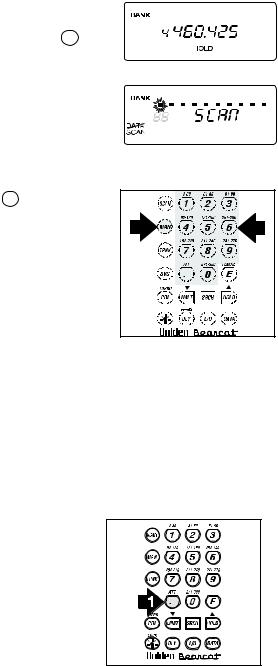
If you want to stop on a channel during scanning, press  .
.
If you want to resume scanning, press  .
.
1 |
2 |
3 |
4 |
5 |
6 |
7 |
8 |
9 |
10 |
1 |
2 |
3 |
4 |
5 |
6 |
7 |
8 |
9 |
10 |
To directly access a specific channel:
1. Press  .
.
2. Enter the channel number you want using the keypad.
3. Press  again.
RF Attenuation Feature
The UBC 245XLT comes with an RF Attenuation feature. If you’re near an unusually strong signal source, the signal may overload the scanner. The scanner may stop repeatedly on that signal and miss other transmissions.
The RF Attenuation feature works in all modes and attenuates (reduces) the incoming signal strength by about 15 dB, preventing stronger signals from overloading the scanner.
To turn RF Attenuation on: 1. Press ATT.
21
2. You hear a beep, and ATT appears in the display.
Now all incoming signal strength is reduced.
To turn RF Attenuation off, just press ATT again. The ATT icon goes out.
Setting the Delay Mode
A delay can be set for each programmed channel so that when scan or search stops on a channel there is a brief pause before the scanning cycle resumes. Delay must be set for each programmed channel and it can be set when your scanner pauses during a scan or when manual mode is selected.
Delay in Scan or Search Mode
1.Press  or set a search range and press
 .
.
2.When your scanner stops on a channel that you want to delay, press  .
.
displays and scanning resumes two seconds after the transmission ends.DLY
22
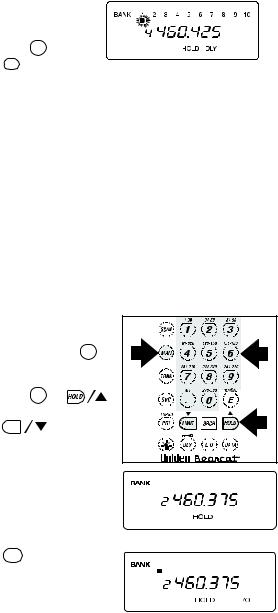
Delay in Manual Mode
1.Press  .
.
2. Select the channel that you want by entering the number and press  .
.
Press  and DLY displays indicating the
scanner will pause on the channel when a transmission is received.
Channel Lockout
You can lockout any channel so it is not reviewed during normal scanning. You can restore the channel to scanning whenever you wish.
Lockout in Manual Mode
1. Press  .
.
2. Select a channel.
Enter the channel number. Press  again.
—OR—
Press  or
or
to change higher, or

 to lower the channel.
3.Press  to lockout the channel.
L/O appears in display.
1 |
2 |
3 |
4 |
5 |
6 |
7 |
8 |
9 |
10 |
1 |
2 |
3 |
4 |
5 |
6 |
7 |
8 |
9 |
10 |
23
Loading...