


FP 107
FP
107
Digital
Answer Machine
Caller ID
Speaker Phone
OWNER’S
MANUAL

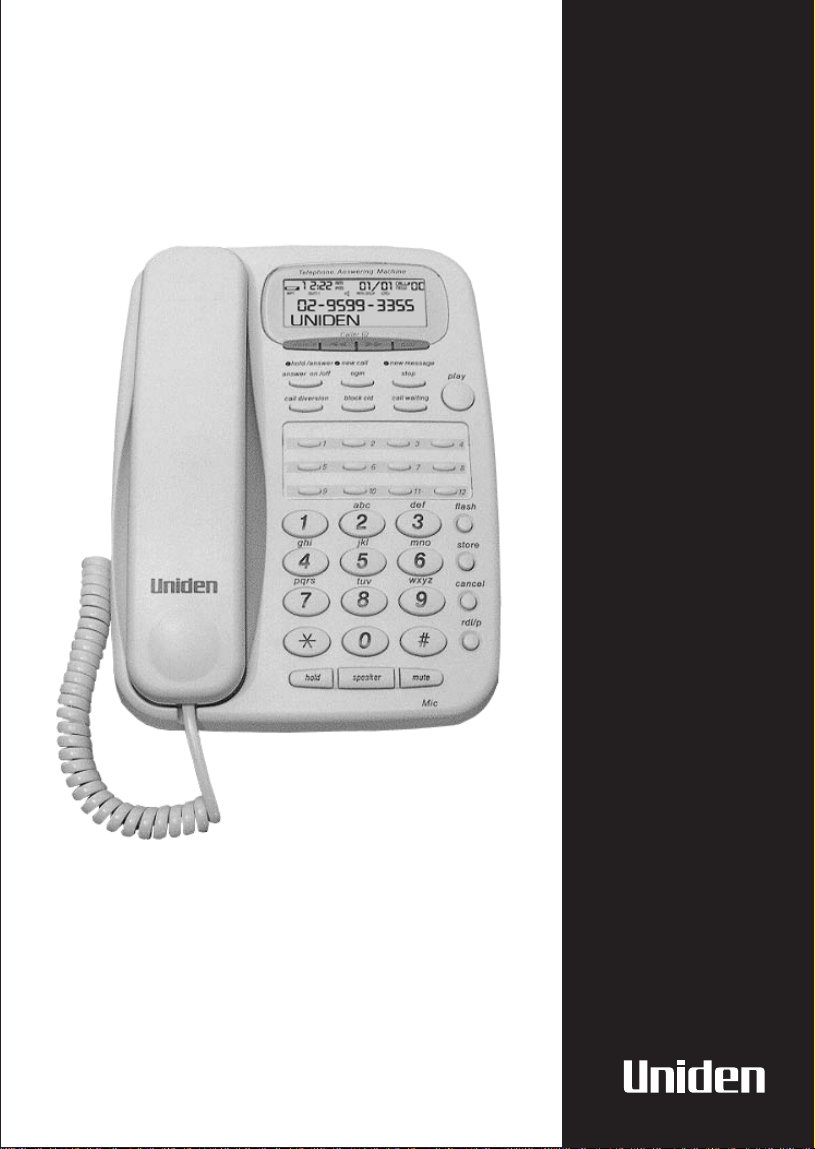
CONTROLS & FUNCTIONS
Telephone Answering Machine
AM
call#
NEW
PM
1
2
3
4
5
6
RPT OGM 1 ANS ON
Caller ID
delete
hold / answer
new call
1
5 6 7
9
1
ghi
4
7
ogm
2
10 11
abc
2
jkl
5
tuv wxyz
8
answer on / off
call diversion
pqrs
0
hold speaker mute
dial
new message
stop
call waitingblock cid
3 4
def
3
mno
6
9
play
8
12
flash
store
cancel
rdl/p
7
8
9
10
11
12
13
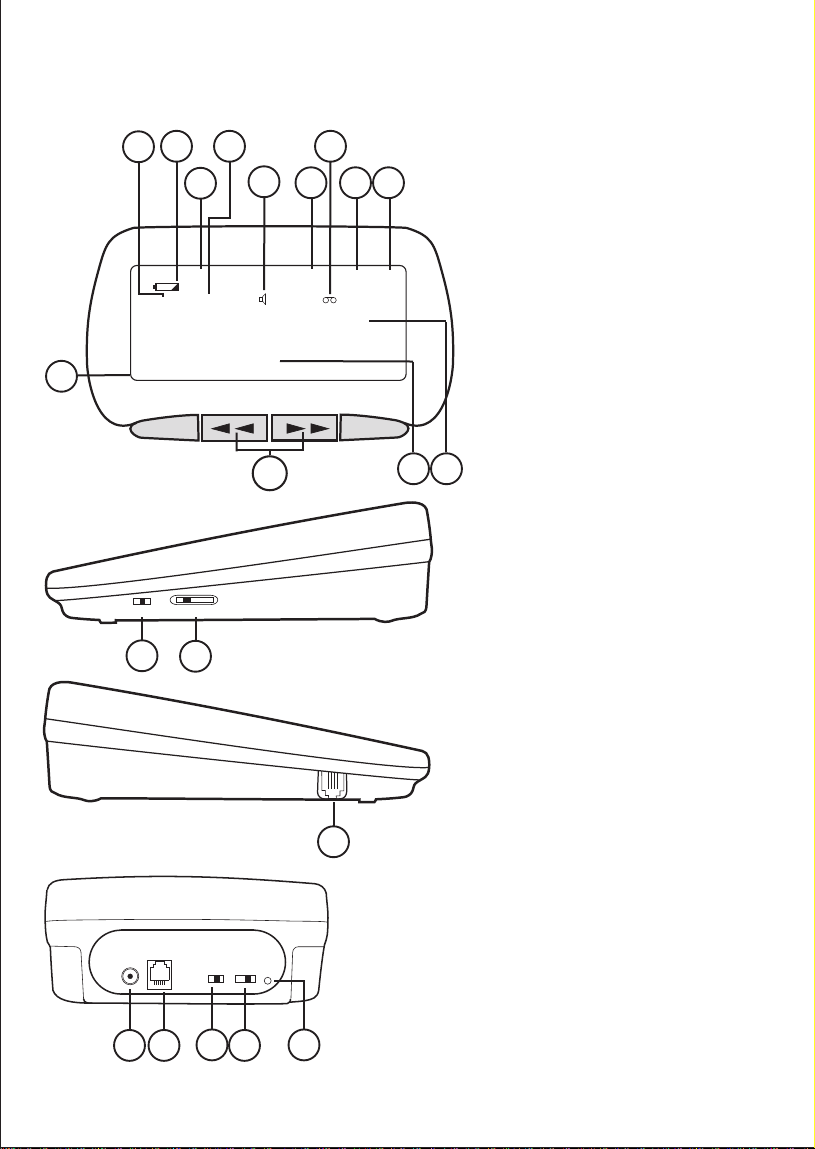
Answer Phone Base Unit
1 LCD Screen
2 Delete
3 Hold / Answer LED
New Call LED
New Message LED
4 Answer on/off
Out Going Message (OGM)
Stop
5 Handset
6 Alpha Numeric Keypad
7 Dial
1
14
15
16
8 Call Diversion
Block CID
Call Waiting
9 12 one touch Speed Dial
10 Flash
11 Store
12 Cancel
13 Redial/Pause
14 Hold
15 Speaker
16 Mute
LCD Screen
19
18
20
21
22
23
25
24 26 27
Telephone Answering Machine
AM
1 2:22
RPT OGM 1 ANS ON
PM
01/01
call#
NEW
00
02-9599-3355
UNIDEN
Caller ID
delete
dial
18 LCD Screen
19 Repeat
20 Battery low icon
21 Time
22 OGM 1
23 Speaker phone
24 Date
25 Message
26 New call icon
27 Call counter
28 Telephone number
29 Name
30 Review
Base Unit - right side
normal
hi
min
speaker volume
32
max
mid
handset volume
31
Base Unit - rear
telephone
line
power
3534 37
ringer
ringer
select
volume
2 4 7 TS
off / lo / hi
36 38
30
Base Unit - left side
33
reset
2829
31 Handset volume control
32 Speaker volume control
33 Handset cord jack
34 AC Adaptor plug
35 Telephone line connection
36 Ringer volume control
37 Answer machine ring select
38 Reset
2

CONTENTS
Controls and Functions
Contents
Quick Start Guide
Introduction
Features
Installation / Safety
Supplied with Your FP107
Wall Installation
Adjusting the Ringer Volume and Tone
Setting the Clock
Telephone Operation
Making a Call
Answering an Incoming Call
Using Flash
Using Hold
Using Mute
Memory Dialling
Storing a Number in Memory
Storing a Number from Caller ID Records
Entering a Pause in a Memory Number
Reviewing Memory Numbers
Dialling a Memory Number
OF YOUR OWNERS MANUAL
Chain Dialling
Call Diversion
Telephone Answer Device
Recording Outgoing Messages
Checking te Outgoing Message
Using Toll Saver
Setting the FP107 to Answer Calls
Caller ID Operation
Name Tagging
Reviewing Caller ID Records
Deleting Call Records
FP107 Operation
Playing Messages
Deleting Messages
Screening Calls
Advanced Features
Setting the Display Contrast
Using Call Breakthrough
Remote Operation
Changing the Remote Operation Security Code
Remote Command List
Troubleshooting
3
CONTENTS
Warranty
1
3
4
6
6
6
7
8
9
9
10
10
10
11
11
11
12
12
12
13
13
13
14
14
15
15
16
16
16
17
17
18
18
19
19
19
19
20
20
20
20
20
21
22
23
This page is a very condensed version of the Owners Manual. It is designed to allow you
to get your phone installed and operating as quickly as possible - however it does not
attempt to explain any of the advanced features of the FP107 .
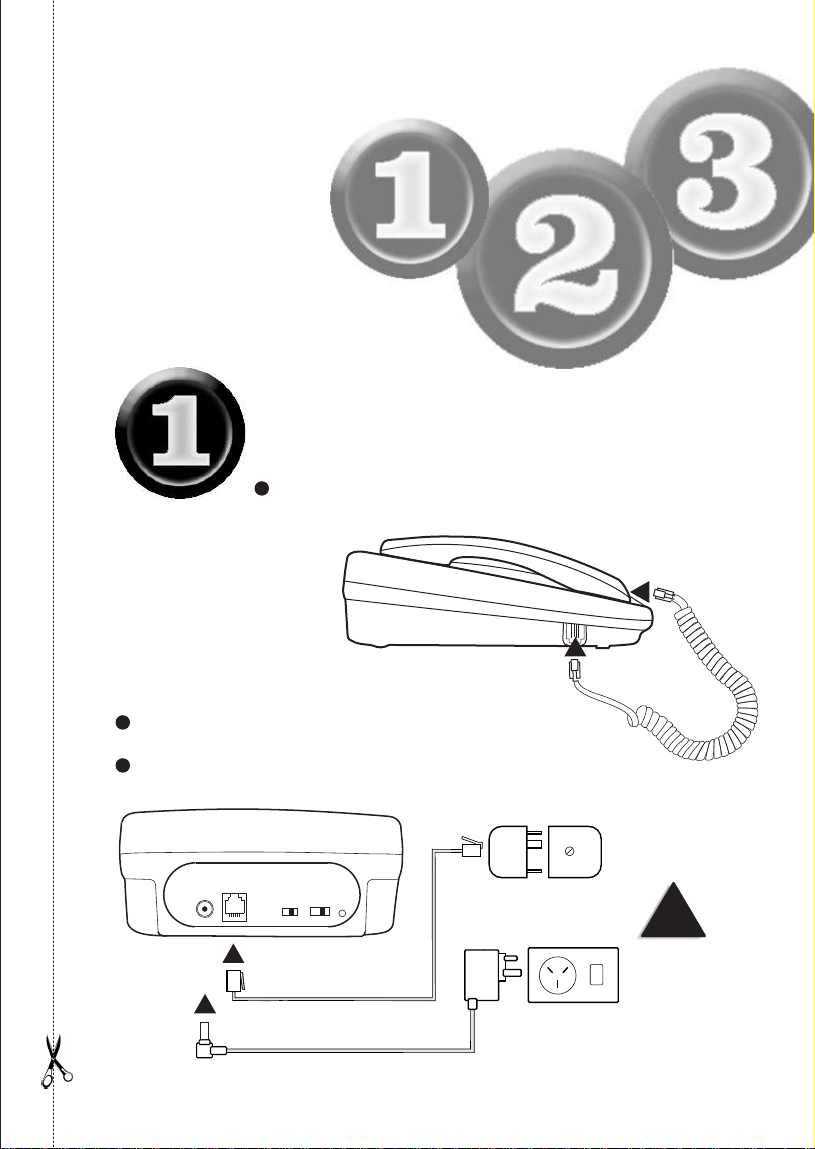
Start
Here!
Quick Start Guide
Installing
the Base Unit
Plug one end of the Handset curly cord into the handset and the
other into the jack on the side of the telephone base.
Plug the Telephone Cord into the Base Unit,
then into the Phone Socket on the wall.
Plug the AC Adaptor into the Base Unit, then
into the Power Point.
telephone
line
power
ringer
ringer
select
volume
2 4 7 TS
off / lo / hi
reset
Telephone cord
AC Adaptor
Phone socket
Power point
!
Make sure the AC
Adaptor remains
switched ON at all
times.
4
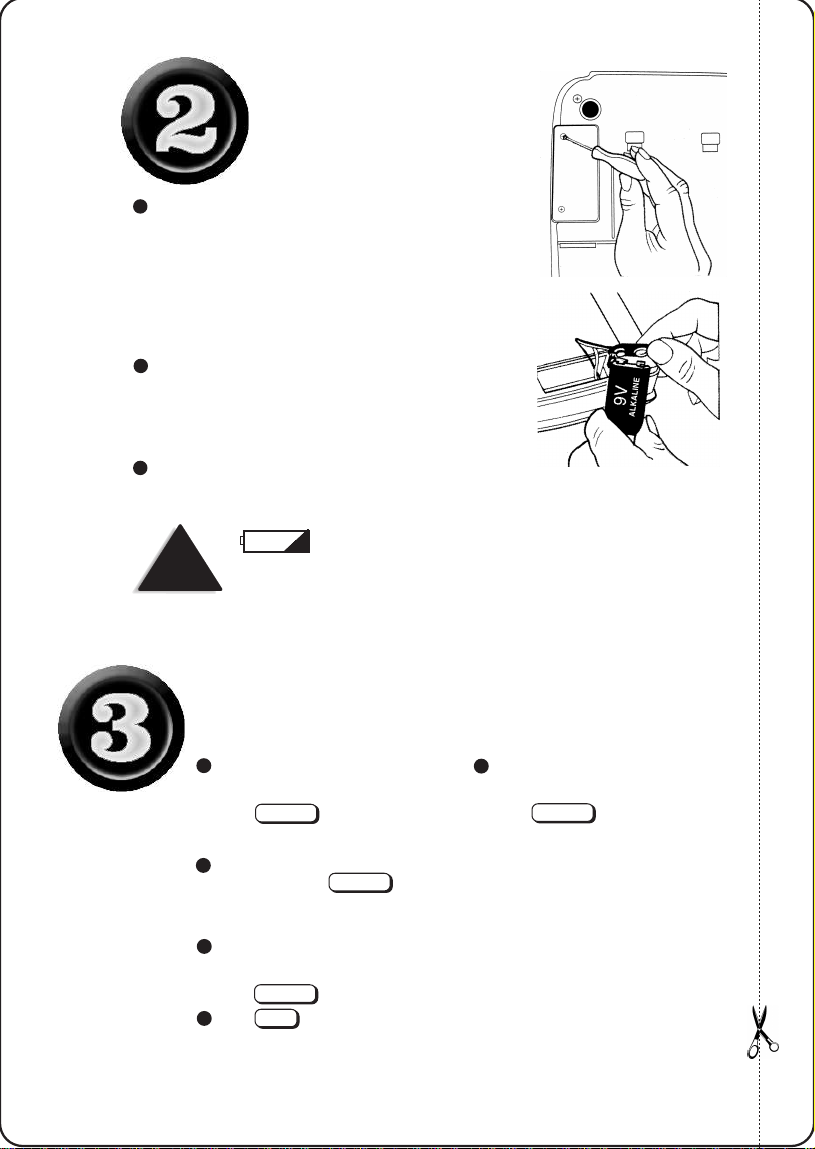
Installing the
Backup Battery
Use a small Phillips screwdriver to remove the two screws on
the battery compartment cover located under the base.
Remove the cover.
Plug the battery contacts in place and lay the battery in the battery
compartment.
Replace the cover and secure with the screws.
This symbol on the display screen indicates the battery level
is low. Disconnect the telephone line cord and replace it with a 9V alkaline
NOTE
battery.
Making a Call
Pick up the handset
OR
speaker
Press
Dial the number
To hang up, replace the handset on
the base - or press
speaker
Answering a Call
Pick up the handset from the base and speak.
OR
speaker
Press and speak
To Redial (last number dialled)
Pick up the handset
OR
speaker
Press
rdl/p
Press
The telephone will automatically
5
redial the last number dialled.
FEATURES
l
12 Number Memory Dialling
l
Speakerphone
l
Flash
l
Mute
l
Hold
ANSWER MACHINE
FEATURES
l
Recordable Outgoing Message
l
Voice/Date/Time Stamp
l
Adjustable Ring Number
l
Toll-Saver
l
Phone Pick-Up Detection
TO YOUR NEW PHONE
CALLER ID FEATURES
l
3-Line Display
l
Caller ID Memory
l
Call Summary
l
Name Tagging
INSTALLATION & SAFETY
l
Pause
l
Redial
l
Volume Controls
l
Adjustable Ringer Volume
l
Hearing-Aid Compatible
l
Tone Dialing
l
Call Breakthrough (CBT) with Programmable Code
l
Call Screen
l
Remote Operation with Programmable Code
l
Room Monitor
l
Memory Backup
l
New Call Indicator
l
Review Scrolling
l
Dialling Option
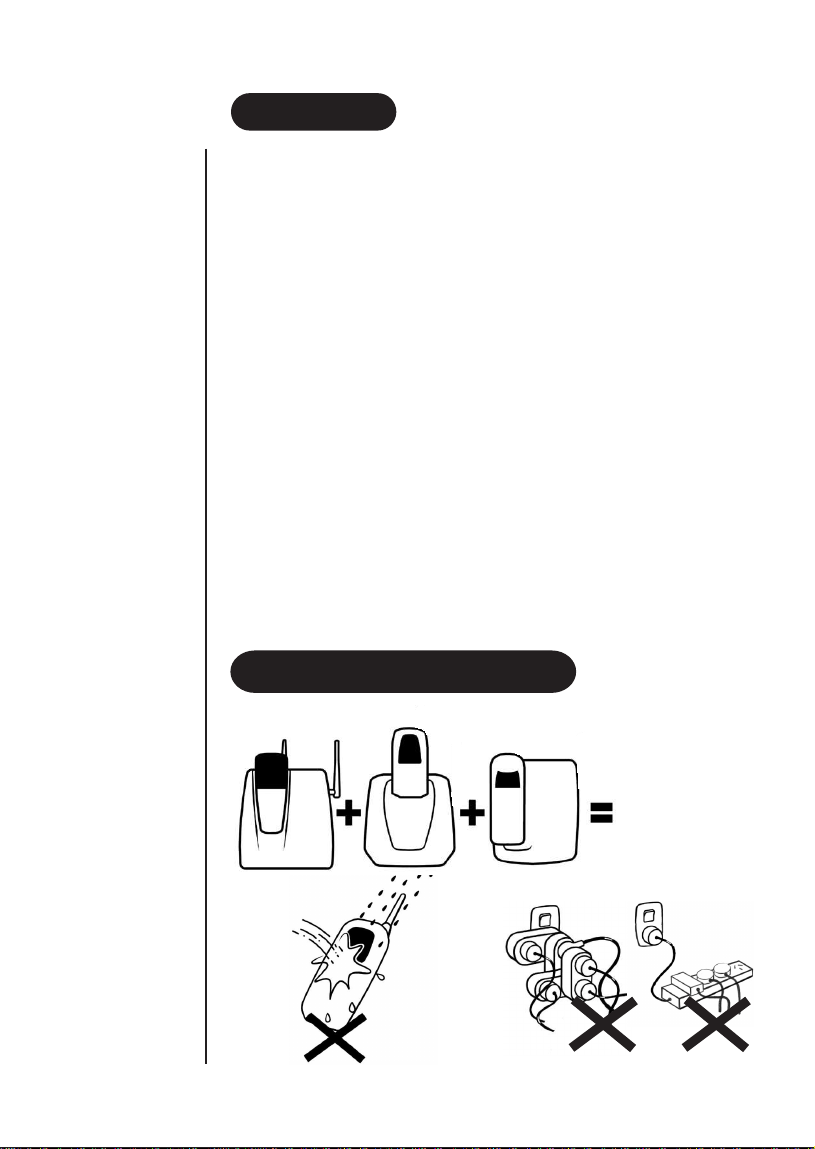
AVOID -
Connecting
more than
3
phones as Ringing
may be impaired.
AVOID -
moisture
INTRODUCTION
DON’T -
overload the
power oulet
OR
plug into a multi
power board.
6
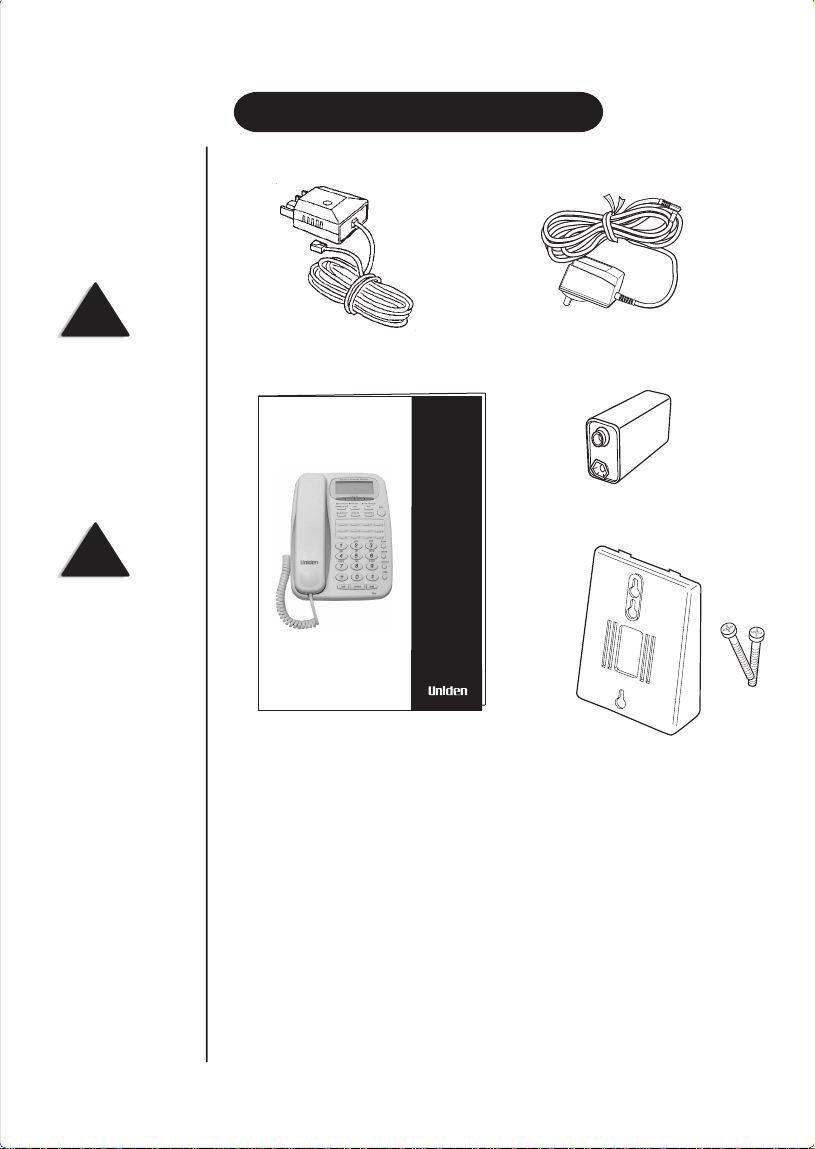
SUPPLIED WITH YOUR FP107
NOTE
To get the most from your
purchase, please read the
Owners Manual
thoroughly . Also be sure
to complete the Customer
Support Card.
NOTE
If any of these items are
missing or damaged,
contact the place of
purchase.
1 - Telephone line cord
OWNER’S
MANU AL
1 - Owners Manual
1 - Customer Support card
FP
107
Digital Answerphone
1 - AC Adaptor
1 - 9V battery
1 - Wall mount bracket
and 2 screws
7
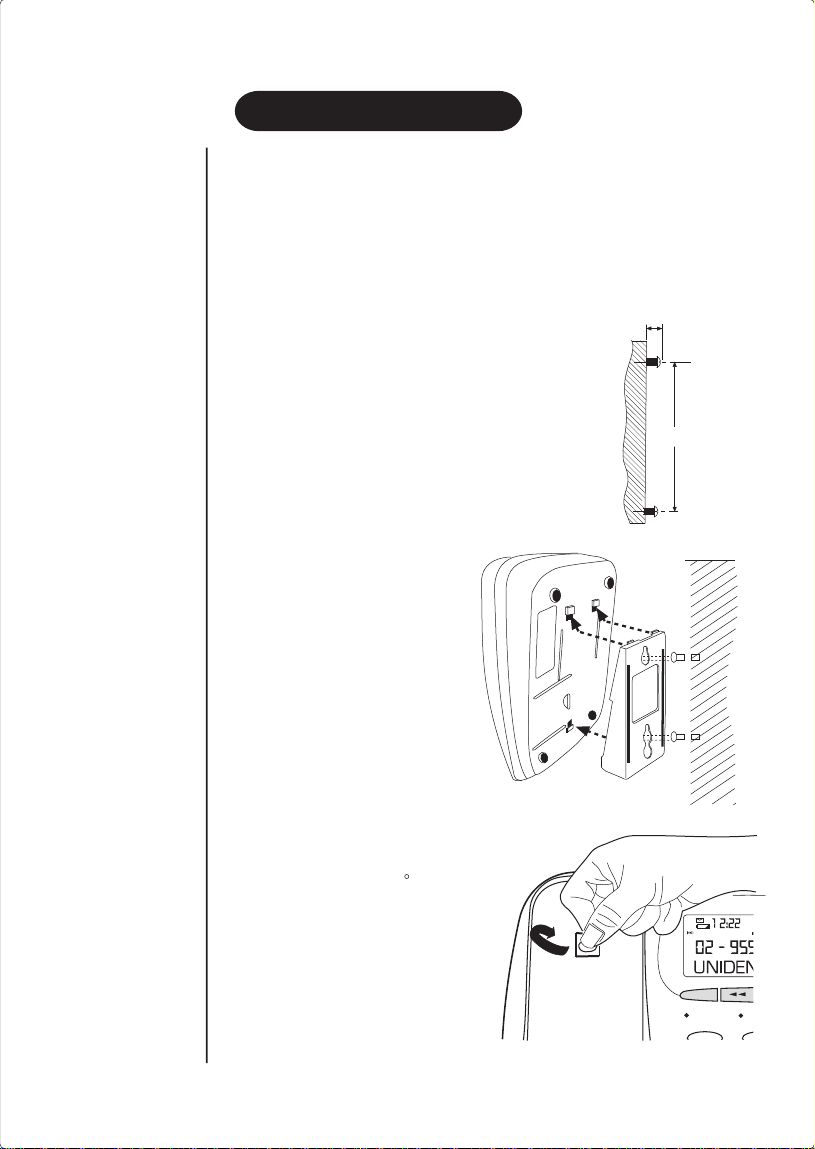
WALL INSTALLATION
Wall Mounting
If required, you can mount y our phone directly on a w all.
Before mounting your phone, please consider the follo wing:
Select a location away from electrical cables , pipes or other items behind the
•
mounting location that could cause a hazard when inserting screws into the wall.
•
Make sure the wall material is capable of supporting the weight of the telephone.
Use the screws (supplied) with anchoring devices suitable for the wall material
•
where the Telephone will be placed.
Insert two mounting screws 100mm apart.
Allow about 5mm between the wall and
screw heads for mounting the phone.
Attach the wall mounting
bracket to the telephone base.
5mm
100mm
Place the base unit on the
screws and push down until it
is firmly seated.
Gently pull out the handset retainer
tab, turn it 180 and refit it.
Telephone Answering Machine
AM
call#
NEW
PM
PM VIP OGM OGM2 ANS ONLY
Caller ID
delete
hold / answer
answer on / off
new call
ogm
dial
new message
8
stop
 Loading...