


DECT Elite 9035
DECT Elite 9035+1
DECT Elite 9035+2
DECT ELITE OM.indb 1 |
|
|
13/3/08 3:16:43 PM |
|
|
||
|
|
|
|

Table of Contents
Welcome....................................................................... |
4 |
Installing the Phone..................................................... |
5 |
Choosing the Best Location....................................... |
5 |
Installing the Battery.................................................. |
6 |
Connecting the AC adapter....................................... |
7 |
To the base........................................................... |
7 |
To the charging cradle (for multi-handset packs |
|
only).............................................................. |
7 |
Charging the Handset................................................ |
8 |
Connecting to the Phone Line................................... |
9 |
Testing the Connection............................................ |
10 |
Installing the Belt Clip.............................................. |
11 |
Expanding Your Phone............................................ |
12 |
Adding accessory handsets................................ |
12 |
Registering accessory handsets......................... |
12 |
Using Multiple Bases............................................... |
13 |
Registering the handset to another base............ |
13 |
Selecting the base.............................................. |
14 |
Getting to Know Your New Phone............................ |
15 |
Features.................................................................. |
15 |
Answering system features................................. |
15 |
Terminology Used in this Manual............................. |
16 |
Manual Conventions................................................ |
16 |
Parts of the Handset................................................ |
17 |
Parts of the Base..................................................... |
18 |
Using the Interface..................................................... |
19 |
Reading the Handset Display.................................. |
19 |
Using the Four-way Function Key........................... |
20 |
Using the Handset Menu......................................... |
20 |
Entering Text from Your Handset............................. |
21 |
Basic Setup................................................................. |
22 |
Setting the Day & Time............................................ |
22 |
Activating Personal Settings.................................... |
22 |
Activating the Key Touch Tone................................. |
23 |
Insert 0 .................................................................... |
23 |
Setting Up the Phonebook........................................ |
24 |
Creating Phonebook Entries.................................... |
24 |
Finding a Phonebook Entry..................................... |
25 |
Editing an Existing Phonebook Entry...................... |
26 |
Storing Caller ID or Redial Numbers in the |
|
Phonebook.................................................. |
26 |
Deleting a Single Phonebook Entry......................... |
26 |
Deleting all Phonebook Entries............................... |
27 |
Copying Phonebook Entries to Another Handset.... |
27 |
DECT ELITE OM.indb 1 |
|
|
13/3/08 3:16:44 PM |
|
|
||
|
|
|
|

Customizing Your Handsets..................................... |
28 |
Changing the Handset Banner................................ |
28 |
Selecting a Ringer Tone.......................................... |
28 |
Activating AutoTalk.................................................. |
29 |
Activating Any Key Answer...................................... |
29 |
Color Scheme.......................................................... |
29 |
Wallpaper................................................................. |
30 |
Activating the Handset Keypad Lock....................... |
30 |
Using Your Phone...................................................... |
31 |
Making a Call from the Phonebook......................... |
32 |
Chain dialing from the phonebook...................... |
32 |
Switching to the Handset Speakerphone |
|
During a Call............................................... |
32 |
Using Caller ID, Call Waiting, and Redial Lists....... |
33 |
Using the Caller ID List ........................................... |
33 |
Making a Call from a Caller ID Record.................... |
33 |
Deleting Caller ID Numbers..................................... |
34 |
Using Call Waiting .................................................. |
34 |
Redialing a Number................................................. |
35 |
Deleting a Redial Record......................................... |
35 |
Adjusting the Ringer, Earpiece and |
|
Speaker Volume.............................................. |
36 |
Adjusting the Ringer Volume................................... |
36 |
Muting the Ringer (One call only)............................ |
36 |
Adjusting the Earpiece Volume................................ |
36 |
Adjusting the Speaker Volume................................ |
37 |
Adjusting the Audio Tone......................................... |
37 |
Finding a Lost Handset............................................. |
38 |
Using Hold, Conference and Transfer...................... |
38 |
Placing a Call on Hold............................................. |
38 |
Conferencing........................................................... |
38 |
Transferring a Call................................................... |
39 |
Answering a transferred call............................... |
39 |
Using Special Features.............................................. |
40 |
Privacy Mode........................................................... |
40 |
Using the Intercom.................................................. |
40 |
Making an intercom page.................................... |
40 |
Answering an intercom page.............................. |
41 |
Muting the Microphone............................................ |
41 |
Installing the Optional Headset................................ |
42 |
Setting Up the Answering System............................ |
43 |
Recording a Personal Greeting............................... |
43 |
Selecting a Greeting................................................ |
43 |
Deleting Your Personal Greeting............................. |
44 |
Setting the Number of Rings................................... |
45 |
Setting the Record Time (or Announce only)........... |
45 |
Activating the Message Alert................................... |
46 |
DECT ELITE OM.indb 2 |
|
|
13/3/08 3:16:45 PM |
|
|
||
|
|
|
|

Activating the Base Call Screen.............................. |
46 |
Using the Answering System.................................... |
47 |
Turning Your Answering System On and Off........... |
47 |
Reviewing Messages............................................... |
48 |
Screening Calls....................................................... |
49 |
Turning Off the Message Alert Tone........................ |
49 |
Operating the Answering System While You Are |
|
Away from Home......................................... |
49 |
Setting a security code or Personal Identification |
|
Number (PIN).............................................. |
49 |
Dialing in to your answering system................... |
49 |
Maintenance............................................................... |
51 |
Specifications.......................................................... |
51 |
Battery Information.................................................. |
51 |
Battery life........................................................... |
51 |
Low battery alert ................................................ |
52 |
Cleaning the charging contacts........................... |
52 |
Battery replacement and handling ..................... |
52 |
Power Failures......................................................... |
52 |
Troubleshooting......................................................... |
53 |
Common Issues....................................................... |
53 |
Resetting the Handset............................................. |
55 |
Resetting the Handset Without the Base................. |
56 |
Changing the Line Mode for Multiple Extensions.... |
57 |
Traveling Out of Range............................................ |
57 |
Liquid Damage........................................................ |
58 |
Precautions! .............................................................. |
59 |
Rechargeable Nickel-Metal-Hydride Battery |
|
Warning ...................................................... |
59 |
Important Safety Instructions .................................. |
59 |
Index............................................................................ |
60 |
Remote Operation Card............................................. |
62 |
One Year Limited Warranty....................................... |
66 |
DECT ELITE OM.indb 3 |
|
|
13/3/08 3:16:45 PM |
|
|
||
|
|
|
|
Welcome
Thank you for purchasing a Uniden Multi-Handset phone.
Note: Illustrations in this manual are used for explanation purposes. Some illustrations in this manual may differ from the actual unit.
Welcome
DECT ELITE OM.indb 4 |
|
|
13/3/08 3:16:46 PM |
|
|
||
|
|
|
|

Installing the Phone
Installing the Phone
Choosing the Best Location
When choosing a location for your new phone, here are some important guidelines you should consider:
PLACE YOUR BASE |
TRY TO AVOID |
|
• Microwave ovens |
• Fluorescent |
• Other cordless |
• Refrigerators |
lighting |
telephones |
Near an AC outlet and a telephone wall jack.
• |
TVs |
• |
Other |
In a centrally-located |
• |
Direct sunlight |
open area. |
• |
Extreme temperatures |
Notes: For maximum range:
• Personal computers |
• Areas with |
|
• Wireless LAN |
a lot of |
|
equipment |
background |
|
|
noise |
|
• Dust |
• Shock |
|
• Excessive |
||
• Vibration |
||
moisture |
||
|
•Keep both the base and handset antennas free of obstruction.
•When the handset is not in use, place the handset in an upright position.
•Metal and reinforced concrete may affect cordless telephone performance.
DECT ELITE OM.indb 5 |
|
|
13/3/08 3:16:48 PM |
|
|
||
|
|
|
|
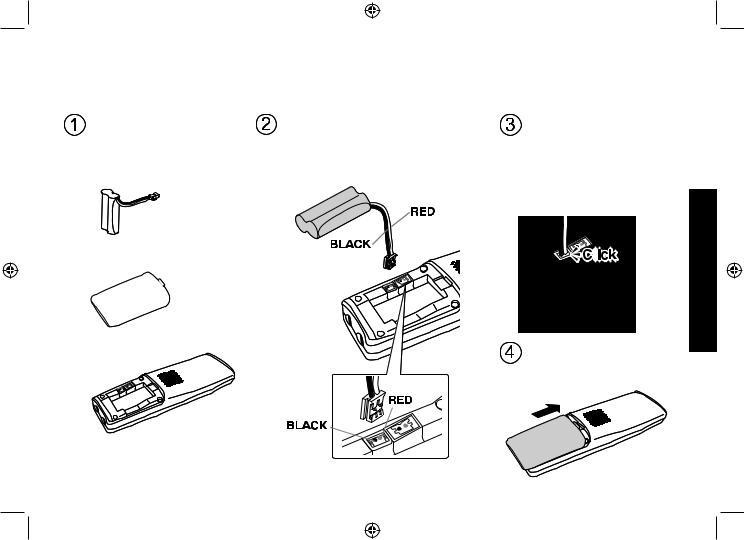
Installing the Battery
Use only the Uniden BT-694 rechargeable battery pack supplied with your cordless telephone.
Locate the battery pack, |
Line up the red and black wires on |
battery cover and the |
the battery pack connector with |
handset. |
the sticker in the handset’s battery |
|
compartment. |
Battery |
|
pack |
|
Battery cover
Handset
Push the battery pack connector in firmly. (You should hear it click into place.) Gently tug on the battery wires to make sure the connection is secure.
Place the cover over the battery compartment and slide it up into place.
Phone the Installing
DECT ELITE OM.indb 6 |
13/3/08 3:16:50 PM |
Installing the Phone
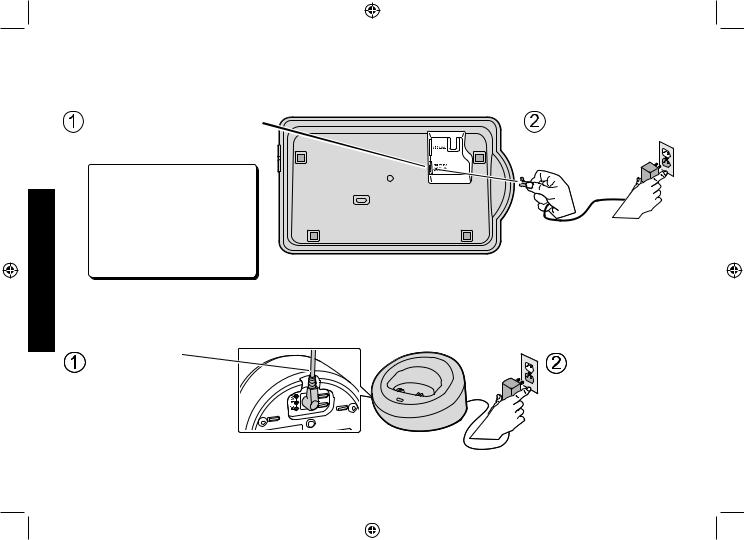
Connecting the AC adapter
To the base
To avoid risk of fire and shock, only use the Uniden AAD-041S AC adapter with the base. |
|
Connect the AC adapter to the |
Connect the AC |
DC IN 9V jack on the bottom |
adapter to a |
of the base. |
standard 240V |
|
AC wall outlet. |
Don’t put any power cord |
|
where it people might trip |
|
over it or step on it. If a |
|
power cord becomes |
|
chafed or worn out, it can |
|
create a fire or electrical |
|
hazard. |
|
To the charging cradle (for multi-handset packs only)
Use only the Uniden AAD-600S AC adapter with the charging cradle.
Route the cord |
Connect the AC |
through the |
adapter to a |
wiring channel. |
standard 240V |
|
AC wall outlet. |
DECT ELITE OM.indb 7 |
|
|
13/3/08 3:16:57 PM |
|
|
||
|
|
|
|
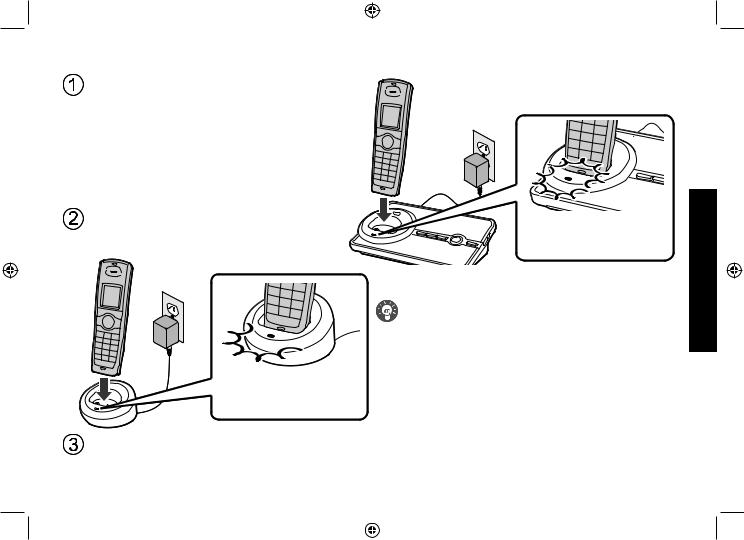
Charging the Handset
Place the handset in the base cradle with the display facing forward.
If you have an accessory handset, place it in the charging cradle with the display facing forward.
Make sure that the charge LED illuminates when the handset is seated.
Make sure that the charge LED illuminates when the handset is seated.
 What if the charge LED doesn’t light up?
 Reseat the handset; make sure the contacts on the bottom of the handset are lined up with the contacts in the cradle.
 Check the AC adapter connection.
Phone the Installing
Charge your handset at least 15 to 20 hours before plugging into the phone line.
DECT ELITE OM.indb 8 |
|
|
13/3/08 3:17:18 PM |
|
|
||
|
|
|
|
Installing the Phone
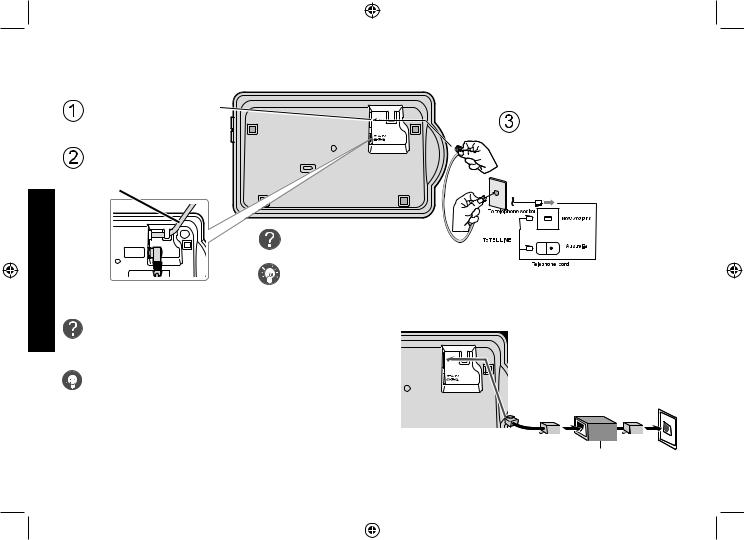
Connecting to the Phone Line
Make sure that the battery pack is fully charged.
Connect the telephone cord to the TEL LINE jack on the bottom of the base.
Route the cord through the molded wiring channel.
What if CHECK TEL LINE appears on the handset display?
Connect the telephone cord to a telephone wall jack.
The telephone cord may not be connected |
(Supplied) |
correctly. Check the telephone cord connection.
Do you have DSL or any high-speed Internet service delivered through your phone line?


 Try putting a DSL filter between the base and the wall jack. Without a filter, telephone-line-based Internet services can interfere with standard phones.
Telephone wall jack
Telephone cord
DSL filter
DECT ELITE OM.indb 9 |
|
|
13/3/08 3:17:22 PM |
|
|
||
|
|
|
|
Testing the Connection
Pick up the handset from the cradle and press [ /flash]. You should hear a dial tone, and the display should show TALK.
What if I can’t hear a dial tone?
Check the telephone cord connection on the base.
What if the display doesn’t show TALK?
• Check the battery pack connection in the handset.
• Make sure the battery pack is fully charged.
• Make sure the AC adapter cord is securely connected to the DC IN 9V jack and a standard power outlet.
• Try resetting the handset (see page 55).
Make a quick test call, and then press [ ] to hang up.
What if there is a lot of static?
Check the sources of interference described in Choosing the
Best Location (see page 5): is the base near any of those?
Note: Make sure you can get a dial tone on any accessory handsets that were packaged with your phone.
10
Phone the Installing
DECT ELITE OM.indb 10 |
|
|
13/3/08 3:17:47 PM |
|
|
||
|
|
|
|
NOW YOU ARE READY TO USE YOUR PHONE!
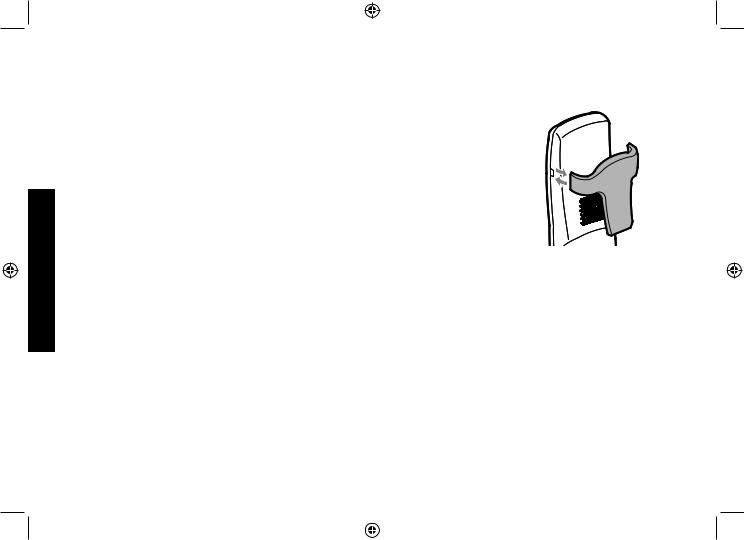
Installing the Belt Clip
Insert the tabs on the sides of the belt clip into the holes on either side of the handset. Press the belt clip down until it clicks into place. (Tug on the clip to make sure it’s secure.)
To remove the belt clip, gently pull the tabs out of the holes, then slide the belt clip off of the handset.
Installing the Phone
11
DECT ELITE OM.indb 11 |
|
|
13/3/08 3:17:48 PM |
|
|
||
|
|
|
|
Expanding Your Phone
Adding accessory handsets
Your phone supports a total of six cordless handsets, including any that were supplied with your phone. You can now place a fully-featured cordless handset anywhere AC power is available to connect the charging cradle.
•Your phone is compatible with the following Uniden DECT accessory handsets: DECT Elite 9005 and DECT 6005. (Please visit our website at www.uniden.com.au for Australian models and www.uniden.co.nz for New Zealand models for the most up-to-date list of compatible handsets.)
•For instructions on connecting the charging cradle, see page 7.
•If you purchase any accessory handsets separately, you must register the handsets to the base before you can use them. (Accessory handsets that come packaged with a base are already registered to that base.)
Registering accessory handsets
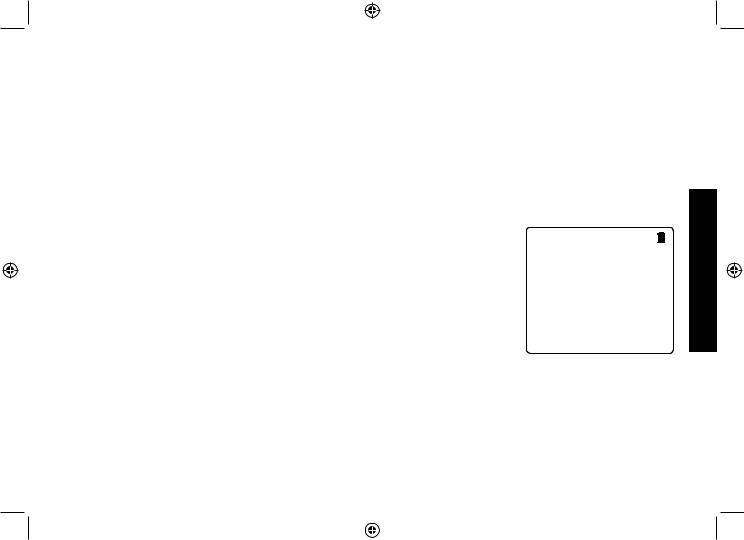
When charged, registered handsets display a handset ID number. Handsets that have not been registered display as shown.
To register a DECT Elite 9005 accessory handset:) Charge the handset for 15-20 hours.
2)Place the handset in the base cradle for about thirty seconds. HANDSET REGISTERING will appear in the LCD.
3)When the handset has registered to the base, the LCD will display REGISTRATION COMPLETE then show the handset ID number.
If the display shows REGISTRATION FAILED, repeat the process again.
To register a DECT 6005 accessory handset:) Charge the handset for 15-20 hours.
Handset not registered - place handset on base to register .
See your Owner's Manual for help .
2)Disconnect the base AC adapter. Then press and hold [find] while you reconnect the adapter. Keep pressing [find] until the charge LED starts to blink.
3)On the handset, press and hold [#] until the handset beeps and displays HANDSET REGISTERING.
12
Phone the Installing
DECT ELITE OM.indb 12 |
|
|
13/3/08 3:17:49 PM |
|
|
||
|
|
|
|

Installing the Phone
4)When the handset has registered to the base, the LCD will display REGISTRATION COMPLETE then show the handset ID number.
If the display shows REGISTRATION FAILED, repeat the process again.
Note: If a handset has ever been registered to a base, reset the handset before you register it to a new base (see Resetting the Handset on page 55). Or to use multiple bases, see the next section.
Using Multiple Bases
The handsets supplied with your phone (or any DECT Elite 9005 accessory handsets) can be registered to a total of four different bases. Compatible bases include the DECT Elite 9035 series, DECT 6015 series and DECT 6035 series models. Once your handset is registered to more than one base, you can set the handset to search
automatically the available base, or you can select manually which base the handset should connect to (for example, if you have one base with an answering machine, you can tell the handset to connect that base to check messages).
Note: To confirm how many bases the handset is registered to, open the SELECT BASE submenu (follow the step
1 of Selecting the base on page 14). Press [ ] to close the list and return to standby.
Registering the handset to another base
) Make sure the handset battery is fully charged.
2)To register a handset to DECT 6015, DECT 6035 or DECT Elite 9035 base:
•Disconnect the base AC adapter. Then press and hold [find hs] or [find] while you reconnect the adapter. Keep pressing [find hs] or [find] until the charge LED starts to blink.
3)On the handset, press [Select/menu]. Select the REGISTER BASE menu. HANDSET REGISTERING will appear in the display. (After step 2, you have thirty seconds to complete this step 3 before the system returns to standby.)
4)Wait approximately thirty seconds. “REGISTRATION COMPLETE” will be displayed to indicate the handset has been registered to the base and a handset ID will be automatically assigned.
If the display shows REGISTRATION FAILED, repeat the process again.
13
DECT ELITE OM.indb 13 |
|
|
13/3/08 3:17:49 PM |
|
|
||
|
|
|
|

Selecting the base
When your handset is registered to another base, it will automatically connect to the base. A base ID (that is for the handset only) will be assigned in the order of registration. You can either select a base you want to use manually, or set to AUTO. If you set to AUTO, when the handset comes out of range, it searches automatically the available base in order of base ID.
) With the phone in standby, press [Select/menu]. Select the HANDSET SETUP menu, and then the SELECT BASE submenu.
2)Move the cursor to select the base you want to connect to, or choose AUTO to have the handset automatically select the base.
3)Press [Select/menu]. SEARCHING will appear in the display.
4)When the base is found, the handset will return to standby. If the base is not found, “SEARCHING” continues to appear. You can repeat the procedure listed above to return back to the original connection or to find the different base.
Note: You cannot change bases during a call.
Phone the Installing
14
DECT ELITE OM.indb 14 |
|
|
13/3/08 3:17:49 PM |
|
|
||
|
|
|
|

Getting to Know Your New Phone
Getting to Know Your New Phone
Features
•1.8GHz DECT Elite expandable system
•Expands up to 6 handsets
•Integrated digital answering system
•Advanced phonebook features on each handset:
•Store 70 phonebook entries
•Alphabetical search
•Personalized ring by party
•Personalized LCD color scheme by party.
•Transfer single listing or entire phonebook
•Call transfer
•Conferencing
•Intercom
Answering system features
•Digital tapeless recording
•Up to 14 minutes of recording time
•Call screening
•Personal or pre-recorded outgoing messages
•Caller ID/Call Waiting*
•Name Tag (POP ID)*
•Personal Settings (Distinctive Ring)*
•Store 30 Caller ID numbers on each handset
•Speakerphone on handset
•10 ringer options (5 tones/ 5 polyphonic melodies)
•Last 5 number redial
•Handset Keypad Lock
*Caller ID, Name Tag, Personal Settings features require subscription to the Caller Display service from your network supplier. A fee normally applies for this. The Caller ID on Call Waiting service is currently unavailable in New Zealand.
•Day and time announcement
•Remote message retrieval
•Toll saver
•Message alert
•Records up to 59 messages
15
DECT ELITE OM.indb 15 |
|
|
13/3/08 3:17:50 PM |
|
|
||
|
|
|
|
Terminology Used in this Manual
Accessory |
Additional handsets that can register to the base, allowing you to add handsets without connecting another |
|||
Handsets |
phone line. This base supports a total of six cordless handsets; see page 12 for compatible handsets. |
|||
|
|
|
|
|
Base |
The main part of the phone that connects to your phone line and lets you make and receive calls. |
|||
|
|
|
|
|
Charging |
A cradle that comes with an accessory handset and charges the handset battery pack. |
|||
cradle |
It connects to power but does not connect to a phone line. |
|||
|
|
|
|
|
CID |
Caller ID is available from your telephone provider and is offered to users on a subscription basis. |
|||
With this service, you will be able to see the incoming caller information such as name and phone number. |
||||
|
||||
|
|
|
|
|
CID/CW or |
Caller ID with Call Waiting is available by subscription from your telephone provider. |
|||
CIDCW |
With this service, you will be able to view incoming caller information while on a call with another user. |
|||
|
|
|
|
|
|
Any settings that apply to all registered handsets and the base. |
|||
Global |
These features are available by selecting “GLOBAL SETUP” or “DAY & TIME” in the handset menu. Only |
|||
one handset can change global settings at a time, and you have to make sure the phone is not currently |
||||
Settings |
||||
being used. If you have multiple bases, the different bases have each global settings; select the base before |
||||
|
||||
|
changing the global setting (see Selecting the Base on page 14). |
|||
|
|
|
|
|
Standby |
The handset and the base are not in use. (It doesn’t matter whether the handset is in the cradle: the [ /flash] |
|||
or [ |
|
] hasn’t been pressed, and there is no dial tone.) |
||
|
|
|||
|
|
|||
|
|
|
|
|
Station |
Any registered handset or the base. |
|||
|
|
|
|
|
Talk |
A dial tone has been enabled, so you can dial and carry on a conversation with an outside party. |
|||
|
|
|
|
|
Manual Conventions
This manual uses several different type styles to help you distinguish between different parts of the phone:
•Bold text with “[ ]” indicates a key or button on the phone
•ALL CAPITALS indicates text on the display, such as menu options, prompts, and confirmation messages
•lower case bold text indicates a status light on the phone
•ALL CAPITALS BOLD indicates a connection jack on the base or charging cradle
16
Phone New Your Know to Getting
DECT ELITE OM.indb 16 |
|
|
13/3/08 3:17:51 PM |
|
|
||
|
|
|
|
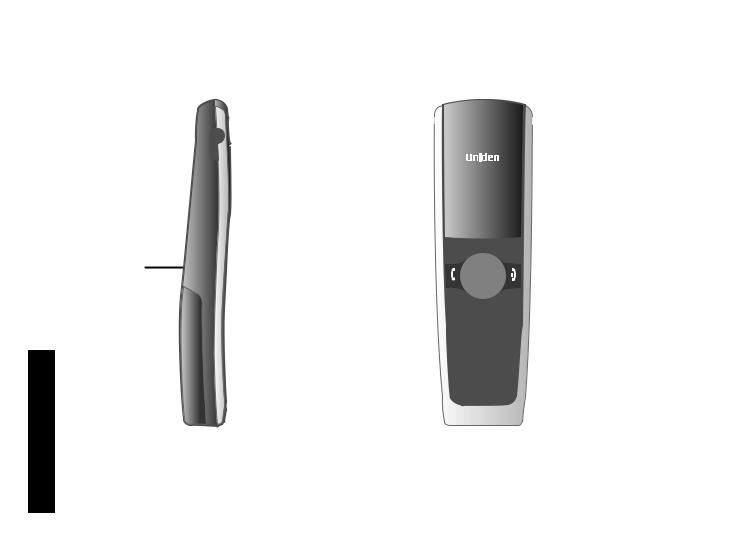
Getting to Know Your New Phone
Parts of the Handset |
|
|
|
|
|
|
|
|
|
new message LED |
|
|
|||
Headset |
|
|
Earpiece |
|
|
||
jack cover |
|
|
|
|
|||
|
|
|
|
|
|
||
Belt clip hole |
|
|
|
|
|
|
|
|
|
Display (LCD) |
|
|
|||
|
|
[Int’com/clear] key |
[ |
] key (up) |
|||
|
|
[Select/menu] key |
|||||
|
|
(intercom/clear) |
|||||
|
|
[ |
] key |
||||
|
|
|
|
|
|||
Speakerphone |
[ |
] key (phonebook/left) |
(caller ID/right) |
||||
[ |
/flash] key (talk/flash) |
[ |
] key (end call) |
||||
speaker and |
|||||||
|
|
|
|
|
|
||
ringer |
|
|
|
|
[ |
] key (down) |
|
|
|
|
|
|
|||
|
|
|
|
|
Twelve-key dial pad |
||
Battery |
|
[ |
/ |
] key |
[#] key |
||
compartment |
|
[ Redial/pause] key |
|
|
|||
|
|
|
|
||||
|
|
(redial/pause) |
|
|
|||
|
|
[ |
/mute] key |
Microphone |
|||
|
|
|
|
||||
|
|
(messages/mute) |
Charging contacts |
||||
|
|
|
|
|
|||
17
DECT ELITE OM.indb 17 |
|
|
13/3/08 3:17:54 PM |
|
|
||
|
|
|
|
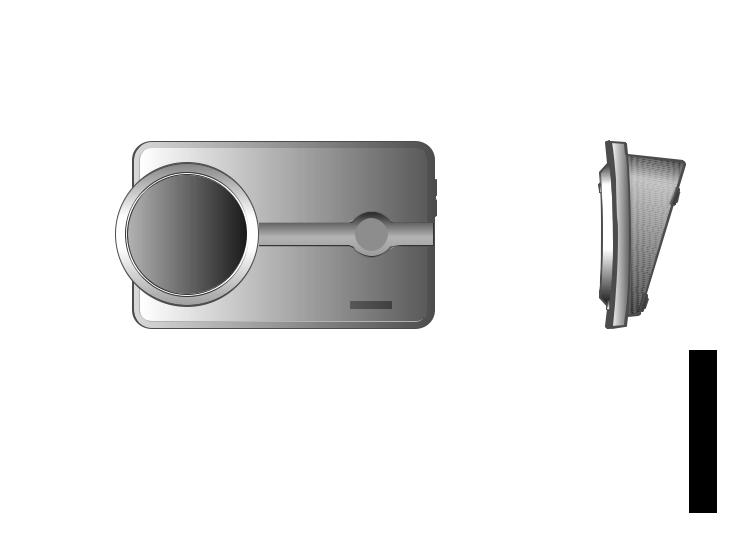
Parts of the Base
[find] key (find handset)
|
|
message |
|
|||
|
|
counter LED |
[+] key |
|||
|
|
|
|
|
(volume up) |
|
|
[ |
|
|
] key |
[-] key |
|
Charging |
|
(play/stop) |
(volume |
|||
|
[ |
|
|
] key |
down) |
|
contacts |
|
|
|
|||
|
(skip) |
|
||||
|
|
|
||||
|
[ |
|
|
] key |
|
|
|
|
|
|
|||
|
|
|
|
|||
|
|
(repeat) |
|
|||
|
|
Speaker |
|
|||
charge LED |
[ ] key (delete) |
[on/off] key (answering system on/off)
18
DECT ELITE OM.indb 18
Phone New Your Know to Getting
13/3/08 3:17:57 PM
Using the Interface
Using the Interface
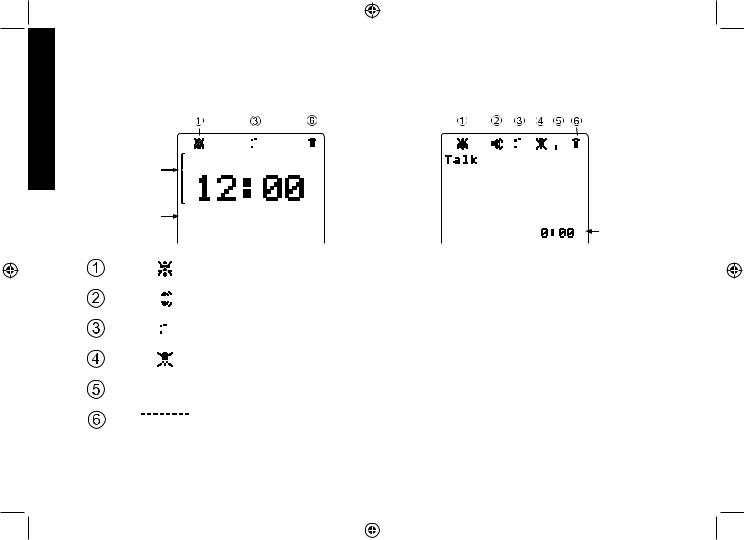
Reading the Handset Display
In standby |
|
|
|
|
|
|
|
|
|
|
During a call |
|||||||||||||||||||||||||||
|
|
|
|
|
|
|
|
|
|
|
|
|
|
|
|
|
|
|
|
|
|
|
|
|
|
|
|
|
|
|
|
|
|
|
|
|
|
|
|
|
|
|
|
|
|
|
|
|
|
|
|
|
|
|
|
|
|
|
|
|
|
|
|
|
|
|
|
|
|
|
|
|
|||||
|
|
|
|
|
|
|
|
|
|
|
|
|
|
|
|
|
|
|
|
|
|
|
|
|
|
|
|
|
|
|
|
|
|
|
|
|
|
|
|
|
|
|
|
|
|
|
|
|
|
|
SUN |
|
AM |
||||||||||||||||||||||||
Day of the week |
|
|
|
|
|
|
|
|
|
|
|
|
|
|
|
|
|
|
|
|
|
|
|
|
|
|
|
|||||||||||
and time |
|
|
|
|
|
|
|
|
|
|
|
|
|
|
|
|
|
|
|
|
|
|
|
|
|
|
|
|||||||||||
Handset ID |
Handset |
#1 |
|
|
|
|
|
|
|
|
|
|
|
|
|
|
|
|
|
|
|
|||||||||||||||||
and banner |
|
|
|
|
|
|
|
|
|
|
|
|
|
|
|
|
|
|
|
|
|
|
|
|
|
|
Call duration |
|||||||||||
|
|
|
|
|
|
|
|
|
|
|
|
|
|
|
||||||||||||||||||||||||
|
|
|
|
|
|
|
|
|
|
|
|
|
|
The ringer off icon indicates that the ringer is turned off. |
||||||||||||||||||||||||
|
|
|
|
|
|
|
|
|
|
|
|
|
|
|||||||||||||||||||||||||
|
|
|
|
|
|
|
|
|
|
|
|
|
|
|||||||||||||||||||||||||
|
|
|
|
|
|
|
|
|
|
|
|
|
|
|
||||||||||||||||||||||||
|
|
|
|
|
|
|
|
|
|
|
|
|
|
The speaker icon appears when the speaker phone is in use. |
||||||||||||||||||||||||
|
|
|
|
|
|
|
|
|
|
|
|
|
|
|||||||||||||||||||||||||
|
|
|
|
|
|
|
|
|
|
|
|
|
|
|||||||||||||||||||||||||
|
|
|
|
|
|
|
|
|
|
|
|
|
|
|
||||||||||||||||||||||||
|
|
|
|
|
|
|
|
|
|
|
|
|
|
The CID icon appears when you have new Caller ID records. |
||||||||||||||||||||||||
|
|
|
|
|
|
|
|
|
|
|
|
|
|
|||||||||||||||||||||||||
|
|
|
|
|
|
|
|
|
|
|
|
|
|
|
|
|
|
|
|
|
|
|
|
|
|
|
|
|
|
|
|
|
|
|
|
|
|
|
|
|
|
|
|
|
|
|
|
|
|
|
|
|
The mute icon appears while the microphone is muted. |
||||||||||||||||||||||||
|
|
|
|
|
|
|
|
|
|
|
|
|
|
|||||||||||||||||||||||||
|
|
|
|
|
|
|
|
|
|
|
|
|
|
|
|
|
|
|
|
|
|
|
|
|
|
|
|
|
|
|
|
|
|
|
|
|
|
|
|
|
|
|
|
|
|
|
|
|
|
|
|
|
The privacy icon appears when the Privacy Mode is turned on. |
||||||||||||||||||||||||
|
|
|
|
|
|
|
|
|
|
|
|
|
|
|||||||||||||||||||||||||
|
|
|
|
|
|
|
|
|
|
|
|
|
|
|||||||||||||||||||||||||
|
|
|
|
|
|
|
|
|
|
|
|
|
|
|
|
|
|
|
|
|
|
|
|
|
|
|
|
|
|
|
|
|
|
|
|
|
|
|
|
|
|
|
|
|
|
|
|
|
|
|
|
|
The battery icon indicates the handset battery status: full, medium, low, and empty. |
||||||||||||||||||||||||
|
|
|
|
|
|
|
|
|
|
|
|
|
|
|||||||||||||||||||||||||
|
|
|
|
|
|
|
|
|
|
|
|
|
|
|
|
|
|
|
|
|
|
|
|
|
|
|
|
|
|
|
|
|
|
|
|
|
|
|
19
DECT ELITE OM.indb 19 |
|
|
13/3/08 3:18:04 PM |
|
|
||
|
|
|
|
Using the Four-way Function Key
Your handset has a four-way function key that allows you to move the cursor or pointer on the display and access the most commonly used features at the touch of a button. By moving this key to the left, you open the phonebook. Move the key to the right to access Caller ID information. To use this four-way key, place your thumb over the key and move to the four positions to get the feel of how it moves and operates.
Using the Handset Menu
Up
View the |
View the |
phonebook |
Caller ID |
Four-way |
|
Function Key |
|
|
Down |
•To open the menu, press the [Select/menu] key.
•The option currently highlighted appears in reversed out text. Use [ ] on the four-way function key to highlight the next upper option and [
 ] to highlight the next lower option.
•To select the highlighted option, press [Select/menu].
•To go back to the previous screen, press [left] on the four-way function key.
•To exit the menu, press [ ].
].
•If you don’t press any keys for thirty seconds, the phone will time out and exit the menu.
•For ANSW. SETUP, GLOBAL SETUP and DAY & TIME menu options, make sure the line is not in use and the handsets are within range of the base.
20
Interface the Using
DECT ELITE OM.indb 20 |
|
|
13/3/08 3:18:06 PM |
|
|
||
|
|
|
|
 Loading...