


Astra 2200
Owner’s Manual
Trademarks
UMAX is a trademark of UMAX Technologies, Inc. Astra is a trademark of UMAX Technologies, Inc. IBM PC/AT is a trademark of International Business Machines Corporation. Ms-Windows, Windows, and MS-DOS are trademarks of Microsoft Corporation. Macromedia and Fireworks are registered trademarks of Macromedia, Inc. NetObjects Fusion is a trademark of NetObjects, Inc. Presto! PageManager is a trademark of NewSoft Technology Corporation. Other names and trademarks appearing herein are trademarks of their respective holders.
1
TABLE OF CONTENTS
CHAPTER 1. GETTING STARTED…………………………………..…4
Introduction……………………………………………………………………………………….4
Unpacking the Scanner…………………………………………………………………………...4
Package Contents……………………………………………………………………………...4
Getting to Know Your Scanner…………………………………………………………4
Astra 2200 Scanner Elements………………………………………………………………….5 Astra 2200 Back Panel………………………………………………………………………...5
System Requirements…………………………………………………………………………….5
Installing Software………………………………………………………………………………..6
Installing Adobe PhotoShop LE on the PC……………………………………………………6 Installing Adobe PhotoShop LE on the Macintosh……………………………………………6 Installing Macromedia Fireworks on the PC…………………………………………………..6 Installing Macromedia Fireworks on the Macintosh…………………………………………..7 Installing NetObjects Fusion on the PC……………………………………………………….7 Installing NetObjects Fusion on the Macintosh……………………………………………….7
Installing the Hardware………………………………………………………………………….7
About Scanner Connectors…………………………………………………………………….7
Setting Up – General Information……………………………………………………………..8
Connecting the Cables…………………………………………………………………………8
Connecting the Power Adapter……………………………………………………………….10
CHAPTER 2. YOUR FIRST SCAN……………………………………..11
Turning the Scanner Lamp On and Off……………………………………………………….11
CHAPTER 3. SCANNING BASICS……………………………………..12
Setting VistaScan Preferences………………………………………………………………….12
General……………………………………………………………………………………….12
Scan Destination……………………………………………………………………………...13
Scanner Information………………………………………………………………………….15
VistaScan Beginner Window Features……………………………………………………….15
VistaScan Advanced Features………………………………………………………………..18
Using VistaAccess – Direct Access………………………………………………………….29
Using VistaShuttle……………………………………………………………………………30
Using the UMAX Copy Utility………………………………………………………………32
CHAPTER 4. PUSH BUTTON SCANNING…………………………...33
Configuring the Push Buttons………………………………………………………………..33
Using the Push Buttons………………………………………………………………………….37
2
CHAPTER 5. SCANNING PROJECTS………………………………...38
Using VistaScan to Scan a Photo to E-mail……………………………………………………39 Using Presto! PageManager to Scan a Form and Edit it with Page Type…………………...40
Converting Scanned Text to Editable Text with OmniPage………………………………….41
Opening OmniPage LE………………………………………………………………………41 Converting Scanned Text with OmniPage LE……………………………………………….42
Creating an Album with Presto! PhotoAlbum………………………………………………...42
Opening PhotoAlbum………………………………………………………………………...43 Creating a Photo Album……………………………………………………………………...43
CHAPTER 6. HOW TO GET HELP……………………………………44
Using Online Manuals…………………………………………………………………………..44
Accessing the UMAX VistaScan Online Manual……………………………………………44 Accessing the Presto! PageManager Online Manual………………………………………...45 Accessing the Caere OmniPage Online Manual……………………………………………..45 Installing Acrobat Reader for Macintosh Users……………………………………………...46
Troubleshooting…………………………………………………………………………………46
General Problems and Solutions……………………………………………………………..46
Windows 98/95 OSR2 Problems and Solutions……………………………………………...47
Macintosh Problems and Solutions…………………………………………………………..50
SCSI Problems and Solutions………………………………………………………………...52
Contacting Technical Support………………………………………………………………….53
Maintenance……………………………………………………………………………………..54
Cleaning………………………………………………………………………………………….54
APPENDIX A. TECHNICAL SPECIFICATIONS…………………….54
Scanner Specifications…………………………………………………………………………..54
APPENDIX B. USING THE UNIVERSAL TRANSPARENCY COVER(UTC)…………………………………………………55
INDEX……………………………………………………………………..56
3
Chapter 1. Getting Started
Introduction
Thank you for purchasing the UMAX 2200 scanner. This versatile unit is perfect for the home or office. Use this scanner to add variety and flare to your documents, or to help you share images with others.
The Astra 2200 scanner is equipped with two SCSI connectors and a USB connector. Both the USB and SCSI interface connectors allow you to make a fast and easy connection to your computer. SCSI connectors are found on Macintosh computers and PC computers equipped with a SCSI interface card. USB connectors are found on newer PC computers and USB equipped Macintosh computers (such as the iMac or blue and white G3).
In addition to being easy-to-connect, the scanner is also easy-to-use. Simply follow the instructions in this guide and you’ll be scanning in no time. With the powerful software included with your scanner, you can create, edit and archive scanned images, e-mail or fax images to friends or clients, or create your own web site gallery. Get ready to unleash your creativity with the UMAX Astra 2200 scanner.
Unpacking the Scanner
Your scanner package includes the cables and software you need to get the scanner up and running. The scanner package should contain all of the items listed below. If you do not find all of the items, contact the retailer from whom you purchased the scanner, or contact UMAX. For information about contacting UMAX directly, refer to Chapter 6. How to Get Help.
Package Contents
•UMAX Astra 2200 Color Flatbed Scanner with Universal Transparency Cover (UTC)
•USB Interface Cable
•SCSI Interface Cable
•SCSI Terminator
•Owner’s Manual
•Quick Start Guide
•Power Adapter
•Slide Holder
•Adobe PhotoShop LE CD-ROM
•Macromedia Fireworks (full version) CD-ROM
•NetObjects Fusion (full version) CD-ROM
•UMAX Scanner CD-ROM. This CD-ROM contains software for Caere® OmniPage® LE OCR, NewSoft® Presto! PhotoAlbum™ LE, NewSoft® Presto! PageType™ (full version, PC), UMAX Copy Utility (PC)
Getting to Know Your Scanner
To gain a complete understanding of the information contained in this manual, it is important that you become familiar with your scanner. The graphics below identify the key scanner components.
4
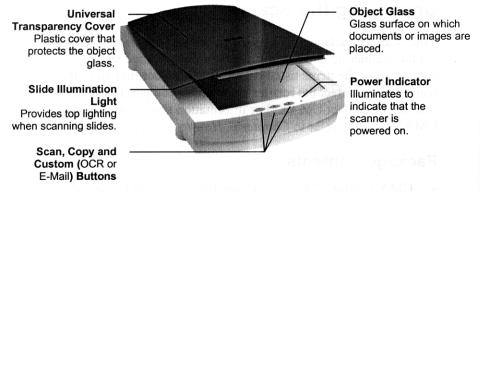
Astra 2200 Scanner Elements
Astra 2200 Back Panel
System Requirements
This section defines the minimum system requirements necessary to operate the Astra 2200 scanner. Please refer to the section below that applies to your computer type.
PC Requirements
•An IBM-Compatible PC with a Pentium processor or above
•Microsoft® Windows 95 (OSR2 for USB), 98, or NT 4.0 Note: SCSI interface card is required for Windows NT
•USB or SCSI port
•16 MB RAM memory, 32 MB RAM memory for Windows NT
•CD-ROM drive
•170+ MB of available hard disk space
Macintosh Requirements
•iMac or Macintosh Power PC or higher
•USB or SCSI port
•32 MB RAM memory
•Macintosh OS 8.0 or higher
•CD-ROM drive
•170+ MB of available hard disk space
5
Installing the Software
Installing Adobe PhotoShop LE on the PC
1.Insert the Adobe PhotoShop LE CD-ROM into your CD-ROM drive.
2.Click the Start button in the bottom left corner of the desktop.
3.Choose Run from the Start menu. The Run dialog box opens.
4.Click the Browse button.
5.Double-click the Photosle folder.
6.Click on Setup.exe to highlight it, and click the OK button. The path to the Setup.exe file appears in the Open text box in the Run dialog box.
7.Click OK to launch the Setup file. Follow the screen prompts.
8.When the User Information dialog box appears, enter your personal information and the software serial number that appears in the upper right corner of the PhotoShop registration card. You can find the registration card in the CD-ROM case.
9.Continue with the installation process by following the remaining screen prompts.
Installing Adobe PhotoShop LE on the Macintosh
1.Disable any virus-protection extensions and restart your computer.
2.Insert the Adobe PhotoShop LE CD-ROM into your CD-ROM drive. The PhotoShop LE CD-ROM content window appears.
3.Double-click the Adobe PhotoShop LE icon. The PhotoShop LE window appears.
4.Double-click the Install PhotoShop LE icon. Follow the screen prompts.
5.When the User Information dialog box appears, enter your personal information and the software serial number that appears in the upper right corner of the PhotoShop registration CD-ROM case.
6.Click the Install Now… button.
7.Continue with the installation process by following the remaining prompts.
Installing Macromedia Fireworks on the PC
1.Insert the macromedia Fireworks CD-ROM into your CD-ROM drive. The Fireworks CD-ROM window opens on your desktop automatically.
2.Double-click the Fireworks icon to launch the setup application.
3.Follow the screen prompts to complete the software installation process.
Installing Macromedia Fireworks on the Macintosh
1.Disable any virus-protection extensions and restart your computer.
6
2.Insert the Macromedia Fireworks CD-ROM into your CD-ROM drive. The Fireworks CD-ROM content window appears.
3.Double-click the Fireworks icon.
4.Follow the screen prompts to complete the software installation process.
5.Once the software is installed, open the VistaScan folder. Open the Plug-in folder. Locate the UMAX VistaScan driver and select it by clicking on the icon.
6.To create a copy of the UMAX VistaScan driver, press the Option key and drag the driver icon to the Fireworks’ XTRAS folder.
Installing NetObjects Fusion on the PC
1.Insert the NetObjects Fusion CD-ROM into your CD-ROM drive.
2.The Net Objects installation application opens immediately. Click the NETOBJECTS FUSION button to access the installer.
3.Follow the screen prompts to install the software.
4.When the User Information dialog box appears, enter your personal information and the software serial number that appears in the lower left corner of the NetObjects Fusion Registration Card.
5.Continue with the installation process by following the remaining screen prompts.
Installing NetObjects Fusion on the Macintosh
1.Insert the NetObjects Fusion CD-ROM into your CD-ROM drive.
2.Double-click the NetObjects Fusion icon.
3.Continue with the installation process by following the remaining screen prompts.
Installing the Hardware
After you have removed the scanner from the box and verified that all of the package contents have been included, please check to make sure that your computer is compatible with the scanner’s connectors.
About Scanner Connectors
USB Connectors
Newer computers (both PC and Macintosh) rely on USB technology as the primary method of communication between the computer and its peripherals. With this new USB “plug-and-play” technology your computer automatically configures peripherals. If your computer has a USB port, you must make sure that this port is enabled in the system BIOS. Please refer to the troubleshooting section to learn more about enabling the USB port.
SCSI Connectors
Some Macintosh computers ship with built-in SCSI (Small Computer System Interface) connectors. SCSI connectors provide fast data transmission, plus they give you the ability to connect up to seven peripheral
7

devices to your computer using just one SCSI port. PC computer users can install a SCSI interface card to provide SCSI support.
Note: Refer to the installation instructions that came with the SCSI card for information about installing the board.
Checking Your Computer’s Connectors
To use your scanner you need to understand what type of connectors you have on your computer. To determine the connector type, look at the back panel of your computer:
•A USB port is a small slot ½” long and ¼” wide.
NOTE: If your computer has a USB port, check to make sure that your computer’s operating system supports USB. The following factory-installed operating systems support USB: Microsoft Windows 95 OSR2, 98 or higher, and Mac OS 8.1.
•A SCSI port is a 25-pin connector.
Setting Up – General Information
Find a suitable location near your computer to place the scanner.
NOTE: Proper scanner hardware installation depends on installing the software first. If you have not installed the software that came bundled with the scanner, refer to Installing the Software earlier in this chapter for instructions.
CAUTION: Make sure that surface is flat. Operating your scanner on an uneven surface can damage the internal components.
Connecting the Cables
If your computer has a USB port, follow the instructions in the Connecting the USB Cable section to connect the scanner to your computer.
If your computer has a SCSI port, follow the instructions in the Connecting the SCSI Cable section to connect the scanner to your computer.
Connecting the USB Cable
The instructions for connecting the USB cable are different for PC and Macintosh users. Refer to the section below that applies to your computer type.
8

PC Connection
1.Locate the USB cable that is provided. Plug the rectangular connector end of this cable firmly into the USB port on the back of the computer.
2.Plug the square connector end of this cable into the port located on the back panel of the scanner.
Macintosh Connection
1.Locate the USB cable that is provided. Plug the rectangular end of the cable firmly into one of the USB ports. IMac computer ports are located on the right side of the computer. The USB port on other Macintosh computers is located on the back panel of the computer, or on a USB interface card.
2.Plug the square connector end of this cable into the port located on the back panel of the scanner.
Connecting the SCSI Cable
The instructions for connecting the SCSI cable are different for PC and Macintosh users. Refer to the section below that applies to your computer type.
PC Connection
1.Power off the computer and the scanner.
2.Connect the SCSI cable to the interface card installed in your computer.
NOTE: If you do not already have your SCSI interface card installed in your computer, install it now. Refer to the installation instructions that came with your SCSI card for information about installing the board.
3.Attach the other end of the SCSI cable into the connection at the back of the scanner marked SCSI.
Macintosh Connection
1.Power off the computer and the scanner.
2.Connect the SCSI cable to your Macintosh SCSI port.
9

3.Attach the other end of the SCSI cable into the first SCSI connector on the backside of the scanner (closest to the left side of the scanner).
NOTE: If your scanner is not chained to other SCSI devices, connect the Terminator to the remaining SCSI port of your scanner.
Changing the SCSI Address
Changing the scanner’s SCSI address is necessary if more than one peripheral is connected to the SCSI port and two or more of the peripherals have the same address or ID number.
To change the scanner’s SCSI address:
1.Check the other peripherals for their SCSI address or ID number. Your Astra 2200 SCSI address is preset to 5. If no other peripherals have used 5 as a SCSI address or ID number – you are done. If another peripheral’s address is 5, proceed to the next step.
2.Unplug the scanner from its power source.
3.Gently turn the dial located on the back of the scanner, on the right-hand side, until an unused number appears.
NOTE: SCSI ID numbers 0 and 7 are used by the computer and by the hard drive. SCSI ID numbers 8 and 9 are settings for factory-use only and could cause damage to the scanner if used as a SCSI address for a peripheral.
Connecting the UTC (Universal Transparency Cover) Cable
1.Locate the UTC cable connected to the back end of the UTC cover.
2.Plug the UTC cable connector into the round three-pin DIN connector on the scanner’s back panel.
Connecting the Power Adapter
1.Plug the scanner’s power adapter into an electrical outlet.
2.Insert the other end of this cable into the power adapter receptacle on the rear panel of the scanner. The power indicator on the front panel of the scanner should now be illuminated.
3.Turn your computer on.
10
CHAPTER 2. Your First Scan
Before you begin your first scan, you must install the scanner and the bundled software. Refer to Chapter 1. Getting Started, for installation and scanner test instructions.
You can perform a basic scan using any of the software applications bundled with this scanner.
Turning the Scanner Lamp On and Off
For PC Users Only: You can turn the scanner lamp on and off using the Astra 200’s built-in Power Saving utility. The lamp remains on whenever the scanner has power, unless you turn it off using the UMAX Power Saving utility.
The Power Saving window appears when you close VistaScan.
It appears in the bottom-right corner of your desktop by default. The window displays an image of the scanner with the lamp illuminated.
To turn the scanner lamp off:
Click on the image of the scanner in the Power Saving utility window. After a second or two, the light in the scanner image goes out, and your scanner lamp is turned off.
To turn the scanner lamp on:
Open the VistaScan software, or simply click on the scanner image in the Power Saving utility window.
NOTE: The scanner lamp is different from the power Indicator light. The Power Indicator light is the very small, green light located on the front panel of the scanner. This indicator remains ON whenever the scanner is plugged into an electrical outlet (regardless of whether the Power Saving utility is engaged).
Scanning with Adobe PhotoShop LE
1.Open Adobe PhotoShop LE.
2.Choose Import from the File menu.
3.Click UMAX VistaScan from the dropdown menu. The VistaScan window opens.
4.Place the image to be scanned on the object glass.
5.Set the scanning options.
6.Click the Preview button.
7.Set the desired scan area.
8.Click the Scan button.
9.VistaScan closes and the scanned image appears in PhotoShop.
10.Modify the image using the PhotoShop tools.
11.Choose Save As from the File menu to save the scanned image.
11
CHAPTER 3. Scanning Basics
VistaScan is the primary program or driver you use to scan with your Astra 2200 scanner. It is a TWAINcompliant program, which means that it can be run from other programs that support scanning, like OmniPage and others. It is also a stand-alone program, which allows you to scan images for a variety of uses, even without launching another program first.
Setting VistaScan Preferences
Preferences control scanner settings that you generally do not modify every time you use the scanner. The Preference settings are used as the default settings for several of the scan settings.
To access the VistaScan Preferences, click the Preferences icon in the upper right corner of the VistaScan window.
The Preferences cover three areas:
•General
•Scan Destination
•Scanner Information
A tab at the top of the Preferences window indicates each VistaScan preference group. To view the preference settings for an area, click on the associated tab.
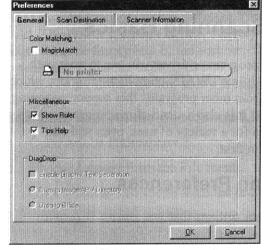
General
The General tab contains preference settings that control color matching and color correction, and whether to display the ruler and tips.
Color Matching/Correction
Color Matching allows you to fine-tune the colors of scanned images so that they emulate the colors of your original source documents as closely as possible. This is accomplished using MagicMatch.
When you click on the MagicMatch checkbox (so a checkmark appears) the Profile List displays. A profile is a list of applicable calibration profiles, which MagicMatch uses to render a final output image. If a
12
printer or calibration profile is not chosen, MagicMatch will calibrate the image to optimize its display on a monitor.
MagicMatch only functions when you are scanning in color mode. When you are using MagicMatch, it automatically disables the Level/Curve and Color Adjustment/Balance settings in the VistaScan Advanced window.
Show Ruler
The Show Ruler command displays or hides the rulers that border the top and left sides of the Preview window. These rulers correspond to the rulers on your scanner’s object glass. Clicking on the Show Ruler checkbox turns off (removes the checkmark) and hides the ruler. Clicking on the checkbox again turns the feature on (displays a checkmark) and shows the ruler.
Tips Help
The Tips Help option determines whether tips are displayed when you pause with your cursor over a VistaScan option. Click on the Tips Help box to enable tips (displays a checkmark). When a checkmark appears, clicking the checkbox disables the tips and removes the checkmark.
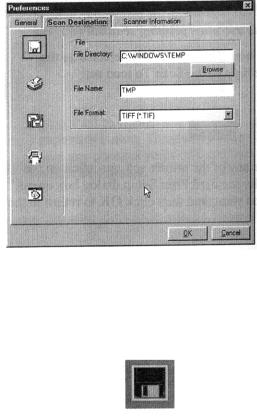
Scan Destination
The options in this Preferences tab specify how scanned images are stored, printed, faxed, transferred to another application, or transmitted via e-mail.
File
To set the location of your stored images:
1.Click on the File icon. The file preferences appear to the right of the Scan To icon set.
2.Enter the directory in which you want to store the scanned image file, in the File Directory text box. If you are not sure of the directory path, click the Browse button to locate the desired directory.
13

3.Enter the file name under which you want to store the scanned image files (such as TMP) in the File Name text box.
4.Select the file format in which you want to save scanned images from the File Format drop down list.
Printer
To specify which printer to use when printing scanned images:
1.Click on the Printer icon. The driver currently selected as the default appears to the right of the Scan To icon set.
2.If you want to change any of the printer settings, click on the Properties button. The standard Print Setup dialog box opens. Make any changes you want, and then click OK to return to the Preference settings.
To specify which e-mail application to use when you e-mail scanned images:
1.Click on the E-mail icon. The e-mail preferences appear to the right of the Scan To icon set.
2.Click on the button next to the e-mail software you are using (Microsoft Exchange or Lotus cc:Mail).
3.Select the image format you want to use when you attach scanned images to your e-mail application from the Image Format drop down list.
Fax
1.Click on the Fax icon. The fax driver (or printer driver if a fax driver is not selected) currently selected as the default appears to the right of the Scan To icon set.
2.If you want to change any of the settings, click on the Properties button. The standard Print Setup dialog box opens. Make any changes you want, and then click OK to return to the Preference settings.
Application
1.Click on the Application icon. The application preferences appear to the right of the Scan To icon set.
2.Enter the application name to which you want to send the scanned image files (such as Presto! PageManager) in the Application Name text box.
3.Enter the file name of the application executable in the File Name text box. If you are not sure of the directory path, click the Browse button to locate the correct path.
4.Select the image format in which you want to save scanned images from the Image Format drop down list.
14

Scanner Information
The Scanner Information tab displays important information about your scanner.
The information includes:
•Scanner Manufacturer
•Scanner Model
•Firmware Version
•VistaScan Version
•Maximum Scan Width and Length
•Maximum Resolution
VistaScan Beginner Window Features
The VistaScan Beginner window appears when you launch VistaScan. The features of the VistaScan Beginner window let you scan a wide variety of documents, photos, and graphics. Just click a button.
Scanning an item via the Beginner window consists of just a few steps:
1.Perform a preview scan of the item to be scanned by clicking the Preview button. The item is quickly scanned at low-resolution, and is displayed in the Preview window (on the left side if the VistaScan Beginner window).
15
2.Select what you want to do with the image after it is scanned using the Scan To icons.
3.Specify what kind of image you are going to scan, and start the final scan process using the Click To Scan icons.
Performing the Preview Scan
The Preview feature lets you scan an item at low-resolution so you can define the specific area to be scanned when you scan at higher resolution.
To preview the item you are going to scan:
1.Place the item you want to scan facedown on the object glass, under the inverted triangle that appears in the center of the rear ruler.
2.Click the Preview button on the right side of the Beginner window. The image is quickly scanned and displayed in the Preview window.
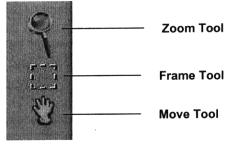
There are three Preview tools in the VistaScan Beginner window.
Zoom tool – Lets you enlarge or reduce the view of the image in the Preview window. To use the Zoom tool:
Once the preview image appears in the Preview window, click on the Magnifying Glass icon.
Move your cursor into the Preview window and click. The image enlarges. To reduce the view size, press the shift key (the command key on the Macintosh) and click in the Preview window.
Frame tool – Lets you select the portion of the image displayed in the Preview window you want scanned in the final scan step.
You can size the selection frame by clicking on the Frame tool and placing your cursor over one of the four edges of the frame (which changes the cursor shape to a two-headed arrow), drag the Frame inward to reduce the size, or outward to increase the size.
You can also move a selected frame by positioning the cursor inside the frame (which changes the cursor shape to a four-direction arrow), and dragging the frame to another location in the Preview window.
Move tool – Lets you move an image in the Preview window so you can see portions that are not visible because the image is zoomed too large to display completely. Click on the Move tool. Put the cursor inside the Preview window (which changes the cursor shape to a hand). Scroll the image view by clicking and dragging the cursor.
16
Selecting the Scan Device or Application
To specify the device or application to which you want to send the scanned item, click on the icon that represents this device or application.
The icons include:
name specified in the VistaScan Preferences.
application specified in the VistaScan Preferences.
File – stores the scanned image in a file using the file
Print – prints the scanned item on the default printer.
Fax – faxes the scanned item using your fax driver.
Application – sends the scanned item to the
E-mail – sends the scanned item as a graphic file to your Microsoft Exchange or Lotus cc:Mail e- mail application. (NOTE: Other e-mail applications are not supported.)
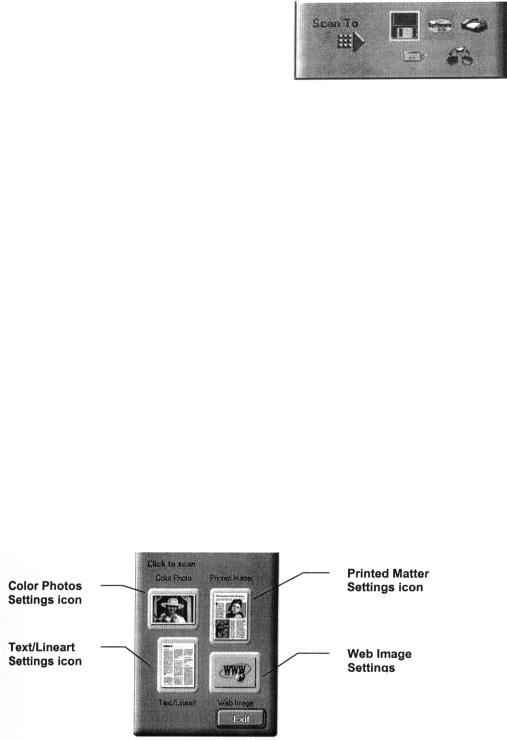
Defining the Type of Image to Scan
The Beginner window provides you with pre-defined scanning options so you can quickly and easily scan any of the following items:
•Color Photos – use this setting when you want to scan color or black and white photos.
•Printed Matter – use this setting when you want to scan something that has been printed like a brochure, magazine, etc.
•Text/Lineart documents – use this setting when you want to scan the text contained in a document, or when you want to scan simple lineart graphics.
•Web Images – use this setting when you want to scan graphics and then use them on the web.
To specify the type of image you are going to scan, click on the icon that represents the type of item you want to scan.
17

Clicking on any of these icons automatically starts the final scan process using the pre-defined settings. The scanned image is saved or sent to the device or application you specified by clicking on the Scan To icon.
VistaScan Advanced Features
The VistaScan Advanced window gives you the ability to adjust the scan setting individually so you can customize the settings for the type of document you are going to scan. If you are a novice computer user, you may want to use the VistaScan Beginner window until you are more familiar with VistaScan and the scanning process. The Beginner window options re preset to provide a quick and easy way to scan images.
If you are an experienced computer user with some scanning experience, you can use the features contained in the Advanced window to optimize the scan process for the specific item you are going to scan.
The Advanced window contains the following tools and features you can use the scan documents:
•Original Document Source Settings
•Image Mode Settings
•Resolution Settings
•Descreen Settings
•Filter Settings
•Scaling Options
•Auto Adjustment Setting
•Scan Control Unit
•Multiple Scan Mode Settings
•Color Adjustment Feature Panel
Changing the Original Document Source
The Original Document Source setting identifies the item you want to scan.
You can choose from the following settings:
Flatbed Reflective: Scans paper originals (non-transparencies) e.g., photographs, documents, and brochures.
UTA (Transmissive): Scans 4” x 5” or smaller photo transparencies.
UTA (Negative): Scans 4” x 5” photographic negatives.
Auto Doc Feeder: The Automatic Document Feeder option is not available for this scanner.
NOTE: For more information about scanning photo transparencies or negatives, refer to Appendix B. Using the Universal Transparency Cover (UTC).
18
 Loading...