


Platinum Format Full Range Loudspeakers with HEATT™ Technology
Installation and Operation Guide
Ultimate Sound, Inc |
Ultimate Europe AB |
138 University Parkway |
Flojelbergsgatan 8B |
Pomona, California |
SE 431 37 |
Phone: 909-594-2604 |
Molndal, Sweden |
Fax: 909-594-0191 |
Phone: 46-31 87 64 50 |
Fax: 46-31 87 64 50 |
|
technicalsupport@ultimate-sound.com |
anders.roti@tin.se |
I.Introduction
You have purchased a very sophisticated full range audio transducer manufactured by Ultimate® Sound. Founded in 1975, Ultimate® Sound makes speakers for every car audio application, speakers for marine environments, enclosed speaker systems, amplifiers, accessories and other products. Our tradition of leadership and innovation in the audio industry continues with products like Platinum Format loudspeakers with HEATT™ Technology.
We recommend you have your new Platinum Format loudspeakers installed by a professional. Professional installation shops have the equipment to do the job correctly, and the experience to recommend the best mounting locations in your vehicle.
Please use your new Platinum Format loudspeakers responsibly. Very loud music can cause permanent hearing loss.
PLATINUM FORMAT FEATURES:
∙HEATT™ Technology means our Platinum Format drivers handle more power with less distortion. A layer of nickel, bonded to an injection molded cone, dissipates heat from the voice coil. The nickel layer also increases the stiffness of the cone for less harmonic distortion at high power.
∙The Butyl Rubber Surround has superior damping characteristics and will last longer than foam surrounds
∙Titanium Dome Tweeters with Neodymium Magnets provide smooth response beyond 25kHz for crystal clear high frequencies. An integral phase plug insures even dispersion throughout the listening area.
∙A Black Chrome Plated Frame provides a distinctive appearance in keeping with the "Platinum" designation.
∙A Rubber Magnet Cover protects the magnet from chipping or breaking.
∙Titanium Dome Mid-ranges add warmth and presence to the sound of the PS6940 and
PS8940.
∙The PS8940 includes an adapter for mounting in a 6" X 9" cut-out.
II.Package Contents
∙1 pair of Platinum Format full range loudspeakers
∙1 pair of speaker grilles and mounting rings
∙Grille mounting adhesive
∙20' of #18AWG speaker wire
∙Mounting hardware(screws and screw clips)
∙Instruction manual, warranty card and cut-out template
III.Installation
1.Choose a mounting location for your Platinum Format loudspeakers. Check for clearance behind the speaker mounting locations, making sure the speakers will not interfere with any handles, window cranks, door locks, or brackets. If the speakers are to be mounted in the vehicle doors, check the operation of all functions(windows, locks, and any other switches or hand cranks) to make sure there is no obstruction. Be sure the mounting location and the drilling of screw holes for mounting will not present a hazard to any wires, control cables, fuel lines, fuel tanks, hydraulic lines, or other vehicle systems or components. For rear deck installations, make sure the speakers will not interfere with opening and closing the trunk.
2.If you are replacing the original factory speakers with speakers that are exactly the same size, you may not need to cut or drill any new holes or run any additional wires. Simply connect the speakers, observing correct polarity, and mount the speakers in the factory location, using the original mounting cut-outs, screw holes and hardware. You probably will not need the grilles and mounting rings for replacement installations.
2 |
Ultimate® Sound |
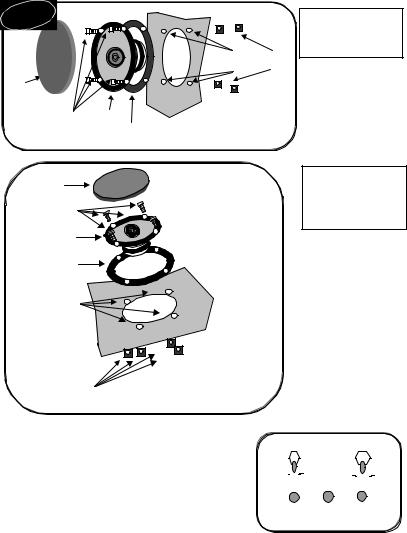
3.Use the supplied template as a guide to cut the proper diameter mounting holes. Use the template or mounting ring to mark the locations for the mounting screws and drill the holes with a 1/8” diameter bit.
|
|
|
|
Fig. 1- Door |
|
|
|
|
installation |
|
|
Cut-out |
Mounting |
Screw |
|
|
|
Holes |
Clips |
Grille |
|
Mounting |
|
|
|
|
|
|
|
|
|
Surface |
|
|
|
Mounting |
Speaker |
|
|
|
Screws |
|
|
|
|
Mounting |
|
|
|
|
|
|
|
|
|
|
Ring |
|
|
|
Grille |
|
|
Fig. 2- Rear |
|
|
|
Deck |
|
|
|
|
|
|
|
Mounting |
|
|
installation |
|
Screws |
|
|
|
|
|
|
|
|
|
Speaker |
|
|
|
Mounting
Ring
Mounting
Cut-out
Holes
Mounting
Surface
Screw
Clips
4.Feed the speaker wires through the openings and mounting rings, and connect them to the speaker
|
terminals. Make sure you maintain the correct |
|
|
|
|
|
|
|
|
|
|
|
|
|
polarity. If you need to run new wiring, the |
|
|
|
|
|
|
|
|
|
|
|
|
|
supplied speaker wire is marked to help you |
|
|
|
|
- |
+ |
|
|
|
|
|
|
|
maintain correct polarity when making |
|
|
|
|
|
|
|
|
|
|||
|
connections. The terminals at one end of the |
|
|
|
|
|
|
|
|
|
|
|
|
|
|
|
|
|
|
|
|
|
|
|
|
||
|
speaker wire are coded by size to match the |
|
|
Speaker Terminals |
|
|
|||||||
|
speaker terminals. Just push the connectors onto |
|
|
|
|
|
|
|
|
|
|
|
|
|
|
|
|
|
|
|
|
|
|
|
|
||
|
the matching terminals. |
|
|
Fig. 3- |
Speaker |
|
|||||||
5. |
Fit the mounting rings and speakers to the cut-outs, |
|
|
|
|||||||||
|
|
|
|
|
Terminals |
|
|||||||
|
and mount with the supplied screws and clips. |
|
|
|
|
|
|
||||||
|
Apply a small amount of the grille adhesive at 4 or |
|
|
|
|
|
|
|
|
|
|
|
|
|
|
|
|
|
|
|
|
|
|
|
|
|
|
|
more points around the edges of the grilles and carefully, but firmly, press the grilles into |
||||||||||||
|
place. |
|
|
|
|
|
|
|
|
|
|
|
|
3 |
Ultimate® Sound |
 Loading...