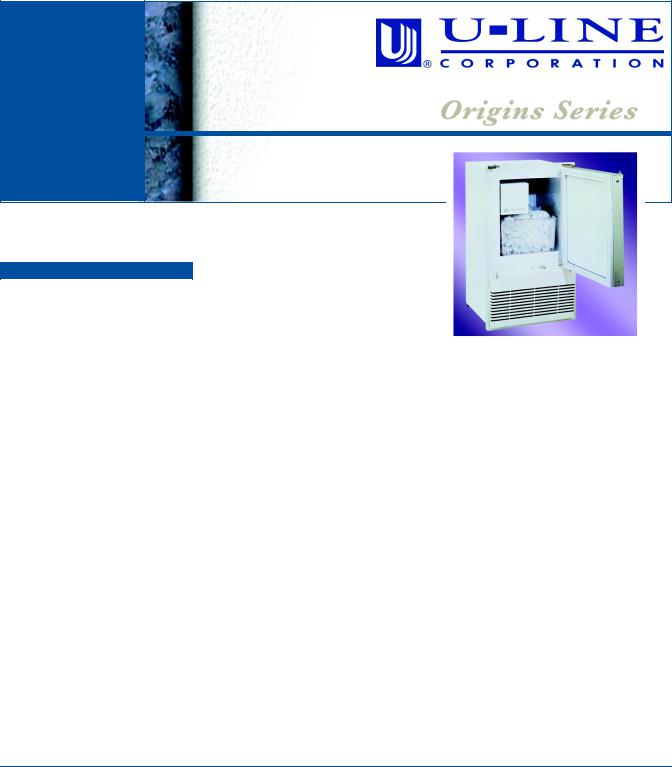
Uline ORIGINS BCM-95, ORIGINS BI-95BTP, ORIGINS WH95TP Manual

Installation Guide
WH95TP, BI95BTP and BCM95 Ice Makers
for Marine or Recreational Vehicle Use
www.U-LineService.com
Phone (414) 354-0300 • FAX (414) 354-7905
Service & Parts Tech Lines Phone (800) 779-2547 • FAX (414) 354-5696
OnlineService@U-Line.com
©2005 U-Line Corporation
02/2005

WH95TP, BI95BTP and BCM95 Ice Makers
Contents
Exterior Cleaning . . . . . . . . . . . . . . . . . . . . . . . . . . . . . . 3 Cut-Out Dimensions . . . . . . . . . . . . . . . . . . . . . . . . . . . 4 Product Dimensions . . . . . . . . . . . . . . . . . . . . . . . . . . . . 4 Door Swing/Clearances Information . . . . . . . . . . . . . . 4 Reversing the Door. . . . . . . . . . . . . . . . . . . . . . . . . . . . . 5 Other Site Requirements . . . . . . . . . . . . . . . . . . . . . . . . 6 Custom 1/4" Thick Door Panel Insert . . . . . . . . . . . . . . 7 Checking Door Alignment . . . . . . . . . . . . . . . . . . . . . . 8 Adjusting Door Alignment . . . . . . . . . . . . . . . . . . . . . . 8 Water Supply Connection . . . . . . . . . . . . . . . . . . . . . . . 8 Electrical Specifications . . . . . . . . . . . . . . . . . . . . . . . . . 9 Leveling Information . . . . . . . . . . . . . . . . . . . . . . . . . . . 10 Installation of the WH95TP, BI95BTP or BCM95 . . . . . 10 Grille Installation . . . . . . . . . . . . . . . . . . . . . . . . . . . . . . 10 Installation Troubleshooting . . . . . . . . . . . . . . . . . . . . . 11 Initial Start-Up . . . . . . . . . . . . . . . . . . . . . . . . . . . . . . . . 11 Start-Up Troubleshooting . . . . . . . . . . . . . . . . . . . . . . . 12 Service Information . . . . . . . . . . . . . . . . . . . . . . . . . . . . 12
1 Follow Safety Precautions
IMPORTANT
PLEASE READ all instructions completely before attempting to install or operate the unit.
•This unit requires connection to the water supply. Improper hook-up can result in substantial property damage! If you are unsure of your ability to safely connect the water supply to the unit, consult a licensed plumber for assistance.
•This unit requires connection to a grounded (threeprong), polarized receptacle that has been placed by a qualified electrician in accordance with applicable electrical codes.
Safety Alert Definitions
Safety items throughout this guide are labeled with a Danger, Warning or Caution based on the risk type:
 DANGER
Danger means that failure to follow this safety statement will result in severe personal injury or death.
 WARNING
Warning means that failure to follow this safety statement could result in serious personal injury, or death.
 CAUTION
Caution means that failure to follow this safety statement may result in minor or moderate personal injury, property or equipment damage.
www.U-LineService.com |
2 |
02/2005 |

WH95TP, BI95BTP and BCM95 Ice Makers
General Precautions
Use this appliance for its intended purpose only and follow these general precautions along with those listed throughout this guide:
 WARNING
SHOCK HAZARD — Electrical Grounding Required.
•Keep the unit unplugged throughout installation except during testing.
•Never remove the round grounding prong from the plug and never use a two-prong grounding adapter.
•Never use an extension cord to connect power to the unit.
•Always keep your working area dry.
 CAUTION
•Use care when moving and handling the unit. Use gloves to prevent personal injury from sharp edges.
•Do not lift the unit by the door or door handle.
•Do not install the unit behind closed doors or in any way that would obstruct airflow to the front grille, which may cause the unit to malfunction.
2 Inspect and Plan
You have received a carton containing your WH95TP, BI95BTP or BCM95 Ice Maker with a package inside containing a User Manual, a Product Registration Card and water connection parts. Complete and mail the Product Registration Card or register online at www.U- LineService.com. Once your unit is installed, keep the User Manual and this Installation Guide in a safe place for future reference.
WH95TP units are available in vinyl clad cabinets with matching doors which have a metal door frame and handle, a travel pin to secure closure and are reversible. 1/4-inch thick panel not available for this model.
BI95BTP units are available in vinyl clad cabinets with matching doors which have a slightly contoured handle across the top, a travel pin to secure closure and are reversible. The doors have recessed front panels that will accept a custom 1/4-inch thick door panel.
BCM95 units are available in vinyl clad cabinets with doors that have a black glass panel, a handle across the top, a travel pin to secure closure and are reversible. 1/4-inch thick panel not available for this model.
Please carefully follow the directions that apply to your unit and your intended design.
Tools/Materials Required
•Screwdrivers — slotted and Phillips head
•1/4-inch OD copper tubing and shut-off valve for water supply line
•1/4-inch thick door panel material and cutting tools (item only needed if 1/4-inch panel will be used)
Inspection
Unwrap and inspect the unit on a flat, level surface capable of supporting its entire weight.
Exterior Cleaning
(As Required)
Black and White Models:
Black and white surfaces may be cleaned with a mild detergent and warm water solution. Do not use solventbased or abrasive cleaners. Use a soft sponge and rinse with clean water. Wipe with a soft, clean towel to prevent water spotting.
02/2005 |
3 |
www.U-LineService.com |

WH95TP, BI95BTP and BCM95 Ice Makers
3 Prepare Site
Your U-Line product has been designed for built-in installation. When built-in, your unit does not require additional air space for top, sides or rear. However, the front grille must NOT be obstructed and clearance is required for water and electrical connections in the rear.
Note: Unit can NOT be installed behind a closed cabinet door.
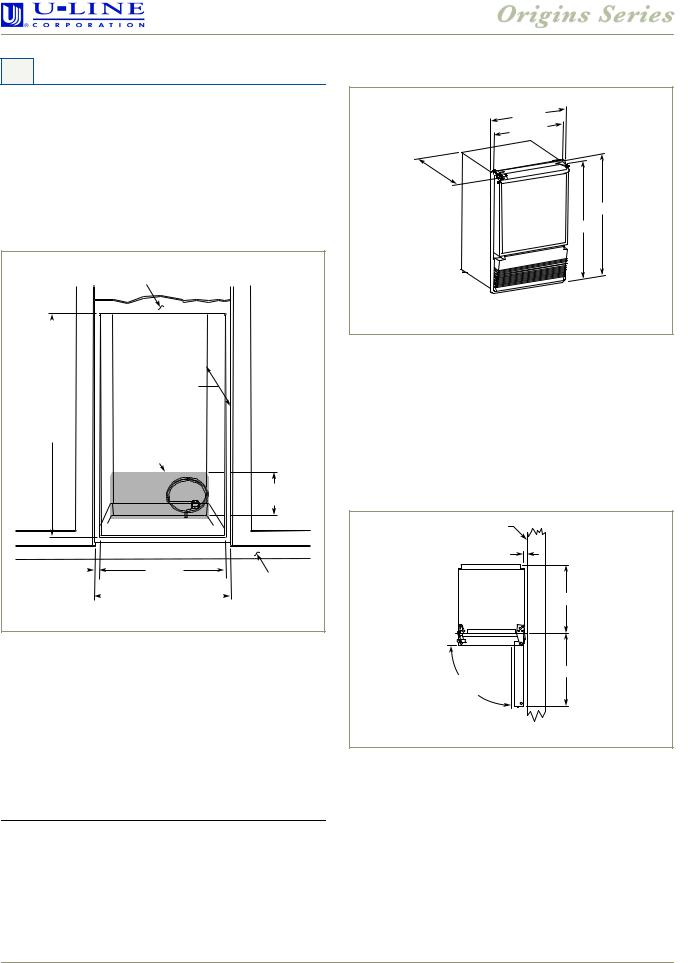
Cut-Out Dimensions
Filler Panel (Not Provided by U-Line) –
Needed to Attach Mounting Flange on Unit
|
|
18-1/2" Minimum |
|
|
|
Cut-Out |
|
|
Height |
|
|
24-3/4" |
See Electrical |
|
|
|
Specifications |
|
|
for Power Supply |
8" Height
From Floor
3/4" |
|
|
14-1/16" |
|
|
|
|
|
|
|
|||
Minimum Flange |
Cut-Out Width |
Toe Kick |
||||
Mounting Area |
|
15-3/16" |
|
|
||
|
|
|
|
|
|
|
|
|
|
Minimum Opening |
|
||
Figure 1
Follow the cut-out drawing in Figure 1. The unit must sit in a frame structure with a frame thick enough to accommodate mounting the 1/2" flange to its sides and top and a base high enough to align the door with other cabinet doors. Make the frame’s inside dimensions 1/4" larger than the cabinet’s dimensions (without flange) for ease in installation and removal of the unit. 24" is the counter depth in most installations. 18-1/2" depth includes the door, handle and water line connection (see
Figure 2).
IMPORTANT
Product Dimensions
15-1/16"
13-13/16"
17" Including Handle
25-1/4"
24-3/4"
Figure 2
Door Swing/Clearances Information
Units have a zero clearance for the door to open
90° (see Figure 3). U-Line recommends a minimum door clearance of 3/4" to accommodate the flange if the unit is right-hand hinged and installed next to a wall or similar type of structure.
Note: When a raised panel is used, additional clearance is needed for easy removal of ice bin if door hinge side is installed adjacent to wall.
Wall
3/4" Min.
14-3/8"
15-1/2"
90° Door Swing
Figure 3
It is extremely important that the unit sits on a level surface, as it does not have feet levelers. If it is not level, the ice mold will not fill evenly.
www.U-LineService.com |
4 |
02/2005 |
 Loading...