


Use and Care Guide
Wine Captain® Drawer Model:
2275DWRWS, 2275DWRWOL
2275DWRWS |
2275DWRWOL |
1 Introduction
Congratulations on your purchase of a U-Line refrigeration product. A pioneer in the field for more than 40 years, U-Line Corporation is the world’s number one manufacturer of built-in, under-counter, specialty refrigeration and ice making products. U-Line dedicates 100% of its research and development to these products. The result: U-Line technology consistently leads the market with innovation, design, depth of product line and performance.
U-Line products are making life more convenient in homes, businesses, and hotels around the world. U-Line supports its products with a strong dealer network, and its commitment to quality even extends to environmentally safe packaging.
IMPORTANT
READ all of the instructions in this guide completely before operating the unit for the first time.
For future reference, keep this guide in a safe, accessible location. If you need additional information or assistance, please contact U-Line Corporation directly. Contact information appears on the rear cover of this guide.
If you have a problem with the operation of this product, the SERVICE section of this guide will assist you in quickly identifying common problems and provide information on possible causes and remedies. If your product needs service, contact U-Line directly.
Warranty Registration
Your U-Line Corporation Limited Warranty is located on the inside rear cover of this guide. To validate your warranty, the product and its original purchase date must be registered. A Warranty Registration Card has been included for this purpose in the package containing this manual. Complete and mail the Warranty Registration Card, or register your product online at www.U-LineService.com as soon as possible after purchase.
If your product registration is not on file and a request for warranty coverage is received, the date of sale to the U-Line Selling Dealer or Distributor will be established as the first date of warranty coverage for your product.
Please Record Your Model Information
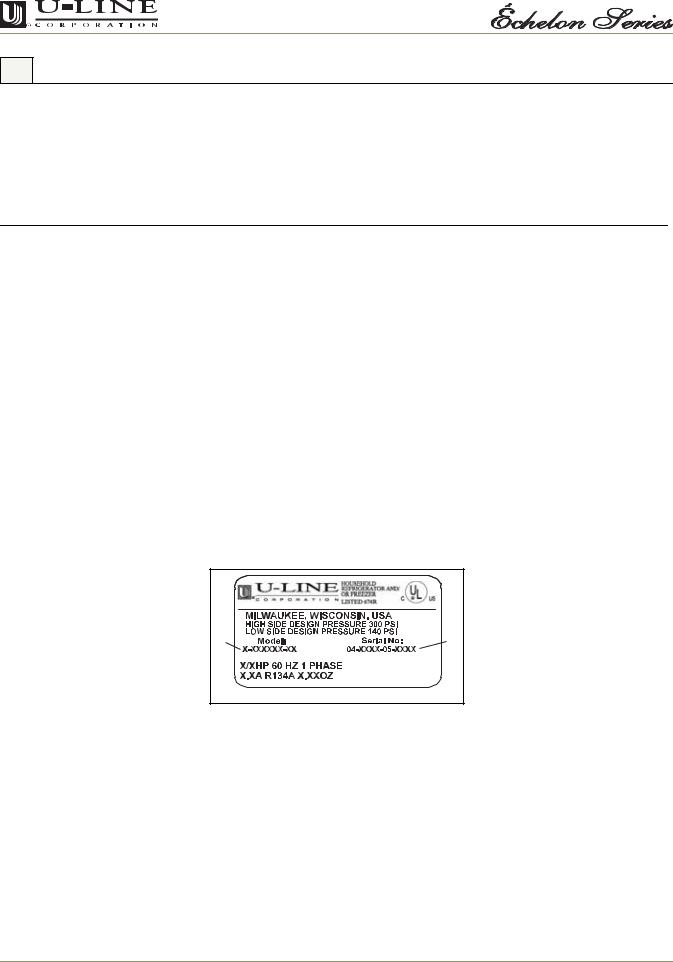
When you request additional information or service, you will be asked for your products model and serial numbers. You can find this information on the serial plate located on the upper right or rear wall in the interior of your unit. This information also appears on the warranty registration card.
1 |
2 |
|
ULIN_0023_A |
Figure 1
Please record the model number (Figure 1, 1), serial number (Figure 1, 2), date of purchase, and dealer contact information for your U-Line product below:
Model Number: |
Dealer Name: |
_____________________________________________________ _____________________________________________________
Serial Number: |
Dealer Address: |
_____________________________________________________ _____________________________________________________
Purchase Date: |
Dealer Telephone: |
_____________________________________________________ _____________________________________________________
2 |
2275DWRWS, 2275DWRWOL |
2 Table of Contents
Introduction ............................................................................................................................... |
2 |
Warranty Registration ....................................................................................................... |
2 |
Please Record Your Model Information ........................................................................... |
2 |
Table of Contents ....................................................................................................................... |
3 |
Safety Precautions ...................................................................................................................... |
5 |
Safety Alert Definitions ..................................................................................................... |
5 |
General Precautions ........................................................................................................... |
5 |
Product Features ........................................................................................................................ |
6 |
Échelon Wine Captain ....................................................................................................... |
6 |
Operation ................................................................................................................................... |
7 |
Initial Startup ..................................................................................................................... |
7 |
Interior Lighting ................................................................................................................. |
7 |
Electronic Control Panel .................................................................................................... |
8 |
Normal Operating Sounds ................................................................................................. |
9 |
Wine Stocking Recommendations .................................................................................... |
9 |
Storage, Vacation, Moving .............................................................................................. |
10 |
Product Disposal ............................................................................................................... |
10 |
Wine Guide ............................................................................................................................... |
11 |
Wine Selections Suggestions ........................................................................................... |
11 |
Suggestions for Matching Food and Wine ..................................................................... |
11 |
Common Food and Wine Matches .................................................................................. |
11 |
Cleaning and Maintenance ..................................................................................................... |
13 |
General Cleaning ............................................................................................................. |
13 |
Maintenance .................................................................................................................... |
13 |
Adjust Drawers ................................................................................................................. |
15 |
Service ....................................................................................................................................... |
21 |
Before Calling for Service ................................................................................................ |
21 |
If Service is Required ........................................................................................................ |
21 |
Replacement Parts ........................................................................................................... |
21 |
Troubleshooting Guide .................................................................................................... |
22 |
U-Line Corporation Limited Warranty .................................................................................... |
23 |
2275DWRWS, 2275DWRWOL |
3 |

This page intentionally left blank
4 |
2275DWRWS, 2275DWRWOL |
3Safety Precautions
•PLEASE READ all instructions completely before attempting to install, operate, or service your unit.
•Proper installation procedures must be followed if this unit is being initially installed, or is moved to a new location after being in service. An INSTALLATION GUIDE for your unit, providing complete installation information is available from U-Line Corporation directly, and must be consulted before any installation is begun. U-Line contact information appears on the rear cover of this guide.
•This unit requires connection to a grounded (three-prong), polarized receptacle that has been placed by a qualified electrician in accordance with applicable electrical codes.
Safety Alert Definitions
Safety items throughout this guide are labeled with a Danger, Warning or Caution based on the risk type:
 DANGER
Danger means that failure to follow this safety statement will result in severe personal injury or death.
 WARNING
Warning means that failure to follow this safety statement could result in serious personal injury or death.
 CAUTION
Caution means that failure to follow this safety statement may result in minor or moderate personal injury, property or equipment damage.
General Precautions
Use this appliance for its intended purpose only and follow these general precautions along with those listed throughout this guide:
 DANGER
RISK OF CHILD ENTRAPMENT. Before you throw away your old refrigerator or freezer, take off the doors and leave shelves in place so that children may not easily climb inside.
 WARNING
SHOCK HAZARD - Electrical Grounding Required.
•Never attempt to repair or perform maintenance on the unit until the electricity has been disconnected.
•Never remove the round grounding prong from the plug and never use a two-prong grounding adapter.
•Altering, cutting of power cord, removal of power cord, removal of power plug, or direct wiring can cause serious injury, fire and/or loss of property and/or life, and will void the warranty.
•Never use an extension cord to connect power to the unit.
•Always keep your working area dry.
 WARNING
The Anti-Tip Kit must be installed on this unit before it is used. Never use the drawers as steps or as a shelf to support more than the drawers’ contents. Serious personal injury could occur.
 CAUTION
•Use care when moving and handling the unit. Use gloves to prevent personal injury from sharp edges.
•If your model requires defrosting, DO NOT use any type of heater to defrost. Using a heater to speed up defrosting can cause personal injury and damage to the inner lining.
IMPORTANT
•Do not lift unit by drawer handles.
•Never install or operate the unit behind closed doors. Be sure front grille is free of obstruction. Obstructing free air flow can cause the unit to malfunction and may void the warranty.
•Failure to clean the condenser every three months can cause the unit to malfunction. This could void the warranty.
•Allow unit temperature to stabilize for 24 hours before use.
•If your model requires defrosting, never use an ice pick or other sharp instrument to help speed up defrosting. These instruments can puncture the inner lining or damage cooling unit.
•Use only genuine U-Line replacement parts. Imitation parts can damage the unit, affect its operation or performance and may void the warranty.
2275DWRWS, 2275DWRWOL |
5 |
4 Product Features
Échelon Wine Captain
Your U-Line Wine Captain is the industry’s only built-in under the counter two drawer wine storage unit with dual zone temperature control and up to 43 bottle (750 mL size) capacity. Your Wine Captain will accommodate up to 24 bottles in the top drawer and up to 19 bottles in the bottom drawer. The bottom drawer also includes a wine caddy for elegant transportation and service of three bottles of wine. The corks remain moist, which keeps air from entering the bottles.
The Right Temperature for Wine
Your Wine Captain is designed to provide a temperature zone in each drawer, adjustable between 40 - 60°F, so the specific storage requirements of your finest wines can be satisfied.
NOTE: Product temperatures, not air temperatures, are referenced above.
Features of Échelon Wine Captain
•An electronic control panel with digital display allows you to display the actual temperature in each drawer, and adjust the individual temperature setting to your personal preference. The electronic control and digital display provides an attractive appearance, and its method of control provides precise temperatures for storage of one or multiple types of wine.
•An interior light will illuminate automatically in each drawer as it is opened, providing easy visual identification of the wine. However, you can easily select two other modes of operation:
a.Interior lights in both drawers can be illuminated while the drawers are closed, providing an attractive display of your wine collection.
b.A blackout/Sabbath mode (not Star K certified) allows you to darken both interior lights and the LED display, while maintaining complete temperature control in both drawers.
•Automatic (cycle) defrost means maintenance-free defrosting.
•Wine racks have a contoured maple front trim that adds a fashionable appearance to Wine Captain. The wood facing may be stained or replaced in its entirety with other woods or manufactured products (such as Corian® or Sandstone).
•Black vinyl wine racks blend with the wine bottles, placing greater emphasis on the wines themselves. The vinyl holds the wine bottles more effectively than a chromed or painted finish.
•All units feature a vinyl clad steel cabinet that provides
arich textured look, and resists scratching, peeling and flaking.
•Stainless models feature a stainless steel wrap and sculpted stainless handles.
•Wood overlay units feature the ability to match cabinetry. Handles are not included with overlay units.
•Both drawers feature tinted thermal glass that protects your wines from potentially harmful light rays while providing a very fashionable appearance.
•Wine Captain models are not recommended for outdoor use.
•This Wine Captain cannot be configured for a freestanding installation. It must be installed as a built-in, under counter unit, and must be anchored to prevent tipping using the originally provided anti-tip kit.
Features and specifications are subject to change without notice.
6 |
2275DWRWS, 2275DWRWOL |
5 Operation
ULIN_0080_A |
Figure 2
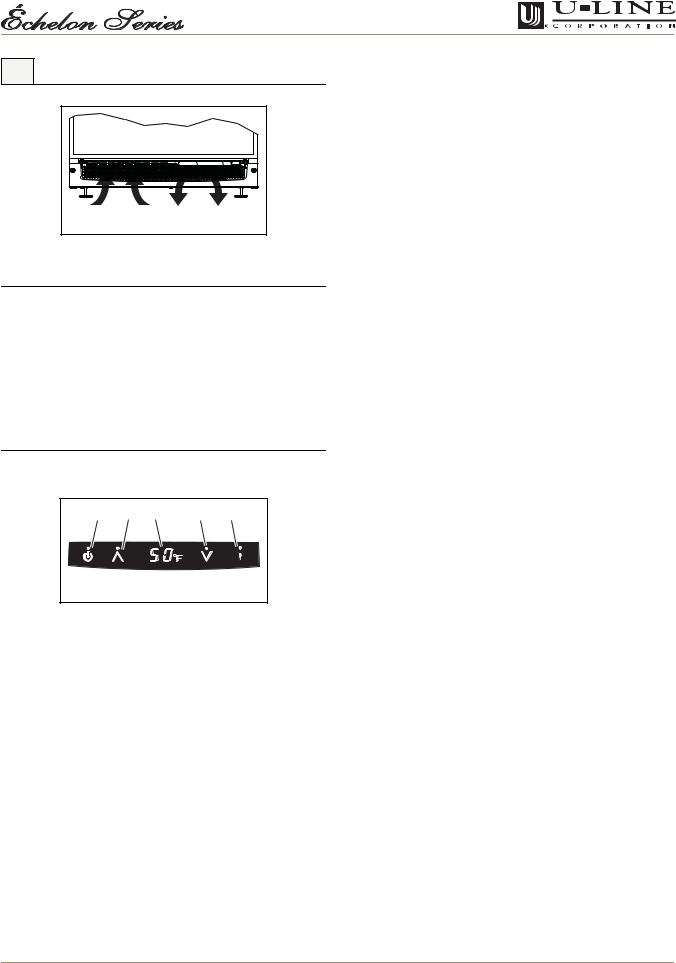
IMPORTANT
Proper air flow (Figure 2) is required for your unit to operate at its highest efficiently. A grille, located in the base of the unit, must not be blocked at any time, or your unit will not perform as expected.
Initial Startup
All U-Line units are shipped with controls that are preset. No initial adjustments are required.
IMPORTANT
U-Line recommends the unit be allowed to run overnight prior to loading with product.
1 |
2 |
3 |
4 |
5 |
ULIN_0184_A
Figure 3
To turn the unit on or off, touch and hold the POWER icon (Figure 3, 1) on the display panel for approximately five seconds until the °F symbol flashes and release.
•A small LED above the icon will illuminate to confirm the touch of any controller icon.
•The display (Figure 3, 3) will show the unit set-point temperature when the unit is on and will show OFF when the unit is off.
•Turning the unit off will override any other control function.
Interior Lighting
The interior of the cabinet can be illuminated whenever a drawer is opened (default mode) or illuminated for a four-hour period.
The LIGHT icon (Figure 3, 5) on the control panel is used to change the lighting functions.
To illuminate the interior of the cabinet for a four-hour period:
1.Touch and release the LIGHT icon (Figure 3, 5) to switch from drawer-operated lighting control to continuous lighting (the °F symbol will flash briefly after the LIGHT icon is pressed).
2.To return to drawer-operated lighting control before the four-hour period is up, repeat Step 1.
2275DWRWS, 2275DWRWOL |
7 |
Electronic Control Panel
Your Wine Captain has been designed to provide two temperature zones within the cabinets so the specific storage requirements of your finest wines can be satisfied. NOTE: These are product temperatures, not air temperatures.
1 |
2 |
3 |
4 |
5 |
ULIN_0184_A
Figure 4
The electronic control with digital display (Figure 4) is configured to show a single temperature continuously. This set-point temperature is a base number used by the controller to maintain the temperature zones in your unit. The factory default set-point temperature is 60°F in the top drawer and 40°F in the bottom drawer. This set-point temperature is used as a gauge if further temperature adjustments are required.
A DISPLAY OFF mode is available through the control panel. This mode allows you to control whether the display (Figure 4, 3) will be ON or OFF whenever the door is closed. The icon touch sequence that follows will switch between both modes:
1.Touch and hold the WARMER icon (Figure 4, 2), and within five seconds press the POWER icon
(Figure 4, 1) three times.
2.The display will be either visible or dark when the door is closed.
3.To return to the previous mode, repeat Step 1.
Temperature Display Selection
U-Line products supplied for 110 VAC operation have temperatures displayed in a default Fahrenheit (°F) configuration (Figure 4, 3).
The display can easily be adjusted for either type of temperature display. Press and hold the LIGHT icon (Figure 4, 5) and within five seconds press the COOLER icon (Figure 4, 4) three times to change the display as desired.
Temperature Display
To display all zone temperatures:
1.Press and hold the WARMER icon (Figure 4, 2) for approximately five seconds and release when the °F symbol in the display (Figure 4, 3) begins to flash.
2.The display (Figure 4, 3) will show an individual reading on each drawer.
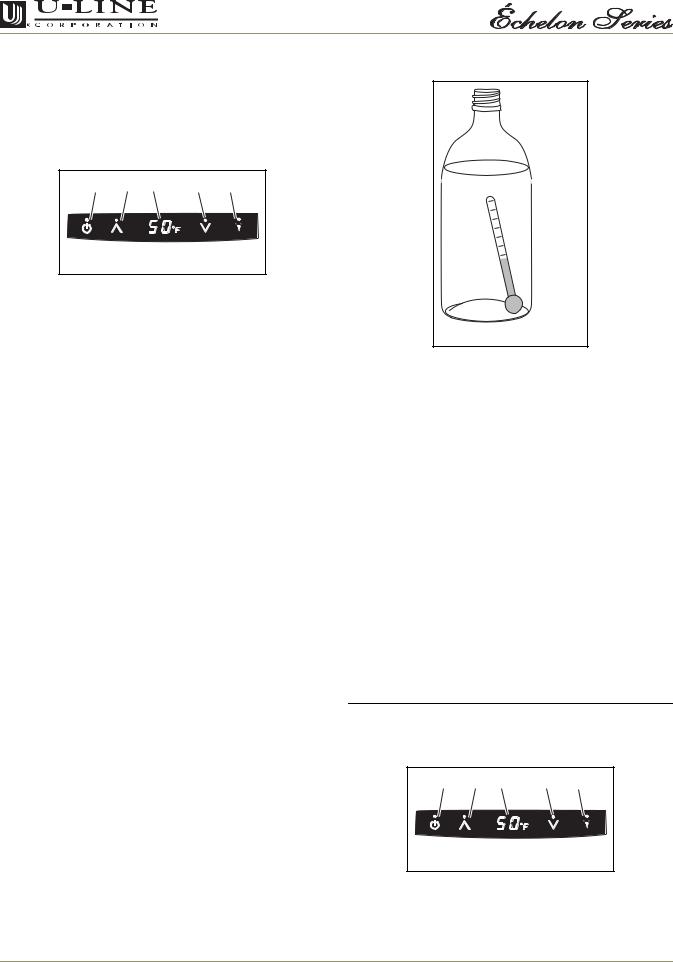
Checking Product Temperature
ULIN_0093_A
Figure 5
To check the actual product temperature in your unit, insert an accurate thermometer into a plastic (nonbreakable) bottle that is partially filled with water. Tighten the bottle cap securely (Figure 5).
Place the bottle in the desired area for 24 hours. Refrain from opening the unit during the testing period. After 24 hours, check the temperature of the water. If required, adjust the temperature control in a small increment (See ADJUSTING TEMPERATURE).
Factors which affect the internal temperatures of the cabinet include:
•Temperature setting.
•Ambient temperature where installed.
•Number of times and length of time the door is opened and closed.
•Installation in direct sunlight or near a heat source.
Adjusting Temperature
IMPORTANT
Adjust the set-point temperature in single increments, and wait 24 hours for the temperature to stabilize before rechecking.
1 |
2 |
3 |
4 |
5 |
ULIN_0184_A
Figure 6
8 |
2275DWRWS, 2275DWRWOL |
 Loading...