


ELECTRONIC TREADMILL J 440
GB |
OWNER'S MANUAL |
P. |
2-8 |
D |
BETRIEBSANLEITUNG |
S. |
9-15 |
F |
MODE D'EMPLOI |
P. |
16-22 |
NL |
GEBRUIKSAANWIJZING |
P. |
23-29 |
I |
MANUALE D'USO |
P. |
30-36 |
E |
MANUAL DEL USUARIO |
P. |
37-43 |
S |
BRUKSANVISNING |
S. |
44-50 |
FIN |
KÄYTTÖOHJE |
S. |
51-57 |
SERIAL NUMBER
SERIENNUMMER
NUMERO DE
SERIENUMMER
NUMERO DI SERIE
NÚMERO DE SERIE
SERIENNUMMER
SARJANUMERO
583.4009 E

INFORMATION AND WARNINGS
PLEASE READ THIS OWNER'S MANUAL THROUGH CAREFULLY BEFORE ASSEMBLING, USING AND SERVICING THE TREADMILL. FOLLOW THE INSTRUCTIONS DESCRIBED IN THIS MANUAL CAREFULLY.
THE EQUIPMENT HAS BEEN DESIGNED FOR USE AT HOME AND FOR INSTITUTIONAL REHABILITATION. PLEASE NOTE THAT THE WARRANTY DOES NOT COVER DAMAGE DUE TO NEGLIGENCE OF ADJUSTMENT OR MAINTENANCE INSTRUCTIONS DESCRIBED IN THIS MANUAL. PLEASE PAY PARTICULAR ATTENTION TO THE NOTES REGARDING LUBRICATION AND ADJUSTMENT OF THE RUNNING BELT.
The figures referred to in the text are in the back fold.
Before connecting the device to a power source make sure that the local voltage matches that which is indicated on the type plate (at the lower right front corner). The device operates on 230 V voltage. Please note that the device's maximum power consumption is 10 A. The device may only be plugged into an earthed socket. Never use extension cords between the treadmill and your wall outlet.
Outlets, that service multiple appliances, or have fluctuating voltage of more than 5 %, may result in erratic performance or cause damage to treadmill electronics. Using electrical power other than that which has been specified in this manual, will ultimately void any warranty, implied or otherwise.
*Before you start using the treadmill, make sure that it functions correctly in every way. Do not use a faulty device.
*Do not attempt any servicing or adjustment other than those described in this manual. The given instructions must be followed carefully.
*Before operating the treadmill familiarize yourself with the adjustments, displays and keys.
*Never operate with the dust or side covers removed.
*Make sure that the treadmill is unplugged and turned off before beginning any assembly or maintenance procedures.
*Always unplug the treadmill from the electrical outlet after each training session.
*Do not pull the treadmill by its power cord.
*Do not use outdoors.
*Place the treadmill on a firm, level and protected surface. Allow 120 cm or 4 feet of clearance behind the treadmill and 60 cm or 2 feet on either side and in front of the treadmill.
*If children are allowed to use the treadmill, they should be supervised and taught to use it properly, keeping in mind the child's physical and mental development and their personality.
*This treadmill is equipped with a cord having an equipment earthed connector and an earthed plug. Do not modify the plug provided with the treadmill in any way. If it will not fit your outlet, have a proper outlet installed by a person familiar with the maintenance of electromechanical devices and authorized under the laws of the country in question (or otherwise) to carry out maintenance and repair work.
*Do not apply silicone as it will damage the running deck.
NOTE!
*Before you start any training, consult a physician to check your state of health.
*If you experience nausea, dizziness or other abnormal symptoms while exercising, stop your workout at once and consult a physician.
*Only one person may use the treadmill at a time.
*Always use the handlebar when stepping on or off the treadmill and when changing speed. Do not jump off the running belt when it is moving.
*Keep hands clear of any moving parts. Never place hands, feet or any other objects under the tredmill.
*Wear appropriate clothing and shoes when exercising. Make sure your shoelaces are properly tied. To avoid injury and unnecessary wear on your treadmill, be sure your shoes are free of any debris such as gravel and small pebbles.
*Always clip the cord attached to the safety tether key to a part of your clothing so that the key will be pulled from its place, stopping the treadmill, if necessary.
*Always strech your muscles prior to and following any exercise program.
*The treadmill must not be used by persons weighing more than 110 kg.
2

ASSEMBLY
Ensure all parts are present (fig. 1):
AMeter
BSafety tether key with cord (+ 1 spare key)
CPower cord
DLeft handlebar
EHandlebar bracket cover
FRight handlebar with attached meter base
GMain frame
Assembly kit including
H2 x M8 x 80 mm allen screws
I2 x flat washers
J1 x white decorative cap
K2 x plastic cable holders
6 mm allen wrench 10/11 open-end wrench T-Lube bottle
If necessary, contact the dealer and give the model, serial number and spare part number from the spare part list at the back of the manual.
Left, right, front and back are as seen from the exercising position. Assemble the treadmill as follows:
HANDLEBARS
NOTE! Do not tighten any fixing screws before both handlebars are completely assembled.
Remove and dispose the silicate bag from the bottom of the right handlebar. The purpose of this bag is simply to absorb dampness during transportation and storage.
Install the right handlebar in place at the front right corner of the treadmill and secure it using the allen screw and washer. Press the white decorative cap onto the lower end of the right handlebar (fig. 2).
Attach the left handlebar to the running deck side rail using an allen screw and a washer. If necessary, lean the treadmill on one side with help of another person (fig. 3).
NOTE! Make sure that the cable operating the lift spring is not pinched or forced to make any tight curves.
Attach the handlebar bracket cover by snapping it into place over the lower end of the left handlebar.
Push the left handlebar inside the plastic meter base attached to the right handlebar. When the top of the left handlebar is touching the top of the right handlebar, tighten the screws in the bottom of the meter base, while ensuring the handlebars are held securely together (fig. 4).
NOTE! Be careful not to pinch or otherwise damage the flat ribbon cable that runs inside the right handlebar.
METER CABLE
Plug the lower end of the flat ribbon cable coming out from the right sidecover into the upper end coming out of the right handlebar. Thread the connected cable inside the hole in the sidecover and push the cover plug on the through hole so that the cable will not be damaged (fig. 5).
LIFT CABLE
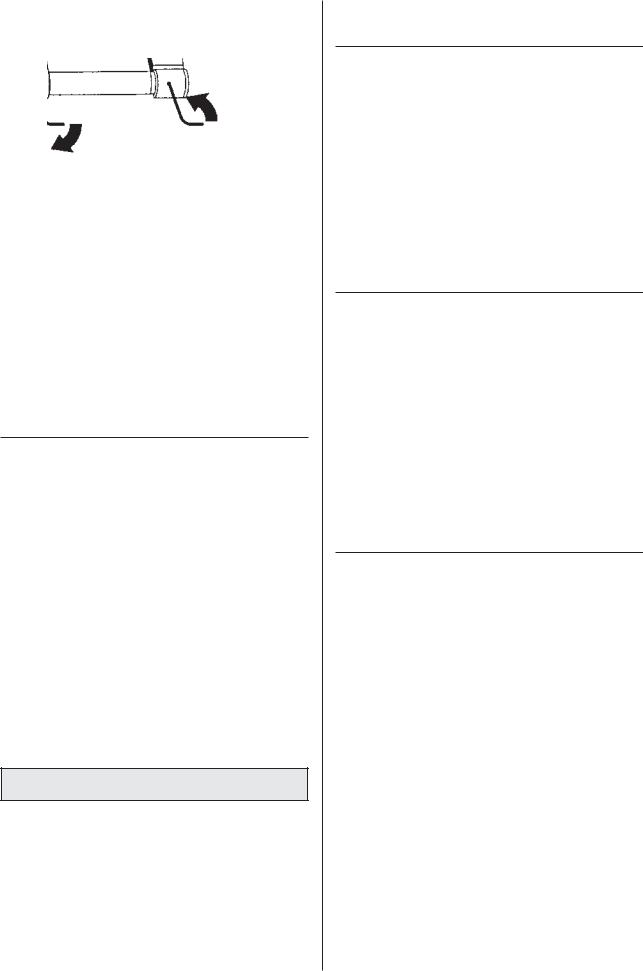
Lift and tilt the treadmill on its right side. Route the lift cable as shown in the figure 6. Attach the wire coming out of the end of the lift cable in its place through the pivot bracket (fig. 7). Adjust wire length by turning the adjuster screw on the cable to the very end. Make sure that the end of the cable is inside the adjuster totally.
Press the wire end in its place in the notch of the black alligator clip. The alligator clip adjusts the gas spring. If necessary, press the jaws of the clip together to get the wire end in its place. Secure the adjustment of the lift cable by tightening the locking nut with an open-end wrench.
Attach the plastic cable holders below the left side rail and press the lift cable to the holders (see arrow in fig. 6).
Lift the treadmill back into the upright position.
Check the functioning of the lift mechanism as follows: Stand on the rear end of the treadmill. Move the elevation control lever located on the left handlebar forward. The back of the treadmill will gradually go down increasing the elevation. To decrease the elevation move to the front of the treadmill. Move the elevation control lever and the rear half of the treadmill will begin to rise decreasing the elevation.
If the elevation mechanism does not function as described above, tilt the treadmill on its right side again. Loosen the locking nut of the of the lift cable and adjust the cable tension with the adjuster screw until the lift mechanism functions properly. Secure the adjustment by tigthening the locking nut.
METER
Plug in the pulse cable and flat ribbon cable connectors on the back side of the display. Tuck the cables inside the meter base and carefully slide the meter onto the base (fig. 8). NOTE! Be careful not to pinch or otherwise damage the cables. Remove the protecting film from the display.
PLUGGING IN THE TREADMILL
Plug the socket end of the power cord into the treadmill at the lower right front corner.
Before connecting the device to a power source make sure that the voltage is correct from the type plate (230 V).
3
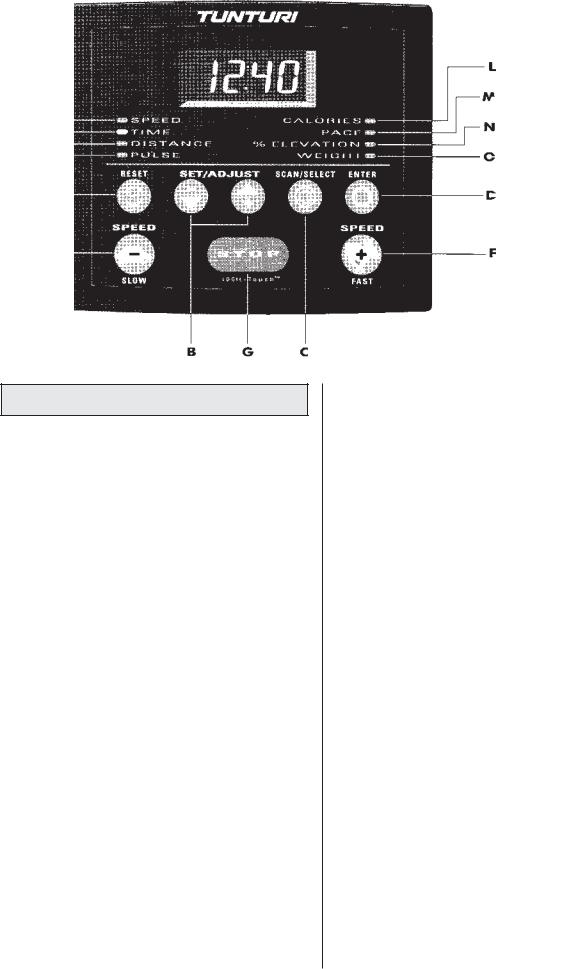
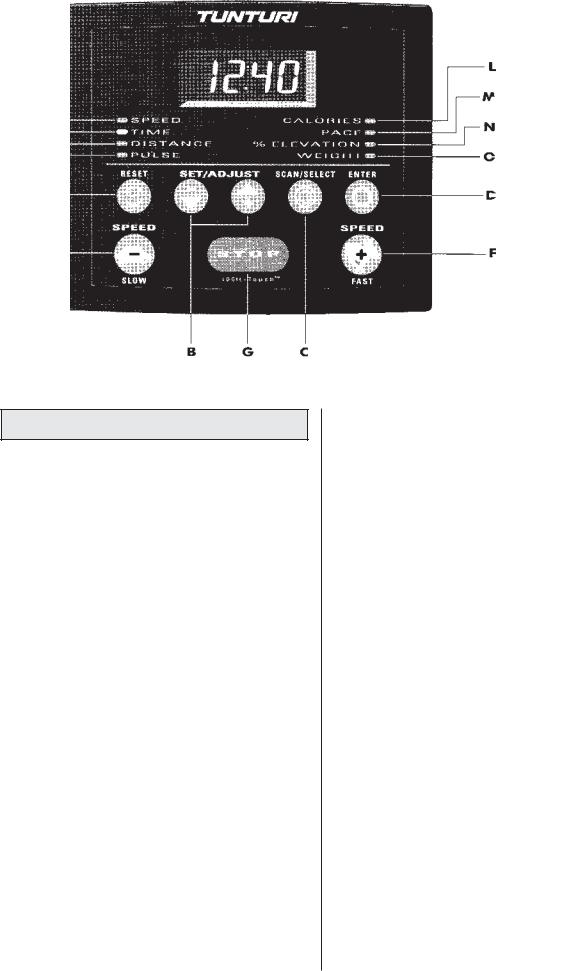
METER
A. RESET
When the treadmill is running: resets time, distance and kilocalories.
When the treadmill is stopped: returns meter to the "enter weight" mode. To continue, either set weight with the arrow keys and push the ENTER key or just push ENTER and accept the default weight.
B. ARROW KEYS (SET / ADJUST)
These keys are used to set weight for the calculation of energy consumption. In addition the arrow keys are used in the user set up mode.
C. SCAN / SELECT
Pressing this key once starts scanning the different display values. Pressing the key a second time stops scanning, allowing the computer to display the current parameter.
D. ENTER
Used to confirm the set user weight. In addition the ENTER key is used in the user set up mode.
E.TORTOISE (SPEED / SLOW)
Decreases belt speed in 0.1 increments.
F.HARE (SPEED / FAST)
Increases belt speed in 0.1 increments.
G. STOP
Stops the treadmill motor and running belt. If pressed once, enters the "pause" mode. All exercise data including current speed and elevation are stored temporarily in the memory of the meter for 1-5 minutes (depending on the set pause timeout duration). This function allows you to pause the treadmill for some minutes and then continue your workout without losing the numerical data.
If the STOP key is pressed twice or when the pause time has expired, the meter will continue displaying the cumulative training values, but it is not possible to continue the workout from those values.
H. SPEED
Displays belt speed either in km/h (1.5-13.0 km/h) or in mph (1.0-8.0 mph).
I. TIME
Displays the elapsed time of the exercise session in minutes and seconds (00.00-99.59 minutes in 1 second increments).
J.PULSE (OPTIONAL)
Displays pulse.
K.DISTANCE
Displays distance traveled during the exercise session in kilometres or miles (00.0-99.9).
L. CALORIES
Displays estimated energy consumption in kilocalories (0- 999 kcal). This meter uses values for weight, time, speed and elevation to calculate the cumulative kilocalories burned during the exercise session. Since different people's capacity to produce energy (efficiency) varies, the energy consumption display shows only an approximation of the real consumption.
M. PACE
Displays the time it takes to run/walk a kilometre or a mile at the current speed.
N. %ELEVATION
Displays current % elevation (0-8%).
O. WEIGHT
Displays user weight entered.
4

USE
Make sure that the power cord is properly connected both to the treadmill and to the wall outlet. Turn on the power switch at the lower right front corner of the treadmill. When the power is switched on the meter is in the "enter weight" mode.
INSERT SAFETY TETHER KEY
The treadmill is equipped with a safety tether key. Insert the yellow safety tether key into the computer base (fig. 8). When you start exercising, attach the clip on the other end of the cord to your shirt or collar. If the key is removed from its place near the electronic display, the treadmill will immediately stop.
NOTE! The treadmill cannot be used and the meter will not function completely if the tether key is not properly installed in the meter base.
ENTER YOUR WEIGHT
1.The small light next to WEIGHT will blink and the display shows the last entered weight.
2.Set your own weight by using the arrow keys.
3.Press ENTER to confirm the set weight.
4.The small light next to SPEED turns on and the display shows 0.0 speed.
USER SET UP MODE
This treadmill features a user set up mode, which enables the user to choose between certain set up parameters: English (mile, mph, lbs) or metric units (km, km/h, kg), audio signals on or off and pause time-out duration.
1.Press and hold the STOP key while pressing the SCAN/SELECT (when meter displays "enter weight" mode).
2.The meter will display either "EngL" (for English units) or "ISo" (for metric units). Choose the desired units by using the arrow keys.
3.Press the SCAN/SELECT key again. The meter will display either "Aud 1" (= Audio signal on) or "Aud 0" (= Audio signal off). Choose the desired parameter by using the arrow keys.
4.Press the SCAN/SELECT key again. The meter will display either "to 1", "to 2", "to 3", "to 4" or "to 5" (= time out). Choose the desired pause time-out duration by using the arrow keys. If you have chosen e.g. "to 4", the meter will memorize the exercising data for 4 minutes allowing you to continue training within that time without losing any numerical data.
5.Press the ENTER-key to return to "enter weight" mode.
PULSE MEASUREMENT
The J 440 is manufactured with heart rate monitoring capability. The treadmill has been fitted with an internal pulse receiver to make it compatible with Polar telemetric heart rate transmitters. The transmitter is available as an accessory.
The telemetric heart rate measurement, in which the electrodes of the transmitter fastened to the chest transmit the pulses from the heart to the meter by means of an electromagnetic field, is the most reliable method of heart rate measurement. Should you wish to purchase the accessory please contact your local Tunturi dealer or distributor for further information.
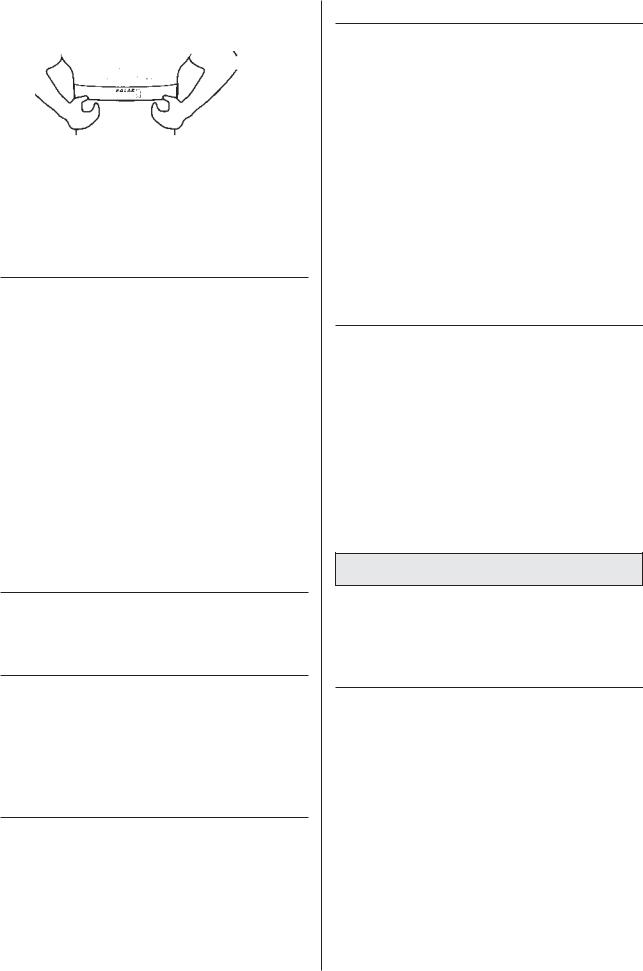
USING THE HEART RATE TRANSMITTER
If you want to measure your pulse telemetrically during your workout start by attaching the elastic belt to the pulse transmitter. Moisten the grooved electrodes on the transmitter belt with saliva or water. If you wear the transmitter and belt over a light shirt, moisten the shirt slightly at the points where the electrodes touch the shirt.
Fasten the transmitter above your stomach, just below the chest firmly enough so that the electrodes remain in contact with the skin while running, but not so tight that normal breathing is prevented.
NOTE! If the electrode surfaces are not moist, the pulse reading will not appear on the display. If the electrodes are dry, moisten them again. It is also important to allow the electrodes to warm up properly to ensure accurate pulse measurement.
The transmitter automatically transmits the pulse reading to the meter up to a distance of about 1 m. Display will show pulse when the small light is on next to the PULSE text. The light flashes in time with the user's heartbeat. NOTE! If there are several telemetric pulse measurement devices next to each other, the distance between them should be at least 1.5 m. Similarily, if there is only one receiver and several transmitters in use, only one person with a transmitter should be within transmission range.
The transmitter is switched to an active state only when it is being used for measurement. To prevent malfunctioning of the transmitter, it is important to dry the electrodes carefully after use.
5
BEGIN TRAINING
Always hold the handrail for support when getting on or off the treadmill and when changing the speed during exercise. Do not jump off the running belt while it is moving!
NOTE! Stand on the landing rails to the left and right of the running belt. Do not stand on the running belt.
Press the HARE key once. The belt will start moving at 1.5 km/h (or 1.0 mph). Steady yourself by holding onto the handlebars and carefully stepping onto the moving belt. Increase speed by pressing the HARE key until the desired speed is reached. To slow down, press the TORTOISE key.
NOTE! Never step onto the running belt at speeds greater than 1.5 km/h or 1.0 mph.
Check that the running belt is aligned and centered on the treadmill bed.
ELEVATION ADJUSTMENT
Do not adjust the elevation while the running belt is moving. Make sure the tether key is installed and power is on.
TO INCREASE ELEVATION
Stand on the rear end of the treadmill, when the running belt is completely stopped. Move the elevation control lever located on the left handlebar forward. The back of the treadmill will gradually go down increasing the elevation. Release the lever when the desired elevation has been reached. Resume your workout by pressing the HARE key.
TO DECREASE ELEVATION
To decrease the elevation move to the front of the treadmill. Make sure the running belt is completely stopped. Move the elevation control lever located on the left handlebar forward. The rear half of the treadmill will begin to rise decreasing the elevation. When the treadmill reaches the desired elevation level, release the lever. Resume your workout.
THE PAUSE FEATURE
If you wish to pause the treadmill for a while, press the STOP key once. The runnings belt stops. All exercise data including current speed and elevation are stored temporarily in the memory of the meter for 1-5 minutes (depending on the set pause time-out duration). To continue exercising press the HARE key. The treadmill will return to its last speed and resume the time, distance and energy consumption counters.
If the STOP key is pressed twice or when the pause time has expired, the meter will continue displaying the cumulative training values, but it is not possible to continue the workout from those values. The display will return to the weight entry mode by pressing the RESET or ENTER keys.
NOTE! Do not remove the tether key when you pause the treadmill. This will stop the treadmill and the elapsed timer.
COMPLETE YOUR EXERCISE SESSION
Grasp the handlebars and press the TORTOISE key. Gradually slow your pace to an easy walk. Press STOP and keep walking until the treadmill comes to a complete stop.
*Remember to strech your muscles following any exercise program.
*Use the main power switch to turn the unit off. Never leave the safety tether key in the treadmill.
*Unplug the electrical cord from the wall outlet and from the treadmill.
*Store the electrical cord where it is clear from all pathways and out of childrens' reach.
*If necessary clean the treadmill from sweat with a damp cloth. Do not use solvents.
ADJUSTMENTS
Monitor belt tracking during exercise and make adjustments as needed (described below).
ALIGNING THE RUNNING BELT
The running belt should remain centered at all times. Normally when the unit is in the horiziontal position and the belt properly tightened the belt will stay in the middle. It is, however, possible for the belt to be pushed to one side due to the user's running style (e.g. more weight on one foot). The alignment of the belt is adjusted by turning the two bolts at the back of the treadmill. Proceed then as follows:
1.Turn the power switch on and increase the treadmill's speed to 5 km/h (3 mph).
2.If the belt drifts to the left, turn the left adjustment bolt 1/8 turn clockwise and the right adjustment bolt 1/8 turn anticlockwise.
3.If the belt drifts to the right, turn the right adjustment bolt 1/8 turn clockwise and the left adjustment bolt 1/8 turn anticlockwise.
6
NOTE! Do not turn more than 1/8 at the time as already very small adjustments effect the alignment.
4.If the belt remains centralised the adjustment is correct. If not, continue to make small adjustments as above, checking for centralisation each time until the belt is correctly aligned.
If the belt is allowed run across to one side for long periods the edges of the belt may be damaged and the treadmill may not continue to operate correctly. Any damage to the belt caused by the lack of necessary adjustment will not be covered by the warranty.
ADJUSTING THE BELT TENSION
NOTE! The belt must be tensioned if it begins to slip on the rollers. In normal use, however, keep the belt as loose as possible!
The belt tension is adjusted by turning the same screws as used for aligning the running belt.
1.Turn the power switch on and increase the treadmill's speed to 5 km/h (3 mph).
2.Turn both adjustment screws an equal amount, approximately 1/8 turn clockwise.
3.Try to slow the belt down by holding onto the handrails and braking as you walk (as if you were walking downhill). NOTE! When braking heavily the belt may slip.
4.If the belt slips, turn another 1/8 turn and repeat the test.
MAINTENANCE
We strongly recommend that a periodic maintenance schedule is adhered to. If you wish to have the maintenance carried out by a trained technician please contact your local Tunturi dealer for details of service available and charges.
Check from time to time that all fasteners are properly tightened and wiring is in place. To avoid damaging fasteners, do not overtighten.
CLEANING AND
INSPECTING THE RUNNING BELT
Turn the unit off and unplug the electrical cord from the wall outlet and from the treadmill. Carefully turn the treadmill on its side. Wipe off the inside of the running belt using a harsh brush. Do not use solvents.
Rotate the running belt carefully by hand to clean the entire inside face. Loosen the belt adjusting screws at the back of the treadmill, if necessary. Return the treadmill into the upright position.
If running belt edges are frayed, check the running belt alignment. If seams are splitting contact your local Tunturi representative.
CLEANING THE TREADMILL
Wipe the treadmill surfaces, especially the handlebars and meter from dust with a damp cloth or towel. Do not use solvents.
Use a small vacuum nozzle to carefully vacuum around all visible components (belt, running deck, side rails etc.). By supporting the device on one of the side rails you can also vacuum it from below. Vacuum also from inside the motor hood.
Clean the rollers once a year as follows: Loosen the adjusting bolts and wipe the rollers with a harsh brush. Tighten the tension adjustment bolts. Check that the running belt is aligned and centered on the treadmill bed.
LUBRICATING THE RUNNING DECK
Lubrication is the most important service activity for the treadmill. This is absolutely essential, if the friction of the running deck increases noticeably or the motor begins to heat up. Ensure after every 50 hours of use that both the belt and the running deck are moist with lubricant. Insufficient lubrication will cause the belt, running deck and motor to wear out and break.
The need for relubrication depends to a great extent on the running styles and weight of the user: heavy user weight and slow speed put particular strain on the device and therefore demand greater lubrication. Use only T-Lube lubricant to lubricate the treadmill. Contact your local Tunturi dealer for further supplies of T-Lube.
NOTE! The device must under no circumstances be lubricated with silicone!
1.Let the treadmill run at 5 km/h (3 mph).
2.Spray T-Lube directly to the underside of the running belt for 5 seconds; the amount corresponds to 10 ml.
3.Ensure that a strip of about 20 cm / 8" wide on the underside of the running belt becomes moist with T-Lube along its whole length. The treadmill is instantly ready for use.
7

ERROR CODES
In case of certain faults relating to the electronics of the treadmill, it has an integral, internal fault-finding system in order that faults can be found and corrected as quickly as possible.
The fault-finding system obviously does not cover all possible faults, but it does help to identify the most likely faults resulting from long-term use. When such a fault occurs, the display shows one of the following error codes:
CODE |
DESCRIPTION |
E 1 |
Failure of speed sensor |
E 4 |
Lift sensor or elevation system failure |
E 7 |
Software failure |
E 8 |
Speed of the running belt exceeds set speed |
If any error code appears on the display or there are other malfunctions, proceed as follows:
1.Turn off the power switch for a minute and then turn it on again.
2.Insure the tether key is properly inserted.
3.Insure the power cord is properly plugged.
4.Insure the treadmill is properly lubricated.
5.If the error code does not disappear after the above mentioned maintenance actions, please contact your local Tunturi dealer. Always give the error code and serial number.
tEtH |
The tether key is not properly installed |
In spite of continuous quality control, individual defects and malfunctions may occur due to individual components. It is in most cases unnecessary to take the whole treadmill for repair, as it is usually sufficient to replace the defective part.
USER MAINTENANCE MENU
The total treadmill running time and total distance are automatically saved in the memory of the treadmill. If you wish to check the total values during assembly measures, for example, proceed as follows:
1.Press and hold the STOP key while pressing the SCAN/SELECT key (when meter displays "enter weight" mode). The meter displays the user set up mode.
2.Press and hold the STOP key again while pressing first the SCAN/SELECT key again and then the ENTER key.
3.The meter will scan the following functions: software version, total time and total distance.
4.Press ENTER key twice to exit the user maintenance menu.
MOVING AND STORAGE
The J 440 is equipped with wheels for easy mobility. Before moving, be sure the power cord is unplugged from the wall and the treadmill. Lift the rear end of the treadmill, then push or pull, rolling the treadmill on the front wheels.
NOTE! The running belt may need to be realigned and centered after moving.
To prevent malfunctioning of the treadmill, store it in a dry place with as little temperature variation as possible, protected against dust. Always unplug the treadmill from the electrical outlet when not in use.
TECHNICAL DATA
Length |
150 cm / 60" |
Height |
125 cm / 49,2" |
Width |
90 cm / 36" |
Weight |
65 kg / 143 lbs |
Running surface length |
135 cm / 54" |
Running surface width |
44 cm / 17,6" |
Speed |
1.5 -13 km/h / 1-8 mph |
Elevation range |
0 - 8 % |
Motor |
1,5 HP (continuous duty) |
Drive system |
Drive belt |
Structural frame |
Welded steel, |
|
powder coated |
Maximum user weight |
110 kg / 250 lbs |
All Tunturi models are designed to meet the electromagnetic compatibility directive, EMC and are affixed with the CE conformity marking.
All Tunturi treadmills meet DIN accuracy and safety norms (DIN 32933-1+3).
NOTE! The instructions must be followed carefully in the assembly, use and maintenance of your equipment. The warranty does not cover damage due to negligence of the assembly, adjustment and maintenance instructions described herein. Changes or modifications not expressly approved by Tunturi Oy Ltd will void the user's authority to operate the equipment!
Due to our continuous program of product development we reserve the right to change specifications without notice.
8

SICHERHEITSHINWEISE
VOR MONTAGE, BENUTZUNG UND WARTUNG DIE GESAMTE GEBRAUCHSANWEISUNG GENAU DURCHLESEN.
IHR NEUER LAUFBANDTRAINER WURDE FÜR DAS HEIMTRAINING UND FÜR REHABILITATIONSZWECKE ENTWICKELT. SOWOHL TUNTURI OY LTD, ALS AUCH SEINE INTERNATIONALEN VERTRETUNGEN ÜBERNEHMEN KEINE HAFTUNG FÜR VERLETZUNGEN ODER GERÄTESCHÄDEN, DIE SICH BEI DAUEREINSATZ IN GEWERBLICHEN FITNESS-CENTERN UND VERGLEICHBAREN EINRICHTUNGEN ERGEBEN. FÜR SCHÄDEN, DIE DURCH MISSACHTUNG DER IN DIESEM HANDBUCH BESCHRIEBENEN EINSTELLUNGSUND WARTUNGSHINWEISE ENTSTEHEN, BESTEHT KEIN GARANTIEANSPRUCH!
Die im Text erwähnten Abbildungen finden Sie auf der hinteren Innenseite dieser Anleitung.
Vor Anschluss des Gerätes ans Netz sicherstellen, dass die Netzspannungen von Gerät und Stromnetz übereinstimmen. Der Laufbandtrainer wird mit einer Netzspannung von 230 V betrieben. Beachten Sie, dass die Leistungsaufnahme des Gerätes maximal 10 A betragen kann. Das Gerät nur an geerdete Schukosteckdosen anschliessen und zum Anschluss kein Verlängerungskabel verwenden.
Schwankungen in der Netzspannung von mehr als 5 Prozent können zu Fehlfunktionen des Gerätes führen und die Elektronik beschädigen. Die Garantie erlischt, wenn das Gerät nicht diesen Anleitungen entsprechend angeschlossen wird.
*Vor Beginn eines Trainingsprogrammes sicherstellen, dass das Gerät völlig intakt ist. Auf keinen Fall mit einem fehlerhaften Gerät trainieren.
*Keine anderen als die in dieser Gebrauchsanweisung beschriebenen Wartungsmassnahmen und Einstellungen vornehmen. Die angegebenen Wartungsanweisungen sind einzuhalten.
*Das Gerät nie benutzen, wenn die Handläufe oder Abdeckungen nicht ordnungsgemäss angebracht sind.
*Vor Montageund Reparaturarbeiten das Gerät ausschalten und den Netzstecker ziehen.
*Nach jedem Training den Netzstecker ziehen.
*Zum Bewegen des Gerätes nie am Netzstecker ziehen.
*Das Gerät nur in Innenräumen benutzen. Für feuchte Räume nicht geeignet.
*Das Gerät auf möglichst ebenen Untergrund stellen. Bei der Plazierung des Gerätes darauf achten, dass der Bereich neben und vor (mindestens 60 cm) und hinter (mindestens 200x100 cm) dem Laufbandtrainer frei ist.
*Wenn Sie Kinder an das Trainingsgerät lassen, müssen Sie deren geistige und körperliche Entwicklung und vor allem deren Temperament berücksichtigen, sie gegebenenfalls beaufsichtigen und sie vor allem auf die richtige Benutzung des Gerätes hinweisen.
*Modifikationen an Steckdosen und Netzkabel dürfen nur von Fachkräften durchgeführt werden, die mit der Wartung von elektromechanischen Geräten vertraut sind und im betreffenden Land eine gültige Genehmigung für die Durchführung derartiger Wartungsund Reparaturarbeiten haben.
*Die Laufplatte unter keinen Umständen mit Silikon behandeln.
*Machen Sie sich vor dem Training mit den Einstellungen, der Tastatur und der Anzeige vertraut.
NICHT VERGESSEN
*Vor Beginn eines Trainingsprogrammes einen Arzt konsultieren.
*Bei Übelkeit, Schwindelgefühl oder anderen anomalen Symptomen das Training sofort abbrechen und unverzüglich den Arzt konsultieren.
*Das Gerät sollte grundsätzlich nur von einer Person benutzt werden.
*Zum Aufund Absteigen und zum Ändern der Laufbandgeschwindigkeit immer an den Handläufen festhalten. Nie vom laufenden Laufband abspringen!
*Nie die Hände in die Nähe von beweglichen Teilen bringen. Den Raum unter dem Gerät freihalten und weder Hände, Füsse noch fremde Gegenstände unter das Gerät bringen.
*Zur Benutzung des Gerätes stets angemessene Kleidung und Schuhwerk tragen. Darauf achten, dass beim Training die Schnürsenkel richtig gebunden sind. Wenn möglich, nur für das Training in Innenräumen vorgesehene Sportschuhe tragen. Von Strassenschuhwerk abfallende Sandkörner und kleine Steine können das Laufband unnötig verschleissen oder zu sonstigen Beschädigungen führen.
*Darauf achten, dass die Schnur des Sicherheitsschlüssels mit Hilfe des Clips an der Kleidung (z. B. an Kragen oder Brusttasche) befestigt ist, damit im Notfall der Sicherheitsschlüssel automatisch aus dem Schloss herausgezogen wird und das Laufband somit unverzüglich stehenbleibt.
*Zur Vermeidung von Muskelkater, das Aufund Abwärmtraining (langsames Jogging oder Gehen) sowie die Dehnübungen nicht vergessen.
*Das Gerät ist nicht für Personen mit einem Körpergewicht von mehr als 110 kg geeignet.
9

MONTAGE
Sicherstellen, dass alle Teile mitgeliefert wurden (Abb. 1):
AElektronikanzeige
BSicherheitsschlüssel mit Schnur und Clip (+ 1 Ersatzschlüssel)
CNetzkabel
DLinker Handlauf
EAbdeckkappe für Handlaufbefestigung
FRechter Handlauf mit Halter für die Elektronikanzeige
GRahmen
Montagezubehör und Werkzeugsatz mit:
H2 St M8 x 80 mm Inbusschraube
I2 St Unterlegscheiben
J1 St weisse Kunststoffkappe
K2 St Zughalter
6 mm Imbusschlüssel 10/11 Gabelschlüssel T-Lube Dose
Sollte Ihr Gerät unvollständig sein, wenden Sie sich bitte unter Angabe des Modells, der Seriennummer und Nummer des fehlenden Teils an Ihren Tunturi-Händler. Die Ersatzteilnummer geht aus der Ersatzteilliste am Ende dieser Betriebsanleitung hervor.
Alle Teile auspacken und wie folgt zusammenbauen. Die Beschreibung der Lage von Teilen (rechts, links, vorne, hinten) geht von der Blickrichtung beim Training aus.
HANDLÄUFE
BITTE BEACHTEN! Alle Schrauben erst festziehen, wenn die beiden Handläufe fertig montiert sind.
Die Silikatbeutel am unteren Ende des rechten Handlaufs entfernen und vernichten. Diese Beutel sollen Feuchtigkeit während Transport und Aufbewahrung aufnehmen.
Das rechte Handlaufrohr rechts bei der vorderen Laufrolle plazieren und mit einer Inbusschraube und Unterlegscheibe befestigen. Die weisse Kunststoffkappe auf das untere Ende des Handlaufrohrs drücken (Abb. 2).
Das untere Ende des linken Handlaufrohrs mit einer Inbusschraube und Unterlegscheibe an der seitlich am Rahmen befindlichen Schiene befestigen. Falls nötig, das Laufband auf die Seite legen. Abdeckkappe für Handlaufbefestigung auf das untere Ende des Handlaufs setzen und festdrücken (Abb. 3).
BITTE BEACHTEN! Sicherstellen, dass der Gasfederzug nicht eingeklemmt wird oder unnötige Biegungen macht.
Das obere Ende des linken Handlaufs in den am rechten Handlauf befindlichen Halter für die Elektronikanzeige stecken. Die beiden oberen Handlaufenden gegeneinanderdrücken, bis sie einander berühren. Dann Sicherungsschrauben am Halter festziehen (Abb. 4).
BITTE BEACHTEN! Sicherstellen, dass das im Handlauf befindliche Flachkabel während des Zusammensteckens der Handläufe bzw. des Festziehens der Schrauben nicht eingeklemmt wird.
ELEKTRONIKANZEIGENKABEL
Das vom rechten Handlauf kommende Flachkabel mit dem aus der Seitenabdeckung vorne rechts kommenden Flachkabel verbinden. Das überstehende Kabel in die Öffnung der Seitenabdeckung vorsichtig einführen und die Öffnung mit der Gummikappe schliessen, damit das Kabel nicht beschädigt wird (Abb. 5).
GASFEDER
Den Laufbandtrainer auf die rechte Seite legen. Den Gasfederungszug über die Abstützung führen (Abb. 6), an den Gasfederungsmechanismus montieren und das Ende in den Auslöserhebel der Gasfeder einhängen (Abb. 7). Bei Bedarf die Einstellschraube nachdrehen und den Auslöserhebel etwas nach hinten drücken. Nach dem Einhängen des Gasfederungszuges die Sicherungsmutter festziehen.
Die mitgelieferten Zughalter aus Kunststoff an der linken Unterseite des Laufbandtrainers befestigen und den Gasfederungszug in die Zughalter drücken (Pfeil in Abb. 6). Den Laufbandtrainer wieder aufrichten.
Zur Funktionsprüfung des Hubmechanismus wie folgt vorgehen: Auf den hinteren Teil des Laufbandes stellen und durch Betätigen des am linken Handlauf befindlichen Schalters den Neigungswinkel erhöhen. Der hintere Teil des Gerätes wird dadurch langsam abgesenkt und die Steigung wird grösser.
Entsprechend auf den vorderen Teil des Laufbandes stellen, und durch Betätigen des am linken Handlauf befindlichen Schalters den Neigungswinkel reduzieren. Der hintere Teil des Gerätes wird langsam angehoben und die Steigung wird kleiner.
Funktioniert der Hubmechanismus nicht in gewünschter Weise und das Gerät geht zurück in unterste Position, den Laufbandtrainer wieder auf die Seite legen, die Sicherungsmutter der Einstellschraube für den Gasfederzug lösen und danach den Zug durch Drehen der Einstellschraube nachspannen, bis der Hubmechanismus in gewünschter Weise funktioniert. Nicht vergessen die Sicherungsmutter wieder festzuziehen.
ELEKTRONIKANZEIGE
Die am Halter für die Elektronikanzeige befindlichen Kabel (Elektronikkabel und Pulsmesskabel) in die Buchsen an der Elektronikanzeige einstecken. Die überstehenden Kabel in den Halter schieben. Die Elektronikanzeige vorsichtig auf den Halter stecken (Abb. 8). BITTE BEACHTEN! Dabei darauf achten, dass die Kabel nicht eingeklemmt werden. Zum Schluss die Schutzfolie von der Tastatur abziehen.
NETZANSCHLUSS
Das Netzkabel in die am vorderen Ende des Laufbandtrainers, neben dem Netzschalter befindliche Buchse einstecken. Vor Anschluss des Gerätes ans Netz sicherstellen, daß die Netzspannungen von Gerät und Stromnetz übereinstimmen (230 V).
10
ELEKTRONIKANZEIGE
A. RESET-TASTE
Im Betrieb dient die RESET-Taste zum Zurücksetzen der Werte für abgelaufene Zeit, zurückgelegte Strecke und verbrauchte Energie.
Im Stillstand dient die RESET-Taste zur Eingabe des Körpergewichtes. Zur Bestätigung des neuen Wertes oder zur Übernahme des Standardwertes ENTER drücken.
B. PFEILTASTEN (SET/ADJUST)
Zum Erhöhen und Reduzieren des Körpergewichtes in kg oder lbs. Dieser Wert wird für die Berechnung des Energieverbrauchs benötigt. Ausserdem können die Pfeiltasten zur Einstellung der Anwenderoptionen verwendet werden.
C. SCAN/SELECT
Zum Einund Ausschalten des automatischen Anzeigenwechsels.
D. ENTER
Zur Bestätigung des eingegebenen Körpergewichtes und zu Bestätigungen in der Betriebsart ANWENDEROPTIONEN.
E. SCHILDKRÖTENTASTE (SPEED/SLOW)
Zum Reduzieren der Laufgeschwindigkeit in 0,1 Intervallen.
F. HASENTASTE (SPEED/FAST)
Zum Erhöhen der Laufgeschwindigkeit in 0,1 Intervallen.
G. STOP-TASTE
Zum Anhalten des Laufbandes (1 x drücken). Die Trainingswerte sowie zuletzt eingestellte Trainingsgeschwindigkeit und Neigungswinkel werden, je nach Vorprogrammierung, 1 - 5 Minuten gespeichert. Innerhalb dieser Zeit kann das Training mit den bis dahin gespeicherten Werten fortgesetzt werden. Nach erneutem Drücken der STOP-Taste oder nach Ablauf der
vorprogrammierten Speicherzeit zeigt die Anzeige zwar weiterhin die erzielten Trainingswerte an, das Training kann aber nicht mehr von diesen Werten ausgehend fortgesetzt werden.
H. SPEED (GESCHWINDIGKEIT)
Zur Anzeige der Laufbandgeschwindigkeit in Kilometern pro Stunde (1,5 - 13,0 km/h) bzw. Meilen pro Stunde (1 - 8 mph).
I. TIME (TRAININGSZEIT)
Abgelaufene Trainingszeit in Minuten und Sekunden (00:00 - 99:59) in 1-Sekunden-Intervallen.
J.PULSE (HERZFREQUENZ) - Zusatzfunktion Zur Anzeige der Herzfrequenz.
K.DISTANCE (TRAININGSSTRECKE)
Zur Anzeige der zurückgelegten Trainingsstrecke in Kilometern (00.0-99.9) oder in Meilen.
L. CALORIES (ENERGIEVERBRAUCH)
Geschätzter Energieverbrauch während des Trainings in Kilokalorien (0-999 kcal). Der Energieverbrauch wird anhand von Körpergewicht, Trainingszeit, Trainingsgeschwindigkeit und Neigungswinkel ermittelt. Da die Menschen unterschiedliche Fähigkeiten haben Energie zu produzieren, kann der angezeigte Energieverbrauch nur eine Annäherung des tatsächlichen Energieverbrauchs sein.
M. PACE (ZEIT PRO KILOMETER BZW. MEILE)
Zur Anzeige der zum Zurücklegen eines Kilometers bzw. einer Meile erforderlichen Zeit. Der Wert wird aufgrund der eingestellten Geschwindigkeit berechnet.
N. % ELEVATION (NEIGUNGSWINKEL)
Zur Anzeige des eingestellten Neigungswinkels (Steigung 0-
8%).
O. WEIGHT (KÖRPERGEWICHT)
Zur Anzeige des vorprogrammierten Körpergewichts.
11

BETRIEB
Sicherstellen, dass das Netzkabel sowohl an der Steckdose, als auch aus der Buchse am Laufbandtrainer ordnungsgemäss angeschlossen ist. Das Gerät am Netzschalter am vorderen Ende des Laufbandtrainers einschalten. Die Funktion KÖRPERGEWICHT ist in der Anzeige aktiviert.
SICHERHEITSSCHLÜSSEL
Das Laufband ist mit einem Sicherheitsschlüssel ausgestattet. Die Schnur des Sicherheitsschlüssels mit Hilfe des Clips an Kleidung befestigen und den Sicherheitsschlüssel ins Schloss stecken (Abb. 8). Das Laufband bleibt automatisch stehen, sobald der Sicherheitsschlüssel nicht mehr im Schloss am Elektronikanzeigenhalter ist.
BITTE BEACHTEN! Das Gerät funktioniert nur, wenn der Sicherheitsschlüssel ordnungsgemäss im Schloss ist.
EINSTELLUNG
DES KÖRPERGEWICHTES
1.Die Leuchtdiode neben dem Text WEIGHT blinkt und die Anzeige gibt das zuletzt eingegebene Körpergewicht an.
2.Mit den Pfeiltasten, das eigene Körpergewicht eingeben.
3.Zum Bestätigen des Wertes ENTER drücken.
4.Danach leuchtet die Leuchtdiode neben dem Text SPEED, und die Anzeige zeigt eine Geschwindigkeit von “0.0” an.
ANWENDEROPTIONEN
Die Betriebsart ANWENDEROPTIONEN dient zur Auswahl folgender Optionen: metrische (km, km/h und kg) oder englische (Meile, mph und lbs) Masse, Warnton ein/aus und Einstellung der Zeit, nach welcher die erzielten Trainingswerte gelöscht werden.
1.Die Funktion KÖRPERGEWICHT anwählen. Danach gleichzeitig STOPund SCAN/SELECTTasten drücken.
2.In der Anzeige erscheint der Text “EngL” (= englische Masse) oder “ISo” (= metrische Masse).
Zur Auswahl die Pfeiltasten benutzen.
3.Noch einmal auf SCAN/SELECT drücken. In der Anzeige erscheint der Text “Aud 1” (= Warnton ein) oder “Aud 0” (= Warnton aus). Zur Auswahl die Pfeiltasten benutzen.
4.Noch einmal auf SCAN/SELECT drücken. In der Anzeige erscheint der Text “to 1”, “to 2”, “to 3”, “to 4” oder “to 5” (= timeout = Zeitsperre zum Löschen des Betriebsspeichers). Zur Auswahl die Pfeiltasten benutzen. Ist “to 4” vorprogrammiert, kann das Training innerhalb von 4 Minuten mit
den bis dahin gespeicherten Werten fortgesetzt werden.
5.Zum Schluss ENTER drücken, wodurch die Funktion KÖRPERGEWICHT wieder aktiviert wird.
HERZFREQUENZMESSUNG
Der Empfänger in der Elektronikanzeige ist kompatibel mit den meisten drahtlosen Herzfrequenzmessgeräten von Polar (Zusatzausrüstung).
Als zuverlässigste Art der Herzfrequenzmessung hat sich die drahtlose Messung erwiesen, bei der die Herzschläge mit einem Elektrodengurt von der Brust abgenommen werden. Vom Gurt werden die Impulse danach über ein elektromagnetisches Feld an den Empfänger in der Elektronikanzeige übertragen. Für weitere Informationen über drahtlose Herzfrequenzmessung wenden Sie sich bitte an Ihren Fachhändler.
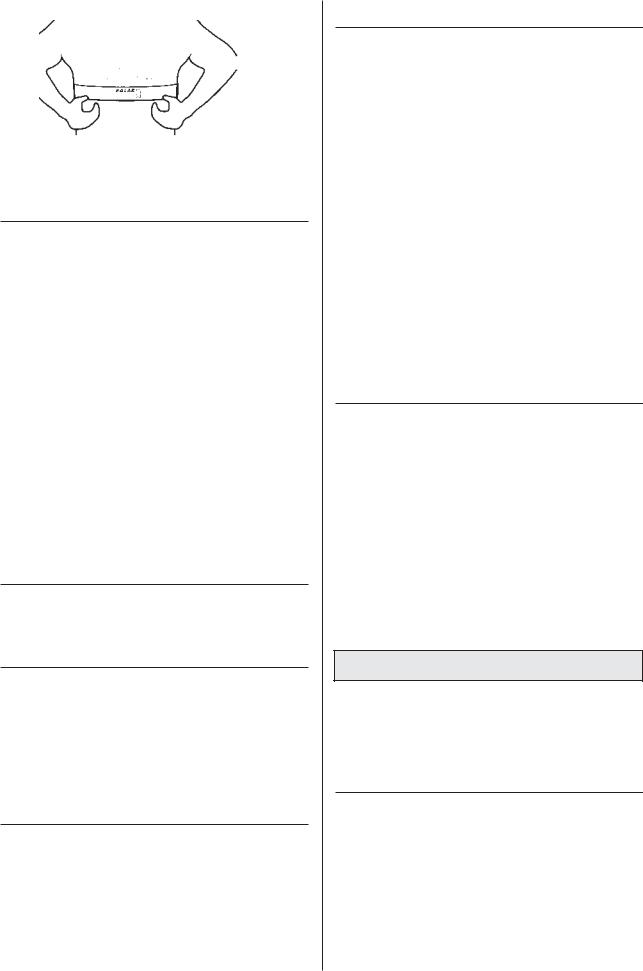
DRAHTLOSE HERZFREQUENZMESSUNG
Zur drahtlosen Herzfrequenzmessung während des Trainings die gegen die Haut kommenden Elektroden am Elektrodengurt sorgfältig mit Wasser oder Speichel anfeuchten. Wird der Elektrodengurt über einem dünnen Hemd getragen, sind die gegen die Elektroden gerichteten Flächen ebenfalls zu befeuchten. Den Elektrodengurt jedoch nicht so festziehen, daß z.B. die Atmung erschwert wird. Den Sender mit Hilfe des Gurtes fest unterhalb der Brustmuskulatur befestigen und darauf achten, dass der Gurt beim Training nicht verrutscht.
BITTE BEACHTEN! Bei trockenen Elektroden wird kein Herzfrequenzwert angezeigt. Ggf. Elektroden wieder anfeuchten. Der Sender kann den Herzfrequenzwert bis zu einer Entfernung von zirka 1 m an den Empfänger übertragen. Der Wert ist in der Anzeige, wenn die Leuchtdiode neben dem Text PULSE aufleuchtet.
BITTE BEACHTEN! Werden mehrere drahtlose Herzfrequenzmessgeräte gleichzeitig nebeneinander eingesetzt, sollten sie in einem Abstand von mindestens 1,5 m voneinander aufgestellt werden. Werden nur ein Empfänger aber mehrere Sender eingesetzt, darf sich nur eine Person, die einen Sender trägt, während der Messung innerhalb der Reichweite des Senders befinden.
Der Sender schaltet sich aus, wenn der Elektrodengurt abgenommen wird. Um Funktionsstörungen zu vermeiden, den Sender nach dem Training sorgfältig zu trocknen.
12
TRAINING BEGINNEN
Zum Aufund Absteigen und zum Ändern der Laufbandgeschwindigkeit immer an den Handläufen festhalten. Nie vom laufenden Laufband abspringen!
BITTE BEACHTEN! Mit gegrätschten Beinen auf die Seitenränder des Laufbandtrainers stellen. Das Gerät nicht auf dem Laufband stehend in Bewegung setzen.
Die HASEN-Taste drücken. Danach dreht sich das Laufband mit einer Geschwindigkeit von 1,5 km/h. An den Handläufen festhalten und auf das Laufband treten. Nach Bedarf durch erneutes Drücken der HASEN-Taste die Geschwindigkeit erhöhen, bis die gewünschte Laufgeschwindigkeit erreicht ist. Zur Reduzierung der Laufgeschwindigkeit die SCHILD- KRÖTEN-Taste drücken.
BITTE BEACHTEN! Nicht auf das Laufband steigen, wenn dessen Geschwindigkeit größer ist als 1,5 km/h.
Sicherstellen, dass das Laufband gerade läuft und genügend gespannt ist.
EINSTELLEN DES NEIGUNGSWINKELS
Den Neigungswinkel nur bei stillstehendem Laufband einstellten.
VERGRÖSSERUNG
Bei stillstehendem Laufband auf den hinteren Teil des Laufbandes stellen und durch Betätigen des am linken Handlauf befindlichen Schalters den Neigungswinkel erhöhen, bis die gewünschte Steigung erreicht ist. Der hintere Teil des Gerätes wird dadurch langsam abgesenkt und die Steigung wird grösser. Danach normal mit dem Training fortfahren.
REDUZIERUNG
Bei stillstehendem Laufband auf den vorderen Teil des Laufbandes stellen (ggf. auch ganz absteigen) und durch Betätigen des am linken Handlauf befindlichen Schalters den Neigungswinkel reduzieren, bis die gewünschte Steigung erreicht ist. Der hintere Teil des Gerätes wird langsam angehoben und die Steigung wird kleiner. Danach normal mit dem Training fortfahren.
TRAINING UNTERBRECHEN
Für eine kurzfristige Unterbrechung des Trainings das Laufband durch Drücken der STOP-Taste anhalten. Die Trainingswerte sowie zuletzt eingestellte Trainingsgeschwindigkeit und Neigungswinkel werden, je nach Vorprogrammierung, 1 - 5 Minuten gespeichert. Innerhalb dieser Zeit kann das Training mit den bis dahin gespeicherten Werten fortgesetzt werden. Zum Fortsetzen die HASEN-Taste drücken. Das Training geht danach mit der gleichen Geschwindigkeit weiter wie vor der Unterbrechung. Dasselbe gilt für Trainingszeit, Trainingsstrecke und Energieverbrauch.
Nach Ablauf der vorprogrammierten Speicherzeit zeigt die Anzeige zwar weiterhin die erzielten Trainingswerte an, das Training kann aber nicht mehr von diesen Werten ausgehend fortgesetzt werden. Zum Zurücksetzen der Werte auf Null die RESEToder ENTER-Taste drücken.
BITTE BEACHTEN! Wird der Sicherheitsschlüssel während der Unterbrechung abgezogen, kann das Training nicht mehr von den vor der Unterbrechung gültigen Werten ausgehend fortgesetzt werden.
TRAINING BEENDEN
An den Handläufen festhalten und mit der SCHILD- KRÖTEN-Taste allmählich die Geschwindigkeit reduzieren. Zum Anhalten des Laufbands die STOP-Taste drücken.
*Zur Vermeidung von Muskelkater Abwärmtraining und Dehnübungen nicht vergessen.
*Das Gerät am Netzschalter am vorderen Ende des Laufbandtrainers ausschalten.
*Nach Beendigung des Trainings immer den Sicherheitsschlüssel abziehen und das Netzkabel sowohl aus der Steckdose als auch aus der Buchse am Laufbandtrainer ziehen und an einem sicheren Ort vor Kinderhand geschützt aufbewahren.
*Das Gerät mit einem etwas feuchten Wischtuch von Schweiss befreien. Keine Lösungsmittel verwenden.
EINSTELLUNGEN
Beobachten Sie den Lauf des Bandes während des Trainings und führen Sie die unten beschriebenen Einstellmassnahmen sofort aus, wenn sie notwendig sind.
AUSRICHTEN DES LAUFBANDES
Während des Trainings sollte das Laufband möglichst gerade und mittig laufen. Bei einem ebenen Aufstellort braucht die Laufbandspannung gewöhnlich nicht nachgestellt zu werden. Aufgrund von besonderen Laufstilen (z.B. einseitige Gewichtsverteilung) kann das Laufband mit der Zeit jedoch schräg laufen. Zum Ausrichten des Laufbandes wie folgt vorgehen:
1.Das Gerät mit dem Netzschalter am vorderen Ende des Laufbandtrainers einschalten und das Band mit einer Geschwindigkeit von zirka 5 km/h (3 mph) laufen lassen.
13

2.Läuft das Laufband nach links, die linke Einstellschraube am hinteren Ende des Laufbandtrainers um 1/8 Umdrehung nach rechts und die rechte Einstellschraube 1/8 Umdrehung nach links drehen.
3.Läuft das Laufband nach rechts, die rechte Einstellschraube am hinteren Ende des Laufbandtrainers um 1/8 Umdrehung nach rechts und die linke Einstellschraube 1/8 Umdrehung nach links drehen. BITTE BEACHTEN! Bereits eine 1/8 Umdrehung verändert die Richtung des Bandes. Deshalb die Stellung der Einstellschrauben nur wenig auf einmal verändern.
4.Läuft das Laufband in der Mitte, ist die Einstellung richtig. Wenn nicht, die obigen Schritte solange wiederholen, bis das Laufband in der Mitte des Gerätes bleibt.
Läuft das Laufband über längere Zeit hinweg schräg, so dass es an der einen Geräteseite scheuert, können Betriebsstörungen auftreten. Die Garantie deckt keine Schäden, die auf eine unterlassene Ausrichtung des Laufbandes zurückzuführen sind.
NACHSPANNEN DES LAUFBANDES
Das Laufband muss nachgespannt werden, wenn es bei normalem Betrieb über die Laufrolle zu rutschen beginnt. Die Laufbandspannung jedoch so gering wie möglich halten. Das Nachspannen erfolgt mit denselben Einstellschrauben wie zum Ausrichten:
1.Das Gerät am Netzschalter am vorderen Ende des Laufbandtrainers einschalten und das Band mit einer Geschwindigkeit von zirka 5 km/h laufen lassen.
2.Beide Einstellschrauben gleich viel (zirka 1/8 Umdrehung) nach rechts drehen.
3.Durch Gehen wie an einem steileren Abhang versuchen, das Laufband zu bremsen. BITTE BEACHTEN! Das Laufband sollte erst bei scharfem Bremsen rutschen.
4.Rutscht das Laufband immer noch zu leicht über die Laufrolle, die Einstellschrauben um eine weitere 1/8 Umdrehung nach rechts drehen und einen weiteren Bremsversuch machen.
WARTUNG
Von Zeit zu Zeit alle Schrauben und Muttern auf festen Sitz überprüfen. Die Schrauben aber nicht überdrehen.
REINIGUNG UND
KONTROLLE DES BANDES
Das Gerät mit dem Netzschalter ausschalten und das Netzkabel sowohl aus der Steckdose als auch aus der Buchse am Laufbandtrainer ziehen. Das Gerät auf die Seite legen. Die Innenfläche des Laufbandes mit einer rauhen Bürste reinigen. Auf keinen Fall Lösungsmittel verwenden. Das Band mit den Händen weiterschieben, bis die gesamte Innenfläche gereinigt ist. Bei Bedarf an den Einstellschrauben die Laufbandspannung lösen. Zum Schluss die Einstellschrauben nachziehen und das Gerät wieder aufrichten. Bei verschlissenem Laufband ist besonders auf die Ausrichtung zu achten.
REINIGUNG DES GERÄTES
Die Handläufe und die Elektronikanzeige mit einem leicht feuchten Wischtuch reinigen. Auf keinen Fall Lösungsmittel verwenden. Die sichtbaren Teile des Rahmens (wie Laufband, Laufplatte und Seitenprofile) regelmässig mit einer kleinen Düse absaugen. Durch Kippen kann auch der untere Teil des Gerätes gereinigt werden.
Die Laufrollen sollen einmal im Jahr wie folgt gereinigt werden: Die Einstellschrauben etwas lösen und die Laufrollen mit einer rauhen Bürste abwischen. Die Einstellschrauben wieder festziehen. Dabei sicherstellen, dass das Laufband gerade läuft und richtig gespannt ist.
PFLEGE DER LAUFPLATTE
Die Behandlung des Laufbandes mit Teflon ist die wichtigste Wartungsmassnahme. Diese muss immer dann durchgeführt werden, wenn Sie entweder eine deutliche Reibungszunahme des Laufbandes oder eine Überhitzung des Motors feststellen. Stellen Sie nach jeweils 50 Betriebsstunden sicher, dass sowohl die Unterseite der Laufmatte als auch die Laufplatte ausreichend mit dem Pflegemittel versehen sind. Eine nicht ausreichende Behandlung führt zu erhöhtem Verschleiss und Beschädigung von Laufband, Laufplatte und Motor.
Der Pflegebedarf hängt weitgehend vom Gewicht des Benutzers und seinem Laufstil ab: Ein hohes Körpergewicht sowie eine niedrige Betriebsgeschwindigkeit des Laufbandes führen zu einer stärkeren Belastung des Gerätes und machen daher besondere Sorgfalt bei der Pflege erforderlich. Verwenden Sie zur Behandlung des Laufbandes nur das T-Lube Pflegemittel. Wenn Sie neues T-Lube benötigen, wenden Sie sich bitte an Ihren Tunturi-Händler.
BITTE BEACHTEN! Die Behandlung des Gerätes mit Silikon ist dringend zu unterlassen!
1.Das Laufband mit 5 km/h laufen lassen.
2.Sprühen Sie das T-Lube 5 Sekunden lang direkt auf die Unterseite der Laufmatte.
14

3.Bitte sicherstellen, dass die gesamte Bandrückseite auf einer Breite von ca. 20 cm deutlich sichtbar mit T-Lube angefeuchtet ist. Das Gerät ist sofort betriebsbereit.
FEHLERMELDUNGEN
Für eine leichte Erkennung der wahrscheinlichsten Fehlerquellen ist das Gerät mit einem Meldungssystem ausgestattet. Folgende Fehlermeldungen sind möglich:
MELDUNG |
URSACHE |
E 1 |
Geschwindigkeitssensor erhält kein Signal |
E 4 |
Hubmechanismusoder Sensorfehler |
E 7 |
Softwarefehler |
E 8 |
Laufband rotiert schneller als programmiert |
Wenn ein Fehlercode erscheint oder andere Störungen auftauchen, bitte folgend vorgehen:
1.Hauptschalter ausschalten, 1 Minute warten, wieder einschalten.
2.Sicherstellen, dass der Sicherheitsschlüssel ganz eingesteckt ist.
3.Sicherstellen, dass die 230 V Stromzuleitung korrekt eingesteckt ist.
4.Sicherstellen, dass die Laufband-Unterseite genügend mit Teflon gepflegt ist.
5.Sollte die Fehlermeldung nach Durchführung dieser Massnahmen immer noch vorhanden sein, kontaktieren Sie bitte Ihren Tunturi-Händler. Nennen Sie immer die genaue Fehlermeldung und die Seriennummer Ihres Gerätes. Die Seriennummer finden Sie auf dem Aufkleber hinten links am Rahmen.
tEtH |
Der Sicherheitsschlüssel ist nicht |
|
ordnungsgemäss im Schloss am |
|
Elektronikanzeigenhalter |
Trotz kontinuierlicher Qualitätsüberwachung können vereinzelt an den Geräten durch einzelne Komponenten verursachte Funktionsstörungen auftreten. Dabei ist es nicht angebracht, das ganze Gerät zur Reparatur zu bringen, da der Fehler meistens durch Austauschen der defekten Komponente behoben werden kann.
GESPEICHERTE WERTE
Die Gesamtbetriebsstundenzahl sowie die zurückgelegte Gesamtstrecke werden automatisch im Speicher der Elektronikanzeige festgehalten. Zum Abruf dieser Werte - beispielsweise im Zusammenhang mit Wartungsmaßnahmen - wie folgt vorgehen:
1.Wenn die Leuchtdiode neben dem Text WEIGHT aufleuchtet, die STOP-Taste niedergedrückt halten und gleichzeitig die SCAN/SELECT-Taste drücken. Die Elektronikanzeige ist jetzt in der Betriebsart ANWENDEROPTIONEN.
2.Die STOP-Taste niedergedrückt halten und gleichzeitig erstens die SCANSELECT-Taste und zweitens die ENTER-Taste drücken.
3.In der Anzeige werden jetzt abwechselnd die Gesamtbetriebsstundenzahl, die zurückgelegte
Gesamtstrecke und die Softwareversion angezeigt.
4.Zum Verlassen der Betriebsart 2 x ENTER drücken.
TRANSPORT UND
AUFBEWAHRUNG
Das Gerät lässt sich leicht auf den integrierten Transportrollen bewegen. Vor dem Transport das Netzkabel sowohl aus der Steckdose als auch aus der Buchse am Laufbandtrainer ziehen. Das Gerät am hinteren Ende anheben und auf den Transportrollen an den gewünschten Platz schieben.
BITTE BEACHTEN! Nach dem Bewegen oder Transport muss das Laufband ggf. neu ausgerichtet werden.
Um Funktionsstörungen zu vermeiden, das Gerät in einem möglichst trockenen Raum mit gleichbleibender Temperatur vor Staub geschützt aufbewahren und benutzen. Nach jedem Training den Netzstecker ziehen.
TECHNISCHE DATEN
Länge |
150 cm |
Breite |
90 cm |
Höhe |
125 cm |
Gewicht |
65 kg |
Lauffläche |
135 x 44 cm |
Bandgeschwindigkeit |
0-13 km/h |
Steigung |
0-8 % |
Motor |
1,5 PS |
Antrieb |
Keilriemen |
Rahmen |
Verschweisste Stahl, |
Zul. Körpergewicht |
pulverbeschichtet |
max. 110 kg |
Sämtliche Tunturi-Geräte entsprechen den EG-Richt-linien für elektromagnetische Verträglichkeit (EMC) und sind zum Zeichen der Konformität mit einem CE gekenn-zeichnet.
Tunturi-Laufbänder erfüllen die Anforderungen der DINPräzisionsund Sicherheitsnormen (DIN 32933-1+3).
BITTE BEACHTEN! Es ist wichtig, dass die in dieser Betriebsanleitung angegebenen Hinweise beachtet werden. Für Schäden, die durch Missachtung der angegebenen Montage-, Einstellungsund Wartungshinweise entstehen, besteht kein Garantieanspruch. Werden Modifizierungen ohne das Einverständnis der Tunturi Oy Ltd vorgenommen, soll das Gerät nicht verwerdet werden und jeglicher Garantieanspruch erlischt.
Technische Änderungen vorbehalten - Sie dienen stets dem Fortschritt.
Falls Sie technische Fragen haben bzw. Ersatzteile benötigen, bitte unsere Serviceabteilungen kontaktieren:
Deutschland: Bremshey Sport GmbH,
Tel. 0212-248 1517
Österreich: DOWI GmbH,
Tel. 0316-716 412
Schweiz: GTSM Magglingen,
Tel. 01-4611 130
15

QUELQUES CONSEILS ET AVERTISSEMENTS
AVANT DE PROCEDER A L’ASSEMBLAGE, L’UTILISATION ET L’ENTRETIEN DE L’APPAREIL, LISEZ ATTENTIVEMENT CE MODE D’EMPLOI ET SUIVEZ TOUJOURS LES CONSEILS QUI Y FIGURENT.
CET APPAREIL EST DESTINE A ETRE UTILISE A DOMICILE ET DANS LES ETABLISSEMENTS DE REEDUCATION. LA GARANTIE DONNEE PAR LA SOCIETE TUNTURI OY LTD NE COUVRE QUE LES DEFAUTS OU IMPERFECTIONS APPARUS AU COURS DE L'UTILISATION A DOMICILE / REEDUCATION. VEUILLEZ NOTER QUE LA GARANTIE NE COUVRE PAS LES DOMMAGES CAUSES PAR UN MANQUE DE PRECAUTION QUANT AUX INSTRUCTIONS DE MONTAGE ET D'ENTRETIEN DANS CE MODE D'EMPLOI.
Les figures mentionnées dans le text se trouvent á la fin de ce mode d'emploi.
Avant de brancher votre appareil sur secteur, remarquez qu’il fonctionne sur 230 V. Sa consommation de courant est de 10 A à son maximum. L’appareil doit être branché sur une prise mise à la terre. N’utilisez pas de rallonge.
Les sources de courant présentant des variations de tension de plus de 5 % peuvent entraver le bon fonctionnement de l’appareil et endommager son équipement électronique. Si l’appareil est branché sans tenir compte des instructions données dans ce mode d’emploi, sa garantie n’est plus valable.
*Commencez toujours par vérifier que l’appareil est en parfait état de marche. N’utilisez jamais un appareil défectueux.
*N’effectuez jamais d’autres opérations de réglage et d’entretien que celles mentionnées dans ce guide et suivez bien les conseils d’entretien qui y sont donnés.
*Vérifiez toujours que toutes les pièces de protection de l’appareil sont bien en place.
*Veillez à ce que, durant l’assemblage et l’entretien de l’appareil, l’appareil est éteint et débranché.
*Débranchez l’appareil après chaque utilisation.
*Ne déplacez jamais l’appareil en tirant sur le fil électrique.
*Utilisez l’appareil uniquement à l’intérieur.
*Placez l’appareil sur une surface aussi plane que possible et laissez au moins 60 cm d’espace libre devant et sur les côtés et au moins 120 cm derrière.
*Si vous décidez de laisser un enfant utiliser l’appareil, prenez toujours en considération l’état de son développement physique et mental ainsi que son caractère. Donnez à l’enfant tous les conseils nécessaires pour une bonne utilisation de l’appareil et ne le laissez jamais seul. L’appareil ne doit en aucun cas être utilisé comme un jouet.
*Le fil électrique de l’appareil est équipé de fiches mises à la terre. Seule une personne spécialisée dans l’entretien et la réparation de tels appareils électromécaniques et qui détient le permis exigé par la loi du pays concerné pour effectuer les travaux en question, peut réaliser d’éventuels changements sur les fiches de l’appareil ou la prise secteur.
*N'utilisez pas de silicone ce qui endommagerait la plaque de base.
*Avant de monter sur votre appareil, familiarisez-vous avec les diverses mesures de réglage et l’utilisation de l’unité des compteurs.
ATTENTION !
*Consultez votre médecin avant de commencer les exercices.
*Interrompez immédiatement la session et consultez votre médecin si vous êtes pris de nausées ou de vertiges ou sentez d’autres symptômes anormaux pendant l’entraînement.
*Ne montez jamais à deux ou à plusieurs sur l’appareil.
*Prenez appui sur la barre de soutien en montant sur l’appareil ou en en descendant et également au cours de chaque changement de vitesse. Ne sautez jamais d’un tapis en marche!
*N’approchez jamais vos mains des parties mobiles de l’appareil. Veillez à ce qu’il n’y ait jamais rien sous le tapis et ne glissez jamais votre main ou votre pied ou tout autre objet sous le tapis.
*Portez des vêtements et chaussures appropriés. Vérifiez que vos lacets sont bien serrés. Utilisez de préférence des chaussures de sport réservées à une utilisation à domicile. Vous éviterez ainsi toute usure ou autre dommage inutile que pourraient causer les cailloux et grains de sable venant de chaussures utilisées au dehors.
*N’oubliez pas de fixer le clip au bout du cordon de la clé de verrouillage de sécuritéà votre T-shirt par exemple.
*Afin d’éviter toutes douleurs musculaires, commencez et terminez vos sessions par des mouvements d’échauffement (marche ou course lente) et d’étirement.
*L’appareil ne doit pas être utilisé par des personnes pesant plus de 110 kg.
16

ASSEMBLAGE
Commencez par vérifier que les pièces suivantes figurent bien dans l’emballage (fig. 1):
AUnité des compteurs
BClé de verrouillage de sécurité + cordon avec clip (+ clé réserve)
CFil électrique
DMoitié gauche de la barre de soutien
EPièce de protection
FMoitié droite de la barre de soutien + support unité des compteurs
GChâssis
Un jeu d’outils et vis contenant:
H2 vis à six pans creux M8 x 80 mm
I2 rondelles
J1 coiffe blanche
K2 pièces à recevoir le câble
1 clé 6 mm pour vis à six pans
1 clé à fourche (10/11) bombe de T-Lube
En cas de pièce manquante, prenez contact avec votre vendeur et indiquez-lui le modèle, le numéro de fabrication ainsi que le numéro de la pièce manquante (voir vue éclatée et liste pièces détachées à la fin de ce mode d’emploi).
Les termes gauche, droite, devant et derrière sont utilisés comme si vous étiez en position d’exercice sur l’appareil. Vous pouvez ensuite procéder à l’assemblage comme suit:
BARRE DE SOUTIEN
ATTENTION ! Ne serrez pas les vis de fixation avant que les deux barres soient complètement assemblées.
Enlevez le sachet situé au bas de la barre droite, destiné à absorber l'humidité pendant le transport et le stockage.
Placez la moitié droite de la barre de soutien à côté du rouleau devant et fixez-la au châssis à l'aide de la vis et de la rondelle. Pressez le coiffe blanche sur la tête de la moitié droite de la barre de soutien (fig. 2).
Fixez la moitié gauche de la barre de soutien à la languette du châssis à l’aide de la vis et de la rondelle (fig. 3). Si nécessaire couchez le tapis sur un côté avec l'aide d'une autre personne.
ATTENTION ! Faites attention à ce que le câble du mécanisme de levage ne reste pas coincé ou tordu.
Mettez l’embout protecteur en place.
Enforcez la moitié gauche de la barre de soutien dans la moitié droite. Une fois les deux moitiés de la barre de soutien bien l’une dans l’autre, fixez-les à l’aide des vis se trouvant au bas du support de l’unité des compteurs (fig. 4).
ATTENTION ! Faites attention à ce que le câble plat situé dans la barre de soutien ne reste pas coincé.
CABLE DE L’UNITE DES COMPTEURS
Connectez la partie inférieure du câble électrique sortant du carter droit dans la partie supérieure sortant de la barre de soutien droite. Placez le câble connecté dans le trou du carter et poussez le cache sur le trou afin que le câche ne soit pas endommagé (fig. 5).
CABLE DU MECANISME DE LEVAGE
Basculez l’appareil sur son flanc droit. Faites passer le câble du mécanisme de levage entre le châssis et son support (fig. 6) et faites passer le bout du câble à travers la douille comme indiqué sur la figure 7. Serrez la vis de réglage pour faire sortir le câble un peu plus.
Fixez le bout du câble dans l’encoche de la tige (noire) de commande du mécanisme de levage. Au besoin, appuyez sur le haut de la tige pour faciliter la mise en place du bout du câble dans l’encoche. Réglez la tension du câble à l’aide de sa vis de réglage et bloquez le mécanisme de réglage du câble à l’aide de l’écrou de blocage.
Fixez les pièces (voir flèche sur la figure 6) destinées à recevoir le câble du mécanisme de commande sous le dessous gauche du châssis et installez-y le câble.
Remettez l’appareil dans sa position normale.Vérifiez le fonctionnement du mécanisme de levage. Pour ce faire, commencez par vous mettre debout sur l’arrière du tapis. En appuyant sur le bouton de réglage de l’inclinaison du tapis se trouvant à gauche sur la barre de soutien, la partie arrière du tapis doit s’abaisser. Si ensuite vous vous mettez debout sur l’arrière du tapis ou restez près du tapis et que vous appuyez sur ce même bouton, la partie arrière doit se lever.
Si ce n’est pas le cas, il vous faudra régler à nouveau le mécanisme de levage. Pour ce faire, commencez par faire basculer l’appareil sur son flanc droit. Dévissez l’écrou de blocage du mécanisme de réglage du câble et resserrez la vis de réglage du câble. Bloquez le mécanisme de réglage du câble à l’aide de l’écrou de blocage.
UNITE DES COMPTEURS
Connectez le câble plat et le câble de la mesure du pouls sortant du support de l’unité des compteurs à l’unité des compteurs. Rentrez les câbles dans le support du compteur et placez avec précaution l’unité des compteurs sur son support en prenant garde que les câbles ne restent pa coincés (fig. 8). ATTENTION ! Faites attention à ce que le câble plat situé dans la barre de soutien ne reste pas coincé. Retirez le film protecteur recouvrant les touches de fonction.
BRANCHEMENT DE L’APPAREIL
Connectez le fil électrique à l’avant droit de l’appareil, près de l’interrupteur secteur. Avant de brancher l’appareil sur le secteur, vérifiez que la tension secteur convient en la comparant avec celle indiquée sur la plaque signalétique de l’appareil.
17
UNITE DES COMPTEURS
A. RESET
Lorsque le tapis est en marche: appuyer sur RESET = remise
àzéro de la durée écoulée, dae la distance parcourue et de l’énergie consommée.
Lorsque le tapis est à l’arrêt: appuyer sur RESET = passage
àla fonction “Entrée du poids de l’utilisateur”. Il est possible alors soit d’acquitter le poids proposé par l’unité des compteurs elle-même avec la touche ENTER, soit d’entrer une autre valeur à l’aide des touches fléchées et d’acquitter cette nouvelle valeur avec ENTER.
B. TOUCHES FLECHEES (SET/ADJUST)
Pour l’entrée du poids de l’utilisateur en kilos ou en livres afin que l’unité des compteurs puisse calculer la consommation d’énergie. Egalement pour des réglages personnels à chaque utilisateur.
C. SCAN/SELECT
Pour le défilement automatique des affichages (SCAN) ou le choix d’un affichage particulier (SELECT).
D. ENTER
Pour acquitter l’entrée du poids de l’utilisateur et pour effectuer les réglages personnels.
E. TORTUE (SPEED/SLOW)
Pour réduire la vitesse (0,1 km/h par appui sur la touche).
F. LIEVRE (SPEED/FAST)
Pour augmenter la vitesse (0,1 km/h par appui sur la touche).
G. STOP
Pour arrêter l’appareil. Après un appui sur STOP, les valeurs enregistrées par l’unité des compteurs et la vitesse et l’inclinaison du tapis choisies restent en mémoire entre 1 et 5 minutes suivant le choix effectué. Après un second appui
sur STOP ou si le temps choisi pour le maintien en mémoire est dépassé, seules les valeurs enregistrées au cours de l’exercice seront conservées, par contre tous les choix entrés par l’utilisateur seront annulés.
H. SPEED (vitesse)
Affichage de la vitesse en km/h (1,5-13) ou en milles/h.
I. TIME (durée)
Affichage de la durée écoulée en minutes et secondes (00.00-99.59) par crans d’une seconde.
J. PULSE (mesure du pouls)
- nécessite un accessoire supplémentaire
Affichage du pouls.
K. DISTANCE (distance)
Affichage de la distance parcourue en kilomètres ou milles (00.0-99.9).
L. CALORIES (consommation d’énergie)
Affichage de l’estimation de la quantité d’énergie consommée en kilocalories (0-999) durant une session. Cette valeur est calculée en prenant en compte le poids de l’utilisateur, la durée de la session, la vitesse et l’inclinaison du tapis. La capacité à produire de l’énergie variant d’un individu à l’autre, la valeur affichée ne peut être qu’une estimation de la consommation réelle.
M.PACE (temps pour parcourir un km/un mille)
Affichage du temps nécessaire pour parcourir un kilomètre ou un mille à la vitesse choisie.
N.% ELEVATION (angle d’inclinaison)
Affichage de l’angle d’inclinaison choisi en pourcent (0-8).
O. WEIGHT (poids de l’utilisateur)
Affichage du poids de l’utilisateur entré dans l’appareil.
18
 Loading...