


OmniSmart

Owner’s Manual
1111 W. 35th Street Chicago, IL 60609 USA
Customer Support: (773) 869-1234 • www.tripplite.com
Important Safety Instructions
2
Quick Installation
3
Basic Operation
4
Storage & Service
7
Specifications
8
OmniSmart
™
& SmartPro
®
USB
120V Input/Output, Line-Interactive UPS Systems
Copyright
©
2003 Tripp Lite. All rights reserved.
OmniSmart
™ is a trademark of Tripp Lite. SmartPro
®
is a registered trademark of Tripp Lite.
Español
9
Français
17
UL1778

Important Safety Instructions
2
UPS Location Warnings
• Install your UPS indoors, away from excess moisture or heat, dust or direct sunlight.
• For best performance, keep the indoor temperature between between 32º F and 104º F
(0º C and 40º C).
• Leave adequate space around all sides of the UPS for proper ventilation.
UPS Connection Warnings
• Connect your UPS directly to a properly grounded AC power outlet. Do not plug the
UPS into itself; this will damage the UPS.
• Do not modify the UPS’s plug, and do not use an adapter that would eliminate the UPS’s
ground connection.
• Do not use extension cords to connect the UPS to an AC outlet. Your warranty will be
voided if anything other than Tripp Lite surge suppressors are used to connect your UPS
to an outlet.
• If the UPS receives power from a motor-powered AC generator, the generator must
provide clean, filtered, computer-grade output.
Equipment Connection Warnings
• Do not use Tripp Lite UPS Systems for life-support appliances in which a malfunction
or failure of a Tripp Lite UPS System could cause failure or significantly alter the
performance of a life-support device.
• Do not connect surge suppressors or extension cords to the output of your UPS. This
may damage the UPS and will void the surge suppressor and UPS warranties.
Battery Warnings
• Your UPS does not require routine maintenance. Do not open your UPS for any reason.
There are no user-serviceable parts inside.
• Battery replacement must be performed by qualified service personnel. Because the
batteries present a risk of electrical shock and burn from high short-circuit current,
observe proper precautions. Unplug and turn off the UPS before performing battery
replacement. Use tools with insulated handles, and replace the existing batteries with the
same number and type of new batteries (Sealed Lead-Acid). Do not open the batteries.
Do not short or bridge the battery terminals with any object.
• The UPS batteries are recyclable. Refer to local codes for disposal requirements, or in
the USA only call 1-800-SAV-LEAD or 1-800-8-BATTERY (1-800-8-228-8379) or visit
www.rbrc.com for recycling information. Do not dispose of the batteries in a fire.
• Do not attempt to add external batteries.
SAVE THESE INSTRUCTIONS
This manual contains instructions and warnings that should be followed during the
installation, operation and storage of all Tripp Lite UPS Systems. Failure to heed these
warnings will void your warranty.
3
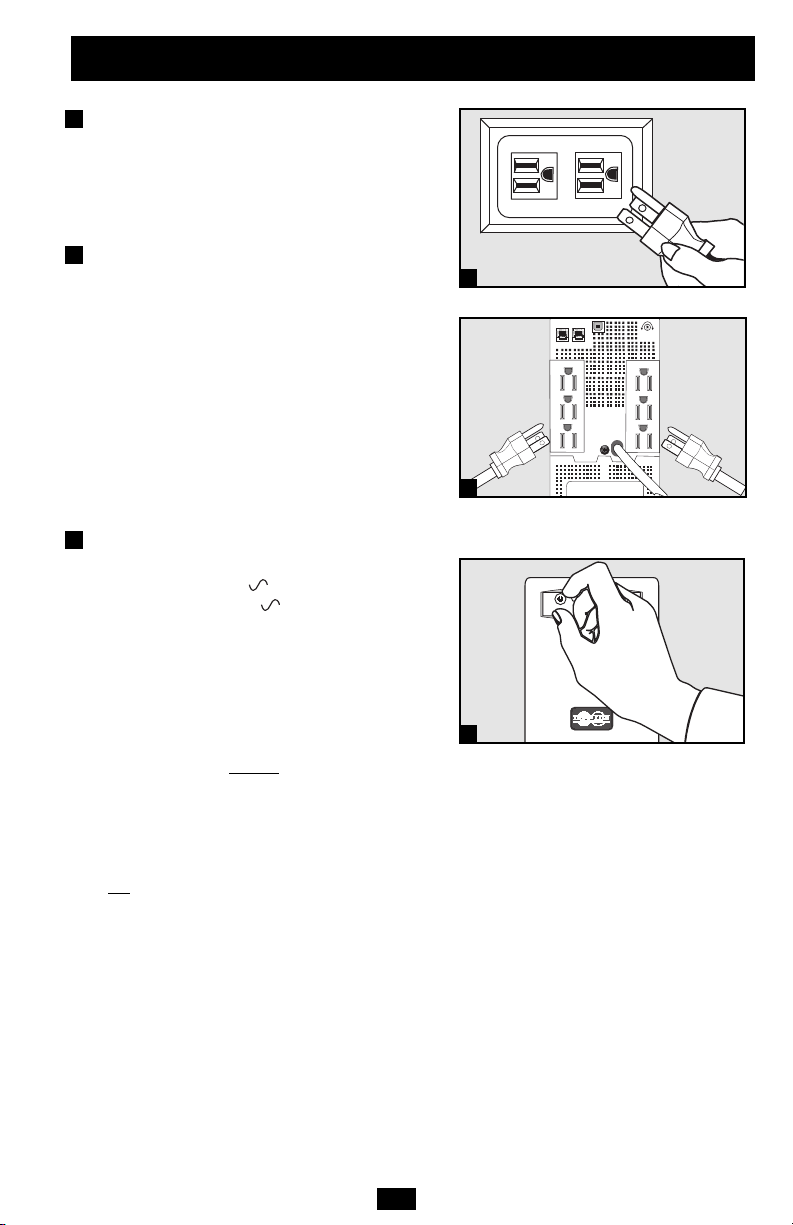
Quick Installation
Connect your UPS to
an electrical outlet.
Your UPS will run a self-test after it is
plugged in. See Basic Operation to understand
the results of its self-test.
Plug your computer, monitor
and other equipment into
the UPS system.
Your UPS is designed to support only comput-
er equipment. You will overload your UPS if
you connect high power draw equipment such
as household appliances or laser printers to
outlets providing UPS battery backup. Select
models feature special outlets (clearly labeled
on the rear panel) which provide surge-only
(not battery backup) protection designed for
laser printers and other heavy-draw devices.
Select UPS Operating Mode.*
Press the ON/OFF button to toggle your UPS
between the UPS (“ ” LED lit) and the
CHARGE ONLY (“ ” LED flashing)
modes. Choose the operating mode based on
your location:
USA, Canada & Western Europe:
• Leave the UPS in the UPS mode at all times.
All other countries:
• Put the UPS in the CHARGE ONLY
mode when you ar
e not using connected
equipment.
(WARNING! When set to “CHARGE ONLY,” the UPS
will not provide battery backup during a blackout
or brownout)
• Put the UPS in the UPS mode when you
ar
e using connected equipment.
*See Basic Operation section for a complete explanation
of each mode.
3
2
1
NORM DELAY
1
2
3
 Loading...