


900 mm Built In Oven
OPERATING AND INSTALLATION INSTRUCTIONS
MODEL NO.
BD 921/2 BD 931

TECHNICAL DETAILS
MODEL NO. BD 921/2
Voltage: |
230/240 Volts AC 50 Hz |
Wattage: |
5.3/5.8 kW |
Height: |
885 mm |
Width: |
595 mm |
Depth: |
545 mm |
|
(excluding handles and knobs) |
Weight: |
53kg |
MODEL NO. BD 931
Voltage: |
230/240 Volts AC 50 Hz |
|
Wattage: |
5.3/5.8 kW |
|
Height: |
885 mm |
|
Width: |
595 mm |
|
Depth: |
545 mm |
|
|
(excluding handles and knobs) |
|
Weight: |
53kg |
|
|
||
|
|
|
This appliance complies with: European Council Directive 73/23/EEC. EMC Directive 89/336/EEC.
CE Marking Directive 93/68/EEC.

CONTENTS
Please follow these instructions step by step to install and operate your oven safely and easily.
Technical Details . . . . . . . . . . . . . . . . . . . . . . . . . . . . . . . . . . . . . . . . . . . . . . . . . . . . . . . . . . . . . . . . . . . . . . . 2
Contents . . . . . . . . . . . . . . . . . . . . . . . . . . . . . . . . . . . . . . . . . . . . . . . . . . . . . . . . . . . . . . . . . . . . . . . . . . . . . . . 3
Preface . . . . . . . . . . . . . . . . . . . . . . . . . . . . . . . . . . . . . . . . . . . . . . . . . . . . . . . . . . . . . . . . . . . . . . . . . . . . . . . . . 5
Safety . . . . . . . . . . . . . . . . . . . . . . . . . . . . . . . . . . . . . . . . . . . . . . . . . . . . . . . . . . . . . . . . . . . . . . . . . . . . . . . . . . . 6
Before Installation . . . . . . . . . . . . . . . . . . . . . . . . . . . . . . . . . . . . . . . . . . . . . . . . . . . . . . . . . . . . . . . . . 6
During Operation . . . . . . . . . . . . . . . . . . . . . . . . . . . . . . . . . . . . . . . . . . . . . . . . . . . . . . . . . . . . . . . . . 6
After Use . . . . . . . . . . . . . . . . . . . . . . . . . . . . . . . . . . . . . . . . . . . . . . . . . . . . . . . . . . . . . . . . . . . . . . . . . 7
General . . . . . . . . . . . . . . . . . . . . . . . . . . . . . . . . . . . . . . . . . . . . . . . . . . . . . . . . . . . . . . . . . . . . . . . . . . 7
Installation Instructions . . . . . . . . . . . . . . . . . . . . . . . . . . . . . . . . . . . . . . . . . . . . . . . . . . . . . . . . . . . . . . . . 8 Things You Need to Know . . . . . . . . . . . . . . . . . . . . . . . . . . . . . . . . . . . . . . . . . . . . . . . . . . . . . . . . . 8 Warnings . . . . . . . . . . . . . . . . . . . . . . . . . . . . . . . . . . . . . . . . . . . . . . . . . . . . . . . . . . . . . . . . . . . . . . . . . 8 Things to Note . . . . . . . . . . . . . . . . . . . . . . . . . . . . . . . . . . . . . . . . . . . . . . . . . . . . . . . . . . . . . . . . . . . . 8
Getting Things Ready . . . . . . . . . . . . . . . . . . . . . . . . . . . . . . . . . . . . . . . . . . . . . . . . . . . . . . . . . . . . . . . . . . 8 Choice of Electrical Connection . . . . . . . . . . . . . . . . . . . . . . . . . . . . . . . . . . . . . . . . . . . . . . . . . . . . 8 Preparing Cabinet for Fitting Oven . . . . . . . . . . . . . . . . . . . . . . . . . . . . . . . . . . . . . . . . . . . . . . . . . 8 Recommended Cabinet Dimensions . . . . . . . . . . . . . . . . . . . . . . . . . . . . . . . . . . . . . . . . . . . . . . . 9 How to Finish Unpacking . . . . . . . . . . . . . . . . . . . . . . . . . . . . . . . . . . . . . . . . . . . . . . . . . . . . . . . . . 10 Tools Required . . . . . . . . . . . . . . . . . . . . . . . . . . . . . . . . . . . . . . . . . . . . . . . . . . . . . . . . . . . . . . . . . . 10
Making the Electrical Connections . . . . . . . . . . . . . . . . . . . . . . . . . . . . . . . . . . . . . . . . . . . . . . . . . . . . |
10 |
Preparing Cable . . . . . . . . . . . . . . . . . . . . . . . . . . . . . . . . . . . . . . . . . . . . . . . . . . . . . . . . . . . . . . . . . |
10 |
To Remove Cover of Mains Terminal . . . . . . . . . . . . . . . . . . . . . . . . . . . . . . . . . . . . . . . . . . . . . |
10 |
Connecting to the Mains Terminal . . . . . . . . . . . . . . . . . . . . . . . . . . . . . . . . . . . . . . . . . . . . . . . . |
11 |
Connecting to a Hob or Cooker Point . . . . . . . . . . . . . . . . . . . . . . . . . . . . . . . . . . . . . . . . . . . . . |
11 |
Checking Electrical Connections . . . . . . . . . . . . . . . . . . . . . . . . . . . . . . . . . . . . . . . . . . . . . . . . . . |
11 |
Fitting Into The Cabinet . . . . . . . . . . . . . . . . . . . . . . . . . . . . . . . . . . . . . . . . . . . . . . . . . . . . . . . . . . . . . . . |
12 |
Introduction . . . . . . . . . . . . . . . . . . . . . . . . . . . . . . . . . . . . . . . . . . . . . . . . . . . . . . . . . . . . . . . . . . . . . . . . . . . |
13 |
Getting to Know Your Oven (BD 921/2) . . . . . . . . . . . . . . . . . . . . . . . . . . . . . . . . . . . . . . . . . . . |
13 |
Getting to Know Your Oven (BD 931) . . . . . . . . . . . . . . . . . . . . . . . . . . . . . . . . . . . . . . . . . . . . . |
14 |
Rating Plate . . . . . . . . . . . . . . . . . . . . . . . . . . . . . . . . . . . . . . . . . . . . . . . . . . . . . . . . . . . . . . . . . . . . . |
15 |
General Notes on Using The Ovens . . . . . . . . . . . . . . . . . . . . . . . . . . . . . . . . . . . . . . . . . . . . . . |
15 |
When First Switching On . . . . . . . . . . . . . . . . . . . . . . . . . . . . . . . . . . . . . . . . . . . . . . . . . . . . . . . . . |
15 |
About Condensation and Steam . . . . . . . . . . . . . . . . . . . . . . . . . . . . . . . . . . . . . . . . . . . . . . . . . . |
15 |
Cookware . . . . . . . . . . . . . . . . . . . . . . . . . . . . . . . . . . . . . . . . . . . . . . . . . . . . . . . . . . . . . . . . . . . . . . . |
15 |
The Trivet . . . . . . . . . . . . . . . . . . . . . . . . . . . . . . . . . . . . . . . . . . . . . . . . . . . . . . . . . . . . . . . . . . . . . . . |
15 |
The Shelf Positions . . . . . . . . . . . . . . . . . . . . . . . . . . . . . . . . . . . . . . . . . . . . . . . . . . . . . . . . . . . . . . |
15 |
Push to Turn Controls (BD 931 only) . . . . . . . . . . . . . . . . . . . . . . . . . . . . . . . . . . . . . . . . . . . . . . |
16 |
The Cooling Fan for the Controls . . . . . . . . . . . . . . . . . . . . . . . . . . . . . . . . . . . . . . . . . . . . . . . . . |
16 |
Control Panel Indicator Neons . . . . . . . . . . . . . . . . . . . . . . . . . . . . . . . . . . . . . . . . . . . . . . . . . . . . |
16 |
Grill and Oven Furniture . . . . . . . . . . . . . . . . . . . . . . . . . . . . . . . . . . . . . . . . . . . . . . . . . . . . . . . . . . |
16 |
The Grill . . . . . . . . . . . . . . . . . . . . . . . . . . . . . . . . . . . . . . . . . . . . . . . . . . . . . . . . . . . . . . . . . . . . . . . . . . . . . . . 17 Uses of the Dual Grill . . . . . . . . . . . . . . . . . . . . . . . . . . . . . . . . . . . . . . . . . . . . . . . . . . . . . . . . . . . . 17 Selecting the Dual Grill . . . . . . . . . . . . . . . . . . . . . . . . . . . . . . . . . . . . . . . . . . . . . . . . . . . . . . . . . . . 17 Things to Note . . . . . . . . . . . . . . . . . . . . . . . . . . . . . . . . . . . . . . . . . . . . . . . . . . . . . . . . . . . . . . . . . . . 17 The Grill Pan and Handle . . . . . . . . . . . . . . . . . . . . . . . . . . . . . . . . . . . . . . . . . . . . . . . . . . . . . . . . . 18 Hints and Tips . . . . . . . . . . . . . . . . . . . . . . . . . . . . . . . . . . . . . . . . . . . . . . . . . . . . . . . . . . . . . . . . . . . 18 Grilling Chart . . . . . . . . . . . . . . . . . . . . . . . . . . . . . . . . . . . . . . . . . . . . . . . . . . . . . . . . . . . . . . . . . . . . 19
The Second Oven . . . . . . . . . . . . . . . . . . . . . . . . . . . . . . . . . . . . . . . . . . . . . . . . . . . . . . . . . . . . . . . . . . . . . 20
Uses of the Second Oven . . . . . . . . . . . . . . . . . . . . . . . . . . . . . . . . . . . . . . . . . . . . . . . . . . . . . . . . 20
Selecting the Second Oven . . . . . . . . . . . . . . . . . . . . . . . . . . . . . . . . . . . . . . . . . . . . . . . . . . . . . . . 20
Things To Note . . . . . . . . . . . . . . . . . . . . . . . . . . . . . . . . . . . . . . . . . . . . . . . . . . . . . . . . . . . . . . . . . . 20
To Fit the Top Oven Shelf . . . . . . . . . . . . . . . . . . . . . . . . . . . . . . . . . . . . . . . . . . . . . . . . . . . . . . . . 21
Hints and Tips . . . . . . . . . . . . . . . . . . . . . . . . . . . . . . . . . . . . . . . . . . . . . . . . . . . . . . . . . . . . . . . . . . . 21
Second Oven Cooking Chart . . . . . . . . . . . . . . . . . . . . . . . . . . . . . . . . . . . . . . . . . . . . . . . . . . . . . 21
3

CONTENTS
The Main Fan Oven . . . . . . . . . . . . . . . . . . . . . . . . . . . . . . . . . . . . . . . . . . . . . . . . . . . . . . . . . . . . . . . . . . . . 22 Uses of the Fan Oven . . . . . . . . . . . . . . . . . . . . . . . . . . . . . . . . . . . . . . . . . . . . . . . . . . . . . . . . . . . . 22 Selecting the Fan Oven . . . . . . . . . . . . . . . . . . . . . . . . . . . . . . . . . . . . . . . . . . . . . . . . . . . . . . . . . . 22 Things to Note . . . . . . . . . . . . . . . . . . . . . . . . . . . . . . . . . . . . . . . . . . . . . . . . . . . . . . . . . . . . . . . . . . . 23 To Fit the Main Oven Shelves . . . . . . . . . . . . . . . . . . . . . . . . . . . . . . . . . . . . . . . . . . . . . . . . . . . . 23 Hints and Tips . . . . . . . . . . . . . . . . . . . . . . . . . . . . . . . . . . . . . . . . . . . . . . . . . . . . . . . . . . . . . . . . . . . 23
Defrost Feature . . . . . . . . . . . . . . . . . . . . . . . . . . . . . . . . . . . . . . . . . . . . . . . . . . . . . . . . . . . . . . . . . . . . . . . . 24 Uses of Defrost Feature . . . . . . . . . . . . . . . . . . . . . . . . . . . . . . . . . . . . . . . . . . . . . . . . . . . . . . . . . . 24 Selecting Defrost . . . . . . . . . . . . . . . . . . . . . . . . . . . . . . . . . . . . . . . . . . . . . . . . . . . . . . . . . . . . . . . . 24 Things to Note . . . . . . . . . . . . . . . . . . . . . . . . . . . . . . . . . . . . . . . . . . . . . . . . . . . . . . . . . . . . . . . . . . . 24 Hints and Tips . . . . . . . . . . . . . . . . . . . . . . . . . . . . . . . . . . . . . . . . . . . . . . . . . . . . . . . . . . . . . . . . . . . 25
The Conventional Oven . . . . . . . . . . . . . . . . . . . . . . . . . . . . . . . . . . . . . . . . . . . . . . . . . . . . . . . . . . . . . . . 26 Uses of the Conventional Oven . . . . . . . . . . . . . . . . . . . . . . . . . . . . . . . . . . . . . . . . . . . . . . . . . . . 26 Selecting the Conventional Oven . . . . . . . . . . . . . . . . . . . . . . . . . . . . . . . . . . . . . . . . . . . . . . . . . 26 Things to Note . . . . . . . . . . . . . . . . . . . . . . . . . . . . . . . . . . . . . . . . . . . . . . . . . . . . . . . . . . . . . . . . . . . 26 Hints and Tips . . . . . . . . . . . . . . . . . . . . . . . . . . . . . . . . . . . . . . . . . . . . . . . . . . . . . . . . . . . . . . . . . . . 27
The Zoned Oven . . . . . . . . . . . . . . . . . . . . . . . . . . . . . . . . . . . . . . . . . . . . . . . . . . . . . . . . . . . . . . . . . . . . . . . 28 Uses of the Zoned Oven . . . . . . . . . . . . . . . . . . . . . . . . . . . . . . . . . . . . . . . . . . . . . . . . . . . . . . . . . 28 Selecting the Zoned Oven . . . . . . . . . . . . . . . . . . . . . . . . . . . . . . . . . . . . . . . . . . . . . . . . . . . . . . . . 28 Things to Note . . . . . . . . . . . . . . . . . . . . . . . . . . . . . . . . . . . . . . . . . . . . . . . . . . . . . . . . . . . . . . . . . . . 28 Hints and Tips . . . . . . . . . . . . . . . . . . . . . . . . . . . . . . . . . . . . . . . . . . . . . . . . . . . . . . . . . . . . . . . . . . . 29
Oven Cooking Chart . . . . . . . . . . . . . . . . . . . . . . . . . . . . . . . . . . . . . . . . . . . . . . . . . . . . . . . . . . . . . . . . . . . 30
Thermal Grilling . . . . . . . . . . . . . . . . . . . . . . . . . . . . . . . . . . . . . . . . . . . . . . . . . . . . . . . . . . . . . . . . . . . . . . . 31 Uses of Thermal Grilling . . . . . . . . . . . . . . . . . . . . . . . . . . . . . . . . . . . . . . . . . . . . . . . . . . . . . . . . . . 31 Selecting Thermal Grilling . . . . . . . . . . . . . . . . . . . . . . . . . . . . . . . . . . . . . . . . . . . . . . . . . . . . . . . . 31 Things to Note . . . . . . . . . . . . . . . . . . . . . . . . . . . . . . . . . . . . . . . . . . . . . . . . . . . . . . . . . . . . . . . . . . . 31 Hints and Tips . . . . . . . . . . . . . . . . . . . . . . . . . . . . . . . . . . . . . . . . . . . . . . . . . . . . . . . . . . . . . . . . . . . 32 Thermal Grilling Chart . . . . . . . . . . . . . . . . . . . . . . . . . . . . . . . . . . . . . . . . . . . . . . . . . . . . . . . . . . . . 33
Oven Clean Feature . . . . . . . . . . . . . . . . . . . . . . . . . . . . . . . . . . . . . . . . . . . . . . . . . . . . . . . . . . . . . . . . . . . 34 Uses of Oven Clean Feature . . . . . . . . . . . . . . . . . . . . . . . . . . . . . . . . . . . . . . . . . . . . . . . . . . . . . 34 Selecting Oven Clean . . . . . . . . . . . . . . . . . . . . . . . . . . . . . . . . . . . . . . . . . . . . . . . . . . . . . . . . . . . . 34 Things to Note . . . . . . . . . . . . . . . . . . . . . . . . . . . . . . . . . . . . . . . . . . . . . . . . . . . . . . . . . . . . . . . . . . . 34 Hints and Tips . . . . . . . . . . . . . . . . . . . . . . . . . . . . . . . . . . . . . . . . . . . . . . . . . . . . . . . . . . . . . . . . . . . 35
The Electronic Timer (BD 921/2) . . . . . . . . . . . . . . . . . . . . . . . . . . . . . . . . . . . . . . . . . . . . . . . . . . . . . . . 36 The Electronic Timer (BD 931) . . . . . . . . . . . . . . . . . . . . . . . . . . . . . . . . . . . . . . . . . . . . . . . . . . . . . . . . . 38
Helpful Hints when Buying and Preparing Food . . . . . . . . . . . . . . . . . . . . . . . . . . . . . . . . . . . . . . |
42 |
Care and Cleaning . . . . . . . . . . . . . . . . . . . . . . . . . . . . . . . . . . . . . . . . . . . . . . . . . . . . . . . . . . . . . . . . . . . . . |
43 |
Cleaning Materials . . . . . . . . . . . . . . . . . . . . . . . . . . . . . . . . . . . . . . . . . . . . . . . . . . . . . . . . . . . . . . . |
43 |
Cleaning the Outside of the Cooker . . . . . . . . . . . . . . . . . . . . . . . . . . . . . . . . . . . . . . . . . . . . . . . |
43 |
Cleaning Between the Outer and Inner Door Glass . . . . . . . . . . . . . . . . . . . . . . . . . . . . . . . . |
43 |
Cleaning Inside the Ovens . . . . . . . . . . . . . . . . . . . . . . . . . . . . . . . . . . . . . . . . . . . . . . . . . . . . . . . |
44 |
Cleaning the Oven Shelves and Grill/Oven Furniture . . . . . . . . . . . . . . . . . . . . . . . . . . . . . . |
44 |
Care of Stayclean Surfaces . . . . . . . . . . . . . . . . . . . . . . . . . . . . . . . . . . . . . . . . . . . . . . . . . . . . . . |
44 |
Hints and Tips . . . . . . . . . . . . . . . . . . . . . . . . . . . . . . . . . . . . . . . . . . . . . . . . . . . . . . . . . . . . . . . . . . . |
44 |
Cooking to Reduce Soilage . . . . . . . . . . . . . . . . . . . . . . . . . . . . . . . . . . . . . . . . . . . . . . . . . . . . . . . |
44 |
Replacing the Oven Light Bulb . . . . . . . . . . . . . . . . . . . . . . . . . . . . . . . . . . . . . . . . . . . . . . . . . . . . |
45 |
Something Not Working? . . . . . . . . . . . . . . . . . . . . . . . . . . . . . . . . . . . . . . . . . . . . . . . . . . . . . . . . . . . . . 46
Service and Spare Parts . . . . . . . . . . . . . . . . . . . . . . . . . . . . . . . . . . . . . . . . . . . . . . . . . . . . . . . . . . . . . . . 47
Tricity Bendix Service Centres . . . . . . . . . . . . . . . . . . . . . . . . . . . . . . . . . . . . . . . . . . . . . . . . . . . . . . . . 48
Guarantee Conditions . . . . . . . . . . . . . . . . . . . . . . . . . . . . . . . . . . . . . . . . . . . . . . . . . . . . . . . . . . . . . . . . . 50
4

PREFACE
Dear Customer,
Thank you for buying a Tricity Bendix built-in oven. With our 80 years experience in developing and manufacturing the very best in U.K. cookers, you can be assured that you have purchased a hard working, reliable, quality cooker.
In addition Tricity Bendix cookers comply with British Standard safety and performance requirements. They have been approved by BEAB (British Electrotechnical Approvals Board) and are covered by a 12 month parts and labour guarantee.
In order that you get the best from your new Tricity Bendix cooker, the following instructions have been prepared. PLEASE MAKE SURE YOU READ
THEM CAREFULLY. Particular attention should be paid to cooking times and temperatures which may differ from your previous cooker.
It is most important that this instruction book should be retained with the cooker for future reference. Should the cooker be sold, or transferred to another owner, or should you move house and leave the cooker, always ensure that the book remains with the cooker so that the new owner can be acquainted with the functioning of the cooker and the relevant warnings.
Please read the whole instruction book before using the cooker ensuring you follow the recommendations given.
5

SAFETY
THESE WARNINGS ARE PROVIDED IN THE INTERESTS OF YOUR SAFETY. ENSURE THAT YOU UNDERSTAND THEM ALL BEFORE INSTALLING OR USING THE COOKER.
PLEASE
READ
CAREFULLY
BEFORE INSTALLATION
This cooker is heavy and care must be taken when moving it.
Ensure that all packaging, both inside and outside the cooker has been removed before the cooker is used.
Do not try to move the cooker by pulling the door handles. Refer to installation instructions.
The cooker must be installed according to the instructions supplied. Any electrical installation work must be undertaken by a qualified electrician/competent person.
It is dangerous to alter the specifications or modify the cooker in any way.
After installation, please dispose of the packaging with due regard to safety and the environment.
DURING OPERATION
Do not use this cooker if it is in contact with water. Never operate it with wet hands.
This cooker is designed to be operated by adults. Young children must not be allowed to tamper with the controls or play near or with the cooker.
Caution accessible parts especially around the grill area may become hot when the cooker is in use. Children should be kept away until it has cooled.
Take great care when heating fats and oils as they will ignite if they become too hot.
This cooker has been designed for cooking edible foodstuffs only, and must not be used for any other purposes.
Never place plastic or any other material which may melt in or on the oven.
Ensure cooking utensils are large enough to contain foods to prevent spillages and boil overs.
Take care to follow the recommendations given for tending the food when grilling. Use the handle provided in the recommended way (see page 18).
Do not leave the handle in position when grilling as it will become hot.
Always use oven gloves to remove and replace food in the oven. Similarly always use oven gloves to remove and replace the grill pan handle when grilling.
Recommendations given on page 18.
6

Ensure that you support the grill pan when it is in the withdrawn or partially withdrawn position.
Ensure that all vents are left unobstructed to ensure ventilation of the oven cavity.
You must ensure that the grill control is in the 'OFF' position when the timer control has been set for automatic cooking.
Ensure that the anti-tilt shelves are put in place correctly. Refer to instructions on pages 21 and 23.
Never line any part of the cooker with aluminium foil. Do not allow heatproof cooking material, e.g. roasting bags to come into contact with oven elements.
Always stand back from the cooker when opening the oven door to allow any build up of steam or heat to release.
Stand clear when opening the drop down oven door. Do not allow it to fall open - support it using the door handle until it is fully open.
Do not place sealed cans or aerosols inside the oven. They may explode if they are heated.
AFTER USE
Ensure that all control knobs are in the OFF position when not in use.
For hygiene and safety reasons this cooker should be kept clean at all times. A build-up of fats or other foodstuffs could result in a fire, especially in the grill pan.
Do not leave utensils containing foodstuffs, e.g. fat or oil in or on the cooker in case it is inadvertently switched ON.
Cookers and hobs become very hot, and retain their heat for a long period of time after use. Children should be kept well away from the cooker until it has cooled.
GENERAL
Under no circumstances should repairs be carried out by inexperienced persons as this may cause injury or serious malfunction. This cooker should be serviced by an authorised Service Engineer and only genuine approved spare parts should be used. Details of servicing and repair arrangements are supplied on page 47 of this book.
Do not stand on the cooker or on the open oven door.
Do not hang towels, dishcloths or clothes from the cooker or its handle. They are a safety hazard.
Always allow the cooling fan to cool the cooker down before switching off at the wall prior to carrying out any cleaning or maintenance work.
Only clean this cooker in accordance with the instructions given on page 43.
Your safety is of paramount importance.
Therefore, if you are unsure about any of the meanings of these WARNINGS contact the:
Consumer Care Department
Telephone: (01635) 525542
7
INSTALLATION INSTRUCTIONS
THINGS YOU NEED TO KNOW
WARNINGS:
lThis cooker must be installed by a qualified electrician/competent person. Safety may be impaired if installation is not carried out in accordance with these instructions.
lThis cooker must be earthed.
lDo not remove the screws from the earth tab extending from the oven mains terminal block (Fig. 6).
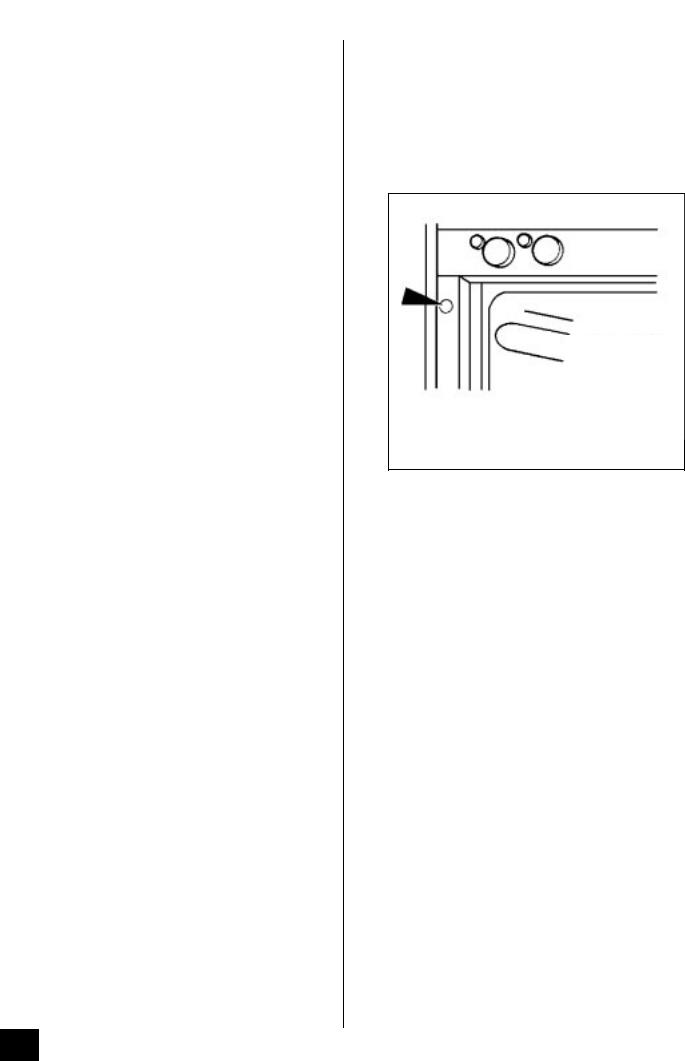
lBefore connecting the cooker make sure that the voltage of your electricity supply is the same as that indicated on the rating plate. The rating plate can be seen by opening the oven door and looking below the oven door seal.
lDo not alter the electrical circuitry of this cooker.
THINGS TO NOTE
lThis cooker is designed to be fitted in cabinets of the recommended dimensions as shown in Fig. 2. If your cabinet interior dimension is between 565-570mm the oven may still be fitted. However a minor modification to the cabinet will be required.
lThe dimensions given provide adequate air circulation around the unit within the cabinet, ensuring compliance with BS EN60-335.
lEnquiries regarding the installation of the cooker point if required should be made to your Regional Electricity Company to ensure compliance with their regulations.
lThe cooker point should be within 2m of the cooker to make it accessible to switch off the cooker in case of an emergency.
lTo protect the hands wear gloves when lifting the oven into its housing.
NOTE: HOUSE CIRCUIT
Earth leakage and continuity tests must be carried out before the cooker is connected to the mains supply and re-checked after fitting.
GETTING THINGS READY
CHOICE OF ELECTRICAL CONNECTION
lThere are three possible ways to connect your cooker. In each case the cooker should be operated using at least 6mm² twin core and earth PVC insulated multicore cable. Please choose from the most appropriate after reading the descriptions:
a)By connecting the cooker to a cooker point having a double pole isolating switch with at least 3mm contact separation in all poles and neutral, and protected with a fuse or miniature circuit breaker at your mains fuse box.
Subject to Regional Electricity Company regulations if you wish to connect the oven and hob to the power supply you may use one of the following two methods:-
b)By connecting the cooker together with a hob box directly to a cooker point(s). Having a double pole isolating switch with at least 3mm contact separation in all poles and neutral.
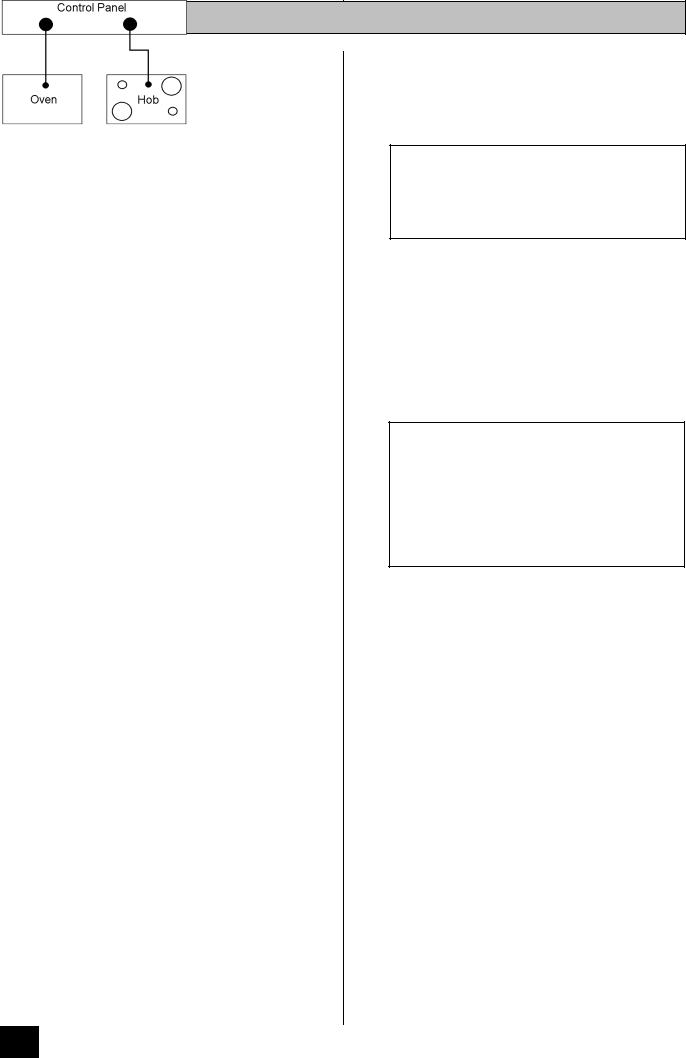
c)If you wish to connect an oven and a hob to a cooker point you can by connecting the oven and hob separately to the cooker point. Oven and hob units should be separately connected to a control panel. See Fig. 1.
Fig. 1
NOTE: It is good practice to:
lFit an Earth Leakage Circuit Breaker to your house wiring.
lWire your appliance to the latest IEE regulations.
PREPARING CABINET FOR FITTING OVEN
lMake sure the cabinet is the correct size for the appliance to be fitted (Ref. Fig. 2).
lIf the size is between 565-570*mm, then the cabinet should be modified so that at the screw fixing points the recommended dimension of at least 560-565mm is maintained. The modification should ideally be localised to ensure that after screw fitment the oven is securely fixed into position.
lThe cabinet must be stable and level by firmly securing it to the wall or floor. If necessary, make arrangements to ensure the shelf upon which the oven will rest is level.
8
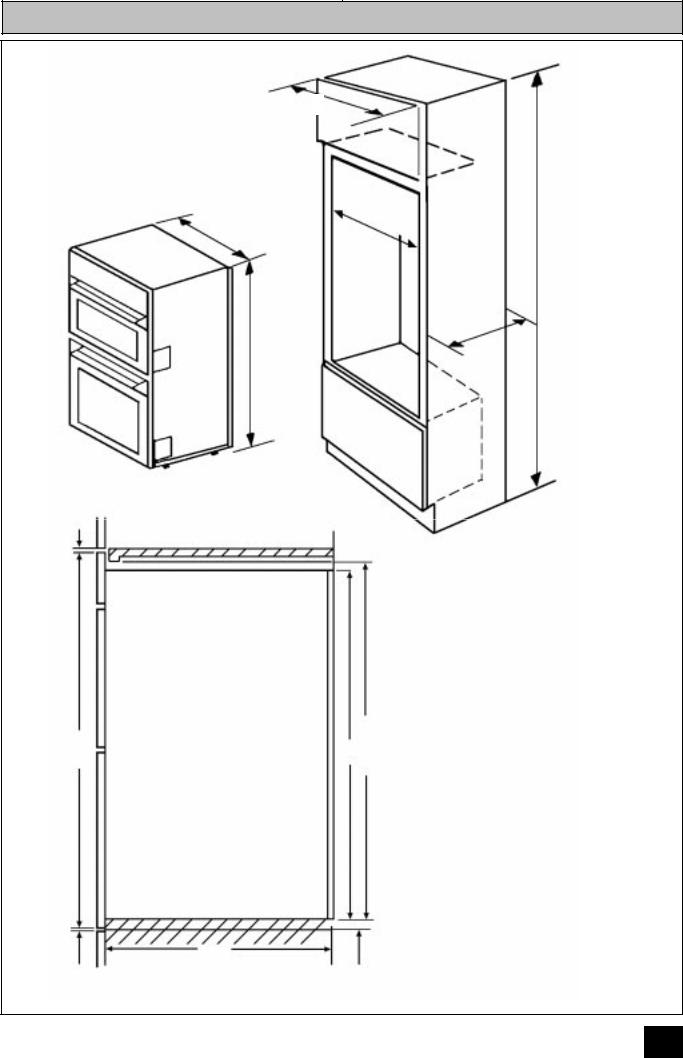
RECOMMENDED CABINET DIMENSIONS (IN MILLIMETRES)
600 min
|
560 |
min |
|
|
|
|
|
|
|
|
570 |
max |
|
d |
5 |
|
|
e |
|
58 |
|
|
|
d |
|
|
|
|
n |
|
|
|
|
e |
|
|
|
|
m |
|
|
|
|
m |
|
|
|
|
o |
|
|
|
|
c |
|
|
|
|
e |
|
|
|
|
R |
|
|
|
min |
0 |
|
|
550 |
0 |
|
|
|
|
0 |
|
|
|
|
|
2 |
&
%
5
|
|
9 |
|
5 |
5 |
7 |
|
8- |
|||
8 |
6 |
4 |
|
7 |
|||
8 |
8 |
||
8 |
|||
|
|
5 |
5 |
540
Fig.2 Built In Installation
Cross section through cabinet showing oven positioned
9
HOW TO FINISH UNPACKING
lPlace packed cooker next to the cabinet in which it will be installed.
lRemove the cooker packing except for bottom tray which should be left in position until the cooker is ready to be fitted into its cabinet.
lEnsure the owner is given these operating instructions.
TOOLS REQUIRED
The following tools will be needed and its helps to assemble them before starting to install your oven:
A terminal screwdriver (3mm wide blade)
A pozidrive screwdriver
Pliers
Wirestrippers
Knife
Sidecutters
Adhesive Tape
Tape Measure
MAKING THE ELECTRICAL CONNECTIONS
Important: Switch off at mains, miniature circuit breaker and, if appropriate, remove fuse before commencing any electrical work.
PREPARING CABLE
We recommend you use a new length of cable to ensure your safety.
lEnsure you have the correct length of cable appropriate to the wiring method you are using. When fitting new cable allow sufficient cable for removal of the unit at a later date, should it be necessary.
lScore, but do not cut through, around the sheathing with a knife 100mm (4in) from each end of the cable and break through to the encased wires by bending the cable backwards and forwards to fatigue the sheathing.
lCarefully score down from each end of the cable sheathing along the length of the bare earth wire (if a cut was made along the length of the live and neutral wires, it might cut into their sheathing) to the cuts already made.
lCarefully prise open the sheathing at each end of the cable to expose the encased wiring.
TO REMOVE COVER OF MAINS TERMINAL
From the rear of the cooker, remove mains input terminal cover to gain access to terminal block.
lFirst remove retaining screw with pozidrive screwdriver. See Fig. 3.
Pozidrive
Screwdriver
Fig.3
lPrise cover loose using screwdriver in position
(1)then lever off with screwdriver in position (2) at either side. See Fig. 4.
|
|
|
|
|
|
|
|
(2) |
|
|
|
|
|
|
|
|
|
|
|
|
|
|
|
|
|
|
|
|
|
|
Terminal |
|
|
|
|
|
|
|
(1) |
|
|
Fig.4 |
Screwdriver |
|
|
|||
|
|
|
||||
|
|
|
|
|||
|
|
|
|
|
|
|
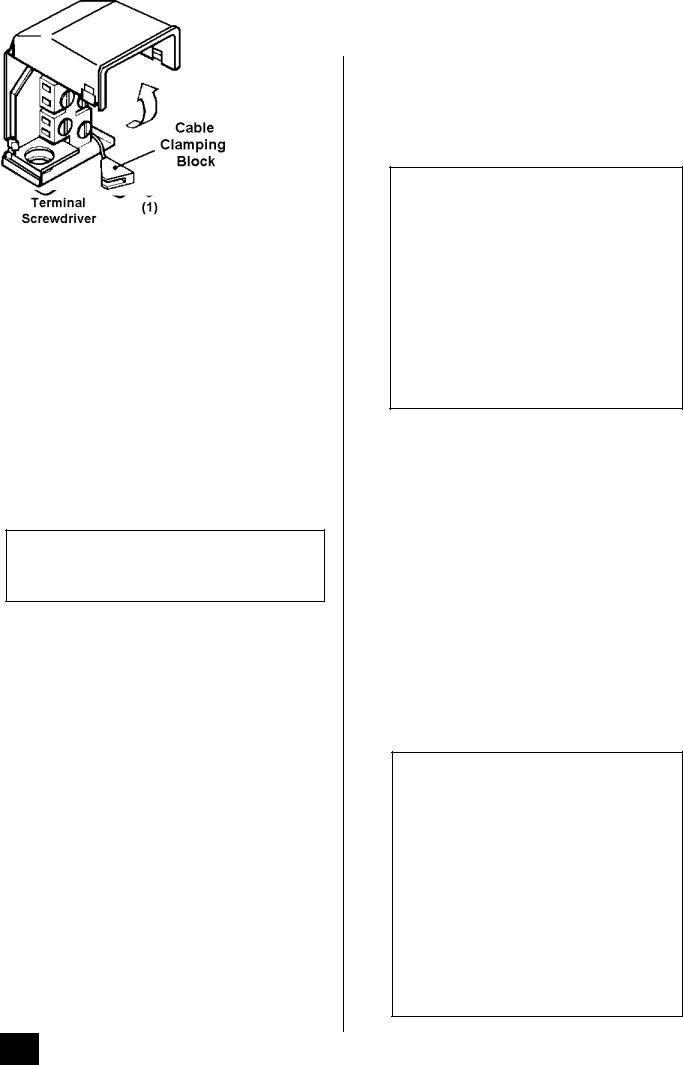
lLift cover and remove screw from cable clamp. See Fig. 5.
Cable
Clamping
Block
Fig.5
10
CONNECTING TO THE MAINS TERMINAL
Warning: This cooker must be earthed.
l Make connection as shown in Fig. 6 by proceeding as follows:-
Earth (Green or
|
|
|
|
Red or |
Green/Yellow) |
|||
|
|
|
|
Brown |
||||
|
|
|
|
|
|
|||
|
|
|
|
|
|
|
||
|
|
|
|
Blue or |
|
|
||
|
|
|
|
Black |
|
|
||
|
|
|
|
|
|
|
|
|
|
|
5mm |
|
|
|
|||
|
|
|
|
|
|
|
|
|
|
|
|
|
|
|
|
|
Earth Tab |
|
|
|
Mains |
|
|
|||
|
|
|
|
|
|
|||
|
|
|||||||
|
|
|
Cable |
|
|
|
||
Fig.6 |
|
|
|
|
|
|||
|
|
|
|
|
|
|
||
|
|
|
|
|
||||
|
|
|
|
|
|
|
|
|
lPreform wires to the appropriate shape to suit fitting into the mains terminal block.
lStrip inner insulation on wires using wirestrippers.
lTwist the bared wires using pliers.
lCut bared wires 10mm away from the end of the inner insulation. Where uninsulated Earth wires are used ensure they are suitably sheathed to leave 10mm bare wire to fit into the terminal.
lClamp bare wires into the relevant terminal and check they are held by tugging each one in turn.
lClamp the mains cable securely ensuring 5mm of the outer insulation is inside the terminal block and that the wires are not taught but not so slack as to cause any fouling. See Fig. 6.
lPlace fuse/ miniature circuit breaker in circuit and switch on at mains.
CONNECTING TO A HOB OR COOKER POINT
Warning: This cooker must be earthed.
lEither follow in general terms the instructions for connecting to the terminal block or refer to the hob suppliers installation instructions.
Feed the cable through the cabinet and arrange to route the cable away from the cooker which may become hot.
CHECKING ELECTRICAL CONNECTIONS
lConfirm the cooker is correctly connected by switching on and observing the various oven functions indicators.
lThe electronic timer will flash on and off.
NOTE: HOUSE CIRCUIT
Earth leakage and continuity tests must be carried out before the cooker is connected to the mains supply and re-checked after fitting.
11
FITTING INTO THE CABINET
IMPORTANT: Ensure that the oven is switched off at the wall before any further work is carried out.
lUsing a tape measure establish the internal width of the cabinet. Refer to page 8 if greater than 565mm.
lPosition the cooker in front of the cabinet. See Fig. 7.
|
|
|
|
|
|
|
|
|
|
Mains |
|
|
|
|
|
|
Cable |
|
Pack Base |
|
|
Fig.7 |
|
|
|
||
|
|
|
|
|
|
|
|
|
|
|
|
|
|
lTake out all oven furniture before installation to reduce the weight you need to lift. The oven door should be taped up to keep it closed whilst lifting.
lTo place the cooker into the cabinetry follow the procedure below:
lN.B. Two people will be required to carry out the lifting procedure.
a)Each person should squat either side of the cooker.
b)Tilt the cooker so that your hands can support the underside of the cooker.
c)Keeping your back straight, raise the appliance to the cabinet by straightening at the knees.
d)Rest the rear underside of the cooker on the cabinet floor while your hands support the front.
e)The cooker can be pushed fully into the cabinet. Take care to avoid fouling the mains lead.
f)Ensure the cooker is central in the cabinet and level.
g)When the cooker is fully housed, screw the stability screws (supplied with the cooker) into the side of the cabinet taking care not to distort the side trims (see Fig. 8). It is advisable to turn each screw alternately to avoid damaging the trims.
h)Switch on the cooker then refer to the operating instructions in the following pages.
Fixing Points
for
Stability Screws
Fig.8
12

INTRODUCTION
WARNING: THIS COOKER MUST BE EARTHED
GETTING TO KNOW YOUR OVEN (BD 921/2)
A B C D E F G H
A - Electronic Timer
B - Main Oven Indicator Neon
C - Second Oven Indicator Neon
D - Dual Grill Indicator Neon
E - Main Oven Temperature Control
F - Multifunction Selector
Fan Oven
Conventional Oven
Zoned Oven
Defrost
Oven Clean
Thermal Grilling
Oven Light
G - Second Oven Temperature Control
H - Dual Grill Control
13

GETTING TO KNOW YOUR OVEN (BD 931)
A B C D E
F
G
H
A - Electronic Timer
B - Main Oven Temperature Control
C - Multifunction Selector
Fan Oven
Conventional Oven
Zoned Oven
Defrost
Oven Clean
Thermal Grilling
Oven Light
D - Second Oven Temperature Control
E - Dual Grill Control
F - Main Oven Indicator Neon
G - Second Oven Indicator Neon
H - Dual Grill Indicator Neon
14
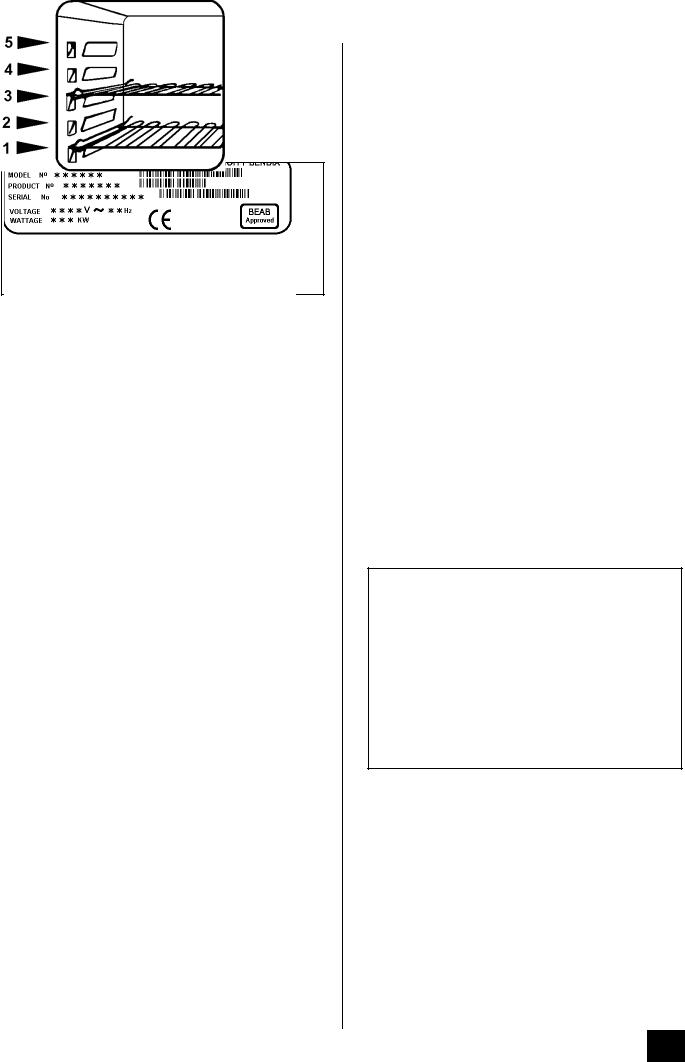
RATING PLATE
Record the model, product and serial numbers of your cooker on the back cover of this instruction book for future reference. These numbers can be found on the rating plate on the lower front frame of the cooker upon opening the oven door.
The cooker must be protected by a suitably rated fuse or circuit breaker. The rating of the cooker is given on the rating plate.
GENERAL NOTES ON USING THE OVENS
Wipe over the base of the ovens with a soft cloth and hot soapy water and wash the grill and oven furniture before use.
We suggest that you run the oven elements for 10 - 15 minutes at 220°C to burn off any residue from their surfaces.
The procedure should be repeated with the grill for approximately 5 - 10 minutes.
During this period an odour may be emitted, it is therefore advisable to open a window for ventilation.
WHEN FIRST SWITCHING ON
The timer must be set to manual before the ovens can be operated. See pages 36 and 39. This must be done whenever the cooker is switched off at the wall or when there has been a power failure.
If the oven indicator neons do not glow when the controls are switched on, it is most likely that the timer is set for automatic cooking.
ABOUT CONDENSATION AND STEAM
When food is heated it produces steam in the same way as a boiling kettle does. The oven is vented to allow some of this steam to escape. However, always stand back from the cooker when opening the oven door to allow any build up of steam or heat to release.
If the steam comes into contact with a cool surface on the outside of the cooker, e.g. a trim, it will condense and produce water droplets. This is quite normal and is not caused by a fault on the cooker.
To prevent discolouration, regularly wipe away condensation and also soilage from surfaces.
COOKWARE
Baking trays, oven dishes etc., should not be placed directly against the grid covering the fan at the back of the oven.
Do not use baking trays larger than 30cm x 35cm (12" x 14") as they will restrict the circulation of heat and may affect performance. Advice on the effect of different materials and finishes of bakeware is given in 'Hints and Tips' in the appropriate oven section.
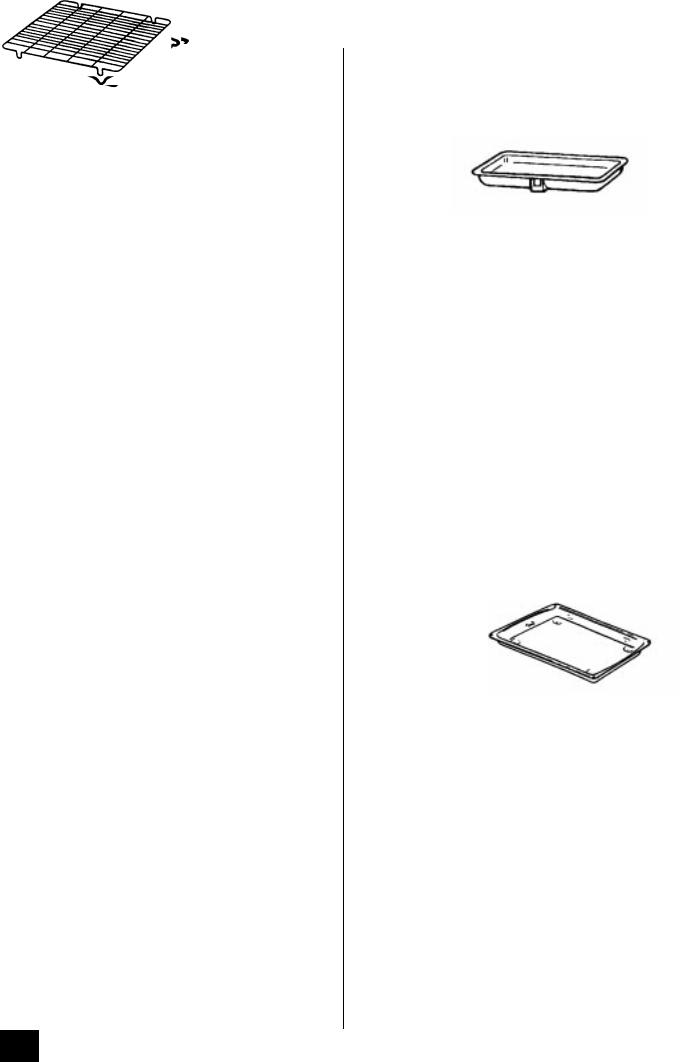
THE TRIVET
When roasting do use the trivet in the meat tin. Fat and meat juices will drain into the meat tin below and can be used to make gravy. The trivet also prevents splashes of fat from soiling the oven interior.
N.B. The meat tin should not be placed on a heated hotplate as this may cause the enamel to crack.
THE SHELF POSITIONS
Recommended shelf positions have been shown in the cooking chart on page 30.
If not fitted correctly the shelf will lie at an angle and the safety stop will not be effective. To ensure that the shelf has the correct side uppermost, the wire stringers which make up the shelf should lie on top of the surrounding frame.
15
PUSH TO TURN CONTROLS (BD 931 only)
The control knobs must be pushed in towards the panel before they can be turned or adjusted.
THE COOLING FAN FOR THE CONTROLS
The cooling fan comes on immediately when the grill is switched on and after a short time when either of the ovens are in use and switches off when cooking is completed.
During the initial period the cooling fan may cycle ON and OFF, this is quite normal.
It may run on after the ovens or grill are switched off to keep the controls cool.
Always allow the cooling fan to cool the cooker down before switching off at the wall prior to carrying out any cleaning or maintenance work.
NOTE
The action of the cooling fan will depend on how long the oven(s) or grill have been used and at what temperature. It may not switch in at all at lower temperature settings nor run on where the grill or oven has only been used for a short time.
CONTROL PANEL INDICATOR NEONS
These lights indicate whether the grill or ovens are switched ON. In the case of the ovens, the neons also indicate when the set temperature has been reached. They will cycle on and off during use to show that the temperature is being maintained.
If the neons do not operate as the instructions indicate the controls have been incorrectly set. Return all controls to zero and re-set following the instructions for the required setting.
When the oven has been set for automatic cooking the neon should remain unlit during OFF periods.
.
GRILL AND OVEN FURNITURE
The following items of oven furniture have been supplied with the cooker.
1 grill pan
1 grill pan handle
1 grill pan grid
1 grill deflector
1 trivet
1 meat tin
2 straight shelves
1 cranked shelf for grilling and top oven cooking only
Scuffing of the Stayclean lining by the oven furniture pack may occur during transit.
These marks will disappear after the oven elements have been burnt off for the first time.
16
 Loading...