


TRENDnet User’s Guide |
|
Contents |
|
Product Overview ................................................................................. |
1 |
Package Contents .......................................................................................................... |
1 |
Features ......................................................................................................................... |
1 |
Product Hardware Features........................................................................................... |
2 |
Installation............................................................................................ |
3 |
Wired Connection ..................................................................................................... |
3 |
WPS Connection........................................................................................................ |
3 |
Wall mount installation............................................................................................. |
4 |
Starting the TRENDnet Cloud Service..................................................... |
5 |
Image A (connecting using WPS) ................................................................................... |
5 |
Image B (wired connection)........................................................................................... |
5 |
Blue Mode ..................................................................................................................... |
5 |
Green Mode................................................................................................................... |
6 |
Red Mode ...................................................................................................................... |
6 |
Using the AutoRun Wizard .................................................................... |
7 |
Wireless Connection.................................................................................................... |
11 |
Using WPS ............................................................................................................... |
11 |
Connecting Wireless Network Manually................................................................. |
14 |
Mobile Apps........................................................................................ |
18 |
Configuration...................................................................................... |
20 |
Viewing Video .............................................................................................................. |
21 |
Viewing Camera Settings ............................................................................................. |
22 |
System..................................................................................................................... |
23 |
Video ....................................................................................................................... |
23 |
|
Table of Contents |
Audio....................................................................................................................... |
23 |
Wireless................................................................................................................... |
23 |
Network .................................................................................................................. |
24 |
Cloud Link................................................................................................................ |
24 |
Active Users ............................................................................................................ |
24 |
Configuring Camera Settings ....................................................................................... |
25 |
System..................................................................................................................... |
25 |
Video ....................................................................................................................... |
25 |
Audio....................................................................................................................... |
26 |
Wireless................................................................................................................... |
27 |
Network .................................................................................................................. |
28 |
Cloud Link................................................................................................................ |
29 |
User......................................................................................................................... |
29 |
Date/Time ............................................................................................................... |
30 |
Motion Detection.................................................................................................... |
30 |
Upload..................................................................................................................... |
31 |
Day/Night Mode (for TV-IP851WIC) ....................................................................... |
33 |
Tools ............................................................................................................................ |
33 |
FTP Server Test........................................................................................................ |
34 |
E-mail Test............................................................................................................... |
34 |
Restart..................................................................................................................... |
34 |
Factory Reset .......................................................................................................... |
35 |
Firmware Upgrade .................................................................................................. |
35 |
Backup and Restore ................................................................................................ |
35 |
How to setup/access the camera remotely.......................................... |
36 |
Technical Specifications ...................................................................... |
39 |
Troubleshooting ................................................................................. |
42 |
© Copyright 2013 TRENDnet. All Rights Reserved.
i

TRENDnet User’s Guide
Product Overview
TV-IP851WC |
TV-IP851WIC |
Package Contents
In addition to your camera, the package includes:
Multi-Language Quick Installation Guide
CD-ROM (Utility & User’s Guide)
Network cable (1.5m / 5ft)
Power adapter (12V DC, 1.25A)
If any package contents are missing or damaged, please contact the retail store, online retailer, or reseller/distributor that the item was purchased.
TV-IP851WC / TV-IP851WIC
Features
TV-IP851WC
The Wireless PTZ Internet Camera, model TV-IP851W, provides wide visibility with its varied Pan and Tilt feature. Pan the camera side-to-side, a remarkable 340 degrees, and tilt up-and-down 115 degrees to broaden your viewing capabilities.
Wireless n technology provides unsurpassed wireless coverage and improved streaming video quality. Add this camera to your wireless network at the touch of a button with Wi-Fi Protected Setup (WPS).
Record 640 x 480 pixel (VGA) video at up to 20 frames per second (fps). Manage up to 32 TRENDnet cameras with the included complimentary camera management software. Advanced features include adjustable motion detection recording areas, email alerts, scheduled recording sessions, pan/tilt Auto-Patrol, date-and-time overlays, one-way audio, an adjustable lens, and four times digital zoom. A wall/ceiling mounting kit is included and the camera’s off white housing blends into most environments.
TV-IP851WIC
The Wireless Day/Night PTZ Internet Camera, model TV-IP851WI, provides day and night visibility with its infra-red optics above the lens. Pan the camera side-to-side, a remarkable 340 degrees and tilt up-and-down, 115 degrees, from any Internet connection.
Record indoor video in complete darkness for distances of up to 7.5 meters. Wireless n technology provides unsurpassed wireless coverage and improved streaming video quality. Add this camera to your wireless network at the touch of a button with Wi-Fi Protected Setup (WPS).
Record 640 x 480 pixel (VGA) video at up to 20 frames per second (fps). Manage up to 32 TRENDnet cameras with the included complimentary camera management software. Advanced features include adjustable motion detection recording areas, email alerts, scheduled recording sessions, pan/tilt Auto-Patrol, date-and-time overlays, one-way audio, an adjustable lens, and four times digital zoom. A wall/ceiling mounting kit is included and the camera’s off white housing blends into most environments.
© Copyright 2013 TRENDnet. All Rights Reserved.
1
TRENDnet User’s Guide
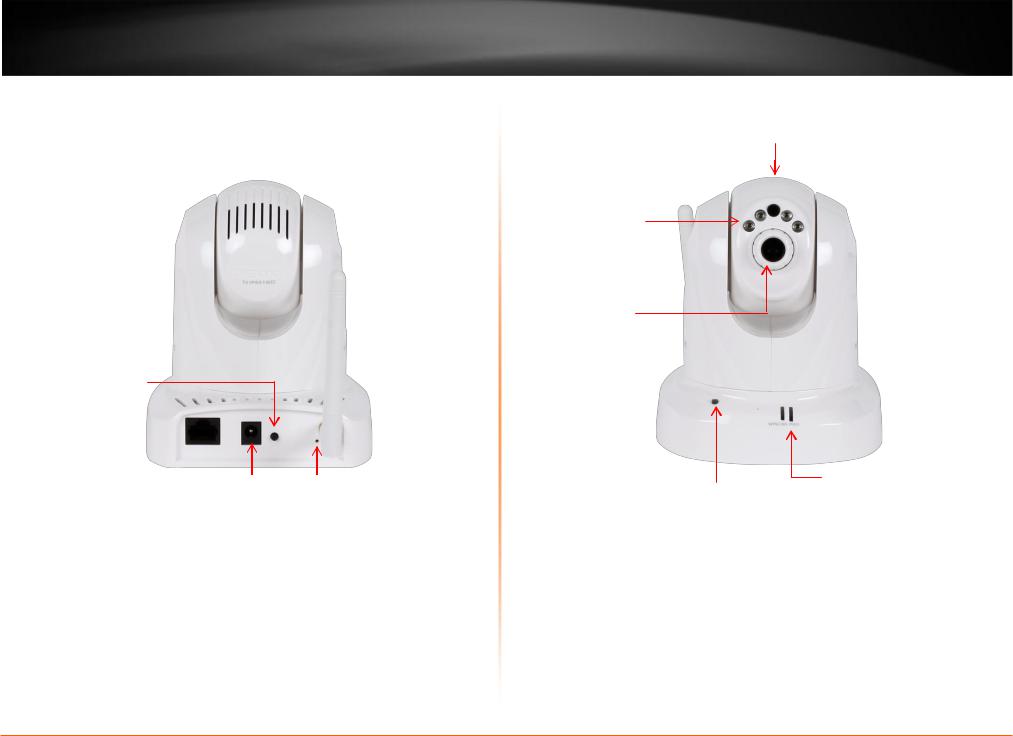
Product Hardware Features
Rear Panel View
 Rear Air Vents
 Antenna
WPS button
LAN port 
Power port |
Reset button |
|
|
LAN Port – Connect Ethernet cables to your wired network devices.
Power Port – Connect the included power adapter from your camera to an available power outlet.
Note: Use only the adapter that came with your camera.
Reset Button – Use an item such as a paperclip to push and hold this button for 3 seconds and release to reset your camera to its factory defaults.
WPS (Wi-Fi Protected Setup) – Push and hold this button for 3 seconds to activate WPS. The button LED is blinking green when WPS is activated.
Antenna – 2dBi detachable antenna
TV-IP851WC / TV-IP851WIC
Front Panel View
Microphone
 Light Sensor
IR LED
 Camera Lens
Focus Ring
Power/Link LED
Privacy button
IR LED – Built-in 4 IR LED for night vision uses. (for TV-IP851WIC)
Light Sensor – Detects the light source to turn IR on or off.
Focus Ring – Turn to adjust the focus of the camera.
Microphone – Built-in microphone for audio can be turn on or off.
Privacy button – Press the privacy button to redirect the camera’s viewing position to a downward and obscured view. To return the camera to the previous viewing position, wait 5 seconds and then press the privacy button again.
Power - This LED indicator is solid blue when your camera is powered on. Otherwise if this LED indicator is off, there is no power to your camera.
Link – This LED indicator is blinking orange when there is connection/data to your camera.
© Copyright 2013 TRENDnet. All Rights Reserved.
2
TRENDnet User’s Guide
Installation
Wired Connection
1.Connect the Ethernet Cable
If you intend to use the network camera as a wired device, connect one end of the included Ethernet cable into the Ethernet port on the rear panel of the camera and connect the other end to an available port on your network. If you prefer to use the camera on a wireless network, see below for instructions on connecting the power adapter.
2.Attach the Power Supply
Attach the included power supply to the DC 12V 1.25A receptor on the rear panel of the camera and then connect it to a wall outlet or power strip. A blue LED will light up under the lens indicating that the camera has power.
TV-IP851WC / TV-IP851WIC
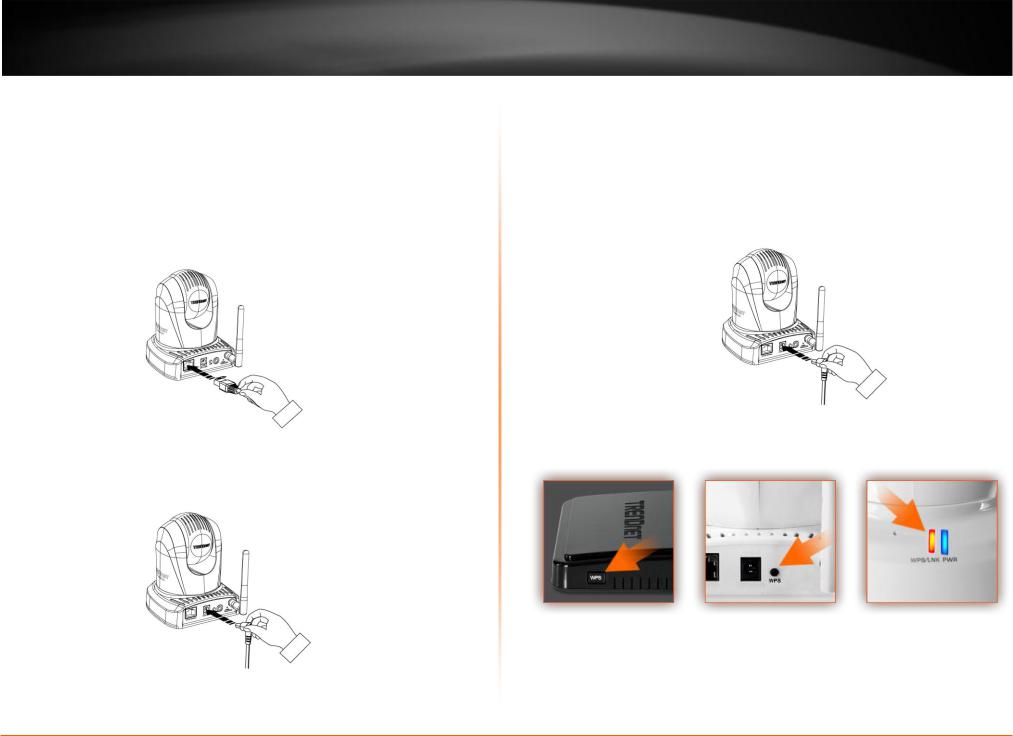
WPS Connection
An alternative method of connecting your camera to your network is by using WPS. WPS is a quick, simple and secure method of adding devices to a network. If you have a router which supports WPS follow the steps below, otherwise, please use the wired mode of setting up the camera.
1.Attach the Power Supply
2.Press the WPS button on your wireless device then press the WPS button on the camera.
© Copyright 2013 TRENDnet. All Rights Reserved.
3
TRENDnet User’s Guide |
TV-IP851WC / TV-IP851WIC |
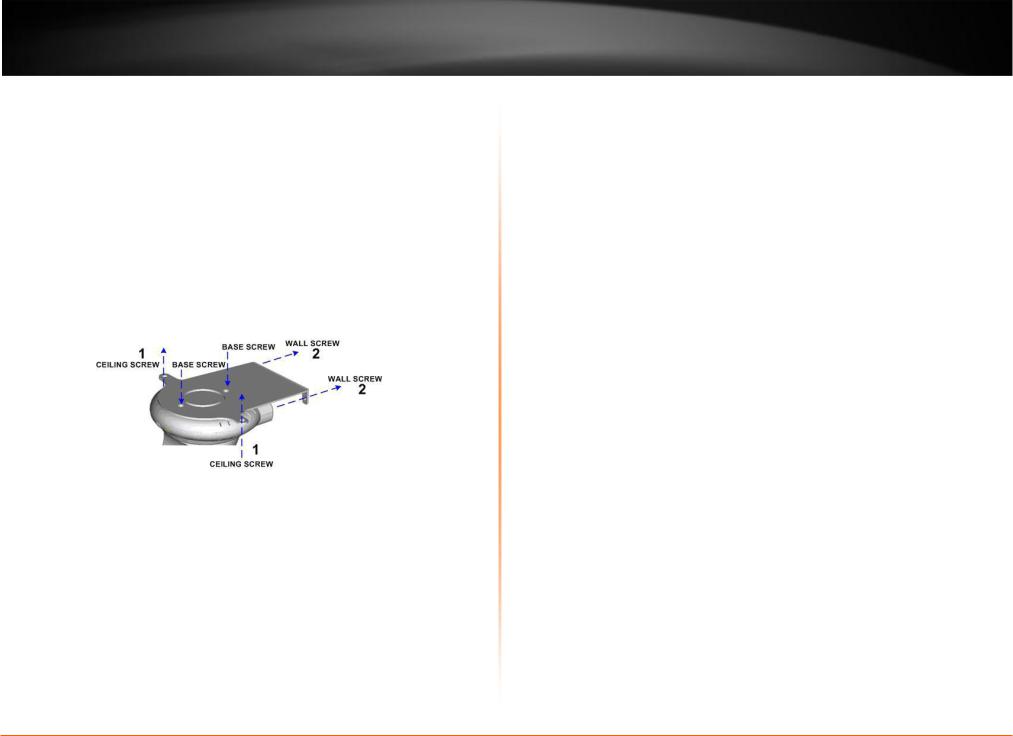
Wall mount installation
To attach the metal plates carry out the following:
Remove the two rubber pads under the base of the Camera.
Slide the metal plate onto the base of the camera, making sure that the two holes on the base of the camera align with the two screw holes on the base of the camera.
Secure the metal plate to the base of the Camera with the two screws provided.
The camera can now be mounted to the ceiling or a wall. See the diagram below for more information.
© Copyright 2013 TRENDnet. All Rights Reserved.
4
TRENDnet User’s Guide
Starting the TRENDnet Cloud Service
Note: (Connect the camera to the Internet and make sure its accessible to the web).
1.Look underneath the camera for a similar URL
(http://11223344.cam.trendnetcloud.com) on the label.
2.Connect the power cable to the camera.
There are two methods to connect to the Internet, wired and wireless. For wireless, follow the instructions from Image A below. For wired, follow the instructions from
Image B below.
Image A (connecting using WPS)
TV-IP851WC / TV-IP851WIC
Image B (wired connection)
3.Open your browser, type the URL listed on the label of your camera and hit
Enter to connect to the camera’s live stream. Please note: you can also use this
URL to connect to the camera from any location or computer.
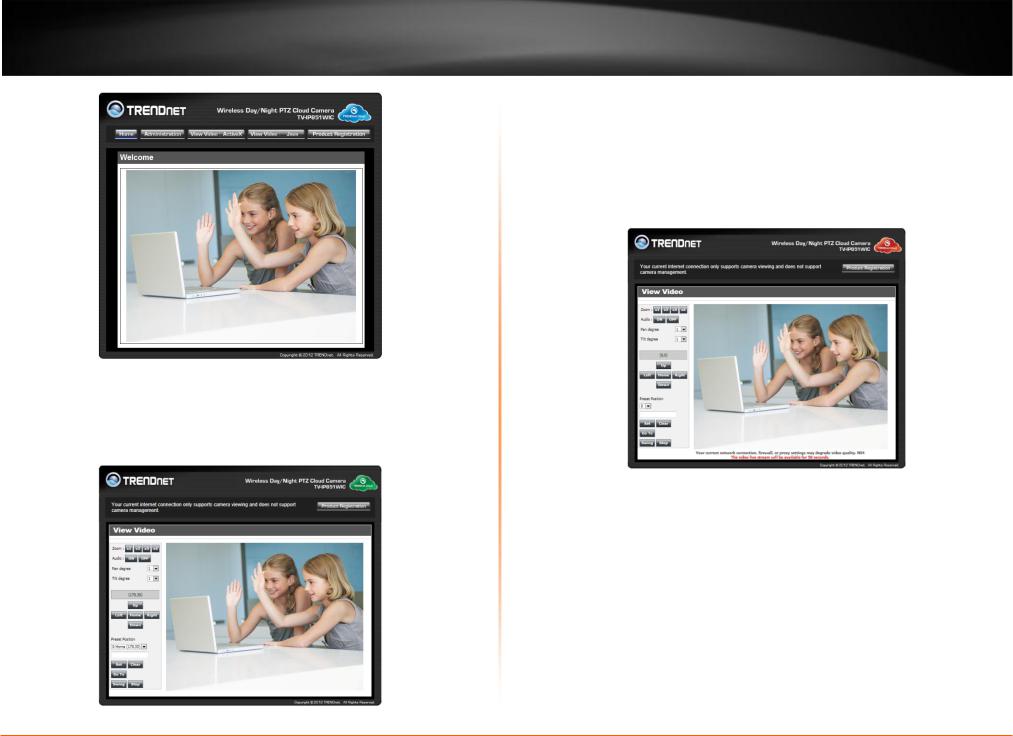
There are three modes when connecting your TV-IP851WC/TV-IP851WIC to the web. This is visible through the “cloud” at the top right side of the web interface.
Blue Mode
The Blue Mode indicates the camera is connecting directly to the internet or local network. This mode offers configuration and management options.
© Copyright 2013 TRENDnet. All Rights Reserved.
5
TRENDnet User’s Guide
Green Mode
The Green Mode indicates the camera is connecting to media in a peer-to-peer fashion to the Internet or local network. This mode doesn’t offer configuration and management options – only live streaming.
TV-IP851WC / TV-IP851WIC
Red Mode
The Red Mode indicates the camera is connecting to the Internet or local network through a firewall. This mode doesn’t offer configuration and management options – just live streaming for 60 seconds. The firewall settings limits live streaming for each user. The “red” notification at the bottom of the viewing area warns users of the limited time. Refresh this screen continuously if you wish to view your camera’s live stream.
© Copyright 2013 TRENDnet. All Rights Reserved.
6
TRENDnet User’s Guide
Using the AutoRun Wizard
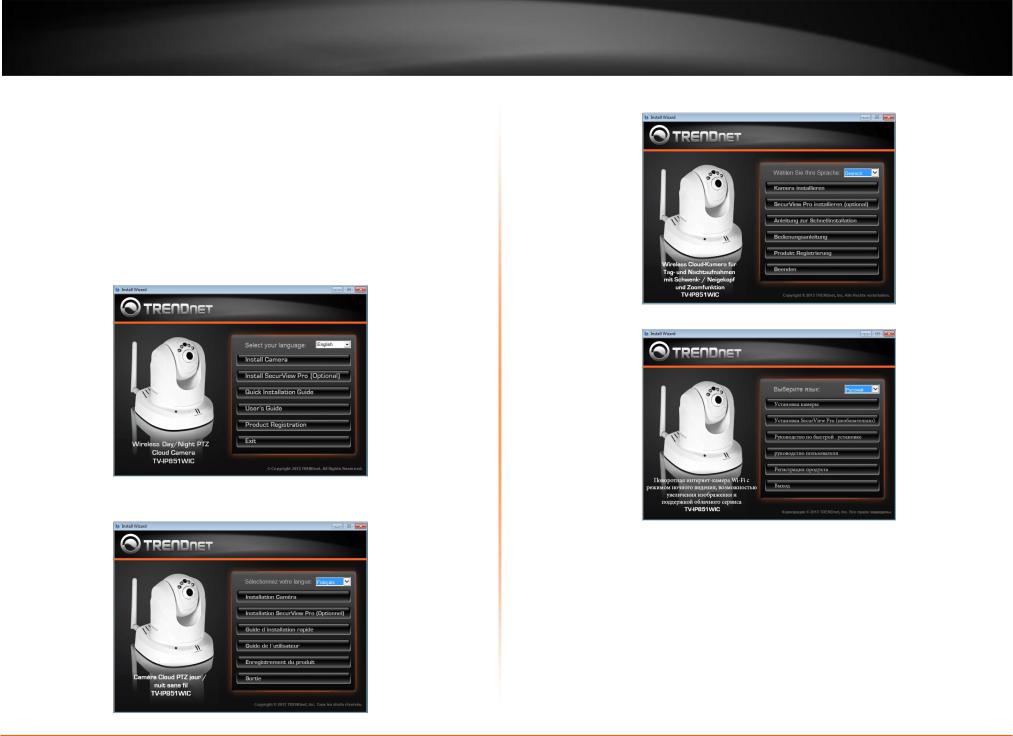
Insert the included CD-ROM into your CD/DVD drive. The Install Wizard program will run automatically.
Note: If the Install Wizard does not run, you may have autorun disabled on your machine. In this case, browse to the CD drive and run InstallWizard.exe to begin the installation wizard.
Begin by selecting a language from the drop-down list. There is a choice of five languages – English, French, German, Russian, and Spanish. Next, click Install Camera and follow the on-screen steps to continue the installation.
English
TV-IP851WC / TV-IP851WIC
French
German
Russian
© Copyright 2013 TRENDnet. All Rights Reserved.
7

TRENDnet User’s Guide |
TV-IP851WC / TV-IP851WIC |
Spanish
1.This is TRENDnet’s Terms of Use. Click Agree to continue.
2.The next step references information on the camera itself. Go to your camera and check the details at the bottom of the device. Click Next to continue, Back to go to the previous screen or Home to return to the Main Menu. Also enclosed, is a sticker with the same details attached.
3.The most important part of the setup process is the network connection type. There are three options:
a.Connect camera to your wireless network using Wi-Fi Protected Setup (WPS) button (Verify your router has a WPS button. If not, select the next option).
b.Connect camera to your wireless network manually
c.Connect camera to your network using a network cable.
4.The basic connection type is “C” using a network cable. Let’s begin the installation process using the network cable connection first. Click this radio
© Copyright 2013 TRENDnet. All Rights Reserved.
8
TRENDnet User’s Guide
button and click Next to continue, Back to go to the previous screen or Home to return to the Main Menu.
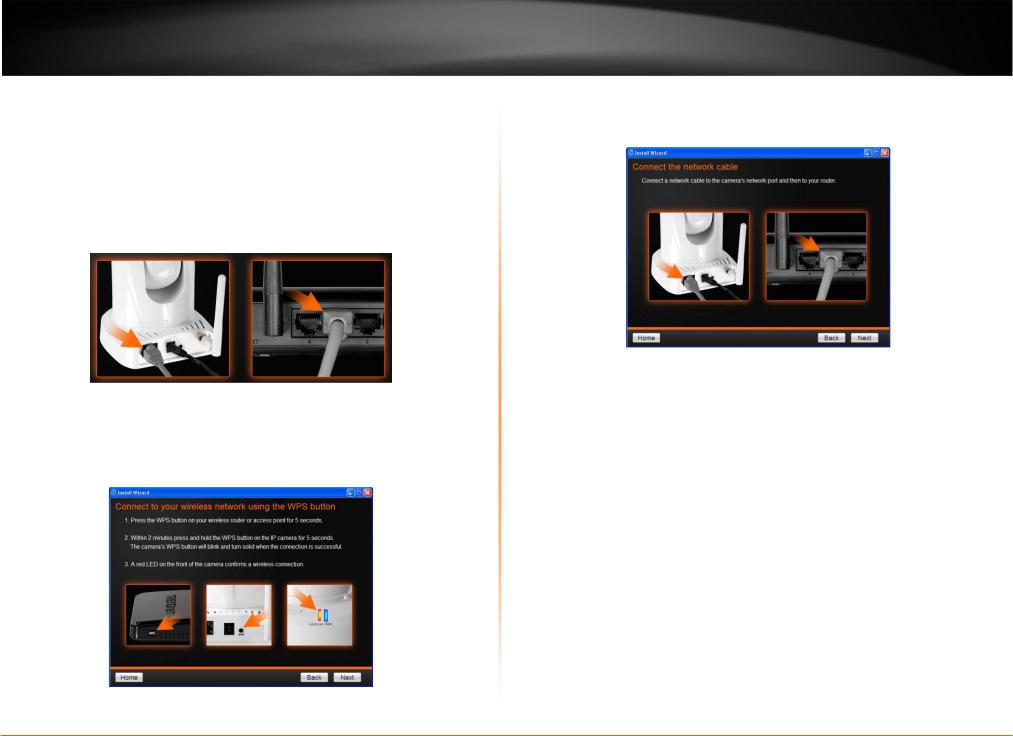
5.Follow the instructions in the next screen to Power up the Camera. Connect one end of the power adapter to the camera and watch the LED flicker. Click Next to continue, Back to go to the previous screen or Home to return to the
Main Menu.
6.Connect one end of the network cable to your camera and the other end to your router. Click Next to continue, Back to go to the previous screen or Home to return to the Main Menu.
TV-IP851WC / TV-IP851WIC
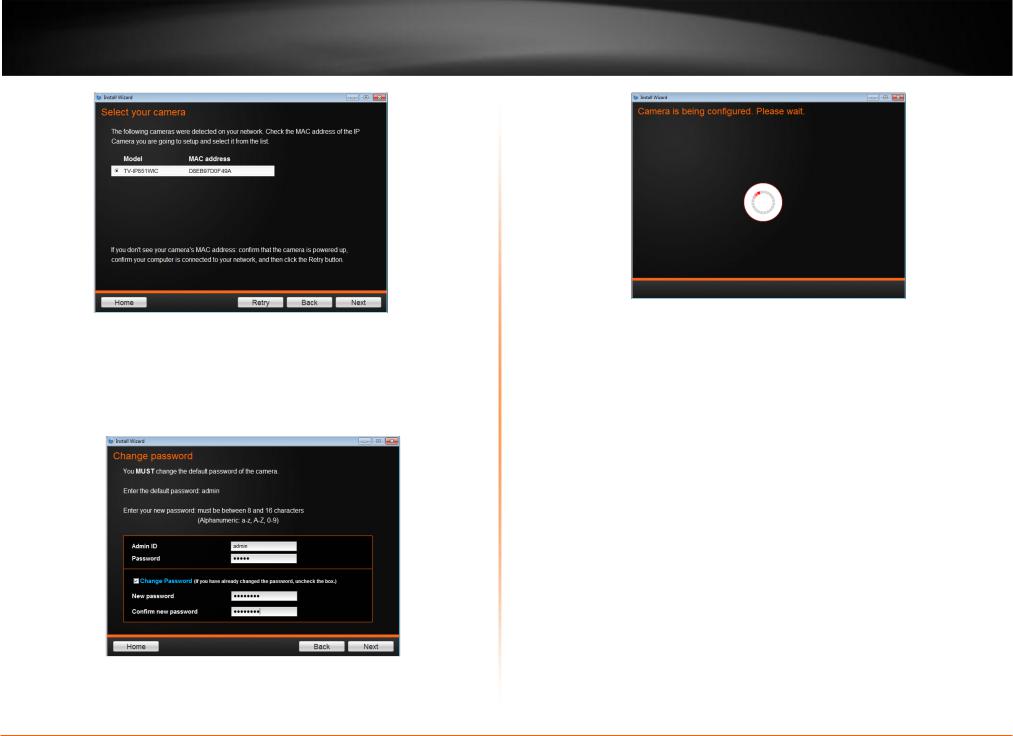
7.The wizard searches the network for your camera.
8.If you only have one camera on your network, the wizard will automatically select it (as shown below). Otherwise, if you have more than one camera, it provides several options from the list. The wizard provides the Model Name and MAC Address of the camera. If you do not see any of your camera(s) in the wizard, click Retry to scan for the camera again. Click Next to continue, Back to go to the previous screen or Home to return to the Main Menu.
© Copyright 2013 TRENDnet. All Rights Reserved.
9
TRENDnet User’s Guide |
TV-IP851WC / TV-IP851WIC |
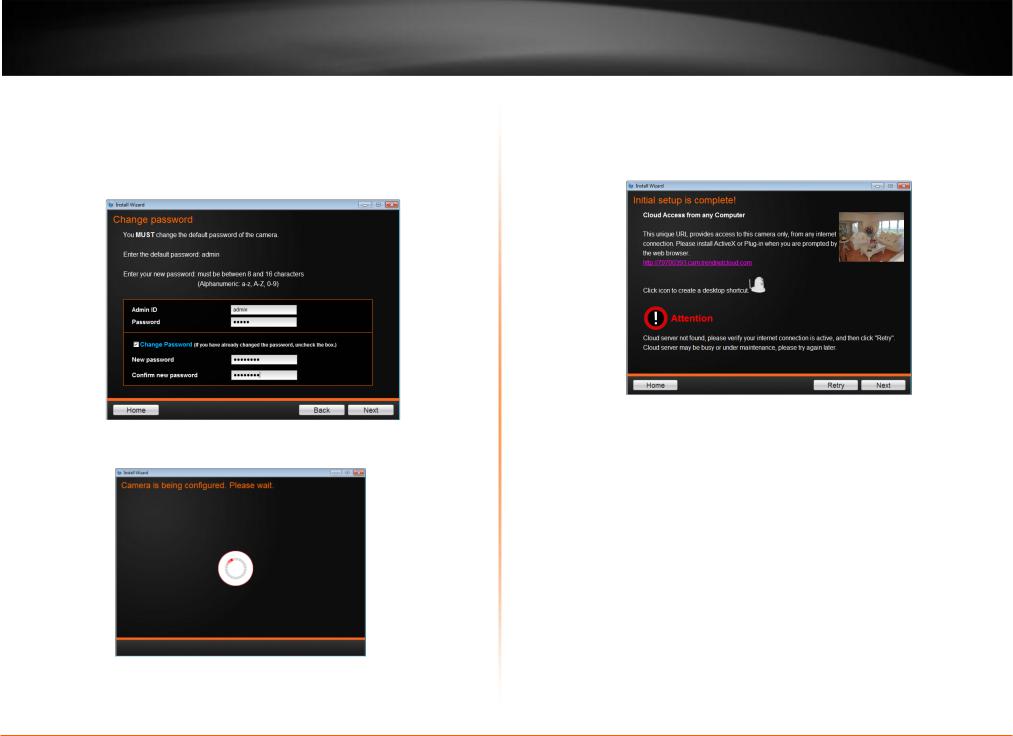
9.Password Settings. Follow the instructions on the screen. Remember to change the password with an 8 bit preset. The default username and password is admin. Tick the Change Password checkbox to enter the new password details. The password should be between 8 and 16 characters. Click Next to continue, Back to go to the previous screen or Home to return to the Main Menu.
10. The wizard configures your parameters.
11.The initial setup is complete. The main feature is the Cloud Access accessibility feature. Click the link(s) or icon below to create a shortcut on your desktop. Also, below the icon is a warning. This warning is only shown when the internet connection is inactive or the Cloud server cannot be found. Make sure the internet connection is active, click Retry. When the Cloud server isn’t found, the server may be busy or under maintenance. Under these circumstances, click Retry later again. If there is no warning, click Next.
© Copyright 2013 TRENDnet. All Rights Reserved.
10

TRENDnet User’s Guide |
TV-IP851WC / TV-IP851WIC |
Wireless Connection
Using WPS
12.The mobile option allows the user to download the TRENDnet Cloud App in either Apple or Google android format. To use this feature, the user must have a Barcode Scanner App on their mobile device. This is also available from the Apple App Store or Google’s Play. You are now ready to use your camera. Click Finish to exit.
You are now ready to use your camera. Click Finish to exit.
Find the access point (AP) or wireless router you wish to connect to from the Available AP drop down menu.
In most cases you should leave the Channel set to Auto as the AP will determine the channel of operation.
Select the type of authentication and encryption required by the access point and enter the Key required to connect.
Click Next to continue, Back to go to the previous screen or Home to return to the Main
Menu.
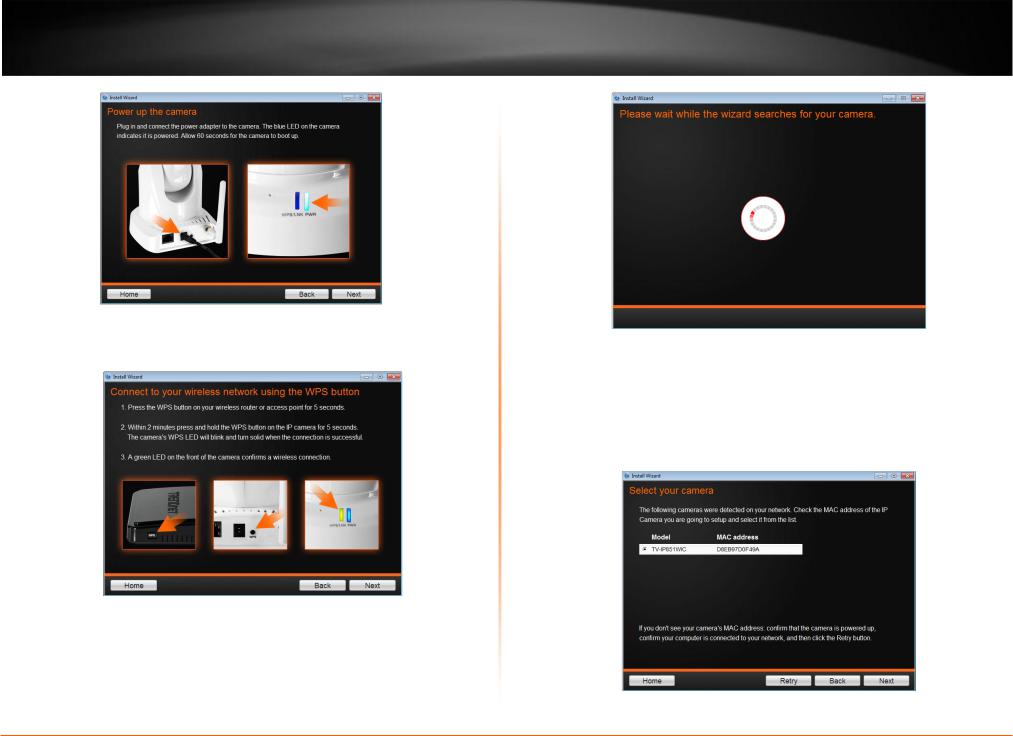
Please read the next steps carefully as it pertains to the WPS feature on your router and camera.
1.Follow the instructions in the screen to Power up the Camera. Click Next to continue, Back to go to the previous screen or Home to return to the Main
Menu.
© Copyright 2013 TRENDnet. All Rights Reserved.
11
TRENDnet User’s Guide |
TV-IP851WC / TV-IP851WIC |
2.Follow the instructions and click Next to continue. If you wish to go to the previous screen, click Back or Home to return to the main menu.
3.The camera now searches for the settings you chose.
4.If you only have one camera on your network, the wizard will automatically select it (as shown below). Otherwise, if you have more than one camera, it provides several options from the list. The wizard provides the Model Name and MAC Address of the camera. If you do not see any of your camera(s) in the wizard, click Retry to scan for the camera again. Click Next to continue, Back to go to the previous screen or Home to return to the Main Menu.
© Copyright 2013 TRENDnet. All Rights Reserved.
12
TRENDnet User’s Guide |
TV-IP851WC / TV-IP851WIC |
5.Password Settings. Follow the instructions on the screen. Remember to change the password with an 8 bit preset. The default username and password is admin. Tick the Change Password checkbox to enter the new password details. The password should be between 8 and 16 characters. Click Next to continue, Back to go to the previous screen or Home to return to the Main Menu.
6.The wizard configures your parameters.
7.The initial setup is complete. The main feature is the Cloud Access accessibility feature. Click the link(s) or icon below to create a shortcut on your desktop. Also, below the icon is a warning. This warning is only shown when the internet
connection is inactive or the Cloud server cannot be found. Make sure the internet connection is active, click Retry. When the Cloud server isn’t found, the server may be busy or under maintenance. Under these circumstances, click Retry later again. If there is no warning, click Next.
8.The mobile option allows the user to download the TRENDnet Cloud App in either Apple or Google android format. To use this feature, the user must have a Barcode Scanner App on their mobile device. This is also available from the
Apple App Store or Google’s Play. You are now ready to use your camera. Click
Finish to exit.
© Copyright 2013 TRENDnet. All Rights Reserved.
13
 Loading...