


 Loading...
TPL-4052E User’s Guide
Table of Contents
Product Overview 1
Package Contents 1 Features 1 Product information on device label 2 Push Buttons 3 Diagnostic LEDs 3 Application Diagram 4
Install Your Powerline Adapter 5
Before you Install 5
Connect a Powerline Adapter to your router 5 Add adapters to your network 6
Secure Your Powerline Network 7
Using the Sync button 7
Change the network name and associate two Powerline Adapters: 8
Add adapters using the Sync button 8
Configure an additional Powerline Adapter to connect and use the network name of your existing powerline network: 9
Using the Powerline Utility 9
Powerline Utility System Requirements 10 Software Installation 10 Using the Utility 13
Table of Contents
Powerline Utility - Map View 14 Powerline Utility - Detailed View 16 Powerline Utility - Device Setup 17 Powerline Utility - Advanced 18 Powerline Utility - Options 19 Powerline Utility - About 20
Technical Specifications 21 Troubleshooting 22 Appendix 23
Overlapping powerline networks 23
Move Powerline Adapters between different overlapping powerline networks 23
Federal Communication Commission Interference Statement 25
RoHS 25 Europe – EU Declaration of Conformity 25 Limited Warranty 27
© Copyright 2013 TRENDnet. All rights reserved.

TPL-4052E User’s Guide
Product Overview
TPL-4052E
Package Contents
TPL-4052E package includes:
•TPL-4052E: 4-Port Powerline 500 AV Adapter
•Multi-language Quick Installation Guide
•CD-ROM (Utility & User’s Guide)
•Network cable (1.5 m / 5 ft.)
Product Overview
Features
TRENDnet’s 4-Port Powerline 500 AV Adapter, model TPL-4052E, uses an electrical outlet to create a 500 Mbps powerline network. Two adapters are needed to start a network. Connect network ready TVs, media players, game consoles, and computers to the four Ethernet ports. No CD installation required—encrypted TRENDnet adapters autoconnect out of the box. This adapter will automatically connect to other out of box TRENDnet Powerline AV adapters. No installation required. (To add up privacy on top of your network, TRENDnet recommends using button pressing sequence to scramble network name instead leave the key public as set in default.) Power saving mode reduces
up to 80% electric consumption when network is idle. QoS, Quality of Service, technology prioritizes video, audio, and online gaming, smoothing your streaming experience. LED lamps indicate device and
port status for network monitoring and easy troubleshooting. Advanced AES encryption secures your network. This adapter is ideal for use in buildings that interfere with wireless networking signals.
•Compliant with IEEE1901 and HomePlug AV standards
•High speed networking over an existing electrical system
•4 x 10/100 Mbps Auto-MDIX Fast ports
•One-touch Sync button networks adapters quickly
•Three LED indicators: Power (on/off), Powerline Link (green (best), amber (better), red (good), off(no connection), Ethernet Link (solid, blinking, off)
•Connect one Powerline 500 AV Adapter to the Internet and then plug in up to 15* additional Powerline 500 AV Adapters for instant connectivity
•Share data intensive files, play games, download music and more at faster data transfer rates
•Advanced 128-bit AES encryption to ensure total network security
•Power Save mode reduces electric consumption by 80%
•Network signal transmits up to 300 meters (984ft.)
•Auto QoS support through traffic classification and multiple priority queuing
© Copyright 2013 TRENDnet. All rights reserved. |
1 |

TPL-4052E User’s Guide
•Optional management utility compatible with Windows 8 (32/64bit), Windows
* 8 active adapter can stream data at the same time. Up to 16 adapters
can be configured in the same network. Additional adapters may decrease network performance. 500Mbps is the maximum theoretical powerline data rate. Actual throughput will vary depending on the environment. Networked Powerline devices must be plugged into power outlets that are on the same electrical system. GFCI outlets and AFCI circuit breakers may degrade powerline network signals.
Product information on device label
ModelNumber 
SerialNumber 
NetworkMACAddress 
DevicePassword(DPW) 
Hardwareversion 
Firmwareversion 
Power (PWR) LED
Powerline (PL) LED
Network 1 ~ 4
Connect network cables from Powerline Adapter to your computer, game console, network TV, and othernetworkdevices.
Power plug
Plugsdirectlyintoan availablepoweroutlet.
Not on power strip.
Product Overview
{
Reset button
 Resetstheunittofactory defaults.
Sync button
Synchronizewithother
PowerlineAdapters.
© Copyright 2013 TRENDnet. All rights reserved. |
2 |

TPL-4052E User’s Guide |
Product Overview |
Push Buttons
Button |
Action |
Function |
|
|
|
Initiate Sync/Connection and generate random |
|
|
|
private network name on first adapter (PWR |
|
|
|
LED will start blinking). |
|
|
|
|
|
|
|
Match the network name on secondary |
|
Sync |
Push and hold |
or additional adapter and connect to first |
|
(see Using |
for 2 seconds |
adapter. (PWR LED will start blinking) |
|
the Sync |
|
Note: To establish connectivity, the secondary |
|
Button |
|
||
Section for |
|
or additional Powerline Adapter’s Sync button |
|
instructions) |
|
must also be pushed within 2 minutes (120 |
|
|
|
||
|
|
sec) of pushing the Sync button of the first |
|
|
|
adapter. |
|
|
|
|
|
|
Push/hold for |
Erases the network name |
|
|
15 seconds |
(All LEDs will turn off and turn back on). |
|
|
|
|
|
|
|
Reset device to factory defaults (All LEDs will |
|
Reset |
Push/Hold for |
turn off and turn back on). |
|
1 second only |
Note: Will reset to the factory default private |
||
|
|||
|
|
network name “HomePlug AV”. |
|
|
|
|
Save Mode: The device will automatically standby to reduce power usage when there is no network traffic for more than 10~20 minutes. It will automatically resume back to full speed service when traffic resumes.
Diagnostic LEDs
Indicates the device and connection status
LED |
Color |
Sequence |
Definition |
|
PWR |
Green |
Solid |
Device powered on |
|
(Power) |
N/A |
Off |
Device powered off |
|
|
|
Solid |
Powerline connected (Best) |
|
|
Green |
Blinking |
Syncing or Powerline data |
|
|
|
|
transmitting/receiving (Best) |
|
|
|
Solid |
Powerline connected (Better) |
|
PL |
Amber |
Blinking |
Powerline data transmitting/receiving |
|
(Powerline) |
|
(Better) |
||
|
|
|||
|
|
Solid |
Powerline connected (Good) |
|
|
Red |
Blinking |
Powerline data transmitting/receiving |
|
|
|
|
(Good) |
|
|
N/A |
Off |
Powerline is not synced or |
|
|
connected |
|||
|
|
|
||
1-4 |
Green |
Solid |
Network connection established |
|
Blinking |
Data transmission is detected |
|||
(Fast |
||||
Ethernet |
N/A |
Off |
Network standby or no network |
|
Connection) |
connection |
|||
|
|
|
Note: Powerline (PL) LED color indicates the strength and quality of the Powerline connection through the electrical system. The following factors may affect the powerline network’s connection quality:
•Noise – Generated by appliances which use your electrical system (e.g. Microwaves, ovens, hair dryer, irons, dishwashers, etc.). The quality of your household electrical wiring may also cause additional noise on your electrical system.
•Distance – Long lengths of electrical wiring through your electrical system between connected Powerline Adapters.
© Copyright 2013 TRENDnet. All rights reserved. |
3 |

TPL-4052E User’s Guide |
Product Overview |
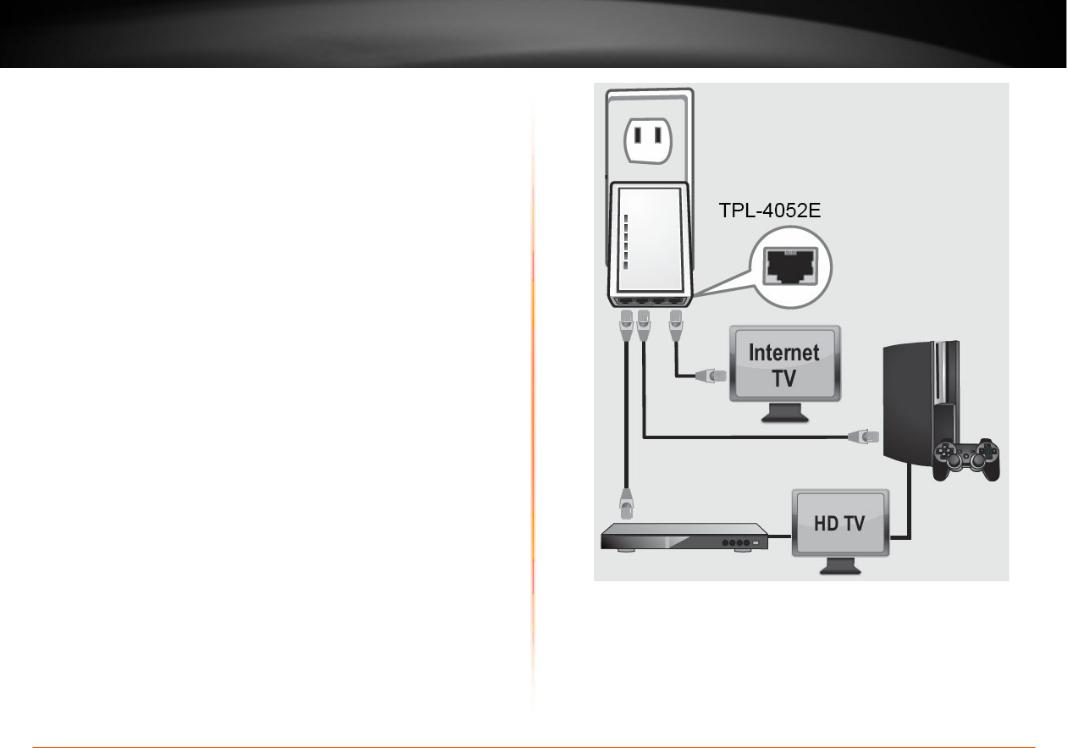
Application Diagram
Diagram Explanation:
The first Powerline unit is networked to a router which is in turn connected to a modem (typically supplied by your Internet Service Provider (ISP)) that provides Internet connectivity. A second Powerline Adapter is plugged into a wall power outlet near a media center and is providing Internet connectivity to a game a game console and a Blu-ray player / media player via Ethernet.
© Copyright 2013 TRENDnet. All rights reserved. |
4 |

TPL-4052E User’s Guide
Installing Your Powerline Adapter
Before you install
1.Before you proceed with the installation, verify the following:
•Verify that you already have Internet access through your existing network.
•Verify that you have an available Ethernet port (also known as a LAN port) on you router.
•Verify that you have at least two Powerline Adapters. Two or more Powerline Adapters are required to create a powerline network.
Note: The TPL-4052E package only includes a single Powerline Adapter. Please ensure that your other Powerline Adapter is HomePlug® AV or IEEE 1901 compliant (e.g. TRENDnet models TPL-401E, TPL-402E, TPL-405E , TPL-406E , TPL-407E or another TPL-4052E.)
2.Plan the location of where you will install your Powerline Adapters.
•Avoid plugging the adapters into power strips, extension cords, or surge protectors as this may prevent the adapter from functioning correctly or degrade performance.
•Avoid plugging the adapters into wall power outlets that are controlled by a light switch to prevent the Powerline Adapter from being turned off accidentally.
•Avoid plugging the adapters into wall power outlets that are located near appliances that consume a lot of power (e.g. refrigerators, washers, dryers) as this may degrade performance.
•Make sure there is an available wall power outlet in the room where the router is installed and also near the router.
•Make sure there is an available wall power outlet in the room where you want to extend network connectivity.
Installing Your Powerline Adapter
Connecting a Powerline Adapter to your router
1.Plug the Powerline Adapter into an available wall power outlet near your router.
Note: This will allow devices connected to your powerline network to access the Internet and other devices connected to your network.
2.Connect the included Ethernet cable (also called a network cable) from the Ethernet port (also called network port) of your Powerline Adapter to an available Ethernet port (also called LAN port) on your router.
3.Once the Powerline Adapter is installed and connected to your router, verify that the Power (PWR) LED is on or blinking and the Network LED is on or blinking.
TPL-4052E
© Copyright 2013 TRENDnet. All rights reserved. |
5 |
TPL-4052E User’s Guide
Adding adapters to your network
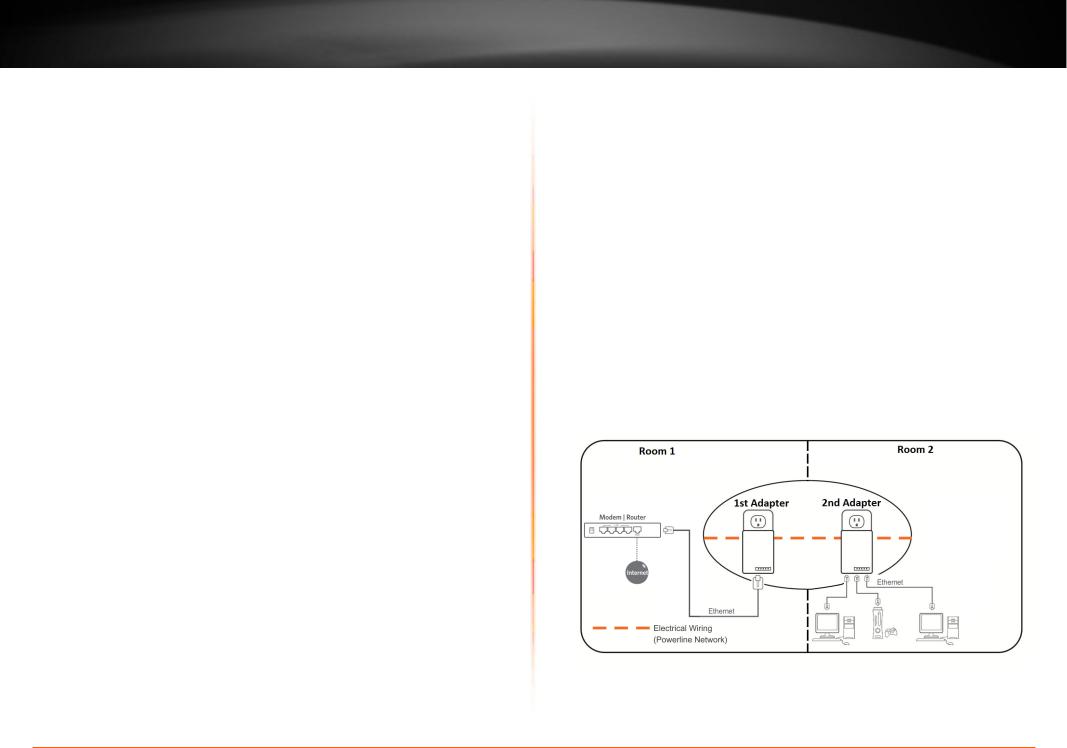
Once you have installed and connected the first Powerline Adapter to your router, you can easily extend your network to other rooms by adding additional Powerline Adapters.
To extend your network using an additional Powerline Adapter:
1.First, make sure the first Powerline Adapter is installed and connected to your router.
Note: This will allow devices connected to your powerline network to access the Internet and other devices connected to your network. See “Connecting a Powerline Adapter to your router” on page 5.
2.Plug in the additional Powerline Adapter to an available wall power outlet in another room near a computer or network device (e.g. game consoles, network-enabled TVs, network attached storage, network media server/players, etc.) you want to connect to your network.
3.Connect one end of the included Ethernet cable to the Ethernet port on your Powerline Adapter and then connect the other end to the Ethernet port on your computers or another network enabled device.
4.After the additional Powerline Adapter is connected and installed to your computer or network device, wait for the Powerline (PL) LED to turn on. After the Powerline (PL) LED turns on, verify that the Power (PWR) LED is on, the Powerline (PL) LED is on or blinking, and the network LED is on or blinking.
Note: To verify that your Powerline Adapters are connected successfully
Installing Your Powerline Adapter
to your network, you can check if the computer(s) or network device(s) can access the Internet through your powerline network.
To install additional Powerline Adapters in other rooms, repeat the steps above for each adapter.
© Copyright 2013 TRENDnet. All rights reserved. |
6 |
TPL-4052E User’s Guide
Secure Your Powerline Network
Powerline Adapters join powerline network by using network name. The default network name is “HomePlugAV”. All out-of-the-box TRENDnet HomePlugAV Powerline Adapters have the same default network name and can be connected to each other without further configuration. To add network security to your network, you can change your Powerline network name away from the factory default name. With a private custom network name, no one can connect to your Powerline network with an out-of-the-box HomePlugAV adapter.
TRENDnet recommends you change the Powerline network name away from the factory default name to increase network security. Once configured, the Powerline network name will be saved. The adapter can be moved freely within its operating range without having to reconfigure the network name. If a mistake is made in the settings, the adapter can be reset to the factory default settings by pressing the reset Reset button for 1 second.
There are two ways to change the default network name:
1.(Recommended) Use the physical Sync button on your Powerline Adapter to generate a random private network name.
See “Using the Sync Button” in next section.
OR
2.Create a customized private network name for your powerline network by using the included Powerline Utility. See “Using the Powerline Utility” on page 9”.
* If the Powerline Adapter settings have been changed, the adapter must be reset to the factory default settings to be recognized by Powerline Utility.
Securing Your Powerline Network
Using the Sync button
Change your default network name using the Sync button
The physical Sync button on the Powerline Adapter provides an easy method of changing the network name. The Sync button generates a random network name for your powerline network. To create a customized network name, see “Using the Powerline Utility” on page
9.
Note: The default network name assigned to TRENDnet Powerline Adapters is HomePlugAV. Before changing the default network name, please make sure your Powerline Adapters are already installed and connected using the default network name.
See “Installing Your Powerline Adapter” on page 5.
© Copyright 2013 TRENDnet. All rights reserved. |
7 |
Loading...