


NVR
Network Video Recording Software
User Manual
Models SWIP-32
SWIP-16
SWIP-8
Please carefully read these instructions before using this product
Save this manual for future use
1

ii

iii
Surveillix™ NVR Server
Software Manual (Version 4)
Manual Edition 27177AJ – OCTOBER 2009
Printed in USA
No part of this documentation may be reproduced in any means, electronic or mechanical, for any purpose, except as expressed in the Software License Agreement. Toshiba shall not be liable for technical or editorial errors or omissions contained herein. The information in this document is subject to change without notice.
THE INFORMATION IN THIS PUBLICATION IS PROVIDED “AS IS” WITHOUT WARRANTY OF ANY KIND. THE ENTIRE RISK ARISING OUT OF THE USE OF THIS INFORMATION REMAINS WITH RECIPIENT. IN NO EVENT SHALL TOSHIBA BE LIABLE FOR ANY DIRECT, CONSEQUENTIAL, INCIDENTAL, SPECIAL, PUNITIVE, OR OTHER DAMAGES WHATSOEVER (INCLUDING WITHOUT LIMITATION, DAMAGES FOR LOSS OF BUSINESS PROFITS, BUSINESS INTERRUPTION OR LOSS OF BUSINESS INFORMATION), EVEN IF TOSHIBA HAS BEEN ADVISED OF THE POSSIBILITY OF SUCH DAMAGES AND WHETHER IN AN ACTION OR CONTRACT OR TORT, INCLUDING NEGLIGENCE.
This software and documentation are copyrighted. All other rights, including ownership of the software, are reserved to DVR Support Center. TOSHIBA, and Surveillix are registered trademarks of TOSHIBA CORPORATION in the United States and elsewhere; Windows, and Windows XP are registered trademarks of Microsoft Corporation. All other brand and product names are trademarks or registered trademarks of the respective owners.
The following words and symbols mark special messages throughout this guide:
WARNING: Text set off in this manner indicates that failure to follow directions could result in bodily harm or loss of life.
CAUTION: Text set off in this manner indicates that failure to follow directions could result in damage to equipment or loss of information.

iv

|
v |
Table of Contents |
|
PREFACE...................................................................................................................................................................... |
9 |
About This Guide....................................................................................................................................................... |
9 |
Technician Notes....................................................................................................................................................... |
9 |
INTRODUCTION.......................................................................................................................................................... |
11 |
Product Description ................................................................................................................................................. |
11 |
Features .................................................................................................................................................................. |
11 |
NVR Software Requirements .................................................................................................................................. |
12 |
NVR Software Specifications................................................................................................................................... |
13 |
GETTING STARTED ................................................................................................................................................... |
15 |
NVR Contents ......................................................................................................................................................... |
16 |
NVR BASICS............................................................................................................................................................... |
17 |
Installing the Software ............................................................................................................................................. |
18 |
Installing NERO® Burning Rom.......................................................................................................................... |
18 |
Installing the NVR Software................................................................................................................................ |
18 |
Registering the NVR Software............................................................................................................................ |
19 |
Locating the System ID.................................................................................................................................. |
19 |
Obtaining the Unlock Code ............................................................................................................................ |
19 |
Unlocking the Upgrade .................................................................................................................................. |
20 |
Unlocking New Network Device.......................................................................................................................... |
20 |
Display Screen ........................................................................................................................................................ |
21 |
Live Camera Options.......................................................................................................................................... |
21 |
Live Digital Zoom ........................................................................................................................................... |
21 |
Camera View........................................................................................................................................................... |
22 |
Recording Status Indicator ................................................................................................................................. |
22 |
Special Recording .............................................................................................................................................. |
22 |
Screen Division Buttons .......................................................................................................................................... |
23 |
Custom Live View Divisions................................................................................................................................ |
24 |
SETUP OPTIONS ........................................................................................................................................................ |
25 |
Setup Overview ....................................................................................................................................................... |
26 |
Camera Setup ......................................................................................................................................................... |
27 |
Network Video ......................................................................................................................................................... |
28 |
Connecting a Network Device ............................................................................................................................ |
28 |
Connecting Manually ..................................................................................................................................... |
28 |
Connecting with Camera Finder .................................................................................................................... |
29 |
Assigning a Network Device to a Channel.......................................................................................................... |
29 |
Assigning Audio Channels to a Network Device................................................................................................. |
30 |
Camera Configuration ........................................................................................................................................ |
31 |
Displaying More Columns .............................................................................................................................. |
31 |
Accessing the Configuration Menu ................................................................................................................ |
31 |
Motion Setup ........................................................................................................................................................... |
32 |
Create a Motion Area ......................................................................................................................................... |
32 |
Activating an Alarm on a Motion Event............................................................................................................... |
33 |
Regular Interval Recording ................................................................................................................................. |
33 |
General Setup ......................................................................................................................................................... |
34 |
Voice Warning .................................................................................................................................................... |
34 |
Connecting to a Wide Screen Display ................................................................................................................ |
35 |

vi |
|
Connecting a Second Monitor ............................................................................................................................ |
35 |
Volume ............................................................................................................................................................... |
36 |
Hybrid Sensor Setup .......................................................................................................................................... |
36 |
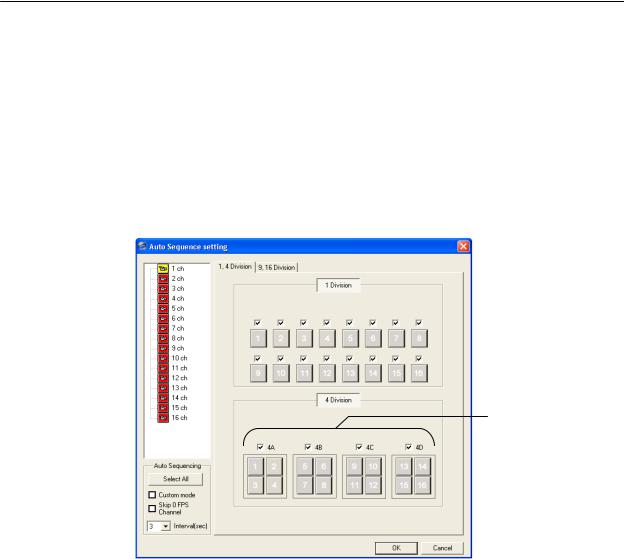
Auto Sequence Setting....................................................................................................................................... |
37 |
Create Custom Auto Sequence ..................................................................................................................... |
37 |
Schedule Setup ....................................................................................................................................................... |
38 |
Recording Schedule ........................................................................................................................................... |
38 |
Sensor Schedule ................................................................................................................................................ |
39 |
Create a Recording Schedule............................................................................................................................. |
40 |
Create a Sensor Schedule.................................................................................................................................. |
40 |
Scheduling Alarm Events............................................................................................................................... |
40 |
Emergency Agent Schedule .......................................................................................................................... |
40 |
Special Day Schedule ........................................................................................................................................ |
41 |
Creating/Editing a ‘Special Day’ Schedule..................................................................................................... |
41 |
Deleting a ‘Special Day’ Schedule ................................................................................................................. |
41 |
System Restart Setup......................................................................................................................................... |
42 |
Create System Restart Schedule................................................................................................................... |
42 |
Network Setup......................................................................................................................................................... |
43 |
Administrative Setup ............................................................................................................................................... |
44 |
Disk Management............................................................................................................................................... |
44 |
User Management .............................................................................................................................................. |
45 |
Add a New User............................................................................................................................................. |
45 |
User Rank...................................................................................................................................................... |
46 |
Changing the Administrator Password ............................................................................................................... |
46 |
Default Administrator Password..................................................................................................................... |
46 |
Log Management................................................................................................................................................ |
46 |
Setup Log Management Options ................................................................................................................... |
46 |
Status Check / Email .......................................................................................................................................... |
47 |
General .......................................................................................................................................................... |
47 |
Users ............................................................................................................................................................. |
47 |
Storage Check ............................................................................................................................................... |
48 |
Recording Data Check................................................................................................................................... |
48 |
SMART Information ....................................................................................................................................... |
49 |
SMART Alert.................................................................................................................................................. |
49 |
Alarm Event ................................................................................................................................................... |
49 |
HDD Management.............................................................................................................................................. |
50 |
Information .............................................................................................................................................................. |
51 |
Instant Recording .................................................................................................................................................... |
51 |
Activate Instant Recording.................................................................................................................................. |
51 |
Searching ‘Instant Recorded’ Video ................................................................................................................... |
51 |
SEARCH...................................................................................................................................................................... |
53 |
Search Overview ..................................................................................................................................................... |
54 |
Play Controls ...................................................................................................................................................... |
54 |
Adjust the Brightness of an Image...................................................................................................................... |
55 |
Zooming in on an Image..................................................................................................................................... |
55 |
Zooming in on a Portion of an Image.................................................................................................................. |
55 |
Open Video from a Saved Location.................................................................................................................... |
55 |
Time Sync........................................................................................................................................................... |
55 |
Clean Image ....................................................................................................................................................... |
55 |
Performing a Basic Search...................................................................................................................................... |
56 |

|
vii |
Printing an Image .................................................................................................................................................... |
56 |
Daylight SAVIng Time ............................................................................................................................................. |
56 |
Save to JPG or AVI ................................................................................................................................................. |
57 |
Bookmarks.......................................................................................................................................................... |
58 |
Modify Bookmarks ......................................................................................................................................... |
58 |
Single Clip Backup ............................................................................................................................................. |
59 |
Single Clip Backup Using Bookmark Data ..................................................................................................... |
59 |
Index Search ........................................................................................................................................................... |
60 |
Performing an Index Search ............................................................................................................................... |
60 |
Index Search Results Display............................................................................................................................. |
60 |
Preview Search ....................................................................................................................................................... |
61 |
Performing a Preview Search ............................................................................................................................. |
62 |
Graphic Search ....................................................................................................................................................... |
62 |
Performing a Graphic Search ............................................................................................................................. |
62 |
Object Search.......................................................................................................................................................... |
63 |
Performing an Object Search ............................................................................................................................. |
63 |
Motion Search ......................................................................................................................................................... |
64 |
Performing a Motion Search ............................................................................................................................... |
64 |
Audio Playback........................................................................................................................................................ |
64 |
Search in Live.......................................................................................................................................................... |
65 |
PAN / TILT / ZOOM ..................................................................................................................................................... |
67 |
Pan / Tilt / Zoom Overview ...................................................................................................................................... |
68 |
Setting up a PTZ Camera........................................................................................................................................ |
68 |
Enable the PTZ Settings..................................................................................................................................... |
68 |
Advanced PTZ Setup .............................................................................................................................................. |
69 |
Creating and Viewing Preset Positions............................................................................................................... |
69 |
Creating a Preset........................................................................................................................................... |
69 |
Viewing a Preset............................................................................................................................................ |
69 |
PTZ Address Settings......................................................................................................................................... |
70 |
Accessing PTZ Menus ............................................................................................................................................ |
70 |
Controlling a ptz camera ......................................................................................................................................... |
71 |
Using the Graphical PTZ Controller.................................................................................................................... |
71 |
Using the On-Screen Compass .......................................................................................................................... |
72 |
Understanding Tours............................................................................................................................................... |
72 |
PTZ Tour Schedule ............................................................................................................................................ |
73 |
Create PTZ Tour Schedule ............................................................................................................................ |
73 |
BACKING UP VIDEO DATA ....................................................................................................................................... |
75 |
Backup Overview .................................................................................................................................................... |
76 |
Nero® Express .................................................................................................................................................... |
76 |
General Screen Overview................................................................................................................................... |
77 |
Performing a General Backup........................................................................................................................ |
77 |
Clip Screen Overview ......................................................................................................................................... |
78 |
Performing a Clip Backup .............................................................................................................................. |
78 |
Scheduled Screen Overview .............................................................................................................................. |
79 |
Performing a Scheduled Backup ................................................................................................................... |
79 |
Specifying Scheduled Backup Drives ............................................................................................................ |
79 |
LAN / ISDN / PSTN CONNECTIONS .......................................................................................................................... |
81 |
LAN Overview ......................................................................................................................................................... |
82 |
Connecting to a LAN Using TCP/IP......................................................................................................................... |
82 |

viii |
|
Configuring TCP/IP Settings............................................................................................................................... |
82 |
LDAP INTEGRATION.................................................................................................................................................. |
83 |
Features .................................................................................................................................................................. |
84 |
Installing LDAP........................................................................................................................................................ |
84 |
WEB VIEWER.............................................................................................................................................................. |
87 |
web viewer overview ............................................................................................................................................... |
88 |
Configuring the Server for Remote Connection .................................................................................................. |
89 |
Connecting to a DVR Using Web Viewer ........................................................................................................... |
89 |
Closing the Web Viewer ..................................................................................................................................... |
89 |
INCLUDED SOFTWARE SETUP ................................................................................................................................ |
91 |
Emergency Agent Overview.................................................................................................................................... |
92 |
Configuring the DVR........................................................................................................................................... |
92 |
Configuring the Client PC ................................................................................................................................... |
92 |
Setup Window .................................................................................................................................................... |
93 |
Emergency Agent Window ...................................................................................................................................... |
93 |
Filter Event List................................................................................................................................................... |
93 |
Add Items to Alarm Confirm List ......................................................................................................................... |
94 |
Search Alarm Window............................................................................................................................................. |
95 |
View Recorded Video ......................................................................................................................................... |
95 |
Export Video ....................................................................................................................................................... |
95 |
Remote Software Overview..................................................................................................................................... |
96 |
Remote Software Setup...................................................................................................................................... |
97 |
Installing Remote Software ............................................................................................................................ |
97 |
Create a New Remote Connection ................................................................................................................ |
97 |
Configuring the DVR...................................................................................................................................... |
98 |
Configuring the Server for Remote Connection ............................................................................................. |
98 |
Digital Verifier Overview .......................................................................................................................................... |
99 |
Installing the Digital Verifier ................................................................................................................................ |
99 |
Using the Digital Verifier ..................................................................................................................................... |
99 |
Backup Viewer Overview ...................................................................................................................................... |
100 |
Installing Backup Viewer................................................................................................................................... |
100 |
Loading Video from DVD or Hard Drive............................................................................................................ |
100 |
SCS Overview....................................................................................................................................................... |
101 |
Configuring the Server for Remote Connection ................................................................................................ |
101 |
Connecting to a DVR........................................................................................................................................ |
101 |

9
PREFACE
ABOUT THIS GUIDE
This manual is a setup and maintenance guide that can be used for reference when setting up the NVR and for troubleshooting when a problem occurs. Only authorized personnel should attempt to repair this unit.
Toshiba reserves the right to make changes to the NVRs represented by this manual without notice. The following text mark special messages throughout this guide:
NOTE: Text set off in this manner indicates topics of interests that can help the user understand the product better.
TIP: Text set off in this manner indicates topics and points of interests that can be helpful when using or settings up the NVR.
TECHNICIAN NOTES
WARNING: Only authorized technicians trained by Toshiba should attempt to repair this NVR. All troubleshooting and repair procedures that may be shown are for reference and minor repair only. Because of the complexity of the individual components and subassemblies, no one should attempt to make repairs at the component level or to make modifications to any printed wiring board. Improper repairs can create a safety hazard. And any indications of component replacement or printed wiring board modifications may void any warranty.
WARNING: To reduce the risk of electrical shock or damage to the equipment:
•Do not disable the power grounding plug. The grounding plug is an important safety feature.
•Plug the power cord into a grounded (earthed) electrical outlet that is easily accessible at all times.
•Disconnect the power from the computer by unplugging the power cord either from the electrical outlet or the computer.
CAUTION: To properly ventilate your system, you must provide at least 3 inches (7.6 cm) of clearance at the front and back of the NVR.

10
11
INTRODUCTION
PRODUCT DESCRIPTION
Toshiba’s NVR Software is the next great step in surveillance. The NVR Software has been designed for use on non-proprietary hardware and existing IT infrastructures, making it a cost effective next generation surveillance package. The NVR Software allows users to connect up to 32 network cameras and/or network video encoders per server.
The Surveillix NVR software comes pre-configured for fast and seamless integration with non-proprietary hardware. Designed for Microsoft® Windows® XP, Vista and Windows 7, the NVR Software offers the unparalleled stability, security, and ease of use of a Surveillix NVR, but on a PC platform. The NVR Software allows for multiple users to simultaneously connect through any network connection for instantaneous live viewing, digital search, and off site video storage. Users can also connect remotely through DSL, Cable Modems, ISDN, or 56K dial-up.
This NVR Software enables users to establish recording schedules, create motion detection zones, and use PTZ controls for each of the system's cameras. Searching and indexing your video archive has never been easier, video can now be found, viewed, and exported in a number of file formats with just a few clicks and can all be done on a PC or existing IT infrastructure.
FEATURES
Toshiba’s Surveillix NVR Software includes the following features:
•PAN / TILT / ZOOM Controls on supported Network Cameras
•Simultaneous Search, Playback and Backup
•Up to 32 Network Cameras
•Multiple Levels of Security Access
•Advanced POS and ATM Support
•Continuous, Motion Detection and Alarm Recording Modes
•Video Signal Loss Detection
•Records at the Encoding Resolution of the Network Camera
•Digital Signature Support for Tamper Proof Exporting
•Works with Computers Running Windows XP, Vista, and Windows 7
•Fully integrates with Toshiba’s Surveillix NVRs and DVRs
•Fully Compatible with Toshiba’s Line of Network Cameras

12
NVR SOFTWARE REQUIREMENTS
Recommended Workstation/Server for NVR Software
Total Cameras / Video Input |
8/16 |
32 |
Type & Number or Processors: |
|
|
Intel® Q8200 2.33GHz+ Core 2 Quad |
X |
|
Intel® Q9550 2.83GHz+ Core 2 Quad |
|
X |
|
|
|
Operating System: |
|
|
Microsoft Windows 7 |
X |
X |
Microsoft Windows Vista |
X |
X |
Microsoft Windows XP Professional, SP2 |
X |
X |
File System: |
|
|
NTFS File System |
X |
X |
|
|
|
Memory: |
|
|
2GB, DDR2 SDRAM Memory, 400Mhz,ECC |
X |
|
3GB, DDR2 SDRAM Memory, 400Mhz,ECC |
|
X |
CD-ROM AND DVD Read-Write Devices: |
|
|
16X(or more) CD-RW / DVD+RW/+R |
X |
X |
|
|
|
Graphics Cards: |
|
|
128MB PCI / PCIe / AGP Graphics adapter |
X |
X |
Keyboard and Mouse: |
|
|
Entry Level, PS/2 / USB Keyboard and PS/2 / USB Mouse |
X |
X |
|
|
|
Speakers: |
|
|
Internal Chassis Speaker and External Speakers |
X |
X |
Soundcard: |
|
|
Microsoft® DirectX Compatible Soundcard |
X |
X |
|
|
|
Network Adaptor: |
|
|
1000Mbit Ethernet Network Adaptor |
X |
X |
Internet Browser: |
|
|
Microsoft® Internet Explorer 6+ |
X |
X |
|
|
|
Backup Software: |
|
|
Nero® 8 OEM/Standard/Ultra |
X |
X |
Display Adapter Settings: |
|
|
32-Bit Color Setting |
X |
X |
Minimum Resolution of 1024X768 |
X |
X |

13
NVR SOFTWARE SPECIFICATIONS
Total Cameras / Video Input |
8 |
16 |
32 |
Recording Rate: |
30 PPS per camera (depending on hardware configuration) |
||
|
|
|
|
PTZ Control |
|
YES |
|
Sample Image Size Averages: |
Variable Depending on Network Camera and Network Camera Settings |
||
|
|
|
|
Password Control: |
|
User Defined Access |
|
Image Compression: |
Dependant on Camera, MJPEG, MPEG4, H.264 |
|
|
|
|
|
|
Motion Detection: |
Up to 15 Regions Per Ch. Adjustable Sensitivity |
|
|
Emergency Agent: |
|
Transmitted Via TCP/IP – Pop-Up Window |
|
|
|
|
|
Digital Signature |
|
Supports Digital Signature Verification |
|
Recording Mode |
Continuous, Motion Detection, Sensor, Scheduled Recording |
||
|
|
|
|
PAN/TILT/ZOOM |
|
Built in Software Interface |
|
Remote Operation |
Full Remote Control Through PSTN, ISDN, ADSL, or LAN |
||
|
|
|
|
Audio |
8 CH Mono |
16 CH Mono |
|
|
|
|
|

14

15
GETTING STARTED
This chapter includes the following information:
•Software CD Contents
16
NVR CONTENTS
Identify the following components to make sure everything has been properly included with your new NVR Software CD. If any of the following items are missing, contact your dealer to arrange a replacement.
Included Component List:
NVR
Network Video Recording Software
User Manual
Please carefully read these instructionsbefore using this product.
Savethismanual for future use.
Manual (PDF) Software Installation CD
• Toshiba NVR Software
• Surveillix Central Station (SCS)
• Emergency Agent
• Remote Software
• Backup Viewer
• Digital Signature Verifier

17
NVR BASICS
This chapter includes the following information:
•Installing the NVR Software
•Registering the NVR Software
•Becoming familiar with the Display screen
•Defining Screen Divisions

18
INSTALLING THE SOFTWARE
Installing NERO® Burning Rom
The NVR Software has been designed to work with Nero Burning Software Version 8. When installed, Nero will enable backup to the CD ROM directly within the NVR Software. Without Nero installed, video data may still be backed up but must be saved locally first and then copied to a CD using a separate application outside the NVR Software.
CAUTION: NERO Burning Rom must be installed on the PC prior to installing the NVR Software. Failure to do so will compromise the backup features.
To Install Nero 8 and enable CD Backup using the NVR Software:
1.Insert the NERO ® CD
2.Follow the on-screen instructions.
3.Restart the system.
Installing the NVR Software
CAUTION: NERO Burning Rom must be installed on the PC prior to installing the NVR Software. Failure to do so will compromise the backup features.
To install the NVR software:
1.Insert the NVR Software CD into the CD/DVD Drive.
2.Follow the on-screen instructions.
3.When prompted select the Server or Workstation type of installation.
Server: Preferred installation for systems with video cards equipped with less than 128 MB of video ram or systems running Windows Server 2003. Disables live video display.
Workstation: Preferred installation for systems with a video card equipped with 128 MB or more of video ram. Enables live video display.
4.Click Finish to complete the installation and close all open windows.
19
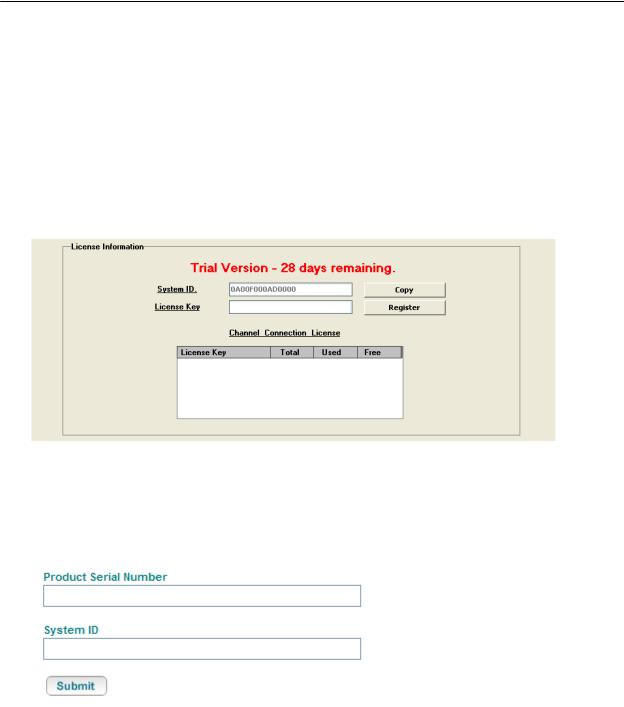
Registering the NVR Software
Have the following information available before registering.
Software Serial Number: That product Serial Number is the unique number that Toshiba provided with the purchase software.
System ID: The System ID is a unique code generated using the MAC address of the computer running the software. The following steps illustrate how to obtain a unique System ID.
Locating the System ID
1.From the Display screen, click Setup.
2.Click Network Cameras.
3.Click the License tab.
4.Click Copy to copy the System ID.
Obtaining the Unlock Code
1.Open an Internet browser and go to: http://register.surveillixdvrsupport.com/
2.Type the Product Serial Number that was provided by Toshiba.
3.Type the System ID generated by the DVR.
4.Click Submit.
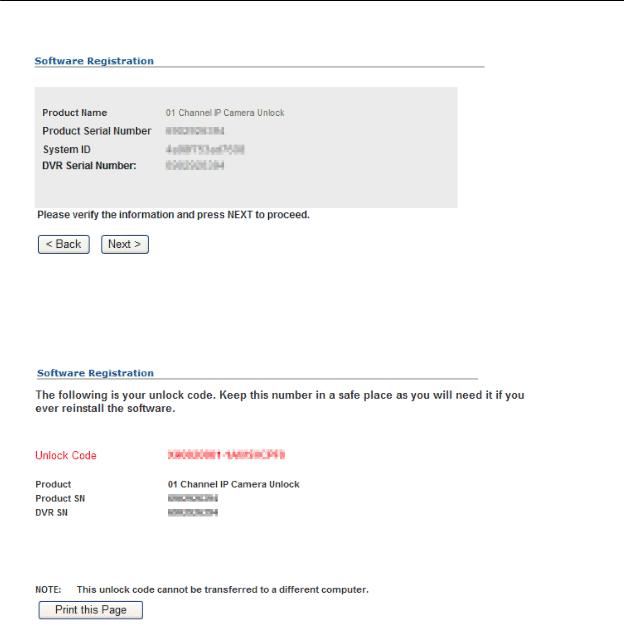
20
5.Verify the information.
6.Click Next if the information provided is correct.
7.Once validated, the user will be provided with the Unlock Code.
8.Print the page and save for later reference.
Unlocking the Upgrade
1.Return to Setup > Network Cameras > License.
2.Enter the Unlock Code generated by the Surveillix Registration Site into the License Key box.
3.Click Register and confirm that the new License Key is listed in the Channel Connection License box.
4.Click OK.
Unlocking New Network Device
Follow the instructions above for registering the NVR upgrade to unlock any additional network devices.
21
DISPLAY SCREEN
Each time the DVR starts, the program defaults to the Display screen. The following diagram outlines the buttons and features used on the Display screen. You should become familiar with these options as this is the screen that will be displayed the majority of the time.
Opens:
• Search Display
• Backup Center
• PTZ Controller
Opens Setup Display
Screen Division buttons
Current Date /
Time
Sensor Status
 Relay Outputs
Live Camera Options
Right-click a camera on the Display screen to display these options:
•Full Screen
•Instant Recording
•Search In Live
•Digital Zoom
Live Digital Zoom
Zoom in on an image while watching live video with network video cameras.
1.Double-click the live video feed of an IP camera. This feature only works in the single camera screen division.
2.Right-click the video and then click Digital Zoom.
3.Use the mouse and the scroll wheel to control the direction and zoom in / zoom out.

22
CAMERA VIEW
Recording Status
Special Recording Type
INSTANT
Camera No. and Name
Recording Status Indicator
The camera status for each camera is displayed in the upper right corner on the Video Display Area. The following are the different states for each camera:
Recording |
Displayed when the camera is currently being recorded to the DVR. |
Motion Detection |
Displayed when a camera (set up for motion detection) detects motion. |
Display |
Displayed when the camera is currently not being recorded to the DVR. |
Special Recording
There are two types of DVR Special Recording. Text is displayed on the camera indicating what type of Special Recording is activated.
SENSOR Sensor is displayed when a sensor, associated with a given camera, is activated.
INSTANT Instant Recording is a manual activation of the recording for the selected camera. Regardless of the recording method, Instant Recording will start the camera recording and also flag the video for future searches using the Index Search feature. INSTANT is displayed when a user activates the instant recording option. Double Right-Click the video display to activate and deactivate the Instant Recording option.
23
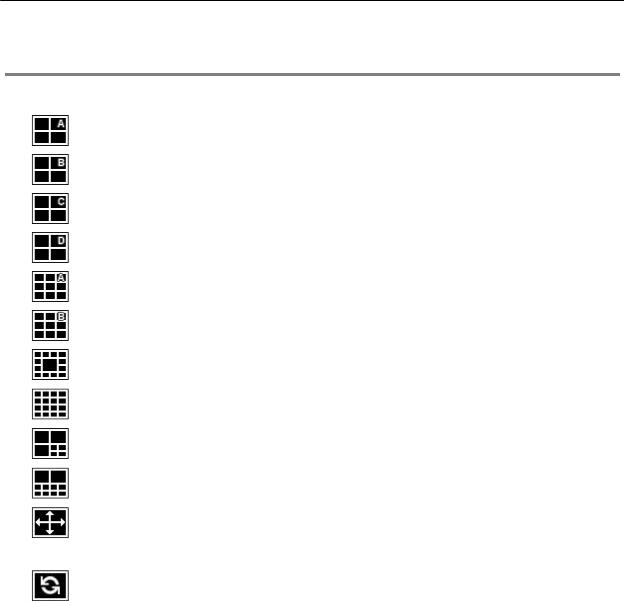
SCREEN DIVISION BUTTONS
The Screen Division menu allows you to view cameras in groups such as two by two, three by three and four by four. The button options are shown below.
1st Four Cameras View – Displays cameras 1-4 in the Video Display Area. To return to a different Multi-Camera View, select a different Screen Division option from the Screen Division menu.
2nd Four Cameras View – Displays cameras 5-8 in the Video Display Area. To return to a different Multi-Camera View, select a different Screen Division option from the Screen Division menu.
3rd Four Cameras View – Displays cameras 9-12 in the Video Display Area. To return to a different Multi-Camera View, select a different Screen Division option from the Screen Division menu.
4th Four Cameras View – Displays cameras 13-16 in the Video Display Area. To return to a different Multi-Camera View, select a different Screen Division option from the Screen Division menu.
1st Nine Cameras View – Displays cameras 1-9 in the Video Display Area. To return to a different Multi-Camera View, select a different Screen Division option from the Screen Division menu.
2nd Nine Camera View – Displays cameras 8-16 in the Video Display Area. To return to a different Multi-Camera View, select a different Screen Division option from the Screen Division menu.
Multi-Camera View – Displays a group of cameras within the Video Display Area.
All Camera View – Displays all 16 cameras within the Video Display Area.
Multi-Camera View – Displays a group of cameras within the Video Display Area.
Multi-Camera View – Displays a group of cameras within the Video Display Area.
Full Screen – The Full Screen Option allows you to view the Video Display Area using the entire viewable area on the monitor. When this is selected, no menu options are visible. You can activate the Full Screen Option by clicking on the Full Screen button within the Screen Division menu. You can deactivate Full Screen mode by right clicking on the screen.
Auto Sequence – Sequences through the Screen Divisions sets. For example, selecting the 1A and then the Loop button will sequence through 1A, 2A, 3A, 4A and then repeat. This option is not available for the 7, 10 and 13 screen divisions.
24
Custom Live View Divisions
Customize your Live View screen by changing the order of the cameras. Each screen division can be individually customized but a camera can only be displayed once (once in 4 camera view, once in 9 camera view, etc). Both analog and IP video cameras can be moved.
Create custom live view divisions:
1.On the Live View screen click Setup, and then click General.
2.Click Sequence Setting.
3.Drag and drop cameras from the Channel List to the desired location within the Division Group (4 Division, 9 Division, 16 Division).
Channel List
Division Group

25
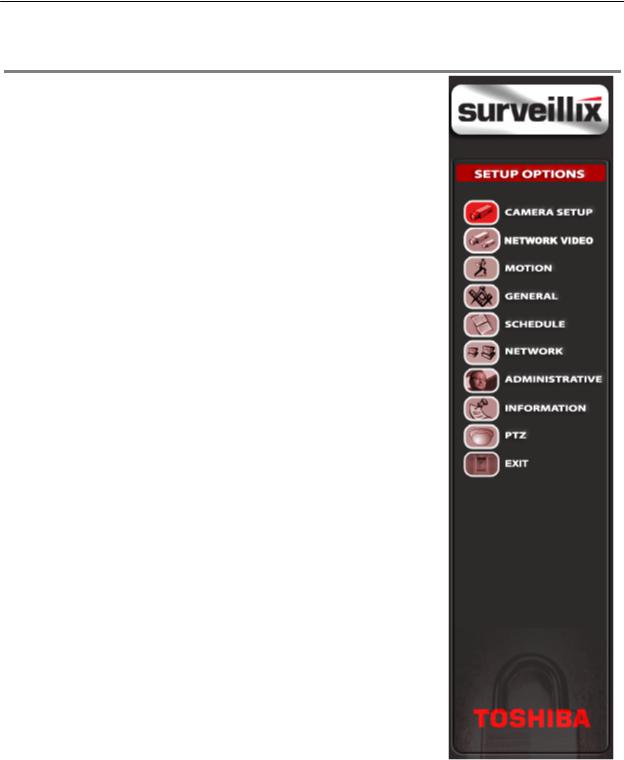
SETUP OPTIONS
This chapter includes the following information:
•Setup Overview
•Camera Setup
•Motion
•Schedule
•Network
•Information
•Administrative
26
SETUP OVERVIEW
The Setup options allow you to optimize your DVR by adjusting things like camera names, reboot schedules, recording schedules and more. It is extremely important that you setup your DVR correctly for several reasons.
•Recording Schedules – By optimizing the recording schedule you can increase the amount of pertinent recorded video that is saved on the DVR and keep it longer. You can optimize the type of recording done by adding motion detection to this as well, again increasing the amount of useful video.
•DVR Access – By setting up the access passwords you can tightly control the types of access an individual may have. This ensures the security and integrity of the DVR.
•Camera Naming – By naming each camera you can easily identify the location and any other pertinent information that may be helpful simply by viewing it on the Video Display Area.
27
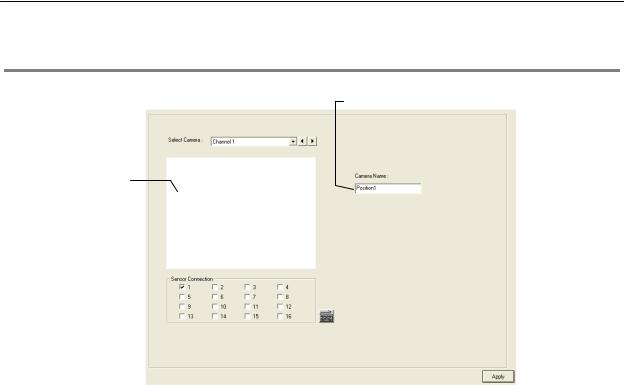
CAMERA SETUP
Define Camera Name
Selected Camera
Display
Select Camera |
Selects the camera to be edited. |
|
|
Selected Camera Display |
Displays the live camera feed from the camera selected. |
|
|
Sensor Connection |
Specify which sensors are currently in use. |
|
|
Camera Name |
Specify a name for each camera. |
|
|
28
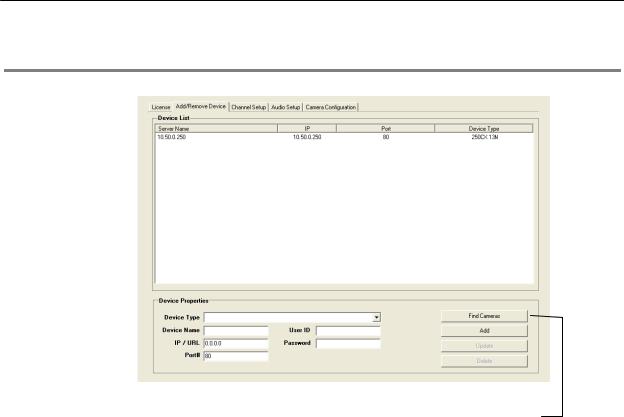
NETWORK VIDEO
Connected Devices
Automatic Camera Finder
Supported IP Camera Manufacturers
ACTi |
Panasonic |
Arecont Vision |
Pixord |
Axis |
Samsung |
Brans |
Securgen |
D-Link |
Sony |
IQeye |
Stardot |
Lumenera |
Toshiba |
Mobotix |
VivoTek |
Connecting a Network Device
Connecting Manually
1.From the Display screen, click Setup.
2.Click Network Video.
3.Click the Add/Remove Device tab.
4.Select your network device from the Device Type list.
5.Type a Device Name.
6.Type the IP/URL address, Port, User ID and Password of the device.
7.Click Add.
29
Connecting with Camera Finder
1.From the Display screen, click Setup.
2.Click the Network Video tab.
3.Click the Add/Remove Device tab.
4.Click Find Cameras to automatically find all connected Network cameras.
5.Select the check box next to the desired camera.
6.Click Get Device.
7.Type the User ID and Password of the device.
8.Click Update.
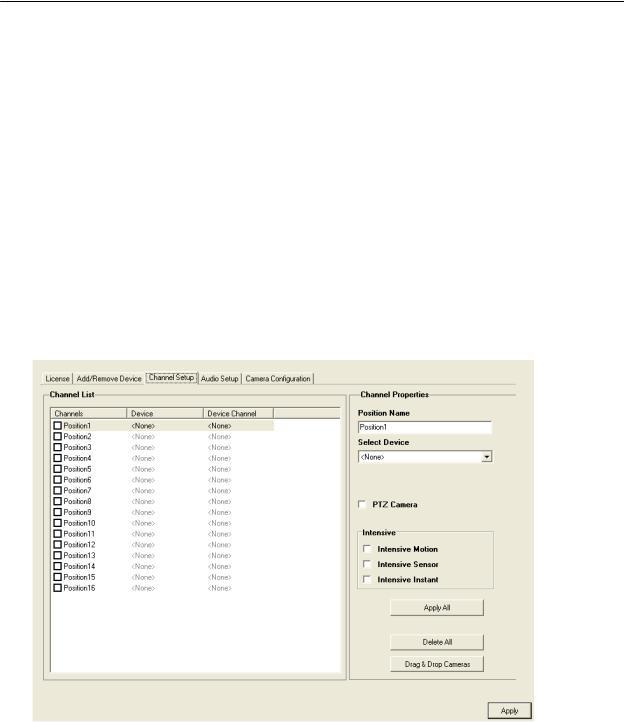
Assigning a Network Device to a Channel
1.From the Display screen, click Setup.
2.Click Network Video.
3.Click the Channel Setup tab.
4.Click an available channel on the Channel List.
5.Type the desired Position Name.
6.Select the appropriate network device added previously.
7.If the device has PTZ capabilities, select the PTZ Camera check box to enable.
8.If supported, select the Use Network Camera Motion Detection check box.
9.Select Intensive Motion, Intensive Sensor, and/or Intensive Instant to increase the recording rate on an event.
10.Click Apply, and then click Exit Setup.
30
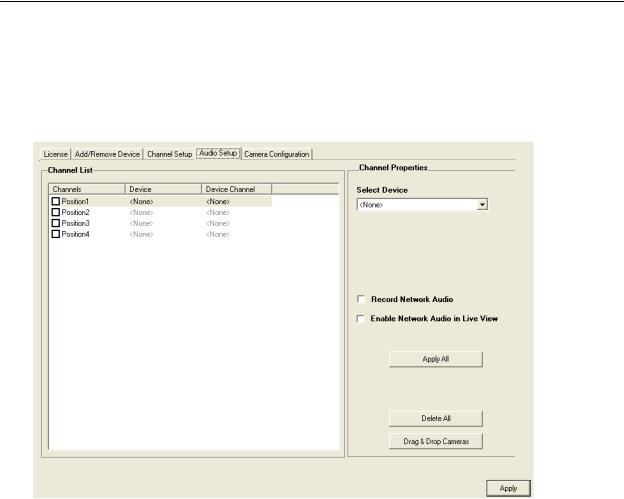
Assigning Audio Channels to a Network Device
1.From the Live View screen, click Setup.
2.Click Network Video.
3.Click the Audio Setup tab.
4.Click an available audio channel on the Channel List.
5.Select a network device added previously.
6.To record the network audio select the Record Network Audio check box. The audio channel will be available on the search screen.
7.To access the audio channel from the Live View screen, select the Enable Network Video in Live View check box.
 Loading...